Zero PR265D Manual

Author: Rudi Updated: 2 October 2018
Version: 1.0 Revision: 1 P a g e | 1
Installation, Service and User
INSTRUCTIONS
FOR THE
ZERO MODEL:
PR265D
Refrigerator
ZERO APPLIANCES (PTY) LTD
WARNING: THIS APPLIANCE MUST BE EARTHED
ENSURE THAT THE GAS SUPPLY HOSE IS NOT IN
CONTACT WITH OR NEAR THE BURNER BOX

Author: Rudi Updated: 2 October 2018
Version: 1.0 Revision: 1 P a g e | 2
Instructions for Installation, Operation & Service
Manufacturer: Zero Appliances, Chloorkop, Ext. 44, Kempton Park, Gauteng, South Africa.
MODEL: PR265D PARAFFIN Refrigerator & Freezer
Important Information and Safety Instructions
It is important to read through these instructions carefully before beginning to use the refrigerator.
To ensure reliable refrigeration and economical operation, the refrigerator must be installed and used
as described in this manual.
Retain these instructions for future use.
Warnings:
- Thoroughly dry any spilt paraffin (kerosene) before attempting to light the wick.
- Do not overfill the paraffin (kerosene) tank.
- Keep the tank level at all times to avoid spillage.
- Do not check for leaks with an open flame.
- Do not smoke while checking for leaks.
- Ensure that the refrigerator is standing level.
- All paraffin-burning appliances consume air (oxygen). To avoid endangering your
life, do not use this appliance in an unventilated room. Make sure there is an open
window or designated ventilation opening to provide air supply. Do not obstruct
the flow of combustion and ventilation air. Provide additional ventilation for any
additional fuel burning appliances and additional occupants.
- Do not store or use gasoline or other flammable vapour and liquids in the vicinity of
this or any other appliance.
- Do not spray aerosols in the vicinity of this appliance while it is operating.
.

Author: Rudi Updated: 2 October 2018
Version: 1.0 Revision: 1 P a g e | 3
Data Plate
The data plate, located on the back of the refrigerator will register your model number, serial number
and product number.
Record these details here, for easier access if the need for a service should arise.
Model Number ____________________________
Serial Number ____________________________
Product Number____________________________
Installation Instructions
Placement of the Refrigerator
The room should have a capacity (length x width x height) of at least 20m³ and must be adequately
ventilated as well as follow all relevant national and local regulations.
Further, the room should have a window (which can be opened). It is important that the refrigerator is
not subject to radiation of heat from a stove etc.
For best performance also at high ambient temperatures, there must be free air circulation over and at
the rear of the refrigerator.
The refrigerator is designed for a free-standing installation and the clearance to the rear wall and to
the possible side walls, should be at least 50mm. The clearance above the refrigerator should be at
least 600mm.
NB: The refrigerator must be adjusted to a vertical and horizontal level position, see bubble spirit
level supplied with the refrigerator. Use the feet on the refrigerator to adjust its position.
TO START PARAFFIN (KEROSENE) OPERATION
1. Loosen the retainer screws on the element and slide the element out of the
bottom of the chimney.
2. Remove the paraffin
(kerosene) tank filler
cap.

Author: Rudi Updated: 2 October 2018
Version: 1.0 Revision: 1 P a g e | 4
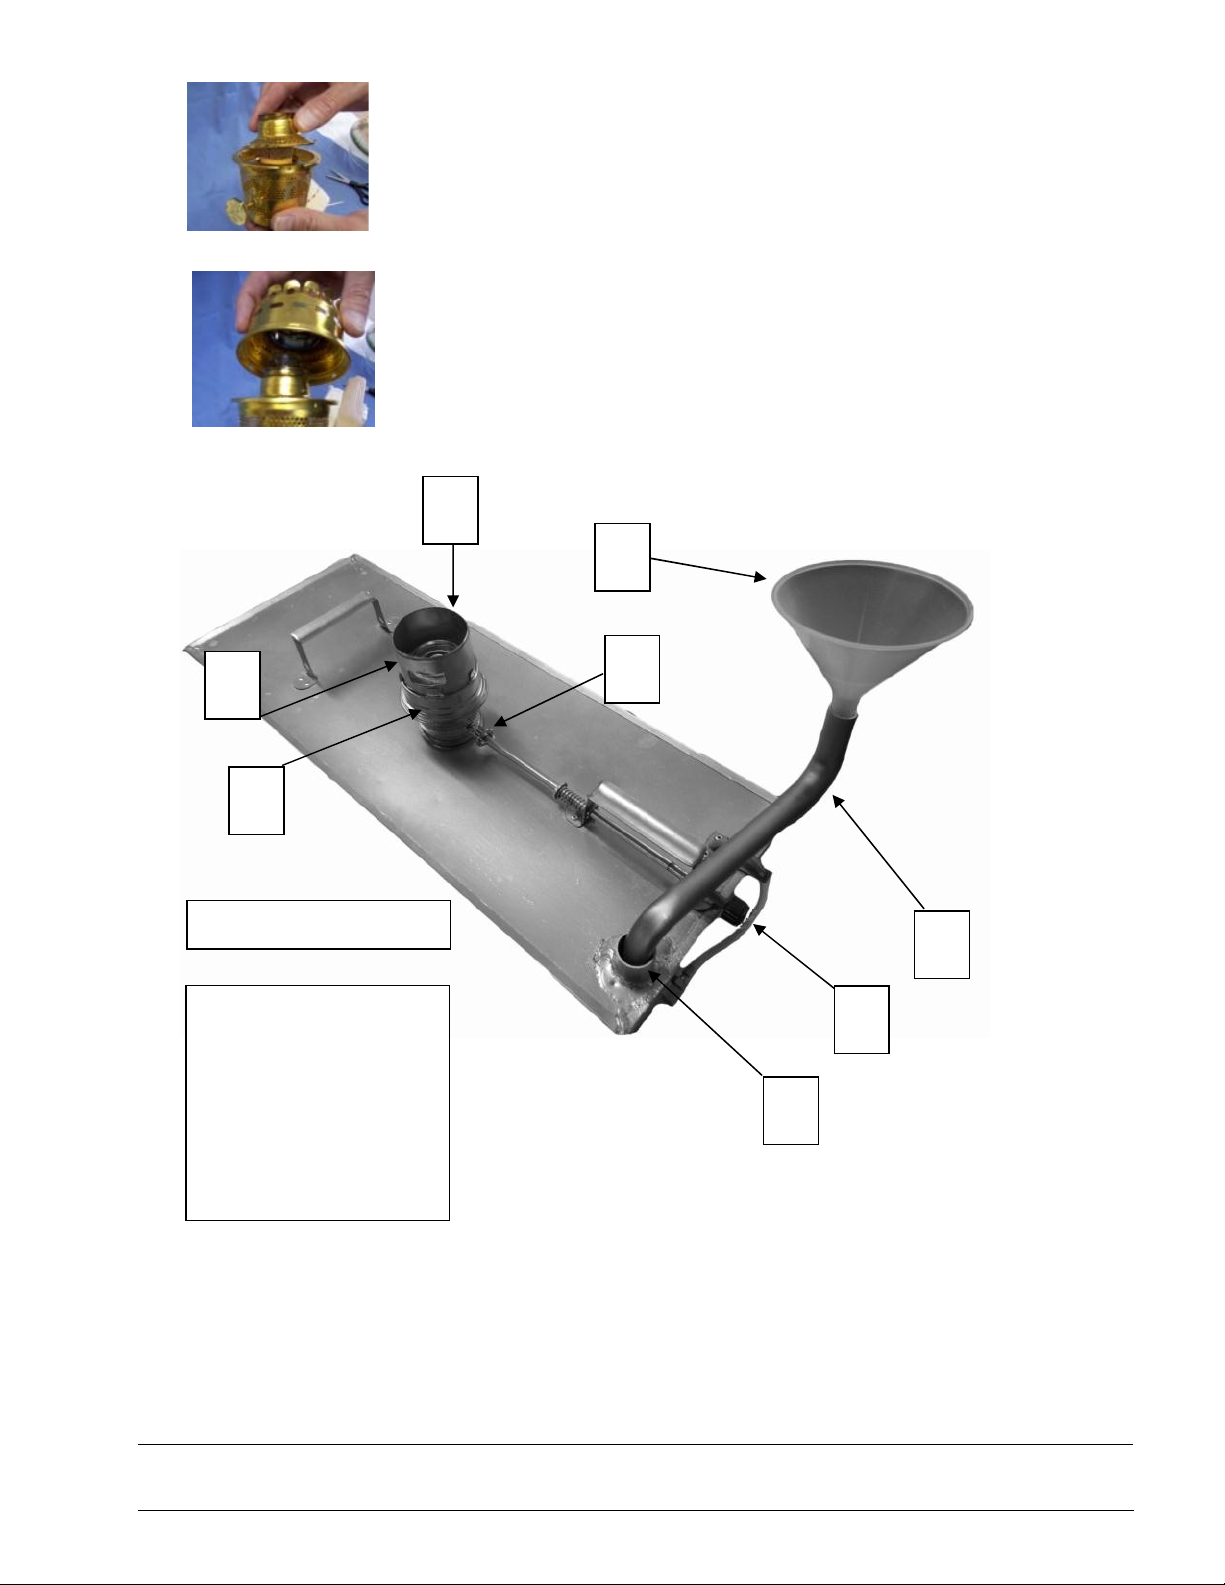
3. Insert the one side of the paraffin filler tube (B) into the filler orifice (A). Insert the
funnel (C) into the top of the paraffin filler tube (B). See image below.
4. Fill the tank with paraffin (kerosene) until the paraffin (kerosene) reaches the
maximum filling level on the tank level indicator. The tank will take approximately
8 liters to fill. (Be careful to not overfill the tank). Use only illuminating paraffin
(kerosene) and thoroughly dry any spilt paraffin (kerosene) before attempting to
light the wick. See image below.
5. When filling is complete remove the funnel ©, paraffin filler tube (B) & reposition
the filler cap. Store funnel & paraffin filler tube in a safe place for future use.
Paraffin filler tube Paraffin filler tube (B)
Funnel (C)
Filler Orifice (A)
Max
Min
Control rod (D)
Author: Rudi Updated: 2 October 2018
Version: 1.0 Revision: 1 P a g e | 5
6. When the paraffin (kerosene) reaches the minimum level on the tank level
indicator blow out the flame and repeat steps 3, 4, 5.
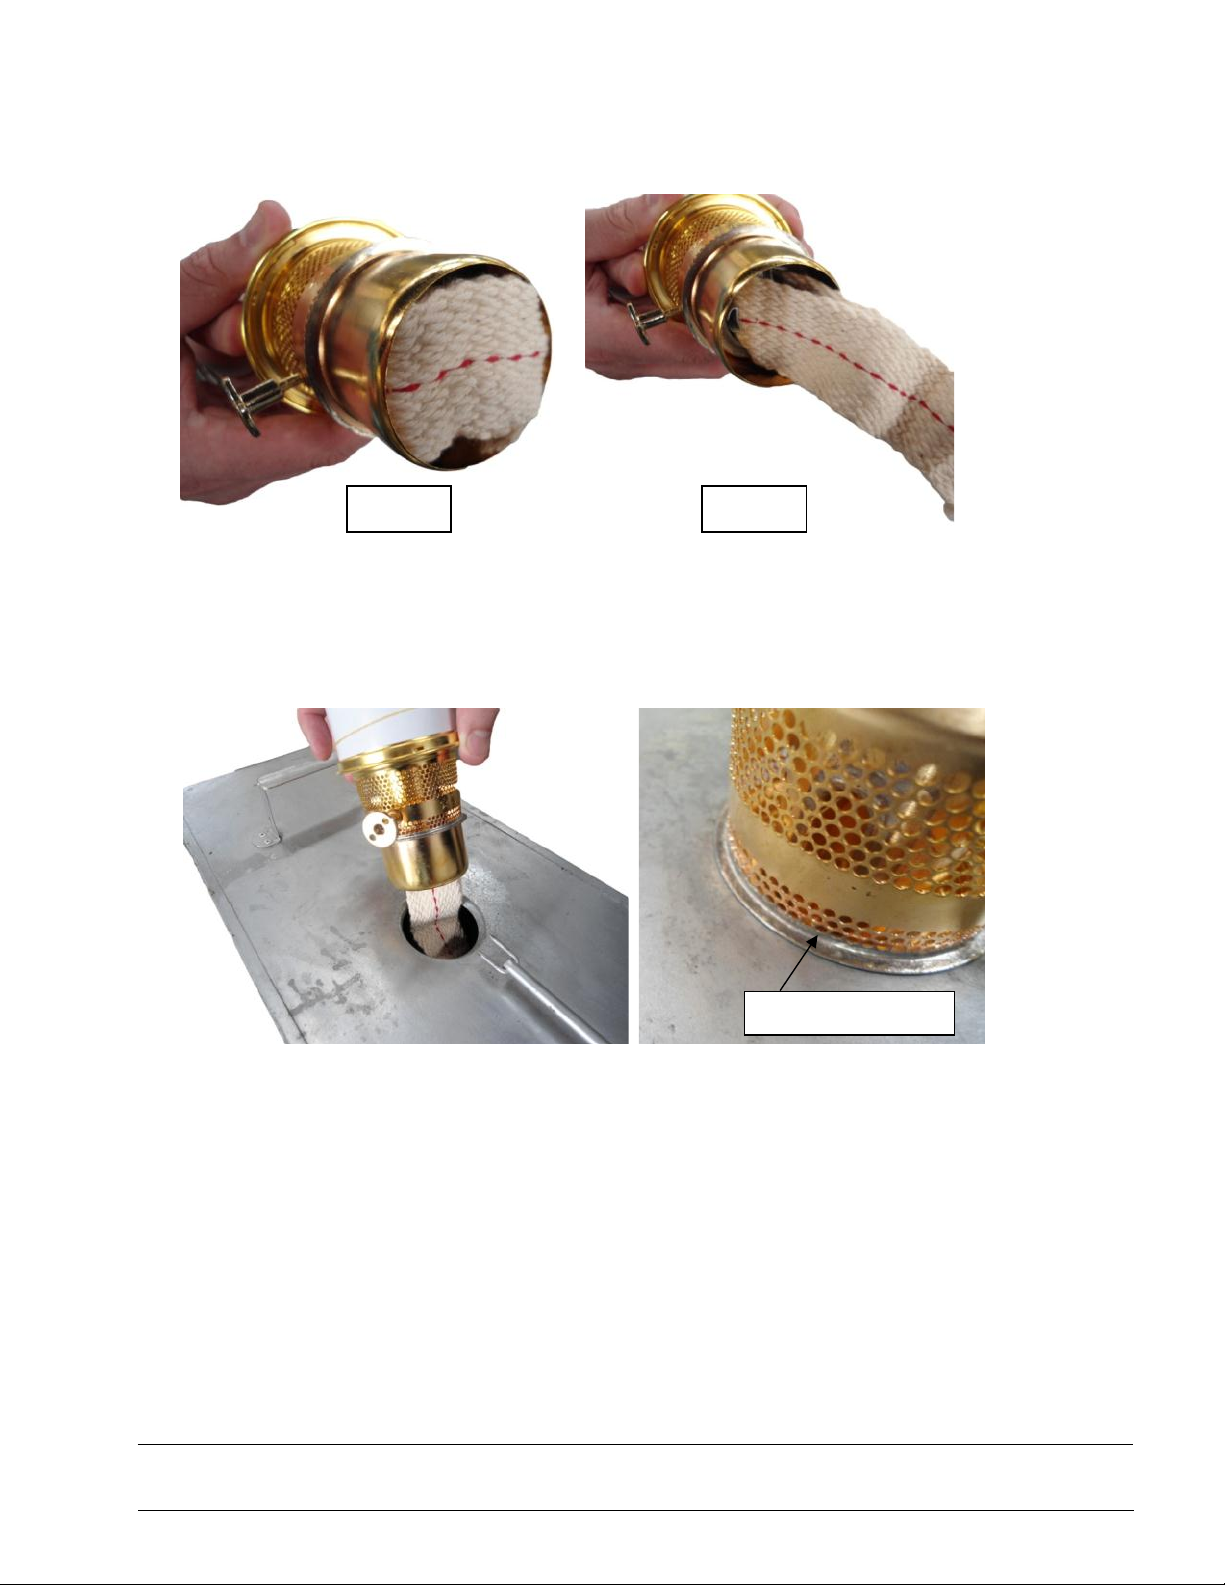
7. Lower the soft part of the wick from the bottom of the burner. See image below.
8. Place the burner inside the burner orifice on top of the paraffin (kerosene) tank.
See image below. Be careful not to dent the burner body or flame spreader
as this may affect the burner’s performance.
9. Allow the paraffin (kerosene) 5 minutes to soak into the soft part of the wick
before lighting the burner.
Before After
Correct position
Author: Rudi Updated: 2 October 2018
Version: 1.0 Revision: 1 P a g e | 6
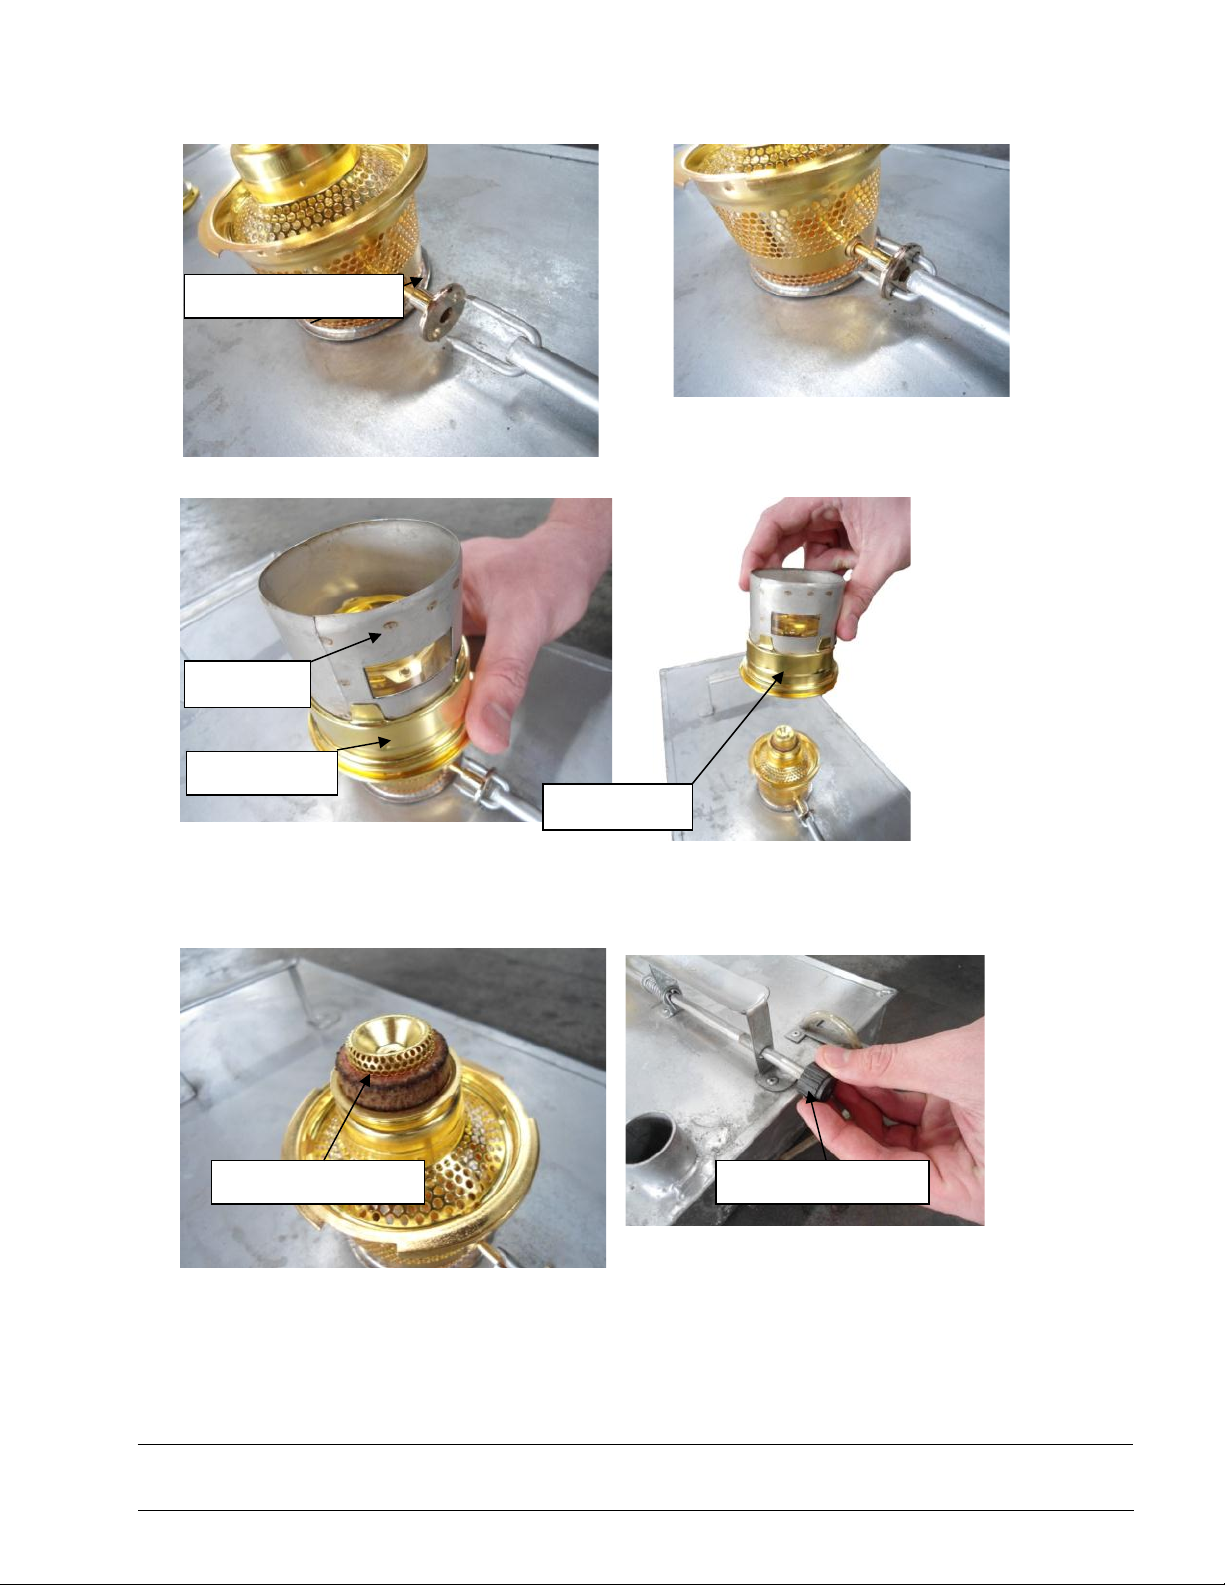
10. Insert the two pins of the control rod (D) into the two hole of the burner wick
adjuster (H). See image below.
11. To light the burner, remove the flue
(F) and gallery (G) together by turning the
gallery (G) anti clockwise. See image below.
12. Turn the hard part of the wick so that 4mm of the wick is visible by turning the
control rod clockwise (D) before lighting. See image below.
13. Light the hard part of the wick with a match or lighter.
Wick adjuster (H)
Flue (F)
Gallery (G)
Removed
Hard part of wick Control rod (D)

Author: Rudi Updated: 2 October 2018
Version: 1.0 Revision: 1 P a g e | 7
14. Place the gallery (G) and flue (F) back onto the burner and turn the gallery (G)
clockwise until tight. See image below.
15. Be careful not to burn yourself whilst executing this operation. Leave the
burner to burn for 5 minutes whilst it is out the appliance.
16. Roll the fuel tank into the correct position. Note: It is important that the burner is
positioned directly under the bottom of the sealing washer (3) and seals properly
on top at the flue (4) and sealing washer (3). See image below.
Author: Rudi Updated: 2 October 2018
Version: 1.0 Revision: 1 P a g e | 8
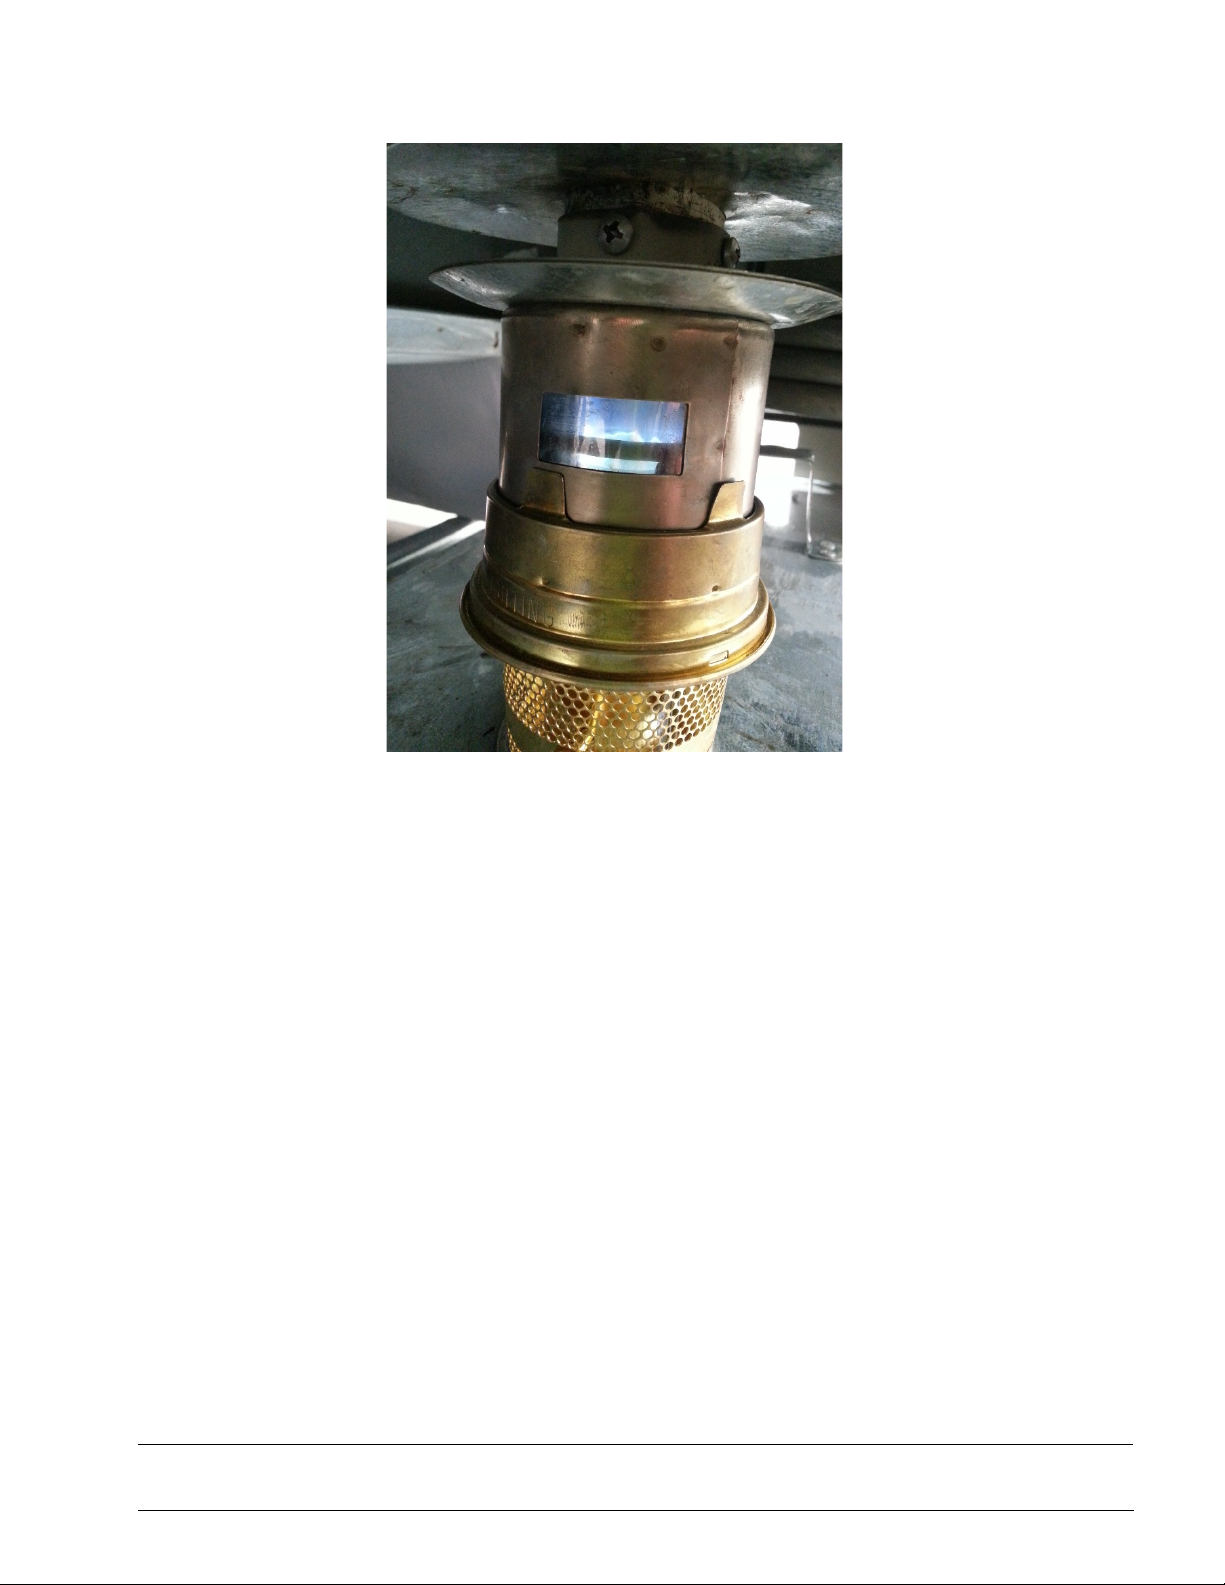
17. Adjust the flame with the control rod (D) until it is burning a blue colour without
many yellow tips. Please see image below
18. You may have more yellow than blue when using kerosene.
19. Close the fuel tank compartment door.

Author: Rudi Updated: 2 October 2018
Version: 1.0 Revision: 1 P a g e | 9
1
4
REPLACING THE WICK
Remove old wick by first removing (a) gallery, (b) flame
spreader
and
(c)
outer
wick
tube
and pulling
out wick from the top. It may be
necessary
to
grasp
the old wick with a
pair
of needle nosed pliers
in
order
to remove it from the lamp. CAUTION: The
flame
spreader is often caught inside the old wick and be careful not
to discard this part, as it is necessary to operate your lamp
safety and c
orrectly
.
2. Wash the
burner
to remove any
accumulated
oil
and
dirt. Wisk
brand
liquid laundry
detergent
works well mixed 10:1 (10
parts
water to one
part
Wisk)
and then
allow the
burner
to soak for 15-
20
minutes.
Give it a good
scrubbing
with
an
old tooth
brush,
then
rinse
in
clean
water
and
allow to dry.
3.
Re-install
the flame
spreader
into the
center
wick tube.
Carefully
inspect the flame
spreader
for dents
and cracks.
If any
are present,
then replace
with a new flame
spreader,
so
that
your Aladdin
will
operate
correctly. NOTE: The flame
spreader
acts as a guide for the
wick to be easily
installed
over the
center
wick tube
and
prevents
the
inner fabric
tape from
catching
on the tube’s top edge.
4. Use the
paper
tails glued on the bottom of the wick to help pull
down the long cotton tails
through
the wick
channel
holes located
in the bottom of the
burner.
Use a long,
thin
object (like a
slender
letter
opener)
to help guide the tails down
through
the
burner
channels.
Then,
grab
the
paper
tails
and
pull
through
the bottom
opening.
If
necessary,
use needled-noised pliers to pull down
further.
DO NOT pull the wick completely down, as you have
to
first
attach the wick raiser arms to the wick clips.
NOTE:
It
may also be
necessary
to
insert
a slip of
paper
between the wick
and
the
gear
on the inside of the knob (or pull out the knob all the
way) while you
are pulling
the wick down to prevent the woven
wick
fabric
from
snagging
on the teeth of the gear.
5. After
installation
of the wick is
started
within the
burner, install
the
wick
raiser
so
that
the
elongated gear channel arm
is
pointing
downward.
SEE SPECIAL NOTES
(below) for
easier
installation. Also, be
careful
not to
roughen
up
the top edge of the
wick,
as it is
important that
the top edge be
completely smooth in
order
to
produce an
even flame
that
lights
up
the
Aladdin
incandescent mantle.
Trim off any loose
threads
with a
pair
of
sharp
scissors,
again
being
careful
not to
roughen
up the top edge of the
wick.
Author: Rudi Updated: 2 October 2018
Version: 1.0 Revision: 1 P a g e | 10
6
6. After the wick
raiser
is correctly
attached
to the wick,
and
it is
lined up over the gear inside the knob, gently pull the wick tails
down so
that
the
gear engages
fully onto the
wick
raiser
teeth.
Check this by
turning
the knob back
and forth.
If the wick smoothly
goes
up
and
down by
turning
the
burner
knob, you wick is
correctly
installed. Then re-install
the
outer
wick tube
and turn
to
right
to lock into place.
7. Next
re-install
the gallery by first
lining
up the
three notches
on the
bottom with the
cutouts
on top of the
burner
basket.
Then
seat the
gallery
squarely
into the
notches and turn
to the
right
to lock. Now
your re-wicked Aladdin
burner
is ready to be
returned
to your lamp
fount.
IMPORTANT:
Allow at least 5 minutes for the new wick to
soak in the
ker
osene of the lamp fount before lighting.
Otherwise, you may experience a weak flame and
poor
light.
E
D
C
B
A
A. Filler Orifice.
B. Paraffin filler tube.
C. Funnel.
D. Control rod.
E. Complete burner
F. Flue.
G. Gallery.
H. Burner wick adjuster.
COMPLET
E TANK
.
G
F
H
Table of contents
Other Zero Refrigerator manuals


