Zetta Z12 User manual

Zetta Z12 Intelligent Security Camcorder Quick Start Guide
www.zetta.com.hk
Overview
Congratulations on your purchase of Zetta Z12 intelligent security camcorder!
Zetta Z12 is an intelligent security camcorder with multiple triggering methods and multi
auto on/off modes. The camcorder comes with a built-in rechargeable battery which can
record up to 8 hours continuous video during typical use and standby for more than 3
months when vibration triggering is enabled. By plugging in the 5V DC adapter, it can achieve
96 hours circular recording for surveillance use.*
* Actual life and performance may vary depending upon usage and settings; battery not replaceable.
Features
Circular recording – loop back recording once memory card is full
Time stamp – put time stamp on video
Vibration-trigger recording – select to record only when vibration is detected
Motion-trigger recording – select to record only when motion is detected
Voice-trigger recording – select to record only when voice is detected
Auto on/off mode – select different auto on/off scenarios
Selectable day/night mode – select day mode or night mode to suit your environment
Auto gapless split file – gaplessly split files for every 10 / 15 / 30 minutes
Orientation – use when the camcorder is turning up-side-down
Selectable resolution – recording of 640x480(VGA) or 320x240(QVGA) video and sound
Frame rate adjustment – lower the frame rate to save memory space
Configurable video quality – high / medium / low
Support max 32GB microSD(TF) card (for better performance, use card with class 4 or
above and format the card before use)
Minimum System Requirements
Windows 2000, XP, Vista, 7 (mass storage class)
Windows Media Player 9
Intel Pentium class computer
USB 2.0 port for hi-speed transfers and charging
Package Contents
Please unpack your intelligent security camcorder and check that the following were included:
Zetta Z12 intelligent security camcorder
5V DC Adapter
5V Car Adapter
USB 2.0 Cable
Quick Start Guide
Charging
The camcorder comes with an internal rechargeable battery. To use the camcorder for the
first time or not using the camcorder for a long time, remember to fully charge the battery
for at least 4 hours and resync the time by using the widget (see section “PC Software
Widget”). You can charge your camcorder through the USB port of your computer, the DC or
car adapter.
To charge the battery through USB port, connect the USB cable to the USB port of the
computer and the camcorder. For details, please see the status below. The camcorder will
function as a mass storage device, you will not be able to record video at this moment.
To charge the battery through DC adapter or car adapter, connect the DC adapter or car
adapter to the camcorder. For details, please see the status below. Moreover, you will also be
able to record video while charging, depending on the mode you set.
Recording
The power button is located at the right side of the camcorder. It can turn the camcorder on
or off.
Start Recording
Press and hold the Power button until the green LED is on (approximately 2 seconds), and
then release the button. When you see the green LED flashing, the camcorder is recording.
Otherwise, please see the status below.
Stop Recording
Press and hold the Power button until the green LED is off (for approximately 2 seconds).
WARNING: Turn off camcorder before removing card!
Status
Without DC adapter
Green LED on: camcorder is booted up
Red LED on: no card, card fail, battery low or card full (not in circular recording)
Green LED flashing: normal recording
Green / Red LED intermittent flashing: battery low and recording
DC adapter plugged in
Red LED flashing: charging
Red LED on: no card, card fail or card full (not in circular recording)
Orange / Green LED intermittent flashing: charging and recording
Green LED flashing: charging complete and recording
All LED off: charging complete and no recording
Connected to computer
Orange LED on: charging
Green LED on: charging complete
Zetta Z12 at a Glance
camera
microphone
USB port
card slot
on/off
LED indicator
custom modesurveillance mode
On-the-GO mode

Zetta Z12 Intelligent Security Camcorder Quick Start Guide
www.zetta.com.hk
FCC Regulation
This device complies with part 15 of the FCC Rules. Operation is subject to the following two
conditions:
1 This device may not cause harmful interference, and
2 This device must accept any interference received, including interference that may cause
undesired operation.
This equipment has been tested and found to comply with the limits for a Class B digital
device, pursuant to Part 15 of the FCC Rules. These limits are designed to provide reason-
able protection against harmful interference in a residential installation. This equipment
generates, uses, and can radiate radio frequency energy and, if not installed and used in
accordance with the instructions, may cause harmful interference to radio communications.
However, there is no guarantee that interference will not occur in a particular installation. If
this equipment does cause interference to radio or television reception, which can be deter-
mined by turning the equipment off and then on, the user is encouraged to try to correct the
interference by one or more of the following measures:
1 Increase the separation between the equipment and camcorder.
2 Connect the equipment to a different outlet so that the equipment and camcorder are
on different branch circuits.
3 Consult the dealer or an experienced radio / TV technician for help.
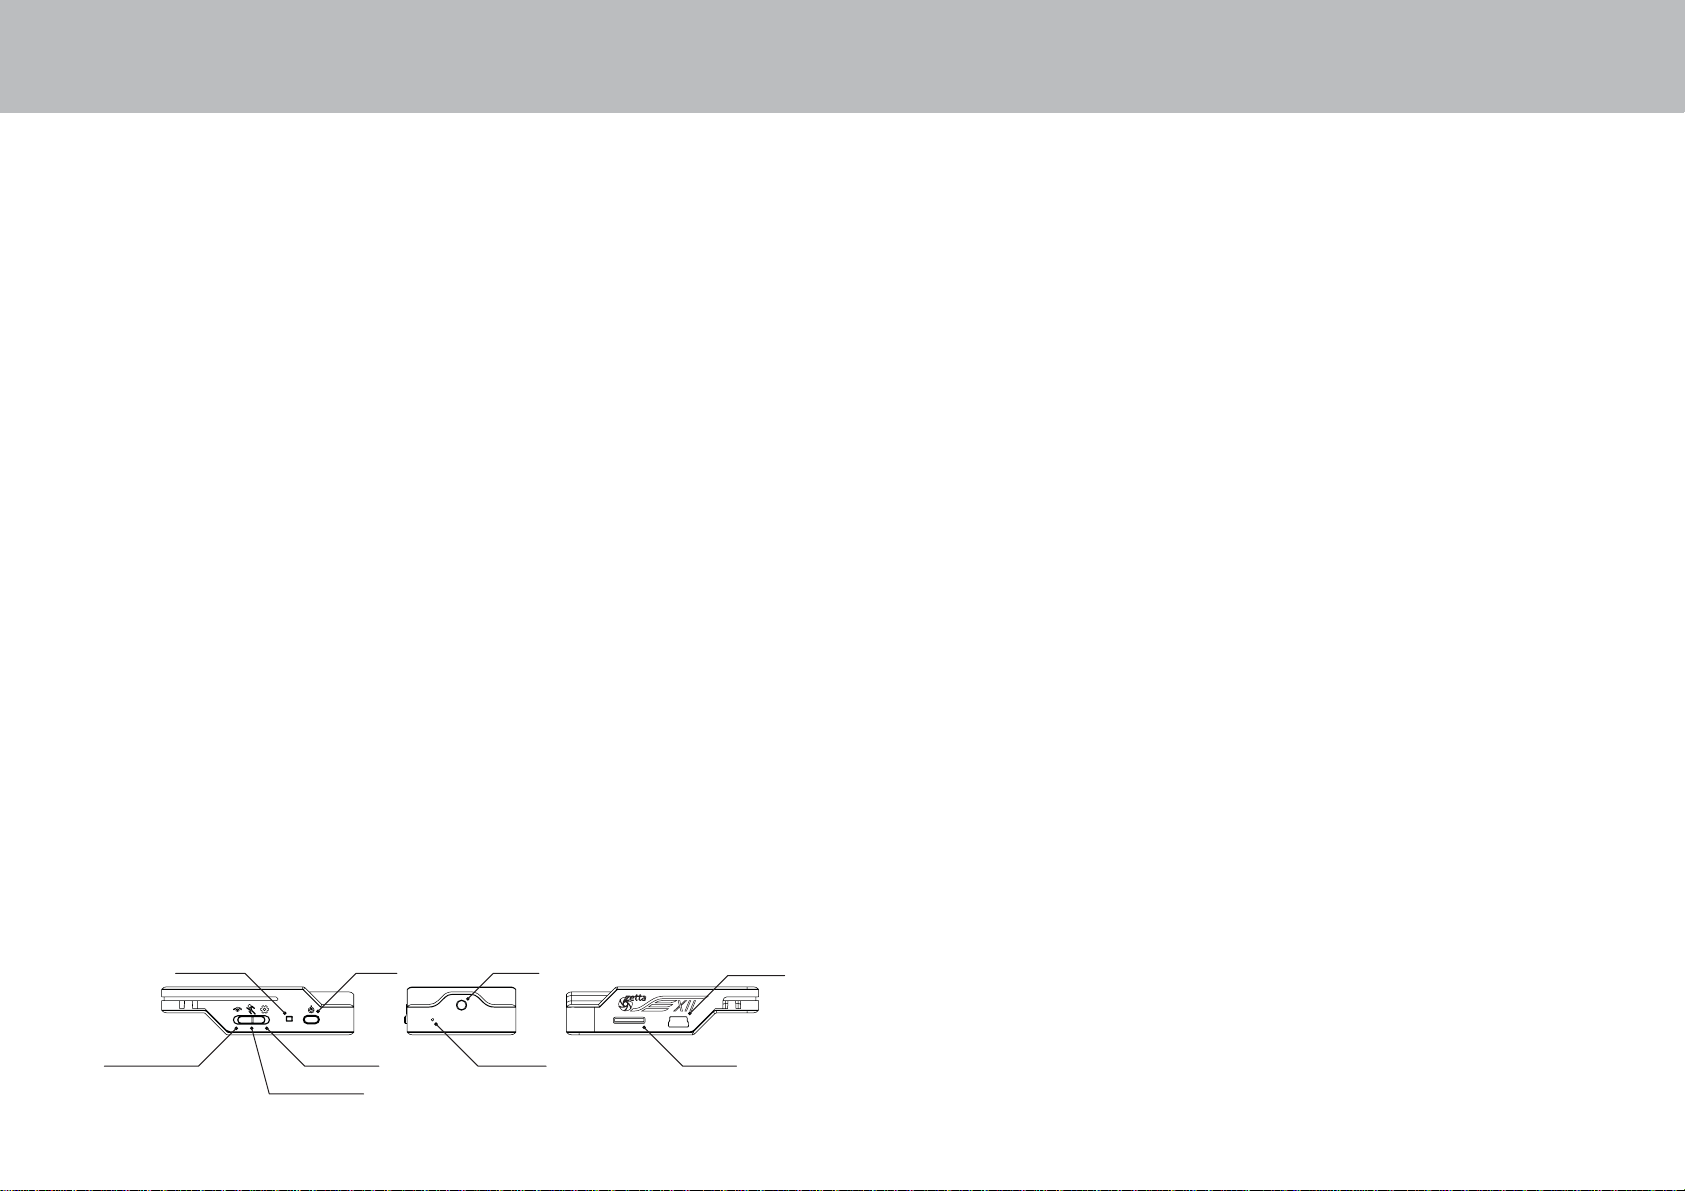
Mode switch
Switch between surveillance, on-the-go and custom mode. Default setting is in bracket.
Note: For custom mode configuration, please use the PC software Widget to change
the settings. The widget can be downloaded from www.zetta.com.hk. To make the
custom mode settings take effective, please push the mode switch to the “custom
mode” position before powering up Z12.
Connecting to computer
To connect the camcorder to your computer, follow these instructions:
1 Connect the larger end of USB cable into an available USB port on the computer.
2 Connect the smaller end of the cable into the USB port of the camcorder.
3 The camcorder will appear in My Computer as a drive.
PC Software Widget
To synchronize the time and customize settings, download the PC software
“Widget” from www.zetta.com.hk and follow the instructions in the soft-
ware guide.
REMARK: If the time shown is year 2026 or beyond due to loss of Real Time Clock,
recording time will not be shown on video even timestamp is enabled. Please use
the widget to resync the time and delete files in 2026 or beyond!
Firmware upgrade
Zetta will from time to time release new firmware for enhancement or adding new features.
Visit www.zetta.com.hk to check it out.
Surveillance On-the-GO Custom (default)
Video Quality High High (High) / Medium / Low
Resolution 320x240 640x480 640x480 / (320x240)
Frame Rate High High (High) / Low
Indoor Lighting
Condition 50Hz 50Hz (50Hz) / 60Hz
Day / Night Mode Day mode Day mode (Day mode) / Night mode / Auto
switching
Orientation Normal Normal (Normal) / Up-side-down
Time Stamp Enable Enable (Enable) / Disable
Circular Recording Enable Disable (Enable) / Disable
Split File Time (min) 30 15 10 / (15) / 30
Mic Enable Enable (Enable) / Disable
LED On / Off On On (On) / Off
Voice-Trigger
Sensitivity Disable Disable High / Medium / Low / (Disable)
Vibration-Trigger
Sensitivity Disable Disable High / Medium / (Low) / Disable
Vibration Standby Mode N/A N/A Fast Wake Up / (Power Saving)
Motion-Trigger
Sensitivity Disable Disable High / Medium / Low / (Disable)
Auto On / Off Disable Disable Car-activate Recording /
Car-stop Recording /
Car-activate and Car-stop Re-
cording /
(Disable)
When Z12 is connected to the lighter through the 5V car adapter and the auto on /off mode is selected:
Car-activate Recording: Auto start recording once car is started, auto stop recording when car is stopped.
Car-stop Recording: Auto start recording when car is stopped, auto stop recording once car is started.
Car-activate and Car-stop Recording: Auto start recording once car is started and continue to record
even when car is stopped. Need to turn off the camcorder manually.
* If any triggering mode is selected, after no further triggering for several duration, the recording will stop
and LED will turn off. Then, if any triggering arrives, the recording will start and LED will turn on until
no further triggering for several duration again. After power up, the 1st duration is 10secs. The following
duration is 5mins.
version: 1.0
Environmental Requirements
Storage temperature: 32˚to 113˚F (0˚to 45˚C)
Operating temperature: 32˚to 113˚F (0˚to 45˚C)

Zetta Z12智能安保攝錄機快速入門指南
www.zetta.com.hk
概述
恭喜你購買Zetta Z12智能安保攝錄機!
Zetta Z12智能安保攝錄機,有多樣觸發方法及多樣自動開關模式。Z12內置充電池,可攝錄長達8小時影片
及待機超過3個月。插上5伏變壓器更可96小時循環攝錄。*
*實際時間和性能可能會有所不同,取決於環景和設置;電池不可更換。
特點
循環攝錄 - 當記憶卡容量不足時自動刪除較早前錄影片段, 持續錄影
時間標示 - 把時間標籤顯示於視頻內
震動觸發攝錄 - 當Z12感到震動時才攝錄
移動觸發攝錄 - 當Z12偵測到物體移動時才攝錄
聲音觸發攝錄 - 當Z12偵測到有聲音時才攝錄
自動開關模式 - 於不同情況自動開或關
日間 / 夜間模式 - 選擇日間 / 夜間模式來適應你的環境,使影像更清晰
自動無縫分割文件 - 每10 / 15 / 30 分鐘分割文件,更輕鬆傳送到視頻網站
攝錄方向 - 正常或反轉
解像度 - 640 x 480(VGA)或320 x 240(QVGA)的視頻及聲音
可調幀率 - 降低幀率,以節省儲存空間
可調視頻質量 - 高 / 中 / 低
最大支持32GB microSD(TF)卡(想有更好性能,請使用class 4或以上的卡, 使用前請格式化)。
最低系統要求
Windows 2000,XP,Vista,7(Mass Storage Device)
Windows Media Player 9
英特爾奔騰級或更高級電腦
USB 2.0高速傳輸連接埠
包裝內容
請打開你的Zetta Z12智能安保攝錄機包裝盒,並檢查下列配件:
Zetta Z12智能安保攝錄機
5伏變壓器
5伏汽車充電器
USB 2.0連接線
快速入門指南
充電
Z12配備一顆內置充電池,第一次使用或不使用Z12一段長時間,切記要完全充電4小時以上及使用設置工
具,重新同步時間(詳情請見”電腦軟件Widget”部份)。充電可通過電腦的USB接口, 5伏變壓器或汽車充電
器進行。
要進行USB充電,請將Z12用USB線連接到電腦上可用的USB接口,燈號請見”狀態”。當連接到電腦時,
你不能攝錄視頻。
另外,將Z12連接到5V變壓器或汽車充電器, 亦可進行充電, 燈號請見”狀態”。視乎你的自動開關模
式,你還可以同時攝錄視頻。
攝錄
電源按鈕位於Z12右側。
開始攝錄
緊按電源按鈕直到綠色LED發亮 (約2秒) 來開始攝錄。當你看見綠色LED閃爍時表示正在攝錄,否則請看”
狀態”。
關機
緊按電源按鈕直到綠色LED關閉 (約2秒)。
警告:退出記憶卡前,請關上Z12攝錄機!
狀態
沒有插入5伏變壓器
綠色LED發亮:Z12開啟
紅色LED發亮:無卡,壞卡,低電量或卡已滿 (不在循環攝錄模式下)
綠色LED閃爍:正常攝錄
綠色 / 紅色LED交替閃爍:低電量記錄
插入5伏變壓器
紅色LED閃爍:正在充電
紅色LED發亮:無卡,壞卡或卡已滿 (不在循環攝錄模式下)
橙色 / 綠色LED交替閃爍:充電並正在攝錄
綠色LED閃爍:充電完成並正在攝錄
所有LED不亮:充電完成,沒有攝錄
連接到電腦
橙色LED發亮:正在充電
綠色LED發亮:充電完成
Z12智能安保攝錄機一覽
鏡頭
麥克風
USB 連接埠
卡槽
開關LED 指示燈
自訂模式監控模式
行動模式

Zetta Z12智能安保攝錄機快速入門指南
www.zetta.com.hk
模式
切換監控,行動或自定模式,默認設置於括號內。
註意: 如要使用自定模式,請從 www.zetta.com.hk 下蛓設置工具更改設定 ,並於開機前將推鍵撥到“自定
模式”才能生效。
監控 行動 自訂 (默認)
視頻質量 高 高 (高) / 中 / 低
解像度 320x240 640x480 640x480 / (320x240)
幀率 高 高 (高) / 低
室內照明頻率 50Hz 50Hz (50Hz) / 60Hz
日間 / 夜間模式 日間模式 日間模式 (日間模式) / 夜間模式 /
自動切換
攝錄方向 正常 正常 (正常) / 反轉
時間標籤 啟用 啟用 (啟用) / 停用
循環攝錄 啟用 停用 (啟用) / 停用
分割文件時間 (分鐘) 30 15 10 / (15) / 30
麥克風 啟用 啟用 (啟用 ) / 停用
LED 顯示燈 亮 亮 (亮) / 不亮
聲量觸發靈敏度 停用 停用 大 / 中 / 小 / (停用)
震動觸發靈敏度 停用 停用 大 / 中 / (小) / 停用
震動觸發待機模式 不適用 不適用 速動 / (省電)
移動偵測觸發靈敏度 停用 停用 大 / 中 / 小 / (停用)
自動開關模式 停用 停用 汽車起動自動攝錄 /
汽車熄火自動攝錄 /
汽車起動及熄火自動攝錄 /
(停用)
用5伏汽車充電器連上車充,並選用自動開關模式:
汽車起動自動攝錄: 汽車起動自動攝錄,汽車熄火自動關機
汽車熄火自動攝錄: 汽車熄火自動攝錄,汽車起動自動關機
汽車起動及熄火自動攝錄: 汽車起動自動攝錄,汽車熄火後仍然攝錄, 要手動關機
* 如欲有最長攝錄時間,將視頻質量設為低,解像度設為320 x 240及幀率設為低,作用類似數碼錄音機。
** 如攝錄機己關始攝錄,你將不能切換攝錄模式。
*** 如選用任何一種觸發方式,在一段時間沒有觸發後,錄影會停止,LED會熄滅,之後,若有觸發,錄影會再次開始,LED
會閃爍,在一段時間沒有觸發後,錄影會再次停止,LED會再次熄滅。在剛開機,這段時間第一次是10秒,之後是5分鐘。
連接到電腦
要連接Zetta Z12微型攝錄機到電腦,請執行以下步驟:
1. 將USB線較大的一端連接到電腦上可用的USB接口。
2. 將USB線較小的一端插入Z12 USB接口。
3. Z12 安保攝錄機會出現在我的電腦。
固件升級
Zetta會不時發布新的固件,加強現有或增加新的功能,請到訪www.zetta.com.hk下載更新。
技術支援
在您聯繫技術支援之前,我們鼓勵您閱讀www.zetta.com.hk的技巧和疑難解答,看看您的問題是否已在
那裡列出。如果您有Z12使用上或功能上的疑問或其他Zetta產品的問題,請到訪我們的知識庫www.zetta.
com.hk或致電 (852) 31884492。
保修信息
請在www.zetta.com.hk網上登記保修。
FCC的規則
此設備符合FCC規則第15條。使用受以下兩個條件約束:
1. 該設備不會產生有害干擾
2. 此裝置必須接受任何收到的干擾,包括可能導致不理想操作的干擾。
本設備已經通過測試,符合FCC規則第15條Class B的限制。這些限制旨在在住宅安裝的情況下,提供合理的
保護,防止有害干擾。本設備產生,使用,並能發射無線電頻率能量; 如果沒有按照指示安裝和使用,可能
會干擾無線電通訊。但是,我們不能保證干擾不會發生在特定的安裝情況下。如果本設備確實干擾無線電或
電視接收,用戶可以使用一個或多個下列措施,嘗試糾正干擾:
1. 提高設備和Z11之間的距離。
2. 使用不同的電源插座,使設備和Z11使用不同的分支電路。
3. 諮詢經銷商或有經驗的無線電/電視技術人員尋求幫助。
一切保證及規則,皆以英文版本為準。
版本: 1.4
電腦軟件Widget
如要設定時間或更改自訂模式的設置, 請從www.zetta.com.hk下載設置
工具並參照軟體使用指南。
注意: 如時間因時鐘丟失而顯示為2026年或以後,就算已啟用時間標示,這些影片都不會顯示攝錄時間。此
時,請用此工具更新時間及刪除2026年或以後的檔案!
環境要求
儲存溫度: 華氏32至113度 (攝氏0至45度)
工作溫度: 華氏32至113度 (攝氏0至45度)
Table of contents
Other Zetta Camcorder manuals