Ziegler & Brown ZGIGK User manual

OPERATING INSTRUCTIONS
Covering Models ZGIGK / ZG1GNGK / ZG1GRK /
PORTABLE GRILL
THE TAKE ANYWHERE BBQ
Barbeque stand sold separately

2
Congratulations onYour Purchase and
Welcome to theWorld of Outdoor Cooking
IMPORTANT HEALTH & SAFETY INFORMATION:
Australia has an excellent safety record when it comes to gas appliances. This reflects
both the high quality of appliances sold, as well as growing consumer awareness about
safe practice. We urge you to follow these guidelines and instructions for safe use, to
prevent overheating and to produce great cooking results.
• Please read these instructions carefully prior to assembly and use. Failure to
follow these instructions could lead to serious injury and/or significant damage to
property.
• This barbeque is an outdoor appliance only. Under no circumstances should it be
used indoors.
• Do not start the barbeque if there is any doubt over the correct assembly, ignition,
gas control or safe operation of the unit.
• These instructions should be retained for future reference.
• This barbeque has not been approved for marine use.
• Never attempt to ignite the barbeque with the hood or the grease cup closed.
• Do not perform any servicing on the barbeque yourself. This includes internal
adjustment of the regulator and gas valves. Servicing can only be carried out by
authorised technicians.
• It is important that you install your barbeque exactly as described in these
instructions. In particular you should keep the barbeque clear of combustible
material, and you should check for leaks whenever a new connection is made.
• Do not store chemicals or flammable materials near this appliance.
• Do not place articles on, against, or enclose this appliance.
• The barbeque gets extremely hot while in use. Keep children away from the
appliance until it has cooled to normal temperatures.
• It is a good idea to tie back long hair and loose clothing while cooking in case of
unexpected flare ups.
• Fat fires are the most common cause of problems in barbeques. They are caused
by a build up of grease in the grease cup and the inside of the barbeque frame.
A fat fire can be difficult to put out, and will be dangerous if it spreads to the gas
hose. You should keep your barbeque clean to avoid this occurrence. Fat fires will
void the warranty.
• Do not attempt to move or transport the barbeque whilst it is hot. Always allow
the barbeque to completely cool down before moving or covering.

3
• NEVER leave the barbeque unattended with the burner switched on. Always
switch OFF the burner and cylinder or gas supply valves when the barbeque is not
in use.
• Take care when touching a hot barbeque, especially on surfaces close to the
firebox or roasting hood.
• It’s fine to pre-heat with the burner on HIGH and the hood closed, but NEVER let
the temperature on the hood thermometer exceed 300 degrees Celsius.
• When cooking with the hood closed, turn the burner to LOW or OFF as required to
keep the barbeque from getting too hot. NEVER let the temperature on the hood
thermometer exceed 300 degrees Celsius.
• NEVER leave the burner on HIGH for more than 15 minutes without checking,
always stay in control by adjusting the burner to LOW and OFF as required to
maintain suitable cooking temperatures.
• Follow all manufacturer’s instructions to periodically check for gas leaks.
• Flammable materials and liquids must be stored well away from the barbeque.
• Aerosols must not be used near a lit barbeque.
• Gas bottles MUST be transported stored and used vertically only.
• Avoid dousing the barbeque with water.
• For safety reasons it is advisable to keep a fire extinguisher and fire blanket close
to hand.
• Unsupervised children and the infirm should not be allowed too close to the
barbeque during pre-heat, cooking, burn off or cooling down of the unit.
• Please dispose of all polythene packing and plastic bags carefully and keep out of
the reach of children.
• Spare or extra gas bottles must NOT be stored within close proximity of this
barbeque or any other gas or electric appliance.
• Spare or extra gas bottles should NOT be stored where they are exposed to
continuous direct sunlight, as this is a potentially dangerous practice.
• The position of the assembled barbeque should be such that the gas bottle is
not left exposed to continuous direct sunlight as this is a potentially dangerous
situation.
• For storage and gas cylinder exchange, disconnect the gas cylinder only. DO NOT
disconnect the hose and regulator from the barbeque.

4
Where to Put Your BarbequeWhen it is in Use
• Please make sure that the barbeque is NOT positioned underneath any
combustible material or surface.
• There MUST be a clearance of at least 250mm from the sides and the back of
the barbeque to any combustible materials or surfaces. There must also be a
clearance of at least 1500mm above the cooking surfaces to any combustible
surface.
• Flammable materials of any description MUST be kept well away from the
barbeque.
• The barbeque must be positioned such that the gas bottle is kept away from
continuous direct sunlight.
• The barbeque must be positioned to avoid walkways, gangways and general
pedestrian access.
• The nature of a barbeque is such that many of the surfaces are hot to touch,
the positioning of the barbeque should take into consideration the possibility of
accidental hand or body contact.

5
Putting your Barbeque in an Enclosure
This appliance must only be used in an above ground, open air situation with natural
ventilation, without stagnant areas, where gas leakage and products of combustion are
rapidly dispersed by wind and natural convection. Any enclosure in which the appliance
is used must comply with one of the following:
• An enclosure with walls on all sides, but at least one permanent opening at
ground level and no overhead cover. SEE EXAMPLE 1
• Within a partial enclosure that includes an overhead cover and no more than two
walls.
• SEE EXAMPLE 2 & 3
• Within a partial enclosure that includes an overhead cover and more than two
walls, the following shall both apply: (1) At least 25% of the total wall area is
completely open and (2) at least 30% of the remaining wall area is open and
unrestricted SEE EXAMPLE 4 & 5
• In the case of balconies, at least 20% of the total of the side, back and front wall
areas shall be and remain open and unrestricted
EXAMPLE 1
EXAMPLE 4 EXAMPLE 5
EXAMPLE 2 EXAMPLE 3
Both ends open
Open side at least
25% of total wall area
30% or more in total of
the remaining wall area
in open is unrestricted Open side at least
25% of total wall area
30% or more in total of
the remaining wall area
in open is unrestricted

6
Installation
• Do not obstruct any ventilation ports on the body or the hood of the barbeque.
• The gas cylinder must be kept out of direct sunlight and away from any heat
sources.
• During a gas cylinder swap or refill ensure that the control knob is in the OFF
position and there are no naked flames in close proximity.
• Gas hose must NOT be twisted, kinked or under any form of tension. The gas hose
should hang freely with no bends, folds or kinks.
• No part of the flexible hose should come into contact with any part of the
barbeque that will become hot during operation.
• A regular inspection of the hose should be made to ensure that it is not cracking,
breaking cutting or deteriorating in any other way.
• Any damage to the hose requires an immediate replacement from your local
agent or gas expert.
Assembling your Barbeque
Start by unpacking the barbeque, and placing it on a flat surface. Be careful not to damage
the painted finish.
Check that you have all the correct parts, barbeque, cooking grill, grease cup, Allen key,
match holder, cylinder strap.
Remove all packaging materials and dispose of thoughtfully.
Before use, unhook the gas hose from the front right leg and from both back legs.
The gas hose should remain permanently hooked to the front left leg to keep it safely
clear of the hot barbeque.
Only hook the hose back into place on all legs for transport once the barbeque has cooled!

7
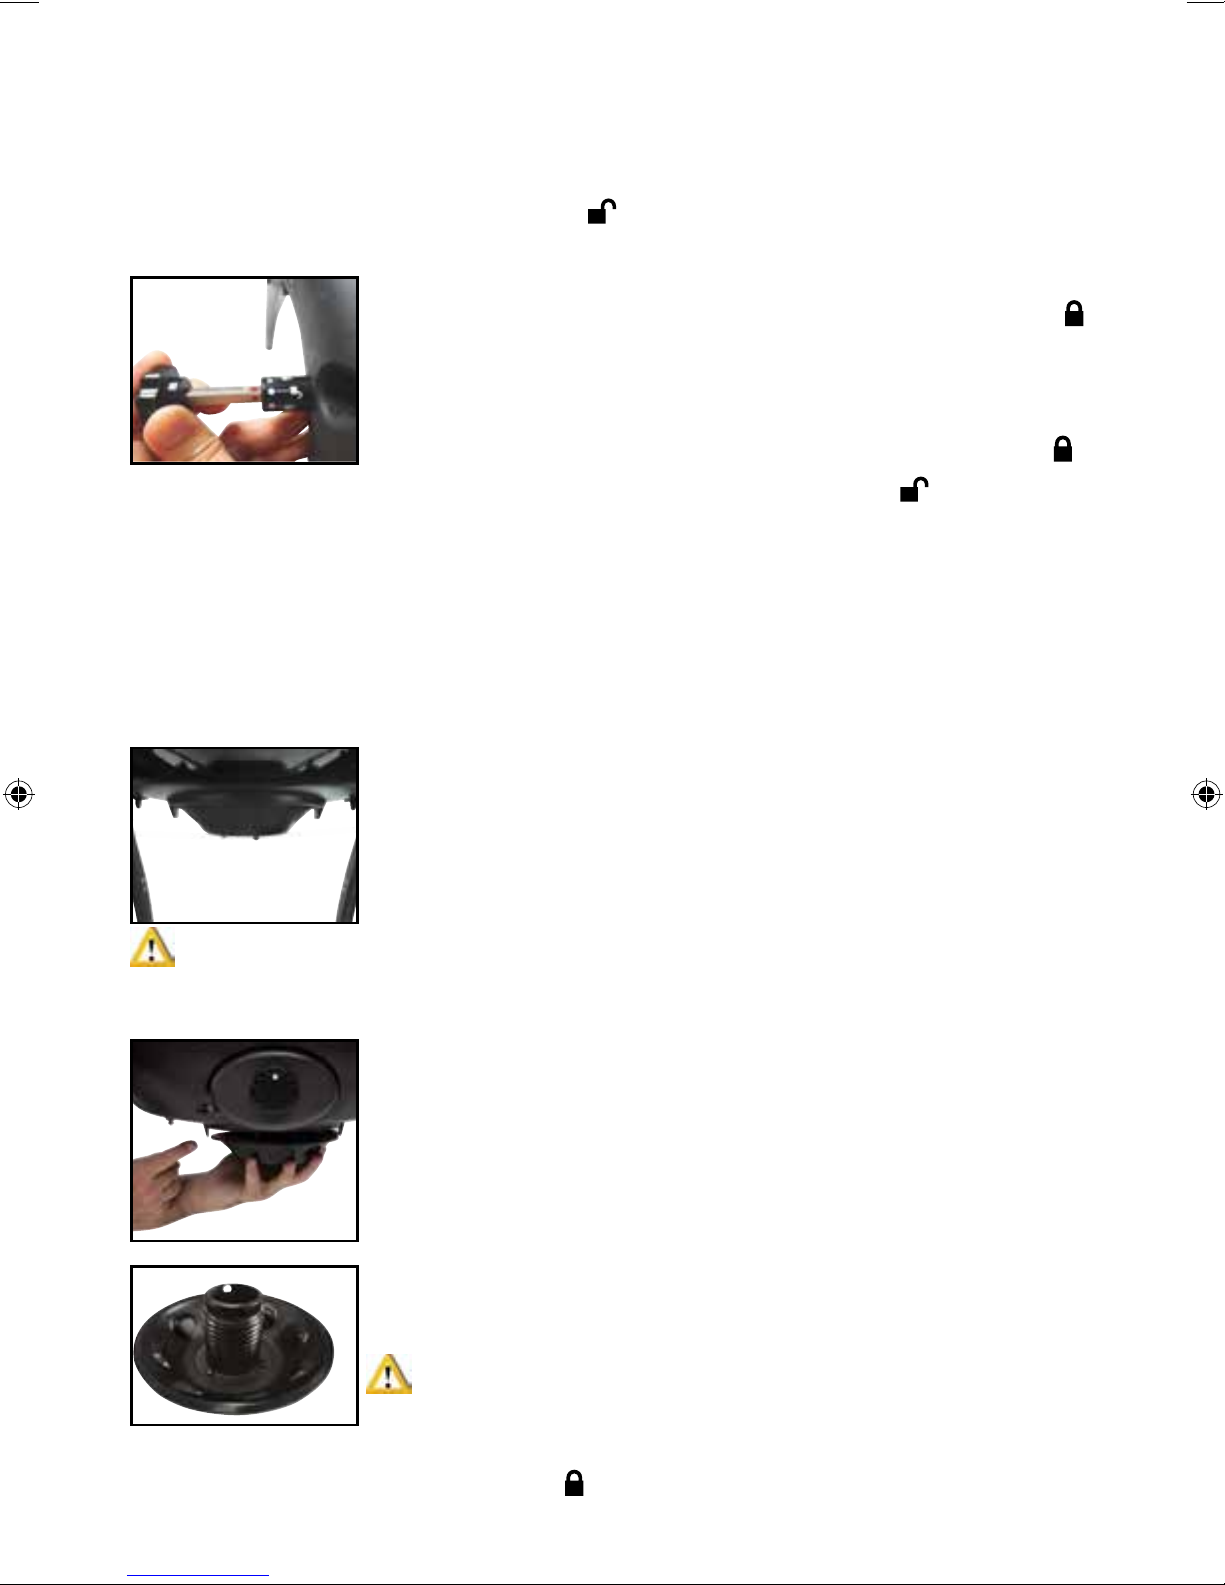
How to Lock And Unlock the Hood & Cooking Grill:
The barbeque hood has a spring pin on each side that locks the hood and cooking grill in
position. When both spring pins are pulled fully outwards from the barbeque, the pins can be
rotated and rested back into the UNLOCKED position. This allows the hood to freely open
and close, and allows the cooking grill to be removed / inserted.
Also, when both spring pins are pulled fully outwards from the
barbeque, the pins can be rotated and rested back into the LOCKED
position where the pins will be free to spring back into the barbeque.
Note that the hood can only be locked in the fully closed cooking postion,
or in the fully retracted transport position. In these positions, the hood
and cooking grill will be fixed in place when the spring pin is LOCKED
During cooking, you should always leave the spring pins in the UNLOCKED position so you
can freely open and close the hood.
Note that unless the grease cup is closed againt the barbeque, the grease cup will
deliberately limit the range of movement of the hood as detailed below.
How to Adjust the Grease Cup:
The barbeque has an adjustable grease cup that screws into the body of the barbeque from
underneath. The grease cup should be adjusted to one of three positions:
(1) For transport, once the barbeque has cooled, the grease cup
should be screwed up firm against the body of the barbeque to
minimise leakeage of any residual grease or moisture. You don’t need
to turn it very hard as it has a flexible o-ring that seals softly against
the barbeque. In this position, the grease cup will allow the hood to
swing to any position (when the spring pins are both unlocked).
(2) For cooking, when the barbeque is cool, the grease cup should
be screwed away from the barbeque 3 ½ full turns until the bottom
of the grease cup is in line with the bottom of the two indicator tabs
on the bottom of the barbeque. In this position, the grease cup will
allow optimum airflow into the firebox for combustion, and also act
as a stopper to hold the hood when opened in the ideal position as
a windshield / splatter guard.
Before transport, ensure that the grease cup has been fully cooled, emptied,
wiped clean and screwed firm against the barbeque to allow the hood to fully retract
to the transport position.
(3) For cleaning, once the barbeque has cooled, the grease cup can
be easily unscrewed and removed completely from the barbeque for
grease disposal and cleaning.
ONLY ADJUST THE GREASE CUP POSITION WHEN THE WHOLE
BARBEQUE HAS COOLED TO ROOM TEMPERATURE.
It is also good practice to only adjust the grease cup when the hood is fully closed and both
spring pins are in the LOCKED POSITION so the hood does not accidently swing closed.

8
Gas Safety Checks
Before assembling your barbeque, you should ensure your barbeque is suited to the type
of gas that you are going to use.
Universal LPG, Also Known As Propane:
Barbeques suited to Universal LPG should have a red printed label saying “UNIVERSAL LPG”.
This is most commonly supplied as a portable 4 kg POL or 9 kg POL gas cylinder, which can
be refilled or swapped at petrol stations or your place of purchase when empty. Either of
these cylinders is suitable for use with the “UNIVERSAL LPG” version of this barbeque.
Some homes have twin 45 kg LPG cylinders permanently installed near an outside wall.
These cylinders supply LPG gas to many appliances in the home via copper pipes, and are
filled as required by the gas supply company.
Natural Gas:
Barbeques suited to natural gas should have a black printed label saying “NATURAL GAS”.
This is piped to your home in a similar fashion to water, so there are no cylinders to refill.
You will need to contact your local gas company to determine if Natural Gas is available in
your area.
To Change the GasType ofYour Barbeque
If your barbeque is manufactured to operate from “UNIVERSAL LPG” (Propane/Butane
mix),it can be connected to LPG (Propane) without any alteration. If you wish to connect
that barbeque to natural gas, it must be converted beforehand using the appropriate
conversion kit available at your nearest Barbeques Galore store.
If your barbeque is manufactured to operate from “NATURAL GAS” and you wish to
connect to LPG, it must be converted beforehand using the appropriate conversion kit
available at your nearest Barbeques Galore store.
Either conversion must be done by a licensed gas fitter or an authorised gas appliance
technician. It is extremely dangerous to use the barbeque with the wrong type of gas. Fire
or explosion may result. Conduct a leak test before use.
For Portable LPG Cylinder Use:
• For stand or cart models, do not attempt to connect to a gas cylinder before the
BBQ is secured properly into its stand or cart.
• Ensure that the model you have is labelled “UNIVERSAL LPG” and therefore
designed to run from an LPG cylinder.
• Check that the barbeque control knob is in the OFF position before any attempt is
made to connect the regulator to the gas cylinder.

• Double check that the gas cylinder valve is securely in the OFF position before
attempting to connect the regulator to the gas cylinder.
• If using without a cart, lock the
strap provided to the gas cylinder
handle and hook the eyelet at the
other end of the strap to the hook
on the back rear left leg of the
barbeque. This is to prevent the
hose from being able to be over
stretched.
• For portable stand models, loop the strap provided around
both left legs of the stand, through the cylinder handle and
lock the strap to itself. This is to prevent the hose from
being able to be over stretched.
• For cart models hook the LPG cylinder onto the left side of the cart, so that it
hangs vertically and rests on the bottom hook. Adjust the top hook height if
necessary, using the Allen key provided with the barbeque so that both the
top hook and bottom hook are holding the cylinder in position, so the cylinder
cannot swing.
• Check the hose that came attached to the barbeque, make sure that it has a
rubber seal on the regulator end of it, and connect this end of the hose to the gas
cylinder. You won’t need a spanner here. Just turn the fitting in an anti-clockwise
direction and hand tighten as much as you can. This should seal it sufficiently.
• The regulator as supplied should be firmly tightened but care must be taken not
to over-tighten the connections. The regulator as supplied is the correct regulator
for this item.
• Ensure the gas cylinder remains upright at all times.
• Should there be any concern in making the correct regulator connection please
contact the after sales support help line towards the back of this manual.
9
BARBEQUE
CONNECTION TO
HOSE REGULATOR
GAS BOTTLE
CONNECTION TO
HOSE REGULATOR

10
For Permanently Installed LPG Supply or Natural Gas Use:
Barbeques which are connected to twin 45 kg LPG cylinders or to Natural Gas must be
installed by a licensed gasfitter, in accordance with the requirements of AS 5601, and local
gas authority requirements.
There are two approaches to installation:
Permanent Piped Connection: Your barbeque may be permanently connected to the main
gas lines or LPG cylinders via copper pipe. This must be done entirely by the gasfitter, in
accordance with requirements of AS 5601, and local gas authority requirements.
Your gasfitter will ensure that your barbeque is permanently connected to the supply
via copper pipe, the gas pressure in the lines is adequate, pipe sizes are correct, all
connections are secure, and that all necessary components (such as secondary regulators
and manual shut offs) are included where regulations require them. Once this is done, the
barbeque cannot be moved. It is a permanent fixture of the property.
Bayonet Point:Alternatively, you can have the gas fitter terminate the gas line using a
“bayonet point”. This allows you to connect and disconnect the barbeque using a special
hose and bayonet termination. Such a hose is provided for the Natural Gas versions of this
barbeque. For LPG installations, an appropriate hose is available through good barbeque
retailers.
Even if your barbeque area already has a bayonet point, you will still need to call upon
a gas fitter to ensure gas pressure is sufficient for your barbeque, and to ensure your
barbeque functions correctly before leaving. Where a gas fitter is required, the gasfitter
must test the safety and operation of the appliance before leaving, including gas pressure,
ignition and burner operation. Conduct a leak test before use.
• For stand or cart models do not attempt to connect to the gas supply before the
BBQ is secured properly into its stand or cart.
• If connecting to a Natural Gas supply, ensure thar the model you have is labelled
“NATURAL GAS” and therefore designed to run from Natural Gas.
• If connecting to an LPG supply, ensure that the model you have is labelled
“UNIVERSAL LPG”and therefore is designed to run from LPG.
• Check that all the control knobs (including side burner) are in the OFF position
before any attempt is made to connect the hose to the gas supply.
• Lock the strap provided to a strong point at the bayonet connection point and
hook the eyelet at the other end of the strap to the hook on the rear left leg of the
barbeque. This is to prevent the hose from being able to be over-stretched.
• Take the bayonet hose that was already fitted to the barbeque by an authorised
person, and connect to the bayonet outlet.
• Should there be any concern in making the correct connection, please contact
your local Barbeques Galore store.
To the installer:You must instruct the consumer on safe operation, and ensure
these instructions are left with the consumer before leaving the site.

LeakTesting
Naked flames (matches or other open flames) must not be used to check for leaks. This is
a dangerous practice which must be avoided.
IFYOU SMELL GAS!
• Immediately isolate the gas supply by turning the gas off at the bottle.
• Extinguish all naked flames.
• Do not operate any electrical devices close to the barbeque.
• Check for leaks as described below.
• Ensure that local area is well ventilated to remove any excess gas.
• If the gas smell continues the barbeque should not be operated under any
circumstances and it is important to immediately turn off gas supply and contact
the after sales support provider help line mentioned towards the back of this manual.
• Before proceeding, it is important that you leak test the barbeque. Make sure the
barbeque control knob is OFF.
Leak Tests Must be Carried Out in a Well Ventilated Area!
If you have a portable gas cylinder, turn the cylinder ON by rotating the knob anti-clockwise. If you
have a wall connection, ensure the bayonet fitting is connected and supply valve open. Spray or
pour soapy water (about the same concentration as washing up water) along the gas line including:
• The gas connection at the inlet of the barbeque, hose connections and regulator
connections.
• The gas hose or copper piping, including any joints, valve connections or bends in
the piping, and the gas connection at the gas cylinder or the wall connection.
• If bubbles appear, there is a gas leak.
• If the leak is at a connection, check and retighten all gas connections and joints
and retest. If the leak is anywhere else, or if you cannot resolve the leak, do not
proceed. Immediately turn the gas supply OFF at the source and contact your
local Barbeques Galore store. If you have a bayonet connection, turn the supply
valve OFF, remove the hose from the wall or floor fitting and contact your local
Barbeques Galore store.
You can also check for leaks using a Gas Safety Gauge, available at your Barbeques
Galore store. This provides an easier and more convenient way to check for leaks.
• After performing the soapy water test, please ensure the fittings are rinsed
thoroughly with clean water.
It is Recommended that a Leak Test be Carried Out on an Annual Basis.
Check Cylinder Connection Every Time you Refill or Exchange Cylinders.
11

Lighting your Barbeque
Before using the barbeque please ensure that you have fully read and understood the
IMPORTANT HEALTH & SAFETY INFORMATION section at the front of this manual.
STARTING THE BARBEQUE:
Lighting the barbeque is easy, but must be done with due care.
• Ensure that all the controls are in the OFF position prior to initiating the start up
process.
• Ensure that the grease cup is in the cooking position
(unscrewed 3 ½ full turns from the barbeque – so that the
bottom of the fat cup is in line with the two indicator tabs at
the bottom of the barbeque).
• Make sure that the gas is turned on at the cylinder, or supply
valve to the barbeque.
• Ensure that the hood is in the cooking (half open) position (not closed and not
retracted for transport).
• Make sure there are no obstructions of airflow to the gas unit. Spiders and
insects can nest within and clog the burner/venture tube at the orifice. A clogged
burner tube can lead to a fire beneath the appliance.
Flame Thrower Ignition:This ignition system works by throwing a flame to the side of the
burner to light it. Push the knob IN and turn anticlockwise to the HIGH position. Hold the
knob IN until the burner ignites. You may need to push IN and turn the knob several times
before ignition.
Manual Ignition:You can light your barbeque manually by using the match holder provided
to hold a lighted match next to the burner, then push the knob IN and turn the burner
control knob to HIGH. You can access the burner through the cooking grills or through the
front holes in the optional hotplate.
If the burner doesn’t light first go, push the knob IN, return the knob to the OFF position and
try a couple more times. If the burner still does not light, wait a few minutes to allow the
gas to disperse before trying again. If satisfactory operation cannot be achieved check the
troubleshooting guide towards the back of this manual. Otherwise, consult your retailer
before proceeding.
Note carefully: Failure to follow the lighting procedures correctly can lead to a hazardous
condition.
12

13
Checking the Flames
The barbeque control knob has three basic positions: OFF, HIGH and LOW. You can
achieve any flame height between LOW and HIGH by rotating the control knob between
these positions.
Controlling the Flames
Look into the barbeque so that you can see the flames. They should be a soft blue colour
with small yellow tips. Check with your retailer if in any doubt about the flames. Special
note: “Blowback” is a situation where the flame burns inside the burner, towards the front.
It can be recognised by a sharp roaring sound coming from the burner. It is not dangerous
unless it is allowed to persist. If this occurs, simply push the knob IN, turn the burner OFF,
wait a few seconds, then relight.
Turning O (Shut Down)
When you’ve finished cooking, leave the burner controls on HIGH for a maximum of
5 minutes to burn off excess grease from the burner and other surfaces. To turn the
barbeque off, it is best to turn OFF at the supply valve first, and allow all the gas left in the
hose to burn off. This will only take a couple of seconds. Then push the knob IN and turn
the burner control knob clockwise to OFF.
Note that failure to follow these shutdown procedures correctly can lead to a hazardous
condition.
It’s recommended for good hygiene and safety to empty and clean the grease tray at the
end of each cooking session.
First Time Use
PreparingTo Cook
• Wash the grill (and any optional hotplates) thoroughly in warm soapy water
before first use. Dry thoroughly and then coat the top surface to prevent food
sticking with canola oil or Nice & Easy which is salt free and available from your
local Barbeques Galore store. Light the barbeque as described earlier and leave
on HIGH for about 3 minutes to warm the barbeque up. Once the barbeque is
warmed up, you should set the burners to your desired cooking temperature.
You’re now ready to start cooking up a feast. For ongoing protection of the
cooking surface, follow the procedures in the Maintenance and Storing sections.

14
Cooking Hints
Controlling Flare Up
Flare-ups are caused by juices and oils from the food igniting in sudden bursts of flame
that come up over the grill. A little bit of flare up as well as the resulting smoke is a good
thing. It’s what gives barbequed food that unique outdoor flavour. But if it happens too
often, or if the flame lasts more than a few seconds, your food will char, so you need to
control it:
• First of all, cooking very fatty foods may cause a lot of flare up. You should trim
excess fat off your meat.
• Excess flaring usually means the burner control is up too high, turning it down
before flare-up occurs will usually prevent it happening in the first place.
• Moving the meat away from the flare up will also reduce the problem.
• Some very fatty foods are best cooked on the optional hotplate or in a baking dish
to collect the fat and shield the food from direct heat. Always remember to switch
the barbeque OFF once you are finished cooking.
KeepingYour Food Moist
It’s easy to keep your food moist and succulent on a barbeque by following these
guidelines:
• Use tongs instead of a fork when turning meat and poultry. A fork pierces the
flesh and causes the juice to seep out.
• Juices tend to rise to the top of a piece of meat and then settle. Each time you
turn the meat over, the juices are lost. It’s better to quickly sear the meat on each
side (about half a minute) then leave the meat to cook on one side at a time,
turning once only before serving. (An alternative method is to turn the meat every
30 seconds or so, before the juices have time to reach the top surface. This keeps
the meat succulent and juicy, but means constant adjusting while cooking.)
• Baste food with light marinade or oil a couple of times while cooking, though
watch out for excessive flare-up if too much oil is used.
• Using the roasting hood as outlined later in these instructions is an excellent way
to preserve moisture and succulence and takes the hard work out of barbeque
cooking.

15
Other UsefulTips
You don’t need to be an expert to serve up a tasty, good looking meal. Try these ideas:
• Although cooking on the optional hotplate seems easier, cooking on the grill
gives you a more authentic barbeque flavour. Natural juices vapourise, with the
vapours penetrating back into the food.
• As an alternative to simply grilling, try marinating your meat, fish, poultry or
vegetables first. The longer you leave the food to stand in the marinade, the
more thoroughly the flavour will soak through. Several pre-made marinades are
available and good recipes are easy to come by. It is best to leave food standing
in the refrigerator.
• If you use a tomato or sugar based sauce for basting, apply it in the last 5-10
minutes of cooking. Using these sauces over a longer period of time will result in
over-browning.
• To prevent meat from curling, slash the remaining fat at roughly 5cm intervals,
taking care not to cut into the meat.
• Avoid burning or charring food as this has been shown to be unhealthy. Don’t
leave cooked food standing for too long before eating.
Covered Cooking
Cooking with the Hood Closed
Using the roasting hood traps heat, moisture and flavour that is normally lost on an open
top barbeque. The Ziegler and Brown Grill is designed with plenty of power to heat up
quickly and cook lots of food with the hood either open or closed. With the hood closed
and the barbeque already pre-heated, its important to then turn burners to LOW and
occasionally even OFF as required, in order to not overheat the barbeque which could
result in increased temperature hazards and burning your food. Never let the hood
temperature exceed 300 ºC.
For covered cooking, there are two basic ways to cook:
(A) Direct Cooking and (B) Indirect Cooking
(A) Covered Cooking-Direct Cooking Method
This is when you place the food directly over the lit burners, either on the grill or the
optional hotplate.
This method is great for frying, searing and grilling, especially with thinner cuts and foods
that require shorter cooking time. Cooking takes less time than with the hood open, and
the results are more tender and juicy. Preheat the barbeque with both the burner on HIGH
and the hood closed until the hood thermometer reads around 200ºC. Importantly, once
the barbeque is pre-heated and the hood is closed, heat is trapped around the food, so the

16
burner will usually only need to be on LOW and in some rare cases, OFF for short periods.
Heat from the lit burner will circulate all through the hood cooking quite evenly. Quite
close attention needs to be paid to the food, and the burners frequently reset to LOW or
occaisionally OFF as required to prevent overheating.
Don’t be afraid to open the hood often to check progress. You are in full control of the
temperature by turning the burner higher, lower or occasionally OFF as required. The
gas burner will respond instantly and powerfully to your control. Most importantly, use
the hood thermometer as a warning guide that the barbeque is too hot. For grilling most
foods, aim to keep the thermometer below around 200ºC. Never let the temperature on
the thermometer reach over 300ºC or the barbeque may overheat and burn your food.
A separate probe thermometer is available as an accessory from all Barbeques Galore
stores. This takes the guesswork out of knowing when your food is cooked.
Always remember to switch the barbeque OFF once you are finished cooking.
(B) Covered Cooking-Indirect Cooking Method
This is when you shield the food from direct heat by using an optional drip pan and roasting
rack or any other method of shielding the food from direct heat such as alumimium foil
under a roasting rack, or a pizza stone. The burner is adjusted from mostly LOW to HIGH
and occasionally OFF for short periods to maintain contant lower roasting temperatues.
This method is ideal for thicker cuts of meat, legs of lamb, pork, shoulders of beef, whole
chickens and whole fish.
Moist, hot air rises from the lit burners and circulates around the food, trapping juices and
flavour. Even cakes and breads can be cooked in your barbeque this way. Cooking lower
and slower lets the food cook completely through without burning on the outside, yet
remaining juicy and tender on the inside.
Preheat the barbeque with the burner on HIGH and the hood closed for 5 minutes or until
the hood thermometer reads around 200ºC. Best results are achieved by placing your roast
in a rack and that rack in a drip pan. The roast is slighty elevated to allow heat to circulate
all the way around, and water, wine, juices, herbs can be added to the drip pan to help
flavour the roast and make a baste or gravy. Use a large drip pan positioned centrally in
the barbeque. Importantly, once the barbeque is pre-heated and the hood is closed, heat
is trapped around the food, so the burner that is on will mostly only need to be on LOW and
sometimes turned OFF for short periods. Heat from the lit burner will circulate all through
the hood cooking quite evenly.
TIP: Maintaining a level of liquid (water, juice, wine) in the drip pan keeps the roast moister
and lowers the roasting temperature.
Importantly, use the hood thermometer as a warning guide that the barbeque is too hot. For
roasting most foods, aim to keep the thermometer around 200ºC to avoid burning.
For short periods of browning only, or for 10 minutes to make pork crackling, aim for
around 250ºC.

17
For smokey roasting, lower temperatures and longer cooking times will result in more
intense smoke flavour and more tender meats. Aim for around 175ºC. A tray of water
positioned on the grill will help keep the temperature stable and lower.
Always use a probe thermometer to ensure that the meat has cooked all the way through
to the right temperature. Don’t ever let the temperature exceed 300ºC on the hood
thermometer or the barbeque may overheat. A separate probe thermometer is available as
an accessory from all Barbeques Galore stores. This takes the guesswork out of knowing
when your food is cooked.
Always remember to switch the barbeque OFF once you are finished cooking.
BarbequeTip
Great chefs will tell you that cooked meats need to “rest” away from the heat of the
barbeque before slicing for several minutes to allow the moisture pushed to the surface to
redistribute. If you don’t rest the meat, moisture that has pooled near the surface will run
out and the rest of the meat will be quite dry. Covering the meat in aluminium foil while its
resting helps keep it from cooling too fast.
Use the few minutes while resting the meat to open the barbeque hood, turn the burner to
HIGH for 3 to 5 minutes to burn off food residue. After 5 minutes, turn the barbeque OFF.
While the cooking surfaces are still hot, take a long moistened handled brush or scraper
and remove remaining oil and food residue. You should use an oven mitt to avoid burns. 5
minutes now will save 30 minutes next barbeque.
Always remember to switch the barbeque OFF once you are finished cooking.

18
Internal MeatTemperatures
Beef
Meat Probe temperatures:
Rare 140ºF / 60ºC. Medium 150ºF / 66ºC. Well-done 170ºF / 77ºC
Lamb
Meat Probe temperatures:
Rare 140ºF / 60ºC. Medium 150ºF / 65ºC. Well-done 165ºF / 75ºC
Veal
Meat Probe temperatures:
Rare not advised. Medium 155ºF / 70ºC minimum safe temperature. Well-done 165ºF / 75ºC
Pork
Meat Probe temperatures:
Rare not advised. Medium 150ºF / 65ºC minimum safe temperature. Well-done 160ºF / 70ºC
Poultry
Meat Probe temperatures:
Rare not advised. Medium 170-175ºF / 75-80ºC minimum safe temperature.
Well Done not advised; poultry tends to dry out over 175ºF / 80ºC
To obtain correct temperature use an instant-read meat thermometer in
the thickest part of the flesh, careful not to touch any bone.

19
CookingTimes
Poultry
Cut of Meat Weight or Thickness BBQ Method Approx Cook Time
Chicken (whole) 2 kg Indirect 70-80 min
Chicken (halved or quartered) 2 kg total Indirect 55-65 min
Chicken (breasts, boneless) 150 g ea Direct 12-15 min
Chicken (breasts, boneless) 150 g ea Indirect 23-25 min
Wings 120 g Direct 23-30 min
Wings 120 g Indirect 35-40min
Cut Up Legs and Wings 2 kg Direct 10 min
Cut Up Legs and Wings 2 kg Indirect 40 min
Boneless Cubes (For Kebabs) 2.5 cm Direct 12-15 min total
Turkey (Whole) 4.5 kg Indirect 2-3 hours
Beef
Cut of Meat Weight or Thickness BBQ Method Approx Cook Time
Roasts 2 kg Indirect 50 min per kg (rare)
Steaks (T-bone, New York,
Porterhouse, Round, Sirloin) 2.5 cm Direct 5-6 min per side (rare)
Rump Steak 3.5 cm Direct 5-7 min per side (med rare)
Minute Steaks 0.5 cm Direct 1.5-2 min per side (rare)
Ground Beef Patties 2.5 cm Direct 4-5 min per side (rare)
Ground Beef Patties 2.5 cm Direct 5-6 min per side (med. rare)
Ground Beef Patties 2.5 cm Direct 6-7 min per side (well done)
Thermometer Temperature: Rare = 60ºC, Medium = 66ºC, Well-done = 77ºC
Seafood
Cut of Meat Weight or Thickness BBQ Method Approx Cook Time
Whole Fish (with or
without head and tail) 2 kg Indirect 30-35 min total
Steaks & Fillets 2 cm Direct 3-4 min per side
Prawns Medium sized Direct 1.5-2 min per side
Lobster Tails 300 g Direct 9-13 min
Fish is done when flakes easily when prodded with a fork or knife in the thickest part.
Frozen fillets should not be thawed before cooking. Cooking times will be approximately
double that of fresh fish.

20
Maintenance - Cleaning Your Barbeque
Your barbeque will look better and last longer if you keep it clean. Follow these simple steps:
• Throwing cold water over any hot surface of the barbeque is NOT recommended
and is potentially dangerous.
• Avoid handling and touching hot parts of the barbeque.
The Cast Iron Cooking Surface on the Grill and Optional Cast Iron Full Hotplate:
Once cooking is finished a burn-off process to clean the barbeque should be as follows:
• Remove all excess burnt food with a long handled scraper or brush.
• Light the burner, set to the HIGH position and leave running with the hood fully
open for approximately 5 minutes.
• During this 5 minute period most excess food, fat and juices should be burnt off
making cleaning easier.
• The roasting hood must be left in the open position during the burn off period.
• Turn the barbeque OFF at the control knobs and at the gas supply valve.
• Using Bar-B-Chef Heavy Duty Cleaner and warm water, scrub the cooking surfaces
with a long handled brush or scourer. Rinse thoroughly with fresh warm water.
• Once dry, store barbeque with the hood closed and out of the elements and direct
sunlight.
The Non-Stick Cooking Surface on the Optional Aluminium Half Hotplates:
• Wipe the surface clean with a damp paper towel.
• For more stubborn baked on grease, first soak the hotplate in water with some
dishwashing detergent.
• Rinse thoroughly with fresh warm water
The Burners:
• Occasionally the burner holes may get slightly clogged with grease and food
particles. Leaving the burner on HIGH for a maximum of 5 minutes with the hood
open after you’ve finished cooking will remove most of this.
• Check the burner periodically for more persistent blockages. In particular, you
should ensure that the aeration vents are free of insect nests and spider webs.
• To clean the burner, once OFF, let it cool down and inspect. If any of the holes are
clogged, use a toothpick to unclog the holes.
• If the burner accidently gets too wet, it will not operate properly until thoroughly
cleaned and dried.
The Barbeque Firebox and Hood:
• Regular care and maintenance of the barbeque firebox and hood will significantly
increase its life and long term appearance.
• Excess grease and fat can be removed using Bar-B-Chef Heavy Duty BBQ
Cleaner and warm water with a soft scraper (not metal edged). Do not use caustic
cleaning agents as these can quickly damage surface coatings and gradually
damage even metal finishes.
This manual suits for next models
2
Table of contents
Other Ziegler & Brown Grill manuals
Popular Grill manuals by other brands

Char-Griller
Char-Griller DUAL THREAT E5037 owner's manual

TriStar
TriStar BQ-2814 instruction manual

Char-Griller
Char-Griller 789792090207 Assembly instructions

MrHeater
MrHeater Buddy Flex MH8CFLEX Operating instructions and owner's manual

Members Mark
Members Mark G54502 Assembly instructions & user manual

H.Koenig
H.Koenig GR20 instruction manual