Zippo 44026 User manual

YEAR LIMITED
GUARANTEE
WINDPROOF STOVE
TM
Safety..................................3
Assembly ............................4
Operation ............................8
Ignition ..............................11
Transport ..........................12
Maintenance .....................12
Warranty............................14
Trouble Shooting ..............15
Parts Listing......................16
Assembly Diagram ...........16
ENGLISH 1-16 / FRANÇAIS 17-31 / ESPAÑOL 32-46
READ AND SAVE THESE INSTRUCTIONS
Use & Care
Manual
Zippo Manufacturing Company
33 Barbour Street,
Bradford, Pennsylvania 16701 USA
Telephone: 888-368-0826
Customer Care Website: zippo.com
Assembled in USA with domestic
and foreign components.
843712_rA
ANSI Z21.72-2011
CSA 11.2-2011
MODEL #: 8202-54Z
ZIPPO MODEL #: 44026
PLEASE RECORD YOUR SERIAL NUMBER, LOCATED INSIDE LID OF
WINDPROOF STOVE, AND THE DATE OF PURCHASE BELOW.
SERIAL NUMBER ______________________________________________
DATE OF PURCHASE ___________________________________________
THIS INSTRUCTION MANUAL CONTAINS IMPORTANT INFORMATION
NECESSARY FOR THE PROPER ASSEMBLY AND SAFE USE OF THE
APPLIANCE. READ AND FOLLOW ALL WARNINGS AND INSTRUCTIONS
BEFORE ASSEMBLING AND USING THE APPLIANCE. FOLLOW ALL
WARNINGS AND INSTRUCTIONS WHEN USING THE APPLIANCE.

2

3
SAFETY
Your new Zippo®Windproof Stove™is a safe, convenient
appliance when assembled and used properly. However, as
with all gas-fired products, certain safeguards must be observed.
Failure to follow these safeguards may result in damage or
injury including fire or explosion which could cause property
damage, personal injury, or death. If you have questions
concerning assembly or operation, consult your dealer, gas
appliance serviceman, your gas company or Zippo Consumer
Relations at 888-368-0826.
IF YOU SMELL GAS:
1. DO NOT ATTEMPT TO LIGHT
APPLIANCE.
2. EXTINGUISH ANY OPEN FLAME.
3. DISCONNECT FROM FUEL SUPPLY.
DO NOT STORE OR USE GASOLINE
OR OTHER LIQUIDS WITH FLAMMABLE
VAPORS IN THE VICINITY OF THIS OR
ANY OTHER APPLIANCE
Propane tank not supplied.
This manual contains important information about the assembly,
operation and maintenance of this propane stove. General
safety information is presented in these first few pages and is
also located throughout the manual. Safety precautions are
essential when using propane fueled equipment. These
precautions are necessary when using, storing, and servicing.
Using this equipment with respect and caution will reduce the
possibilities of personal injury or property damage.
Keep this manual for future reference and to educate new users
of this product. This manual should be read in conjunction with
the labeling on the product.
• Failuretocomplywiththeprecautionsandinstructions
provided with these stoves can result in death, serious
bodily injury and property loss or damage from hazards of
fire, explosion, burn, asphyxiation, and/or carbon
monoxide poisoning.
• Thisstoveisacombustionappliance.Allcombustion
appliances produce carbon monoxide (CO) during the
combustion process. This product is designed to produce
extremely minute, non-hazardous amounts of CO if used and
maintained in accordance with all warnings and instructions.
Do not block air flow into or out of the stove.
• CarbonMonoxide(CO)poisoningproducesu-like
symptoms, watery eyes, headaches, dizziness, fatigue and
possibly death. You can’t see it and you can’t smell it. It’s an
invisible killer. If these symptoms are present during operation
of this product get fresh air immediately!
• For outdoor use only.
• Never use inside house, camper, tent, vehicle or other
unventilated or enclosed areas. This stove consumes air
(oxygen). Do not use in unventilated or enclosed areas to
avoid endangering your life.
• Neverstorepropanenearhighheat,openames,pilotlights,
direct sunlight, other ignition sources or where temperatures
exceed 120°F (49°C).
• Propaneisheavierthanairandcanaccumulateinlowplaces.
If you smell gas, leave the area immediately.
• Neverinstallorremovepropanetankwhileoutdoorstove
is lit, near flame, pilot lights, other ignition sources or while
outdoor stove is hot to touch.
• Duringoperation,thisproductcanbeasourceofignition.
Never use the stove in spaces that contain or may
contain volatile or airborne combustibles, or products such
as gasoline, solvents, paint thinner, dust particles or unknown
chemicals. Minimum clearances from combustible materials:
30in [76cm] from the sides, shown in figure 1.
• Provideadequateclearancesaroundairopeningsintothe
combustion chamber.
• Propanegasisheavierthanairandleakingpropanewillsink
to the lowest level possible. It can ignite by ignition sources
including matches, lighters, sparks or open flames of any kind
many feet away from the original leak.
FOR YOUR SAFETY
FOR YOUR SAFETY
DANGER CARBON MONOXIDE
HAZARD
THIS APPLIANCE CAN
PRODUCE CARBON
MONOXIDE WHICH HAS
NO ODOR.
USING IT IN AN
ENCLOSED
SPACE CAN KILL YOU.
30 in (76 cm)
30 in (76 cm)
figure 1
DANGER
NEVER USE THIS APPLIANCE
IN AN ENCLOSED SPACE SUCH AS A
CAMPER, TENT, CAR OR HOME.
FOR OUTDOOR USE ONLY.
Shown with optional
accessory legs

4
• Propanegasshouldbestoredorusedincompliancewith
local ordinances and codes or with ANSI/NFPA 58. Turn off
propane when not in use
• Thisappliancemustnotbeleftunattendedduringoperation
or when hot.
• Specialcaremustbetakentokeepchildrenawayfromthe
appliance during operation or when hot.
• Letthestovecoolcompletelybeforedisassembly
or transportation.
SERVICE SAFETY
• Keepallconnectionsandttingsclean.Inspectpropane
cylinder and stove propane connections for damage
before attaching.
• Duringsetup,checkallconnectionsandttingsforleaks
using soapy water. Never use a flame. Bubbles indicate a
leak. Check that the connection is not cross-threaded and
that it is tight. Perform another leak check. If there is still a
leak, remove the cylinder and contact. Zippo Consumer
Relations for service or repairs at 888-368-0826.
• Useasacookingapplianceonly.Neveralterinanywayor
use with any device or part not expressly approved by Zippo
Manufacturing Company.
• Cleanstovefrequentlytoavoidgreaseaccumulationand
possible grease fires.
CALIFORNIA PROPOSITION 65
• WARNING:Thisfuel,andtheby-productsofcombustionof
this fuel, contains chemicals known to the state of California
to cause cancer, birth defects, or other reproductive harm.
SPECIFICATIONS
INPUT: 8,500BTU/H per Burner
CATEGORY: Pressure Regulated Propane
Fuel: 14.1oz [400g] or 16.4oz [465g] or 20lb [9kg]
REGULATOR PART #: 38110-114
WARNING
Assembly
1

5
4
2
3
2X
2X

6
5
6
7

7
8
9
10
Free Standing Mode For Optional Leg Assembly

8
OPERATION
SMALL PROPANE CYLINDERS
Not for use with natural gas.
Use cylinders that are marked “Propane Fuel” only.
Use small propane cylinders with a capacity of 14.1 oz. or
16.4 oz. These cylinders are typically available in the camping,
hardware, or plumbing sections of your local retailer.
1. Remove protective cap from propane cylinder.
2. Align and push the small propane cylinder into the regulator
and turn clockwise until tight.
• Do not use a wrench to tighten small propane cylinder
connection. Using a wrench could damage the regulator
coupling and could cause a leak and or fire.
• Disconnect small propane cylinder when windproof stove
is not in use.
SMALL PROPANE CYLINDERS CONNECTION
1. While holding the regulator in one hand, push the propane
cylinder into the regulator and turn clockwise until tight. Pull
the quick connect coupler back until it clicks, as shown in
figure 3.
2. Be sure appliance valves are shut off as shown in figure 4.
3. With the propane cylinder assembled on the regulator and the
quick connect coupler pulled back, push the quick-connect
coupler onto the valve assembly, until it clicks as shown in
figure 5.
4. Position the propane cylinder, as shown in the illustration
for table top mode in figure 5 and for free standing mode
(with optional legs) in figure 6, to ensure proper
propane withdrawal.
CAUTION
WARNING
14.1 oz. (400 g)16.4 oz. (465 g)
This windproof stove accommodates these
cylinder sizes, not included.
Small Propane Cylinder
•directconnection
Large Propane Cylinder
•connectwithZippo
accessory adaptor
hose only
20 lb. (9 kg)
figure 3
figure 4
figure 5
figure 6
QUICK CONNECT
COUPLER
REGULATOR
VALVE
ASSEMBLY
VALVE
ASSEMBLY

9
QCC®-1 QUICK CLOSING COUPLING
(Large Propane Cylinder)
The QCC®-1 system incorporates new safety features required
by the American National Standards Institute (ANSI) and the
Canadian Standards Steering Committee.
* Gas will not flow until a positive connection has been made.
* A thermal element will shut off the flow of gas between
240°F and 300°F.
* When activated, a Flow Limiting Device will limit the flow
of gas to 10 cubic feet per hour.
All models are equipped with a hose with a QCC®-1 Quick
Closing Coupling.
1. The QCC®coupling contains a magnetic Flow Limiting
Device which will limit the flow of gas should there be a
leak between the regulator and the appliance valve. This
device will activate if the cylinder valve is opened while the
appliance valves are open. Be sure the appliance valves
are off before the cylinder valve is opened to prevent
accidental activation.
2. The QCC®coupling incorporates a heat sensitive hand wheel
that will cause the back check module in the QCC®cylinder
valve to close when exposed to temperatures between 240°
and 300°F. Should this occur, do not attempt to reconnect
the nut. Remove hose/ regulator assembly and replace with
a new one.
3. The pressure regulator is set at 11 inches WC (water
column) and is for use with propane only. The hose and
hose couplings comply with CSA Standard CAN 1.83. No
modifications or substitutions should be attempted.
4. Protect the hose from dripping grease and do not allow the
hose to touch any hot surface, including the base casting
of the windproof stove.
5. Inspect seal in the QCC®cylinder valve when replacing
propane cylinder or once per year, whichever is more
frequent. Replace seal if there is any indication of cracks,
creases, or abrasion.
6. Inspect hose before each use of the stove. If the hose is
cracked, cut, abraded or damaged in any way, the appliance
must not be operated.
7. For repair or replacement of hose/regulator assembly, contact
Zippo Consumer Relations at 888-368-0826.
QCC®-1 CONNECTION
(Large Propane Cylinders)
1. Be sure the cylinder valve and appliance valves are off.
2. While holding the regulator in one hand, push the adapter hose
into the regulator and turn clockwise until tight. Pull the quick
connect coupler back until it clicks, as shown in
figure 8.
3. Center the nipple of the adapter hose in the cylinder valve and
hold in place. Using the other hand, turn the hand wheel
clockwise until there is a positive stop.
5. Be sure appliance valves are shut off.
6. With the propane QCC®-1 adaptor hose assembled on
the regulator, the QCC®-1 adaptor hose connected to the
propane cylinder and the quick connect coupler pulled back.
Push the quick-connect coupler onto the valve assembly, until
it clicks as shown in figure 10.
figure 7
ADAPTER HOSE
CHECK VALVE
HEAT SENSITIVE
HAND WHEEL
NIPPLE WITH FLOW
LIMITING DEVICE
SHUT OFF VALVE
CYLINDER
figure 9
figure 8
figure 10
QUICK CONNECT
COUPLER
REGULATOR
ADAPTER
HOSE
NIPPLE
Large Propane Cylinder Connection With Optional Accessory Adaptor Hose

10
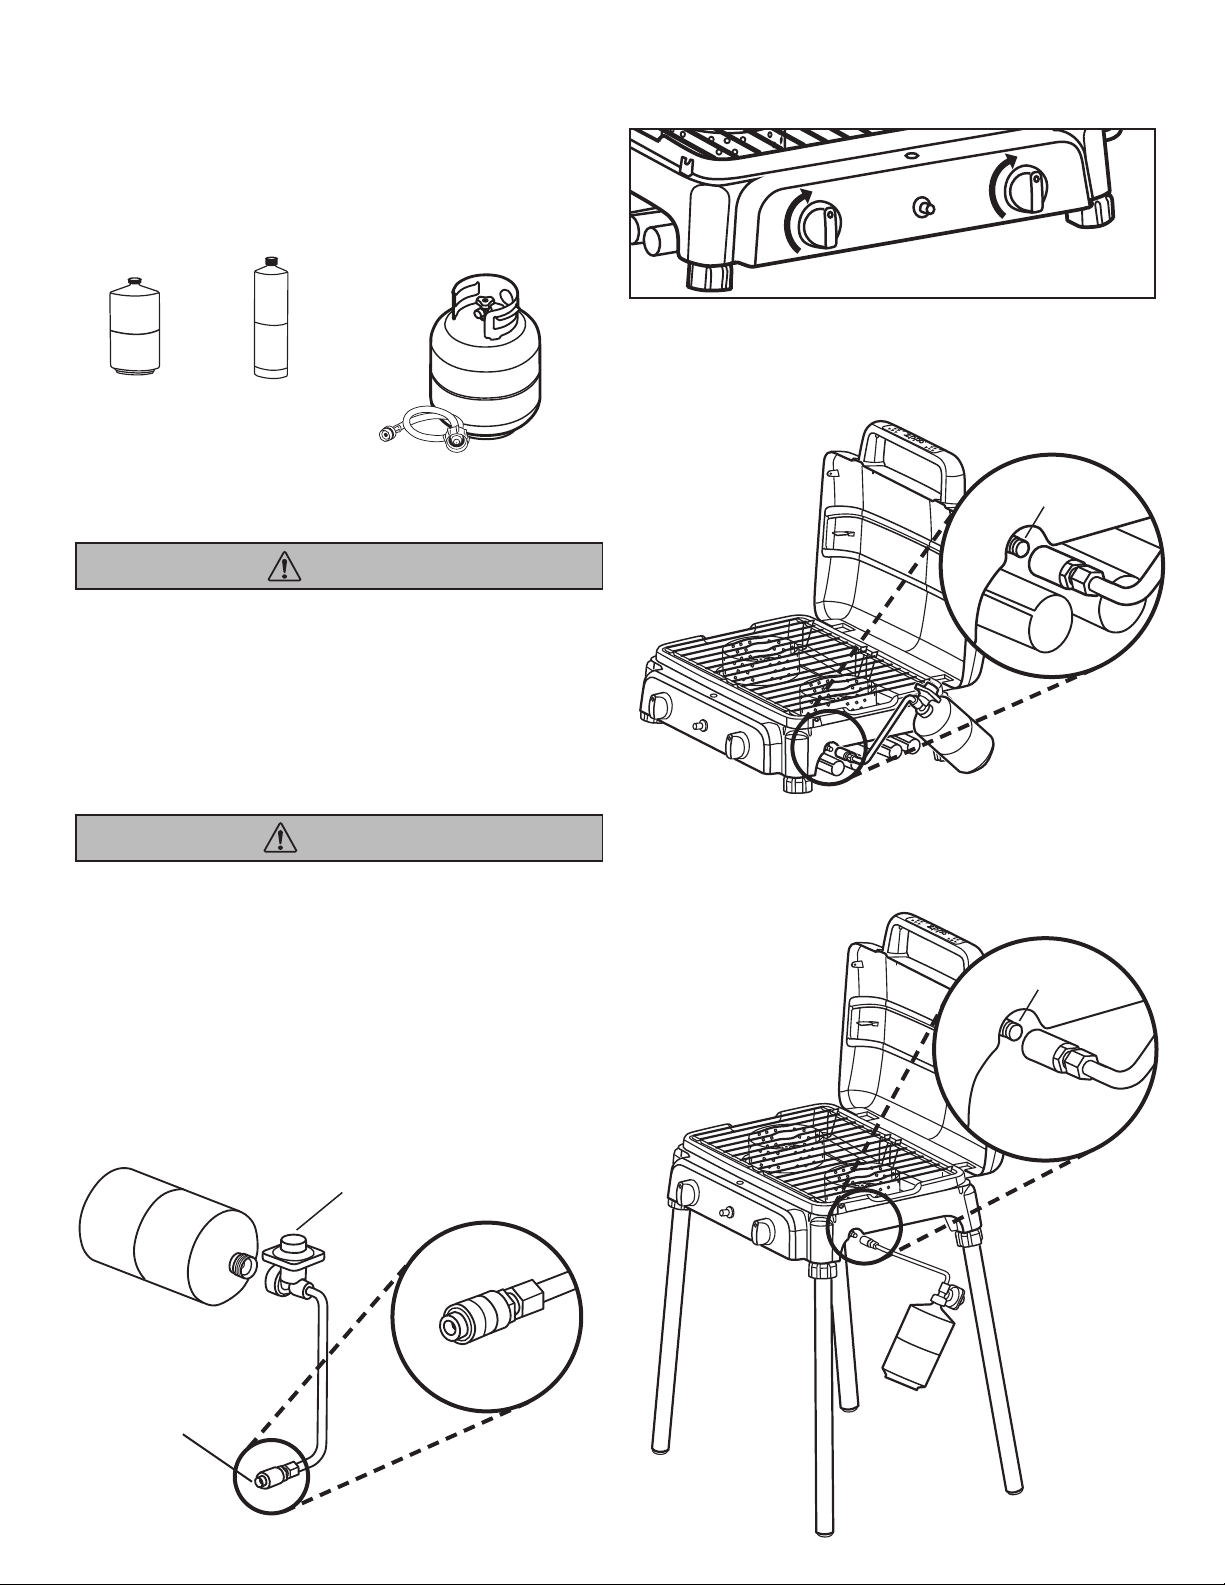
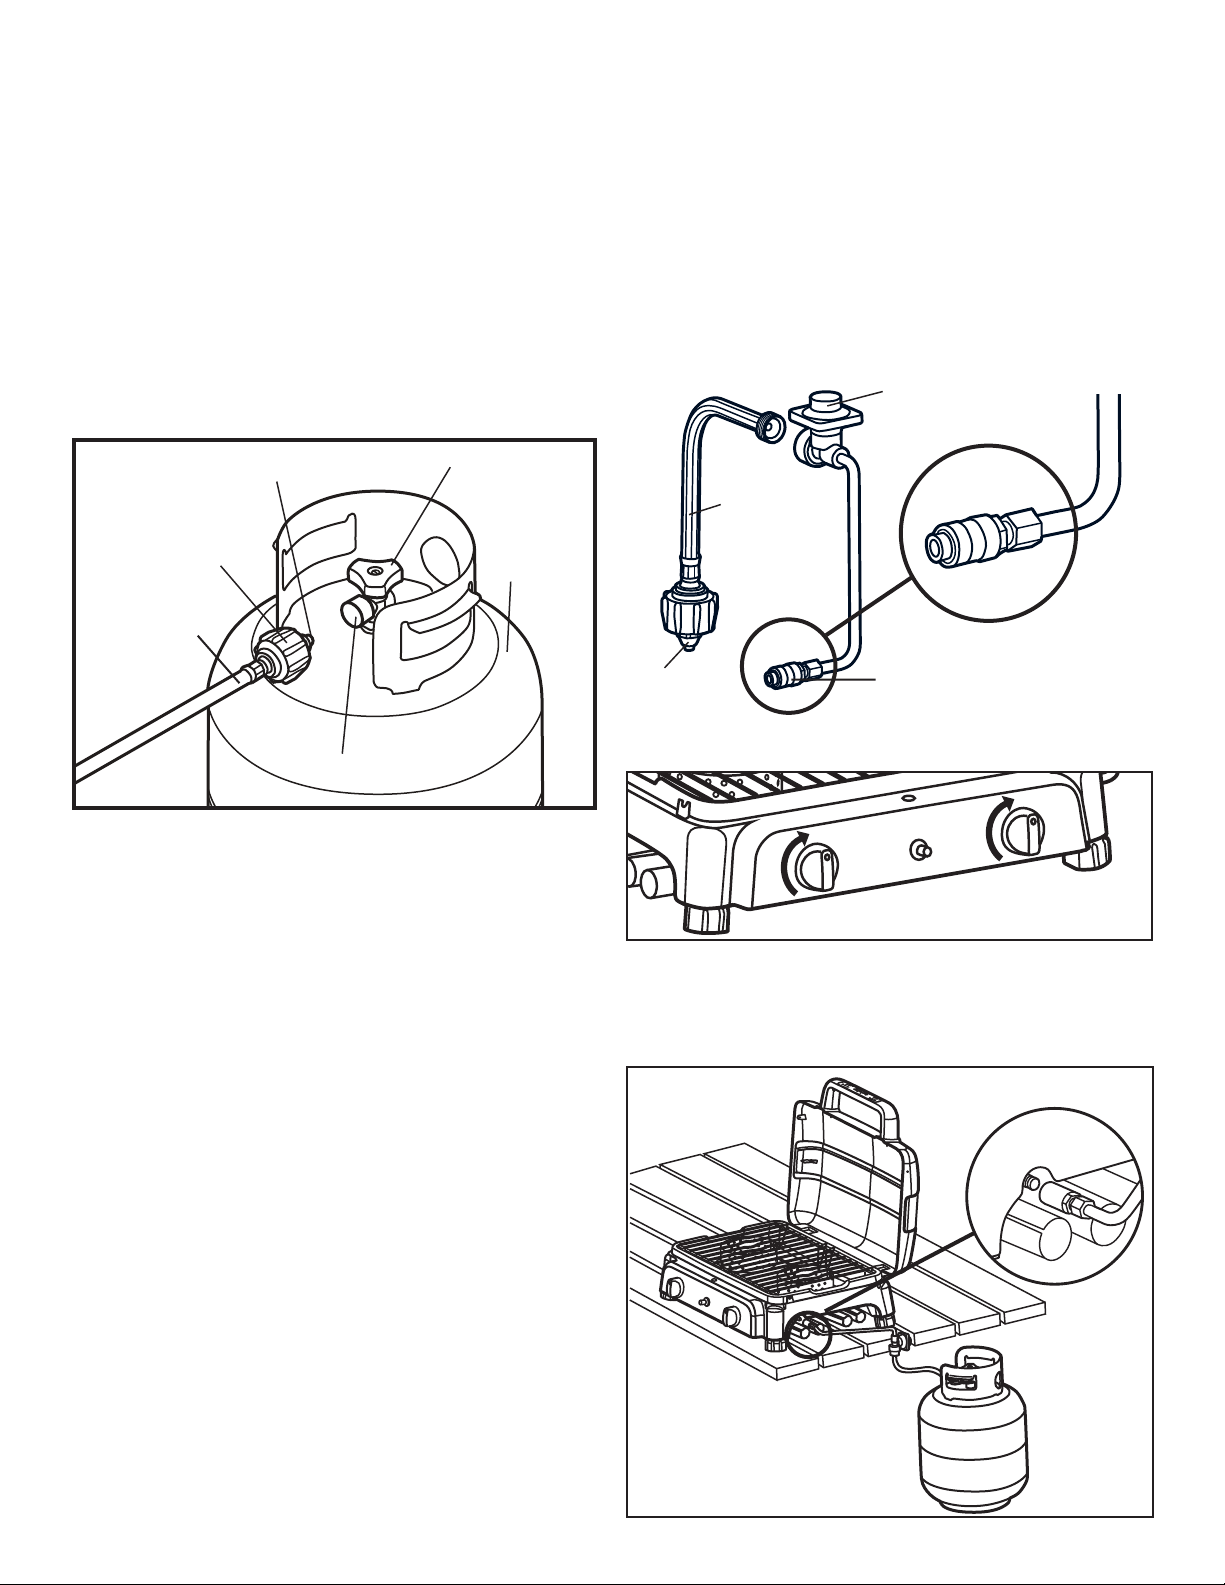
7. Position the propane cylinder as shown in the illustration for
table top mode and for free standing mode.
8. Do not use tools. Hand tighten only. When making the
connection, hold the adapter hose in a straight line with
the cylinder valve, and be sure to not cross thread
the connection.
9. Leak test the connections. See “Leak Testing Section.”
10. Refer to lighting instructions.
11. To avoid activating the Flow Limiting Device, when lighting,
open the cylinder valve slowly with the appliance valves off. If
the Flow Limiting Device is accidently activated, turn off the
appliance valves and cylinder valve and wait 10 seconds to
allow the device to reset. Open the cylinder valve slowly, then
open the appliance valve.
PROPANE CYLINDER
The Propane Cylinder is not included with the Zippo®Windproof
Stove™. QCC®valve equipped cylinders are available from your
gas grill dealer or propane supplier. This valve is recognized
by the external threads on the inlet port of the valve.
Any attempt to connect the supplied hose, by use of adapters
or any other means, to any other type of valve could result in
damage, fire or injury and may negate the important safety
features designed into the QCC®-1 system.
SPECIFICATION:
1. Any propane cylinders used with this appliance must be
constructed and marked in accordance with the
Specifications for LP Gas Cylinders of the U.S.
Department of Transportation (D.O.T.) or the National
Standard of Canada, CAN/CSA-B339, Cylinders, Spheres
and Tubes for Transportation of Dangerous Goods; and
Commission, as applicable.
2. The propane cylinder used for this appliance must not have a
capacity larger than 20 lb. (9 kg). Approximately 18” (46 cm)
high, or 12” (31 cm) diameter.
3. Any propane cylinders used with this appliance should be
inspected at every filling and re-qualified by a licensed
service outlet at the expiry date (10 years), in accordance
with the DOT (USA) and CTC (Canada) codes for
LP Gas Cylinders.
4. Any propane cylinders used with this appliance must be
provided with a shutoff valve terminating in a cylinder valve
outlet No. 510, specified in the Standard for Compressed
Gas Cylinder Valve Outlet and Inlet Connection (USA) ANSI/
CSA-V-1-1977 (Canada) CSA B96. The cylinder supply
system must be arranged for vapor withdrawal. The cylinder
must include a collar to protect the cylinder valve. The
cylinder must be installed as per assembly instructions.
Never fill the cylinder beyond 80% full. A fire causing death
or serious injury may occur. The cylinder valve must include
a safety relief device having direct communication with the
vapor space of the cylinder.
HANDLING:
1. Government regulations prohibit consumer shipping
propane cylinders.
2. A filled propane cylinder is under very high pressure. Always
handle carefully and transport in the upright position. Protect
the valve from accidental damage.
3. Do not tip the propane cylinder while connecting it to the
regulator. Fasten the cylinder securely during transport,
use and storage.
4. If the cylinder is tipped after it is connected to the
regulator, shut off the gas, disconnect the regulator and
have it checked before using again.
STORAGE:
1. Store the propane cylinder outdoors in a well ventilated place.
2. Do not store the propane cylinder in direct sunlight, near a
source of heat or combustion.
3. If you intend to store the windproof stove indoors,
disconnect and remove the propane cylinder first.
Disconnected cylinders must have a dust cap installed.
Large Propane Cylinders must not be stored in a building,
garage or any other enclosed area.
4. Keep out of the reach of children.
5. When the propane cylinder is connected to the windproof
stove, the windproof stove and propane cylinder must be
stored outside in a well ventilated place.
OPERATION:
1. Never connect your stove to a propane cylinder without the
regulator provided, and NEVER TO AN
UNREGULATED PROPANE SUPPLY. The gas regulator
supplied with the appliance must be used.
2. Always leak test the propane cylinder to regulator connection
when connecting the propane cylinder to the appliance. See
“Leak Testing Section”.
3. DO NOT operate appliance if the smell of propane is present.
Extinguish all flame and determine source of propane before
proceeding. DO NOT ignite the appliance until the propane
leak has been found and sealed and the area has been
properly ventilated.
4. Always shut off propane cylinder valve when the appliance is
not in use.
figure 11

11
OPD EQUIPPED CYLINDER
IDENTIFICATION
To identify these cylinders,
the new OPD knob has
been standardized to
the shape shown.
OVERFILL PREVENTION DEVICE
The standard for outdoor gas appliances, ANSI Z21.58/ CAN/
CSA-1.6, requires that appliances are to be used with cylinders
equipped with an Overfill Prevention Device (OPD).
LEAK TESTING
All factory-made connections have been thoroughly tested for
gas leaks. However, shipping and handling may have loosened
a gas fitting.
AS A SAFETY PRECAUTION:
• TEST ALL FITTINGS FOR LEAKS BEFORE USING
YOUR GAS WINDPROOF STOVE.
• TEST THE CYLINDER VALVE FOR LEAKS EACH
TIME THE CYLINDER IS FILLED.
• TEST FOR LEAKS EVERY TIME YOU CONNECT
A GAS FITTING.
• DO NOT SMOKE!
• NEVER TEST FOR LEAKS WITH A LIGHTED
MATCH OR OPEN FLAME.
• TEST FOR LEAKS OUTDOORS.
TO TEST FOR LEAKS:
1. Extinguish any open flame or cigarettes in the area.
2. Be sure that cylinder valve and appliance valves are off.
3. Connect propane cylinder. See “Installation Section”.
4. Prepare a soap solution of one part water, one part
liquid detergent.
5. With a full gas cylinder, open cylinder slowly.
6. Brush the soap solution on each connection.
a. Valve to regulator connection
b. Regulator to propane cylinder/ adapter hose connection
c. Adapter hose to large propane cylinder connection
7. A leak is identified by a flow of bubbles from the area
of the leak.
8. If a leak is detected, close the gas cylinder “shut-off” valve,
tighten the connection and retest (Step 5).
9. If the leak persists, contact Zippo Consumer Relations at
888-368-0826 for assistance. Do not attempt to operate
appliance if a leak is present.
LIGHTING INSTRUCTIONS
The lighting instructions are the same for both modes of usage
and both propane supply configurations.
Before lighting:
• Theappliancemustbeassembledaspertheassembly
instructions.
• Checkthatthereisfuelinthepropanecylinderandthatitis
properly connected to the regulator.
• Checkthattherearenogasleaksinthegassupplysystem.
See “Leak Testing”.
• Checkthattheventuritubeisproperlylocatedoverthegas
valve orifice, as shown in figure 13.
• CheckthatburnerIgnitionwireisconnected.
• Readcarefullyallinstructionscontainedontheinformation
plate attached to the barbecue.
• Setcontrolknobsto“OFF”andturnonthegassupply.
BURNER VENTURI ALIGNED WITH VALVE
WARNING: Do not expose stove to flammable vapors or
liquids during lighting.
1. Read operating instructions before lighting.
2. Open lid before lighting.
3. Push and turn control knob to “HIGH”. Push the igniter 3 or
4 times, or match light.
4. If ignition does not occur in 5 seconds, turn burner controls
to “OFF”, wait 5 minutes and repeat lighting instructions.
Check the burner flame after ignition. All ports on the burner
should show a 2.5cm flame on high setting.
IF BURNER DOES NOT IGNITE:
1. Turn control knob to off. Wait 5 minutes, then try again.
2. If the burner-venturi will not light, consult “Trouble Shooting
Guide”. If problem cannot be resolved, do not attempt to
operate the appliance; contact Zippo Consumer Relations
at 888-368-0826.
NEW
OPD
HANDWHEEL
FLOAT
FILLING STOPS
AT 80% FULL
OPD
QCC1
®
figure 12
figure 13
CAUTION
figure 15
figure 14
High
Off
Low

12
CAUTION
CAUTION
figure 16
figure 18
figure 19
SHUT DOWN
Direct Connection (Small Propane Cylinder)
1. Turn control knobs to off.
2. Remove propane cylinder and place protective cap back
on cylinder.
3. Remove regulator by pulling quick connect coupler back until
it clicks.
QCC®-1 Connection (Large Propane Cylinder)
1. Turn cylinder valve off.
2. Turn control knobs to off.
3. Disconnect the adapter hose from regulator and large propane
cylinder.
4. Remove regulator by pulling quick connect coupler back until
it clicks.
TRANSPORT MODE
• CAUTIONHOTSURFACES
• Letthestovecoolcompletelybeforecleaning,maintenance,
storage or transportation.
• Removeregulatoradapterhoseandpropanetankbefore
storage or transportation.
1. Lock lid in closed position with locking pins.
2. Ensure optional accessory legs and regulator are secured
into leg retainer, as shown in figure 17.
3. Flip stove onto hinges to lift and carry like a suitcase.
MAINTENANCE
• CAUTIONHOTSURFACES
• Letthestovecoolcompletelybeforecleaning,maintenance,
storage or transportation.
TO CLEAN
1. Move stove away from flame and other ignition sources.
2. Remove propane cylinder and regulator from stove.
3. Wipe surfaces clean with a damp soft cloth and a mild dish
detergent. DO NOT USE ABRASIVES.
4. You can disassemble some components of the stove to
assist in cleaning.
Burner-Venturi Assembly
• KEEPBURNER-VENTURIASSEMBLYCLEAN.
• Blockagescausedbyspiders,insects,andnestscancausea
flashback fire.
Although the stove might still light, the backed up gas might also
light resulting in a fire around the burner-venturi assembly at
the control panel.
* If a flashback fire occurs, turn off gas at the source
immediately.
Inspect and clean the burner-venturi assembly if any of the
following symptoms occur:
1. You smell gas.
2. Your stove does not reach temperature.
3. Your stove heats unevenly.
4. The burner-venturi makes popping noises.
Inspecting & Cleaning Burner-Venturi Assembly
1. Turn off gas at the source, i.e. the propane cylinder.
2. When stove is cool, remove lid, wire grate, and wind shields
3. From underneath the stove, pull ignitor wires free from ignitor
electrodes and remove (2) burner screws that secure each
burner to the stove, as shown in figure 20.
figure 17

13
figure 20
4. Remove the burner-venturi assembly from the stove.
5. Clean the burner-venturi assembly with a pipe cleaner or
burner-venturi cleaning tool.
6. Replace the burner-venturi assembly, making sure that the
burner-venturi tube is correctly aligned with the screw holes
and is aligned and fitted on the orifice.
7. Install burner screws and reconnect ignitor wires to
ignitor electrodes.
8. Replace wind shields, wire grate, and lid.
figure 21
figure 22
figure 23
figure 24
figure 25
figure 26

14
MAINTENANCE
1. Keep stove and the area around the stove free from
combustible materials, gasoline and other flammable liquids
and vapors.
2. Do not obstruct the flow of combustion and ventilation air.
3. A good flame should be blue with a minimal yellow tip. Some
yellow tips are acceptable as long as no carbon or soot
deposits appear.
WARRANTY
LIMITED WARRANTY
5 years against defects on materials and workmanship of the lid,
cook box, legs, valves, burner-venturi assembly, and cooking
grate. Normal wear and tear, misuse, or abuse, use contrary to
instructions, paint or plastic fading are excluded.
Any failure due to accident, abuse, misuse, alteration,
misapplication, vandalism, improper installation or improper
maintenance or service, or failure to perform normal and
routine maintenance, including damage caused by insects
in burner-venturi assembly, are excluded.
REPLACEMENT PARTS
Genuine Zippo®Windproof™Stove Parts must always be used
for replacement. Use of any other parts will automatically nullify
the above warranty. Contact Zippo Consumer Relations at
888-368-0826 for repairs or replacement parts. To ensure
optimum performance, use only genuine Zippo®Windproof
Stove™replacement parts.
BURNER-VENTURI ASSEMBLY
The life of the Zippo®Windproof™Stove burner-venturi assembly
depends almost entirely on proper use, cleaning and
maintenance. This warranty does not cover failure due to
improper use and maintenance.
PROPANE CYLINDER
Zippo Manufacturing Company does not manufacture Propane
Cylinders. The Propane Cylinder manufacturer is responsible for
the materials, workmanship and performance of the cylinder.
If the cylinder has a defect, malfunctions, or you have a
question regarding the cylinder, contact your dealer or
the propane cylinder manufacturer.
OPTIONAL ACCESSORIES
Legs Assembly 31408-201A
QCC-1 Adaptor Hose 30114-18

15
TROUBLE SHOOTING
PROBLEM POSSIBLE CAUSE CORRECTIVE ACTION
SMELL OF GAS SHUT OFF GAS CYLINDER VALVE AT ONCE.
DO NOT USE THE APPLIANCE UNTIL LEAK IS REPAIRED.
Leak detected at cylinder,
regulator or other
connection.
1. Regulator tting loose.
2. Gas leak in hose/regulator or control valves.
1. Tighten tting and “Leak Test Section”.
2. Contact Zippo Consumer Relations at
888-368-0826.
Flame ashback beneath
control panel.
1. Burner-Venturi blocked. 1. Remove burner-venturi, clean burner-venturi.
See “Burner-Venturi Assembly Section”.
Burner will not light.
1. Out of propane.
2. Igniter wire(s) not connected.
3. Igniter electrode misaligned on
burner-venturi .
4. Igniter malfunction.
5. Regulator is not fully connected to the
cylinder valve.
6. Burner valve left open while cylinder valve
was opened causing excess ow device
to activate.
7. A leak in the system causing the excess
ow device to activate.
8. Burner-Venturi blocked.
9. Burner-Venturi not aligned with valve orice.
10. Orice is blocked
11. Hose is twisted.
1. Rell Propane Cylinder.
2. Connect both burner-venturi wires.
3. Realign electrode.
4. Use “Manual Lighting” Procedure or replace.
5. Tighten the regulator hand wheel.
6. Close burner and cylinder valves. Open cylinder
valve slowly, then open burner valve to light.
7. Leak test connections to determine loose tting.
Tighten tting. Leak test system.
8. Remove burner, clean burner-venturi. See
“Burner-Venturi Assembly Section”.
9. Realign burner-venturi to orice. See “Burner-
Venturi Assembly Section”.
10. Remove burner, clean orice with a pin or ne
wire. Do not attempt to drill orice.
11. Straighten hose. Check for damage, replace if
necessary. Keep away from bottom casting.
Decreasing heat, “popping
sound”.
1. Out of propane.
2. Burner-Venturi blocked.
1. Rell Propane Cylinder.
2. Remove burner, clean burner-venturi. See
“Burner-Venturi Assembly Section”.
“Flare-ups” or grease res. 1. Excessive grease buildup.
2. Excessive heat.
1. See “Maintenance”.
2. Turn burner controls to a lower setting.
Humming noise from
regulator.
1. Cylinder valve turned on too quickly. 1. Close control knobs. Reopen cylinder valve
slowly before reigniting.
Yellow Flame. 1. Some yellow ame is normal. If it becomes
excessive the burner-venturi may be
blocked.
2. Burner ports blocked.
1. Remove burner, clean burner-venturi. See
“Burner-Venturi Assembly Section”.
2. Remove burner & clean with soft bristle brush.

16
3
1
4
13
12 13
11
11
6
5
6
7
7
2
18
17
33
32
14
8
910
15
14
34
18
27
21
25
25
26
22
23
20
25
35
31
30
25
19
28
30
29
16
24
ITEM NO.
PART NUMBER
DESCRIPTION DESCRIPTION DESCRIPCION
QTY
.
1
36010-E201
LID
COUVERCLE
TAPA
1
2
37020-E201
BASE BASE BASE
1
3
36015-244
LID STRAP
COUVERCLE - BANDE
TAPA - TIRA
1
4
34400-138A
HANDLE
POIGNEE
MANGO
1
5
30225-181
WIRE GRATE
GRILLE DE FILE
MALLA DE ALAMBRE
1
6
35489-114
WIND SHIELD
PARE-BRISE
PARABRISAS
2
7
33909-24
BURNER
BRULEUR QUEMADOR
2
8
30286-204
CONTROL COVER
COUNVERTURE DE CONTRÔLE CUBIERTA DE CONTROL
1
9
38009-234A
CONTROL ASSEMBLY
ASSEMBLÈE DE CONTRÔLE
CONTROL DE ASAMBLEA
1
10
SP5004-11
REGULATOR
REGULATEUR
REGULADOR
1
31
SP41-18
SCREW - #10-24 x 3/4
VIS
- #10-24 x 3/4
TORNILLO - #10-24 x 3/4
4
11
37500-178
LEG RETAINER
RETENUE PIED
RETENCION DE LAS PATAS
2
12
32329-93
HEAT SHIELD - CENTER
PROTECTION CONTRE LA
CHALEUR - CENTRE
PROTECTOR CONTRA EL
CALOR - CENTRO
1
13
32329-91
HEAT SHIELD - SIDE
PROTECTION CONTRE LA
CHALEUR - CÔTÉ
PROTECTOR CONTRA EL
CALOR - LADO
2
14
10472-K432
CONTROL KNOB
BOUTON DE CONTROL
PERILLA DE CONTROL
2
15
10342-22
IGNITOR
ALLUMAGE
ENCENDEDOR
1
16
37430-178
LEG LEVELER SLEEVE
MANCHON DE PIED NIVELURE
MANGA DE LE PATA NIVELADOR
4
17
37420-178
LEG LEVELER INNER
PIED NIVELEUR INTERIEURE
PATA NIVELADORA INTERIOR
4
18
34100-904
LID PIN
PINS COUVERCLE
PINS DE TAPA
2
19
37409-241
BUBBLE LEVEL
BUBBLE LEVELER
BURBUJA LEVELER
1
20
32839-904
VALVE STRAP
BANDE SOUPAPE
VALVULA DE CORREA
1
21
10342-T14
IGNITOR WIRE
FIL ALLUMAGE
CABLE ENCENDEDOR
2
22
S21277
SPACER - 1/4 ESPACEUR - 1/4 SEPARADOR - 1/4
2
23
SP23-16
NUT - #10-24
ECROU - #10-24
TUERCA - #10-24
2
24
Y-12865
SCREW - 1/4-20 x 1/2
VIS - 1/4-20 x
1/2
TORNILLO - 1/4-20 x 1/2
4
25
S21123
SCREW - #8-32 x 1/2
VIS - #
8-32 x 1/2
TORNILLO - #8-32 x 1/2
18
26
S21125
SCREW - #8-24 x 3/8
VIS - #8-24 x 3/8
TORNILLO - #8-24 x 3/8
2
27
Y-11231
SILICON PAD
BOUCHON
TAPADERO
8
29
S21136
SCREW - #8-32 x 3/8
VIS - #8-32 x 3/8 TORNILLO - #8-32 x 3/8
1
30
Y-12853
WASHER - #8 RONDELLE NO 8 ARANDELA - #8
5
28
32031-004
BUBBLE LEVEL BRACKET
35*
30114-18
QCC-1 ADAPTER HOSE
* Optional Accessories / Optional Accessories / Optional Accessories
33*
Y-12662
LEG CLIP
34*
31003-248
LEG PLUG
32*
31408-201
LEG
SUPPORT AVEC NIVEAU À BULLE SOPORTE PARA NIVEL DE BURBUJA
1
TUYAU ADAPTATEUR QCC-1
ADAPTADOR DE MANGUERA QCC=1
1
CLIP PIED CLIP PATA
4
FICHE DE PIED
TAPON DE PATA
4
PIED
PATA
4
POÊLE RÉSISTANT AU VENT
TM
GARANTIE
LIMITÉE
GARANTIE LIMITÉE
DE 5 ANS
Table of contents
Popular Stove manuals by other brands

Pelpro
Pelpro PPC90 Service manual

Duroflame
Duroflame Batavia T4 manual

Brunner
Brunner 0708043N Instructions for use

Karibu
Karibu Stove with 3,6 kW PnP Assembly and operating instructions

Stuv
Stuv 30 Compact Installation & directions for use

Mendip Stoves
Mendip Stoves 8 standard Operating/service instructions

Ecoflam
Ecoflam Ares 7,4 kW EKO Installation & operation instructions

SCAN
SCAN DSA 12 Assembly and instruction manual

Valor
Valor 550 installation instructions

England's Stove Works
England's Stove Works 26-GBVLP Installation and operation manual

Dimplex
Dimplex Optiflame Cassia Noir RTOFSTV20 Operating instructions manual

Regency Fireplace Products
Regency Fireplace Products C34 Classic Owners & installation manual