Zotac NB-102 User manual

NOTEBOOK COMPUTER
32
Symbol for Separate Collection in European Countries
This symbol indicates that this product is to be collected separately.
The following apply only to users in European countries.
- This product is designated for separate collection at an appropriate collection point.
Do not dispose of as household waste.
- For more information, contact the retailer or the local authorities in charge of waste
management.
CE Declaration of conformity
This equipment complies with the requirements relating to electromagnetic compatibility, EN
55022 class B for ITE, the essential protection requirements of Council Directive 89/336/EEC on
the approximation of the laws of the Member States relating to electromagnetic compatibility.
Canadian Department of Communication Statement
This digital apparatus does not exceed the Class B limits for radio noise emissions from
digital apparatus set out in the Radio Interference Regulations of the Canadian Department of
Communications.
This class B digital apparatus complies with Canadian ICES-003.
Products and corporate names appearing in this manual may or may not be registered trademarks or
copyrights of their respective companies, and are used only for identication or explanation and to the
owner’s benet, without intent to infringe.

NOTEBOOK COMPUTER
Federal Communications Commission (FCC) Statement
This equipment has been tested and found to comply with the limits for a Class B digital device,
pursuant to Part 15 (Subpart B) of FCC Rules. These limits are designed to provide reasonable
protection against harmful interference in a residential installation. This equipment generates,
uses and can radiate radio frequency energy and, if not installed and used in accordance with
instructions contained in this manual, may cause harmful interference to radio and television
communications. However, there is no guarantee that interference will not occur in a particular
installation.
If this equipment does cause harmful interference to radio or television reception, which can
be determined by turning the equipment off and on, the user is encouraged to try to correct the
interference by one or more of the following measures:
- REORIENT OR RELOCATE THE RECEIVING ANTENNA
- INCREASE THE SEPARATION BETWEEN THE EQUIPMENT AND THE RECEIVER
- CONNECT THE EQUIPMENT INTO AN OUTLET ON A CIRCUIT DIFFERENT FROM
THAT OF THE RECEIVER
- CONSULT THE DEALER OR AN EXPERIENCED AUDIO/TELEVISION TECHNICIAN
NOTE:
Connecting this device to peripheral devices that do not comply with Class B requirements, or
using an unshielded peripheral data cable, could also result in harmful interference to radio or
television reception.
The user is cautioned that any changes or modications not expressly approved by the party
responsible for compliance could void the user’s authority to operate this equipment.
To ensure that the use of this product does not contribute to interference, it is necessary to use
shielded I/O cables.
CE Declaration of conformity
This equipment complies with the requirements relating to electromagnetic compatibility, EN
55022 class B for ITE, the essential protection requirements of Council Directive 89/336/EEC on
the approximation of the laws of the Member States relating to electromagnetic compatibility.
Canadian Department of Communication Statement
This digital apparatus does not exceed the Class B limits for radio noise emissions from
digital apparatus set out in the Radio Interference Regulations of the Canadian Department of
Communications.
This class B digital apparatus complies with Canadian ICES-003.
Products and corporate names appearing in this manual may or may not be registered trademarks or
copyrights of their respective companies, and are used only for identication or explanation and to the
owner’s benet, without intent to infringe.
Electronic Emission Notices
WARNING!
3

NOTEBOOK COMPUTER
Content 54
Precautions
Precautions
- Please read the manual carefully and thoroughly.
- Keep the notebook away from humidity, high temperature, and dirty or dusty environments.
- Always place the notebook on a stable surface when using.
- Always handle the notebook with care.
- Do not touch or put pressure on the LCD screen.
- Do not cover the ventilation openings on the notebook to prevent overheating
- Keep the notebook away from strong magnetic or electrical elds.
- Keep battery in a safe place when it is not used.
- Do not disassemble the notebook unless an authorized service technician performs repairs
- Keep the notebook away from liquids (water, soda, tea, coffee, etc...).
- Always check the input power voltage to the power adapter to make sure it’s within safety
range before connecting the adapter to a power outlet.
- Do not damage or cover the power cable and power adapter by any material.
- Always turn off the notebook and disconnect the power adapter and battery before adding
any add-on cards, memory or hard drive.
- Do not use any battery or power adapter that is not recommended by the manufacturer.

NOTEBOOK COMPUTER
Content
1. Notebook Overview ----------------------------------------------------------------------------------------- 7
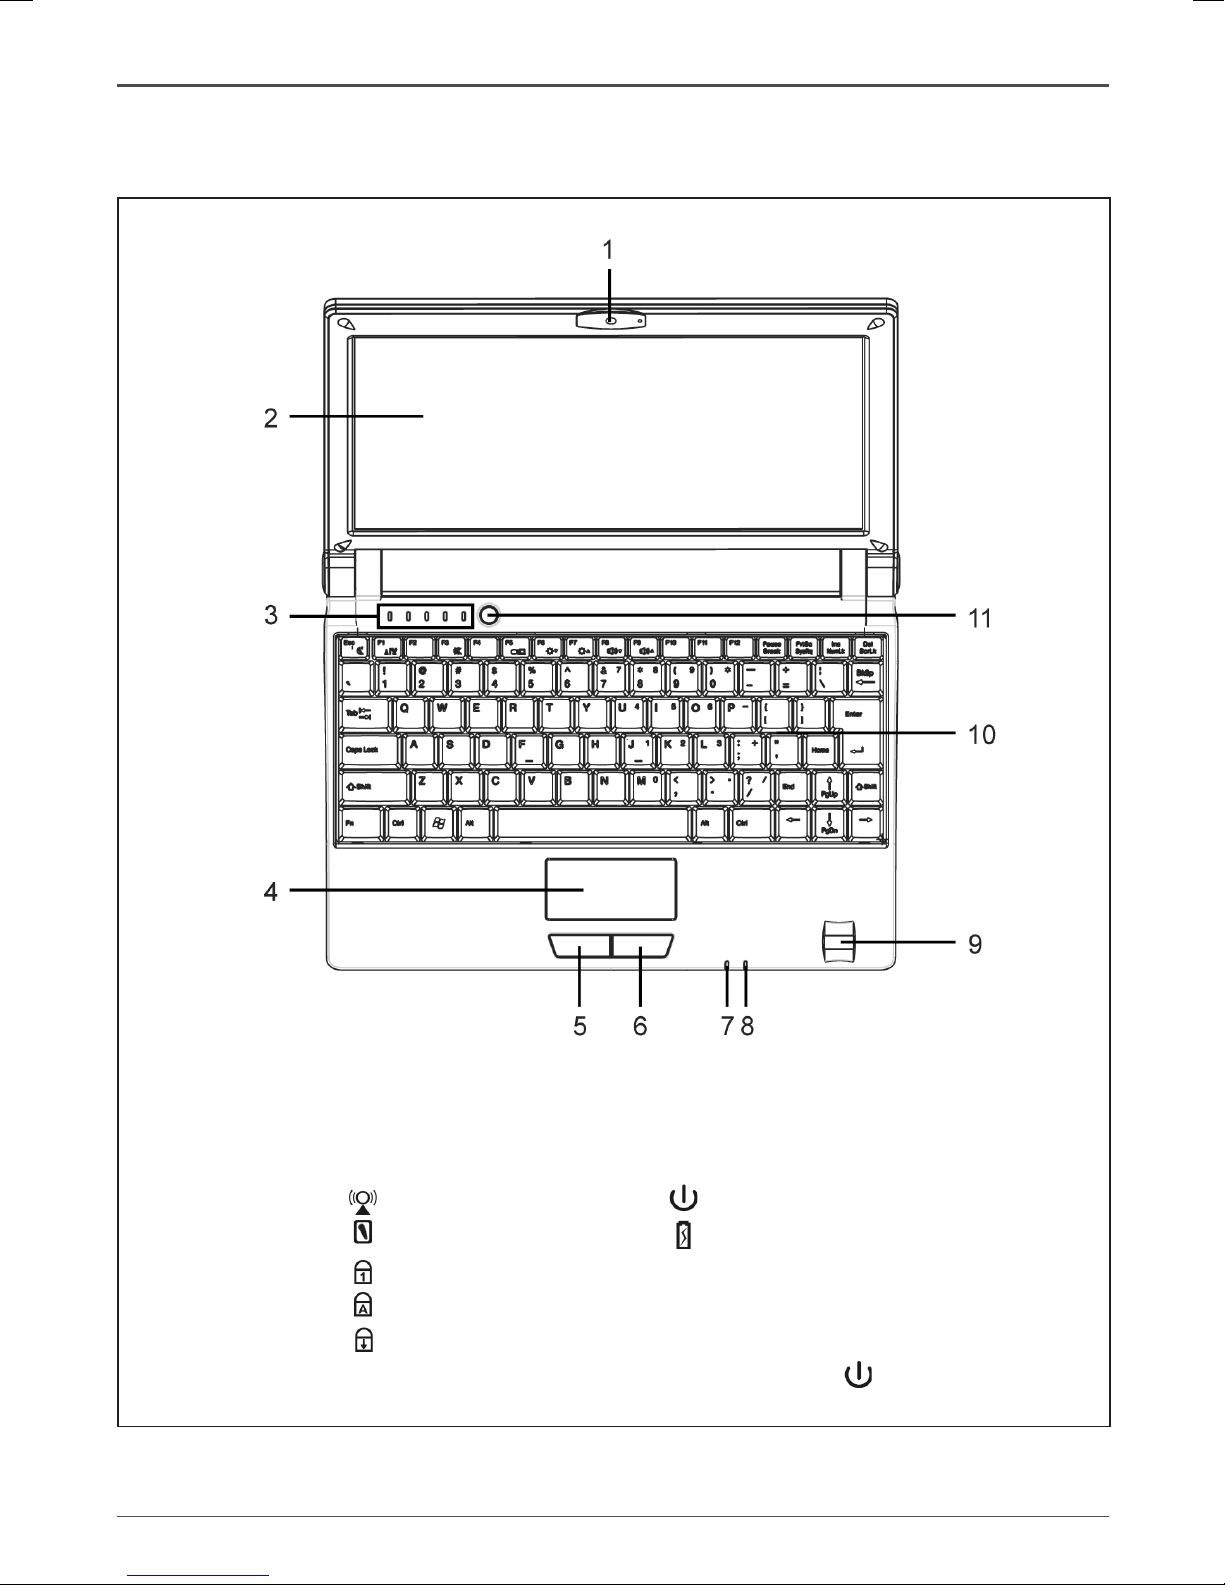
1-1 Opened top side --------------------------------------------------------------------------------------- 7
1-2 Front side ------------------------------------------------------------------------------------------------ 8
1-3 Left side -------------------------------------------------------------------------------------------------- 8
1-4 Right side ------------------------------------------------------------------------------------------------ 8
1-5 Rear side (without battery) -------------------------------------------------------------------------- 9
1-6 Bottom side ---------------------------------------------------------------------------------------------- 9
2. Getting Started ----------------------------------------------------------------------------------------------- 10
2-1 Installing battery pack ------------------------------------------------------------------------------- 10
2-2 Removing battery pack ----------------------------------------------------------------------------- 10
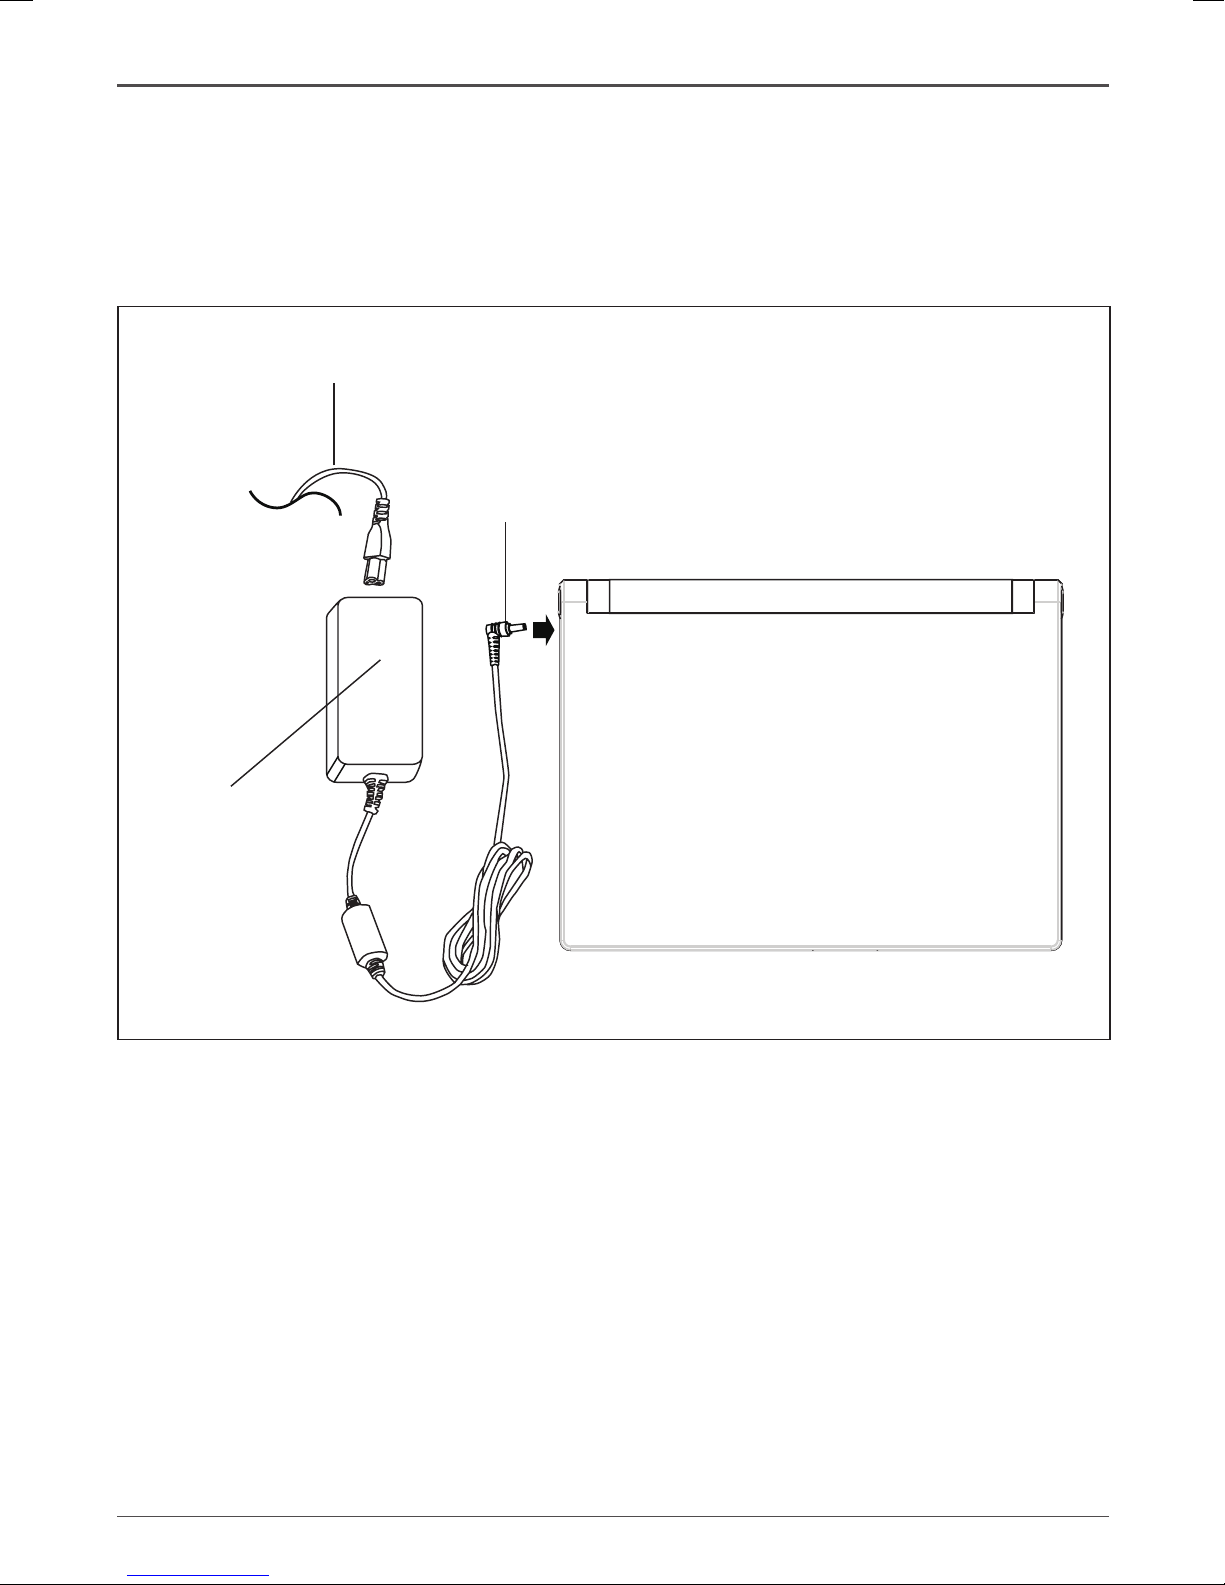
2-3 Connect A/C power adapter ---------------------------------------------------------------------- 11
3. Tips and Safety Notes --------------------------------------------------------------------------------------12
3-1 LCD ------------------------------------------------------------------------------------------------------ 12
3-2 Keyboard ----------------------------------------------------------------------------------------------- 12
3-3 Touch pad ---------------------------------------------------------------------------------------------- 12
3-4 Hard disk ----------------------------------------------------------------------------------------------- 12
4. Using the Notebook ---------------------------------------------------------------------------------------- 13
4-1 Turn on the notebook ------------------------------------------------------------------------------ 13
4-2 Adjusting the LCD brightness--------------------------------------------------------------------- 13
4-3 Using keyboard -------------------------------------------------------------------------------------- 14
4-4 Using Touch pad ------------------------------------------------------------------------------------- 15
4-5 Using memory card reader ------------------------------------------------------------------------ 15
4-6 Using Express cards -------------------------------------------------------------------------------- 16
4-7 Connecting USB devices -------------------------------------------------------------------------- 16
4-8 Connecting an analog display -------------------------------------------------------------------- 17
5. Installing Hardware inside the Notebook ----------------------------------------------------------- 18
5-1 Removing hard disk --------------------------------------------------------------------------------- 18
5-2 Installing hard disk ----------------------------------------------------------------------------------- 19
5-3 Removing RAM module ---------------------------------------------------------------------------- 21
5-4 Installing RAM module ------------------------------------------------------------------------------ 23
5-5 Installing Mini-PCIe card module ---------------------------------------------------------------- 24
6. BIOS Conguration------------------------------------------------------------------------------------------26
6-1 Main ----------------------------------------------------------------------------------------------------- 26
6-2 Security ------------------------------------------------------------------------------------------------- 26
6-3 Boot ----------------------------------------------------------------------------------------------------- 27
Appendix A Troubleshooting -------------------------------------------------------------------------------- 28
Appendix B Specications ----------------------------------------------------------------------------------- 29
Content 54
Precautions

NOTEBOOK COMPUTER
Notebook Overview 76

NOTEBOOK COMPUTER
1 Notebook Overview
1-1 Opened top side
Notebook Overview 76
1. Camera
2. LCD Screen
3. LED Indicators :-
- Wireless LAN
- HDD
- Num Lock
- CAP Lock
- Scroll Lock
4. Touch Pad
5. Left Mouse Button
6. Right Mouse Button
7. - Power LED Indicator
8. - Battery Charging LED Indicator
(Red - Charging, Green - Present)
9. Fingerprint Sensor (Optional)
10. Keyboard
11. Power Button ( )

NOTEBOOK COMPUTER
1-2 Front side
1-3 Left side
1-4 Right Side
Notebook Overview 98 Notebook Overview
Memory Card Reader
(SD/MMC/MS)
DC Jack (For power adaptor)
VGA Port
USB 2.0 Port
Safety Lock
Express Card 34 Slot
USB 2.0 Ports
LAN Port (10/100)
Left Speaker Out
Headphone Jack
Microphone Jack
Right Speaker Out

NOTEBOOK COMPUTER
1-5 Rear side (without battery)
1-6 Bottom side
Notebook Overview 98 Notebook Overview
Battery Pack Battery LockBattery Latch
HDD and Memory Cover
Battery Pack Connector
SIM Card Slot (optional)

NOTEBOOK COMPUTER
2 Getting Started
2-1 Installing battery pack
Despite using a power adapter, the notebook can be powered on by using the rechargeable battery.
1. Make sure the power adapter is disconnected from the notebook before installing battery.
2. To install the battery into the notebook, push the battery according to the direction shown in
the picture below until the battery is locked into place.
3. Push the battery lock to the “locked” position.
2-2 Removing battery pack
1. Turn off the notebook and disconnect the power adapter.
2. Turn over the notebook.
3. Unlock the battery by sliding the battery latch and battery lock according to the direction
shown in the below picture.
4. Draw the battery out from the notebook.
Getting Started 1110 Getting Started
Battery Pack
Battery LockBattery Latch
Battery Pack
Battery LockBattery Latch

NOTEBOOK COMPUTER
2-3 Connect the A/C power adapter
1. Connect the power adapter with the power cord
2. Plug the DC end of the power adapter into the power jack of notebook
3. Insert AC end of the power adapter into power outlet
4. Double check the connection before turning on the notebook
Getting Started 1110 Getting Started
Battery Pack
Battery Lock
Battery Lock
AC/DC Adapter
Power Cord
DC Connector
To Power Outlet
Notes: Appearance of power adapter may not be the same as shown.

NOTEBOOK COMPUTER
3 Tips and Safety Notes
3-1 LCD
1. Fold up the notebook gently to prevent damage to the LCD.
2. Take out all materials on top of the keyboard before folding up the notebook.
3. Gently adjust the viewing angle of the LCD screen to t posture.
4. Never scratch the LCD surface with any materials or items.
5. Always use soft and lint-free cloth to gently wipe LCD surface if necessary.
6. Do not clean the LCD surface with chemical cleaners.
7. Do not focus on the LCD screen for a long period of time.
3-2 Keyboard
1. Use a little soft brush to remove dust on the keyboard
2. Use moist, soft and lint-free cloth to wipe keyboard surface if necessary
3. Keep keyboard away from any liquid. In case of liquid seeping into the keyboard, please
contact dealer for advice immediately.
4. Function keys (marked with blue symbols or characters) are included on the keyboard to
provide easy access of special functions.
5. Press the “Fn” key and the function key together to perform the respective function.
3-3 Touch pad
1. Touch pad performs the same function as a traditional mouse.
2. Slide ngertip on the surface of touch pad to move the mouse cursor.
3. Pressing the left button below the touch pad or tapping the touch pad can perform a
“click” function.
4. Always keep hands clean when using touch pad
5. Use moist, soft and lint-free cloth to clean the touch pad surface if necessary.
6. Do not scratch the surface of the touch pad
7. No object other than hands should be placed on the touch pad surface.
3-4 Hard disk
1. Do not turn off the notebook when the hard disk is in use.
2. Always backup critical data on hard disk periodically.
3. Never remove the hard disk when the notebook is turned on
4. Changing the hard disk is only allowed to be performed by authorized service technician.
Using the Notebook 1312 Tips and Safety Notes

NOTEBOOK COMPUTER
4 Using the Notebook
4-1 Turn on the Notebook
1. Open the LCD screen and adjust the screen to a proper view.
2. Press the POWER button to turn on the notebook.
4-2 Adjusting the LCD brightness
The brightness of the LCD can be adjusted by pressing function keys on the keyboard:
<Fn> + <F5>: Switch the display output between the LCD screen and external monitor
<Fn> + <F6>: Reduce the brightness of the LCD screen
<Fn> + <F7>: Increase the brightness of the LCD screen
Using the Notebook 1312 Tips and Safety Notes
POWER button

NOTEBOOK COMPUTER
4-3 Using keyboard
The notebook keyboard is a U.S. standard keyboard with 83 keys, which is similar to a normal
keyboard used with desktop computers, except the number pad keys and function keys are
integrated with some of the normal keys. The characters in blue found on the keyboard represent
those special functions. Pressing <Fn> key together with those keys to execute the respective
functions.
<Fn> + <Esc>: Suspend mode
<Fn> + <F1>: WiFi on/off
<Fn> + <F3>: Speaker mute
<Fn> + <F5>: Switch display between LCD screen and external monitor
<Fn> + <F6>: Reduce brightness of LCD
<Fn> + <F7>: Increase brightness of LCD
<Fn> + <F8>: Reduce volume of speaker
<Fn> + <F9>: Increase volume of speaker
<Fn> + <Ins>: Number lock
<Fn> + <Del>: Scroll lock
<Fn> + <↑>: Page Up
<Fn> + <↓>: Page down
Using the Notebook 1514 Using the Notebook

NOTEBOOK COMPUTER
Using the Notebook 1514 Using the Notebook
Right ButtonLeft Button
Touch Pad
4-4 Using touch pad
The touch pad integrated in the notebook is a pointing device which is compatible with standard
mouse in order to control the cursor on the screen and make selection with the two buttons
located below the pad.
The cursor moves accordingly by sliding a nger on the surface of the touch pad. The two
buttons below the pad can be treated as the left and right button on standard mice. By using the
two buttons with the touch pad, all functions of a standard mouse can be performed.
4-5 Using memory card reader
There is a single slot memory card reader integrated in the notebook. The card reader can read
SD, MMC, Memory stick and Memory Stick PRO. Please insert the card as the below picture
shows.
To prevent data loss or damage of memory card, never remove the card in the card reader when
the memory card is in reading or writing status.
Storage Card
Memory Card Reader

NOTEBOOK COMPUTER
4-6 Using Express card
The notebook features an Express Card slot for hardware expansion. The slot can accept
“Express Card/34” form factor cards.
The card can only be inserted in one orientation. Using force to insert the card may lead to
damage of card and the card slot.
To remove the card, make sure the card is in idle state and push the card slightly, the card will
then be ejected and taken out from the slot.
4-7 Connecting USB devices
The notebook provides 3 USB ports for connecting various USB devices, such as a mouse,
keyboard, external optical storage device, etc. Before connecting these devices to the notebook,
install the drivers for each device rst if necessary.
Express Card slot
Express Card
USB ports
USB device
USB Connector
Using the Notebook 1716 Using the Notebook

NOTEBOOK COMPUTER
4-8 Connecting an analog display
The notebook PC supplies a VGA port for connecting an external analog display or compatible
projective devices.
1. Turn off the notebook.
2. Insert the 15-pin D-sub plug of the monitor to the VGA port.
3. Turn on the notebook.
15-pin VGA Connector
15-pin VGA port
Using the Notebook 1716 Using the Notebook

NOTEBOOK COMPUTER
5 Installing Hardware inside Notebook
5-1 Removing hard disk
1. Open the hard disk cover of the notebook.
2. Take out the original hard disk with hard disk bracket from the notebook.
Open
Screws
HDD & Memory Cover
Screws
Hard Disk Drive (HDD)
Hard Disk Bracket
Installing hardware inside Notebook 1918 Installing hardware inside Notebook

NOTEBOOK COMPUTER
3. Detach the hard disk from hard disk bracket and keep the screws.
5-2 Installing hard disk
1. Open the hard disk cover of the notebook.
Open
Screws
HDD & Memory Cover
Hard Disk Drive
HDD Connector
Screw
Screws
Hard Disk Bracket
Installing hardware inside Notebook 1918 Installing hardware inside Notebook

NOTEBOOK COMPUTER
Screws
Hard Disk Drive (HDD)
Hard Disk Bracket
2. Attach the new hard disk to hard disk bracket with the screws.
3. Place the hard disk inside the notebook.
4. Move the hard disk according to the direction shown to attach the hard disk into the
connector.
Installing hardware inside Notebook 2120 Installing hardware inside Notebook
Hard Disk Drive HDD Connector
Screw
Screws
Bracket Screws
Hard Disk Bracket

NOTEBOOK COMPUTER
5. Close the hard disk cover.
5-3 Removing RAM module
1. Open the hard disk cover.
Installing hardware inside Notebook 2120 Installing hardware inside Notebook
Screws
HDD & Memory Cover
Open
Screws
HDD & Memory Cover
Table of contents