1 BY ONE O00QH-0509 User manual
1
Summary
● Strong anti-interference performance
● The full range of fine temperature compensation
● CE, FCC and ROHS compliant
Specication
● Power Supply (Receiver): DC 6 V or 1.5 V C Battery x 3
● Power Supply (PIR Transmitter): DC 4.5 V (1.5 V AAA Battery x 3 )
● Working Current (Receiver Alarming): <180mA
● Working Current (Receiver Chiming): <200mA
● Working Current (PIR Transmitter): <15mA
● Quiescent Current (Receiver): <400uA
● Quiescent Current(PIR Transmitter): <50uA
● Sensing Angle: 45°
● Sensing Distance: 5–8 m
● Ring Volume: ≥100dB ( within 0.5 m)
● Reception Sensitivity: ≥- 85dBm
Accessories List
● 1 x PIR Transmitter ● 1 x Receiver ● 1 x Instruction Manual
● 3 x Wall Plugs ● 3 x Screws
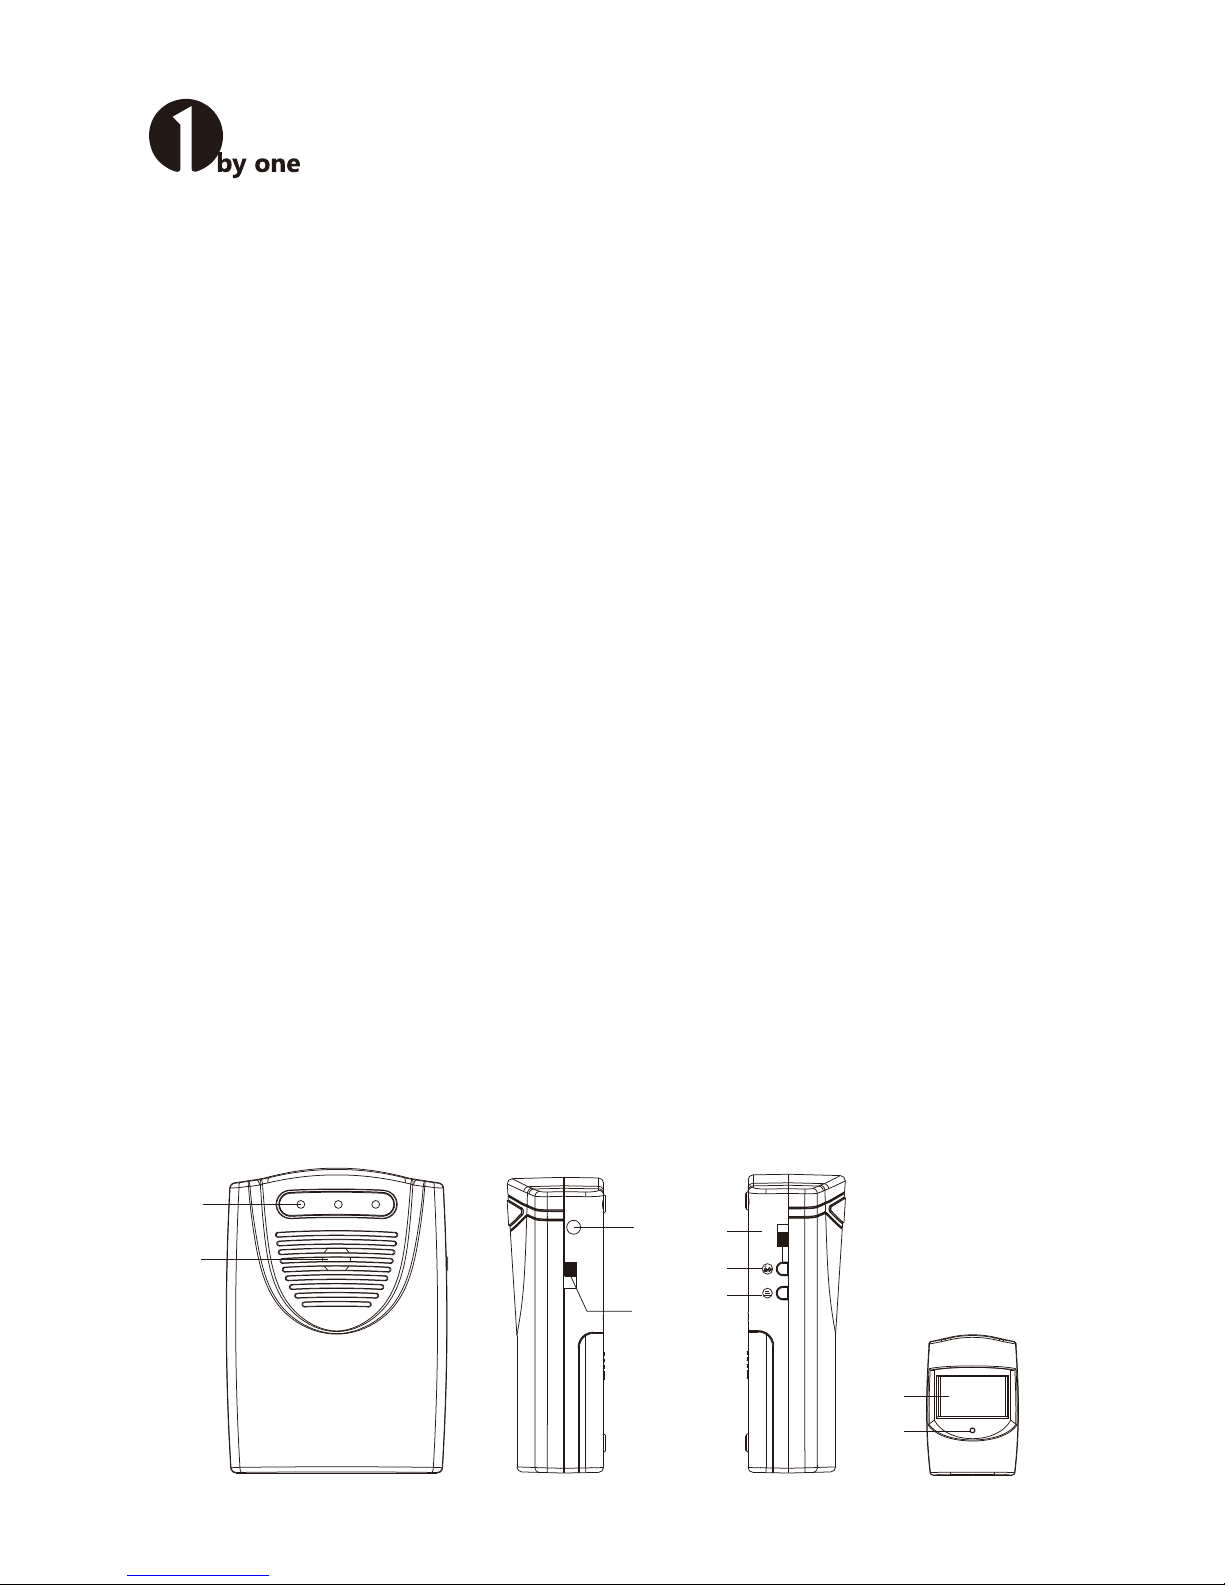
Names for Parts
(1) LED Indicator (2) Speaker (3) DC 6V Input Jack
(4) Switch for Chime, Low, Alarm (5) On/Off Switch (6) Sound-and-Flash Switch Button
(7) Auto-learning Code Button (8) PIR (9) LED Indicator
Driveway Alert Alarm Instruction Manual
SKU: O00QH-0509
(1)
(2)
CHIME
LOW
ALARM
(3)
(4)
OFF
ON
(5)
(6)
(7)
(8)
(9)
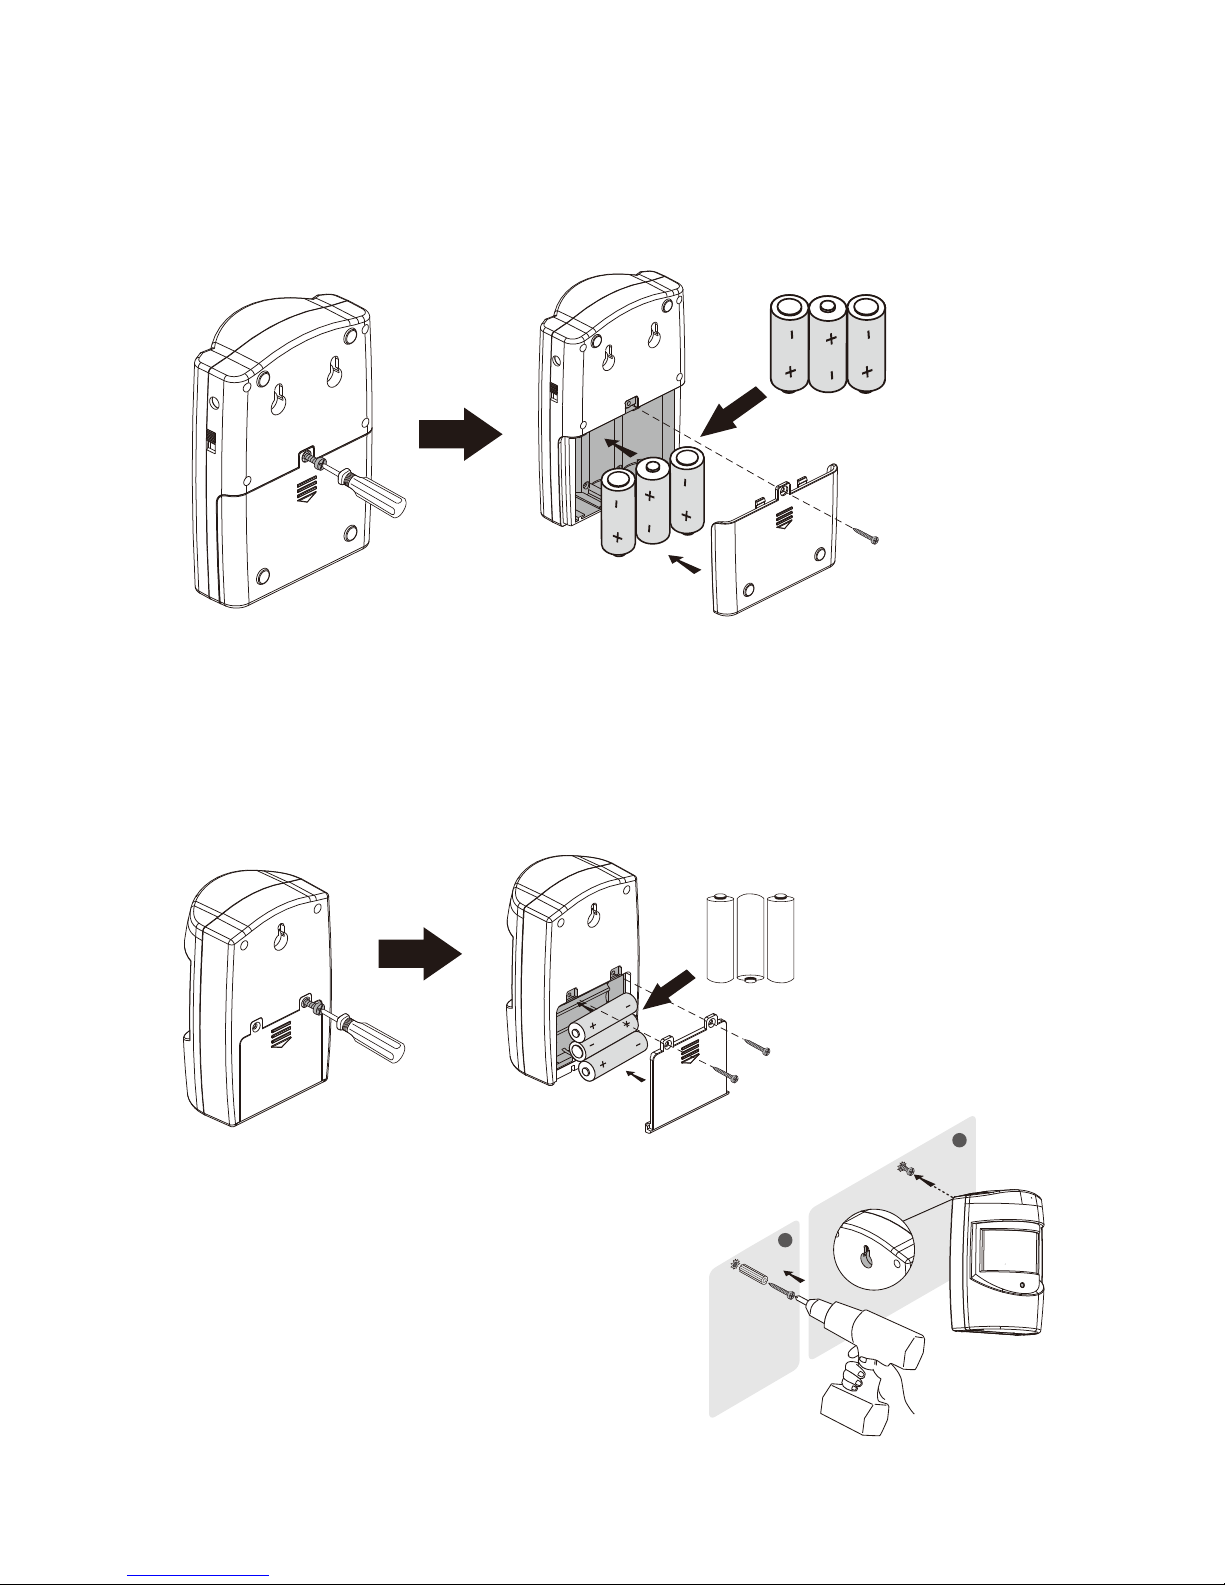
Battery Installation (Receiver)
1. Remove the screws on the rear of the Receiver with a cross-headed screwdriver. Remove the
battery compartment cover.
2. Insert three C type batteries in the battery compartment according to the”+ -”marks.
3. Replace the battery compartment cover and secure the screws.
2
Battery Installation (PIR Transmitter)
1. Remove the screws on the rear of the PIR Transmitter with a cross-headed screwdriver. Remove
the battery compartment cover.
2. Insert three A A A 1.5 V batteries in the battery compartment according to the”+ -”marks in the
battery compartment.
3. Replace the compartment cover and secure the screws.
Wall Mount(Receiver and PIR Transmitter)
PIR Transmitter Unit
Drill a hole on the wall at your required height.
Insert a wall plug (included) into the hole.
Then insert a screw (included) into the wall plug. Be noted
that you should not insert completely the screw into the
wall plug, but keep a suitable length out of the wall surface,
which is to hold the transmitter.
Finally you can hang the transmitter.
(Mounting on UPVC or metal doorframe surfaces will reduce the transmitting range.)
3 x C 1.5V
Alkaline Battery
3xAAA 1.5V
Alkaline Battery
1
2

3
Receiver Unit
Drill two holes on the wall at your required height.The distance between
the two holes should match the two hanging holes at the back of the
receiver.
Then insert two wall plugs (included) into the holes.
After that, insert two screws (included) into the wall plugs.
Be noted that you should not insert completely the screws
into the wall plug, but keep a suitable length out of the wall
surface, which is to hold the receiver.
Finally you can hang the receiver.
Avoid positioning on UPVC Frames, above heat sources (e.g. radiator) or in damp areas such as a
kitchen or bathroom.
Installation
Install the PIR transmitter in channels through by cars or on wall of the indoor main channels or
key monitoring area. During installation, pay attention to the followings: avoid direct sunlight;
don’t be in face of glass doors and windows; don’t be opposite to cold and hot air vents or sources;
and don’t be opposite to any easy oscillation.The recommended installation height is 1.0m-1.5m,
adjusting the angle to make it face the monitoring area. If a car or a person moves into the detection
range of the PIR transmitter; the PIR transmitter will send a signal to the receiver.The receiver makes
ding-dong or alarm sound after receiving the signal to warn the master.
Functions Instruction
1. Install the PIR Transmitter with three AAA alkaline batteries.It turns into induction state after 10
seconds power-on,with induction time interval 5 seconds.
2. Install the receiver with three 1.5V type “C” alkaline batteries or plug the receiver into DC6V
200mA power. Move the On/Off Switch to the ON position. Maximum 50 codes can be matched
and saved in the receiver within 15 seconds. After 15 seconds, the receiver turns into power saving
mode.
Note: If there is no code matched and saved within the first 15s, the receiver can be matched with
and save ONLY one code after 15s.
3.When there is a code saved within the receiver, you need not to match the code the second time
you turn on the power, as the receiver will come directly into alarm state or chime state.
4. If you want to add PIR Transmitter or magnetic transmitter, press the auto-learning code button
on the side of the Receiver once, then trigger the PIR Transmitter or magnetic transmitter.The
Receiver will sound to indicate that the transmitter works successfully with the Receiver. (Press the
button once can only match one transmitter).
5. Press the auto-learning code button and hold for 5 seconds, you can delete all the information
within the receiver. At the same time, the LED indicator light will flash and receiver sounds.
6.There is a Sound and Flash Switch Button on the side of the receiver. Press this button for three
options, working only with sound, only LED flash, sound and LED flash.
1
2

7. Low voltage indication: normal voltage for the receiver 3.08V±0.1V and for the transmitter
3.08V±0.1V. If lower than this voltage, the LED indicator light will flash once every second to
remind you to change the batteries.
8.There is one Chime-Low-Alarm switch on the side of the receiver. It operates as follows: High
Volume Chime/ Low Volume Chime / Alarm.
9. Move the Chime-Low-Alarm switch to Chime or Low position the receiver will work as a chime.
Move the switch to Alarm position, it will work as an Alarm.
10.The receiver batteries’ lifespan: if a 1.5V C battery with capacity 7800mAh is used, based on
average 10 sounds per day, 80% of the battery capacity available, these three batteries can be
used for 20 months.
11.The PIR transmitter batteries’lifespan: if a 1.5V AAA battery with capacity 1150mAh is used,
based on average 10 sounds per day, 80% of the battery capacity available, these three batteries
can be used for 12 months.
4
1byone Products Inc.
www.1byone.com
2313 E, Philadelphia Street, Ontario, CA 91761
This manual suits for next models
2
Table of contents
Other 1 BY ONE Security System manuals


Popular Security System manuals by other brands


First Alert
First Alert Onelink 1042136 user manual

DSC
DSC PowerSeries Neo 3G8080 installation manual

Destiny
Destiny 4100 owner's manual

Lorex
Lorex LW2700 SERIES quick start guide

Response Electronics
Response Electronics miGuard DS26 instructions

Whelen Engineering Company
Whelen Engineering Company IPS 400 product manual