1010music Blackbox User manual

3/18/19 6:19 PM Copyright 1010music LLC 2019 P. 1 of 6
Blackbox'Quick'Start$
Guide!
Blackbox is a compact sampling studio from 1010music. It
lets you gather samples, arrange them into sequences, and
record the sequences into song sections. You can play
sequences by tapping on the pads, touching the virtual
keyboard, or playing a MIDI device. You can further refine
your sound by applying FX to pads and by mixing the sound
levels and stereo effects. All of this work can be saved
together into a Preset.
Blackbox was designed so that you build your song by
working through the buttons from left to right. You can certainly jump around and do things in any order, but the
general flow is to start on the left and move to the right. You start by selecting a preset with the samples you want to
use or by building your own set of samples on the PADS screen. You can then use the PADS and KEYS screens to trigger
the samples. Once you have a riff you like, you can select a sequence cell on the SEQ screen and then use PADS or KEYS
to record one or more pads into a sequence.
Next you can use Song mode on the SONG page to record start and stop events for one or more sequences. You can
use any combination of sequences in any section, and any combination of pads in any sequence. Along the way you can
save your work into the current preset or a new one on the PSET screen.
Figure 1: Pads, Sequences and Sections
Setup
To get started with blackbox you will need to insert the microSD memory card, plug it in to a power source and connect
an audio output. Insert the microSD card into the slot in the front edge of the unit. All of your work will be stored on this
microSD card. The card comes preloaded with presets and WAV files to get you started. You can connect the USB Power

3/18/19 6:19 PM Copyright 1010music LLC 2019 P. 2 of 6
cord to a standard wall adapter and plug it into a household power outlet. To work on the go, you can plug it into a USB
battery, like you might use to recharge your phone. To hear the output, connect headphones to the PHONES jack or
connect one or more audio outputs to your mixer. The PHONES jack will play all of the outputs combined.
Controls Overview
Blackbox has a fairly simple set of input controls. You choose which screen you are using by pushing the white
navigation buttons. You control playback and recording of clips, sequences and songs using the black transport buttons.
You select and trigger sound elements and configure parameters using the touch screen and the knobs. The small round
INFO button allows you to drill into an item on the screen to edit more details. Push it repeatedly to access detailed
information about the item. The small round BACK button takes you back to the main screen for the current functional
area.
Pads
You can explore the available functionality of blackbox by trying out the preloaded
presets. Push PSET, and then use the knobs to select a preset. Touch Load to open the
selected preset. We will use the preset 000 SL BLASS MUSIC DEMO as our example in this
guide. When you first load the preset, you will see the bank of Pads that have been
assigned to this preset on the PADS screen. Touch a pad to select the pad and trigger the
wav file. You can also select a pad by turning a knob. Push INFO a few times to cycle
through the available configuration settings for this pad. Touch PADS or the BACK button
to get back to the PADS screen. A blue progress bar along the bottom of a pad shows
you its playback state. Some pads, such as SY C LFO in this preset, use the LaunchMode
of GATE, and will play as long as you are touching the pad. Other pads, such as PC O BLIP, use the LaunchMode of
Trigger, so tapping the pad will play the entire WAV file. The Toggle LaunchMode will play the WAV file from the time
you first tap the pad until you tap it again to turn it off.
Keys
The KEYS screen has a keyboard that you can use to play the currently selected pad and
pitch shift it based on the note selected. Select a pad to use on the PADS screen (e.g. SY
CHOR), push the KEYS button and then play a tune by touching the notes on the virtual
keyboard. By default, the base wave file is played on C4. However, some WAV files define
a different note as the base note. Use the arrows to slide the keyboard an octave or a key
left or right. The icon in the top left shows which pad is currently selected.
Sequences
On the SEQS screen you can record and play back musical sequences. Push SEQS and you
will see a grid of sequences. The currently active sequences have white frames around
them. Before we push PLAY to hear the sequences, let’s make sure we are not in Song
mode. Push SONG to display the SONG screen. Note the Song button at the top of the
touch screen. If it is blue, touch the on screen Song button to deactivate Song mode.
Figure 2: PADS Screen
Figure 3: KEYS Screen
Figure 4: SEQS Screen

3/18/19 6:19 PM Copyright 1010music LLC 2019 P. 3 of 6
Now, push SEQS so we can watch the sequences as they play. Push PLAY now and you will hear the selected sequences
play. A progress bar at the bottom of each active SEQ shows you the play state of that sequence. Touch an SEQ to
activate or deactivate it. If you go back to PADS you can see the pads that are being triggered by the sequencer over
time. The sequences will play in a loop until you deactivate them or push STOP. If any PADS remain playing after you
push STOP, you can stop them by pushing STOP a second time. While sequences are playing, the counter in the top left
of the screen shows you how many bars and beats have played since you pushed PLAY. The counter in the top right
corner shows how many bars and beats have played in the current loop of the selected sequence.
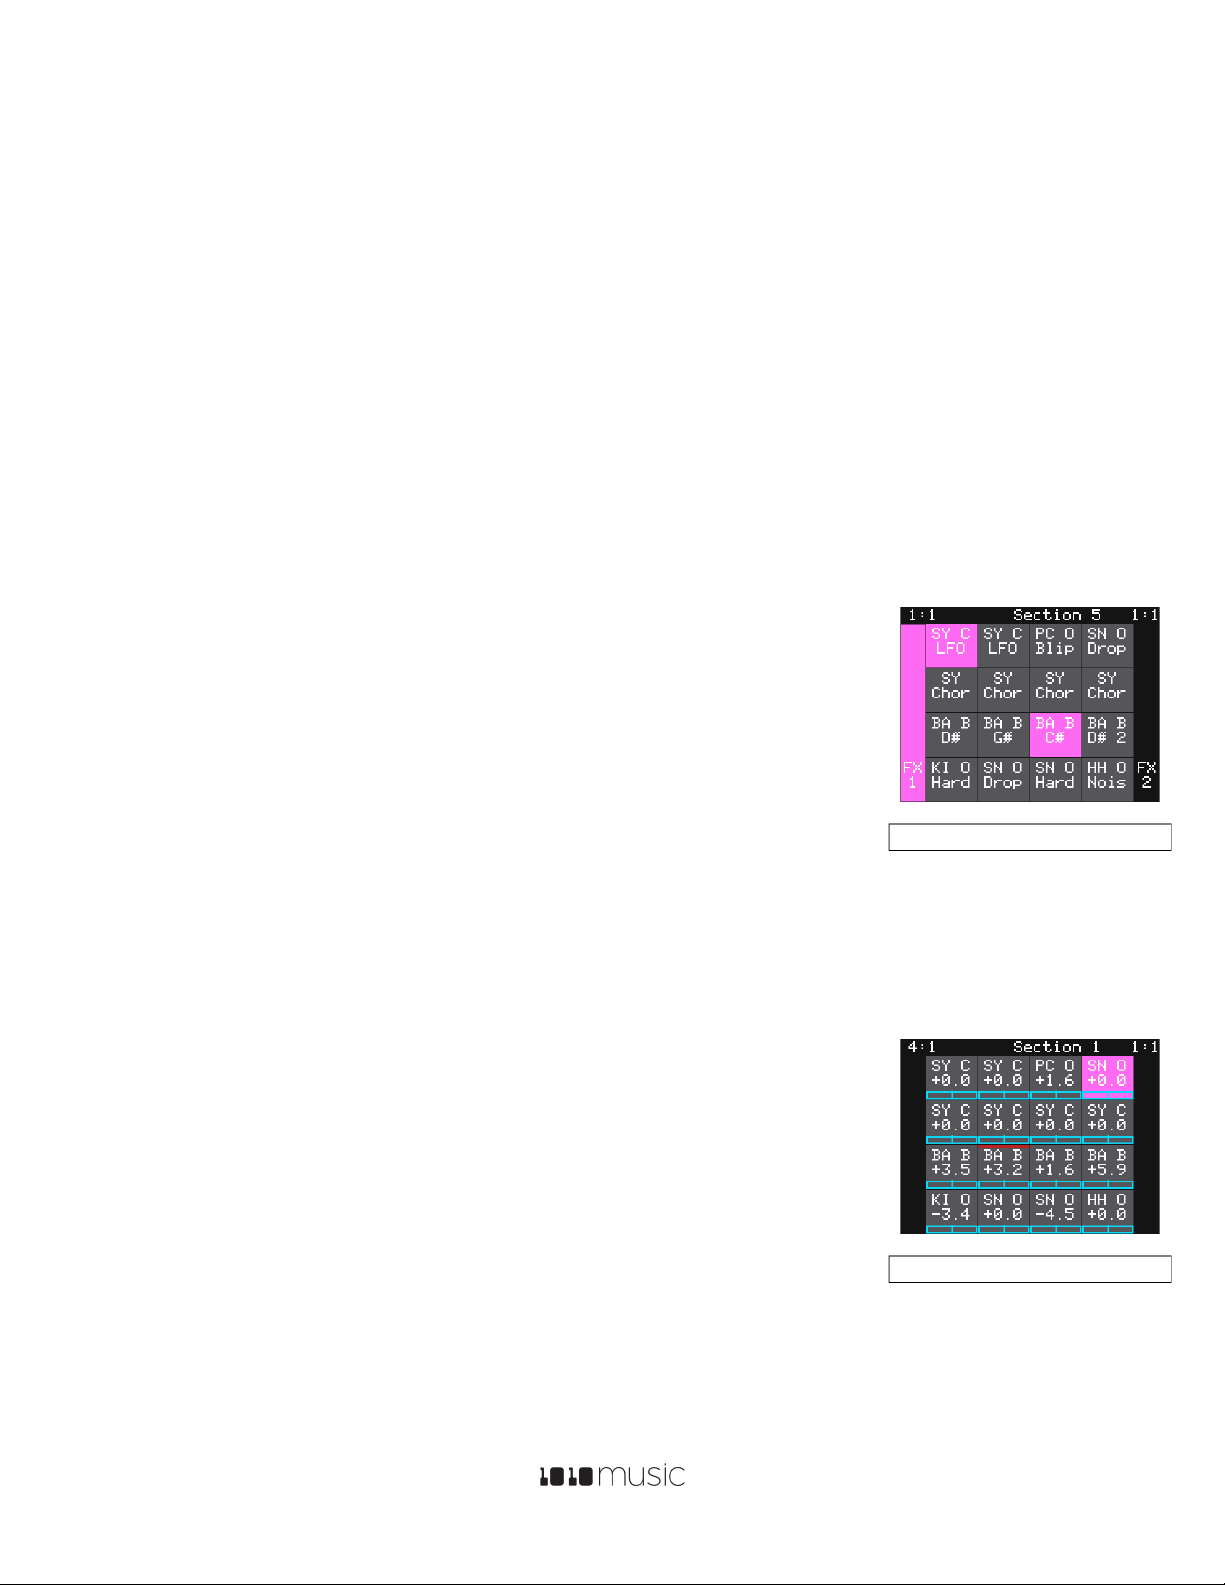
Playing sequences is fun, but recording your own is even better. The pink square is the
currently selected sequence. You can see the sequence number of the selected sequence
at the top of the screen both on the SEQ and the PADS screen (as long as you are not in
Song mode). Select and activate a sequence you want to record into. Go to the PADS or
KEYS screen, push PLAY and REC to start recording. Start playing something by touching
the pads or the keys. The sequence will continue to play and record in a loop until you
press stop. Each subsequent loop allows you to layer more notes on top of those
previously recorded. You can have other sequences playing while you record new
sequences, or you can deactivate all sequences to record without them.
You can view and edit the sequence by pressing INFO with the sequence cell selected.
Toggle the piano roll mode between PADS and KEYS modes by touching the mode
selector to the right of the grid icon. You can touch the screen to add notes, and turn
knobs to select and adjust the length of notes. In PADS mode, each row represents a
different pad and each bar represents a trigger of that pad. In KEYS mode, each row
represents a note on the keyboard and the bars represent note events. The black and
white bars on the left side of the screen represent the notes on a keyboard and the Cs are
numbered to show you which octave you are in. Use pinch and stretch touch gestures to
zoom in and out on the piano roll. Push INFO to cycle through more sequence
parameters, such as Step Length, Step Count and Quant Size. The top left grid icon
reminds you which sequence you are editing. In KEYS mode, the top right grid icon shows
which pad is currently controlled in the piano roll. Touch this icon to switch to a different pad if you want more than one
pad in the sequence.
Song Sections
Song sections allow you to record a series of on and off events for sequences. You can
play multiple sequences simultaneously, with independent start and stop times for each
one. To hear a song section by itself, make sure all of the sequences are deactivated first.
Then push the SONG button to view the SONG screen. Touch the on screen Song button
to toggle the Song mode state to active (blue) if needed. Turn off Loop mode by touching
the Loop button as well. Now push the PLAY button and blackbox will play back a
previously recorded song, section by section. The currently playing section is highlighted
in pink. In Song mode, the context display at the top of the screen now displays the name
of the current section, e.g Section 1.On the SEQS screen, you can watch as the song
section turns sequences on and off, and you can activate additional sequences if you want. If you want one section to
Figure 7: SONG Screen
Figure 5: Sequence Piano
Roll Editor – PADS
Sequence
Figure 6: Sequence Piano
Roll Editor - KEYS
Sequence

3/18/19 6:19 PM Copyright 1010music LLC 2019 P. 4 of 6
play in a loop, select that section and touch Loop to activate loop mode, then press PLAY. Touch Loop again when you
are ready to fall through to the next section.
Once you have a few sequences recorded, you can create your own song section. A new preset starts with one song
section and you can add more up to a total of 16 sections per preset. Touch Edit, then ADD to insert a new section after
the currently selected section. When you are in Song mode, the PLAY button will play both the current song section and
any active sequences. The REC + PLAY button combination will record sequence on and off events into the currently
selected section. Please note that Song mode only records sequences. It does not record anything played on PADS or
KEYS screen. But you can use PADS and KEYS to play along with what you have recorded.
The SONG screen also allows you to change the BPM of the internal clock, and alter the length of each song section.
The current BPM is displayed in the top left below the bars and beats counter. Turn the top left knob to adjust the BPM.
Select a section and push INFO to view and change the number of beats in this section. Back on the main SONG page,
use the EDIT menu to manipulate song sections.
Effects
On the FX screen, you can configure two different effects and see which pads are sending
their output to that effect. To do this, we’ll need to go back and send the output of one
or more pads to each of the effects. Push PADS and select a pad. Push INFO twice and
you will see an output select button next to the grid icon in the top left corner. Touch the
output selector and then touch FX1 or FX2 to send this pad to the corresponding effects
bus. Now push FX to go back to the FX screen. Touch one of the FX panels on either the
left or right side of the screen to select it. The pads that are assigned to this FX bus are
now highlighted pink. Push INFO to cycle through the parameters for this effect. The left
effect is a delay and the right effect is a reverb. The output of the effects will be routed to
Out1. Turn the knobs to adjust the parameters and hear the results in real-time as a sequence or song section is playing.
Blackbox will record the final state of the effects parameters in the preset.
Mixer
On the MIX screen you can independently adjust the volume and pan of each pad. The
number on the pad represents the dB level of the audio output. Turn one of the top two
knobs to adjust the level of the currently selected pad. The bar at the bottom of the grid
cell represents the pan position for the pad. Pan is only available if the pad is routed to a
stereo output. When the pan line is in the middle, the output is balanced equally between
left and right. Turn one of the bottom two knobs to adjust the pan.
The MIX screen also allows you to mute individual pads. Push the INFO button on the
MIX screen to enter MUTE mode. In this mode, active pads have a green background and
muted pads have a red background. Push INFO again to go back to controlling level and pan. Any muted pads will have
a red bar across the top of the pad.
Figure 8: FX Screen
Figure 9: MIX Screen

3/18/19 6:19 PM Copyright 1010music LLC 2019 P. 5 of 6
Tools
The Tools screen is the home for global settings that apply across presets. This is where
you can adjust the Headphone volume and turn on the metronome. Push INFO to cycle
through the available settings pages. Turn a knob to adjust the value of the nearest
setting.
MIDI Devices
Blackbox is designed to work with MIDI devices to offer a more tactile input mode and a bigger keyboard. Plug your
MIDI input device into either the Device USB jack or the MIDI In TRS jack. If you are having trouble getting MIDI to work
through the TRS jack, please read the Mini TRS Audio Jacks for MIDI Connections Compatibility Guide on
1010music.com.
By default, blackbox is configured so that the pads and sequences can be triggered by your MIDI device on any and all
MIDI channels. You can configure a specific channel by setting the GlobalMIDI parameter on the TOOLS screen.
The tables below show how the MIDI note numbers map to the blackbox pad and sequence triggers. The range for
pads is Note 36 (usually C2) through Note 51 (usually D#3/Eb3). The range for triggering sequences is Note 52 (usually
E3), through Note 67 (usually G4). You may need to shift your MIDI device up or down octaves to reach these notes.
You can also configure a specific pad to be played in KEYS mode via MIDI by assigning a MIDI channel to the PAD on
the pad’s parameters screen. Push PADS, select the desired pad and then push INFO until you see the parameter page
with the setting for MIDI. Assign a specific channel to this pad and now your MIDI device will pitch shift this pad to play
varying notes that can be recorded into a sequence. You will need to use a different channel to trigger pads and
sequences, which you can define on the TOOLS page as the GlobalMIDI setting. You will need to switch MIDI channels
on your MIDI device if you want to switch between triggering pads and sequences, and playing notes for a single pad.
Updating Your Blackbox
You can use the microSD card to update the firmware running on blackbox. We highly recommend that you check for
firmware updates regularly. You can find firmware updates and instructions for installing them on our forum. You must
be a registered member of the forum to see and download the latest firmware. Register for free at
forum.1010music.com, and then scroll down to the Firmware Downloads forum. Blackbox displays the current version on
the system start up screen.
Figure 10: TOOLS Screen
48
49
50
51
44
45
46
47
40
41
42
43
36
37
38
39
Figure 11: MIDI
Notes to blackbox
Pads
64
65
66
67
60
61
62
63
56
57
58
59
52
53
54
55
Figure 12: MIDI
Notes to blackbox
Sequences

3/18/19 6:19 PM Copyright 1010music LLC 2019 P. 6 of 6
Additional Information
This quick start guide reviews the basics to get you started but blackbox can do so much that is not covered here. You
can find videos and a full user guide on our website at 1010music.com/blackbox_support. Join the conversation about
blackbox at forum.1010music.com. We can’t wait to hear what you do with your blackbox!
Other manuals for Blackbox
3
Table of contents
Other 1010music Music Mixer manuals