1RC Racing 18th Midget 2.0 User manual
#1RC1030
#1RC1031
#1RC1032
Quick Start Guide/Instrucon Manual
Before operang this model, please read this
enre Quick Start Guide/Instrucon Manual
and all printed materials related to this model.
Read and follow all warnings and precauons.
Failure to follow all warnings and precauons
while operang this model could result in
personal and/or property damage.
SAFETY PRECAUTIONS
THIS RADIO CONTROLLED RACING CAR
IS NOT A TOY!
THIS HIGH-PERFORMANCE R/C MODEL
IS RECOMMENDED FOR AGES 14 AND
OLDER.
THIS IS ONLY FOR YOUR REFERENCE
BEFORE YOU OPERATE THE MODEL
CAR.
PLEASE DO NO CHANGE THE
EQUIPMENT OF THE BRUSHLESS ESC,
MOTOR AND BATTERY CASUALLY, WE
WILL NOT TAKE ANY CHARGE OF THE
DAMAGES OR INJURIES CAUSED BY
YOUR CHANGES!
ASSEMBLE THIS KIT ONLY IN PLACES
OUT OF CHILDREN’S REACH!
TAKE ENOUGH SAFETY PRECAUTIONS
PRIOR TO OPERATING THIS MODEL.
YOU ARE RESPONSIBLE FOR THIS
MODELS ASSEMBLY AND SAFE
OPERATION!
E-mail—support@1rc-racing.com
900-0006 Rev A
FIND AND FOLLOW
US HERE

2
Safety Precauons and Warnings
Please read all warnings and precauons in this Quick Start Guide/Instrucon Manual along with any other documentaon provided for this model.
Failure to operate your model in a responsible and safe manor may result in personal property damage and/or personal injury. As the user of this
model, you are solely responsible for operang the model in a safe manor. 1 RC Racing, LLC shall not be liable for any loss or damages, direct,
indirect, special, incidental, or consequenal that occurs during the use, misuse, or abuse of this vehicle or any product required to operate it.
This radio controlled racing car is not a toy!
This high-performance R/C model is recommended for ages 14 and older.
This is only for your reference before you operate the model car.
Please do not change the equipment of the brushless ESC, motor and baery casually, we will not take any charge of the damages or injuries caused by your
changes!
Assemble the kit only in places out of reach of children’s reach!
Take enough safety precauons prior to operang this model. You are responsible for this models assembly and safe operaon.
This model contains many small parts that could cause a choking hazard, keep all part away from children.
This model is intended for track use only, this model is not intended for o-road use. Track surface should be smooth with minimal bumps.
Never operate your model with low transmier and/or model baeries.
This model is controlled by a radio signal that could be subject to interference from many sources outside your control. This interference may result in the loss of
control so ensure you as the operator of this model always keep some distance in all direcons around your model as a safety margin to avoid personal and/or
property damage to you and others in the area.
Never operate your model in a public street or congested area and always keep away from cars, trac and crowds of people.
Never operate your model at night or anyme line of sight may be obstructed or impaired in any way.
This model is small so ensure you run your model in a non crowded area so nobody trips on model.
This model is small and could be a trip hazard, ensure you only run the car in a safe area.
This model is not waterproof, ensure vehicle is not run in wet condions.
Always turn on your transmier rst, then model.
Do not put ngers on or near any moving part, this may result in serious injury or damage model.
Aer running model, NEVER touch items like motor, baery, or electronic speed control as these items may be hot and result in serious injury as they may
generate high temperatures during operaon.
When you are done using model, turn o model rst, then transmier.
Never store model with baery installed or plugged in, always ensure baery is unplugged and removed before storage. Store baery in safe place.
Never leave baery on charger for more than 1 hour and always unplug charger from wall when not in use.
Some details and images in this manual might not exactly reect the items you nd in you model box.

3
Contents
18th Scale Midget 2.0
Transmier
Baery (for model)
Baery Charger (for model baery only)
4 AA Baeries (for transmier)
L - Allen Wrench
Nut Driver
Manual and Scker Sheets
Bind Plug
Table of Contents
Safety Precauons and Warning and Contents 2-3
Quick Start 4
Baery Charging 4-5
Baery Installaon 5
Transmier Operaon and ESC/Rx Tuning 6-8
Troubleshoong 9
Replacement Parts Lisng and Exploded Views 10-12
Set-up Tips and Notes 13
Limited Warranty and Service Contact Info and Regs 14

4
Quick Start
Before operang your model, please read enre manual to ensure you have complete understanding how to operate and control vehicle.
1. Read all safety precauons and warnings in this manual.
2. Charge the model baery as described below. Read all safety precauons and warnings about charging baery.
3. Install AA baeries in transmier as described on the next page of this manual. Only use alkaline baeries in transmier.
4. Aer model baery is fully charged, ensure switch is in o posion on model and then install model baery as detailed below in this manual.
5. Turn on transmier and then with model in safe locaon away from others, turn on model. Wait at least 5 seconds for transmier and model to bind
together.
6. Ensure steering and throle is working correct and ensure steering is moving front res in correct direcons.
7. Drive model while adhering to all safety precauons and warnings detailed in this Quick Start Guide/Instrucon Manual.
8. When you are done using model, turn o model rst, then transmier, then remove baery from model and store in safe locaon before next use. NEVER
store baery in model.
Safety Data—NiMh Baery
WARNING: USER MUST READ AND FOLLOW ALL INSTRUCTIONS AND WARNINGS AND PRECAUTIONS.
WARNING: This baery is not a toy and care should be taken when handling and charging the baery. Failure to do so could
result in serious injury to user and others in the area. Details listed below must be followed to ensure no harm is done to persons
Handling and Storage
● Never drop baery.
● Never alter baery in any way.
● Never puncture baery.
● Never short circuit baery by
connecng terminals.
● Never leave baery in model.
● Never leave baery connected to
model or charger aer use
● Always store baery in dry cool
locaon.
● Always store baery in safe baery
storage bag.
● Keep baery away from water.
Charging Baery
● Always make sure baery is not
damaged before charging.
● Only use charger that is specically
designed for baery.
● Refer to charger instrucons for
charging details.
● Never charge a baery that is hot to
the touch.
● Remove baery from charger if
baery becomes hot to the touch.
● Baery will take about 30-45 minutes
to fully charge. Do not leave baery
on charger more than 1 hour.
Safety
1 RC Racing, LLC is not liable for the misuse or mistreatment of this baery,
all warnings and precauons must be followed to ensure safe use. In the
event a baery becomes hot to the touch or starts to smoke or outer
covering starts to melt while charging/running or you see any change in the
baery condion, remove baery from charger or model and then safely
move baery to a safe locaon in open outside air away from any persons
and property. Leave baery in outside open area for at least 2 hours to
allow baery to cool and stabilize. Once baery has cooled and is no longer
a danger, store baery in plasc sealed container to eliminate any shorng
and then baery must be recycled. Do not store baery with other waste.
Call your local recycling center for informaon on baery recycling in your
area. Handle any damaged baery with great care, baeries are corrosive
so ensure damage baeries and its contents never contact skin in any way.
If skin comes in contact with damaged baery, immediately wash the
aected area with soap and contact medical care if addional care is
needed. If damaged baery or its contents contact your eyes in any way,
wash with water for at least 15 minutes and then contact medical care
immediately.
5
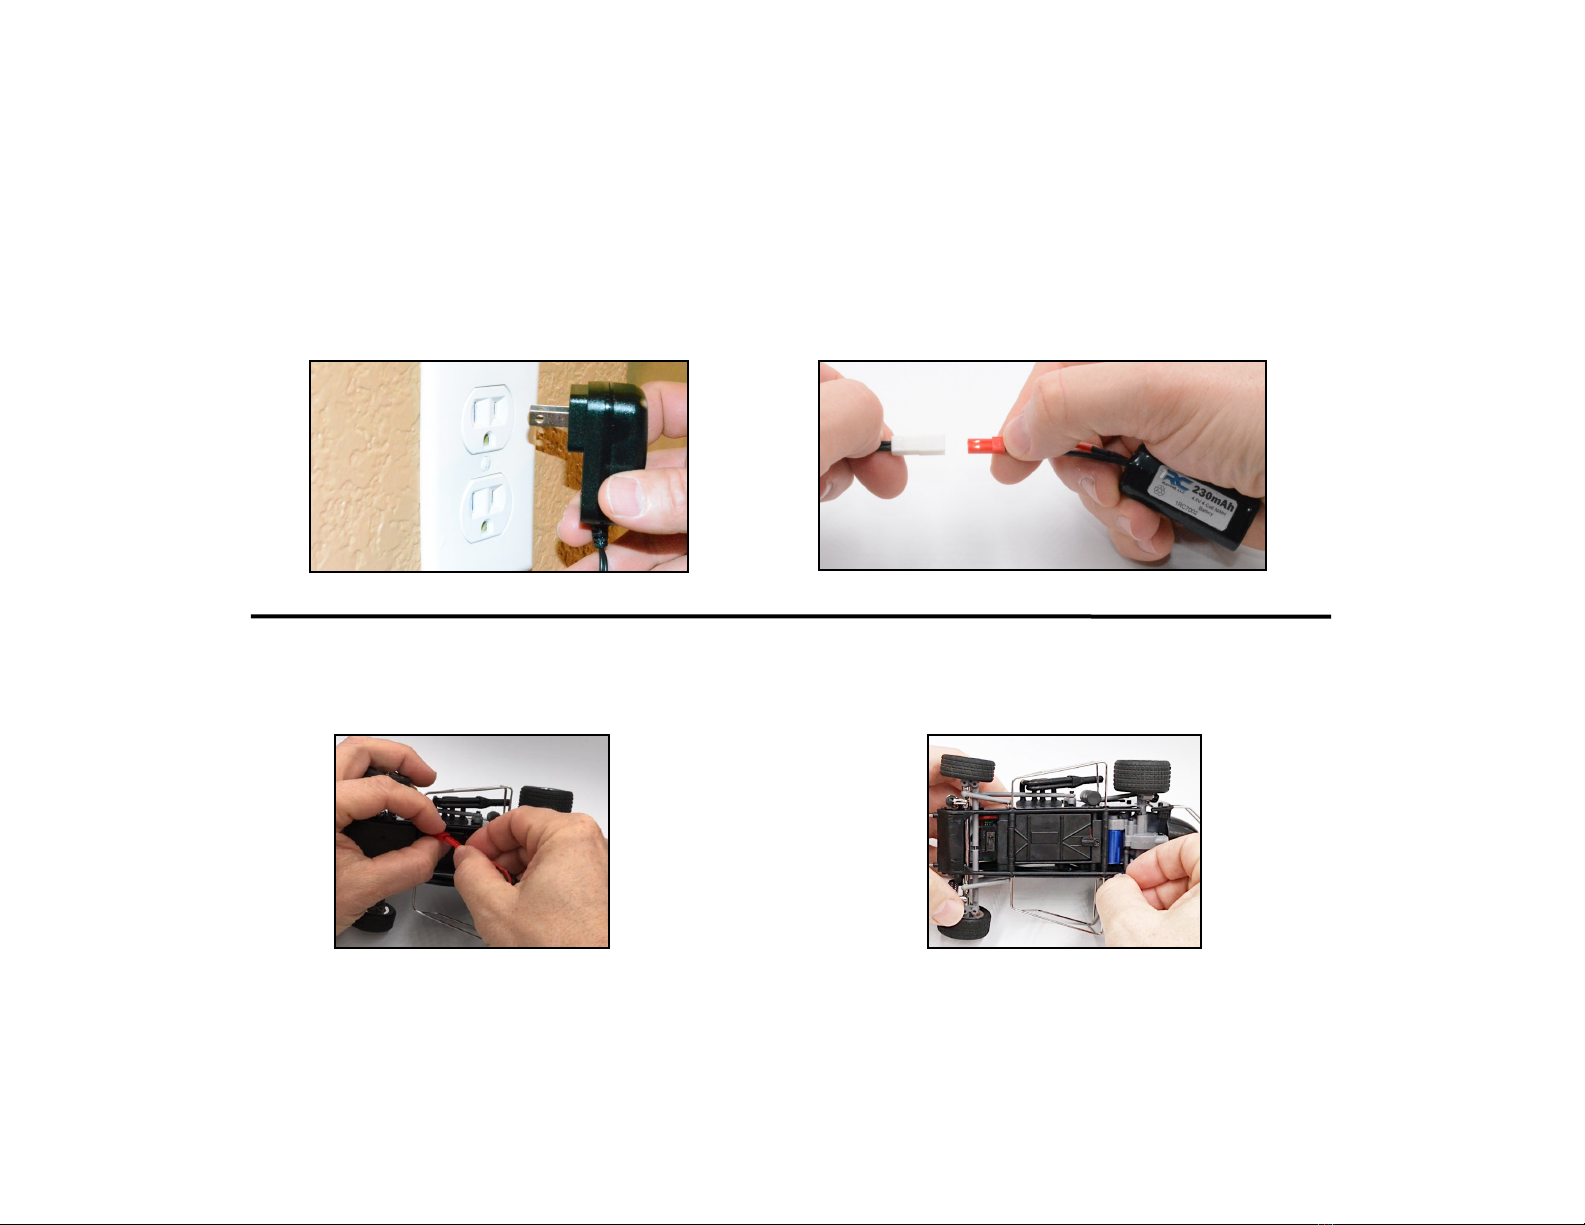
Baery Charging
Cauon: Never leave baery on charger for more than 1 hour. Baery will take about 30-45 minutes to fully charge. Always unplug baery charger from wall
when not in use. Always remove the baery from the model before charging, NEVER charge the baery in the model. Always use charger that came with
model to charge model baery. Never store baery in model when not in use, always store baery in safe place when not in use. Never plug baery in
backwards to charger or model or damage will occur. Always avoid contact with water or other liquids.
Step 1 - Plug in Wall Charger Step 2 - Connect Baery to Charger
Baery Installaon
Cauon: Never store baery in model when not in use, always store baery in safe place when not in use. Never plug baery in backwards to charger or
model or damage will occur. Always avoid contact with water or other liquids. Always remove the baery from the model before charging, NEVER charge the
baery in the model. Aer baery is installed in model, ensure lock tab on baery box is fully locked to ensure baery does not come out of model.
Step 1 - Plug Baery into Model Step 2 - Close Baery Door
6
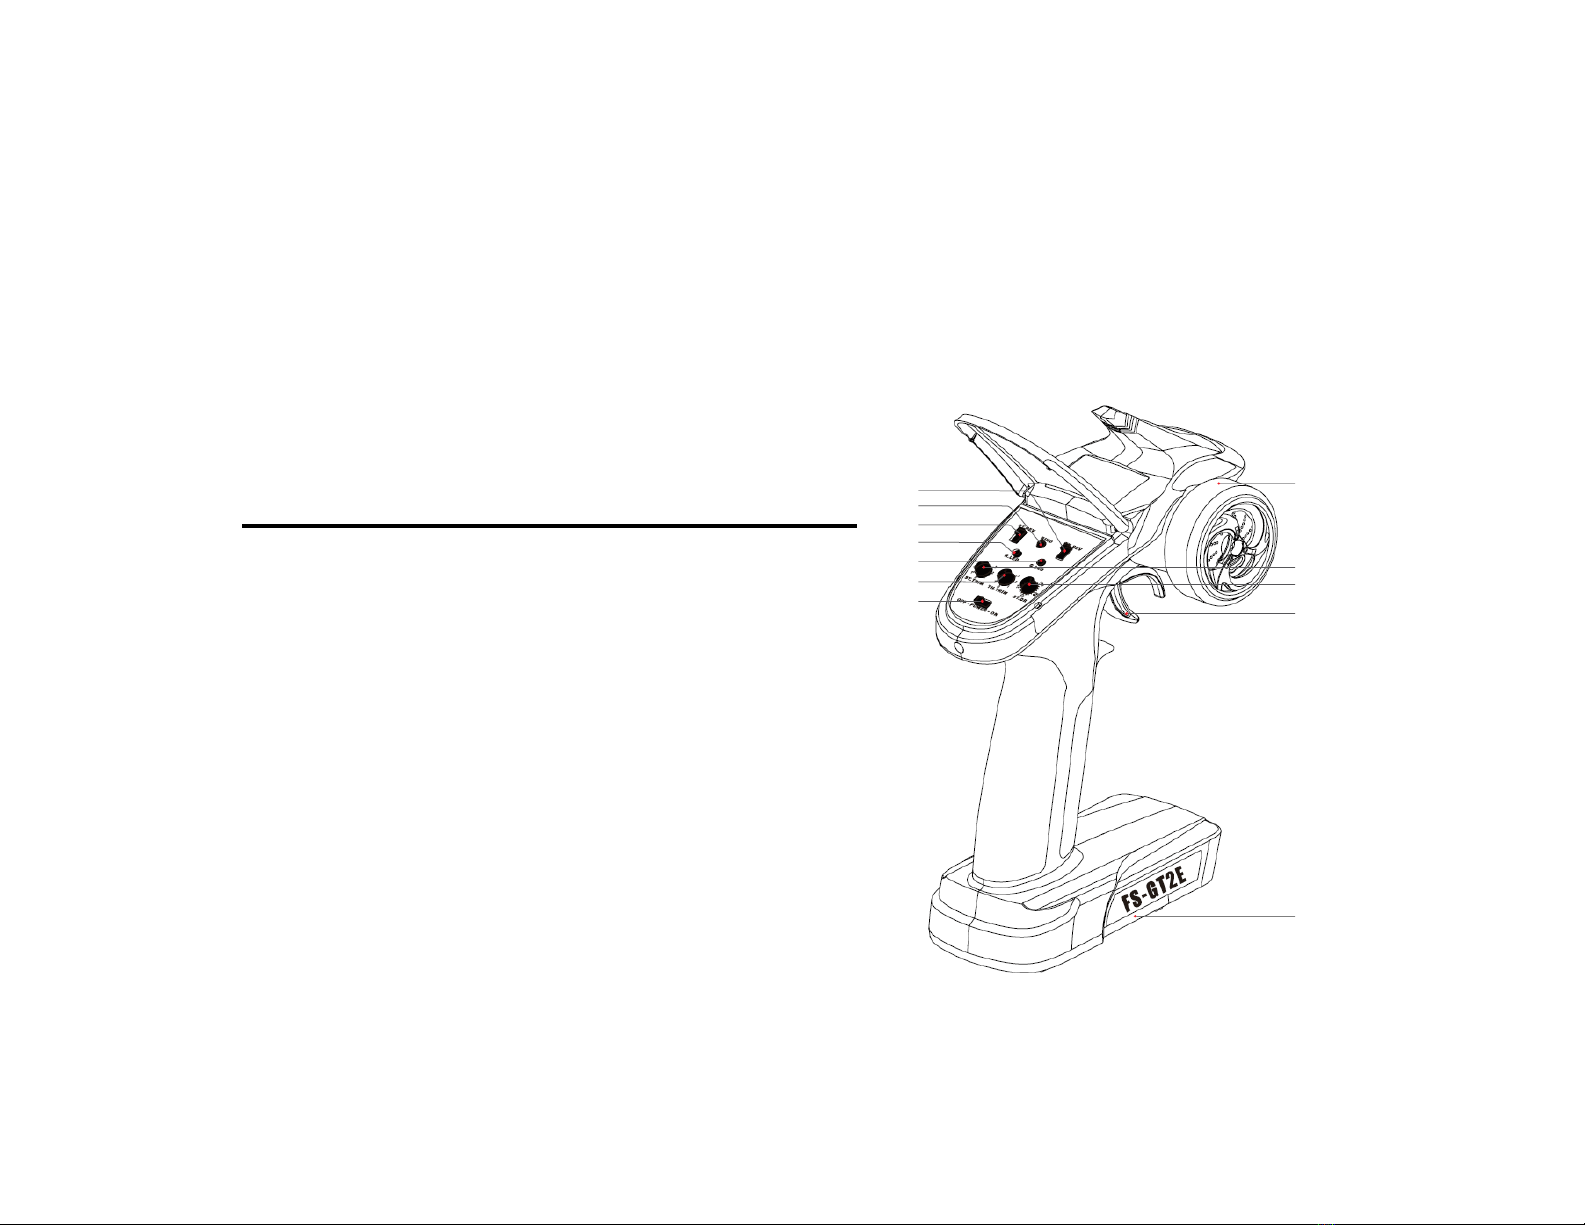
Transmier Operaon
Cauon: Never hold the trigger when turning on transmier. Ensure you understand all features
of transmier before using. Do not drop transmier or damage can occur.
1. Steering Wheel: Controls direcon of model (le/right).
2. Throle Trigger: Controls direcon of model (forward/reverse).
3. Power Switch: Turns transmier on and o.
4. Power LED: Indicates if transmier is on or o.
5. Power Check
6. Steering Trim: Adjusts the centering of the models front res.
7. Steering Dual Rate: Adjusts the amount the models front res turn front right to le.
8. Throle Trim: Adjusts the motors speed when trigger is at neutral posion.
9. Steering Reverse: Switch that will reverse the direcon of steering servo.
10. Throle Reverse: Switch that will reverse the direcon of the motor when trigger is moved.
11. Bind Buon: Used to bind transmier to receiver.
12. Baery Door: Remove door to install 4x AA baeries.
Transmier Features
1
2
3
4
56
7
8
9
10
11
12
Safety Precauons and Warnings
This radio is not a toy and should not be operated by anybody under 14 years of age. Adult
supervision is required.
Always ensure radio is on before turning on car or injury or damage can occur.
Always perform system check to ensure throle and steering is working correct before
operang.
Do not mix old and new baeries. It is recommended to use only alkaline baeries.
Do not operate radio in rain or wet environment.
Ensure Failsafe funcon is set before operang vehicle.
Do no hold transmier by antenna while operang, this will decrease performance.

7
Binding Transmier to Model
1. Plug in bind plug to Bind Port on receiver.
2. Turn on cars on/o switch (located on boom of the car) and
LED on receiver will start to ash rapidly.
3. On transmier, hold down Bind Buon (item 11 in the image on
previous page) and turn on Power Switch (item 3 in image on
previous page). Connue holding Bind Buon unl LED on
receiver stops ashing and goes solid and then starts to ash
slowly.
4. Then turn o car and transmier and remove bind plug from
receiver.
5. Turn transmier on then turn car switch back on and check
steering and throle operaon to ensure controls are working
correctly.
6. If controls are not working correctly, turn of the cars switch and
turn on transmier and repeat steps 1-6.
Bind Port
CH1—Servo Port
CH2—ESC Port
CH3—Spare Port
Can be used for transponder
LED
Fail Safe Buon
Failsafe Seng
The failsafe will help prevent an out of control situaon if the transmier signal is lost.
How to Set the Failsafe:
1. Turn on transmier.
2. Turn on the receiver and ensure the LED on the receiver is on and solid.
3. Leave the throle on the transmier in the neutral posion.
4. Using the Failsafe Seng Sck on the Bind Plug wire, press the Fail Safe Buon on
the receiver. The LED will blink and then stop aer 3 seconds, that will indicate the
failsafe is set.
Test the Failsafe:
1. Turn on transmier.
2. Turn on the receiver.
3. Turn o the transmier and ensure the cars rear wheels do not roll. If rear wheels
roll repeat steps 1-4 in How to Set the Failsafe.
8
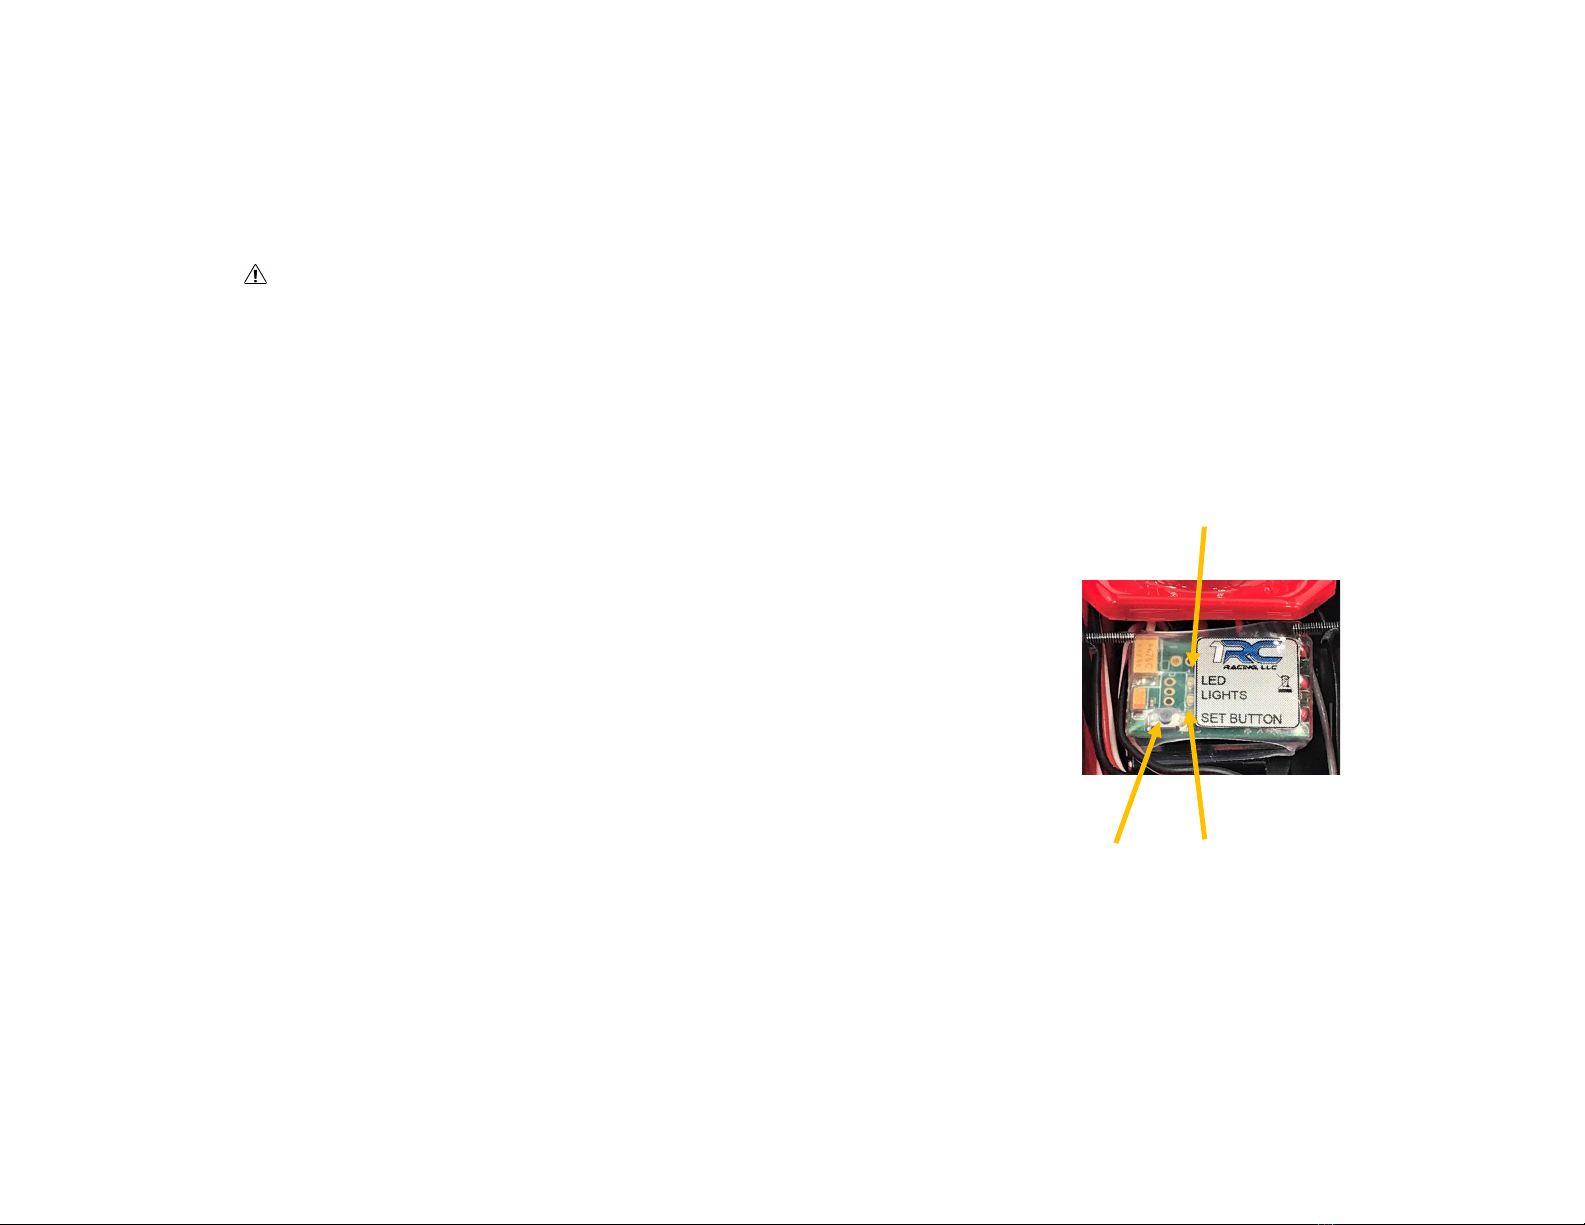
Seng ESC
1. Ensure baery is installed and ensure baery is connected to model and secured in baery tray area. Ensure baery is connected
correctly or damage can occur to ESC/Rx unit.
2. Remove hood on model so you have full access to ESC/Rx unit.
3. Ensure car is elevated o ground so res are not touching ground, this will prevent any damage if car starts to move during binding
process.
4. On transmier, make sure the throle trim knob is set to 0, then turn on transmier.
5. Hold ESC Set Buon down while you turn on the model using the switch just behind the front axle from underside of model.
6. When ESC Red Light starts to ash, release the Set Buon, ESC is now in setup mode.
7. With trigger on radio in neutral posion, press Set Buon one(1) me, ESC Red Light will stop ashing and green light will quickly ash
once, this conrms the neutral posion.
8. Now pull trigger to full throle on transmier and press Set Buon again, ESC Green Light will ash twice to conrm full throle seng,
hold trigger in full throle unl light stops ashing.
9. Now push trigger to full brake on transmier and press Set Buon again, ESC Green Light will ash three me to conrm full brake seng,
hold trigger in full brake unl light stops ashing.
10. Return trigger on transmier to neutral and ESC Green Light will brink two mes. Your ESC and now set.
11. Ensure steering and throle works correct, make adjustment to transmier throle trim knob so motor does not move when trigger on
transmier is in neutral posion.
12. Ensure ESC it reaching full throle, pull trigger to full throle and ESC Green Light should go solid if full throle is reached.
13. If throle does not work correct, go back to step 1 and repeat steps 1-12.
LED LIGHT STATUS—During Startup
- RED LED keeps ashing rapidly indicang ESC does not detect correct throle signal/neutral value stored in ESC that match Radio seng.
Rotate Throle Trim knob on radio unl light stops ashing.
LED LIGHT STATUS—During Operaon
- RED & GREEN LED’s die out when throle trigger is in throle neutral zone.
- RED LED turns solid when your vehicle starts to run forward, GREEN LED will also come on when pulling trigger to full (100%) throle.
- RED LED turns solid when you apply brake.
- RED LED turn solid when you reverse your vehicle.
LED LIGHT STATUS—Protecon Warnings
- RED LED ashes a short single ashes that repeats 3 mes indicang low voltage cuto protecon is acvated.
- GREEN LED ashed in short single ashes that repeats 3 mes indicang the ESC thermal/overheat protecon is acvated.
This ESC unit has advanced sengs that can be adjusted. Visit www.1RC-Racing.com for further details on how these sengs can be adjusted.
ESC Set
Buon
ESC Red
Light
ESC Green
Light
WARNINGS
- USER MUST READ AND FOLLOW ALL INSTRUCTIONS AND WARNINGS AND PRECAUTIONS.
- ENSURE ALL WIRES AND CONNECTIONS ARE WELL INSULATED BEFORE CONNECTING THE ESC/Rx TO RELEATED DEVICES, AS SHORT CIRCUIT WILL DAMAGE THE ESC/Rx.
- ENSURE ALL DEVICES ARE WELL CONNECTED TO PREVENT POOR CONNECTION THAT MAY CAUSE YOUR VEHICLE TO LOSE CONTROL OR OTHER UNPREDICATABLE ISSUES SUCH AS DAMAGE TO THE DEVEICE.
- STOP USING THE ESC WHEN IT TEMPERATURE EXCEEDS 90°C/194°F, OTHERWISE YOUR ESC/Rx WILL BE DAMAGED AND MAY ALSO DAMAGE YOUR MOTOR. WE ALWAYS RECOMMEND SETTING THE “OVER
HEAT WARNING” TO “ENABLED” TO ENSURE DAMAGE DOES NOT OCCUR TO YOUR ESC/Rx UNIT.
- ALWAYS DISCONNECT THE BATTERIES AFTER USE, AS THE ESC WILL CONTINUE TO CONSUME CURRENT IF IT’S CONNECTED TO BATTERIES (even if the esc is turned o). LONG-TIME CONNNECTION WILL CAUSE
BATTERY TO COMPLETELY DISCHARGE AND RESULT IN DAMAGE TO BATTERIES AND/OR ESC. THIS WILL NOT BE COVERED UNDER WARRENTY.
ESC (Electronic Speed Control)
9
Descripon Problem Soluon
Model has no power
Switch is not on Turn transmier and model switch on
Baery is not charged Charge baery
Baery not plugged in Plug in baery
ESC/Rx failure Replace ESC/Rx
Tx not bound to Rx Re-bind Tx to Rx
Transmier failure Replace transmier
Steering Servo does not work
Servo not plugged in Plug servo into ESC/Rx unit
Steering linkage bound up Free up steering linkage
Can hear servo moving but wheels do not turn Check servo saver and linkage from servo to front res
Servo failure Replace servo
Car does not move when pulling
throle trigger on transmier
Motor not plugged in Plug motor in
ESC out of adjustment Reset ESC
Wire unsoldered from motor Re-solder wire to motor
Motor Failure Replace motor
Steering Wheels turn wrong direcon Flip steering reverse switch on transmier
Servo gears damaged Replace servo
Throle
Car goes backward when pulling trigger on transmier Flip throle reverse switch on transmier then reset ESC
No reverse Reset ESC
No brakes Reset ESC
Motor runs but car does not Check all gears in transmission for damage
Model slows or stops while running
ESC/Rx overheang Turn model if and let ESC cool down
Motor overheang Turn model o and let motor cool down
Baery losing charge Charge baery
Tx not bound to Rx Re-bind Tx to Rx
Gear train bound up Free gear train of obstrucons
Transmier baeries low Replace transmier baeries
Model glitching Model baery low Charge model baery
Loose wires Check all wires on model
Troubleshoong

10
1RC1030 1/18 Midget, Red, RTR 2.0 1RC5528 FR/RR Tires & Wheels, Black Wheels, Hoosier, 1/18 Midget (4)
1RC1031 1/18 Midget, Black, RTR 2.0 1RC6034 Body & Driver, Clear, 1/18 Midget 2.0
1RC1032 1/18 Midget, Clear, RTR 2.0 1RC7000 8700kv Brushless Motor & 12T Pinion, 1/18 Midget
1RC2001 T-Type Engine, Header, Oil Tank, 1/18 Midget 1RC7002 NiMH Battery, 4 Cell NiMh, 4.8V, 220mAH, 1/18 Midget
1RC2028 Nerf Bars, 1/18 Midget 2.0 1RC7012 Transmitter & Receiver, GT2E
1RC2029 Frame, 1/18 Midget 2.0 1RC7014 ESC Only, 1/18 Scale
1RC3000 Rear End, 1/18 Midget 1RC7018 Steering Servo, V2, 18th Scale
1RC3001 FR Spindles & Servo Saver, 1/18 Midget 1RC8000 Hardware Set, 1/18 Midget
1RC3002 Radius Rods, 1/18 Midget 1RC8001 Ball Stud & Pivot Ball Set, 1/18 Midget
1RC3006 Front Axle, 1/18 Midget 1RC8502 Roll Pin Set, 1/18 Midget (8)
1RC4000 Rear Axle & Compound Gear, 1/18 Midget 1RC8503 Bearing Set, 1/18 Mid, Spr (8)
1RC5000 Shock Set, 1/18 Midget (4) 1RC8800 Nut Driver & L-Wrench Set, 1/18 Midget
Replacement Parts

11

12

13
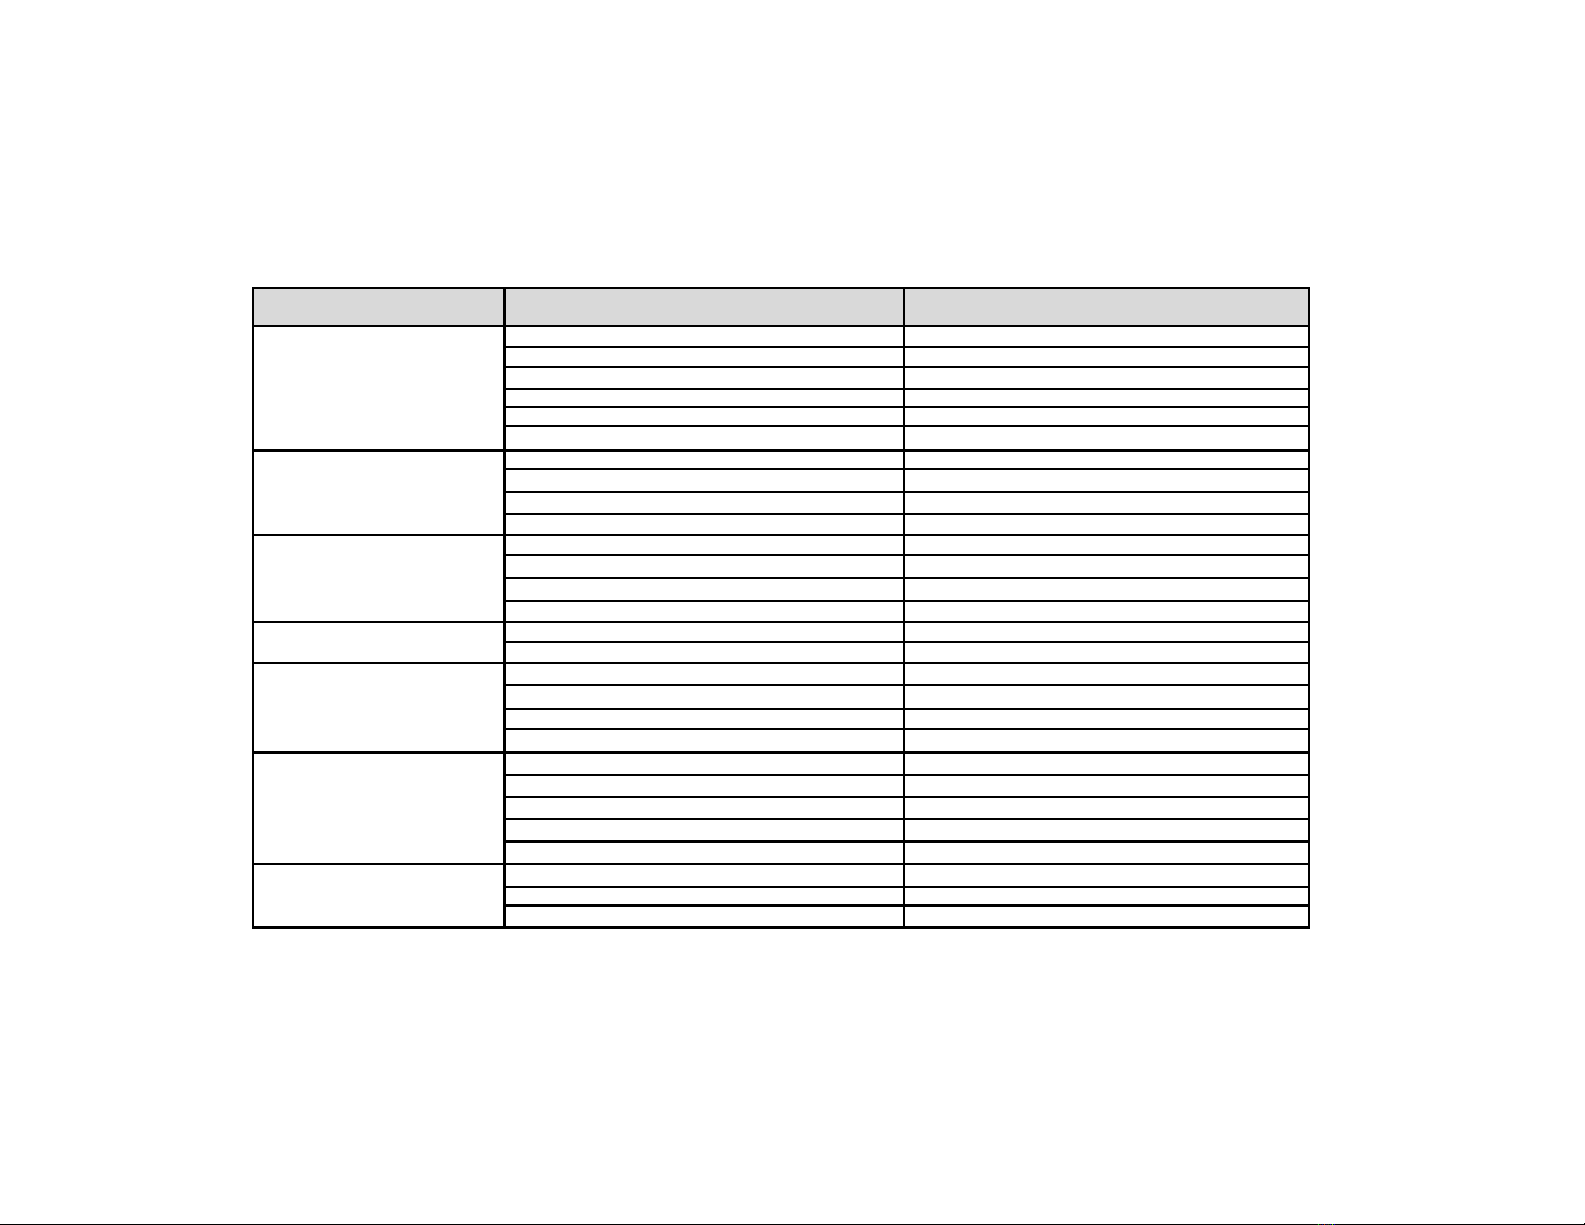
Set-Up Tips
Not Enough Steering on Corner Entry Turn up dual rate on radio
Less tension on right front spring
To Much Steering on Corner Entry Turn down dual rate on radio
More tension on right front spring
Not Enough Steering on Corner Exit Turn up dual rate on radio
More tension on right rear spring
To Much Steering on Corner Exit Turn down dual rate on radio
Less tension on right rear spring
Notes
14
Limited Warranty and Service Contact Informaon
Limited Warranty
1 RC Racing, LLC warrants the model and its components to be free of defects in material and workmanship at the date of purchase to the original purchaser,
warranty is not transferable.
Limitaon of Liability
1 RC RACING, LLC SHALL NOT BE LIABLE FOR SPECIAL, INDIRECT, INCIDENTAL OR CONSEQUENTIAL DAMAGES, LOSS OF PROFITS OR PRODUCTION OR
COMMERCIAL LOSS IN ANY WAY, REGARDLESS OF WHETHER SUCH CLAIM IS BASED IN CONTRACT, WARRANTY, TORT, NEGLIGENCE, STRICT LIABILITY OR ANY
OTHER THEORY OF LIABILITY, EVEN IF 1 RC RACING, LLC HAS BEEN ADVISED OF THE POSSIBILITY OF SUCH DAMAGES.
Service Contact Informaon
All service/warranty requests should be sent to support@1RC-Racing.com and should contain the following informaon.
1. Name and shipping address and contact info
2. Picture of part(s) in queson
3. Descripon of running condion when part broke
All warranes will be reviewed and an email will be sent back within 2-5 days with details of the warranty.
Regulaon Statements
FCC Compliance
This device complies with part 15 of the FCC rules. Operaon is subject to the following two condions: (1) This device may not cause harmful
interference, and (2) this device must accept any interference received, including interference that may cause undesired operaon.
The user is cauoned that changes or modicaons not expressly approved by the party responsible for compliance could void the user’s authority to
operate the equipment.
Baery Recycling (USA)
Product must not be disposed with other waste. Call 1-800-8-228-8379 for informaon on baery recycling in your area.


1 RC Racing, LLC
www.1RC-Racing.com
support@1RC-Racing.com
Table of contents


