FD smart User manual

ELECTRIC CAR INSTRUCTIONS
REAL WORKING DOORS COLOURFUL LIGHTS
DUAL-DRIVE POWER

CONTENTS
1.SPECIFICATIONS
2.PARTS LIST
3.DECOMPOSITION CHART
4.ASSEMBLE STEPS
5.CHARGING
6.USAGE METHOD
7.REMOTE CONTROL INSTRUCTION
8.FAILURE ANALYSIS
9.MAINTENANCE AND REPAIR
10.MAINTENANCE RECORDS
1
2~3
4
5~6
7~8
9 ~ 11
12~13
14
15
16
SPECIFICATIONS
Thank you for purchase products, is always pursuit of
excellence, design and produce comfort & safe children riding toys
continually, accompany your children's happy & lively childhood.
Your Excellency friends, for the safety of your child and others, in
order to keep excellent and stable capacity, please read the
instruction carefully before you use this product. In the instruction,
it supplies knowledge such as assemble steps, usage method and
maintenance & repair, that can make you operate the car skillfully,
and any unsuitable operating will damage your car. Because the
technology product continually improves and updates, specifications
and contents may vary from illustration, please refer to actual
contents. Please keep the instruction carefully, and put in place
easily to reach.
For age: 36-96 months
Less than 30 kg
Low Speed 2.3 km/h
Medium Speed 2.6km/h
High Speed 2.8 km/h
Input:220V
Output:DC6V800mA /
DC12V800mA
Load limited:
Speed:
Specification
of Charger:
Accumulator:
Body Size:
Power type:
Charging time:
Fuse wire:
Dry seal accumulator:
Standard 6V 7AH
Optional 6V 8AH
Optional 12V 7AH
105x58x60cm
Rechargeable
About charge 300 times
8-12 hours
7A、9A、11A、12A
1
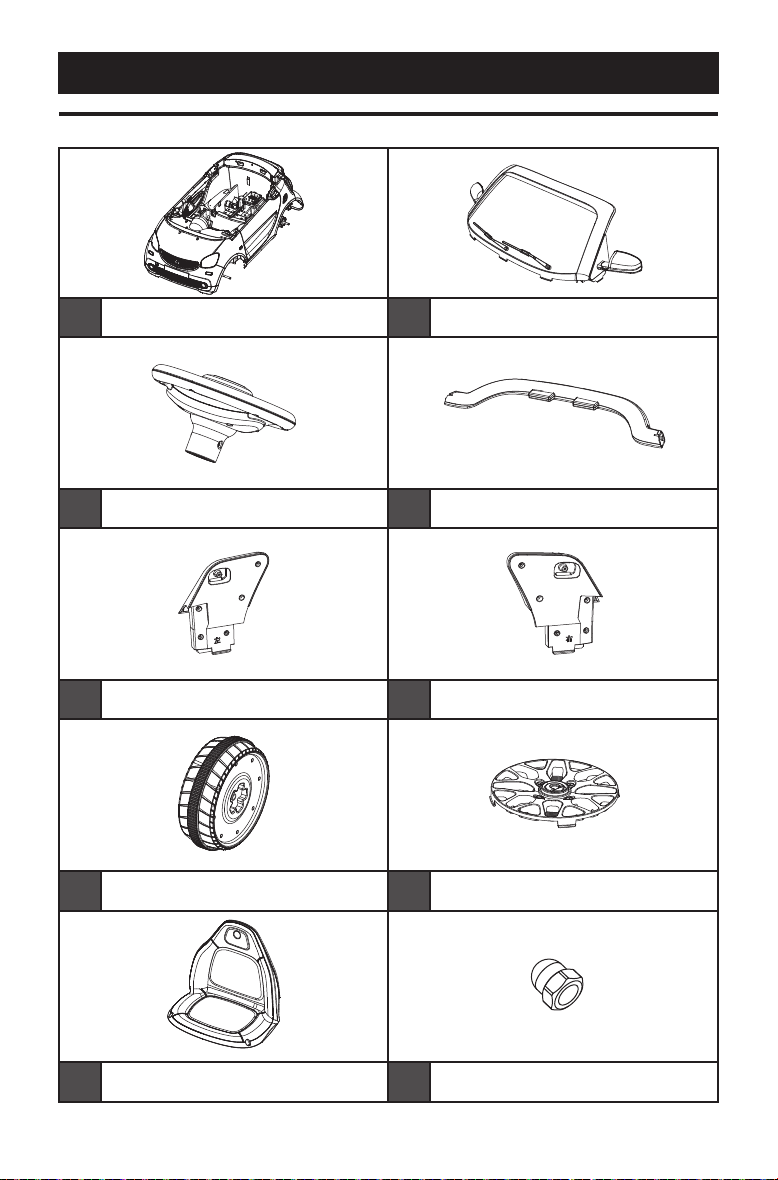
PAETS LIST
1 2
3 4
5 6
7 8
9 10
Car body*1 Windshield*1
Steering wheel*1 Rear wing*1
Left support of rear wing*1 Right support of rear wing*1
Wheel*4 Wheel cover*4
Seat*1 M5 Cap nut*1
2

PAETS LIST
11 12
13 14
15
M5*35mm Machine screw*1 washer*2( Double-motors version )
washer*3(single-motor version)
Charger*1
Remote control *1
Screw 4*12mm 8mm*2
(used to lock the seat)
3
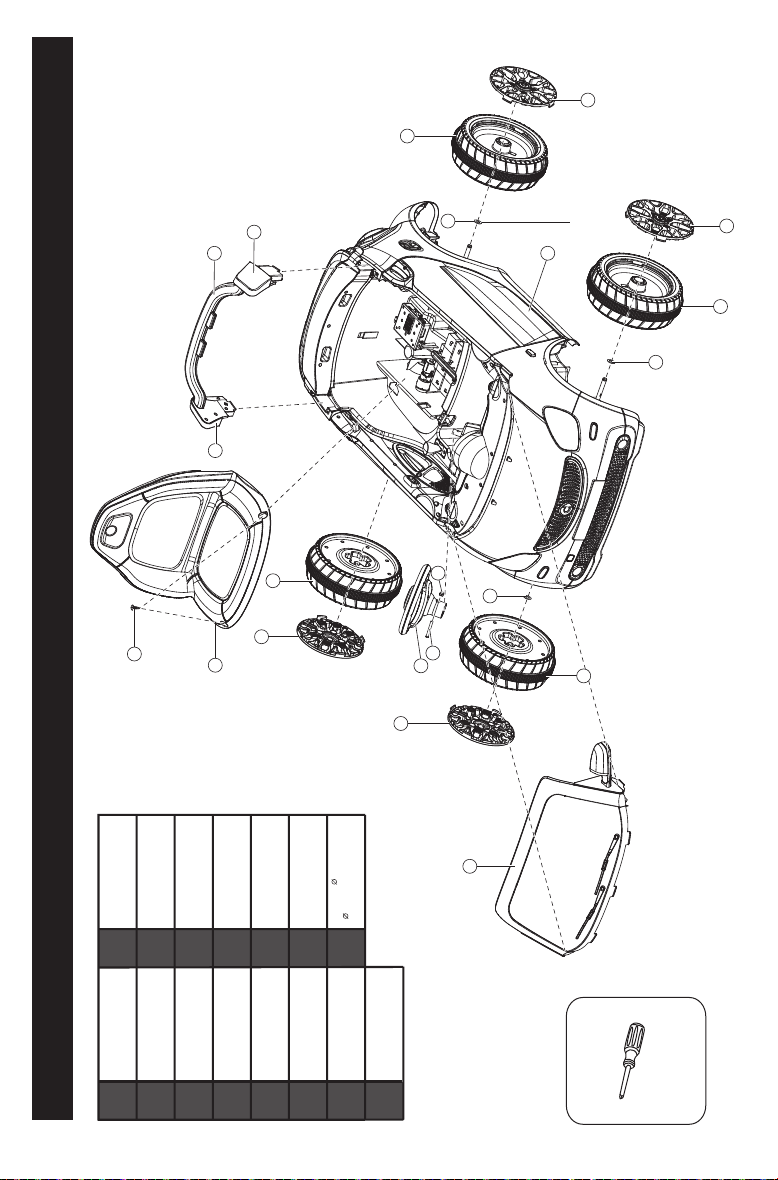
DECOMPOSITION CHART
Tools
Screwdriver
(not included)
See page 5-6 for details.
Attention: Some parts need to assemble
in both sides.
Car body*1 Windshield*1
Rear wing*1
Steering
wheel*1
Left support of
rear wing*1
Wheel cover*4
Charger*1
Remote
control*1
Wheel*4
Seat*1
M5x35mm
Machine screw*1
Washer*2
(Double-motors version)
Washer*3
(single-motor version)
M5 Cap nut*1
Right support of
rear wing* 1
1 2
3 4
5 6
7 8
9 10
11 12
13 14
15
Screw 4x12mm
8mm*2(used to
lock the seat)
7
7
5
8
8
6
7
8
8
11 10
12
12
12
14
7
94
3
2
1
Note:Only for Single-motor version.
4
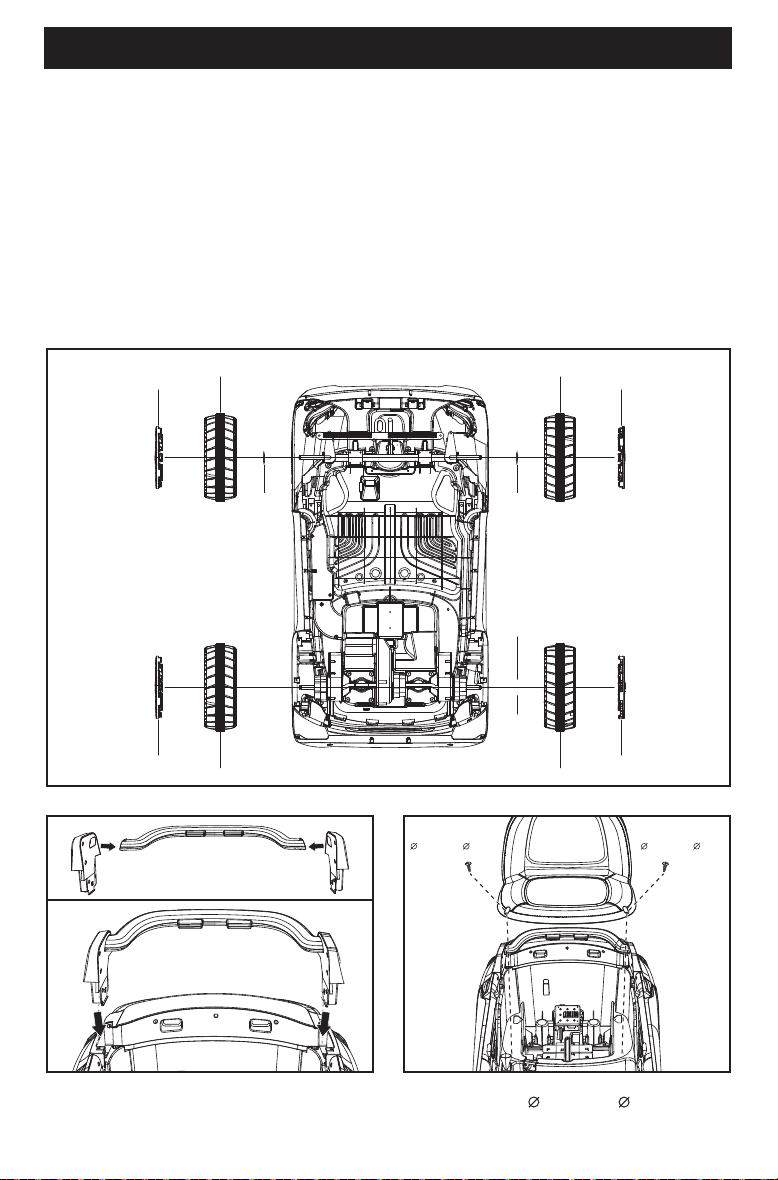
ASSEMBLE STEPS
Assembling of car must be operated by adult.
Choking hazard-small parts.not allow children to touch and play!
Please check the quantity of all parts before assembling.
Please keep the PP bag carefully.choking hazard,prohibit children to play it!
Tools of assembling: screwdriver,scissors(not included)
1 .Assemble wheels:
①Place the car upside down on a flat surface.
②Assemble rear wheels:
Double-motor version: Insert the rear wheel into the rear shaft by pushing
the wheel center, then snap wheel cover in place. Repeat for opposite side.
Single-motor version:
Insert the washer, wheel and wheel cover in place for the left side. Insert the
wheel and wheel cover in place for the right side.
③Assemble front wheels: Insert the washer, front wheel (pushing the wheel
center to the shaft) and wheel cover in place. Repeat for opposite side.
wheel cover
wheel cover
wheel cover
wheel cover
Front wheel Front wheel
Front wheel Front wheel
Washer Washer
Washer
Right Left
Back
Front
Note:Only for single-motor version.
①Complete rear wing assembly first,
then insert the rear wing unit into car
body and press down until it 'snap'
securely.
②Put the seat into car body, and install
seat screws 4x12mm 8mm securely.
2.Assemble other parts:
Installation of rear wing
Screw
4×12mm 8mm
Screw
4×12mm 8mm
5

3. Assemble accumulator and connect power
③Remove the rubber cover of the
steering rod end, connect the steering
wheel terminal to the terminal of the car
body, and put it into the wire hole of the
dashboard. Put the steering wheel into
the steel rod, and fasten it with M5x35mm
machine screw.
④Insert the windshield into place of the
car body and press down until a "snap”
is heard.
1. Remove the rubber cover on the accumulator, and connect the power cord of
the car body to the accumulator in correct polarities. (Black cord corresponds to
black terminal (negative polarity)), red cord corresponds to red terminal (positive
polarity).
2. Connect the wire plug to connector of accumulator firmly.
Installation of accumulator(6V 7Ah)
(This accumulator installation is used for basic version)
Installation of accumulator(12V 7Ah)
(This accumulator installation is used for high version)
Red cord Black cord
M5 Cap nut*1
M5×35mm Machine screw*1
6

CHARGE
Safety Warning of Battery
•Charger, accumulator and dry battery are not toys, prohibit children to play.
•Rechargeable battery must be charged by guardian.
•Battery must be placed in right polarity.
•Please take out battery if do not use for long time.
•Power terminals can not short circuit.
WARNING!
TO AVOIDE FIRE AND ELECTRIC SHOCK:
-Can only use charger and accumulator supplied by manufacturer, other
brand of charger and accumulator is prohibited, or else it may bring fire
and explosion.
-Don’t use the charger and accumulator on other products, or else excess
heat may bring fire and explosion.
-Do not changes the circuit structure arbitrarily, or else may bring fire and
explosion, and make the product perpetually damaged.
-Don’t connect the “+” and “-” pole of accumulator, or else may bring fire
and explosion.
-Keep the accumulator dry, don’t let it touch fresh or salt water.
-When accumulator charging, it produces harmful gas, and has thrill
smell. Prohibit smoking near charging accumulator; prohibit any flame
or sparking to avoid explosion accident.
-It must charge in ventilated and dry place.
-Don’t open accumulator and charger, don’t turn accumulator upside
down.
-Please check charges、accumulator and plug before charging, if find any
damage, please do not use it until repaired.
-Accumulator give out heat during charging is normal phenomenon, but if
the temperature too high, please check whether the charging current too
large or the accumulator short circuit or not.
-It must use batten to fasten accumulator and tighten screws. If the car
turnover, accumulator come off may hurt children.
-If it did not used for long time, please charge before using. And charge
one time every month to extend the lifetime of accumulator.
-Charger and accumulator are not toys, prohibit children to play them.
-When the room temperature lower than 5°C, the time of charge will
extend3-5 hours, don’t use this product when the temperature lower than
- 5°C.
7
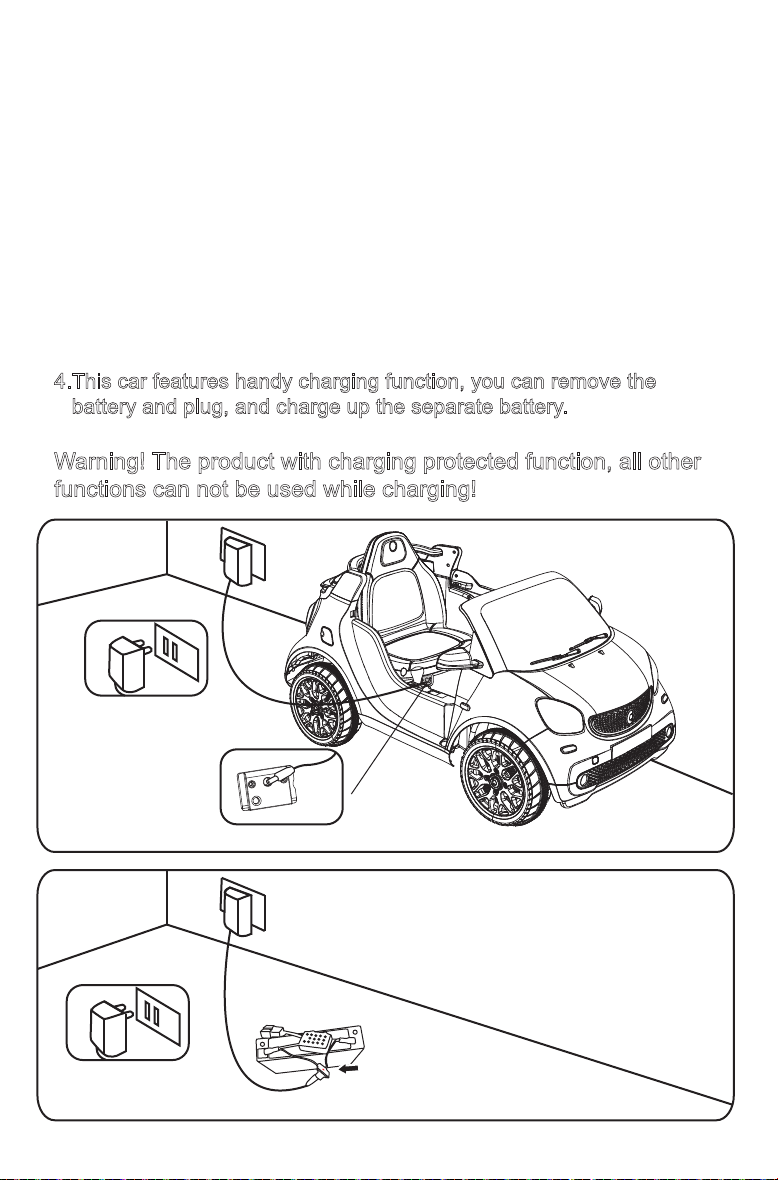
Home power supply
Charger plug-in hole
Home power supply
The indicator
light turns on
while battery
is charging
Special prompt!
•Suggest charging for 4-6 hours before the first time using, but do not
exceed 10 hours.
•While the car running speed obviously slowdowns, it means the power
of accumulator is low, please charge in time.
•It is the best to charge 8-12 hours after using, but do not exceed 16
hours.
1 .The charger insert charge hole.
2.The charger insert power outlet.
3.The light on the charging position of the motorcycle will light up when
it is charging, the charging time is about 8--12 hours.
4.This car features handy charging function, you can remove the
battery and plug, and charge up the separate battery.
Warning! The product with charging protected function, all other
functions can not be used while charging!
8
USAGE METHOD
WARNING!
To prevent accidents:
•This product can only be assembled by adult. Small parts may be bring
danger, children are prohibited to touch or play them!
•Children may be hurt by sharp edges and points of parts, prohibit children
to join assembling.
•This car pretend seat belt. For your children’s safety, please make sure
that seat belt is securely fastened.
•Only allow adult to use the remote control, avoid children touch.
•Please put the packing bag in safety place, prohibit children to play it, or
else may be bring choking hazard!
•While children ride the car, they must be guarded and guided by adult or
parents, and the guardian can not leave away, and ensure the children in
your ken.
•Prohibit to ride the car in danger place, such as road, close to vehicle,
steps or pool and etc.
•Children must wear footwear while ride this product.
•This product should be seated driving, seatbelts.
•For age: 36-96 months; Maximum load is 30 kg. Prohibit overage or
overload!
Please ensure the steps below have finished before using:
Safety Warning
Attention! Before the first using, the accumulator must be charged at
least 4-6 hours, but not over 10 hours, and charging can only be operated
by adult. When charging, the power must be shut off. Assemble the whole
car according to steps show in instructions, the plug-in unit of accumulator
has inserted, the power has close-up. Ensure screws in all positions have
been tightened.
• It is not transportation, it must be used under the directly guard of adult.
When riding this product, the guardian can not leave away, and ensure
the children in your ken. Please make your children and their playmate
know the safety rules below, and ensure they can understand!
a.Children must ride this product under the guard of adult,
b.While riding this product, children must fasten seat belt,
c.While riding this product, children must wear footwear,
d.While riding this product, children must sit on the seat,
e.Each time, only one child can ride the car.
9

•Ensure your children ride this product in safe environment, such as in
house、garden or playground.
•Be careful that this product only suit for hard and flat place, for ensure
safety, it is prohibited to ride in unsafe environments below:
a.Gutter rive、grassplot、step、incline or rugged ground、flooded road.
b. Road or place other vehicles and pedestrian running on it.
c.Maybe hit an obstacle which can bring harm.
d.Other unsafe zones.
•Avoid children ride the vehicle in dark, children can not deal with beat all
obstacle or fortuitous accident; they can only ride the car in day or light
area.
•Don’t use the car outdoor while raining or snowing.
•Ensure the vehicle has completely stop before change gear.
•Please confirm that the user age of this product is suitable, and not over
the maximum load.
•Don’t change the structure and circuit of this product by yourself.
•To avoid accident, the guardian must check whether the main parts are
in good condition before using.
Ensure the accumulator plug-in unit has inserted, and power
close-up, whether the accumulator、charger、wire、plug、
outer shell and other parts are damaged; whether the screws
are loosen; Is there any hidden danger? It must stop using
if find any damage, until it is completely repaired.
•Regular review the plug-in unit、charger and other parts of this product
to find whether they are aging or fall off, stop using if find any damage,
until it is completely repaired.
•When it is running, do not operate the FORWARD/BACKWARD switch,
or else may damage the device.If you want to change gear, please
loosen foot switch, ensure the airplane stop completely, and then stir
the FORWARD/BACKWARD switch.
•Please do not allow children close to the running vehicle, and don’t
allow children to touch the wheel.
•Don’t use this product to drag anything; don’t overload the maximum
load 30 kg.
10

FUNCTION DIAGRAM
Warning!To avoid damaging the gear box and motor,please ensure the
car is completely stopped before change gear.
Power button:Press the button to start the car.
Gear switch:
Forward:1.Push the “Gear switch”to “Forward”position.
2.Press “Pedal switch”slightly,the car will run forwards.
Stop:Take your foot off the “Pedal switch”,the car will stop,then push the
“Gear switch”to “Stop”position.
Backward:1.Push the “Gear switch”to “Backward”position.
2.Press “Pedal switch”slightly,the car will run backwards.
Rocking mode/Sport mode switch: Switch to rocking mode to entertain child
with rocking car fun. Switch to sport mode
to back to driving process.
Light switch: Turn on or off the front and rear lights.
Car light:Press “Light switch”,the car lights will turn on.
Music button on the steering wheel:Push in to change the song.
Horn button on the steering wheel:Push in to make a horn sound.
MP3 control board:
MP3 jack: Used to connect with MP3, radio or CD player.
TF:Use to insert the memory card,and it will play the contents of the memory
card automatically.Press the “V+”button or”V-”button to select the previous or
next content.
USB: Use to insert the USB flash drive,and it will play the contents of the
USB flash drive automatically.Press the “V+”button or”V-”button to select
the previous or next content.
V+:Long press the button to turn up the volume.
V-:Long press the button to turn down the volume.
Music: Press any of the 4 music buttons to play music.
Mode: Press the button to change among USB, memory card and MP3 mode.
Horn: Press the button to sound the horn.
Power
button
Gear switch
Memory card slot
MP3
Music buttons
Mode
button
Horn button
USB port
Music
Pedal
Horn
Rocking mode/Sport mode
switch and Light switch
(This function is only for high
version, the basis version is
Light switch function only)
Forward
Stop
Backward
11

REMOTE CONTROL INSTRUCTIONS
Operated method:
Only guardian can use the remote controller, not allow children to touch it.
Forward/
Backward
Brake
Lights
Radio indicator
Turn left/Turn right
Frequency
Speed
UM-3“AA”1.5V
UM-3“AA”1.5V
Battery cover
The controller use 2 x AA battery (not included).
1.Loosen the screw on battery cover by cross screwdriver, and open the
battery cover.
2.Place 2 AA batteries according to the mark “+”and“-”in battery house
(not included).
3.Place battery cover, and tighten screw.
1.Press the " " button on the remote control,the car run forward.
Press the " " button on the remote control,the car run backward.
2.Press the " " button on the remote control,the car run to the left.
Press the " " button on the remote control,the car run to the right.
3.Operate the right & left control poles, play the car more interesting.
4.Brakes: Press the "Brake" button on the remote control, the car will stop.
5.Frequency:Press the "Frequency" 3 seconds, Remote control and vehicle
will find matching frequency. Release button, remote control first light on.
6.Speed:Press the "Speed" button on the remote control, you can change
3 speed - high / medium / low by this button. One light on means low
speed, two lights on means medium speed, three lights on means high
speed.
12

1.When use remote control function, the distance from adult to the car
can not exceed 10 meters.
2.Only the guardian can use the remote controller, not allow children
to touch or use it.
3.Please read the instructions before use remote control, and take empty
testing. After operate the car skillful, then allow child to ride it.
4.Don’t ride this product on roadway and water place.
5.To avoid circuit damaged, remote control can not get wet in the rain
or be immersed in water by other ways.
6.Suggest to take out battery if do not use controller for long time, otherwise
battery may be leak and corrode circuit board, to damage the controller.
7.Controller must prevent falling in using.
8.Please keep the controller carefully, prevent missing.
9.If the control range under 3 meters, it means the battery is low power,
please replace 2 AA batteries. Replace battery: Screwing out the
screw by screwdriver, push out the cover according to arrow pointed,
and place 2 AA batteries in right polarity, and then fit on cover.
Safety Warning of Usage
•Charger, accumulator and dry battery are not toys, prohibit children to
play.
•Non-rechargeable battery can not be charged, if you use non rechargeable
battery, please do not charge.
•Different type of battery [alkaline /standard(carbon-zinc)/rechargeable
battery(Ni-Ca)]or new and old or different brand of battery can not mix
used.
•Rechargeable battery must be charged by guardian.
•Battery must be placed in right polarity.
•Please take out use up battery from the toy.
•Please take out battery if do not use for long time.
•Power terminals can not short circuit.
Safety Warning of Battery
1.Remote controller does not work. (No reaction)
A.Check whether the remote receiver place in suitable position.(away
from motor)
B.Check whether the power of remote control transmitter is on (Red
light of the transmitter in on)
2.On and off, bad contact conditions while operate the remote controller.
A.Check whether the capacity on motor break off ,tack weld.
B.Whether strong hertzian waves and radio interference near by, such as
high voltage cable,large machine,motor, radar and etc.
Simply maintain
13

FAILURE ANALYSIS
Problem: The car can not run
Reason: The accumulator plug-in unit or wire loose and drop.
Ensure the accumulator plug-in unit has connected correctly, wire does
not loose.
Reason: The accumulator is broken.
Please contact agent or manufacturer.
Reason: The circuit is damaged.
Please contact agent or manufacturer.
Reason: The motor is damaged.
The motor need to repair by career man, please contact agent or
manufacturer.
Problem: The car can not charge
Reason: The accumulator plug-in unit get loose. Ensure the accumulator
terminal connect wire firmly.
Reason: The charge does not insert in place.
Ensure charge insert into power outlet correctly. (If the power outlet with
switch, ensure it has turn on.)
Reason: The charger can not work.
Is the charger a little heat while charging? If it is not, may be the charger
has already damaged, please contact agent or manufacturer.
Problem: The car can only run for short time
Reason: The accumulator does not charge enough.
The accumulator does not charge enough. Please charge in time after
playing. And charge one time each month at least, the advised charging
time is 8-12 hours, and not exceed 16 hours.
Reason: Accumulator is too old.
Accumulator is belong to easily damaged consumable. Its useful life is
depend on the promptness and correctness of charging and operating.
The useful life of accumulator is 1-3 years, if exceed the useful limited,
suggest to replace a new one.
Problem: The charger gives out heat while charging
It is normal phenomenon, but if the temperature is too high, please check
whether the charging current to large or short circuit.
14

MAINTENANCE AND REPAIR
•Before playing, patents must check whether the main parts are in good
condition, whether the accumulator,charger,wire,male plug,outer shell
and other parts are damaged; whether the screws are loosen; is their
any hidden danger? Stop using if any damage is found, until completely
repaired.
•After using period of time, please use a little lube to lubricate the iron
parts to prevent wear and rust.
•This product must keep in place far away fire and avoid illuminate for
long time. Keep level and face upward, do not turn upside down、slant.
In wet weather, the car must keep indoor and cover with oilskin.
•This product must away from high temperature things, such as stove
and heat booster and etc, or else the plastic part may be melt. When
charging, please keep away from combustible to avoid conflagration.
•Please charge in time after using, it must be charged by adult. Please
charge fully before collect or not use for long time, and then charge 1
time each month to extend the useful life of accumulator.
•Cleaned by soft and dry cloth, or use non-waxy furniture polishing cloth
to clean the plastic parts to keep them bright and clean. Don’t use
chemistry dissolvent to clean the plastic part of toy, can not use soap
and water to clean the product, can not ride the car in rainy or snowy
day, water will damage motor,circuitry and accumulator.
•Don’t use fuse wire which not suit for the standard of this product.
•Don’t arbitrarily change the structure and circuit of this product,
maintenance must carry out under the guide of professional or
technician.
15
MAINTENANCE RECORDS
Purchase
date
Customer Name:
Tel:
Address:
Purchase time:
Invoice NO:
Remarks
Shop bill
Date:
16

Supervised by Guangdong Fengyuan Toys Industry & Commerce Co., Ltd
Manufacturer: Fengda Toys Industry & Commerce Co., Ltd
Address: Development Avenue, Economic Development Zone, Hubei Province
Website: https://www.fdtoys.cn
Customer Service Hotline: 400-8754-388
Table of contents
Popular Motorized Toy Car manuals by other brands

ECX
ECX RUCKUS instruction manual

REVELL
REVELL Ferrari California 4925 Assembly instructions

Associated Electrics
Associated Electrics R12E Assembly and operating instructions

REVELL
REVELL Porsche 956 C Assembly manual

Chuck & Friends
Chuck & Friends ROLLIN' RACER RC CHUCK user guide

Jamara
Jamara Crossmo EP Instruction


