2in1 Max User manual

BLOOD GLUCOSE MONITORING SYSTEM /
SISTEM ZA MERJENJE SLADKORJA V KRVI
USER’S MANUAL
UPORABNIŠKI PRIROČNIK
EN
SL

Dear 2in1. MaX System User,
Thank you for choosing the 2in1. MaX system! 2in1. MaX blood
glucose monitoring system is designed for easy test of blood
glucose and helps you keep blood glucose under control.
The 2in1. MaX system is fully complying with the new EN
ISO15197:2015 International Standard.
Read this User’s Manual carefully before you use your meter
system. This manual will help you to get comfortable using the
2in1. MaX blood glucose monitoring system and get reliable
test results. Please keep your User’s Manual in a safe place; you
may want to refer it in the future.
Thank you again for choosing the 2in1. MaX System.
Principle and Intended Use
The 2in1. MaX system (Meter Model: MGM) is designed to
quantitatively measure the glucose concentration in fresh
whole blood. The 2in1. MaX blood glucose test is based on
measurement of electrical current caused by the reaction of
the glucose with the reagents on the electrode of the test
strip. The blood sample is pulled into the tip of the test strip
through capillary action. Glucose in the sample reacts with
glucose enzyme and the mediator. Electrons are generated,
producing a current that is positive correlation to the glucose
concentration in the sample. After the reaction time, the
glucose concentration in the sample is displayed. The meter is
calibrated to display plasma-like concentration results.
The 2in1. MaX system is intended for use outside the body (in
vitro diagnostic use) by people with diabetes at home and
health care professionals in clinical setting, as an aid to monitor
the eectiveness of diabetes control. The system should not
be used for diagnosis of diabetes.
EN

TABLE OF CONTENTS
• Understanding Your Testing Tools ........................................... 3
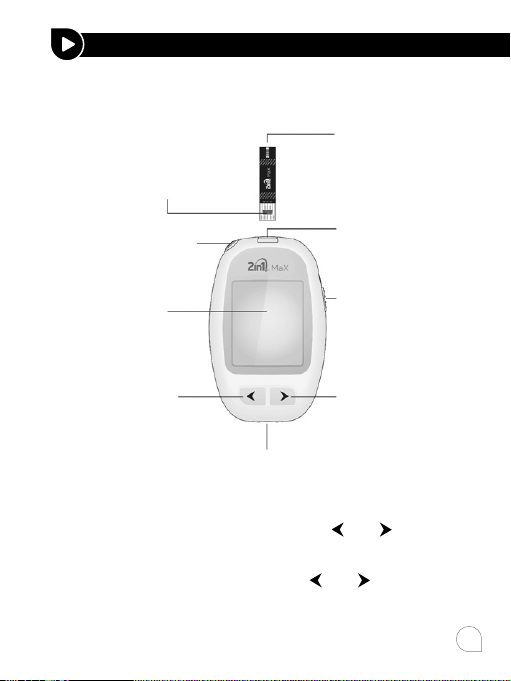
Your Meter System Overview.......................................................... 3
Your Meter Display .............................................................................. 3
Important Safety Information ......................................................... 5
• Setting up your system............................................................... 7
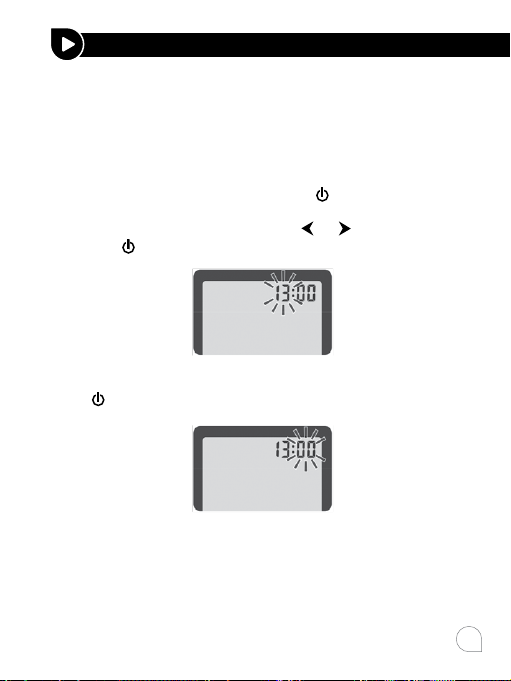
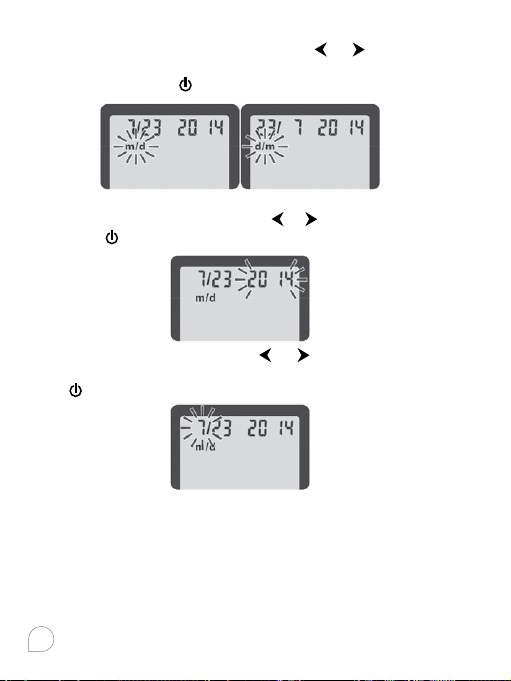
Set the Time and Date ....................................................................... 7
Set up for Basic (L-1) and Advanced (L-2) Modes .................. 9
Set the Hypoglycemia (Hypo) Alarm...........................................11
Set the Ketone Warning ................................................................... 12
Set the Test Alarm Function ...........................................................12
• Taking a test .................................................................................16
Preparing the Test Strip....................................................................16
Preparing the Lancing Device........................................................17
Getting a Blood Drop and Testing................................................19
Marking Blood Glucose Results..................................................... 21
Alternative Site Testing....................................................................26
Testing with Control Solution........................................................ 27
Using the Meter Memory.................................................................32
Transferring Results to a Computer............................................36
• Maintenance and Troubleshooting......................................... 37
Changing the Batteries.................................................................... 37
Caring for Your Glucose Monitoring System ...........................38
Troubleshooting Guide ................................................................... 40
Symptoms of High or Low Blood Glucose...............................43
• Technical Information................................................................44
System Specifications: .................................................................... 44
Limitations ............................................................................................45
Warranty................................................................................................46
Index of Symbols................................................................................47

3
Your Meter System Overview
The 2in1. MaX Blood Glucose Meter and Strip
Your Meter Display
The picture below shows all the symbols that appear on your
meter display. To make sure the display is working properly,
with the meter o, then press and hold and together for
3 seconds to see the complete display. All display segments
will appear for 10 seconds. If you need more than 10 seconds
to check the display, press and hold and together again.
All of the segments should be clear and exactly like the picture
below. If not, contact your local dealer for help.
UNDERSTANDING YOUR TESTING TOOLS
Sample tip:
where the
blood is drawn
Electrode end:
this end is inserted into
the test strip port on the
meter with facing up
Test strip port
Micro USB data port
Strip ejector
Display
Forward
button
Backward
button
Power button

4
Icon What it Means
Top left area on the screen indicates date.
Top right area on the screen presenting time.
Date, month format.
Indicates alarms have been set.
Indicates average value.
Indicates low battery or need to be replaced.
Center area on the display that shows test
results or error codes.
Indicates the system is ready to test.
Ketone warning.
Pre-meal marker.
Post-meal marker.
Control test result.
Test results are displayed as mg/dL or mmol/L
according to local government regulation.
Indicates the temperature is not suitable for
testing.
Indicates low test result may cause
hypoglycemia.

5
Notes:
Your 2in1. Max meter is pre-set with beep sound function, the
meter will beep when:
• turn on the meter.
• the test strip is inserted and ready to apply blood or control
solution.
• sucient blood or control solution is pulled into the test
strip.
• the test is complete.
• it is time to perform a test if you set the test alarms.
• if any error occurs during operation.
Important Safety Information
• Always keep the test strips in the original vial. Tightly close
the vial immediately after you have removed the test strip.
• Do not use the meter if it is dropping into water or splashing
water on to it.
• Wash and dry your hands well before and after testing.
• Test strips and lancets are for single use only.
• Do not drop blood directly on the flat surface of the test
strip.
• Check the expiration dates and discard dates on your test
strips vial label and control solution bottle label.
• Use only 2in1. Max test strip with your 2in1. Max system.
• Use only 2in1. Max control solution with your 2in1. Max
system.
• For self-testers, consult your physician or diabetes health
care professional before making any adjustments to your
medication, diet or activity routines.
• If the system is used in a manner not specified by the
manufacturer, the protection provided by the system can be
impaired.

6
Healthcare professionals or persons using this system
on multiple patients should follow the infection control
procedure approved by their facility. All products or
objects, which come in contact with human blood,
even after cleaning, should be handled as if capable of
transmitting viral disease.

7
Before you first time using your meter or if you change your
meter batteries, you should check and update your meter
settings.
Set the Time and Date
1. Enter the setting mode and set the time
When the meter is o, press and hold until the meter beeps
to enter the set up mode with the number in the hour position
will now flash on the display. Press or to select the hour
and press to set.
The minute will now flash. Press or to select the minute and
press to set.
Note:
Before you first time use your meter system for testing, please
adjust the meter settings to set the date and time, ensuring
that results stored in the memory are shown with the correct
date and time.
SETTING UP YOUR SYSTEM

8
2. Set the Month and Date Format
m/d will now flash on the display. Press or to select the
format you wish (m/d for month/date format or d/m for date/
month format). Press to set.
3. Set the Date
The year will be flashing now. Press or to select the current
year. Press to set.
The month will now flash. Press or to select the month.
Press to set. The date will now flash. Press or to select the date.
Press to set.

9
Set the audio feature
After set the date, the bEEP will now flash. Press or to
select “On” or “OFF”. Press to set.
Set up for Basic (L-1) and Advanced (L-2) Modes
Your 2in1. MaX meter is pre-set with the Basic Mode; it oers
the same test procedure in either the Basic or Advanced Mode.
Basic Mode (L-1) Function Advanced Mode (L-2)
Function
7 day average
900 test result memory
7,14 and 30 day average
900 test result memory
Meal marker function
30 day Pre and Post-meal
average
Selectable test alarms
Hypo warning
Ketone warning

10
After set the date you have finished basic mode set, “L-1” will
flash. To keep your meter in Basic Mode, press to set.
To change your meter to Advanced Mode, press or to
change to “L-2”, and press to set.
If you are using Basic Mode, you have completed your meter
set up. Press to turn o the meter. You can also insert a test
strip into the meter, a symbol of a test strip with a flashing
blood will appear letting you know the meter is ready to test.

11
Set the Hypoglycemia (Hypo) Alarm
If you selected Advanced Mode, you can set the Hypo Alarm
to let you know when your blood glucose is possibly too low.
You can select what blood glucose level you want the alarm to
have (60-80 mg/dL (3.3-4.4 mmol/L).
After you confirmed the selection of Advanced Mode, the
flashes on the display along with “On” on the display. Press
or to turning the Hypo alarm function on or o, press to
set.
If you select the hypo alarm “on”, the display shows 70 mg/dL
(3.9 mmol/L). Press or to select the level you want, press
to set.
Notes:
• Talk to your health care professional to help you decide the
hypo level that suit for your situation.
• For health care professionals, the hypoglycemic level may
vary from person to person. It is recommended to turn
the hypo alarm function OFF when using the meter in a
professional facility.

12
Set the Ketone Warning
After you set the Hypo Alarm, the symbol now will
flash, along with word “On” on the display. Press or to
turning the Ketone warning function on or o, press to set.
If you turn this function on, the symbol will appear
when the test result equals or above 300mg/dL (16.7 mmol/L).
Set the Test Alarm Function
The test alarm function reminds you when to test. You can set
up to 5 alarms per day. When the alarm sounds, the flashes
on the display. The alarm will beep 20 times. You can turn the
alarm o by inserting a test strip to perform a test or pressing
any button to turn the meter o.

13
Your meter is pre-set with the test alarm function to “OFF”.
You can set up to 5 test alarms per day. If you turn 5 test
alarms on (A1, A2, A3, A4 and A5), your meter is pre-set with
the following times for your convenience. You can adjust each
time to suit your needs.
•A17:00•A29:00•A314:00•A418:00•A522:00
Note:
If the meter is on at the test reminder time, the test alarm does
not occur.
After you set the Ketone Warning, the and the word “OFF”
will be displayed, symbol “A1” flashes. Press or to turning
the alarm function on or o, and press to confirm.
If you select “On”, the hour flashes, “A1” and the remain on
the display. Press or to select the hour. Press to set.

14
The minute flashes, press or to select 00, 15, 30, or 45.
These are the only choices. Press to set minutes.
The next alarm “A2” flashes on the display with and “OFF”.
You can either set a second alarm by press or to turn
on the second alarm. Do the same procedures to set the rest
alarms, you have now completed your 2in1. MaX meter set up
for Advanced Mode. The meter shows L-2 along with advanced
function icons.
Press to turn o the meter. You can also insert a test strip
into the meter, the test strip symbol with flashing blood drop
appears on the display, and you are ready to test.

15
Note:
If you want to exit the set up mode at any time, please set up at
least one item, then press and hold till the default operation
mode (L-1 or L-2) appears on the display, press to exit the set
up mode and turn o the meter.

16
Set up your meter correctly and have all the materials you will
need ready before you begin testing. This including your 2in1.
MaX meter, the 2in1. MaX test strips and lancing device with
lancets.
Preparing the Test Strip
1. Wash and dry your hands well before testing.
2. Remove a test strip from the test strip vial or foil pouch.
Tightly close the vial cap immediately after you have
removed the test strip.
3. Insert the test strip into the meter in the direction of the
arrows. Meter turns on after a beep.
4. A symbol with a test strip with a flashing blood will appear
letting you know the meter is ready to test.
TAKING A TEST

17
Note:
Check the expiration and discard dates on the test strip vial.
All expiration dates are printed in Year-Month format. 2018-
01 indicates January, 2018. Your 2in1. MaX test strips have 6
months shelf life after you first open the test strip vial. Write
the discard date on the vial label when you first open it. Make
sure the test strip does not appear damaged. Prior to testing,
wipe the test site with an alcohol swab or soapy water. Use
warm water wash hands to increase blood flow if necessary.
Then dry your hands and the test site thoroughly. Make sure
there is no cream or lotion on the test site.
Preparing the Lancing Device
For fingertip sampling, adjust the depth penetration to reduce
the discomfort. You do not need the clear cap for fingertip
sampling.
1. Unscrew the lancing device cover from the body of the
lancing device. Insert a sterile lancet into the lancing device
and push it until the lancet comes to a complete stop in the
lancing device.

18
2. Hold the lancet firmly in the lancing device and twist the
safety tab of the lancet until it loosens, then pull the safety
tab o the lancet. Save the safety tab for disposing used
lancet.
3. Carefully screw the cover back onto the lancing device.
Avoid contact with the exposed needle. Make sure the cover
is fully sealed on the lancing device.
4. Adjust the puncture depth by rotating the lancing device
cover. There are a total of 11 puncture depth settings. To
reduce the discomfort, use the lowest setting that still
produces an adequate drop of blood.

19
Adjustment:
0 and 1 for delicate skin
2 and 3 for normal skin
4 and 5 for calloused or thick skin
Note:
Greater pressure of the lancing device against the finger will
also increase the puncture depth
Getting a Blood Drop and Testing
1. Pull the cocking barrel back to set the lancing device. You
may hear a click; while the release button changes to orange
color to indicate the lancing device is now loaded and ready
for obtaining a drop of blood.
2. Press the lancing device against the side of the finger to be
lanced with the cover resting on the finger. Push the release
button to prick your fingertip. You should hear a click as the
lancing device activates.
Table of contents
Languages:
Other 2in1 Blood Glucose Meter manuals