Avital 6276 User manual

USER GUIDE
6276ET-M01A4
Blood Glucose Monitoring System
Model:6276
Rev.date:06/2016
Avital 6276
No Coding
Required

Explanation of symbols:
Important Notice to Reader of this Manual
This manual is written for the Avital 6276 meter
Caution (refer to accompanying documents).
Please refer to safety-related notes in the
manual accompanying this instrument.
Consult instructions for use.
Keep away from sunlight.
Authorised representive in the
european community.
Manufacturer
Do not reuse
Use by / Expiry date
Lot number
In vitro diagnostic medical device.
Temperature limitation

1. Contents
Section Topic Page
1.Table of Contents
2.Introduction
3.Appearance and Key Functions of the meter
4.A lternate Site Testing
5. Safety Information
6. Quick Testing Instructions
Preparing for Testing
7.Installing the Battery
8.S ettings (Date/Time/Alarm/
Memory Deletion /Voice volume)
9.Running a Control Solution Test
Blood Testing
10. Running a Blood Glucose Test
11. Recalling the Memory and Viewing the Average
12.Expected Values
13. Performance Evaluation Data
14.Transmitting Results
Maintenance
15. Maintenance of Your System
16. Troubleshooting
17. Customer Service
18. Limitations
Important Additional Information
19. Specifications
20. Ordering Supplies
21. Warranty Information
1
NOTE: For information about the name of the manufacturer of
the lancing device and the lancets, please refer to the package
inserts that came with your starter kits.
1
2-3
4
5-7
8
9
10
11-14
15-16
17-19
20-21
22
22
23
23
24-25
26
27
28
29
29

2
2. Introduction to the System
Intended Use / Indications for Use
The Avital 6276 Blood Glucose Monitoring System is intended
for use in the quantitative measurement of glucose in fresh
capillary whole blood from the finger and the palm. It is
intended for use as an aid by either a healthcare professional
or a patient diagnosed with diabetes mellitus for monitoring
their blood glucose levels when self testing. The Avital 6276
Blood Glucose Monitoring System is not intended for the
diagnosis of or screening for diabetes mellitus, nor for use
with neonates.
The alternative site testing (palm) in this system can only be used
during steady-state blood glucose conditions.
Contents of the System
This User Guide has been prepared to describe the proper use of
the Avital 6276 Blood Glucose Monitoring System.
Please read this User Guide and the package insert that comes
with the Avital Glucose Test Strips before testing.
The system is available either as a meter alone or as a kit. If you
have a meter only, you can purchase the system supplies from
your system provider.

The Avital 6276 Blood Glucose Monitoring System contains
the following items:
1. Avital 6276 Glucose Meter with 2 AAA batteries
2. User Guide
3. Carrying Case
4. Avital Glucose Test Strips
5. Lancets
6. Lancing Device
7. Package Inserts for Test Strips
You may purchase any control solutions that you need from your
system provider.
The Avital 6276 Glucose Meter uses Avital 6276 Glucose Test Strips.
Neither the meter nor the test strips will work when used with any
other brand of glucose products.
3

4
3. Appearance and Key functions
of the meter
The principle of the method
When glucose reacts with the reagents on the test strips, an electrical current
is produced, which is proportional to the glucose concentration in the blood sample.
The glucose concentration is calculated by the meter and based on the current measured.
1.Test strip slot - When the strip is inserted into the
slot, the meter will automatically turn on.
2. LCD Display - Guide you through the test using
symbols and simple messages.
3. M Key - Power ON/OFF, also for memory recalling
mode, please refer to manual for detailed function
description.
4. C Key - Setting mode, please refer to manual for
detailed function description.
5. RS232 port - Cable connection and data transmitting.
6. Battery Compartment - Where batteries are
located.
7. Ejector - Remove used strip.
(1)
(2)
(3)
(4)
(5)
(6)
(7)
*If your meter has the back light feature, this will come on automatically
during every operation to help user readability and to assist with the
smooth operation of your meter .

5
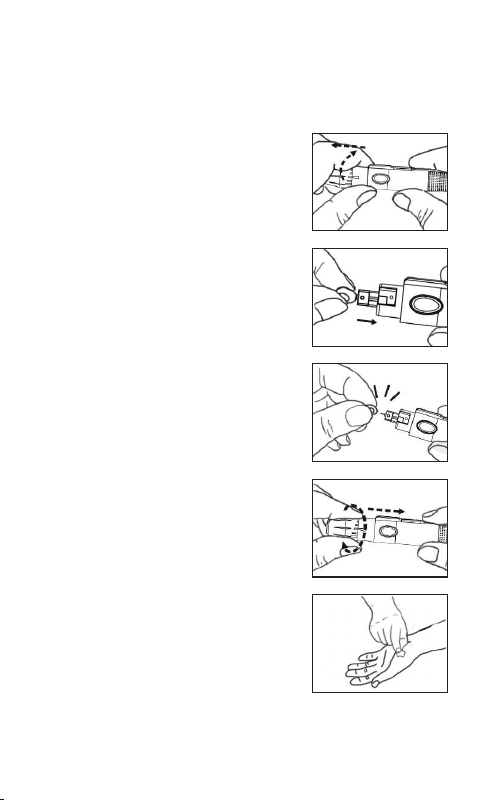
4. Alternate Site Testing (AST)
What is AST?
AST is the sampling from anatomical sites (parts of the body)
other than the fingertip (i.e. palm) to check the blood
glucose levels. This system allows you to test on the palm
with the equivalent results to fingertip testing.
There are important limitations to AST. Please consult your
healthcare professional before you use AST.
What is the advantage ?
Some patients may encounter discomfort when taking a blood
sample from the fingertip as the finger tips have a high
concentration of nerve endings. Other body sites do not have
as many nerve endings, so you will not feel as much pain as at
the fingertip.
When to use AST ?
Medication, stress, illness, food and exercise can affect blood
glucose levels. Capillary whole blood at the fingertip can reflect
test changes faster than capillary blood at other sites of body. If
you test your blood glucose level during or immediately after
a meal, physical exercise or stressful events, take the other
sites of the body blood sample from your fingertip instead of
from other sites.
Use AST only:
1. 2 hours or more after taking insulin;
2. 2 hours or more after a meal;
3. 2 hours or more after exercise.
Do not use AST if you are pregnant, or if you are aware that
your glucose level is not as stable as usual, or if you think
you have hypoglycemia (low blood sugar) or hyperglycemia
(high blood sugar).
Do not use AST if you think your blood glucose is low and if
your AST results do not match the way you feel.

6
Testing Procedure for AST
1.Please unscrew the lancing device
by turning the end cap counter
clockwise. A clear cap will come
with the package of a meter kit or
a lancing device. The clear cap on
the lancing device will make it easy
for you to get a drop of blood for
AST.
2.Insert a new lancet firmly into the
lancet holder.
3.Twist off the protective top of the
lancet.
4.Close the end cap of the lancing
device and grasp the lancing device
as shown. Slide into locking position.
If necessary, please set the lancing
device for a deeper puncture.
5.Select a soft, fleshy area on your
palm that is clean and dry, away
from bone and free of visible veins
and hair.
5
21
4
3
2
1
2
1

7
6.Massage the selected area gently
to increase blood flow to the
puncture site. Clean the test location
with an alcohol wipe or with soap
and water.
7.O pen the test strip vial. Take one
test strip out of the vial and quickly
cover the vial to keep air out.
8.Insert a test strip into the meter
while the meter is off. The meter
will turn on automatically. A blinking
blood icon will be displayed on the
screen. If no action is taken in 2
minutes, the meter will turn off
automatically.
9.Press and hold the loaded lancing
device against the palm for a few
seconds, then press and release the
button.
6
7
8
9

5. Safety Information
Please use this device only for the intended use
described in this user guide.
Before using this system to test your blood glucose
please read the instructions carefully and practice the
test when you first use this system. Do a quality check
on the system following the instructions and consult
with your healthcare professionals for questions or
problems.
Be aware of the safety of young children or
handicapped persons near you when you conduct a
glucose test using this system.
Please keep the test strip vial away from children.
The test strips and vial cap can present a choking
hazard.
Please be cautious when removing the lancet. Take
the lancet out carefully. Always place the protective
cap back on the exposed tip or (if using a twist lancet)
place the cap on a hard surface and push the exposed
tip into the protective cap and discard of properly.
Never try to disassemble the meter in any
circumstance. If your meter is not working properly,
or if you need the Technical Support, please contact
your local distributor for help. 8

6. Quick Testing Instructions
1. With the meter turned off, insert a
new test strip into the meter. A
blinking blood icon will be
displayed on the screen.
2. Lance the finger and let a blood
drop form.
3. Apply the blood drop to the front
edge of the test strip when the blood
drop icon is still blinking on the
meter. Wait for 6 seconds, and the
meter will display the test result.
4. Remove the used strips by hand or
by pushing the ejector and the meter
will power off.
(For detailed instructions start on page 15 for Control
Solutions and page for Blood Testing.) 17
9
1
2
3
4

7. Installing the battery
1. Turn off the meter by pressing
the “M” button and hold for 2
seconds before replacing the
batteries. Slide down the battery
cover on the back of the meter by
pushing the cover in the direction
of the arrow and put the cover aside.
2. Remove the two used batteries.
3. Insert 2 new batteries with
correct +/- direction.(Battery:
AAA 1.5V 2 Alkaline 24A LR03)
4. Put the battery cover back in
place by pushing the cover in the
opposite direction of the arrow to
close the cover into position.
Note:
1.I t is suggested that batteries need to be
replaced when the battery icon appears
empty. If you keep using the meter, the
battery icon will start flashing and an error
message E_3 will appear on the screen.
2.N ote that replacing the battery will not
reset the stored testing results.
3 . You need to reset the time and date after
the batteries are replaced.
4 .I f there is any unexpected symbol on the
display, please follow the above procedure
to replace the batteries again.
5.Please dispose of batteries according
to your local ordinances. 10
1
2
3
4

8. Settings ( Date / Time / Alarm / Memory Deletion /
Voice Volume)
1.Appears with the test result or in mmol/L.
2.Appears when you recall the memory.
3.Appears when you are in setting mode.
4.Appears for control solution test flag (cotr).
5.Indicates the meter is ready to take the blood sample when it flashes.
6.Indicates the battery status.
7.Indicates current displayed result is an average.
8.Appears when alarm is on.
9.Month
10.Day
11.Hour
12.Minute
(1)Measurement Units
(6)Battery Symbol
(3)Setting
(2)Memory
(9)Month
(10)Day (11)Hour
(12)Minute
The LC D screen will show as below:
(4)Test flag
(5)Blood drop icon
(7)Day Average
(8)Alarm
Reminder
11
cotr

1.
2.
3.
Set the Year - To go into the “Setting Mode”
you must press and hold down the M
Button. Then release the M Button and the
first number on the screen will be the year.
Press C key to adjust the year until the
desired year is displayed and then press the
M key to confirm the year setting. When
pressing the C key, the year will be adjusted
in the range of 2014 to 2029. After the year
setting is confirmed, you will see the month
segment flashing on the screen.
Set the Month - Press C key to adjust the
month until the desired month is displayed
and then press the M key to confirm the
month setting. You will then see the day
segment is flashing on the screen.
Set the Day - Press C key to adjust the day
until the desired day appears and then press
the M key to confirm the day setting. You
will then see the hour segment is flashing
on the LCD screen.
1
2
3
SET
SET
SET
12

Set the Hour - Press C key to adjust the hour
until the desired hour appears on the screen
and then press the M key to confirm the
setting. You will then see the minute
segment is flashing on the screen.
Set the Minute - Press C key to adjust the
minute until the desired minute appears on
the screen and then press the M key to
confirm the setting. You will then see an
“AL” displayed on the screen center.
5.
6.
Set the Alarm Reminder - Press C key to
toggle between the alarm reminder setting
or no-setting mode. If you see the LCD
display a small flashing icon of alarm clock
in the lower left corner with a time segment
display, it means that you are in the alarm
setting mode. If you see only AL without
the icon of the small alarm clock, it means
that you are not in the alarm setting mode.
Press M key to confirm the alarm setting
mode. If you select the alarm setting mode, alarm clock icon will
stop flashing and the hour of the time segment will start flashing.
Press C key until the desired alarm hour appears and then press
M key to confirm the hour setting. Then the minute segment will
start flashing. Press C key until the desired minute appears on
the screen and then press M key to confirm the minute setting.
You will see the measuring unit flashing on the upper left corner
of the LCD display. Each time you press the C key to adjust the
minute.
5
SET
6
SET
SET
4
4.
13

Delete Memory - Press C key to toggle
between a flashing “dEL” for memory
deletion or a non-flashing “dEL”. If you
want to delete all memory, press M key
while the “dEL” is flashing. If you do not
want to delete all memory, press M key
when the“dEL” is not flashing.
7.
7
Note:
1. When you change the date and time backward, you will not
change the test results in the meter memory.
2. You need to move through the language, year, month, day, hour,
minutes, alarm, measurement unit, dEL, to save the meter settings
and turn off the meter.
3. The average readings in the meter memory are calculated from
the results obtained during the 7, 14, 28, 60, and 90 calendar days
preceding the current date and time settings.
4. Your meter can show results either in "mg/dL" or"mmol/L"units.
It is very important to use the correct unit of measurement to
properly manage your diabetes. If you live in the Europe, you
should use mmol/L; your results willalways have a decimal point.
The unit of measurement will be setto mmol/L by default. If you do
not see a decimal point in your testresults, it indicates the
measuring unit is in mg/dL.
14

9. Running a Control Solution Test
IMPORTANT:
Always make sure you press C key for Control Solution test,
otherwise the control solution test result will be stored in the
memory, and affect your“AVG”results.
1. Insert a strip into the meter. A blinking
blood icon will be displayed on the screen.
2. Press the C key, and the meter will
display a letter “cotr” on the down right
corner of screen, indicating the control
test mode. The test result will not be
stored in the memory.
3. Squeeze a small amount of Control
Solution on a flat surface and apply to the
front edge of the test strip.
4. Wait for 6 seconds, and the meter will
display the result.
5. Remove the used strips by hand or by
pushing the ejector and the meter will
power off .
15
mmol / L
AM
PM
cotr
1
2
3
4
5

IMPORTANT!!!
1. You must press the C key to distinguish the control solution
test from the blood glucose test. Do not perform the blood test
in Control Solution mode.(If you perform the blood test in
Control Solution mode, the test result will not be stored in the
memory.)
2. Use only SuperCheck2 Control Solution with Avital 6276
Glucose Meter.
3. SuperCheck2 Control Solutions are used to check that the
meter and the test strips are working together as a system and
that you are performing the test correctly.
4. SuperCheck2 Control Solution contains a known amount of
glucose that reacts with test strips. The Medium and High level
Control Solution are intended to check the monitoring system
in different measurement ranges.
5. Shake the vial, discard the first drop of control solution, and
wipe off the dispenser tip to ensure a good sample and an
accurate result.
6. Use only for 3 months after first opening. Record the open
date on the Control Solution vial. Discard after 3 months.
7. Compare your Control Solution test results with the expected
range printed on the test strip vial label. If your glucose control
results fall outside the expected range; repeat the test. Results
that repeatedly fall outside the expected range may indicate:
(1)You may not be doing the test correctly; repeat the test, by
shaking the control solution vial well and carefully following
instructions. Please make sure the test is done within the
temperature range.
(2)The Control Solution is expired or contaminated.
(3)The test strips are damaged or outdated.
(4)You may have applied the Control Solution before the
blood drop appears on the screen. This will cause incorrect
glucose measurement.
(5)Meter malfunction.
8.The recommend temperature range for control solution test
is 68-86℉ (20-30℃). Always allow at least thirty (30) minutes
to let meter, test strip and control solution adjust to the stable
temperature before performing a control test. 16

10.Running a Blood Glucose Test
1. Please unscrew the lancing device
by turning the end cap counter
clockwise.
2. Insert a new lancet firmly into the
lancet holder.
3. Twist off the protective cover of the
lancet.
4. Replace and twist the adjustable
depth cap onto the body of the lancing
device until you hear the click. When
the cap is properly closed in locked
position, you should see the arrow and
release button are aligned. (see Figure
3-4). Holding the cap and select
lancing depth.
Slide the lancing device into locking
position: gently pull the gray sliding
barrel away from the top of the lancing
device until a soft click is heard.
5. Wash your hands in warm, soapy
water. Be sure to rinse and dry well.
17
1
2
21
1
2
3
4
5

6. Open the test strip vial. Take one
new test strip out of the vial and
recap the vial quickly and firmly.
7. While the meter is off, insert a
new test strip into the meter's strip
slot with the contact bars facing
upwards. The meter will turn on
with a full screen display. A blinking
blood icon will be displayed on the
screen. If no action is taken in 2
minutes, the meter will turn off
automatically.
8. Use the adjustable lancing device
or the disposable lancet to take a
blood sample from the fingertip and
let it form a small round blood drop.
To avoid body fluid contamination,
it is recommended that you do not use the first blood drop
for glucose testing.
18
6
7
8
Table of contents
Languages: