3A MEDES EASY-PRESSO EP-100 User manual

EASY-PRESSO
EP-100
Product Manual

EASY-PRESSO EP-100
This product uses air, unlike conventional product, does not generate noise during operation.
Strong pressurization allows precise molding, regardless of model trimming, as well as various thickness (0.5mm
to 4.0mm), and size (127mm, 125mm, 120mm) square and round sheet can be used.
•
After heating the sheet, the heater is automatically shut off when rotating front or center.
•
Carbon glass tube heater is used to heat and heat quickly.
•
This machine is durable using aluminum body.
•
Simple operation makes it easy for anyone to operate.
Special features of goods
This manual provides all the information you need to operate EASY-PRESSO. Please familiarize yourself with the
manual and operate it before operating this product.
Recommendation
01
①
Connect air tube(8
Ø
) to the air connection
on the bottom of the back of the body.
②
Connect power cable to the power supply
on the bottom of the back of the body.
③
Remove the support fixture
9
and fixed cable tie.
④
Rotate the lowing sliding
6
to the left(90°) to look to the front.
Setup
02
Part Identication
03
①
Top plate
②
Main unit
③
Pressure gauge
④
Heater
⑤
Upper sliding
⑥
Lower sliding
⑦
Bottom Plate
⑧
Bead case
⑨
Support fixture
⑩
Heater case
⑪
Air connection
⑫
Regulator
⑬
Label
⑭
Power Supply
⑮
Spring
5
1
2
3
4 6 7
8
9
10
11
12
13
14
15

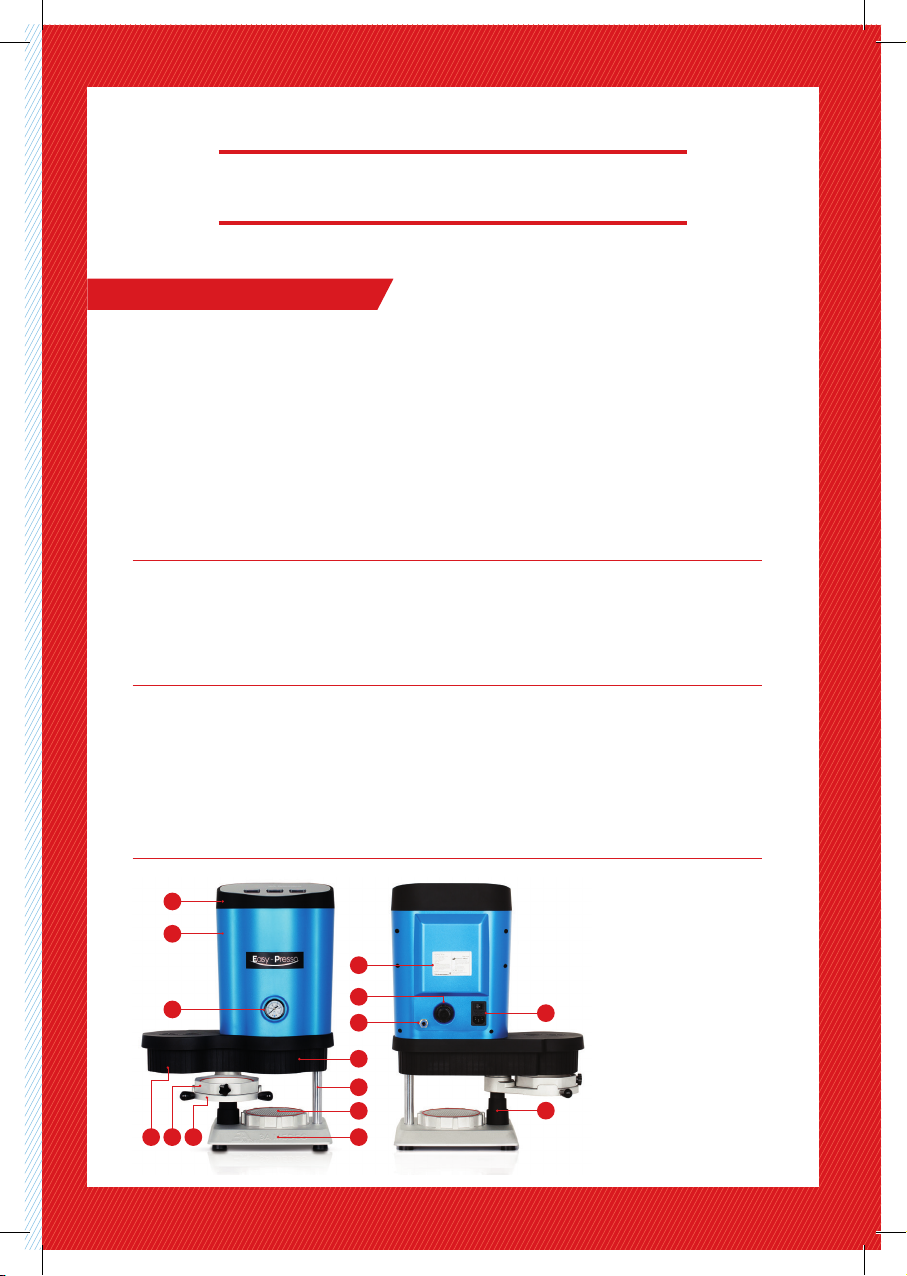
Front (Operating Switch)
•
Heater :
Sheet heating and softening
•
Cylinder :
Up & down operation and vacuum
•
Pressure
:
Pressure ejection and model moulding
Component
(구성품)
①
Product Name : EASY-PRESSO (Model: EP-100)
②
Power : AC 100~120V 50~60HZ, AC 220~240V 50~60HZ
③
Power Consumption : 450W
④
Pressure : 0.4~0.6
㎫
⑤
Dimension : 410x260x545
㎜
⑥
Weight : 15kg
Specication
04
A. Preparation before use
①
Connect the power cable to the main unit and the outlet.
②
Connect air tube(8
Ø
) to air connection of the main unit. (Check pressure gauge operation)
③
The factory setting is 0.5
㎫
. (If the pressure gauge does not work, check the air compressor in use.)
④
Rotate the lower sliding in the front direction and place the bead case on the bottom plate of the main unit.
B. How to use
①
Select the sheet that best suits your purpose. (Temporary, Splint, retainer, bleaching, and so on)
②
Place the model you want to make in the middle of the bead case.
③
Place a round ○or square □type sheet on the lower sliding to fit the guideline, and then put the upper sliding on.
④
Press the heater switch on the front top plate. (The lamp is turned on and the heater is in standby mode.)
⑤
Rotate the lower sliding to the left (90°). At this time, the heater automatically turns on.
⑥
Wait for the sheet to hit the model height or halfway. (Time range is between 50 to 90 seconds. The operating
time differs depending on the material and thickness.)
⑦
Rotate the lower sliding to the right (180°). (Model location in the center of the body)
⑧
Press the cylinder switch on the front top plate. (The lamp is turned on and the air case comes down and
presses the upper and lower sliding to create a vacuum standby state.)
⑨
Press the pressure switch on the front top plate. At this time, the air is injected into the air case and the sheet is
completely molded into the model. (The operating time is about 3 to 5 minutes depending on the material and
thickness.)
⑩
Turn off the front pressure switch and turn off the cylinder switch on the front top plate. (The sheet is fully seated
on the model and comes up.)
⑪
Rotate the lower sliding to the left(90°).
⑫
Remove the upper sliding and take out the molded model.
⑬
Turn off the heater switch on the front plate.
Operation
05

C. Management and storage methods
①
Disconnect the power cable from the outlet.
②
After use, check the equipment is clean.
③
Do not place anything on the heater.
①
There is a risk of burns because the heater area is heated after using this product.
②
Do not disassemble or repair this product.
③
After using this product, must remove the power cable from outlet
④
Contact with sheet softening may cause sheet deformation and burns.
⑤
Do not use for other purposes.
Caution
06
①
Please keep out of reach of children.
②
Please use in a place separated from fire and water.
③
Temperature : -10 ~ 70
℃
④
Humidity : 10~100%
⑤
Pressure : 50~106kpa
Maintenance & Storage
07
This product has passed strict testing and inspection.
This product is warranted for 12 months from the date of purchase from us.
①
This product will be repaired free of charge the performance and function defect that occurred under normal use
condition within the warranty period. If it cannot be repaired, we will replace it free for charge with a new product.
②
Repair fee will be charged after the warranty period is expired.
③
In case of any of the following cases within the warranty period, repair fee will be charged.
•
Failure caused by intention or negligence of the consumer.
•
Failure caused by repair at a place not designated by us.
•
Failure caused by power supply or faulty connecting devise.
•
Other arbitrary disassembly, failure due to arbitrary alteration, etc.
Warrantee
08
Clean the product and each part with a soft cloth and air.
Cleaning
09
Please contact us if you have any mechanical problems.
•
Telephone : 82-31-909-8774
•
Fax : 82-31-909-8773
•
Homepage
: www.3amedes.co.kr
Customer Support Division
10

Fault coping method
(고장대처법)
Quick guide
(퀵가이드)
Component
(구성품)
Explanation of symbols
(기호설명)
Symbol
(기호)
Description
(설명)
Symbol
(기호)
Description
(설명)
Heater(On/OFF)
히터(켜짐, 꺼짐)
Protective Earth(Ground)
접지(Ground)
Cylinder(On/OFF)
실린더(켜짐, 꺼짐)
Warning, Attention
주의, 첨부된 문서 참조
Pressure(On/OFF)
압 력(켜짐, 꺼짐)
Caution, Hot Surface
경고, 고온 표면
Bead case
비드케이스
Sample pack
샘플팩
Upper sliding
슬라이딩 상
Manual
매뉴얼
Power cable
전원케이블
①
Power failure : Check fuse and power switch.
(전원이상 : 휴즈, 전원 스위치 )
②
Heater failure: Check heater switch, limit switch, heater.
(히터이상 : 히터 스위치, 리미트 스위치, 히터 )
③
Pressure failure : Check compressor, pressure switch. (
가압이상 : 컴퓨레샤 확인, 레귤레이터조정, 가압스 위치 )
Manufacture : 3A MEDES
Address : No. 801-2, Ilsantechnotown Bldg., 138, Ilsan-ro, Ilsandong-gu, Goyang-si,
Gyeonggi-do, 410-722, Republic of Korea
Tel : +82-31-909-8774~6 / Fax : +82-31-909-8773
01
Preparation
정면준비
02
Place the sheet
시트를 올려놓는다
03
Turn it to the left(90
°
)
좌측(90°)으로 돌린다
04
Turn it to the center(180°
)
중앙(180°)으로 돌린다
05
Activate the cylinder
실린더를 작동한다
06
Heater on turn left
좌측 회전 시 히터점등
Table of contents