Abit Siluro GF2 MX Troubleshooting guide

SILURO™GF2 MX
Graphics Accelerator
Installation Guide and User’s Manual

Copyright and Warranty Notice
The information in this document is subject to change without notice and does not represent a
commitment on part of the vendor, who assumes no liability or responsibility for any errors that
may appear in this manual.
No warranty or representation, either expressed or implied, is made with respect to the quality,
accuracy or fitness for any particular part of this document. In no event shall the manufacturer be
liable for direct, indirect, special, incidental or consequential damages arising from any defect or
error in this manual or product.
Product names appearing in this manual are for identification purpose only and trademarks and
product names or brand names appearing in this document are property of their respective owners.
This document contains materials protected under International Copyright Laws. All rights
reserved. No part of this manual may be reproduced, transmitted or transcribed without the
expressed written permission of the manufacturer and authors of this manual.
If you do not properly set the Graphics Accelerator settings causing the motherboard to
malfunction or fail, we can not guarantee any responsibility.

MN-211-2A0-01 Rev. 1.00
SILURO™GF2 MX
Graphics Accelerator
Index
CHAPTER 1. GETTING STARTED ...............................................................1-1
1-1. INTRODUCTION .........................................................................................1-1
1-2. KEY FEATURES.........................................................................................1-1
1-3. FEATURES AND BENEFITS.........................................................................1-3
1-4. WHAT’S IN THE BOX? (PACKAGE LIST) ...................................................1-4
CHAPTER 2. HARDWARE INSTALLATION ..............................................2-1
2-1. CARD LAYOUT..........................................................................................2-1
2-2. CARD INSTALLATION................................................................................2-1
2-3. VGA OUTPUT...........................................................................................2-2
2-4. TV OUTPUT ..............................................................................................2-2
CHAPTER 3. DRIVER INSTALLATION ......................................................3-1
3-1. INSTALLING THE VGA DRIVERS FOR WINDOWS®9X ..............................3-1
3-2. HOW TO USE THE DISPLAY PROPERTIES IN WINDOWS®98 SE.................3-3
3-3. DISPLAY TRAY ICON ..............................................................................3-12
3-4. INSTALLING THE VGA DRIVERS FOR THE WINDOWS®NT 4.0
SERVER/WORKSTATION .........................................................................3-13
3-5. HOW TO USE THE DISPLAY PROPERTIES SETTINGS IN
WINDOWS®NT 4.0 SERVER/WORKSTATION..........................................3-17
3-6. INSTALLING THE VGA DRIVERS FOR WINDOWS®2000 .........................3-20
3-7. HOW TO USE THE DISPLAY PROPERTIES SETTINGS IN
WINDOWS®2000 ....................................................................................3-24
3-8. BEFORE RUNNING GRAPHIC MAX ..........................................................3-29
3-9. INSTALLING THE ALBUMVIEW ...............................................................3-31
3-10. INSTALLING THE INTERVIDEO WINDVD 2000 ......................................3-33
3-11. INSTALLING THE MICROSOFT®DIRECTX®7...........................................3-34
3-12. BIOS FLASHING UTILITY .......................................................................3-35
Appendix A. Display Modes Table
Appendix B. Product FAQ
Appendix C. How to Get Technical Support


Getting Started 1-1
User’s Manual
Chapter 1. Getting Started
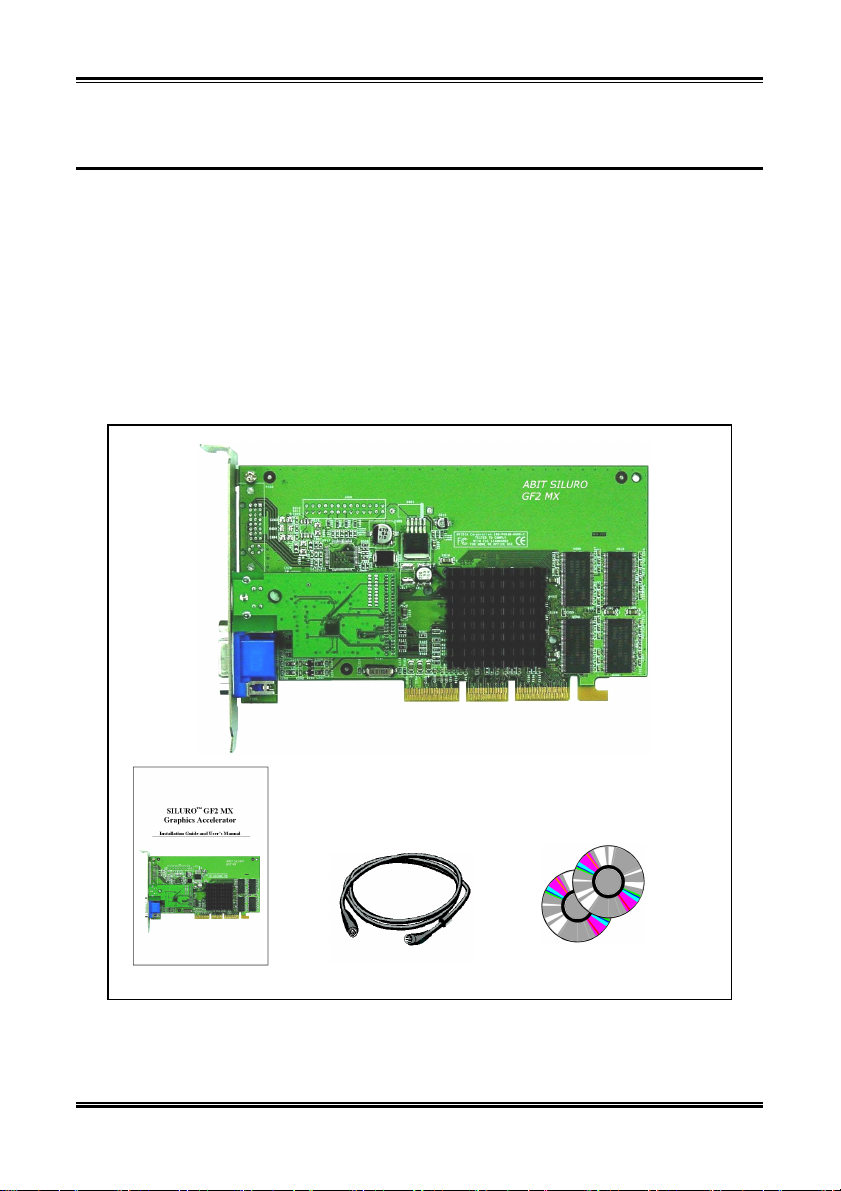
Congratulations! You have chosen one of the most powerful high-performance 3D Graphics Accelerators
available. The SILURO™GF2 MX uses the NVIDIA™GeForce2 MX 256-bit with new 4x4 T&L
architecture processor chip.
1-1. Introduction
The SILURO™GF2 MX Graphics Accelerator provides you powerful 3D acceleration, and also provides
the most advanced Direct3D/OpenGL acceleration solution for games, professional 2D/3D CAD/CAM
applications and 3D drawing applications.
GF2 MX is the first shading GPU with the new NVIDIA Shading Rasterizer and a High Definition Video
Processor (HDVP). Incorporating a radical new per-pixel shading processor, raising image quality to
never-before-seen heights for interactive content. Each of the four new rasterization pipelines now
process two textures per pixel, in life-like 32-bit color, at full speed. GF2 MX second generation
transform and lighting architecture now delivers more than 20 million triangles/sec transformed and lit,
allowing even more stunning scene realism.
GF2 MX’s integrated HDVP supports all ATSC resolutions, including 720p, at their specified frame rates.
When combined with a high performance, high-level software MPEG-2 decoder and a Digital TV
receiver, GF2 MX delivers a cost effective, high quality HDTV playback solution. In addition, GF2 MX
enables ground-breaking new applications like HD time-shifting, and digital VCR capabilities.
GF2 MX is the most complete DX7 hardware implementation and meets all the requirements of the
mainstream PC graphics market, including Microsoft’s PC00, PC99 and PC99a initiatives.
GF2 MX delivers the industry’s fastest Direct3D and OpenGL acceleration and continues NVIDIA’s
tradition of providing leadership, single-chip, integrated VGA/2D/3D and high definition digital video
performance. This enables a wide range of applications, from 3D games to HDTV, DVD, digital content
creation, Internet browsing and general productivity.
1-2. Key Features
•Incorporates NVIDIA’s latest 256-BIT GigaTexel GPU, the revolutionary GeForce2 MX (code-named
NV11) processor
•HyperTexel architecture with 4 texels per clock
•175MHz core clock, 166MHz SDRAM clock
•Integrated 350MHz RAMDAC, resolution up to 2048x1536, True Color @ 60Hz
•20M Triangle/sec through T&L and Set-up, 700-Mtexel fill rate
•2 dual-texturing pipelines, mapping 4 texel/clock cycle
•BIOS VESA BIOS 3.0 support

1-2 Chapter 1
SILURO
GF2 MX
•4X AGP with Fast Writes/AGP 2X compatible and execute mode
•Full acceleration for Microsoft DirectX 7.x, beta DirectX 8, and OpenGL 1.2 ICD
•DirectX Texture Compression support
•Vivid NTSC/PAL TV-Output with flicker filter (Optional)
•Digital Dual-Head display architecture, supporting dual CRTC/simultaneous dual display (Optional
model)
•Thinner dye shrink (0.18 microns) to support more possible overclocking rates, lower power
consumption and reduce heat dissipation
•100% hardware triangle setup
•The most advanced supports for OpenGL 1.2 ICD and DirectX 7.x and beta DirectX 8
•New 3D features: per-pixel shading and lighting for rich, lifelike materials and cinematic effects
•2nd Generation Hardware Lighting Engine
Finer lighting
Rich, lifelike cinematic effects
Processing of multiple lights
2nd Generation Hardware Transform Engine
Smoother movements
Incredibly precise detailing
Low CPU consumption
•Per-pixel Shading
NVIDIA Shading Rasterizer (NSR) featuring
Faster texture mapping on objects and characters
Real-time shadows
Realistic textures with real-time rendering of per-pixel shading
Added depth on flat surfaces
High Quality TV/Video Output and DVD Playback
•Extraordinary image playback with DVD titles or games on your TV: NTSC and PAL TV output in
640x480 and 800x600
•High Definition Video Processor (HDVP) for full-screen, full-frame video playback
•Independent Hardware Color Controls for Video Overlay
•Hardware color space conversion (YUV 4:2:2 and 4:2:0)
•5-tap horizontal by 3-step vertical filtering
•8:1 up-scaling and down-scaling
•Per-pixel color keying
•Multiple video windows with hardware color space conversion and filtering
•DVD sub-picture alpha blended compositing
•Video acceleration for DirectShow, MPEG-1, MPEG-2, and Indeo 5.10
High performance 256-bit 2D acceleration
•Optimized for multiple color depths including 32, 24, 16, 15, and 8-bits per pixel
•True-color hardware cursor
•Multi-buffering (double, triple, quad buffering) for smooth animation and video playback
•Outstanding resolutions of up to 2048x1536 in 16 million colors with a 350MHz RAMDAC

Getting Started 1-3
User’s Manual
1-3. Features and Benefits
Features Benefits
Single-Chip GPU (Graphics
Processing Unit)
On-chip integration of the entire 3D pipeline (transformation, lighting,
setup and rendering) offers the lowest possible component and board
design cost.
Integrated Transform and
Lighting
Delivers 2-4X the triangle rate for 2-4X more detailed 3D scenes. Frees
up CPU bandwidth for physics and artificial intelligence (AI), which
results in more realistic object behaviors and character animation.
Independent Pipelined
QuadEngine™
Separate engines for transformation, lighting, setup and rendering
provide a very powerful, highly efficient architecture that delivers 25
million triangles per second. Allows applications to represent 3D
characters and environments with the highest degree of complexity
possible.
350MHz RAMDAC Delivers the clearest, sharpest, most solid image quality at 2048 x 1536
resolution at 60Hz.
High-Speed Memory
Interface
Designed to support current SDRAM / SGRAM and DDR high-speed
memory.
256-Bit 2D Rendering
Engine
Delivers the industry’s fastest 2D performance for ultra-fast screen
refresh at high resolutions and 32-bit color depths.
Microsoft®DirectX®and
OpenGL®Optimizations
and Support
Delivers the best performance and guarantees compatibility with all
current and future applications and games.
TwinViewArchitecture
Doubles your desktop workspace using two space saving displays. You
can extend one application across two displays or run separate
applications on each screen.
Digital Vibrance ControlProvides crisp, bright visuals.
Second Generation
Integrated Transform and
Lighting (T&L) Engines
Provides a more powerful and balanced PC platform by offloading
graphics-intensive workload from the CPU.
NVIDIA Shading
Rasterizer (NSR)
Brings natural material properties to life with advanced per-pixel
shading capabilities.
High-Definition Video
Processor (HDVP)
Turns your PC into a full-quality DVD player and HDTV
receiver/player.
AGP 4X/2X, AGP
Texturing, and Fast Writes
Support
Takes advantage of new methods of transferring information more
efficiently, and allows content developers to use high-quality, 32-bit
color textures and high-polygon-count scenes.
TV-Out and Video Modules Gives end users the option of big-screen gaming, digital timeshifting
VCR, and video editing applications.

1-4 Chapter 1
SILURO
GF2 MX
1-4. What’s in the Box? (Package List)
Read through this section to familiarize yourself with everything that is included with the SILURO™GF2
MX Graphics Accelerator.
•One SILURO™GF2 MX Graphics Accelerator
•One User’s manual
•One S-Video extension cable
•SILURO™GF2 MX installation CD-Title (which includes Windows®95/98 SE/Windows®NT
4.0/Wondows®2000 drivers, Microsoft®DirectX®7 driver, GART driver, WinDVD player) and game
CD.
Figure 1-1. Package list of SILURO™GF2 MX Graphics Accelerator
SILURO™GF2 MX Graphics Accelerator
S-Video Cable
User’s Manual
Installation CD-Title
& Game CD

Introduction to SILURO™GF2 MX 2-1
User’s Manual
Chapter 2. Hardware Installation
This section tells you how to make a quick connection to the SILURO™GF2 MX series Graphics
Accelerator.
2-1. Card Layout
Figure 2-1. Card Layout of GF2 MX Graphics Accelerator
2-2. Card Installation
Turn off the PC and all external peripherals connected to it (e.g. printer…etc.), then remove the PC
system cover.
Remove the metal bracket corresponding to the AGP slot. Save the screw.
Align the SILURO™GF2 MX Graphics Accelerator to the AGP slot. Hold it by its edges and insert the
card into the slot without using excessive force or pressing any components on the video card. Make sure
it is firmly and completely fixed into the slot.
Secure the SILURO™GF2 MX Graphics Accelerator to the AGP slot. Align the notch in the mounting
bracket of the video card with the screw hole in the rear panel of the computer case. Use the screw that
you had removed from the metal bracket to secure it in place.
Replace the system cover. You are now ready to boot up your PC system.

2-2 Chapter 2
SILURO
GF2 MX
2-3. VGA Output
Figure 2-2. SILURO™GF2 MX connection to PC
Step 1. Insert the SILURO™GF2 MX Graphics Accelerator card into AGP slot on your motherboard
and fix it to the back panel with the screw.
Step 2. Plug the free end of the PC monitor cable into the VGA Connector on the SILURO™GF2 MX
Graphics Accelerator.
2-4. TV Output
The SILURO™GF2 MX Graphics Accelerator supports TV output to display the image on a TV set. Note
that it can’t display the image through both TV output and VGA connector simultaneously.
Step 1. Connect the TV output connector on SILURO™GF2 MX Graphics Accelerator to the S-Video
input connector of the TV set by the S-Video cable included in the product package.
Step 2. Check the “Display Properties” !“Output Device” tab to set the display mode for TV output.
Figure 2-3. SILURO™GF2 MX connection to TV

Driver Installation 3-1
User’s Manual
Chapter 3. Driver Installation
In this chapter we will show you how to install the driver for the SILURO™GF2 MX Graphics
Accelerator. The SILURO™GF2 MX Graphics Accelerator product package contains a CD-Title for
installation.
The SILURO™GF2 MX Graphics Accelerator supports the following drivers:
•Microsoft Windows 95/98
•Microsoft Windows 2000
•Microsoft NT
Note: The latest SILURO™GF2 MX Graphics Accelerator driver is downloadable from your
dealer or from our WEB site at http://www.abit.com.tw.
3-1. Installing the VGA Drivers for Windows®9X
1. Check the “System Properties” !
“Device Manager” !“
Display Adapters”.
Your system now shows the display adapters as
“Standard PCI Graphics Adapter [VGA]”.
Exit the device manager and insert the GF2 MX
CD-Title into the CD-ROM drive. It should
execute the installation program automatically.
If not, you can go to the CD location and
execute the execution file at the root directory
of this CD-Title. After it is executed, you can
see the screen below.
2. Move the cursor to the “Display Drivers”
and click on it. This will take you to the next
step.

3-2 Chapter 3
SILURO
GF2 MX
3. Click “Display Driver for Windows 9X”
to go to next step.
4. Click “Install Display Driver” button to
install the necessary driver.
5. The dialogue box appears to ask you if you
want to install SILURO™display driver. Click
the “OK” button. The program will start
installing the driver and the screen will show
that the files are being copied.
6. When the installation is complete, a
dialogue box appears. Click the “Reboot”
button to reboot your computer.
7. Go to “System Properties” !“
Device
Manager” !“
Display Adapters”. Your
system will now show the “ABIT Siluro GF2
MX” device.

Driver Installation 3-3
User’s Manual
3-2. How to Use the Display Properties in Windows®98 SE
1. When you have properly installed the driver
for the Windows®98 SE operating system,
right-click on the Windows®95/98 desktop
wallpaper area and select the item “Properties”.
2. The “Display Properties” item appears.
Select the “Settings” tab.
3. Click the “Advanced…” button to go to
next step.
4. Now you can see all the advanced
controlling functions of this display card.
Check the “General” tab first. Click on the
right-sided arrow of the item “Font Size”. You
may choose the font size you want.

3-4 Chapter 3
SILURO
GF2 MX
5. You can choose small or large font size here,
or you may choose “Other…” to go to the
“Custom Font Size” screen.
6. Here you may adjust the font size you want.
Click “OK” to enter the settings.
7. Go to the “Adapter” tab to see the current
driver information. Click “Change…” button if
you want to change the driver.
8. Follow the on-screen instructions to update
the new display driver.

Driver Installation 3-5
User’s Manual
9. Now check the “Monitor” tab. Click the
“Change…” button if you want to change the
monitor type.
10. You can select the manufacturer on the left-
sided window and the model on the right-sided
window. Click the “Have Disk…” button if you
want to install a new driver from the disk drive.
11. The “Performance” tab will show how the
Windows would use your display adapter. This
is helpful in troubleshooting the display-related
problems.
12. Check the “Color Management” tab. You
can select the default color profile for your
monitor. This will affect the colors that you see
on your monitor.
The high-end or some middle-end monitors
provide a color profile file with the monitor to

3-6 Chapter 3
SILURO
GF2 MX
allow the colors to be shown more accurately on
the screen. If you do have such a profile disk,
click the “Add…” button to add the file.
13. You will see several profiles in the window.
If your monitor type is listed here, select it
directly, or put the disk into the drive and click
the “Add” button to install.
14. The “Info” tab shows you all the detailed
information regarding your graphics card. If you
want more settings for your graphics card, click
the “Additional Properties…” button.
15. There are five more item tabs that can be
selected. First, look at the tab called “Color
Correction”.
This item lets you adjust “Brightness”,
“Contrast”, and “Gamma” parameters.
The most important parameter is the gamma
adjustment. If you don’t know what gamma
means, you may want to examine additional
information explaining color before making any
adjustments.
The gamma adjustment lets you adjust each
channel’s value. You can adjust the red, blue, or
green channel gamma value separately.
The adjustment in “Color Correction” will
affect the way colors appear on your monitor,
and will affect color accuracy. When you
change the settings, the photo in the left window
will change color and you can see how each
change you make looks.

Driver Installation 3-7
User’s Manual
16. “Direct3D Settings” tab:
"
""
"Enable fog table emulation:
This option is used to turn the fog table
emulation on or off.
Direct3D specifies that a display adapter
capable of D3D hardware acceleration should
be able to implement either vertex fog or table
fog. Some games do not correctly query the
D3D hardware capabilities and expect table fog
support. Choosing this option will ensure that
such games will run properly on your NVIDIA
graphics processor.
"
""
"Adjust Z-buffer depth to render depth if
unequal:
This will cause the hardware to automatically
adjust the depth of its Z-buffer to the depth that
the application requests.
Keep this option enabled, unless your work
absolutely requires a specific Z-buffer depth. If
this option is disabled, any application whose
working Z-buffer depth does not match that of
the current hardware configuration will not run.
"
""
"Enable alternate depth buffering
technique:
This option enables an alternate technique for
depth buffering. It allows the hardware to use a
different mechanism for depth buffering in 16
bit applications. Enabling this setting can
produce higher quality renderings of 3D images.
"
""
"Display logo when running Direct3D
applications:
Enabling this option will display the logo of
NVIDIA at the lower corner of the screen while
running Direct3D applications.
"
""
"Automatically generate …… mipmap
levels:
The NVIDIA™GeForce2 MX can generate
mipmaps automatically to increase the
efficiency of texture transfers across the bus and
provide higher performance of Direct3D
accelerated applications and games.
For some applications, the automatically
generated mipmaps will cause problems. In such
cases, you can reduce the number of
automatically generated mipmap levels until the
images are properly displayed. Usually,
decreasing the number of mipmap levels can
eliminate texture misalignment or seaming. (If
you do that, some performance will be lost.)
"Auto-mipmap method:
This option has two options: bilinear and
trilinear. The bilinear method provides better
performance than the trilinear method. The
trilinear method provides higher image quality
than bilinear method.
"
""
"Mipmap detail level:
This option allows you to adjust the level of
detail (LOD) bias for mipmap. A lower bias will
provide better image quality, and higher bias
will increase application performance. You can
choose from five preset bias values from “Best
image quality” to “Best performance”.
Click the “More Direct3D…” button to go the
next menu.

3-8 Chapter 3
SILURO
GF2 MX
17. “More Direct3D…” tab:
"
""
"Texel Alignment:
This option changes the hardware texture
addressing scheme for texels (texture elements).
Changing these values will adjust the texel
origin definition. The default setting value is in
accordance with Direct3D specifications.
Some software will define the texture origin to
other places. For such applications, re-defining
the texture origin will improve the image quality.
You can use the slider to adjust the texel origin
anywhere between the upper left to the center of
the texel.
"
""
"PCI Texture Memory Size:
This option allows the graphics processor to
utilize up to the specified amount of system
memory for texture storage (in addition to the
memory installed on the display adapter itself).
Note: The maximum amount of system
memory that can be reserved for texture
storage is based on the amount of physical
RAM installed in your computer. The more
system RAM, the higher the value you will
be able to set.
A larger value can improve the performance for
some Direct3D applications. This setting applies
only to PCI display adapters. If you use the
AGP bus display adapter, this option will not be
available (except when the AGP display
adapters are running in PCI compatibility
mode).
18. The “OpenGL Settings” tab allows you to
adjust the image texture quality in OpenGL
applications.
"
""
"Enabled buffer region extension:
This option allows the driver to use the OpenGL
extension
GL_KTX_buffer_region
. It can
increase the application performance in 3D
modeling applications that support this
extension.
"
""
"Allow the dual planes extension to use
local memory:
Allows the use of local video memory when the
GL_KTX_buffer_region extension is enabled.
However, if there are less than 8MB of local
video memory available, dual planes extension
support will not be enabled. This setting has no
effect if the “Enable buffer region extension”
option above is disabled.
"
""
"Use fast linear-mipmap-linear filtering:
Allowing fast linear-mipmap-linear filtering
will provide an increased application
performance at the expense of some image
quality. In many cases, this loss of image
quality may not be noticeable, so you may wish
to take advantage of the extra performance
gained by enabling this feature.
"
""
"Enable anisotropic filtering:
This option allows OpenGL to use anisotropic

Driver Installation 3-9
User’s Manual
filtering for improved image quality.
"
""
"Enable alternate depth buffering
technique:
Enables an alternate technique for depth
buffering. This lets the hardware use a different
mechanism for depth buffering in 16 bit
applications. Enabling this setting can produce
higher quality rendering of 3D images.
"
""
"Disable support for enhanced CPU
instruction sets:
Select this option to disable driver support for
enhanced instructions used by certain CPUs.
Some processors that support additional 3D
instructions can improve performance in 3D
games or applications. The Intel®MMX™series
and AMD 3D NOW!™ series processors are
examples of such. If these 3D games and
applications are not optimized for these
enhanced instructions, the processors will have
no added effect. The display driver is also
needed to support these features. You can
disable this option and it may be useful for
troubleshooting and performance comparison.
"
""
"Default color depth for textures:
This option determines whether textures of a
specific color depth should be used by default in
OpenGL applications.
Use desktop color depth: This setting will
always use the texture of the color depth at
which your Windows desktop is currently
running.
Always use 16 bpp or Always use 32 bpp:
These options will force the use of textures of
the specified color depth, regardless of your
desktop settings.
"
""
"Buffer flipping mode:
This option determines the buffer flipping mode
for full-screen OpenGL applications. You can
select from the block transfer method, the page
flip method or auto-select. Auto-select allows
the driver to determine the best method based
on your hardware configuration.
"
""
"Vertical sync:
This option lets you specify how vertical sync is
handled in OpenGL.
Always off: This setting will always disable
vertical sync in OpenGL applications.
Off by default: This setting will keep vertical
sync disabled, unless an application specifically
requests that it be enabled.
On by default: This setting will keep vertical
sync enabled, unless an application specifically
requests that it be disabled.
"
""
"Use up to “XX” MB of system memory
for textures in PCI mode:
This allows the graphics processor to utilize up
to the specified amount of system memory for
texture storage (in addition to the memory
installed on the display adapter itself).
Note: The maximum amount of system
memory that can be reserved for texture
storage is based on the amount of physical
RAM installed in your computer. The more
system RAM, the higher the value you will
be able to set.
A larger value can improve the performance for
some Direct3D applications. This setting applies
only to PCI display adapters. If you use the
AGP bus display adapter, this option will not be
available (except when the AGP display
adapters are running in PCI compatibility
mode).
"
""
"Custom OpenGL settings:
This is a list of the custom settings (or “tweaks”)
you have saved. Selecting an item from the list
will activate the setting. To apply the setting,
choose “OK” or “Apply”.

3-10 Chapter 3
SILURO
GF2 MX
19. “Overlay Color Control” tab:
Use these controls to adjust the quality of video
or DVD playback on your monitor.
You can independently control the brightness,
contrast, hue and saturation to achieve optimal
image quality when playing video or DVD
movies on your computer.
20. “Other Options” tab:
"
""
"Monitor Timing:
This option allows you to select your monitor
timing mode:
Auto-Detect: Allows Windows to receive the
proper timing information directly from the
monitor itself. This is the default setting. Note
that some older monitors may not offer support.
General Timing Formula (GTF): This is a
standard used by most newer hardware.
Discrete Monitor Timings (DMT): This is an
older standard still in use on some hardware.
Enable this option if your hardware requires
DMT.
21. “Output Device” tab:
Here you can select what kind of output device
you are using. Most people use the “Analog
Monitor” setting. If you have a DFP display,
you can select “Digital Flat Panel” as the
output device here.
Table of contents
Other Abit Video Card manuals

Abit
Abit Siluro GF3 TI500 User manual

Abit
Abit Siluro GF4 TI4600 User manual

Abit
Abit SILURO FX Series User manual

Abit
Abit Siluro GF4 MX Series User manual

Abit
Abit SILURO GT2E Assembly instructions

Abit
Abit SILURO GF256 GTS User manual

Abit
Abit SILURO MX400 User manual

Abit
Abit Siluro MX400 DDR User manual

Abit
Abit Siluro GF4 MX Series User manual

Abit
Abit Siluro GF3 Vio User manual
Popular Video Card manuals by other brands

Lenovo
Lenovo NVIDIA NVS 300 user guide

TerraTec
TerraTec Mystify 9600 XT Product information

ATI Technologies
ATI Technologies 9600 - Radeon XT 128 MB DDR Video Adapter user guide

TerraTec
TerraTec Mystify 5800 Ultra Product information

Gigabyte
Gigabyte GV-N96TMC-512I user manual

Diablotek
Diablotek V9600GT-1024P user manual