ABK PA21III User manual

OWNER SMANUAL
Before operating, please read thismanualcompletely.
PA2179
DIGITALPLAYER
FeaturesofProduct
lLCDscreen display,andvisible operating mode.
lOperating undercontrolwith digitalwheeland light-touch button, and selecting the build-in
programsdirectly.
l2-wayrecording microphone, 1-way recording line input, and dual-channeloutput.
lAbundantbuilt-in broadcasting sources, the totallength ofthe program(including audio
recording)up to 2 –3 hours.
lCanbe programmable controlled by timerPA2189T.
lVisiting thisunit via localarea network, and updating MP3programsfreely.
lThe unit notonly to play the programsin USBdiskthatconnected to the unit,butalso to copythe
programsinto the playing list fromUSBdisk.
POWER
EDIT/PUSH

2
FrontPanel
1Powerswitch (press 1 forpowerONand the powerindicatorislit.)
2Powerindicator3 USBJack
4Audiorecording leveladjustment5 Levelindicating light
6Audiorecording microphone input7 Liquid crystaldisplay
8Playbutton9Playvolume decrease button
10 Playvolume increase button 11 Stop /return button
12 Digitalwheel
Rearpanel
1Audiorecording signalinputport 2Audiosignaloutputport
3PA2189TTiming controlinput4Timing controllink
5 Network cable interface link PC)6AC220VPowerinput
7ACPowerfuse
POWER
EDIT/PUSHEDIT/PUSH

3
POMTES
1. linktimer
When connected withaChinesetimer,thisdigitalrecorder/playercan realize the timelyplaying function.
Forspecificcontroloperation, pleaserefertothe operating instructionsfortheChinesetimer.The
connection method isshownin the figure below.
2. other link
timer
PA2189
T
DATAIN
DATALINK
Otherdevices
DATAOUT
M
ICfromrecorderor
otherplayer
MIC input
Other player
Playersignaloutput,
link to
AmplifierorMonitor
Link toc
omputer,copyor
delete build-in songs

4
OperationInstructions
Power-on: Connectthe line, and turnon the powerswitch ofthe equipmentafterchecking. The equipmentis
initialization for15 seconds.Withinsuch 15 seconds,the displayscreen isnotturned on. Aftercompleting the
initialization, the screen isalightand displays ”, and then it enters the operating mode.
1. Descriptionofstatusdisplay
Beforethe equipmentisplaying, the displayisasshowninthe interface offigure(1).Turnthedigitalwheel
belowsuch interfacetoselectthe programtobe played. Then pressdownthe play”button toplay,and press
down the play”button again to stop play.The playinterface isasshown in figure (2).
2. Operation options
Underabovetwointerfaces,press the digitalwheeltoenterthe operation option”interface. Asshownin
figure(3),the optionsoperated undersuch interfaceinclude playsetting, programoperation, recording
interface and timing editing”.
a) Playsetting
Turnthedigitalwheeltomovethe cursortothe option of PLAYSET”,and press downthe digitalwheel
once to enterthe interfaceshown in figure (4), underwhich the state ofthe currentplayinterface.
The playstateincludesthe optionsof single, singleloop, all loop”.Turnthe digitalwheeltomovethe
cursortotheoption required,andthenpress thedigitalwheelonce, andthe symbol √” appears inthe box in
fig 3)
PLAYSET
RETURN
OPTION
PROGRAM
DISKSPACE
SYSYTEMSET
fig 4)
PLAYSTE
RETURN
操作选项
PROGRA
State :free
VOL :
02.Annis’swonderland
03.StarofBaghdad
04.The daylight
05.Annis’ssong
fig 1)fig 2)
playing:
VOL:
01.the wind of
change
02.Annis’swonderland
03.StarofBaghdad
04.The daylight
05.Annis’ssong
01.the wind ofchange 01.the wind ofchange
DISKSPACE
SYSYTEMSET
single
√
single loop
all loop
RETURN

5
frontoftheoption. Thenexit fromthe interface, andthe equipmentwill playaccording tothe previous
setting.
b) Programoperation
Underthe operation options”interface, turnthe digitalwheel,movethe cursortothe option of
PROGRAM”,andpress thedigitalwheeloncetoenterthe programsetting operation interface, asshown
in figure (5).
The programsetting includes file management, audio recording, playediting andtiming editing”.
(1)Filemanagement
Undertheinterface showninfigure(5),turnthedigitalwheeltoselecttheoption of FILEEDIT”,and press
the digitalwheelonce toenterthe interface asshowninfigure(6).Onsuch interface, it ispossible tocopythe
sourcesfromUSBdisk to built-in MP3 folderoftheequipmentorto delete the built-in sources.
ØCopysources
Beforesuch operation, plugthe USBdiskintothe equipment,and make suretherearethe sourcestobe
copied in the USBdisk.
Ontheinterface asshowninfigure(6),selecttheoption of COPYPROGRAM”,and press the digital
wheelonce toenterthe interface asshowninfigure(7).Inthe box on the left oftheinterface, the built-in
MP3sourcesofthe equipmentarestored;inthe box on the rightofthe interface, the listofthe sourcestobe
copied on theUSBdiskisdisplayed. Turnthe digitalwheeltoselectasonglistinthe rightbox,andpress
downthe digitalwheeloncetoenterthe interface asshowninfigure(8).Onsuch interface, selectthe single
song to be copied orcopyallthe sourcesin the selected list.
a) Selectsingle song copy
Afterselecting thesinglesong copy,turnthe digitalwheel,movethe cursortotheoption of ENTER”,
and press thedigitalwheelonce todisplaythe interface asshowninfigure(9),andthen selectfromthe
songson the right.Afterselecting, press the digitalwheelonce tocopythe song tothisunit,and the
copied songswill appearin the box on the left ofthe interface.
fig 5)
RECORD
FILEEDIT
TIMEEDIT
LISTEDIT
RETURN
fig 6)
DELATE
PR
O
GRAM
COPYPROGRAM
RETURN
fig 7)
01.thadaylight
02.love
03.Adienus
04.Yoursmile
05.La provence
Recycler<U>
test<U>
glj<U>

6
b) Selectall to copy
Afterselecting all tocopy,turnthe digitalwheel,movethe cursortothe option of ENTER”,and press
the digitalwheelonce toenterthe stateofcopy.All the songsinthe selected listwill be copied tothe
built-insongsfolderofthe equipmentone byone. Duringsuch process,if it isnecessarytostop copying,
justpress the digitalwheelonce to exit fromthe copying interface.
ØDelete song
Onthe interface asshowninfigure(6),selectthe optionof DELETE PROGRAM”,and press the digital
wheeloncetoentertheinterface asshowninfigure(10).Onsuchinterface,it ispossibletodeleteany
unwanted song inthe built-infolderofthe equipment.Itisallowed toselectdeleting singlesong ordeleting
all the songs.
a) Selectdeleting single song
Afterselecting deleting singlesong,press theoptionof ENTER”toentertheinterface asshownin
figure(11)bythe wayasdescribed above. Onsuchinterface, selectthesongtobedeleted, andpress the
digitalwheelonce to delete such song.
b)Selectdeleting all the songs
Afterselecting all the songs, press the option of ENTER”and the promptinterface will appear, confirm
whetherall the songsshall bedeletedindeedsoastopreventthe mistaken operation.Ifconfirming the
deletion ofall thesongs,press YES”todeleteall thebuilt-insongs;otherwise, press No”toexit from
the deletion interface.
01.thadaylight
02.love
03.Adienus
04.Yoursmile
05.La provence
Recycler<U>
test<U>
glj<U>
fig 8)
Recycler<U>
test<U>
single √
RETURN
all
ENTRE
fig 9)
01.thadaylight
02.love
03.Adienus
04.Yoursmile
05.La provence
04.starofbaghdad
05.La provence
06.quansheai.mp3
07.thewind of
08.Annie’s wonder
fig 10)
Recycler<U>
test<U>
Single √
RETURN
all
ENTRE
fig 11)
04.starofbaghdad
05.La provence
06.quansheai.mp
07.thewind of
08.Annie’s wonder
fig 12)
Free space:
702M
Deleteallprogram?
NOYES

7
(2)Audio recording
Beforethisoperation,connectthe audiorecordingsoundsourceequipmentorgetthe sound source ofthe
microphone ready,and make efforts topreventtheinterference ofothersoundsexceptforthesoundsource.
During the process ofaudiorecording, it ispossibletocarryoutthe audiorecording monitoring through the
audiosignaloutputport.Inthe frontpanel,thereisthe audiorecording leveladjusting knob. Byadjusting
thisknob, it isallowed tocontrolthe levelofthe recording signal.Theoptimallevelforaudiorecording can
be determined bythe following method:observethe levelindicating lights, and the alightfourthlightfrom
left indicatesthe optimalrecording state;it isalsopossibletodetermine the levelforoptimalaudiorecording
through the triallistening afterrecording.
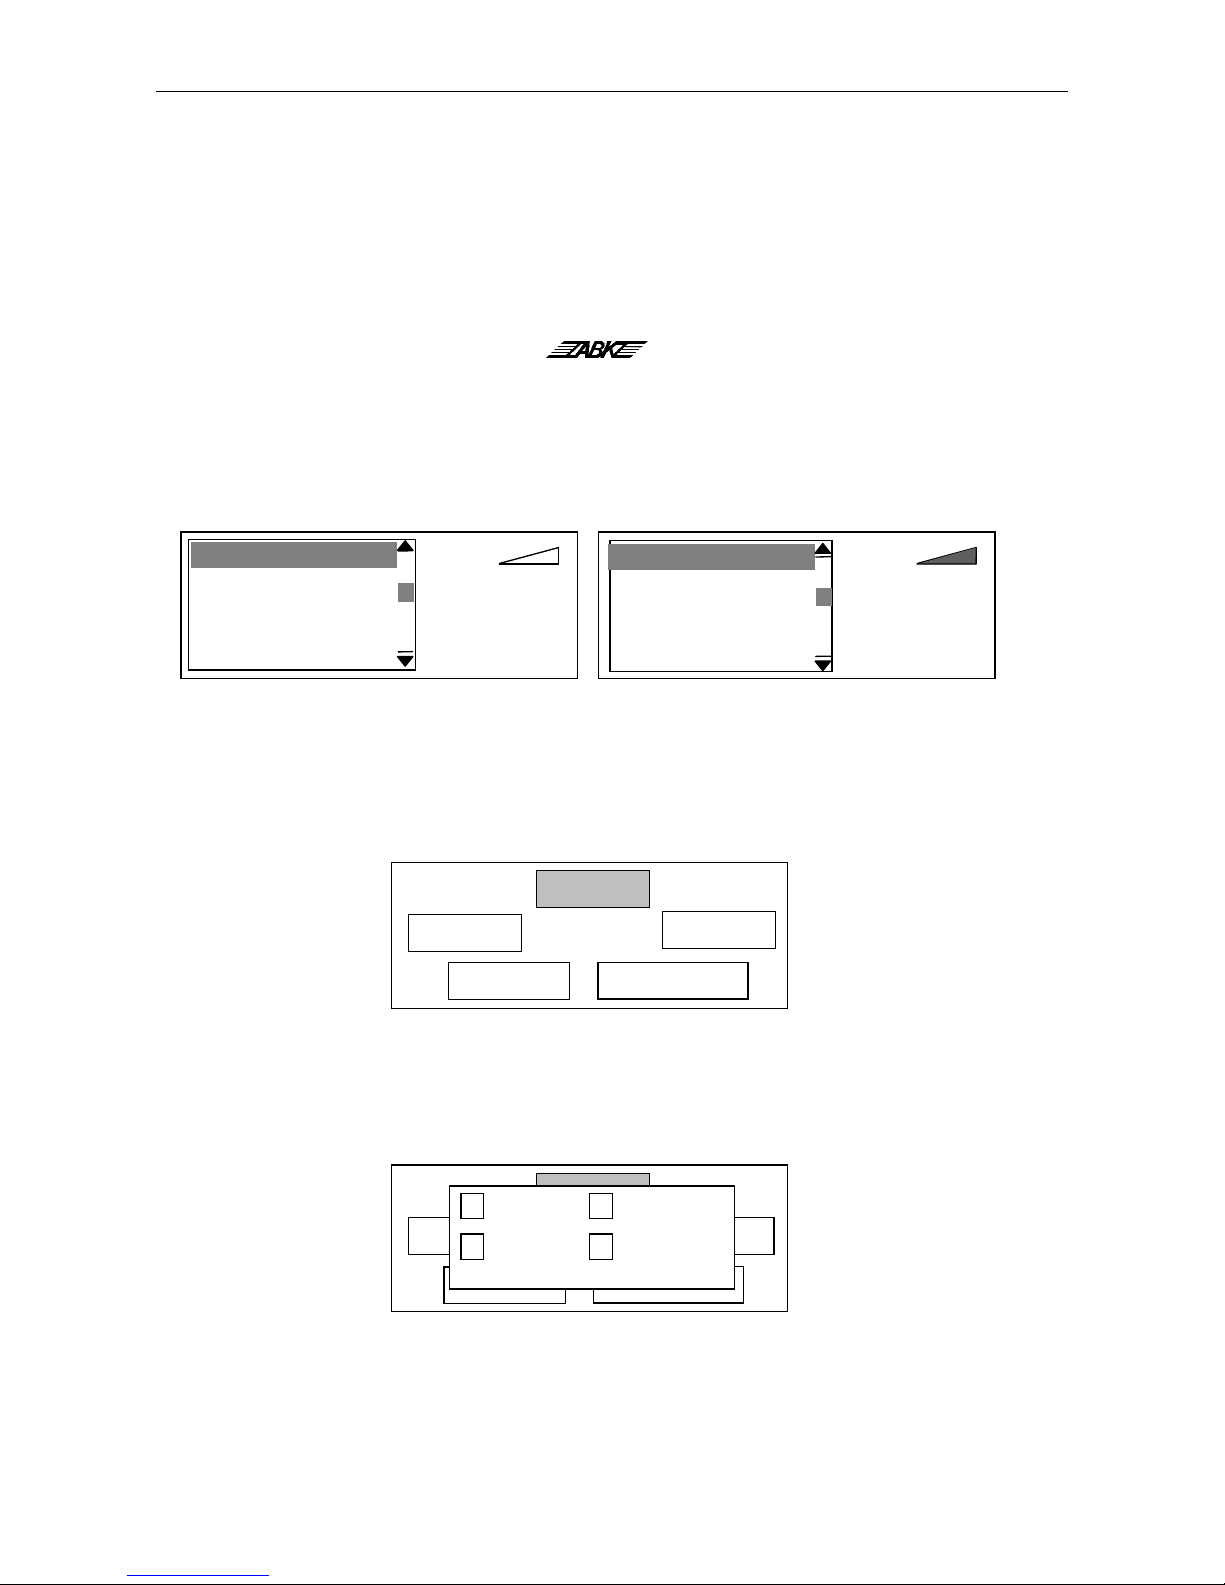
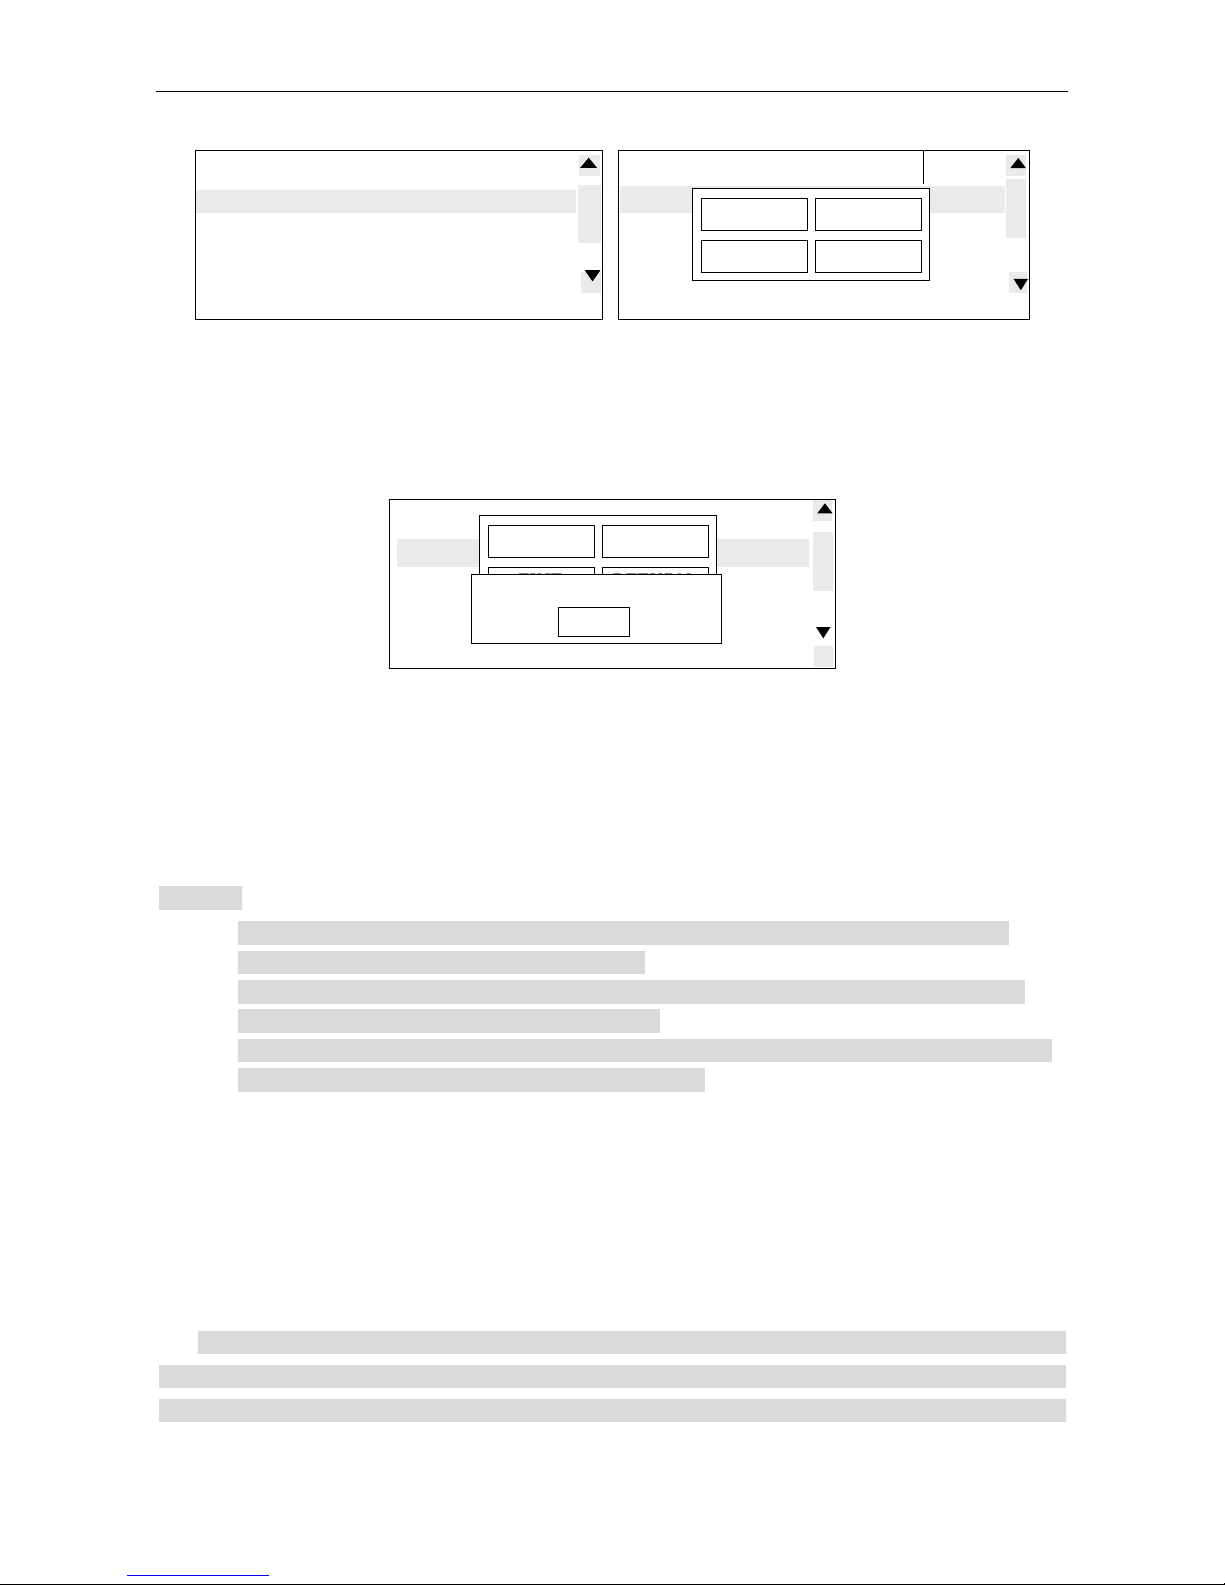
On the interface asshown in figure (5), turn the digitalwheelto selectthe option of RECORD”, press down
the digitalwheelto enterthe audio recordinginterface asshown in figure (13).
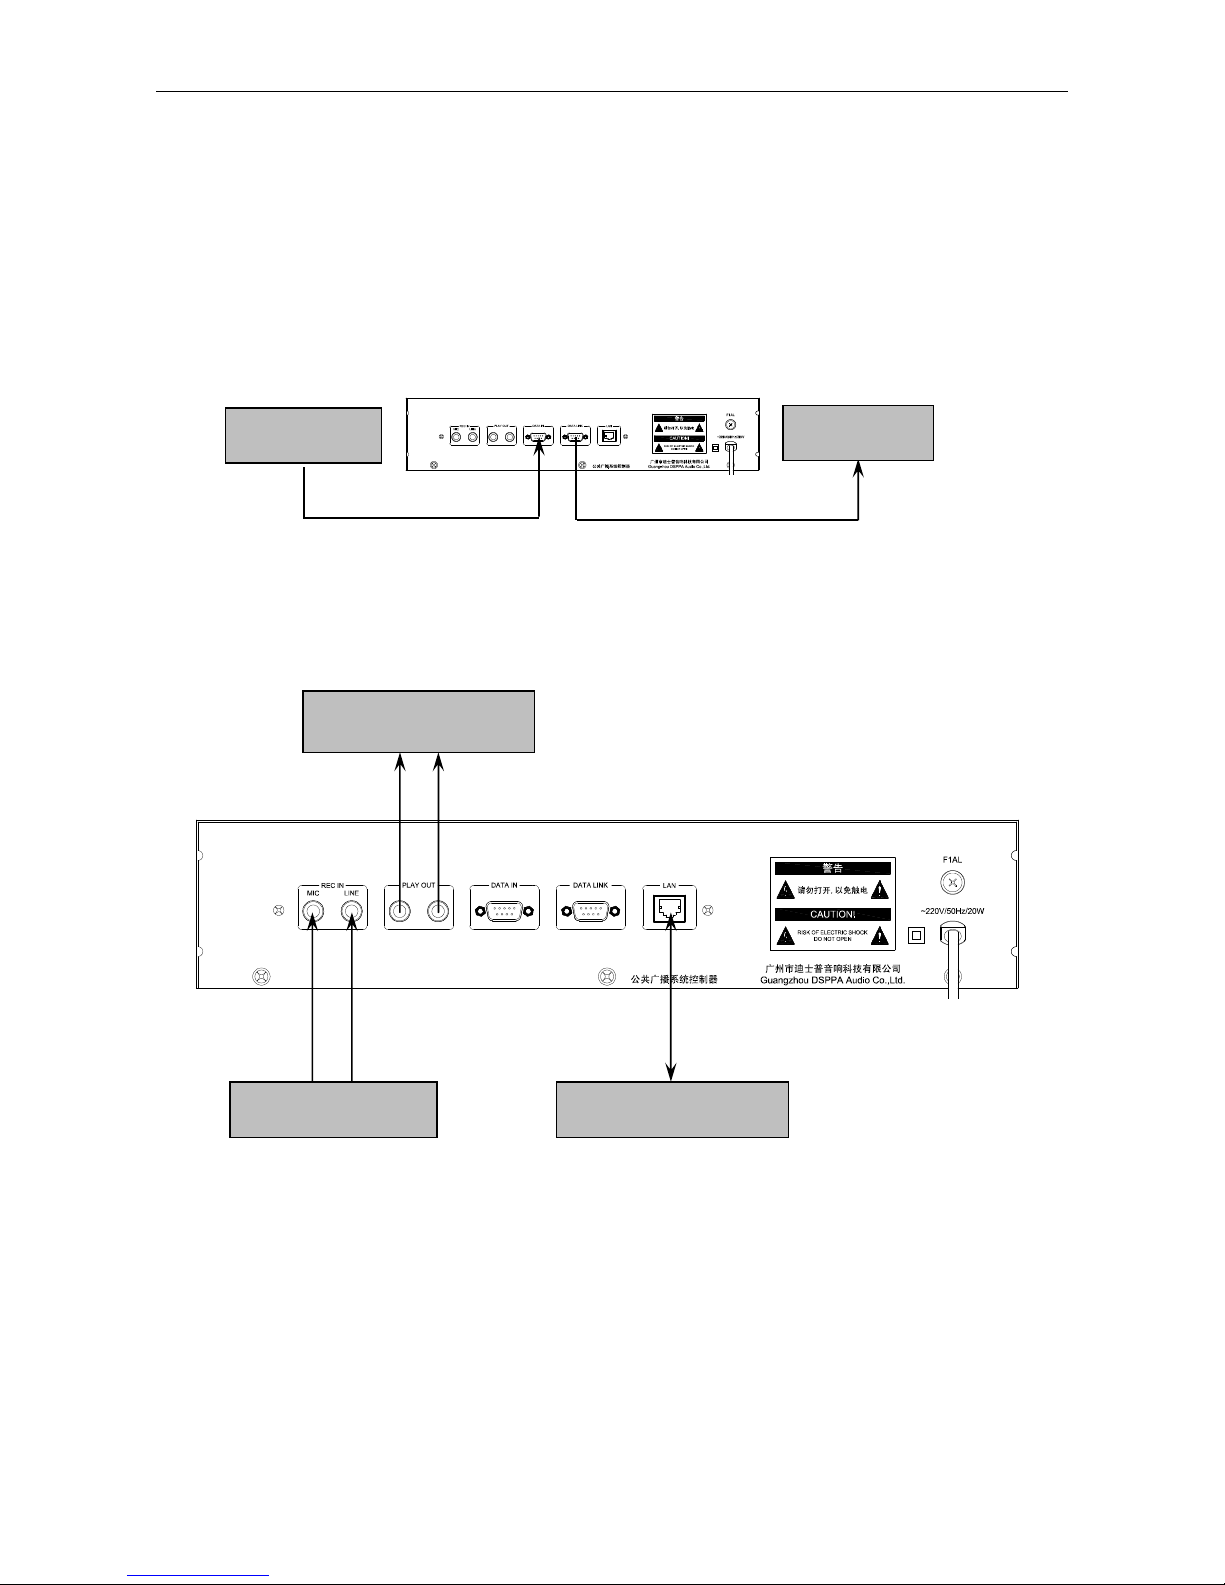
The remaining audiorecording space isdisplayed on the screen. Connectthe sound source (microphone input
orline input),andthedefault titleofaudiorecordingprogramisREC0001,andthe titleofthe audio
recording programcan be amended bythe following means:connectthe unit tothe computerthrough the
networkcable, andamend the titleofthe recorded programbythe computer.Turnthe digitalwheeltoselect
the itemof RECORD”,andpressdownthe digitalwheeltorecord, andthenpressdownthe STOP”item
tostop recording andsavethe recorded programautomatically.Selectthe RETURN”itemand press down
the digitalwheelto save the recorded programautomaticallyand return to the operation option interface.
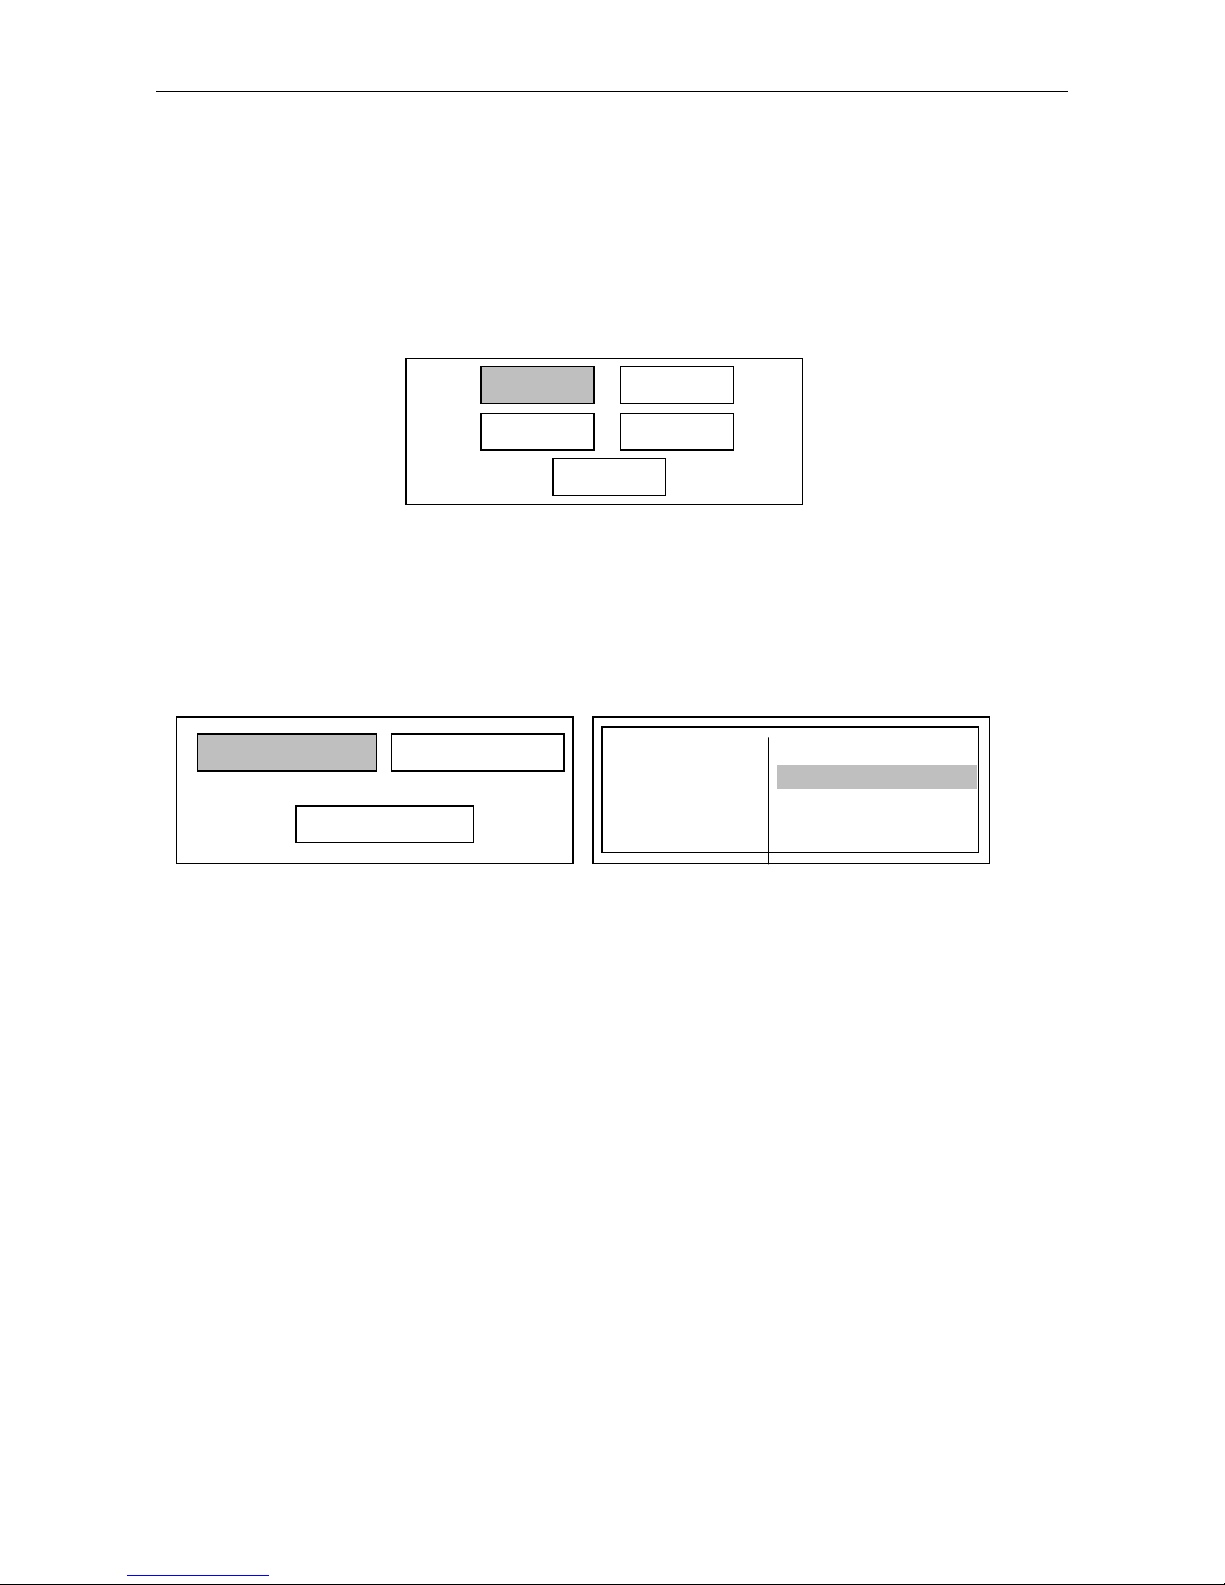
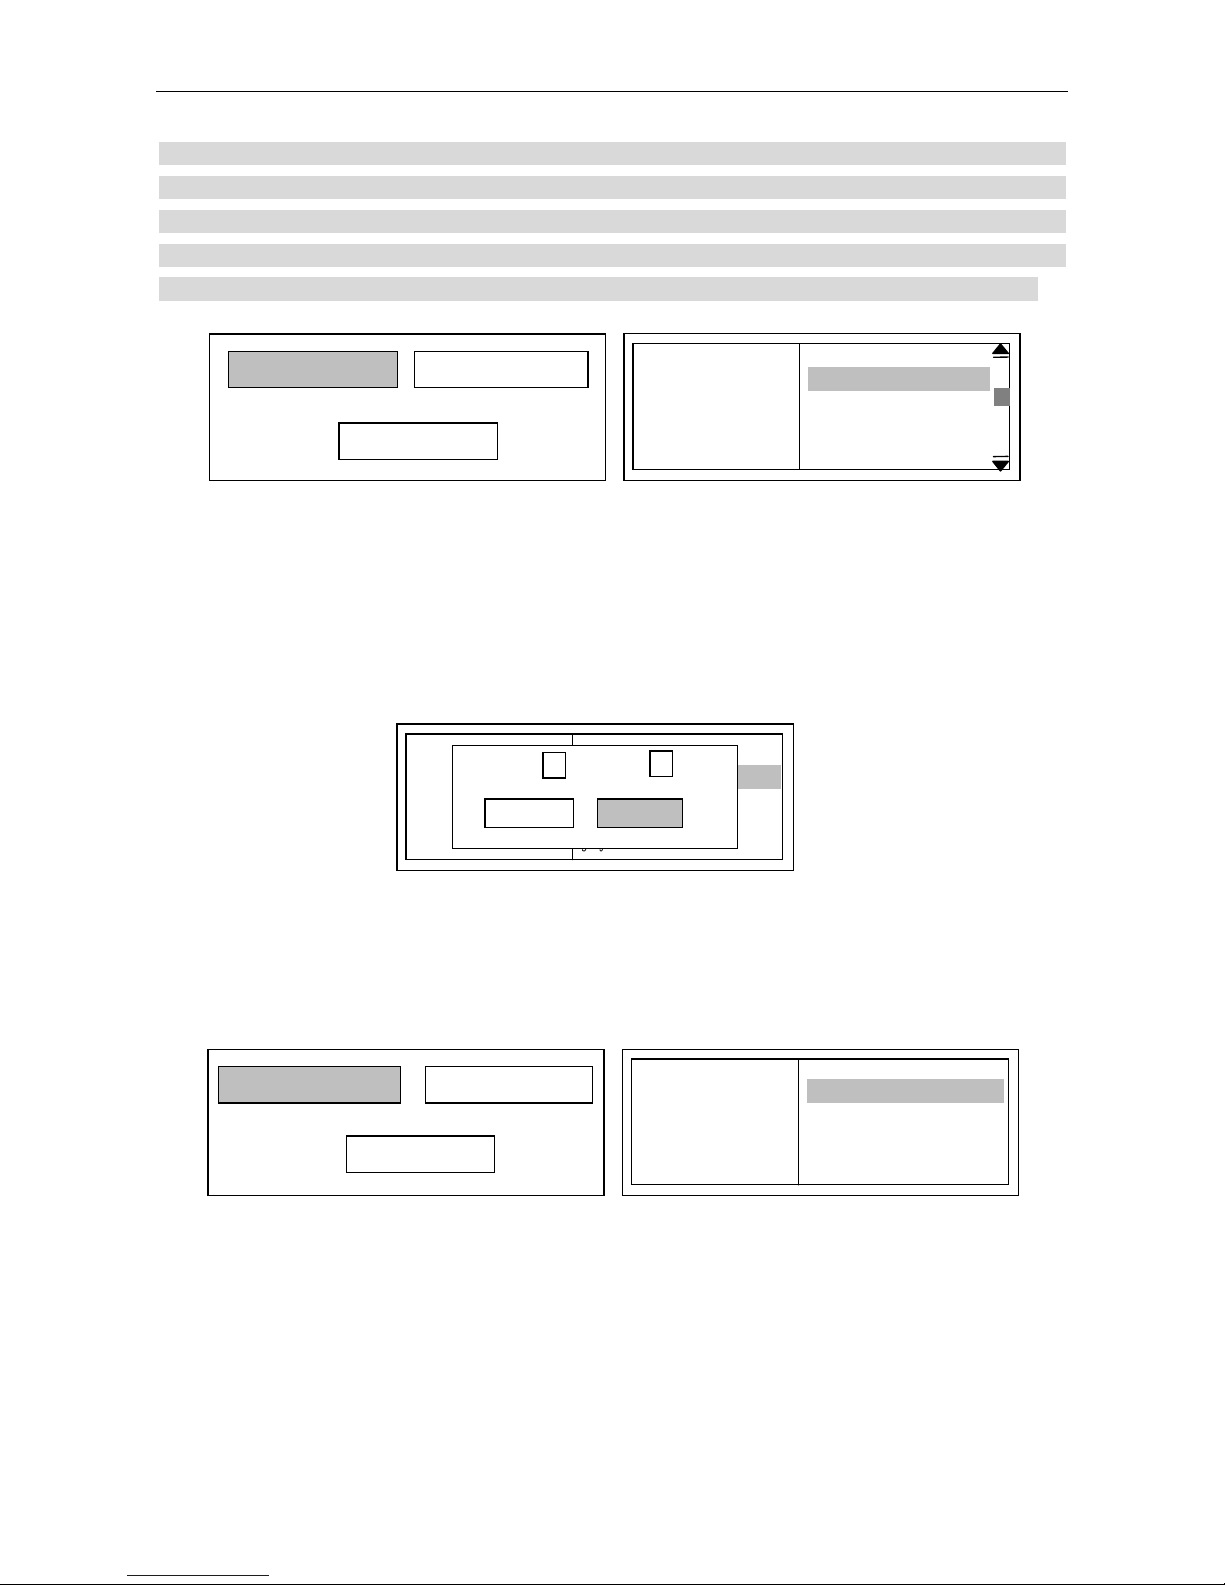
Triallistening
Onthe audiorecording”interface, selectthe AUDITION”option withthedigitalwheel,andpressdown
the digitalwheelonce to enterthe triallistening interfaceasshown in figure (14).
Press downthe STOP”button tostop triallistening;selectand press downthe RETURN”itemtosave
the recorded programand return to the operation option interface.
Browse
Onthe audiorecording”interface, selectthe BROWSE”option withthe digitalwheeland press downthe
BROWSE”option to enterthe browse interface asshown in figure (15).
RECORD
AUDITIO
N
Nn
BROWSE
RETURN
fig 13)
name:REC0001
Free space :20’36’’
Status:recording 00:10:35
fig 14)
N
ame :001
Free space :10’01’’
State :audition 00:10:35
RECORD
STOP BROWSE
RETURN

8
Afterselecting the REC0004programand pressing downthe digitalwheel,the interface asshowninfigure
(16)will be popped up. Onsuch interface, it ispossibletolisten toordeletethe program.Press downthe
DELETE”button todeletethe recorded programsinturn, and press downthe AUDITION”button to
enterthe triallistening interface asshown infigure (17):
Afterthe triallistening, itwill stop automaticallyand returntothe interface asshowninfigure(16); it isalso
possibletopress downthe STOP”button byhand tostop the triallistening. Selectand press downthe
RETURN”button toreturntothebrowseinterface;selectand press downthe EXIT”buttontoreturnto
the audio recording interface.
Caution:
1) The serialnumberofthe latestrecording programis1 (recording 1), and the serialnumberofthe
previousprogramwillbe added by1 automatically.
2) The signalcoming fromthe audio recordinginputport (line ormicrophone)can come outfromthe
audio outputport underthe state ofaudio recording.
3) Afterdeleting the selected recording program, the serialnumberofthe recording programgreaterthan
thatofthisprogramwillbe subtracted by1 automatically.
(3)Playediting
Onthe interfaceasshowninfigure(5),turnthedigitalwheelandselectthe LISTEDIT”option, and press
downthe digitalwheelonce toenterthe interface asshowninfigure(18).Onsuch interface, it ispossibleto
add theprogramstotheplaying listofthisequipmentordeletethe programsunwantedintheplaying list.It
isallowed toadd programsfromthe built-insong folderofthisequipmentorfromtheUSBdiskconnected
to the equipment.
Thisequipmentcan playthe song in the USBdisk directly. Asshown in figure (19), open the folders with the
postfix<U> inthe rightbox,and add the programsinthe foldertothe left playing listtoplay.Attention:When
playing the programsintheUSBdisk, it isrequired toguaranteethattheUSBdiskhasbeenconnectedtothe
listlength
REC0003 00:01:22
REC0002 00:08:11
REC0001 00:00:06
fig 15)
listlength
REC0003 00:01:22
REC0002 00:08:11
REC0001 00:00:06
DELETE
fig 16)
listlength
REC0003 00:01:22
REC0002 00:08:11
REC0001 00:00:06
fig 17)
AUDITION
EXIT RETURN
DELETE AUDITION
EXIT RETURN
00:00:00 /01:00:03
STOP

9
equipment.Ifthe USBdiskispulled out,the programsadded tothe playing listbeforecan notbe played although
their titlesaredisplayed. Afterwards,underthe conditionofno power-offoperation, reconnectthe USBdisk, and
guarantee the existing ofthe programinthe USBdisk, it ispossibletoplaythisprogramagain;Ifthe shut-down
operation iscarried outafterpulling outthe USBdisk,the programsaddedfromUSBdiskbeforewill notbe
displayed in the built-in playing listwhen restarting the equipment, and it isnecessaryto re-add the programs.
Selectthe ADDPROGRAM”optioninfigure(18),and press downthedigitalwheeloncetoenterthe
interface asshowninfigure(19).Onthe left ofthe interface, it isthe playing listofthe equipment; onthe
right,it isthe built-inprogramsfolderofthe equipmentand theprogramslistintheUSBdisk. Selectafolder
orlistin the rightbox, and press down the digitalwheelonce to enterthe interface asshown in figure (20).
The operationsforadding ordeleting theprogramsarethe sameasthoseforcopying and deleting programs
in the file management”, which will notbe described herein.
(4)Timing editing
Ontheinterface asshowninfigure(5),turnthe digitalwheeltoselectthe TIMEEDIT”option andpress
downthe digitalwheelonce toenterthe interface asshowninfigure(21).Onsuch interface, it ispossibleto
add programstoordeleteprogramsfromthe folderofthe equipmentused fortimingcontrolsources.The
programsin such folderareonlyused fortiming playing by DC1989T.
The programsaddedtothe timing playing folderarethe built-insongsofthe equipmentorthe songsinthe
USBdisk.Afteraddingthe programsfromthe USBdisk,it isnotallowed topull outthe USBdisk;otherwise
the equipmentwill notfind outthe programstobe playedwhen the timing pointofDC1989Tiscoming. The
operationsforaddingordeleting the programsarethesameasthoseforcopying anddeleting programsinthe
filemanagement”whichwill notbedescribedherein. Pleaserefertothe description ofthe file
management”.
fig 19)
01.thedaylight
02.love
03.Adienus
04.Yoursmile
05.La provence
record
mp3
recycler<U>
fig 20)
01.the
02.l 人王菲.m
03.A 笑的天使
04.Y 年孤寂 王
05.La provence
1recird
2经典歌曲<U>
Recycler<U>
test<U>
glj<U>
single √
RETURN
all
ENTER
fig 18)
DELETE
P
ROGRAM
ADDPROGRAM
RETURN
fig 22)
01.thedaylight
02.love
03.Adienus
04.Yoursmile
05.La provence
record
mp3
fig 21)
DELETEPROGRAM
ADDPROGRAM
RETURN

10
a) Disk size
Onthe operation option”interface, turnthe digitalwheel,andmovethe cursorto the DISKSPACE”option,
and press down the digitalwheelonce toenterthe disk size inquiryinterface.
b) Systemsetup
Onthe operationoption”interface, turnthedigitalwheel,andmovethe cursortothe SYSTEMSET”
option, andpressdownthe digitalwheelonce toenterthesystemsetup interface asshowninfigure(23).On
such interface, it isallowed to setup the workingmode ofthe background lightofthe displayscreen.
1)AUTO:it refers to thatthe background lightofthe display screen will be shutdown automatically
aftera period oftime withoutanyoperation ofthe equipmentand will be turned on automaticallyupon
the operation.
2)EVER:Itrefers to thatthe background lightofthe display screen isalwayson underthe state of
power-on.
(3)Language:Selectthe menu todisplaythe languageswithtwooptionsincluding Chinese and English.
Afterselecting thelanguage,it isnecessarytorestart the equipmenttobringit intooperation. When
selecting the language, turnthe digitalwheel,and movethe cursortothe language option tobe
selected, and then press downthe digitalwheelonce sothatthe symbol √” willappearinthe box in
frontofthe language option. Then shutdown and restart the equipment.
fig 22)
播放设置
RETUEN
操作选项
PR
DISKSPACE
SYSTE
Disk free space :699M
RETURN
fig 23)
PLAY
RETUEN
操作选项
P
目操作
磁盘容量
系统设
Back light :
RETURN
AUTO
√
EVER
Language :
中文
ENGL
√

11
Packing List
One PA2179III,one operating instruction,
one guarantee card,one 568A-568Anetwork cable,
one powerline, 4 M5*19 stainless-steelcup-head screws,
4 black gaskets,and oneSY546wire (lotus-formed plug versus6.3 plug).
One CDof 2074
ProgramUpdate
60 built-inprogramsareprovided forthisunit,and FileZillaFTPClient is provided also,which can be installed
inanyPCthatcancontrolsthe unit,sothatprogramdeletion and copycan be donebyusing the PC.However,
programdeletion andcopycan onlybe donebyusing the FileZillaFTPClient. Itisrecommended thattheOSof
the PCwhere FileZillaFTPClient is installed shall be Windows2000, WindowsXPorabove.Detailedoperation
(which shall be followed toavoid unexpected hardware error) is asfollows:
1. Switch onthe powersupplyforthe unit andwait until theunit showsthemaininterface. Openthe FileZilla
FTPClient installed inthe PC. There aretwomethodsforlinking the PCtothe unit. Method 1 isasshown
inFig. (a).
Fig a
Enterthe IPaddress (192.100.0.244) at Host”itemdirectlyand Username”, Password”and Port”arenot
set.Directlypress the Enter keyorclick the Quickconnect”asshowninthe Fig. (a).Inthiscase, directly

12
drag anddrop an MP3 folderoran MP3 programinthe Localsite”(the PC)toaspecified folderofthe
Remote site”(DC1979II).The progress ofprogramcopyisasshown in Fig. (b).
Fig b
Bythisway,MP3programscanbedeleted orcopied justlike usingaUSBdisk. (Note:Theunit hasa
directory named MUSIC,which isused tosavefolders and shall notbedeleted.DoNOTsaveaMP3
programinthe directory.Createanewfolderinthe MUSICdirectoryand saveMP3 programsinthe created
folderwhich can be renamed.)
File transferprogress

13
Fig c
Method 2: Click the Open the SiteManager”button inthe FileZillaFTPClient,and interface asshown
inFig. (c)willpop up. Click the NewSite”button tocreateasiteand enterthe IPaddress (192.100.0.244)
ofthisunit intheboxfollowing the Host”.Aftercreation, click the Connect”button toconnect.Todelete
and copya MP3 program, followthe Method 1.
2. Afterthe programisupdated, it isnecessarytoreedit theprogramsoftiming point,since the programsof
timing pointformerlyedited ischanged. Afterthe updateofprograms, the remained space forrecording will
be changed accordingly.
InputPA2179IIIIPAddress
Openthe Site Manager
Newsite
192.100
.0.244

14
Specifications
Record inputMICIN:600Ω, 3mV, unbalanced
LINEIN:10kΩ, 300mV, unbalanced
Output0dBV
Record Frequencyresponse 50Hz-5kHz ±3dB)
OutputFrequencyresponse 50Hz-20kHz ±3dB)
Ratio ofSignaltoNoise Mic input: >90dB
Aux input: >90dB
Protection ACfuse ×1F1AL)
Powersupply AC220V/50Hz
OuterPacking Size(mm) L×W×H)555×455×185
Unit Size (mm) L×W×H)484×349.5×88
Gross weight 8.1kg
Netweight 6.2kg
Specificationsare subjectto change withoutnotice
CAUTION
●Whenthe Power switch”isoff, pleasepull out the power cordfromthesocket.
Please keep the equipment out ofwater.
●Toreducethe riskofelectricshock, do not removethe cover.
●Nouser partsinside.Refer servicing toqualifiedservice personnel.
GuangzhouDSPPAAudio Co., Ltd.
Table of contents
Other ABK Media Player manuals