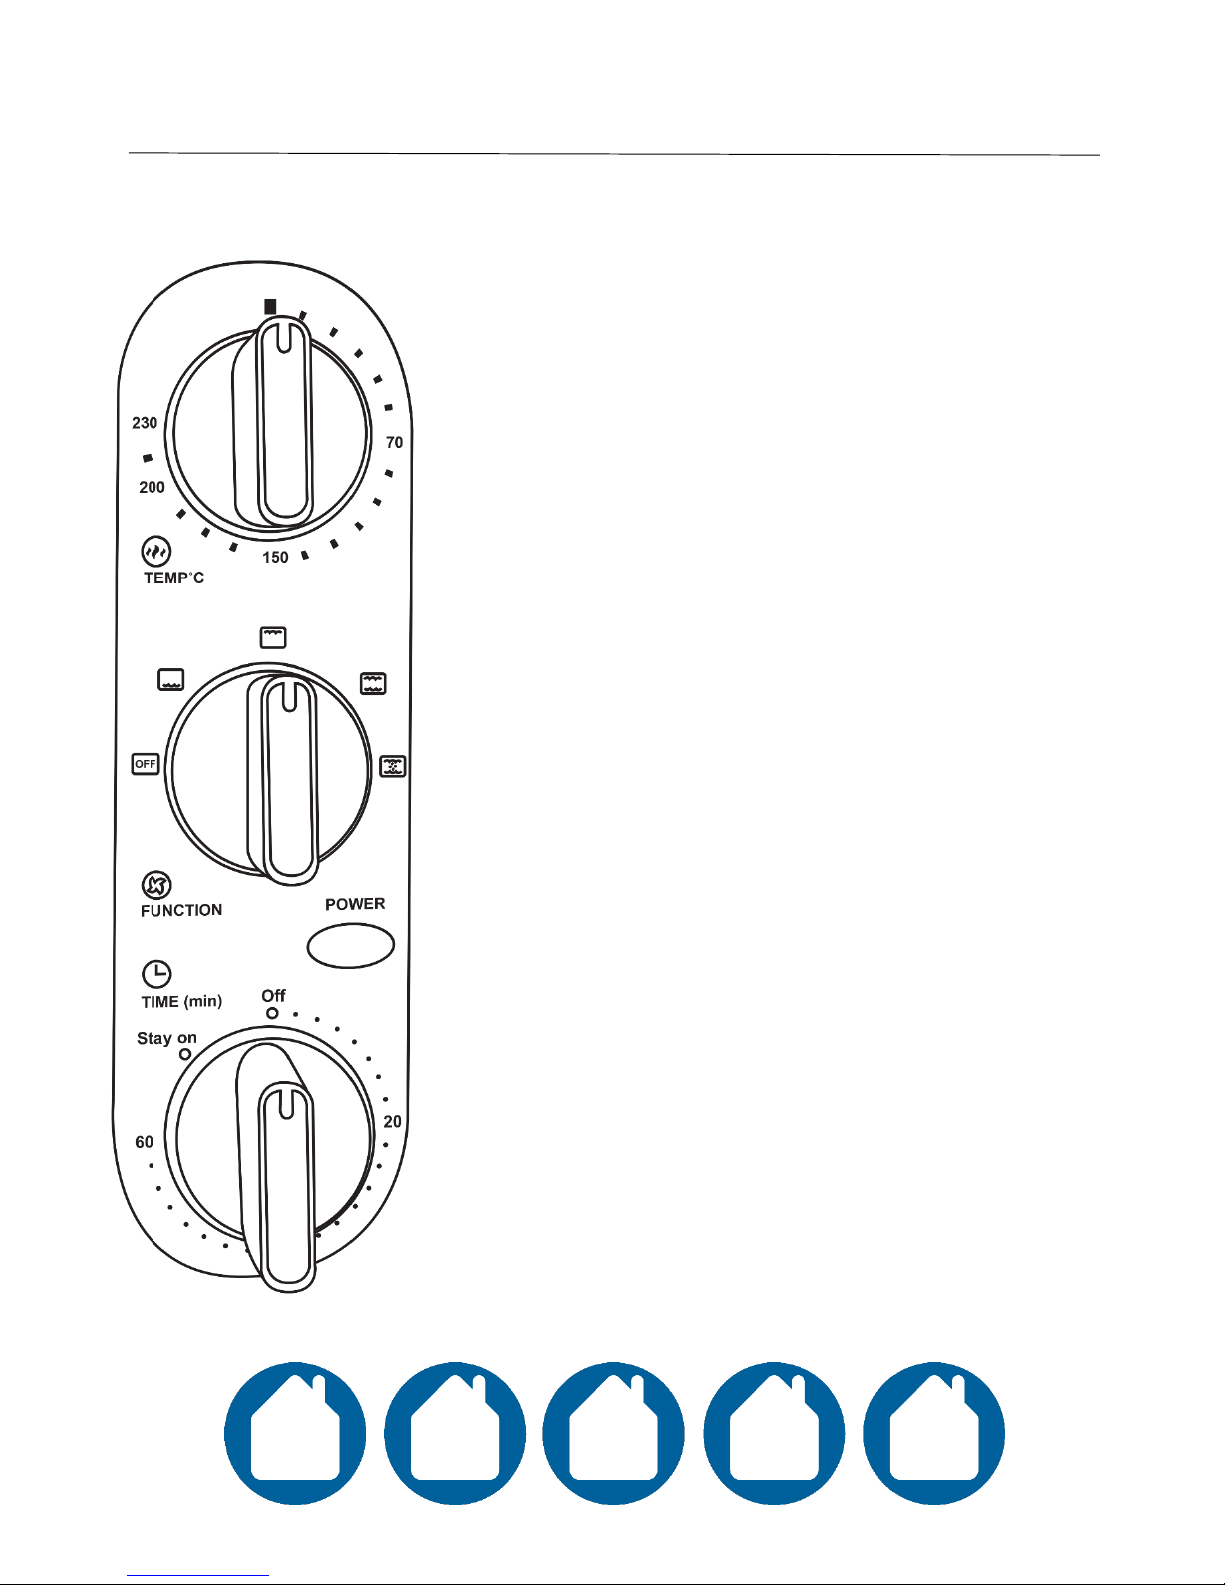
Abode AMO1801 User manual

Model No: AMO1801
18 Litre Mini Oven
User guide
For Customer Services & Spare Parts please call 0345 209 7461
Opening times: Monday - Friday 8am –6pm & Saturday 9am –1pm
Or visit us at www.productcareuk.com
IMPORTANT:
RETAIN FOR FUTURE REFERENCE

For Customer Services & Spare Parts please call 0345 209 7461
Opening times: Monday - Friday 8am –6pm & Saturday 9am –1pm or visit us at
www.productcareuk.com
Contents
2
Page
Safety instructions
…………………………….………..
3
Mini oven feature diagram
………………………………....…..
7
Preparing
your mini oven
……………………………….……..
8
Cable extensions
……………………………….……..
9
Control panel
……………………………….……..
10
Using
your mini oven
………………………………………
11
Cleaning and care
………………………………………
13
Guarantee
………………………………………
14
Customer
services
………………………………………
15
Spare parts
………………………………………
16
Connection to the mains supply
………………………………………
17
Thank you for purchasing your Abode Mini Oven.
To get the best from your new oven, take a few moments to read these
instructions, and keep them in a safe place for future reference.
Should you require any further assistance, our friendly Product Care team will
be happy to help.

WARNING:
•The appliance and its accessible parts become hot during
use. Care should be taken to avoid touching heating
elements. Children less than 8 years of age shall be kept
away unless continuously supervised.
•This appliance can be used by children aged from 8 years
and above and persons with reduced physical, sensory or
mental capabilities or lack of experience and knowledge if
they have been given supervision or instruction concerning
use of the appliance in a safe way and understand the
hazards involved. Children shall not play with the
appliance. Cleaning and user maintenance shall not be
made by children without supervision.
•Do not use harsh abrasive cleaners or sharp metal scrapers
to clean the oven door glass since they can scratch the
surface, which may result in shattering of the glass.
•If the door or door seals are damaged, the oven must not
be operated until it has been repaired by a competent
person.
•It is hazardous for anyone other than a competent person
to carry out any service or repair operation which involves
the removal of a cover which gives protection from electric
shock.
3
Safety instructions
IMPORTANT SAFETY INSTRUCTIONS
READ CAREFULLY AND KEEP FOR FUTURE REFERENCE

Safety instructions
•This appliance includes a heating function. Surfaces, other
than the functional surfaces may develop high
temperatures. Since temperatures are perceived
differently by different people, this device should be used
with CAUTION. Hold the appliance exclusively to grip
surfaces intended to be held and take precautions by using
oven gloves. Areas which are not intended to be handle
must be given sufficient time to cool.
•To reduce the risk of fire in the oven: Do not over cook
food. Do not leave the oven unattended during use.
•Household use only.
IMPORTANT SAFEGUARDS
When using electric appliances, basic safety precautions
should always be followed including the following:
•Read all instructions.
•Do not touch hot surfaces.
•Always use the accessory handle or wear protective,
insulated oven mitts when inserting or removing items
from the hot oven.
•Close supervision is necessary when any appliance is used
near children. Children should not use this appliance.
•Do not let the mains cord hang over the edge of table or
counter, or touch hot surfaces.
•To protect against electric shock, do not immerse the cord,
plug, or any parts of the oven in water or other liquids.
•Take care not to let the electric oven be scratched by hard
edges.
4

Safety instructions
•Do not operate appliance with a damaged cord or plug or
after the appliance malfunctions, or has been damaged in
any manner.
•Do not pull the cord in an aggressive manner or lay any
heavy objects on it.
•Unplug from outlet when it’s not in use to minimise any
fire hazard.
•Using accessory attachments not recommended by the
appliance manufacturer may cause hazard or injury.
•Put the electric oven in a dry place. This electric oven is for
household use only.
•When operating the oven, keep at least 10cm of space on
all sides of the oven to allow for adequate air circulation.
•Do not place on or near a hot gas or electric burner.
•Oversized foods or metal utensils must not be inserted in
the oven as they may create a fire or risk of electric shock.
•Do not place any of the following materials in the oven:
cardboard, plastic, paper, or anything similar.
•Be sure to unplug the electric oven and allow to cool
before moving or allowing a competent service person to
repair it.
•Use extreme caution when removing the tray or disposing
of hot fat or other hot liquids.
•Do not cover the air inlet of oven. Do not cover any part of
the oven with metal foil. This may cause overheating of
the oven which may result in fire.
5

Safety instructions
•Do not load anything on door glass.
•Do not put food trays or any other objects directly on the
heating elements.
•Do not use the oven outdoor to prepare food on.
•Any repair to the oven should be carried out by qualified
or professional persons.
•Children should be supervised to ensure that they do not
play with the appliance.
•The temperature of all surfaces may be high when the
appliance is operating.
•The surfaces are liable to get hot during use.
•Outer surfaces are liable to get hot during use.
•The appliances are not intended to be operated by means
of an external timer or separate remote-control system.
•For appliance with type Y attachment, if the supply cord is
damaged, it must be replaced by the manufacturer, its
services agent or similarly qualified persons in order to
avoid a hazard.
•Rear surface of the appliances should be placed against a
solid wall.
•Do not remove parts from the oven such as the feet,
screws and so on.
•Always test the temperature of cooked food, never eat or
drink food or liquid straight from the oven , allow it to
stand for a few minutes and allow to cool.
6

1
Mini
oven unit
5
Crumb
tray
2
Pull down door handle
6
Baking tray
3
Control panel with dials
7
Tray handle
4
Power
indicator light
8
Oven rack
7
Mini oven feature diagram
123
4
5
6
78

Select a level and stable heat proof surface that provides enough space
for the outlet vents on the sides of the mini oven.
A minimum clearance of 10cm is required between the oven and any
adjacent walls. One side must be open. Leave a minimum clearance of
30cm above the oven.
The oven must be placed away from high temperatures and steam.
Thoroughly wash the removable accessories in hot soapy water and allow
to dry completely. Warning: Do not immerse the mini oven in any liquid.
Once unplugged from the mains power socket and allowed to cool, the
mini oven can be carefully wiped clean using a damp cloth.
8
Preparing your mini oven
Before using your oven
Check the oven after unpacking for any visual damage or missing parts
such as:
•Misaligned or damaged casing.
•Damage to the plug or cable.
•If any parts are missing or there is any damage, please refer to page
15 for Customer Services.
30cm
10cm
10cm

9
Cable extensions
This unit has a short power supply cord to reduce the risk of
entangling or tripping over a long cord. An extension cord may be
used if you are careful in its use:
•The electric rating of the extension cord should be at least as great
as the electrical rating of the appliance.
•An extension cord with the power cord must be arranged so that it
will not drape over the countertop or table top where they can be
pulled on by children or tripped over accidentally.
Technical specifications
Wattage: 1300W
Rated Voltage: 220-240V ~ 50/60Hz
Capacity: 18 litres
After re-assembling your oven, we recommend that you run it at
maximum temperature for approximately 15 minutes to eliminate any
packing oil that may remain after shipping.
Make sure you have oven gloves ready to remove cooked food.
What cookware items can be used in your mini oven?
Anything that can be used in a conventional oven for example:-
oven safe bowls, plates, tin foil etc. as long as the vents are not blocked
and the door can be closed fully. Do not use ceramic bowls or lids.
Preparing your mini oven

10
Control panel
A
B
C
D
E
1
2
3
4
1. Temperature control dial
Turn the control dial clockwise to set the desired
temperature of your oven. This ranges from 70-
230°C. You will need to allow time to let the oven
preheat.
2. Function control dial
A. Off –no function is set and the oven will not heat.
B. Lower heating - for foods such as less tender cuts
of meat, soups and stews.
C. Upper heating - ideal for fish, beef, steak,
vegetables, etc.
D. Lower and upper heating - for foods such as corn,
bread, cookies and general heating of food.
E. Fan assisted lower and upper heating –works the
same as a fan assisted oven. Good for steaks, baking,
pizza and bread.
3. Power indicator light
This will illuminate when the timer control dial is
turned clockwise, or to ‘Stay on’. If you have set the
temperature and function the unit will start heating.
4. Timer control dial
Turn the control dial clockwise to increase the desired
time you require your oven to be on. Note: If the time
you require is less than 5 minutes, you should turn the
dial past 20 minutes and turn back to 5 minutes for
accurate timing. If you turn the dial anticlockwise to
‘Stay on’ this will keep the desired temperature and
function switched on until turned ‘Off’.
Use this setting with caution.

11
Using your mini oven
Once you have prepared your mini oven,
plug it into a mains socket and press the
switch on.
Set the temperature control dial to the recipes
required temperature, turning clockwise.
Select the desired function by turning the
control dial clockwise.
Turn the timer dial clockwise to set a cooking
time up to 60 minutes, or turn anticlockwise
to ‘Stay on’ for untimed cooking.
Note: Allow to preheat for 5 to 10 minutes.
Make sure you are wearing heatproof oven
gloves.
When the oven has had sufficient time to heat
up, open the door, place your food onto the
baking tray and then onto the oven rack. Make
sure your timer is set according to your recipe.
Pull down the door using the handle.
Place your crumb tray into the very bottom of
your oven. This will stop juices/food crumbs
from soiling the bottom of your oven.
Make sure the oven rack is slotted into the
unit securely. You can choose from 3 different
slots at differing heights to accommodate the
food to be cooked. Shut the door.

12
Using your mini oven
You can use the tray handle provided to push
the rack back into the oven.
Close the door and wait the required time for
your food to be cooked. You must monitor the
progress of your cooking as recipes can vary. If
you have set a specific time using the control
dial, this will make a noise when the time has
run out. Check carefully that the food is
cooked thoroughly.
Turn the function dial to the ‘Off’ position.
Switch the power off at the plug socket and
remove the plug.
It is recommended to use oven gloves.
Open the door using the handle.
You can use the tray handle provided to
carefully pull the rack back out of the oven.
Remove your cooked food and serve as
required.

13
Cleaning and care
Before cleaning make sure to switch the
power off at the plug socket and remove the
plug.
Warning: Ensure you have waited for the oven
to fully cool before attempting to clean it.
After cooking, use oven gloves to remove any
accessories that are to be cleaned, including
the baking tray, oven rack and crumb tray.
Wash all the attachments with mild, soapy water. Do not attempt to
wash accessories in the dishwasher as this could damage them.
Do not use abrasive cleaners, scrubbing brushes and chemical cleaner
as they will cause damage to the non-stick coating of the baking tray.
Use a wet cloth to wipe the inner of the oven.
To clean the door, use a damp soft cloth with mild soap/detergent.
Allow the unit to dry completely before using again.
Never immerse the unit in water or any other liquid.
Any other servicing should be performed by an authorised service
representative. Store in a clean, dry place.
We’re here should you need us.
For Customer Services & Spare Parts please call 0345 209 7461
Opening times: Monday - Friday 8am –6pm & Saturday 9am –1pm
Or visit us at www.productcareuk.com

14
Guarantee
This product is guaranteed for 12 months from the date of the original
purchase. If any defect arises due to faulty materials or workmanship
the faulty product must be returned to the place of purchase.
Refund or replacement is at the discretion of the retailer.
The following conditions apply:
•The product must be returned to the retailer with the original proof
of purchase.
•The product must be installed and used in accordance with the
instructions contained in this instruction guide and any other
instructions for use which has been supplied.
•It must be used for domestic purposes only and for its intended use.
•This guarantee does not cover wear and tear, damage, misuse or
consumable parts.
This does not affect your statutory rights.
We’re here should you need us.
For Customer Services & Spare Parts please call 0345 209 7461
Opening times: Monday - Friday 8am –6pm & Saturday 9am –1pm
Or visit us at www.productcareuk.com

15
Customer services
Attach your receipt to this page for proof of purchase.
This symbol is known as the 'Crossed-out wheelie bin Symbol'.
When this symbol is marked on a product/batteries, it means
that the product/batteries should not be disposed of with your
general household waste.
Only discard electrical/electronic/battery items in separate
collection schemes, which cater for the recovery and recycling
of materials contained within. Your co-operation is vital to
make sure the success of these schemes and for the protection
of the environment. For your nearest disposal facility, visit
www.recycle-more.co.uk or ask in store for details.
We reserve the right due to possible changes to design to alter
the instruction manual without prior notice.
Disposal information
We’re here should you need us
For Customer Services & Spare Parts please call
0345 209 7461
Opening times: Monday - Friday 8am –6pm &
Saturday 9am –1pm
Or visit us at www.productcareuk.com
Produced for:
G2S Limited
Wigan,
WN2 4EZ

16
Spare parts
The following spare parts are available to purchase online or by calling
Product Care.
Visit us at www.productcareuk.com
Or call 0345 209 7461
Opening times: Monday - Friday 8am –6pm & Saturday 9am –1pm
Crumb tray Oven rack
Baking tray Tray handle

WARNING- THIS APPLIANCE MUST BE EARTHED
This appliance is designed to operate from a mains supply of 220-240V ~
50/60Hz.
Check that the voltage marked on the product corresponds with your
supply voltage.
This product is fitted with a 13A plug complying with BS1363.
If this plug is unsuitable or needs to be replaced, please note the following:
Important: The wires in the mains lead are coloured in accordance with
the following code:
GREEN/YELLOW-EARTH
BLUE-NEUTRAL
BROWN-LIVE
17
Connection to the mains supply

For UK use only –Plug fitting details (where applicable):
As the colours of the wires in the mains lead of this appliance may not
correspond with the coloured markings identifying the terminals in your
plug, proceed as follows:
The GREEN/YELLOW wire is the EARTH and must be connected to the
terminal which
is marked with the letter E or by the earth symbol or coloured GREEN or
GREEN/YELLOW.
The BLUE wire is the NEUTRAL and must be connected to
the terminal marked with the letter N or coloured BLACK.
The BROWN wire is the LIVE wire and must be connected to
the terminal marked with the letter L or coloured RED.
Always ensure that the plug cord grip is fastened correctly.
If a13A(BS1363) fused plug is used it must be fitted with a
13amp fuse conforming to BS1362 and be BSI or ASTA approved.
Connection to the mains supply
18

19
Notes

Model number: AMO1801
R1
Table of contents
Other Abode Oven manuals
Popular Oven manuals by other brands

AEG
AEG COMPETENCE 305 B Instruction book

Wood Stone
Wood Stone Bistro 3030 WS-BL-3030-RFG Installation and operation manual

Chef Tested
Chef Tested FCO23B CT, FCO25R CT instruction manual

Proline Euro
Proline Euro EP60M8SX user manual

Bosch
Bosch Benchmark HBLP451RUC Specifications

Siemens
Siemens HB675GB 1B Series instruction manual