Abus TVVR70020 User manual

ABUS 16-channel NAS
TVVR70020
User manual
Version 1.0

Notes on the operating instructions
2
English
These user manual contains important information for
installation and operation.
This should be also noted when this product is passed on
to a third party.
Therefore look after these operating instructions for future
reference!
A list of contents with the corresponding page number can
be found in the index.
Pay attention to the information in the separate quick guide.

Device overview
3
Device overview
Status LED
1. HDD status LED
2. HDD activity LED
3. System status LED
4. Ethernet activity LED
5. One-touch backup button

Device overview
4
Overview
1. Network button: Switches device on/off
2. USB ports: USB port (e.g. for connecting an external HDD)
3. eSATA port: eSATA port (e.g. for connecting an external HDD)
4. LAN: RJ45 connection (for connecting to a network)
5. Reset button: Loads the factory settings
6. Power supply: Connection for power supply

Contents
5
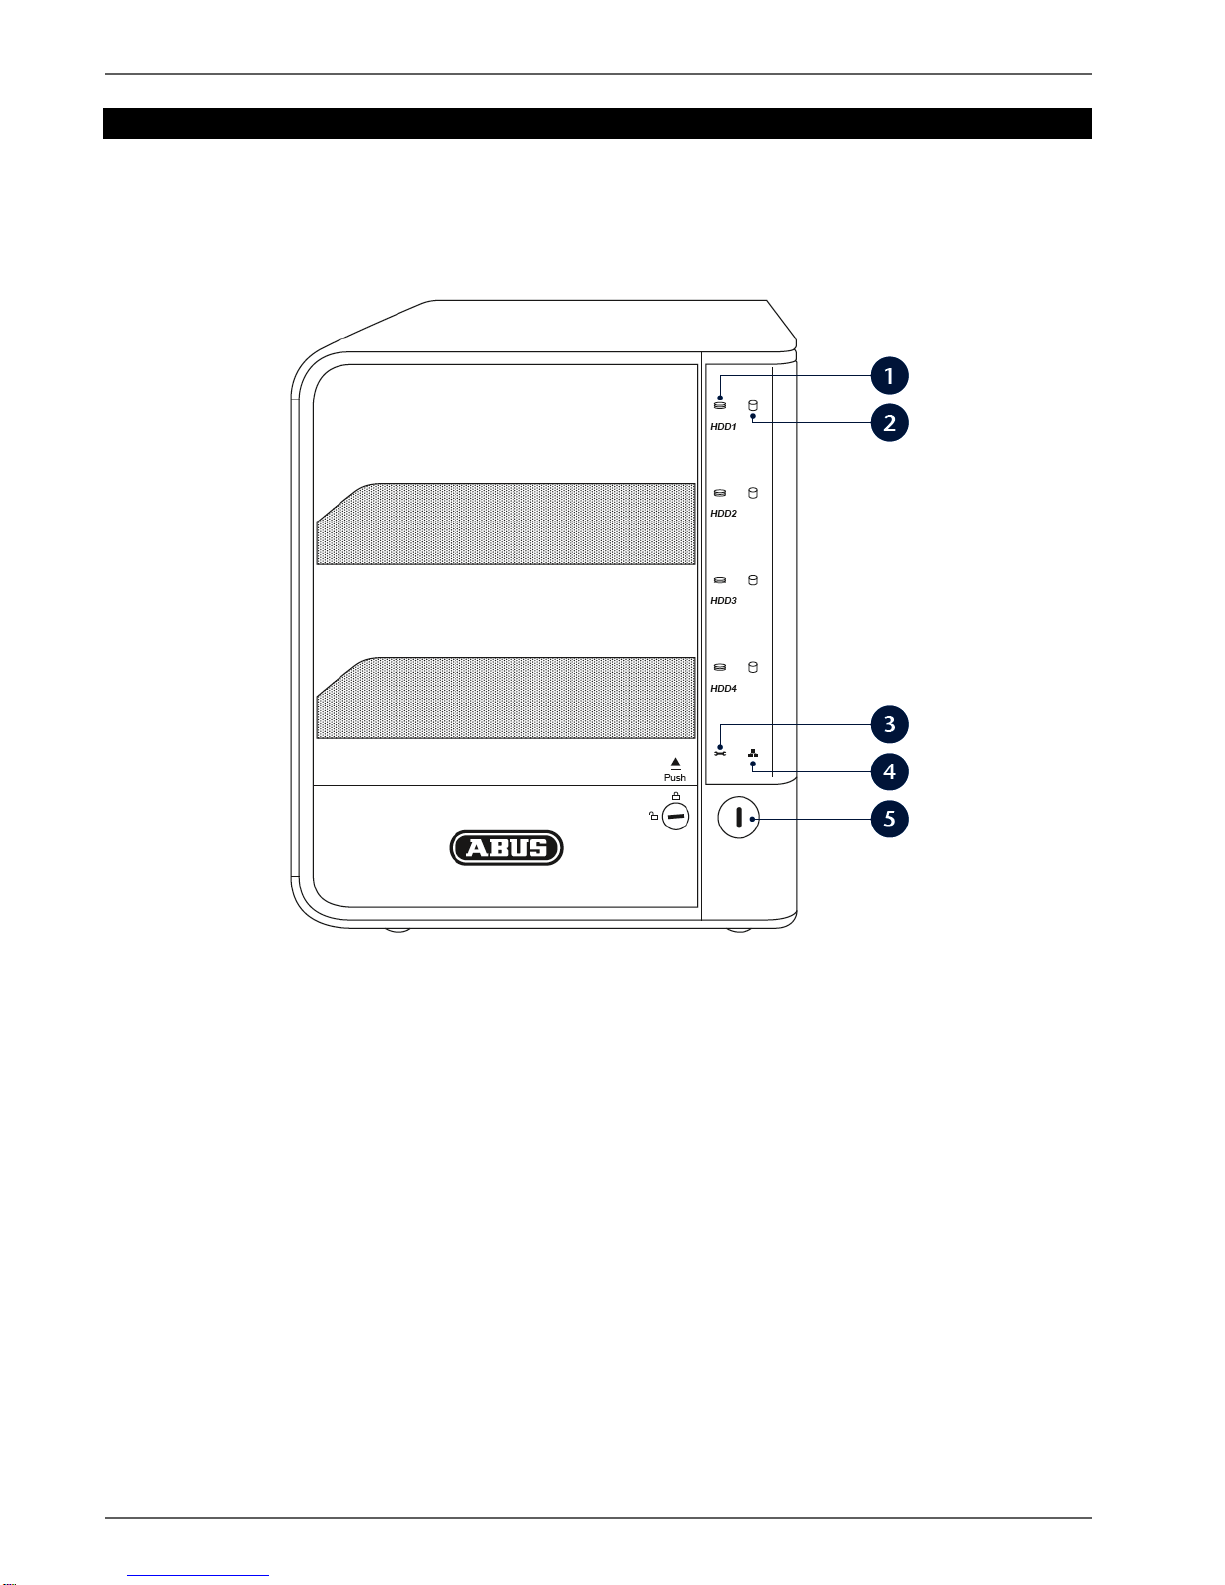
Device overview...............................................................................................................................................................3
Quick guide.......................................................................................................................................................................7
Before you start................................................................................................................................................................7
Installing HDDs ................................................................................................................................................................7
Establishing the connections...........................................................................................................................................7
Configuring the device.....................................................................................................................................................7
Important safety information..........................................................................................................................................8
Explanation of symbols....................................................................................................................................................8
Proper use .......................................................................................................................................................................8
General information .........................................................................................................................................................8
Power supply ...................................................................................................................................................................8
Overloading/overvoltage..................................................................................................................................................9
Cables..............................................................................................................................................................................9
Installation location/operating environment .....................................................................................................................9
Care and maintenance...................................................................................................................................................10
Accessories....................................................................................................................................................................10
Putting into operation.....................................................................................................................................................10
Children and the device.................................................................................................................................................10
Introduction....................................................................................................................................................................11
General information .......................................................................................................................................................11
Unpacking the device.....................................................................................................................................................11
Scope of delivery ...........................................................................................................................................................11
System operation...........................................................................................................................................................12
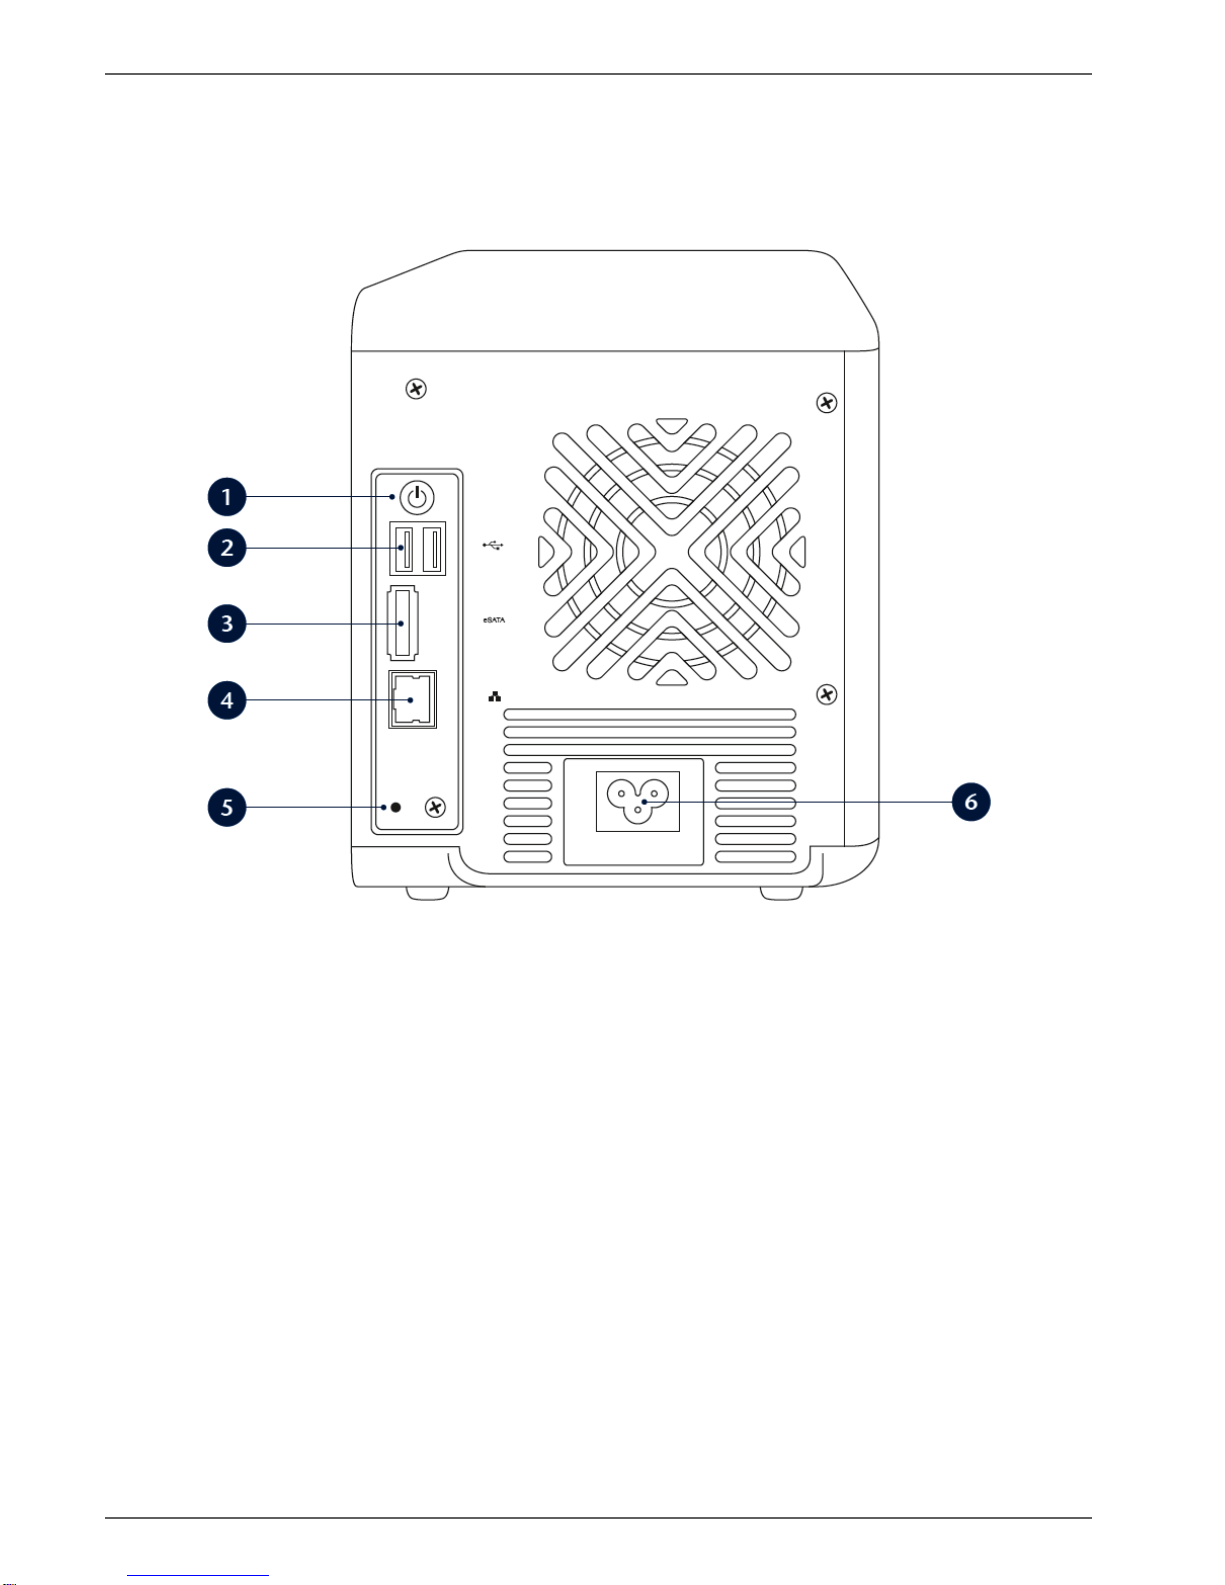
Connections on the rear of the device...........................................................................................................................12
Starting the device.........................................................................................................................................................12
Status LED.....................................................................................................................................................................12
Setting up a connection................................................................................................................................................13
Setting up the system ....................................................................................................................................................13
Login ..............................................................................................................................................................................13
Installing the plug-in.......................................................................................................................................................14
Live image.......................................................................................................................................................................15
Overview........................................................................................................................................................................15
Camera view..................................................................................................................................................................15
Favourites view..............................................................................................................................................................15
Operating mode .............................................................................................................................................................16
Manual recording (Panic Record)..................................................................................................................................16
Camera control ..............................................................................................................................................................16
Using the numeric field ..................................................................................................................................................17
Camera selection...........................................................................................................................................................17
Call up the camera positions (presets) ..........................................................................................................................17
Relays............................................................................................................................................................................17
Switching the image geometry.......................................................................................................................................18
Activating and deactivating the cameras.......................................................................................................................18
Favourites ......................................................................................................................................................................19
Playback..........................................................................................................................................................................20
Overview........................................................................................................................................................................20
Presentation view...........................................................................................................................................................20
Time stream...................................................................................................................................................................20
Playback bar ..................................................................................................................................................................21
Export.............................................................................................................................................................................22

Contents
6
Configuration..................................................................................................................................................................23
Camera ..........................................................................................................................................................................23
Setting up an IP camera ................................................................................................................................................23
Deleting an IP camera ...................................................................................................................................................24
Extended mode..............................................................................................................................................................24
I/O module.......................................................................................................................................................................25
I/O module .....................................................................................................................................................................25
Overview........................................................................................................................................................................25
Settings..........................................................................................................................................................................25
Drive ................................................................................................................................................................................26
Drive...............................................................................................................................................................................26
USB-1.............................................................................................................................................................................26
RAID...............................................................................................................................................................................27
Actions............................................................................................................................................................................29
Actions ...........................................................................................................................................................................29
Overview........................................................................................................................................................................29
Recordings.....................................................................................................................................................................29
Creating a schedule.......................................................................................................................................................30
Deleting a schedule .......................................................................................................................................................30
Changing a schedule.....................................................................................................................................................30
Notifications ...................................................................................................................................................................31
Commands.....................................................................................................................................................................32
Storage...........................................................................................................................................................................33
Network...........................................................................................................................................................................34
Overview........................................................................................................................................................................34
General ..........................................................................................................................................................................34
LAN................................................................................................................................................................................35
E-mail.............................................................................................................................................................................35
Port.................................................................................................................................................................................36
Security...........................................................................................................................................................................37
Security..........................................................................................................................................................................37
Permissions ...................................................................................................................................................................37
User................................................................................................................................................................................38
Other................................................................................................................................................................................39
Other..............................................................................................................................................................................39
Date/Time.......................................................................................................................................................................39
Firmware update............................................................................................................................................................40
Resetting........................................................................................................................................................................40
Safe mode......................................................................................................................................................................40
Troubleshooting.............................................................................................................................................................41
Device cleaning and care..............................................................................................................................................42
Note................................................................................................................................................................................42
Disposal ..........................................................................................................................................................................42
Information on the EU directive on waste electrical and electronic equipment.............................................................42
Information on the European RoHS directive...............................................................................................................42
GPL licence information................................................................................................................................................42
Technical data................................................................................................................................................................43

Quick guide
7
Quick guide
Before you start
The following preparatory steps must be made:
1. Pay attention to the general information, safety
information and notes on setting up and connecting
the device (see page 8 – 12).
2. Check the contents of the package for completeness
and damages.
Note
Pay attention to the information in the separate
quick guide.
Installing HDDs
Warning
Switch off the device and disconnect it from the
mains power supply.
Make sure the device is earthed properly to avoid
static discharge.
1. Install the HDD in the drive carrier.
2. Install the HDD carrier in the 16-channel NAS.
3. Repeat steps 1 and 2 until all the HDDs are
installed.
4. Close the front panel of the 16-channel NAS.
Establishing the connections
Note
Note the minimum radius when laying cables. Do
not kink the cables.
1. Connect the network cameras and the LAN
connection on the device to the network.
2. Set up the connection to the mains power supply.
Configuring the device
Note
Note the information in the separate quick guide.
•You must configure the following settings in
sequence:
•Camera
•I/O module
•Drive
•Actions
•Network
•Security
•Other

Important safety information
8
Important safety information
Explanation of symbols
The following symbols are used in this manual and on the
device:
Symbol Signal word Meaning
Warning Indicates a risk of injury or
health hazards.
Warning Indicates a risk of injury or
health hazards caused by
electrical voltage.
Important Indicates possible damage to
the device/accessories.
Note Indicates important information.
The following labels are used in the text:
Meaning
1. …
2. … Set of tasks or instructions with a defined
sequence in the text
•…
•…
Set of points or warnings without a defined
sequence in the text
Proper use
Only use the device for the purpose which it was
designed and built for. Any other use is considered
inappropriate.
This device may only be used for the following
purpose(s):
•The 16-channel NAS is used in combination with
connected video signal sources (IP cameras) for
property surveillance purposes.
Note
Data storage is subject to national data-protection
guidelines.
During installation, inform your customers
regarding the existence of these guidelines.
General information
Before using the device for the first time, read the
following instructions carefully and pay attention to all
warnings, even if you are already familiar with electronic
devices.
Warning
All guarantee claims become invalid for damages
caused by non-compliance with these operating
instructions.
We cannot be held liable for resulting damages.
Warning
We cannot be held liable in the event of material
or personal damage caused by improper
operation or non-compliance with the safety
information.
All guarantee claims are invalid in such cases.
Keep this manual in a safe place for future reference.
If you pass on or sell the device, you must also include
this user manual.
This device has been manufactured in accordance with
international safety standards.
Power supply
•Only operate this device through a power source
which supplies the mains power specified on the type
plate.
•If you are unsure of the power supply at the
installation location, contact your power supply
company.
Warning
Avoid data loss!
Always use an uninterruptible power supply (UPS)
with overvoltage protection.
•Disconnect the device from the mains power supply
before carrying out maintenance or installation work.
•To disconnect the device completely from the mains
power supply, the plug must be disconnected from
the mains socket. Therefore, the device should be
positioned so that direct and unobstructed access to
the mains socket is guaranteed at all times and the
plug can be disconnected immediately in an
emergency.

Important safety information
9
•To avoid the possibility of fires, the plug should
always be disconnected from the network socket if
the device is not used for long periods. Disconnect
the device from the mains power supply before
impending electrical storms, or use an uninterruptible
power supply.
Warning
Never open the device on your own! There is a
risk of electric shocks!
If it is necessary to open the device, consult
trained personnel or your local maintenance
specialist.
Overloading/overvoltage
•Avoid overloading of mains sockets, extension cables
and adapters as this can result in fires or electric
shocks.
•Use overvoltage protection to prevent damages
caused by overvoltage (e.g. electrical storms).
Cables
•Always hold cables by the connector, and do not pull
the cable itself.
•Never touch the mains cable with wet hands, as this
can lead to a short circuit or electric shock.
•Never knot the cable, and do not tie it to other cables.
•All cables should be laid so that they cannot be
stepped on or cause an obstruction.
•A damaged mains cable can cause a fire or electric
shock. Check the mains cable from time to time.
•Never modify or manipulate the mains cable or plug.
•Do not use plug adapters or extension cables that do
not conform to the applicable safety standards, and
do not make alterations to power supply cables or
mains cables.
Installation location/operating environment
•Position the device on a firm, level surface and do not
place any heavy objects on the device.
•The device is not designed for operation in rooms
subject to high temperatures or moisture (e.g.
bathrooms), or in excessively dusty rooms.
•Operating temperature:
5 °C to 35 °C. The device may only be operated
in moderate climate conditions.
Ensure the following:
•The device must not be exposed to direct heat
sources (e.g. heaters);
•The device must not be exposed to direct sunlight or
strong artificial light;
•The device must not be placed in close proximity to
magnetic fields (e.g. loudspeakers);
•Naked flames (e.g. candles) must not be placed on or
near the device;
•Contact with spraying or dripping water and
aggressive liquids must be avoided;
•The device must not be operated in close proximity to
water, and must not be submerged under any
circumstances (do not place objects containing water
on or near the device, such as vases or drinks);
•Foreign objects must not penetrate the device;
•The device must not be exposed to strong variations
in temperature, as this can lead to condensation and
electrical short circuits.
•The device must not be exposed to excessive jolts or
vibrations.

Important safety information
10
Care and maintenance
Maintenance is necessary if the device has been
damaged. This includes damage to the plug, mains cable
and housing, penetration of the interior by liquids or
foreign objects, exposure to rain or moisture or when the
device does not work properly or has fallen.
•Disconnect the device from the mains power supply
before maintenance (e.g. cleaning).
•If smoke develops or unusual noises or odours are
detected, then switch off the device immediately and
pull the mains plug from the socket. In such cases,
the device should not be used until it has been
inspected by a qualified technician.
•Maintenance work should only be carried out by
qualified specialists.
•Never open the housing on the device or
accessories. There is a risk of fatal injury due to an
electric shock when the housing is opened.
•Clean the device housing and remote control with a
damp cloth.
•Do not use solvents, white spirit or thinners as these
can damage the surface of the device.
•Do not use any of the following substances:
•Salt water, insecticides, solvents containing chlorine
or acids (ammonium chloride) or scouring powder.
•Gently rub the surface with a cotton cloth until it is
completely dry.
Warning
The device works under dangerous voltages. The
device must only be opened by authorised
specialists. All maintenance and service work
must be carried out by authorised firms. Improper
repairs can expose device users to the risk of fatal
injury.
Accessories
•Only connect devices that are suitable for the
intended purpose. Otherwise, hazardous situations or
damage to the device can occur.
Putting into operation
•Observe all safety and operating instructions before
putting the device into operation for the first time.
Warning
When installing the device in an existing video
surveillance system, ensure that all devices are
disconnected from the mains power supply and
low-voltage circuit.
Warning
If in doubt, have a specialist technician carry out
assembly, installation and connection of the
device.
Improper or unprofessional work on the mains
power supply or domestic installation puts both
you and other persons at risk.
Connect the installations so that the mains power
circuit and low-voltage circuit always run
separately from each other. They should not be
connected at any point or become connected as a
result of a malfunction.
Children and the device
•Do not allow children access to electrical devices.
Never allow children to use electrical devices without
supervision. Children may not be able to accurately
detect possible risks. Small parts can be life-
threatening if swallowed.
•Keep batteries away from small children. Call for
medical assistance immediately if a battery is
swallowed.
•Keep packaging materials away from children
(danger of suffocation).
This device should not be used by children. If used
improperly, spring-loaded parts can be ejected and
cause injuries to children (e.g. eye injuries).

Introduction
11
Introduction
Dear customers,
Thank you for purchasing this product.
This product complies with current domestic and
European regulations. Conformity has been proven, and
all related certifications are available from the
manufacturer on request (www.abus-sc.com).
To maintain this status and to guarantee safe operation,
it is your obligation to observe these operating
instructions!
Read the entire operating manual carefully before putting
the product into operation and pay attention to all
operating and safety information!
All company names and product descriptions are
trademarks of the corresponding owner. All rights
reserved.
In the event of questions, please contact your local
maintenance specialist or dealer.
Disclaimer
These operating instructions have been produced
with the greatest care. Should you discover any
missing information or inaccuracies, please
contact us under the address shown on the back
of the manual. ABUS Security-Center GmbH does
not accept any liability for technical and
typographical errors, and reserves the right to
make changes to the product and operating
instructions at any time and without prior warning.
ABUS Security-Center GmbH is not liable or
responsible for direct or indirect damages
resulting from the equipment, performance and
use of this product. No forms of guarantee are
accepted for the contents of this document.
General information
In order to use the device correctly, read this user
manual carefully and keep it in a safe place for later use.
This manual contains instructions on operating and
maintaining the 16-channel NAS.
Unpacking the device
Handle the device with extreme care when unpacking it.
The packaging is made of reusable materials, and
should always be passed on for recycling.
We recommend the following:
Paper, plastic packaging, cardboard and corrugated
cardboard should be disposed of in the appropriate
recycling containers.
If recycling containers are not available in your local area,
then you can dispose of these materials as domestic
waste.
If the original packaging has been damaged, inspect the
device. If the device shows signs of damage, then return
it in the original packaging and contact the manufacturer.
Scope of delivery
•16-channel NAS
•Quick Guide
•Manual on CD
•EU power cord
•UK power cord
•AUS power cord
•2 m Network cable
Consult an authorised specialist if the device needs to be
repaired.

System operation
12
System operation
Connections on the rear of the device
Note
See the overview on page 4.
No.
Name
Function
1 Network button:
•Switches device on/off
2 USB ports:
•For external USB 2.0 devices (e.g. external
HDD)
3 eSata port:
•eSATA port (e.g. for connecting an external
HDD)
4 LAN:
•RJ45 connection (for connecting to a
network)
5 Reset button:
•Loads the factory settings
6 Power supply:
•Connection for power supply
Starting the device
Important
The device must only be connected to the mains
voltage supply specified on the type plate.
For safety reasons, use an uninterruptible power
supply (UPS).
Press the ON/OFF switch on the back of the device.
Starting the 16-channel NAS takes about one minute.
When the start procedure is complete:
- The system status LED lights blue.
- There is a single acoustic signal.
Status LED
Note
See the overview on page 3.
No.
State
Function
1 Blue
Yellow
Red
Off
Normal drive operation
Drive is being set up
Drive error
No drive installed
2 Blue Displaying HDD activity
3 Blue
Yellow
Red
Device working OK
Problem with fan/voltage supply
Fan, voltage supply or file system
defective
4 Blue Displaying Ethernet activity
5 Blue One-touch backup button

Setting up a connection
13
Setting up a connection
Setting up the system
Install and start the “IP Installer” on the enclosed
software CD.
Click “Search” – the program will search the network for
any connected NAS devices.
Once the search is finished, you will be shown a list of
devices found in the network. When you double-click a
list entry, a connection to the video buffer is set up.
Login
Select your preferred language. Enter “eytron” in the
“User name” field.
Login at the system by clicking the key switch.

Setting up a connection
14
Installing the plug-in
When a camera is activated for the first time, you are
requested to install the required plug-in for your web
browser.
MS Internet Explorer 8:
Click on Install - the installation of the plug-in starts.
When the plug-in has been installed successfully, the
camera is displayed by ActiveX.
In some cases, the execution of the plug-in may be
blocked by Internet Explorer (IE8).
Then the security settings must be modified in the
Internet options (Extras menu
Internet options).
Select the Security tab page, then click on the Custom
level button.
In the list in the dialog that appears, change the item
“Initialize and script ActiveX controls not marked ‘Safe for
scripting’” from the deactivated to the activated state.
Close all the windows again using OK.
Now the browser must be closed and restarted. The plug-
in can now be used.
Firefox 3.6, Chrome 4.1 and Safari 5:
Under www.abus-sc.com you can always download the
latest plugin for your product.
Install the Quicktime plug-in.
The same plug-in is used for all three browsers.
When the plug-in has been installed successfully, the
camera is displayed by the QuickTime plug-in.

Live image
15
Live image
Overview
The live view starts automatically after the login.
The screen header contains the following menus:
•Logout
Click on “Logout” to log out of the system.
•Settings
Click on “Settings” to go to the device menu.
•Support
Click on “Support” to go to the online help.
The system status, date and time are displayed on the
top right.
Status symbols
•The following symbols are displayed depending on
the operating status of the device:
Symbol
Meaning
Alarm
Lights up when a video signal from an IP
camera is lost.
Recording
Lights up when video data from at least one
camera is recorded.
Malfunction
Lights up if a fault occurs, e.g. HDD problem.
Camera view
Here, all the activated cameras are listed in a slide view.
The camera type is indicated by the camera symbol on
the top right-hand side of the slide. This can vary as
follows:
•Pan/tilt camera with network connection
•Network camera or video server
The camera name is always displayed at the bottom of
the slide.
If the camera is recording, the Record symbol appears on
the slide.
Favourites view
All the favourites stored are displayed
here. This is indicated by the favourites symbol
Note
For more information, see page 19.

Live image
16
Operating mode
A basic distinction is made between two categories:
Symbol
Meaning
Live mode
Playback mode
The live mode is used for viewing what is currently being
monitored by the system’s cameras.
The playback mode is used to access the video data
recorded by the individual cameras.
Note
For more information on the playback mode, see
page 20.
Manual recording (Panic Record)
Activating the Manual Recording button ensures that
recordings are made from all the currently activated
cameras. The recording continues until the button is
deactivated again.
It is then possible to watch the recordings in Playback
mode.
Symbol
Meaning
Manual recording ON
Manual recording OFF
Camera control
The operating panel on the lower right-hand edge of the
screen is used to control pan/tilt cameras.
Symbol
Meaning
You click on the desired direction
button to control the camera
accordingly.
The current image area can be
enlarged using the zoom function.
To direct a camera, left-click that camera’s live image in
the live window section.
However, only the camera currently selected can be
directed in this way.
Alternatively, the camera can be selected by means of
the numeric field. For this, the number of the camera to
be activated must be entered.
If a pan/tilt camera has been selected, the camera’s
analogue zoom is used. With fixed cameras, the image is
zoomed in on digitally.
Note
For an analogue camera with a zoom objective,
when used in connection with a video server, the
camera’s analogue zoom is used.

Live image
17
Using the numeric field
The numeric field can be divided into three separate
operating modes:
•Camera selection
•Presets
•Relays
The current selection is shown in an LCD display.
Symbol
Meaning
Camera selection
Presets
(stored camera positions)
Relays
Pan/tilt camera returns to the starting
position
Reset input mode to two-digit
(max. entry 99)
to
Number keys
Camera selection
If the camera selection symbol is activated, the number
key can be used to include a camera directly in the live
image.
In this example, number key 1 was clicked, and camera 1
was directly included in the live image.
Call up the camera positions (presets)
The presets can be used to call up specific camera
positions for pan/tilt cameras.
Click on the symbol for presets and select the assigned
preset.
Then move the camera into the saved position.
Relays
Here you can control relays directly from the cameras set
up or from a video server.
Click on the symbol for relays and select the relevant
allocated digit for the relay. When you click on the digit,
the corresponding relay is switched on for the camera or
the video server.

Live image
18
•1Plus view
Switching the image geometry
The camera puck can be used to represent a
total of 6 different views.
The views are only switched once the mouse button is
released.
The following is a more detailed description of how to use
the camera puck.
The camera puck is used to increase or decrease the
number of camera windows. For example, if more free
camera places are required, the puck must be moved
along the horizontal plane towards the plus sign (in
quadratic view).
If the puck is moved along the vertical plane, the current
view is changed to the 1Plus view. The further the puck is
moved away from the top left-hand corner, the larger the
1Plus window.
If more free windows are required again in this view, they
can be created by moving the puck along the horizontal
plane (+/-).
Activating and deactivating the cameras
Drag and drop a camera into a free live window to
activate (switch on) the camera.
To do this, switch to the live mode (No. 1). Next, move
the view switch to the camera view (No. 2).
In the Camera view, click the slide of the desired camera
and hold down the left mouse button (No. 3).
Now move the mouse to a free camera window and
release the left mouse button (No. 4). The camera is then
embedded in the desired window.
If you wish to embed the camera in another window, you
can again use the drag and drop function to move the
embedded live image to another window.
To deactivate (switch off) a camera, simply release the
camera outside the chrome frame using drag and drop
(No. 5). We recommend dragging the camera back to the
slide list.
Example of activating a camera:
No.
Symbol
Meaning
1
Select the live mode
2
Select the camera view
3
Select a slide and hold
down the left mouse
button
4
Select a free camera
window and release the
left mouse button
5
Deactivate camera
Note
When activating it for the first time, please see the
notes on installing a plug-in for your web browser
on page 14.

Live image
19
Favourites
When using multiple cameras, it is advisable to save
certain camera views as favourites.
To display the cameras again, only the favourite needs to
be activated instead of each individual camera. Another
advantage is that the image geometry currently set is
also saved when a favourite is created. This means there
is no need for manual switching between the views.
We differentiate between 3 favourite types:
•Live favourite
•Playback favourite with bar display
•Playback favourite with full-screen display
Symbol
Meaning
Live favourite
Playback favourite with bar view
Playback favourite with full-screen database
playback
Depending on the operating mode in which the favourite
was created, that mode is restored when the favourite is
activated.
Example for creating and deleting a favourite in the live
mode:
No.
Symbol
Meaning
1
Switch the operating
mode to the live mode
2
Set the desired image
geometry
3
Activate the desired
cameras and define the
sequence in the live
window
4
Switch the view switch
to the Favourites view
5 Create a new favourite
6
Assign a name for the
favourite to be saved,
and confirm with OK
7
New favourite is
displayed as slide
(wrong image)
8 Delete the selected
favourite
When this slide is dragged into the live window, the
image geometry is changed according to the saved view,
and the cameras are displayed in the corresponding
sequence. In the process, the existing cameras are
replaced.
Note
Favourites are created separately for each user.
This means that favourites cannot be seen by
other users when in multiple-user mode. No
supervisor rights are needed for the creation of
favourites.
Note
The procedure for creating a favourite applies in
the same way to the playback favourite with bar
view and the playback favourite with full-screen
database playback.

Playback
20
Playback
Overview
Click on the playback symbol to go to the playback mode.
When switching to playback mode, the keyboard at the
lower edge of the screen is replaced by the playback
controls. A time stream is also added to the interface,
which is used for selecting when playback starts and for
defining the backup space.
If you have switched to the playback mode, all the
camera fields that can be used are empty. To start a
playback, you first have to activate the camera to be
played back in one of the fields.
The process here is the same as for
activating/deactivating the cameras in the live mode.
If any cameras are already activated when the system
switches to database playback, these cameras are used
for playback (synchronous playback).
Note
For more information on creating archives, see
page 33.
Presentation view
There are two different presentation views in the
playback mode:
Symbol
Meaning
Playback in bar view
Playback with full-screen database playback
The bar view is used to present the current recording.
Here we differentiate between the following colours:
Symbol Meaning
Continuous recording (yellow bars)
Activity recognition (grey bars)
External data (copper-coloured bars)
Time stream
The time stream enables quick access to the saved video
data.
Explanation of the time stream:
Symbol Meaning
Backup period
Slider for start time
Navigating on the time
stream
View switch
You can click on and pull the blue bar to select your
backup period.
Table of contents
Popular Network Storage Server manuals by other brands

Gridstore
Gridstore GS-1000-1 Administrator's guide

Linksys
Linksys NSLU2 - Network Storage Link NAS Server Quick installation

Gigabyte
Gigabyte GR-ES604 Quick installation guide

Motorola
Motorola EXORdisk II user guide

Buffalo
Buffalo HD-RQSSU2/R5 user guide

HP
HP P6300 Enterprise Virtual Array installation guide