AC Ryan VEOLO2 User manual

1
SMART ANDROID HUB
AC RYAN VEOLO2
User Manual

2
User Information
1 User Information 03
2 Product Overview 05
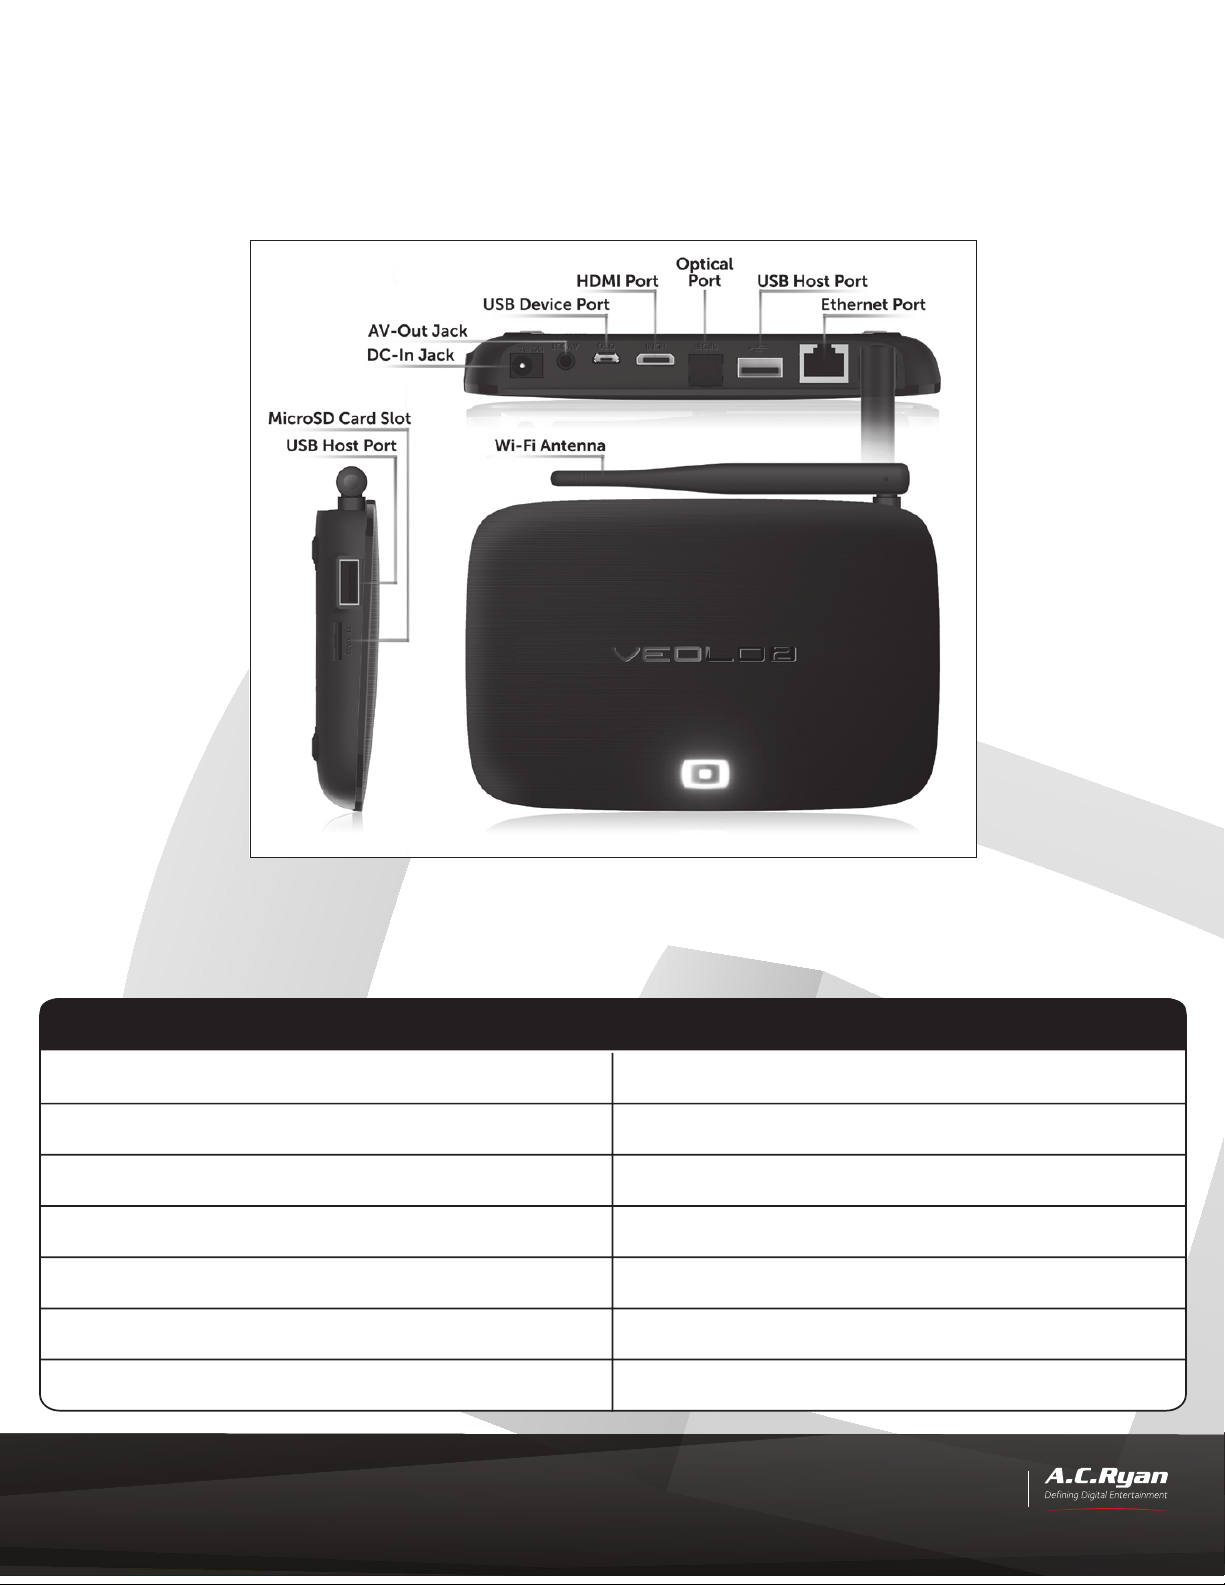
Product appearance 05
Accessories 05
3 Getting Started 06
Power on/o 06
Pairing the VEO Navigator 07
Using the VEO Navigator 08
Setting the language 09
Joining a network 09
Setting date & time 10
Connecting to your computer 11
4 Basics 12
Home screen 12
Using apps 14
Typing using the VEO Navigator 16
Internet browser 17
File explorer 18
Settings 19
5 Specifications 21
6 Warranty 22
Table of contents

3
User Information
1 User Information
1.1 Caution
1.1.1 Usage cautions
1.1.2 Power
1.1.3 Radio interference/compatibility
1.1.4 Repair
1.1.5 Disposing of the player
This player is designed and manufactured with safety in mind. In order to safely and eec-
tively use this player, please read the following before usage.
User should not modify this player. If commercial hard disk is being used, the environmental
temperature should be within +5 ~ +35 degree celsius.
The player’s power voltage: DC 5V.
When using this player, please connect the supplied AC adapter to the player’s power
jack. To reduce the risk of electric shock, unplug the adapter first before cleaning it. Never
connect the adapter to the player in a humid or dusty area. Do not replace the adapter or
cable’s wire or connector.
- If not properly shielded, almost all electronic devices will get radio interference. Under
some conditions, your player might get interference.
- The design of this player complies with CE standards, and adheres to the following rules:
(1) This player may not cause harmful interference
(2) This player may receive some interference, that may cause undesired operation.
If the player has a problem, you should take it to an appointed repair center and let the
specialists do the repair. Never repair the player yourself as you might damage the player or
endanger yourself or your data.
When you dispose of the player, be sure to dispose of it appropriately. Some countries may
regulate disposal of electrical devices, please consult with your local authority.

4
User Information
1.1.6 Others
When using this player, please do not let the player come into contact with water or other
liquid, if water is accidentally spilled on the player, please use a dry cloth to absorb the spill-
age.
Electronic products are vulnerable, when using please avoid the following:
• Do not let the player come into contact with water or other liquid.
• Do not disassemble the player, repair the player or change the design of the player,
any damage done will not be included in the repair policy.
• Do not press the buttons of the player too hard.
• Avoid hitting the player with hard object, avoid shaking the player, and stay away
from magnetic fields.
During electrostatic discharge or when exposed to a strong electromagnetic field, the
product will malfunction. If this happens, then unplug the power cable and the product
will return to normal performance next time it is powered on.
4

5
User Information
5
1.1.6 Others 2 Product Overview
Product appearance
Complies with IDA Standards DA105678
Accessories
Part Quantity
A.C.Ryan VEOLO2 1
VEO Navigator (Remote control) 1
User manual 1
AV-Out Cable 1
HDMI Cable 1
Micro USB Cable 1
AC/DC adaptor 1

6
User Information
3 Getting Started
Power on/o
This player does not require a power button. To power on the unit, connect the AC adaptor
jack to the player’s DC-In socket and plug in the AC adaptor to the power outlet.
The player will boot up when power is supplied.
To power o the player, press the ‘POWER’ button on the remote control and select the on-
screen power o option, or to restart the player by choosing on the reboot option.
The power LED light will turn from white to red while in power standby mode.
To power on from standby, press the ‘POWER’ button on the remote control.

7
User Information
Before you can use the player you will need to pair the remote control first. This step is only
required to be done once. For more information or help regarding this step, please contact
Power on your
player.
Press & Hold both the
Page Up and Enter
buttons at the same
time (as indicated) on
the keyboard side, the
LED on the back will start
blinking.
The pairing sequence
will start within 2 secs
and once connected
to the player, the LED
on the remote will
stop blinking.
1Hold the VEO Navigator within
1m to the player.
2
3 4
Pairing the VEO Navigator

8
User Information
The VEO Navigator is designed to be light-weight and ergonomically easy to hold and
use. Based on RF 2.4GHz technology, the VEO Navigator can be used without having to be
pointed direct line-of-sight with the player.
Using the VEO Navigator
Please take a moment to familiarise yourself with the remote control.
The VEO Navigator has a built-in G-sensor that works with games that requires tilting. To use
this function, launch the game and then flip the remote control over to the keyboard side,
press and hold on to the ‘Ctrl’ button until the white LED is flashing slowly.

9
User Information
Setting the language
You can change the system language to your desired preference. To do this, click on the
settings icon on the home screen, then at the left pane scroll down to the ‘PERSONAL’
header, and click on ‘Language & input’, and at the right pane click on ‘Language’. Select
your preferred language and click on the selection. The eects will take immediately.
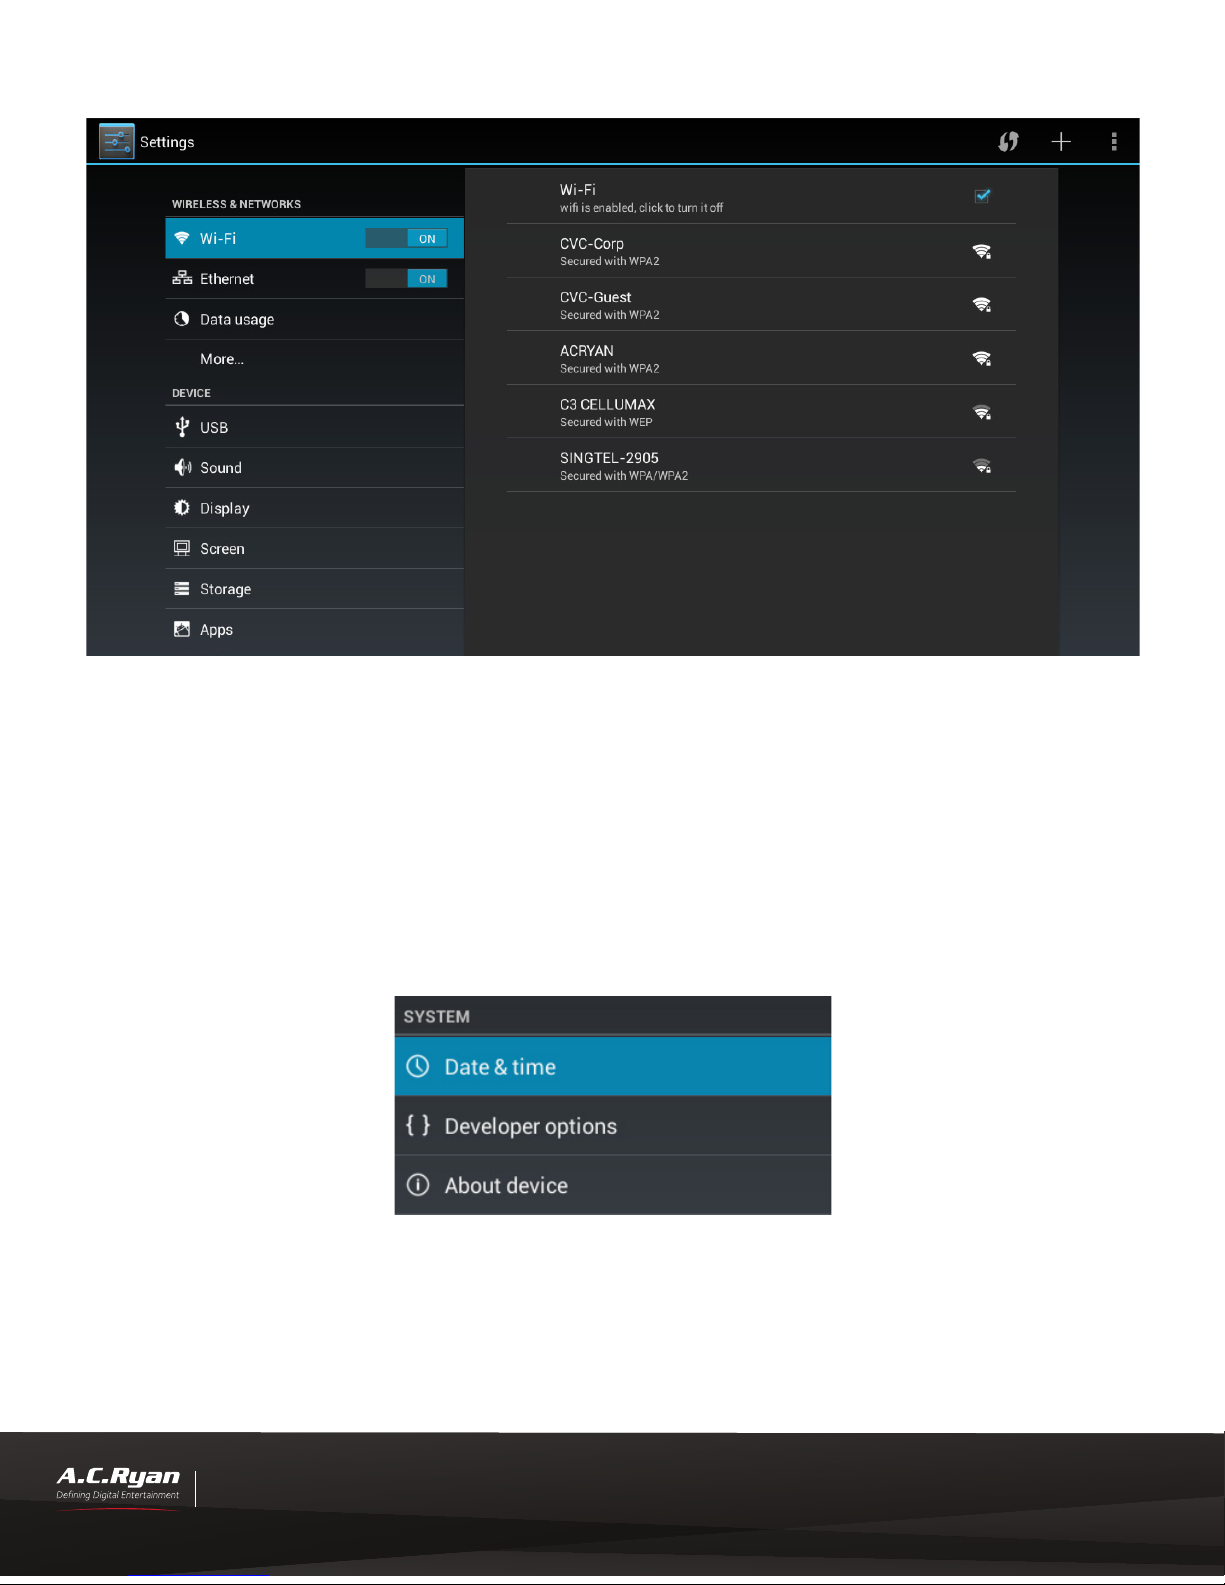
Joining a network
This player comes with a built in wireless 802.11 b/g/n adapter, as well as an on-board
10/100mbps Ethernet adapter. At the settings page as illustrated above, you can choose to
turn on/o either the ‘Wi-Fi’ or ‘Ethernet’ adapter. For faster performance, we recommend to
use the Ethernet adapter.

10
User Information
Once you join a Wi-Fi network, it automatically remembers and connects whenever the
network is in range. If more than one used network is in range, then it will join the last
connected one.
Setting date & time
The player can automatically obtain the date & time when you are connected to the
internet. To do this, please ensure that the ‘Automatic date & time’ option is selected. This
option can be found under settings, ‘Date & Time’, just below the ‘SYSTEM’ header.
Note: To ensure that you have the correct date & time, please be sure to select your country
time zone in the ‘Select time zone’ list.

11
User Information
Connecting to your computer
Connecting to your computer allows you to copy files between your computer and the local
memory or Micro SD Card.
Connect to your computer with the USB cable.
Go to the Home Screen, click on the notification icon on the bottom-right corner of the
screen and then click on ‘USB connected’ followed by ‘Turn on USB storage’.
Note: It is recommended to return to the ‘USB connected’ page and click on ‘Turn o USB
storage’ before unplugging the micro USB cable from the player.

12
User Information
4 Basics
Home screen
The home screen is the main user interface of the player.
In the home screen, all default icons are placed in a single row which can be repositioned
by long clicking on any of the icons and then dragging it to the new position.
The home screen has empty spaces which can be placed with your desired apps shortcuts,
or widgets shortcuts. Widgets are small simple applications that may come with certain ap-
plications that you install, for example popular apps like Facebook and YouTube comes with
widgets that brings you live updates directly on your home screen, without having to launch
the main application itself.
In the following section, we will illustrate in details, the individual home screen icons and
functions.

13
User Information
The home screen contains various frequently used functions and shortcuts that makes it
convenient for the user to use and control. Please spend a moment of your time to familiar-
ise with the home screen.
My apps: This is where all installed apps and widgets can be found.
Clear memory: Free up system memory by ending unused apps running
in the background. It is recommended to do this once in a while if your
system appears to be slow.
Recent apps: You can quickly return to any recently opened apps by
clicking on this icon. To end any of the apps, swipe the cursor from the
left side of the app to the right.
Settings: This is where you can access various system settings and op-
tions to your desired preference.
Notifications: Click on this icon to view any apps notifications or updates
that may be available.
Media: This is a category shortcut where you can place your desired
apps in this category for quick access.
Games: This is a category shortcut where you can place your desired
apps in this category for quick access.
Favorites: This is a general category shortcut where you can place your
desired apps in this category for quick access.
Web browser: Opens up the default web browser that is set in your
player.
File explorer: Launches the file explorer to view or edit files you have
in the internal NAND memory, attached memory card or USB storage
devices.
Google PlayStore: This is where you can login with your Gmail account
to download and install apps via the PlayStore.

14
User Information
Using apps
Click on the ‘My apps’ icon to display all of your installed apps and widgets. Clicking once on
any of the app icon will then launch its application. To exit the application, press the ‘Menu’
button of the remote control to find any exit option or a common way among Android apps
will be to press the ‘Return’ button on the VEO Navigator a couple of times till you see the
home screen.
Note: At times if the app is not responding, you can force out of it by pressing the ‘Home’
button on the VEO Navigator.
To create a shortcut of any of the apps to your desired categories of the home screen, or
placing them directly on the home screen, simply click and hold on to the desired app till the
home screen appears in the background, then drop the app into any of the categories or on
any empty space of the home screen.

15
User Information
To remove any of the apps shortcuts in the categories or on the home screen, click and
hold on to the desired app until you see a ‘X Remove’ overlay appearing at the top of the
screen. Drag the app and drop it o here and the app shortcut will be deleted.
Note: Deleting the app shortcut does not delete the actual app itself.
To view more information or to delete an app, click on ‘My app’, then click and hold on to
the desired app until you see a ‘Uninstall’ and ‘App info’ overlay appearing at the top of the
screen. Drag the app to the desired operation and drop it o. You will be asked to confirm
deleting the app as a precaution.

16
User Information
Typing using the VEO Navigator
The VEO Navigator comes with a full qwerty keyboard that allows the user to conveniently
type in any input entries environment, like keying in a website URL, typing in keyword
searches, or during an instant messaging session, etc.
Simply flip over to the keyboard side and start typing by pressing on the remote control
keys. To input numeric or symbols which are highlighted in blue superscript on the remote
control keys, press once on to the ‘Fn’ button to lock typing in the blue superscipt area, then
press on the corresponding key of your desired numeric or symbol.
To unlock, press the ‘Fn’ button once again.
To input uppercase letters, press the ‘Caps’ button once to lock typing in uppercase format.
To unlock, press the ‘Caps’ button once again.
Note: When you flip over to the keyboard side, the cursor will stop moving to prevent any
unwanted disturbances. After 20 seconds if the cursor is not re-activated by turning back to
the remote’s main side, the cursor will then auto hide and go into power saving mode.

17
User Information
Internet browser
In this section we will describe some of the functions and usage of the default Android
operating system’s internet browser. Users can also install various kind of browser that are
available on the Google PlayStore.
Unless the default browser app has been replaced by the user, launch the stock browser
application by clicking once on the ‘Web browser’ icon on the home screen, or clicking
once on the ‘Browser’ icon in the ‘My apps’ section.
Scroll: Click and hold on to a spot of the webpage you are viewing, then drag up/down with
the remote control. Alternatively, drag up/down and release quickly for fast scrolling. You
can wait for the scrolling to come to a stop, or click anywhere on the webpage to stop it
immediately.
Text size: Click the ‘Menu’ icon on the upper-right corner of the browser, click on ‘Settings’,
‘Advanced’, then ‘Accessibility’, you can now adjust the text size for webpages to your
preference.

18
User Information
File explorer
The file explorer allows you to view files that are on your internal flash memory, micro SD
card and other USB storage devices if they are attached.
Launch the stock file explorer application by clicking once on the ‘File explorer’ icon on the
home screen, or clicking once on the ‘File explorer’ icon in the ‘My apps’ section.
Via the file explorer application, you can use it to find files that you may have downloaded
from the internet, or locate and play your favourite media files simply by clicking on the
desired file name and launching it’s default application.
The file explorer also makes it easy to do basic file operations like copy, delete, move, paste,
and rename. Functions on the buttons of the file explorer are described as seen below.
Home: This is the home page of the file explorer.
LevelUp: Click to go back to the previous directory.
Multi: Clicking once on this icon allows you to select multiple files/
folders by clicking on the titles.
Editor: Pops up the file operation menu when clicked.
Exit: Click to exit from the file explorer.
Back: Click this to go back to the previously viewed page.
Next: Click this to go to the next previously viewed page.

19
User Information
Settings
You can customise your personalised preferences via the settings menu.
The settings can be accessed by clicking once on the ‘Settings’ icon on the home screen, or
clicking once on the ‘Settings’ icon in the ‘My apps’ section.
Connects to a wireless network of your choice.
Connects to a wired network via the Ethernet connection.
Configure your own VPN settings if available.
Below is a brief decription of the various settings you can find in this menu.
WIRELESS & NETWORKS
DEVICE
Sets the audio volume for various environment and also to manage
your desired audio output.
Change your wallpaper in this section, select daydream settings, or to
adjust the font size of the system to your preference.
Scale to fit to your current screen size and also to select the HDMI or
Composite output mode.
Provides information of all attached storage devices on the used and
available storage space. You can also unmount external devices for
safe removal or erase all data on the selected storage device.
Here you can find all apps information that are downloaded, including
system apps and processes that are currently running. Click on an
individual app icon to display more information or to stop the app
from running.
Select this to allow connection when you connect via micro USB
cable to your PC.

20
User Information
PERSONAL
Sets password to prevent unauthorised usage or to allow 3rd party
apps installation that are not downloaded from Google PlayStore.
Allows you to select the desired system menu language and keyboard
language to use as default if you have more than one software key-
board app installed.
Choose if you would like to back up your data and restore automati-
cally when you have signed in using your Google account. This
section also allows you to erase everything on your player and resets
back to factory defaults. **Please take note that this action is irrevers-
ible and A.C.Ryan is not responsible for any lost of data.
Accounts and privacy information that are signed in on the player can
be found here.
Add a new email or Google account if desired.
ACCOUNTS
Adjusts the system date and time to your desired format.
Various options available to ease usage of the player.
SYSTEM
The options here are meant for developing and debugging purposes.
We do not recommend making any changes here unless you are sure
of what you are doing. **If making any changes here results in system
instability, please do a factory reset to reset everything to factory
defaults. Do take note that you will also lose all data on the player.
Provides basic information of your player’s model number, firmware
version, and more.
Table of contents