Acacia 702263 Manual

Instruction Guide
ACACIA

Introduction:
We invite you to get to know the new Acacia, the world’s smallest portable dry herb and wax
vaporizer. Using the most advanced technology available, we have developed the ultimate herb
and wax vaporizer.
No need for butane or a lighter with the Acacia advanced vaping system. Simply fill your Acacia,
and you are ready to vape in style.

GENERAL FUNCTION:
Congratulations on purchasing the smallest, greatest portable vaporizer that this
generation has ever seen! Created with advanced technology and expertise, Acacia is a
vaporizer like no other. Acacia heats and vaporizes your herbs and wax to achieve the greatest results.
Easy and discreet to use, it works in all environments, including a windy day on your boat, a rainy
aernoon at the park, on top of a mountain, or just sitting on your couch! Aer a short 2-hour charge,
your device is ready to use. Simply fill your device’s ceramic heating chamber with tobacco, press the
power button, and a short inhale is all you need to start enjoying your Acacia.
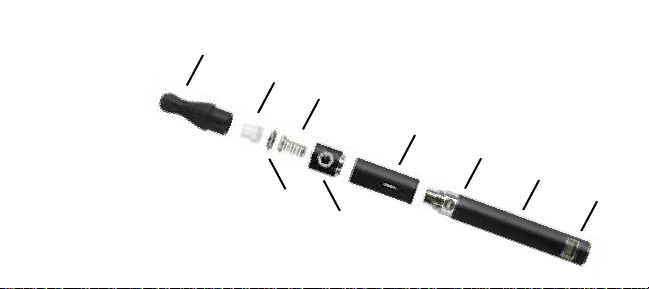
Contents: 1 - Battery 1 - Ceramic Heating Chamber
1 - Spring1 - Mesh Filter1 - Ceramic Filter
1 - Chamber Connector
1 - Mouthpiece 1 - Cleaning Brush 1 - Packing Tool
1 - Wall Adapter 1 - USB Charger

Device Anatomy
1. Mouthpiece
2. Ceramic Filter
3. Mesh Filter
4. Spring
5. Chamber Connector
6. Ceramic Heating Chamber
7. Power Button
8. Rechargeable Battery
9. LED Display
1 - Mouthpiece
2 - Ceramic Filter
3 -Mesh Filter
4 - Spring
5 - Chamber Connector
6 - Ceramic Heating
Chamber
7 - Power Button
8 - Battery 9 - LED
Display

Preparing the Unit
Charge your device for 2 hours.
The light will turn green when the battery is fully charged.
1. Remove the chamber connector from the heating chamber.
2. Use the packing tool to gently pack the chamber with
herb or wax material, but do not over-pack.
(When using wax do not pack the wax)
3. Screw the chamber connector onto the heating chamber.
With your device connected, you are now ready to vape!
1 & 3
2

Activating the Unit
1. With your device ready for use, press the power button to activate the heating element. Continuing to
press the power button, put the mouthpiece into your mouth, and inhale lightly. Enjoy your experience!
2. Your device will automatically shut o aer 9 seconds of continuously depressing the power button.
Wait 3 seconds before activating again.
Charging the Unit
USB charger: Connects directly to any USB port.
Wall adapter: Works in conjunction with the USB port.
1. We recommend charging your device for at least
6 hours during the first charge. This will condition the battery for its future uses.
2. When the LED display is blank, the device needs to be charged. Charge for approximately 2 hours.
The LED will display while charging. When full, remove battery from charger.
Wall Adapter USB Charger
LED Display
Fully Charged

Cleaning and Maintaining the Unit
When using the device for an extended period of time, the filter may get clogged and dirty,
causing a diicult draw or less vapor being released through the mouthpiece.
To clean the heating chamber:
1. Disconnect from the battery.
2. Use the brush tool to gently clean the walls of the heating chamber.
3. Do not touch the heating element at the bottom of the chamber.
To clean the ceramic filter:
1. Insert a paper clip or pin into the holes.
2. Push all the way through to ensure clear airway. Wipe clean with a cloth.
To clean the mouthpiece:
1. Wipe the inside of the mouthpiece with a cotton swab.
2. Wipe the mouthpiece with a damp paper towel.
2

Removing the Spring and Filter from the Unit
1. Remove mouthpiece from the chamber connector.
2. Unscrew the chamber connector from the heating chamber.
3. Turn the chamber connector upside down; the mesh filter should fall out easily.
Use the spoon end of the packing tool to remove filter if necessary.
4. To remove the spring from the chamber connector, hold the top of the spring.
Twist counter-clockwise and quickly pull it through the smaller opening of the
chamber connector.
5. Device parts are very delicate. If they are stretched beyond their original size,
they should be replaced.

Replacing the Spring and Filter
1. Place the spring, smaller end first, into the chamber connector. Gently pull
through from the other side until it is securely in place.
2. Place the filter inside the chamber with the mesh filter tool.
3. Use the packing tool to press the filter in firmly and evenly.
4. Screw the chamber connector to the heating chamber.
5. Insert the ceramic filter to the mouthpiece.
6. Connect the mouthpiece to the chamber connector. Make sure the mouthpiece is
pushed all the way down into the chamber connector. If the mouthpiece doesn’t go
all the way down, then the mesh filter is not laying flat and needs to be readjusted.

Tips
•For best results do not over pack the heating chamber. This will ensure easy airflow passage for
even heating.
•Remember to press the power button for at least 2 seconds before inhaling to activate the
heating element.
•Between uses, wait 3 seconds before reactivating the device.
•In the event that vapor isn’t being released, use the packing tool to gently rotate the tobacco
within the chamber.
• For best results, break the tobacco up by hand or grind them. Be sure to remove all stems and/or
seeds before filling the heating chamber.

SAFETY AND DISCLAIMERS:
Please read the following safety recommendations before using this device, and keep this user manual in a safe place for further reference. Do
not allow children, women who are pregnant or breast feeding, and people with life-threatening illnesses to use this device. The manufacturer
is not responsible for any damage or personal injury caused by inappropriate, incorrect or irresponsible use of the device. This vaporizer is not a
medical device and is not intended to diagnose, cure, treat, or prevent any diseases or other conditions. If you have any health problems, consult
your doctor before using. This device is not intended to administer medicinal or illegal products of any kind, and doing so voids the warranty. Any
illegal use of this device could subject the user to severe fines, penalties, and/or imprisonment under the laws of your jurisdiction.
Warnings:
•Do not fill the device with any stems, seeds or liquids. Doing so will cause damage to the
device and void the warranty.
•Let metal spring cool down at least 1 minute aer use before touching it.
•Do not drop the device.
•Do not put the device into water or any other liquid.
• Do not put any foreign objects into the device.

Acacia #702263 #702264
Manufactured for
and distributed by
Moorpark, CA 93021
WARNING:
This product is intended for use by persons of legal age or older. Not intended for children, women who are pregnant or breast feeding, or
persons at risk of heart disease, high blood pressure, diabetes, or taking medicine for depression or asthma. This product is not a smoking
cessation product and has not been tested as such. Nicotine is addictive and habit forming, and it is very toxic by inhalation, in contact
with the skin, or if swallowed. Nicotine can increase your heart rate and blood pressure and cause dizziness, nausea, and stomach pain.
Inhalation of this product may aggravate existing respiratory conditions. Ingestion of the non-vaporized concentrated ingredients in the
chamber can be poisonous.
CA Proposition 65 WARNING:
This product contains a chemical known to the State of California to cause birth defects or other reproductive harm.
*The U.S. Food and Drug Administration has not determined that any tobacco product presents less risk compared to any other tobacco product.
For tobacco product consumers concerned about the health eects from tobacco product use, the best thing to do is quit.
This manual suits for next models
1
Table of contents