Access HD 1010 User manual

Rev: Sept 22, 2008 Access HD® is exclusively distributed by GXi International, LLC Page 1 of 13
Owner’s Manual
Models: 1010, 1020, 1020A, 1030, 1050, 1080
READ WARNINGS AND OPERATING INSTRUCTIONS CAREFULLY,
SAVE THESE INSTRUCTIONS.
Contents:
1. Safety Instructions and Warnings………………...
2. Remote Control Unit (RCU)……………………….
3. Component Identification………………………….
4. Connecting your Converter Box…………………..
5. Operating your Converter Box…………………….
6. Troubleshooting - FAQ...………………….……….
7. Technical Specifications…………………………..
8. Limited Warranty & Service……………………….
HAVE QUESTIONS OR NEED HELP?
Please read the Troubleshooting Guide on page 12. If you still have difficulties or if
you require an upgraded antenna please call: 1-800-393-1246
or go to www.AccessHD.TV
DO NOT RETURN THIS
CONVERTER TO THE STORE!
(The terms of the federal government coupon program
do not permit store returns for cash or store credit)
Date of Purchase: __________________________
Location of Purchase: __________________________
Serial #: __________________________
Have the following information ready when you call us:
DIGITAL TO ANALOG TV SIGNAL CONVERTER
®
2
2
6
6
8
12
12
13
Mailing Address: Fax Number:
7868 US Highway 70, Suite C (919) 550-3277
Clayton, NC 27520

Page 2 of 13
Rev: Sept 22, 2008
IMPORTANT SAFETY INSTRUCTIONS
1) Read these instructions.
2) Keep these instructions.
3) Heed all warnings.
4) Follow all instructions.
5) Do not use this apparatus near water.
6) Clean only with a dry cloth.
7) Do not block any ventilation openings. Install in accordance with the
manufacturer’s instructions.
8) Do not install near any heat sources such as radiators, heat registers, stoves,
or other apparatus (including amplifiers) that produce heat.
9) Only use attachments/accessories specified by the manufacturer.
10) Unplug this apparatus during lightning storms or when unused for long
periods of time.
11) Refer all servicing to qualified service personnel. Servicing is required when
the apparatus has been damaged in any way, such as power-supply cord or
plug is damaged, liquid has been spilled or objects have fallen into the
apparatus, the apparatus has been exposed to rain or moisture, does not
operate normally or has been dropped.
12) The apparatus shall not be exposed to dripping or splashing and that no
objects filled with liquids, such as vases, shall be placed on the apparatus.
Thank you for purchasing this converter box, which has been designed and
manufactured to give you many years of viewing pleasure. This unit will enable
you to view digital broadcasts after February 2009 when analog transmissions will
be turned off in the USA. This unit has been approved by the NTIA for the coupon
program. For more information, visit www.DTV.gov or www.dtv2009.gov or call
1-888-DTV-2009.
REMOTE CONTROL UNIT (RCU)
Two types of RCU’s are available with each model converter. “Option 1” is a
Dedicated RCU that works only with this device. “Option 2” is a Universal RCU
model capable of operating your TV, VCR, satellite set-top-box or cable set-top-
box in addition to the converter box.
To program the Universal RCU with the codes to operate you model of TV, VCR,
etc, you need to enter a numerical code. A full list of equipment models with their
corresponding codes can be found on the www.AccessHD.TV website.
To program the Universal RCU:
Press “TV” (or “AUX”), Press “SETUP” and hold for 3 sec until the selected de-
vice LED blinks twice, then enter the numeric code of your model. If a valid code
has been entered, the LED will blink twice. If it is an invalid code, you will see one
long blink.

Rev: Sept 22, 2008 Access HD® is exclusively distributed by GXi International, LLC Page 3 of 13
Installing the batteries:
Dedicated RCU - Remove the battery cover from the remote control and put (2) AAA size
batteries inside the compartment. The diagram inside the battery compartment shows the
correct way to install the batteries.
Universal RCU - Remove the battery cover from the remote control and put two (2) AA
size batteries inside the compartment. The diagram inside the battery compartment shows
the correct way to install the batteries.
Using the Remote Control:
To use the remote control, point it towards the front of your converter box.The remote
control has a range of up to 7 meters (23 ft) from the converter box at an angle of up to
60 degrees. The remote control will not operate if its path is blocked.
FOR TECHNICAL ASSISTANCE OR TO
PURCHASE SPARE PARTS AND ACCESSORIES
VISIT
WWW.ACCESSHD.TV
OR CALL 1-800-393-1246

Page 4 of 13
Rev: Sept 22, 2008
Dedicated RCU
Remote Key functions
1. MUTE: Press to mute the sound. Pressing again will
restore the sound.
2. CH3/4: Press and hold for 3 seconds to select NTSC
Channel 3 or Channel 4 on Models 1020, 1020A,
1030, 1050, and 1080.
3. CH+: Press to view the next channel. This will not
work if you are in any of the on-screen menus.
4. CH-: Press to view the previous channel. This will
not work if you are in any of the on-screen menus.
5. INFO: Press to display information about the current
channel.
6. EXIT: Press to exit from the set-up menus.
7. OK: Used to select or confirm an item when using
the on-screen menus.
8. : Used to navigate right in the on-screen menus
9. RECALL: Press to return to the last channel you
were watching.
10. –: Press to input a dash into your channel selection
eg. 23-1.
11. CAPTION: Press to view closed captions when
broadcast with the channel. Press to select services
1-6.
12. AUDIO: Often more than one audio track is
broadcast with the picture, such as other languages.
Press to toggle between different audio tracks.
13. STANDBY: Press to switch the converter box on
and off. When not in use it is recommended that you
switch the converter box off to save your power bill
and the environment. An automatic power down
function is also available in the on-screen menu.
14. VOL+: Press to increase the audio volume. (Models
1020A-1080, only adjustable through RCA audio out jacks)
15. VOL-: Press to decrease the audio volume. (Models
1020A-1080, only adjustable through RCA audio out jacks)
16. : Used to navigate up in the on-screen menus.
17. MENU: Press to display the on-screen menus, or to
revert to the previous menu.
18. : Used to navigate left in the on-screen menus.
19. : Used to navigate down in the on-screen menus.
20. NUMBER KEYS: Press to directly select a particular
channel instead of using the UP and DOWN button.
21. ASPECT: Press to change the picture output
between NORMAL (4:3), Zoom (4:3 from 16:9),
Wide (for 16:9 TV set) and Cinema (4:3 from 16:9).
22. SIGNAL: Press to show the signal strength from
your antenna for a particular channel.
FOR TECHNICAL ASSISTANCE OR TO
PURCHASE A NEW OR UPGRADED REMOTE
CONTROL, VISIT WWW.ACCESSHD.TV
OR CALL 1-800-393-1246

Rev: Sept 22, 2008 Access HD® is exclusively distributed by GXi International, LLC Page 5 of 13
1. SETUP: Used to enter program mode, when you can enter
a code for another piece of electrical equipment such as
your TV or VCR. A complete set of codes is supplied with
this RCU.
2. STANDBY: Press to switch the converter box on and off.
When not in use it is recommended that you switch the
converter box off to save your power bill and the
environment. An automatic power down function is also
available in the on-screen menu.
3. STB: This puts the RCU in STB operation mode if you have
been in TV or AUX mode.
4. AUX: This puts the RCU in AUX operation mode if you
have been in TV or STB mode. AUX can be used for
another piece of equipment such as a Satellite receiver.
5. TV/STB: Toggles between TV and set top box mode.
6. INFO: Press to display information about the current
channel.
7. MENU: Press to display the on-screen menus, or to revert
to the previous menu.
8. EXIT: Press to exit from the set-up menus.
9. : Used to navigate up in the on-screen menus.
10. CH+: Press to view the next channel. This will not work if
you are in any of the on-screen menus.
11. OK: Used to select or confirm an item when using the on-
screen menus.
12. : Used to navigate right in the on-screen menus.
13. CH-: Press to view the previous channel. This will not work
if you are in any of the on-screen menus.
14. : Used to navigate down in the on-screen menus.
15. RECALL: Press to return to the last channel you were
watching.
16. PAUSE: Used when operating a VCR, DVD or DVR.
17. FAST FORWARD: Used when operating a VCR, DVD or
DVR.
18. PLAY: Used when operating a VCR, DVD or DVR.
19. JUMP FORWARD: Used when operating a DVD or DVR.
20. RECORD: Used when operating a VCR or DVR.
21. CAPTION: Press to view closed captions when broadcast
with the channel. Press to select services 1-6.
22. AUDIO: Often more than one audio track is broadcast with
the picture, such as other languages. Press to toggle
between different audio tracks.
23. NUMBER KEYS: Press to directly select a particular
channel instead of using the UP and DOWN button.
24. ENTER: Used when entering a PIN number. Press to input
a dash into your channel selection eg. 23-1.
25. MUTE: Press to mute the sound. Pressing again will restore
the sound.
26. TV: This puts the RCU in TV operation mode if you have
been in STB or AUX mode.
27. GUIDE (CH 3/4): Press this key to show the on-screen
electronic program guide (EPG) on Model 1010 only.
(Press and hold for 3 seconds to select NTSC Channel 3 or
Channel 4 on Models 1020, 1020A, 1030, 1050, and 1080).
28. MACRO: Patented Macro capability for one-touch access
to multiple key commands for quick activity switching.
29. REPEAT: Used when operating a DVD player.
30. VOL+: Press to increase the audio volume. (Models 1020A-
1080, only adjustable through RCA audio out jacks)
31. : Used to navigate left in the on-screen menus.
32. VOL-: Press to decrease the audio volume. (Models 1020A-
1080, only adjustable through RCA audio out jacks)
33. PIP: Picture in Picture. Available on some TVs and DVRs.
34. JUMP BACKWARDS: Used when operating a DVD or
DVR.
35. SKIP BACKWARDS: Used when operating a DVD or DVR.
36. STOP: Used when operating a VCR, DVD or DVR.
37. ASPECT: Press to change the picture output between
NORMAL (4:3), Zoom (4:3 from 16:9), Wide (for 16:9 TV
set) and Cinema (4:3 from 16:9).
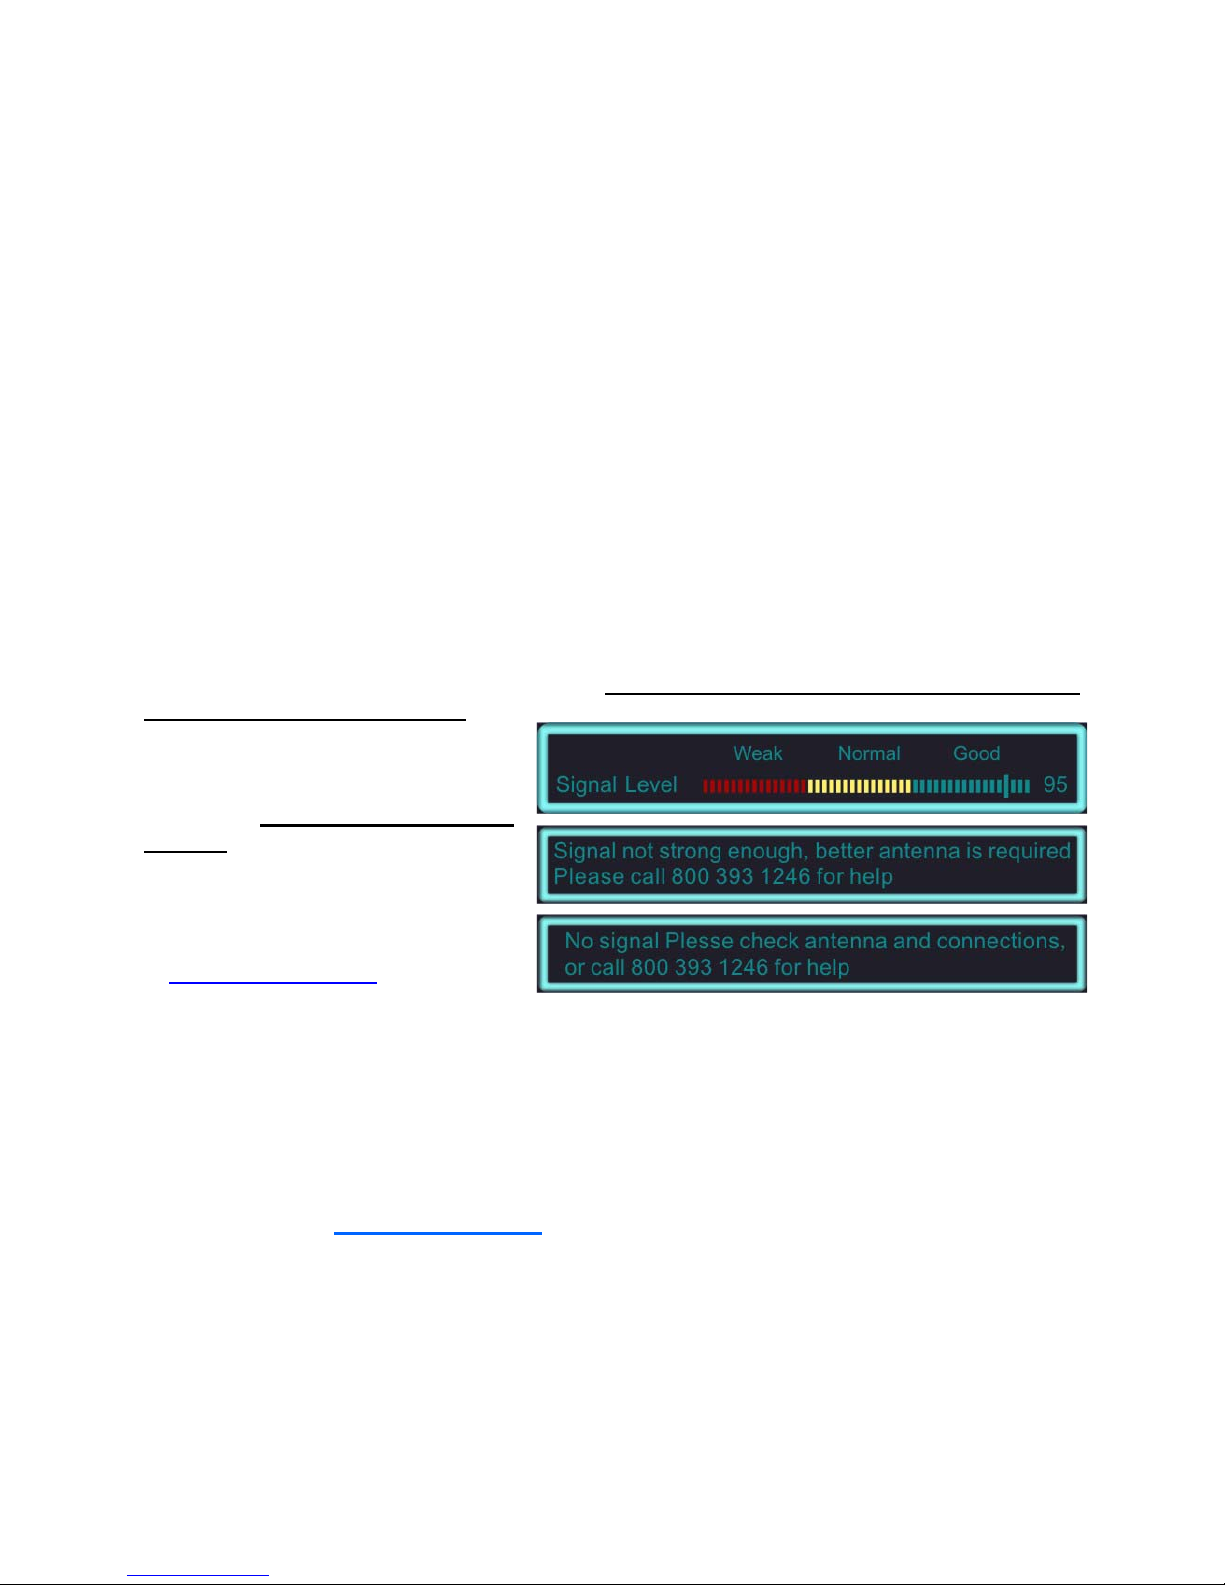
38. SIGNAL: Press to show the signal strength from your
antenna.
39. INPUT: Used to select the input on your DVR.
Universal RCU
Remote Key functions
Registry # 17490 (4452h)
This manual suits for next models
5
Table of contents
Other Access HD TV Converter Box manuals