AccuMate TM72 User manual

www.accumate.com

Automatic 0,6A constant current charger for 12V lead-acid batteries from 2 to 90Ah.
Do not use on rechargeable or any non-rechargeable batteries.
Input 220-240V~ 50 Hz, max. 0,08A.
Caricabatterie automatico a corrente costante di 0,6A per batterie da 12V piombo-acido di 2 fino a 90 Ah.
Non usare per pile NiCd, NiMH, Li-Ion o pile non-ricaricabili. Rete 220-240V~ 50Hz, 0,08A massima.
Cargador automático a corriente constante de baterías plomo-ácido de 12V de 2 hasta 90 Ah.
No utilizar para pilas NiCd, NiMH, Li-Ion o pilas non-recargables. Red 220-240V~ 50Hz, 0,08 max.
2
2,5m
AVAILABLE ACCESSORIES • ACCESSORI DISPONIBILI
ACCESORIOS DISPONIBLES
TM73TM77 TM74TM76TM72 TM78 TM71

Instructions for Use
: IMPORTANT :
Read before using.
WARNING ! Batteries emit EXPLOSIVE GASES -
prevent flame or sparks near batteries
. Disconnect AC
power supply before making or breaking DC/battery connections. Battery acid is highly corrosive.
Wear protective clothing and avoid contact. In case of accidental contact wash immediately with soap and
water. Check that the battery posts are not loose; if so, have the battery professionally assessed.
If the battery posts are corroded, clean with a copper wire brush; if greasy or dirty, clean with a rag damped
in detergent. Before charging batteries provided with filler caps check that the electrolyte level is correct, and
top up with distilled water if necessary. Do not use the charger unless all output leads and connectors are in
good, undamaged condition.
Protect the device, it’s leads, connectors, fuse holders, fuses and terminations from contamination by
acids and fluids, from exposure to damp and humidity, and from physical and accidental damage.
Any damage to the unit, it’s leads or accessory parts resulting from such contamination, exposure or
damage is NOT covered by warranty.
NOTE : This device is delivered with 2 detachable connection lead sets. These sets terminate at one end with
the male element of a special 2-pin connector to insert in the female element which terminates the main char-
ger output cable. At the other end, one connection set has «crocodile» clips for quick connection to the bat-
tery, and a second set has metal eyelets for permanent fixing to the battery posts.
If intending to charge a 12V lead-acid battery using the battery clips, first disconnect and remove the battery
from the vehicle and place in a well ventilated area. To connect the eyelet connection set, fix the eyelets
firmly through the holes in the battery posts with galvanised gutter bolts and nuts or in the case of solid posts
by galvanised self- tapping screws engaging in suitable holes pre-drilled in the posts. Make sure that the
eyelet with red heatshrink is fixed to the positive pole (marked Pos or P or + and often red) and the other eye-
let to the negative pole (Neg or N or - and often black). Ensure that the polarised connector is situated away
from the battery and restrained so as not to come into contact with any moving part of the vehicle. Prevent
ingress of grime and dirt to the 2-pin connector. If any optional accessory connection lead incorporates a fuse
and thus should blow, check for damage or anomalies and replace any burnt fuse only with a new fuse of
identical type and rating.
If in any doubt concerning any of the above instructions, consult a professional service agent for assistance.
LED (light emitting diode) indicator information panel
Float mode 2 main Power ON
tops up & maintains charge charging stages
3
www.accumate.com

4
CHARGING
1) If the device is to be connected to a battery, first ensure that the battery is a 12V battery (which has 6 cells)
and that there is good ventilation around battery and charger.
2) If using the battery clips, connect these to the polarised connector terminating the device’s output cable,
then, if the battery to be charged remains connected to a vehicle’s electrical system, determine whether the
positive or negative (more commonly) pole of the battery is connected to the vehicle chassis. First connect the
RED clamp to the POSITIVE (POS, P, +) terminal if ungrounded (majority of vehicles) or the BLACK clamp to
the NEGATIVE (NEG, N, -) terminal if ungrounded (unusual), and then the other battery clip to the vehicle
chassis or engine, avoiding any part or location where any fuel or fuel vapour may be present.
3) If using the eyelet connection set, see NOTE in the preliminary text above. Connect the device to the batte-
ry by joining male and female halves of the polarised 2-pin connector.
4) It is important to ensure a good contact between battery clips or eyelets and the battery posts or terminals.
5) Fully insert the device’s metal contact pins into a 220-240V AC mains supply socket and if this has a switch,
switch it on. If obstructions close to the wall socket prevent full insertion of the device, the casing of the
device (except the UK model) can be rotated through 90° relative to the contact pins so as to overcome such
difficulties. To achieve this, remove the device from the wall socket. Locate the rotation locking pin close to
the device’s AC contact pins. Use a flat tool to lift the locking pin just clear of the locking hole. This allows
rotation through 90° to the alternative locking position. (NOTE : do not lift the locking-pin by more than is
necessary as this can result in its premature failure).
6) Refer to the LED panel explanation above. The power ON LED should light. If not check all connections.
7) Provided that the battery voltage is above 2 Volts, the yellow LED indicating the 2 main charging stages
should light up and continue to indicate steadily during these 2 stages, which comprise a 0,6A constant cur-
rent BULK CHARGE delivered until the sensed battery voltage has risen to 14,3V, followed by the ABSORP-
TION STAGE in which the charge voltage is maintained at 14,3V until such time as the charge current has redu-
ced as the battery approaches full charge, to 300mA.
8) The battery is now close to full charge and the FLOAT MODE green LED will indicate that the charge vol-
tage is now limited at 13,5V. The charger now gently brings the battery to full charge and then maintains
it for as long as connected, allowing the battery to take charge current according to need to sustain its
charge against any small connected loads, losses in the wiring system supported by the battery, or slight
self-discharge of the battery itself.
9) Should these latter factors cause the battery being maintained to need more than 300mA at any time, the
charge programme automatically reverts to the ABSORPTION STAGE so as to offer the battery up to the
maximum 0,6A current if necessary. The yellow CHARGING LED will indicate this reversion. When the battery
has been brought close to full charge again, this will give way to the FLOAT MODE LED.
10) You may observe the FLOAT MODE and CHARGING LEDs indicating alternatively at short intervals for a brief
period following the first indication of the FLOAT MODE LED. This is more probable if the battery has been in
service for a significant length of time or is no longer in the best of condition or is supporting a wiring system
in which there are some electrical losses. If these alternating indications persist and the battery remains
connected to a wiring system, disconnect and remove the battery, then reconnect the charger. The same LED
indications recurring in due course are symptomatic of some internal battery damage. If on the other hand the
FLOAT mode does eventually indicate steadily, this points to electrical losses in the wiring system.

11) To discontinue, switch off and/or withdraw the device from the wall socket then break the battery
connections.
12) The table below gives approximate maximum charging times from a totally discharged flat battery to fully
charged status. However it is only in cases such as car headlights being left on for a week or the battery being
unused and kept in a warm environment for months that the battery will become totally discharged. The
«Normal Hours from Flat» indicates the average charging time to attain a fully charged battery from a status
whereby the battery is unable to turn the engine.
13) Table
Vehicle description Battery capacity Normal hours from flat Maximum time
50-900cc motor-cycle/ATV/Snow-m. 02 to 14 Amp-hours 02 to 10 hours 20 hours
Touring motor-cycle or Lawn tractor 15 to 30 Amp-hours 11 to 20 hours 40 hours
Small car up to 1400cc 31 to 44 Amp-hours 21 to 30 hours 80 hours
Medium car, 1400-1800cc 45 to 55 Amp-hours 31 to 40 hours 100 hours
Touring car, Boat, Tractor 56 to 75 Amp-hours 41 to 50 hours 120 hours
Limousine, Van 76 to 90 Amp-hours 51 to 60 hours 140 hours
5

6
ISTRUZIONI PER L’USO
: IMPORTANTE :
Leggete tutto il presente
testo, prima di utilizzare
l’apparecchio
ATTENZIONE :Le batterie emettono
GAS ESPLOSIVI
.
Evitate fiamme o scintille nei pressi delle batterie!
Disinserire il collegamento alla corrente della rete prima di attaccare o interrompere i collegamenti alla
batteria. L’acido delle batterie è molto corrosifo. Indossate indumenti protettivi ed evitatene il contatto; se però,
accidentalmente, ciò avvenisse, lavatevi immediatamente con acqua e sapone. Controllate che i poli della
batteria non siano allentati; se ciò accade sistemateli in maniera professionale. Se i poli sono corrosi, puliteli
con una spazzola di rame; se sono unti oppure sporchi, puliteli con uno straccio inumidito con detersivo.
NOTA : Per collegare il caricabatterie alla batteria sono in dotazione due cavi di connessione, l’uno con pinze
a coccodrillo per caricare la batteria fuori del veicolo, e l’altro con occhielli per un collegamento/scollegamento
rapido e facile alla/della batteria si questa rimane sul veicolo. All’altra estremità di questo cavo di connes-
sione è un connettore da due poli. Quando intendete utilizzare le pinze, rimuovete prima la batteria dal veicolo
e mettetela in una posizione ben ventilata. Per fissare gli occhielli ai poli della batteria, dirigetevi a un’ officina
autorizzata. Assicuratevi che il conettore da due poli sia situato lontano dalla batteria e ben trattenuto in modo
da non interferire con eventuali parti in movimento del veicolo. Prevenite eventuali depositi di sudiciume o
sporco sui connettori polarizzati. Se il fusibile in uno qualche accessorio optional dovesse saltare, sostituirlo
esclusivamente con lo stesso tipo. Prima di utilizare l’apparecchio esaminate a fondo tutti i cavi, connettori
e morsetti per difetti. Usate l’apparecchio solo se i conduttori e tutti gli connettori e elementi sono in buona
condizione e non danneggiati.
Proteggete l’apparecchio da acidi, vapori, umidità e sudiciume, e da danni fisici, sia durante
l’uso che quando lo ripone. Se non, la garanzia sarà invalidata.
Pannello d’informazioni fornite a mezzo LED
Modo di mantenimento 2 fasi principali Acceso
a voltaggio flottante di carica
Procedimento per ricaricare e mantenere
una batteria
1) Prima di collegare l’apparecchio a una batteria, confermate che la batteria sia una batteria 12V a sei
elementi e che l’ambiente sia bene ventilato. Fate scorrere il selettore del apparecchio a sinistra (giallo)
per selezzionare la funzione di carica.
2) Per utilizzare le pinze, collegatele al connettore due poli del cavo output. Se la batteria a caricare rimane
collegata al sistema elettrica d’un veicolo, determinate che il positivo oppure il negativo (il caso normale) polo
della batteria sia collegato alla massa. Collegate prima la pinza adatta al polo non collegato alla massa ed
www.accumate.com

7
in seguito l’altra pinza al telaio del veicolo. Evitate una qualsiasi parte o uno qualsiasi ambiente dove di car-
burante potrebbe essere presente.
3) Per utilizzare il cavo di collegamento con occhielli, vedi il testo preliminare sopra.
4) E importante di assicurare un buono contatto tra i poli della batteria e l’apparecchio.
5) Inserire i spinotti del apparecchio nel presa di corrente di 220-240V. Se questa è dotata d’un interruttore,
accendetela. Se uno qualsiasi ostacolo previene l’inserimento completo, si può fare girare il corpo dell’
apparecchio attraverso 90° con riferimento ai suoi spinotti. Ritirate l’apparecchio della presa di corrente e tro-
vate la chiavetta di serratura del movimento rotatorio vicino ai spinetti dell’ apparecchio. Utilizzate un pic-
colo oggetto platto per sollevare leggermente la chiavetta a permettere la rotazione all’ orientamento alterna-
tivo. (ATTENZIONE : Non sollevate eccessivamente la chiavetta che può si fratturare).
6) Vedi il panello di LED sopra. Dovrebbe accendersi il LED «Acceso». Se non, controllate i collegamenti.
7) Se il voltaggio della batteria è sopra dei 2V, il LED giallo che indica le due fasi principali di carica
dovrebbe accendersi e continuare d’indicare di continuo durante queste due fasi, che comprendono la fase a
corrente costante di 0,6A fino a quando il voltaggio sale ai 14,3V, ed in seguito la fase d’assorbimento durante
la quale ed il voltaggio è fisso al livello di 14,3V fino a quando la corrente si reduce a 300mA e la batteria è
quasi caricata.
8) La batteria è adesso prossima alla carica completa, ed il LED verde del modo di mantenimento comincerà
a indicare che il voItaggio di carica è adesso limitato al livello di 13,5V. Il caricabatterie porta la batteria dol-
cemente ad un stato di carica completa e mantienela caricata per finché la batteria rimana collegata. La
batteria può adesso attingere di corrente a seconda di necessità per compensare per le perdite di corrente
dovute a qualsiasi carichi collegati, oppure a delle perdite di corrente dell’ impianto elettrico alimentato
della batteria.
9) Se per qualunque causa la batteria ha bisogno d’una corrente più importante che 300mA durante il
periodo di mantenimento, il circuito di carica rivoltà automaticamente al modo d’assorbimento (corrente
massima 0,6A, LED giallo di carica) fino a quando la batteria è di nuovo stata caricata, a quel tempo il
programma passerà automaticamente di nuovo al modo di mantenimento (LED verde).
10) E possibile che i LED di mantenimento e di carica indichino in alternativa durante un periodo breve in
seguito del primo lampeggiamento del LED verde, soprattutto se la batteria è piuttosto vecchia o se la
batteria rimane collegata ad un impianto elettrico. Se queste indicazioni durano e la batteria rimane collegata
ad un impianto elettrico, scollegatela del impianto e poi ricollegatela al caricabatterie. Se piu tardi ricorrono le
stesse indicazioni di LED, la batteria è probabilmente difettosa. Se d’altra parte il LED verde indica continua-
mente piu tardi, conferma che sono delle perdite di corrente nel impianto elettrico.
11) Per interrompere, spegnete e/o retirate l’apparecchio della presa di corrente, ed in seguito scollegate la
batteria dell’ apparecchio.
12) Lo specchietto sotto dai tempi massimi di carica approssimativi da compIetamente scarico a completa-
mente carico. In ogni caso la batteria sarà completamente scarica solo se lascerete le luci accese per molto
tempo o se non sarà usata e se sarà lasciata al caldo per mesi. Le «ore normali da carica» indicano il tempo
medio di carica per portare una batteria che non riesce a far partire il motore alla carica completa.
13) Tabella
Tipo di veicolo Capacità Tempo normale Tempo
della batteria da scarico pieno massimo
50-900 c.c. scooter/moto/ATV da 12 a 14 Ampere/ora da 12 a 10 ore 120 ore
Moto di turismo, trattorini da 15 a 30 Ampere/ora da 11 a 20 ore 140 ore
Auto fino a 1400 c.c. da 31 a 44 Ampere/ora da 21 a 30 ore 180 ore
Auto 1400-1800 c.c. da 45 a 55 Ampere/ora da 31 a 40 ore 100 ore
Auto 2L+, motoscafo, trattore da 56 a 75 Ampere/ora da 41 a 50 ore 120 ore
Limousine, furgone da 76 a 90 Ampere/ora da 51 a 60 ore 140 ore

Instrucciones de uso
: IMPORTANTE :
Leer antes de utilizar
el aparato
ADVERTENCIA :Las baterías emiten
GASES EXPLOSIVOS
-
No permitir que se acerquen llamas ni
chispás a la batería
. Siempre desconectar la alimentación CA antes de conectar/desconectar una batería. El
acido de batería es altamente corrosivo. Llevar ropa protectora y evitar todo contacto. En caso de contacto
accidental, lavar immediatamente con agua y jabón. Cerciorarse de que los bornes de la batería no estan
flojos; de lo contrario, someter la batería a una revisión profesional. Si los terminales están corroídos,
limpiarlos con un cepillo de alambres de cobre; si están grasientos o sucios, limpiar con un trapo humedecido
con detergente. Antes de cargar las baterías de arranque clásicas (con tapones), cerciorarse de que los
niveles de electrólito sean correctos. llenar a nivel con agua destilada si fuese necesario (NUNCA CON ÁCIDO).
Utilizar el aparato solamente si las pinzas y conectores de entrada y salida están en estado perfecto.
Proteger el aparato y sus elementos de conexión contra toda exposición al ácido o a todo otro fluido, contra
vaho e humedad, y contro todo golpe físico. La garantía no cubretodo daño resultado de golpes o de exposi-
ciones a sustancias indeseables.
NOTA : Se entregan dos juegos de conexión desmontables para utilizar con la función de carga. Un con pin-
zas, el otro con ojales que pueden ser montados en la batería, así permitiendo conexiones/desconexiones rápi-
das. Si se quiere hacer una carga utilizando las pinzas, desconecte la batería y quitéla del vehículo, colocan-
dola en un lugar bien ventilado. Para conectar el juego de conexión con ojales, fijélos firmemente a través de
los agujeros de los postes de la batería. Si cerciorarse de que la toma polarizada (blanca) esté fijada de mane-
ra que no obstaculize el funcionamiento de piezas en movimiento. En caso de duda, consulte con un profe-
sional. Evite la entrada de polvo y suciedad dentro del conector polarizado. Si por alguna razón se funde el
fusible d’accesorios extras, tiene que ser reemplazado con una unidad de tipo identico. Siempre comprobe el
estado de los elementos de conexión antes de utilizar el aparato.
Protege el aparato y sus cables, conectores y terminaciones contra la contaminación del ácido y otros liqui-
dos, de la humedad y contra todo daño físico. Si un elemento de conexión no parece estar en buen estado,
reemplazado. En caso de duda, consulte con un profesional.
Panel sobre los indicadores LED
=
Modo de maintenimiento 2 étapas principales Encendido
- voltaje flotante de cargade carga
Procedimiento de carga
1) Antes de conectarla al cargador, confirmar que la batería sea una batería de 12V que dispone de 6 células
y asegurar que el ambiente sea bien ventilado.
2) Para utilizar las pinzas, conectarlas a la toma polarizada que termina el cable de salida del aparato.
Si la batería a cargar resta conectada al alambrado de un vehículo, determinar si el positivo o el negativo (el
8
www.accumate.com

9
caso normal) sea conectado a la masa del vehículo y conectar primero la pinza apropiada al borne no
conectado a la masa y después la otra pinza al chasis del vehículo, pero evitar piezas y lugares dónde car-
burante puede ser presente.
3) Para utilizar el juego de conexión con ojales, véase la sección preliminar sobre.
4) Es importante de asegurar un bueno contacto entre el cargador y los bornes de la batería.
5) Inserir los polos del aparato en la toma de corriente 220-240V~, y si esta ha un interruptor, encenderlo.
Si una cualquier obstrucción impide la inserción completa de los polos, se puede hacer girar el cuerpo del
aparato a través de 90° en relación a sus polos. Retirar el aparato de la toma y localizar la clavija pequeña de
cerradura del movimiento de rotación cerca de los polos del aparato. Utilizar un objeto plano para levantar la
clavija sólo suficientemente para permitir la rotación a través de 90° a la orientación alternativa.
(ATENCIÓN : Levantar con exceso la clavija de cerradura puede resultar en la fractura de la clavija).
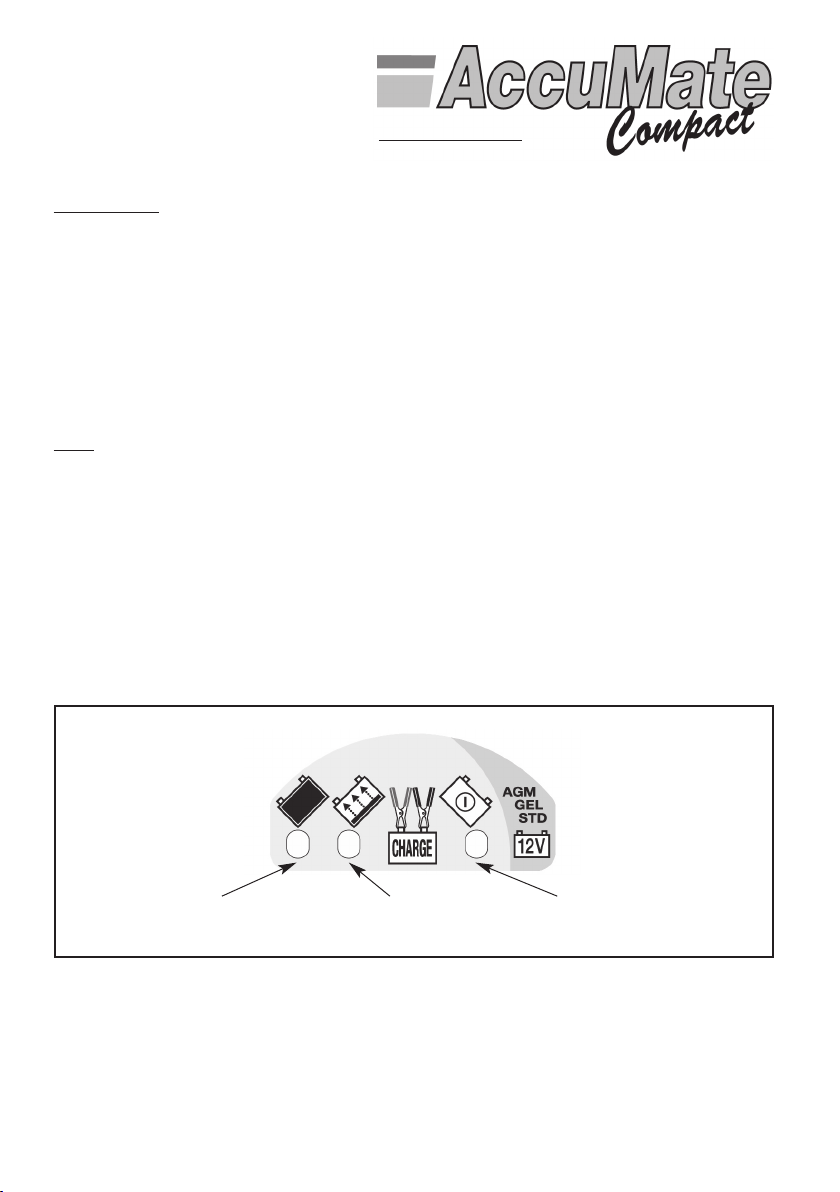
6) Véase el panel de indicadores LED sobre. Se encenderá la LED «Encendido». De lo contrario, comprobar la
alimentación CA y los elementos de conexión. Se encenderá la LED VERDE (modo de mantenimiento) a poco
de la conexión si la batería ya es totalmente cargada o... ¡ si sufre sulfatación!).
7) Si la tensión inicial de la batería es superior a 2Volt, el cargador la cargará automáticamente y la man-
tendrá a un nivel de capacidad comparable a él de su carga plena – con tal de que la batería sea en buen
estado. Durante el ciclo de carga (LED AMARILLA), la batería recibe una corriente de nivel máximo, hasta que
alcance una tensión de 14,3V. A este punto, el programa inicia el modo de absorción (tensión de 14,3V igual
y nivel de corriente flotante). NOTA : Si solamente se enciende la LED de alimentación – todas conexiones
estando correctas – significa que la tensión inicial de la batería es por debajo de 2V y que es probablemente
irrecuperable.
8) Cuando la corriente observada por el cargador se hubiera caída debajo de los 300 mA se reducirá auto-
máticamente la tensión de carga hasta los 13,5V. La LED verde comenzará a indicar que la batería está lista.
Mientras que se dejará conectada la batería, el cargador seguirá manteniendo la batería para compensar todo
consumo de corriente, que sea interno o externo a la batería (descarga natural, alimentación de accesorios,
micro corto-circuitos en la red eléctrica del vehículo, etc.).
9) Si, por cualquier razón que sea, la batería necesita una corriente superior a los 300mA, el circuito de carga
volverá automáticamente al modo de absorción (corriente máxima 0,6A) hasta que el consumo de corriente
se hubiera reducido de nuevo, aquello punto el programa volverá al modo de mantenimiento.
10) Es posible que las LED de mantenimiento y de carga indican alternativamente durante un periodo corto
después del primo indicación de la LED verde, especialmente si la batería es bastante vieja o si la batería resta
conectada al alambrado de un vehículo. Si estas indicaciones persistan y la batería resta conectada al
alambrado de un vehículo, desconectarla del alambrado y luego reconectarla al cargador. Si se producen más
tarde de nuevo las mismas indicaciones, la batería es probablemente defectuosa. Si sin embargo la LED verde
indica constantemente más tarde, significa que hay algún defecto en el alambrado mismo.
11) Desconectar la red CA y retirar el aparato de la toma antes de desconectar la batería del cargador.
Sin embargo, el circuito del cargador desactivará instantáneamente la salida de carga en tanto caso.
12) La tabla que se encuentra a continuación indica los tiempos máximos aproximados de carga, desde un
estado de batería totalmente descargada hasta el estado de carga completa. Los tiempos indicados se
aplican en casos de descargas normales (a partir de un estado en aquello la batería no más puede arrancar
el motor). Los períodos indicados no se aplican para casos anormales, por ejemplo si los faros del vehículo se
hablan quedados encendidos durante varios dios, o si la batería fue almacenada sin ser cargada durante
meses en un medio ambiente caliente.

10
13) Tabla de tiempos de carga
Descripción del vehiculo Capacidad de la batería
Horas norm. desde descarga completa
Tiempo máximo
Motos ligera, moto sport, VTT
02 a 14 Amp-hora 02 a 10 horas 120 horas
Moto de turismo microtractor
15 a 30 Amp-hora 11 a 20 horas 140 horas
Coche pequeño hasta 1400cc
31 a 44 Amp-hora 21 a 30 horas 180 horas
Coche, 1400-1800cc
45 a 55 Amp-hora 31 a 40 horas 100 horas
Coche turismo, motora
56 a 75 Amp-hora 41 a 50 horas 120 horas
Limusina, camioneta
76 a 90 Amp-hora 51 a 60 horas 140 horas

11

12
LIMITED WARRANTY
TecMate (International) SA/NV, 252 Sint-Truidensesteenweg, B-3300 Tienen, Belgium, makes this
limited warranty to the original purchaser at retail of this product. This limited warranty is not
transferable. TecMate (International) warrants this device for two years from date of purchase at retail
against defective material or workmanship. If such should occur the unit will be repaired or replaced
at the
option of the manufacturer. It is the obligation of the purchaser to forward the unit together with proof of
purchase, transportation or mailing costs prepaid, to the manufacturer or its authorized represen-
tative.This limited warranty is void if the product is misused, subjected to careless handling, or repaired by
anyone other than the factory or its authorized representative. Any damage to the unit, it’s leads or
acces-
sory parts resulting from acid or fluid contamination, exposure to damp or humidity or from physical dama-
ge is NOT covered by warranty. The manufacturer makes no warranty other than this limited warranty
and
expressly excludes any implied warranty including any warranty for consequential damages. THIS IS THE
ONLY EXPRESS LIMITED WARRANTY AND THE MANUFACTURER NEITHER ASSUMES NOR AUTHORIZES
ANYONE TO ASSUME OR MAKE ANY OTHER OBLIGATION TOWARDS THE PRODUCT OTHER THAN THIS
EXPRESS LIMITED WARRANTY.
GARANZIA LIMITATA
TecMate (International) SA/NV, 252 Sint-Truidensesteenweg, B-3300 Tienen, Belgio riconosce ques-
ta garanzia limitata agli acquirenti originali al dettaglio di questo strumento. Questa garanzia limita-
ta
non è trasferibile.
TecMate (Int.) garantische l’apparecchio per 2 anni dalla data di acquisto al dettaglio contro difetti di
materiale o di manodopera. Se tali difetti fossero riscontrati lo strumento verrà riparato o sostituito a
discrezione dell’ Azienda. Sarà obbligo dell’ acquirente rispedire lo strumento, a proprie spese e cura, con
il tagliando di acquisto, al produttore o al distributore autorizzato. Questa garanzia limitata è nulla se il
prodotto è maltrattato o usate male, contaminato per acido od umidità, soggetto ad incuria nel maneg-
giamento, o riparato da chiunque esclusi il produttore o il distributore autorizzato. Il produttore non rico-
nosse altre garanzie se non questa limitata garanzia ed esclude espressamente ogni implicate garanzia
che includa garanzie per conseguenti danneggiamenti.
QUESTA È LA SOLA ED ESPRESSAMENTE LIMITATA GARANZIA E L’AZIENDA PRODUTTRICE NE ASSUME NE
AUTORIZZA ALCUNO AD ASSUMERE O FARE ALTRE CONCESSIONI CHE RIGUARDINO IL PRODUTTORE,
DIVERSAMENTE DA QUESTA.
GARANTIA LIMITADA
TecMate (International) SA, Sint-Truidensesteenweg 252, B-3300 Tienen, Bélgica, establece esta
garantia limitada en favor del primer propietario utilizando este aparato. Esta garantia limitada no
es transferible.
TecMate (International) garantiza este aparato durante los dos años siguientes a la fecha de compra por
su primer usuario contra las fallos de materiales y de montaje. En este caso y a discreción del fabricante,
el aparato podrá ser reparado o reemplazado. La organización y los costes relativos al transporte del
aparato, acompañado por una prueba de compra al fabricante o a uno de sus representantes autorizados
se repercutirán al cliente. Esta garantía limitada se anula en caso de uso o tratamiento inadecuado, o de
reparación hecha por toda persona o organización otra diferente al fabricante o uno de sus represen-
tantes autorizados. El fabricante no cumple con otra garantía que esta garantía limitada y expresamente
excluye toda forma de garantía contra otros daños que los sufridos por el aparato mismo.
ESTO CONSTITUE LA UNICA GARANTÍA LIMITADA VALIDA. EL FABRICANTE NO RECONOCE A QUIENQUIERA
EL DERECHO DE EJERCER O DE TANSMITIR NINGUN DERECHO RELATIVO AL PRODUCTO VENDIDO QUE SEA
OTRO QUEL EL QUE SE DERIVA DE ESTA GARANTÍA LIMITADA EXPRESA.
#572 15.07.2005
This manual suits for next models
6
Table of contents
Languages:
Other AccuMate Power Supply manuals