Accurian APD-3911 User manual

Thank you for purchasing this Accurian Portable 7-inch Dual Screen
Portable DVD Player.
7-inch Dual Screen Portable DVD Player
APD-3911
What’s Included
Please read this user’s guide before installing, setting up, or using your new product.
remote
AC adapter
mini-DIN cable
carrying bag
vehicle adapter user’s guide
video cable
monitor
Quick Start p. 4
DVD player

2
Contents
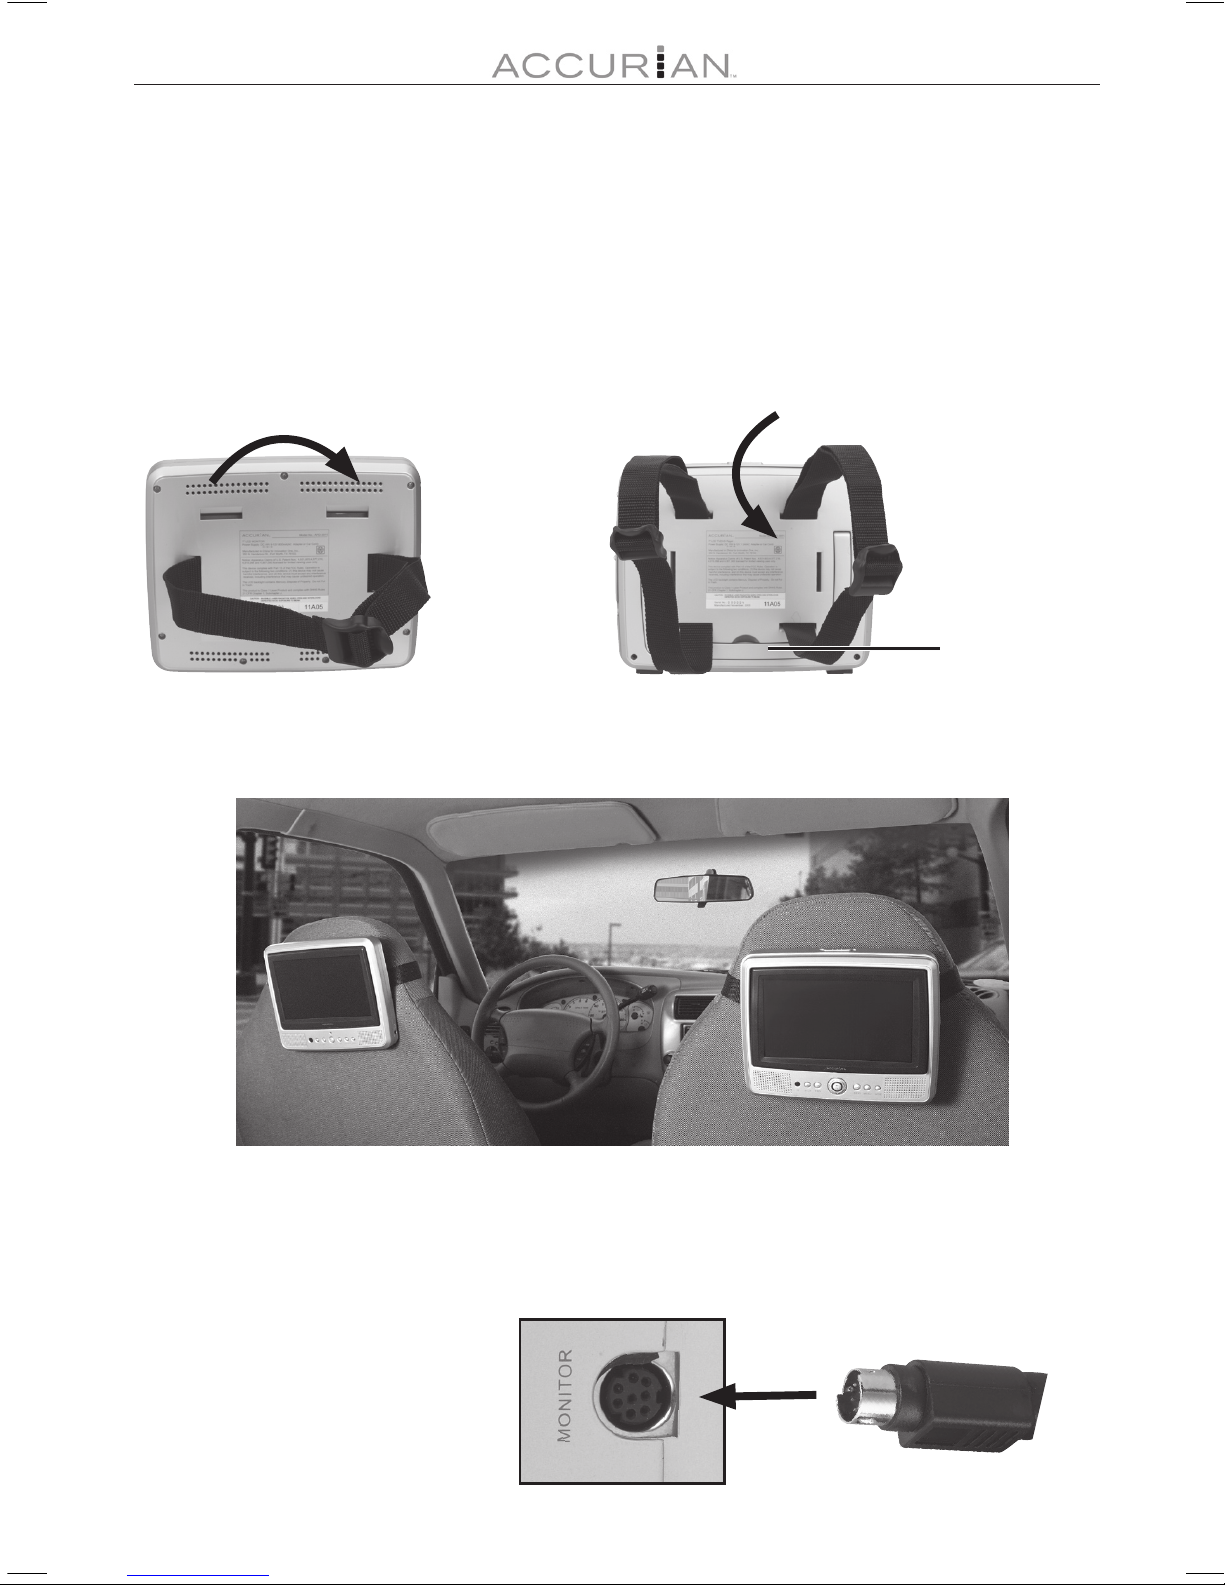
Quick Start: Setup in Your Vehicle 4
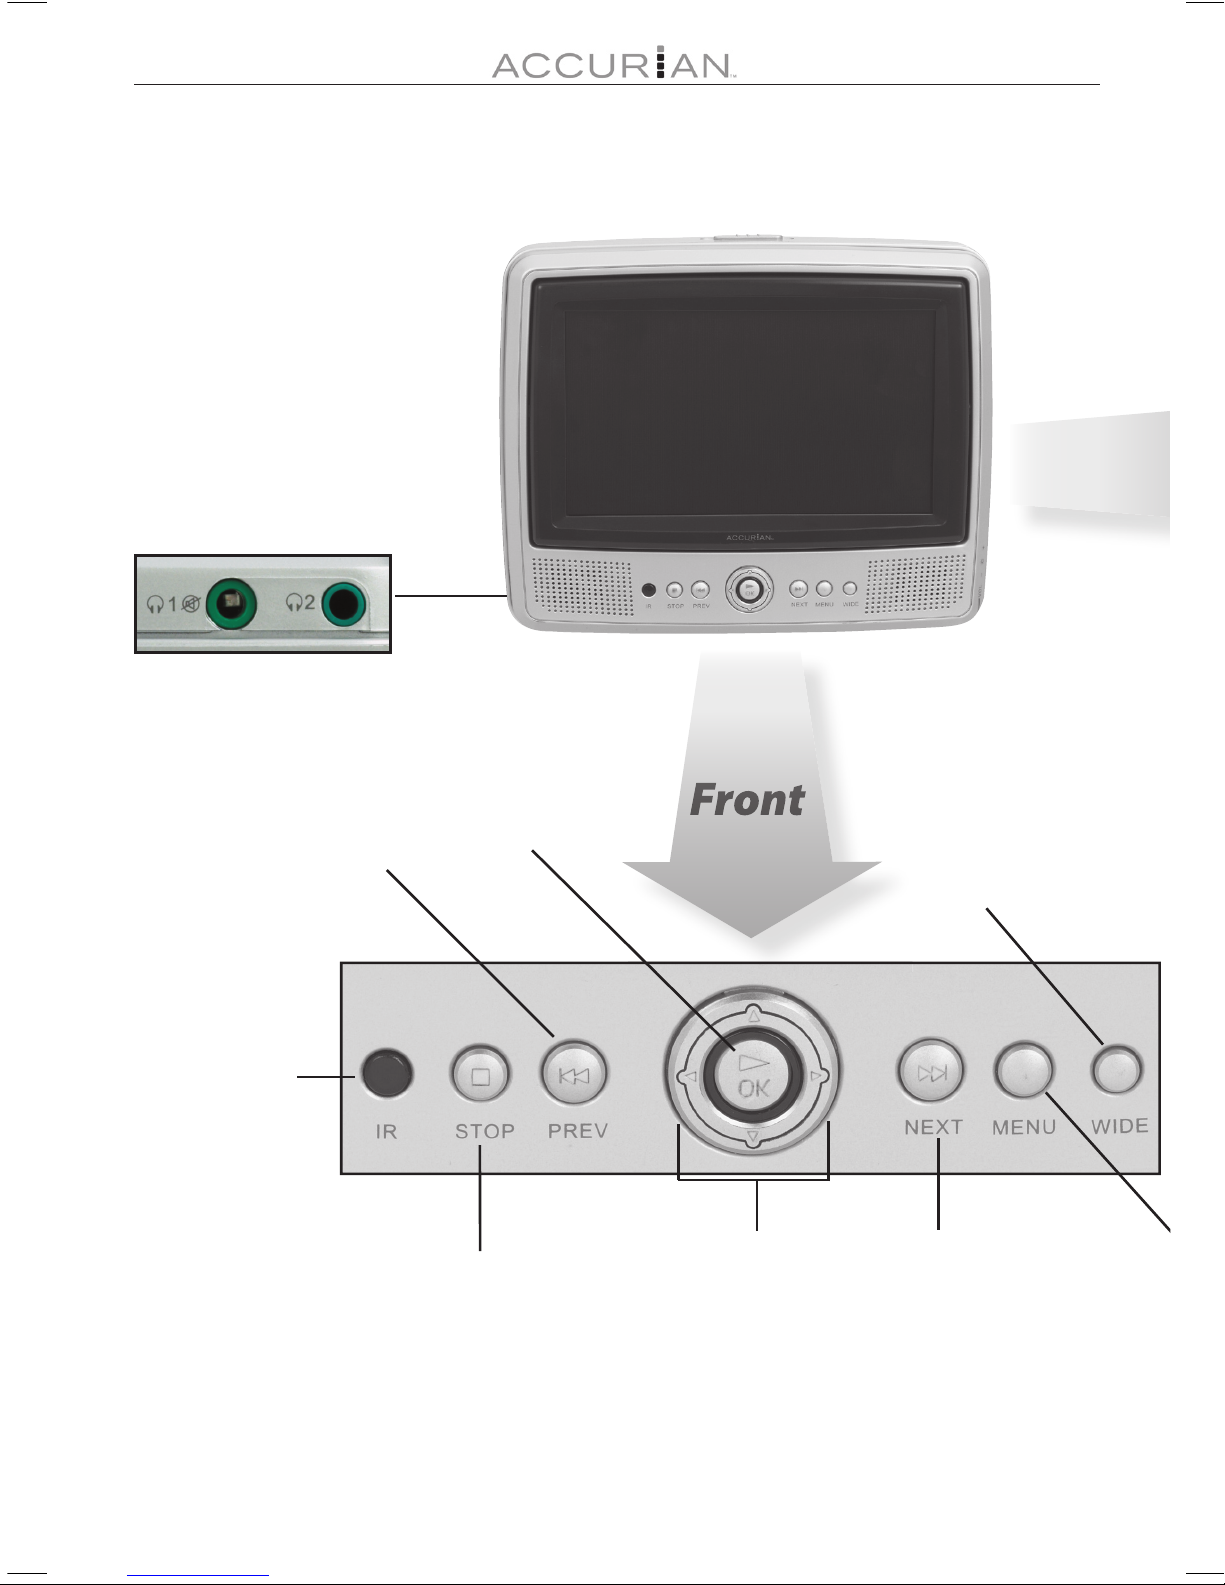
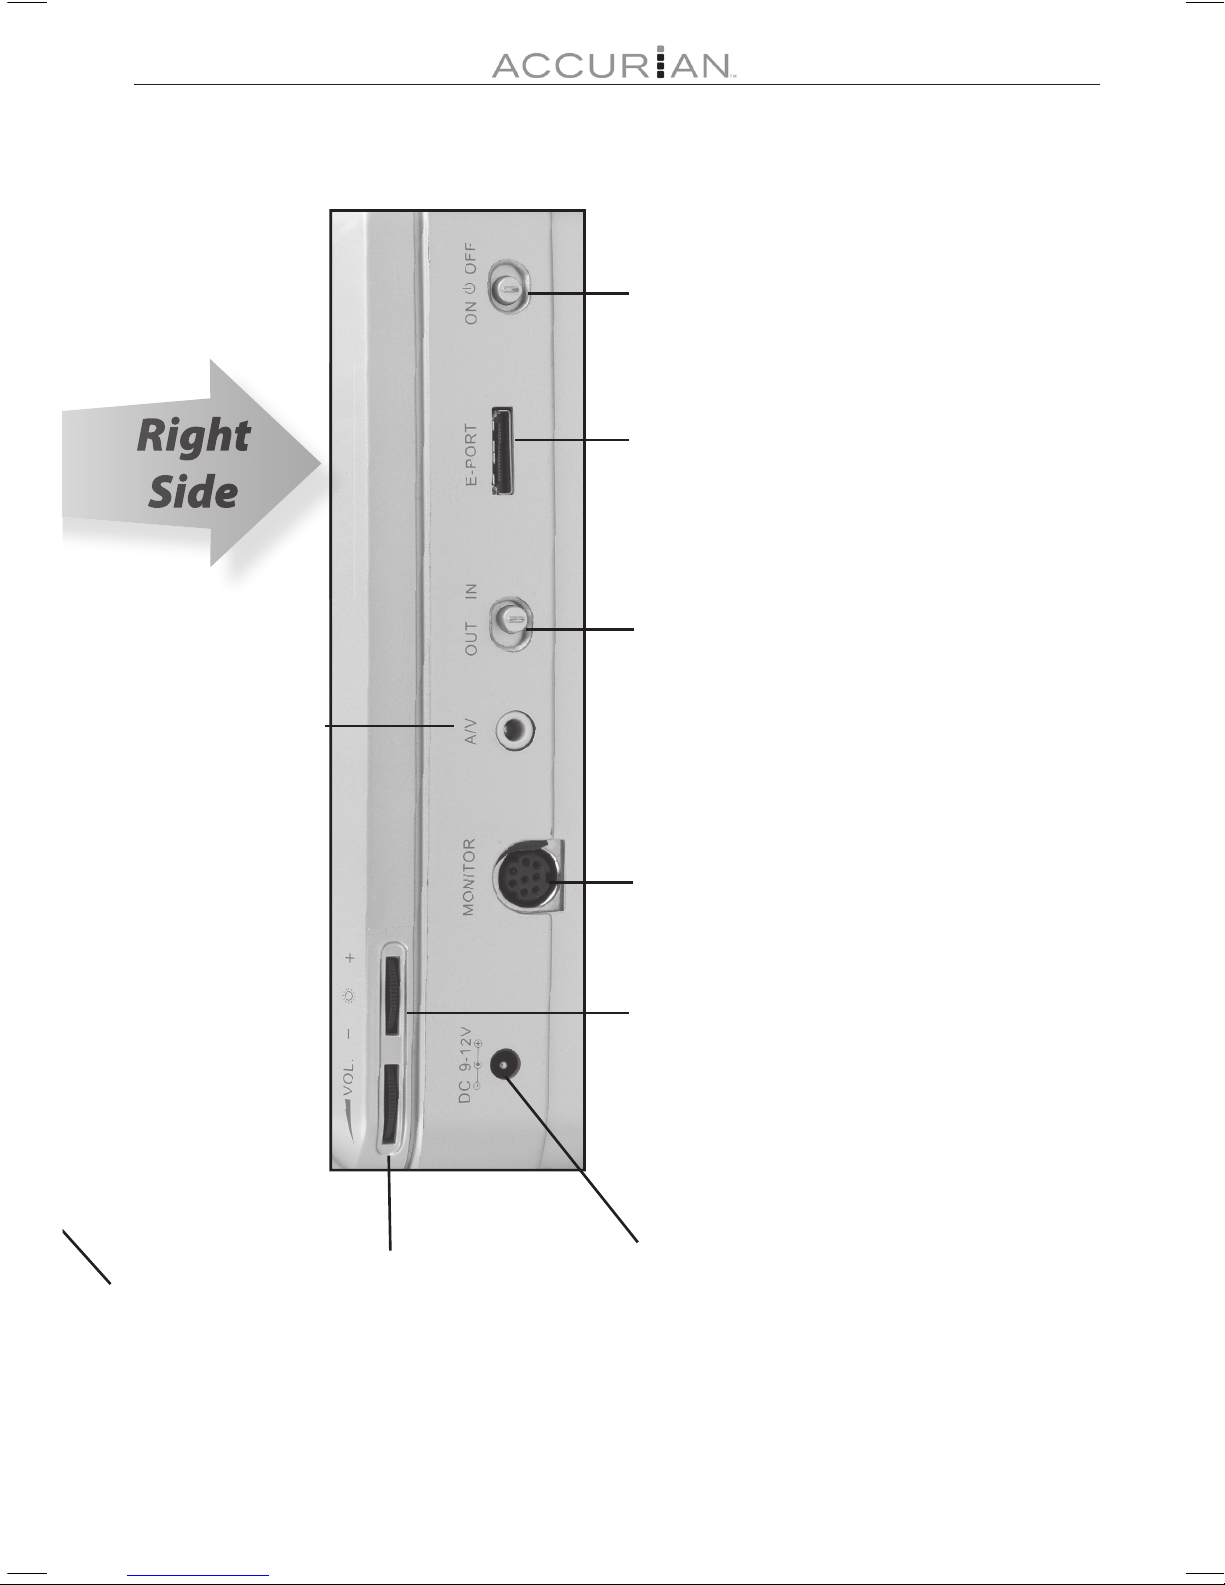
DVD Player Features 6
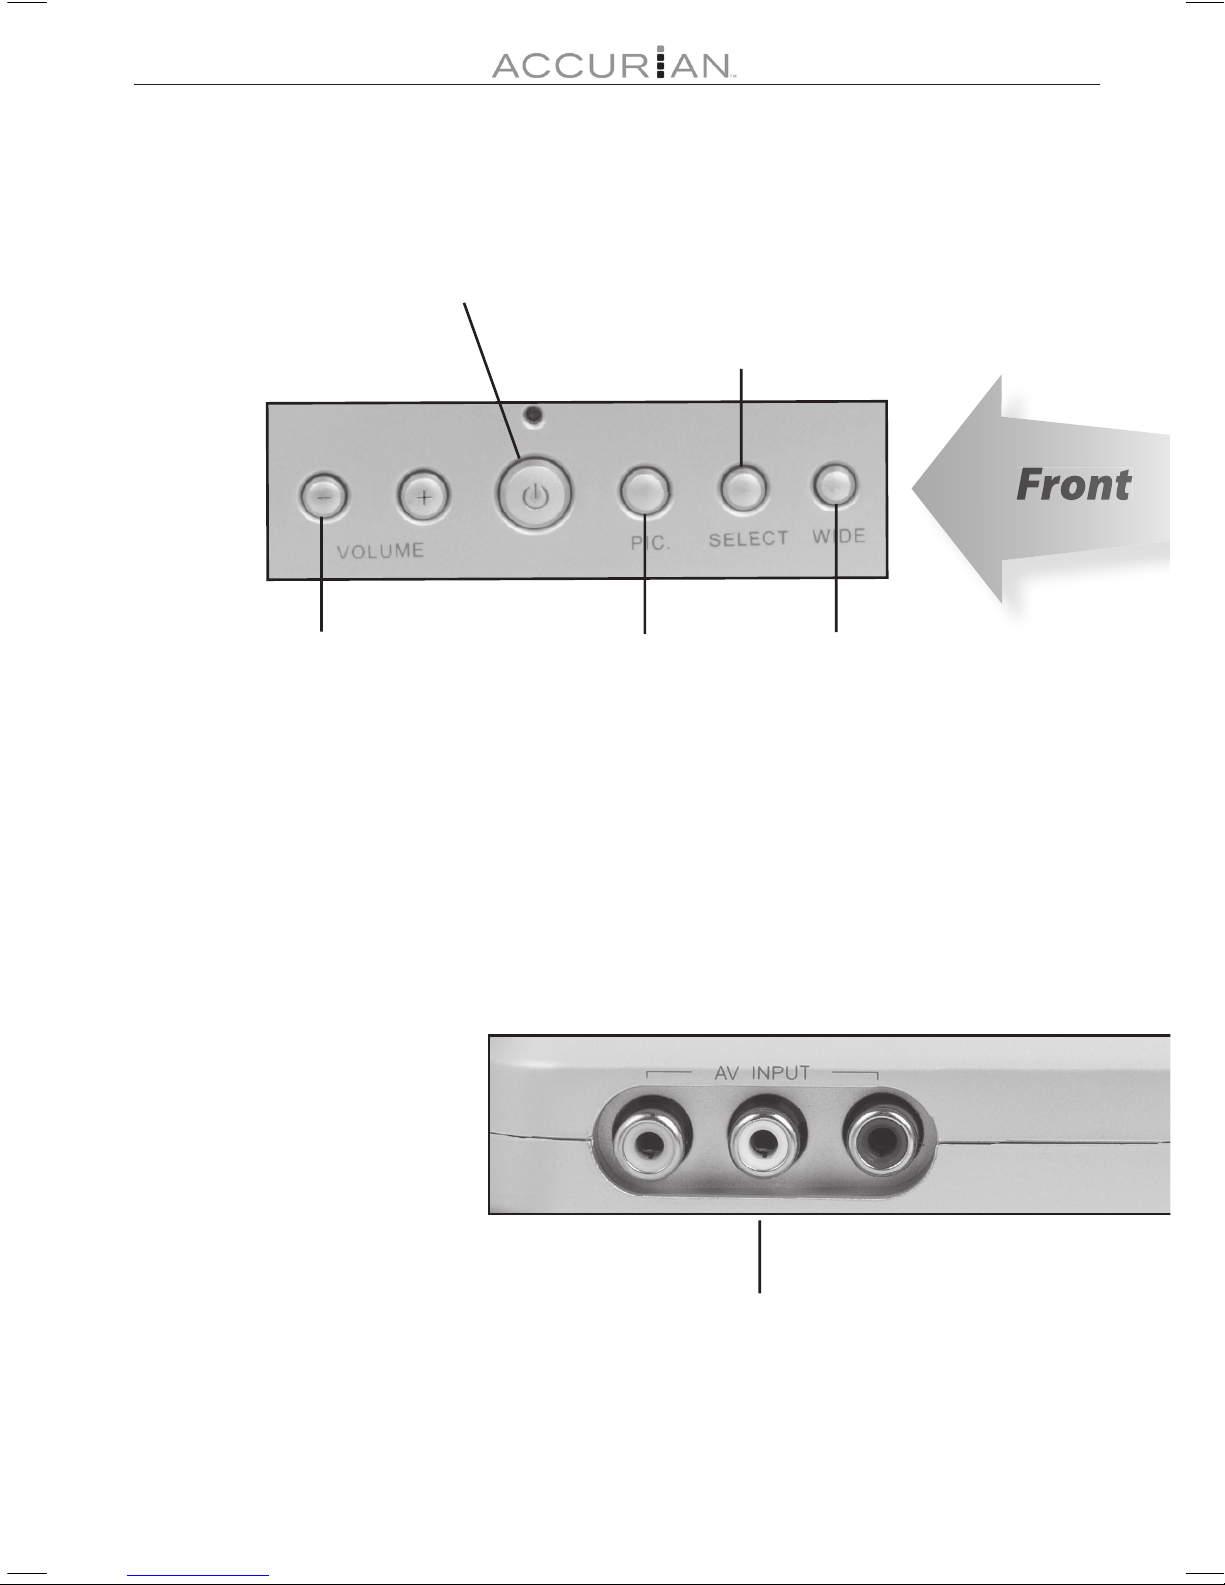
Monitor Features 8
Remote Control Features 10
Replacing the Battery in your Remote Control 11
Display Feature 12
Current title, chapter, and elapsed time 12
Current language and subtitle information 12
Elapsed chapter time 13
Remaining chapter time 13
Elapsed title time 13
Remaining title time 13
DVD Player System Setup 14
Access and Change System Settings 14
System Setup 14
Language Setup 15
Video Setup 15
Password Setup 15
Default Setup 16
Frequently Asked Questions (FAQ) 16
Why won’t my disc play? 16
What is region encoding? 17
Can I play MP3 or picture discs? 17
What if Appears? 17
Why won’t the player turn on? 17
Why is there no picture or the picture jumps? 18
Why is there no sound? 18
How do I connect to additional hardware? 18
SPECIFICATIONS 19
Region Management Information 19
RF EMISSIONS INFORMATION 20
LIMITED WARRANTY 20

3

4
Quick Start: Setup in Your Vehicle
Follow these steps to quickly and easily set up your player and second monitor
in your vehicle. For a complete description of your player’s features, see page
6-11.
Or
Install straps by inserting straps into holes on back
of DVD player and monitor. Then loop the strap back
through the buckle.
Install in vehicle over seats as shown.
Plug the Mini-DIN cable into both the DVD player and
the monitor.
Make sure all equipment
and the cables are
installed safely.
Mini-DIN
Cable
NOTE:
Pull out stand
to prop the
DVD player for
use outside of
vehicle.

5
Plug in vehicle power adapter to the DVD player /
monitor.
Slide latch, and pull the DVD player open. Then place
disc inside graphic side facing toward you.
Turn on both player and monitor and click the OK
button on the front of the DVD player.
Your remote control comes with a battery already
installed. Pull the plastic tab out of the battery
compartment to begin using the remote.
Using an adapter that was
not included may not meet
the player’s specifications
and could damage the
player or the adapter.
For more information on
supplying power to your
player, see page 17.
For a complete description
of your remote’s features
see page 10 -11.
Vehicle Power
Adapter
Remote
control
NOTE:
CAUTION!
Stop movie and
turn off DVD player
before turning off
your vehicle.
NOTE:
Slide latch to
the left

6
DVD Player Features
IR
Infrared sensor
receives
information
from remote.
PREV
Go back to the
previous chapter or
track.
STOP
Press STOP once for Pre Stop. Play
resumes at the last position when you
press ENTER.
Press STOP twice for Full Stop.
Playback starts at the beginning when
you press ENTER.
NEXT
Skip to the
next chapter
or track.
WIDE
Switch between
the 16:9 and 4:3
display size ratio.
OK
Play a disc.
Arrows
Scroll
through
menu
choices.
Front
Headphone jacks (Left
Side)
Insert one or two sets
of headphones for
private listening. Insert in
headphone jack 1 to mute
sound.
Front

7
MENU
Select to
display DVD
menu.
Right
Side
Volume.
Adjust the volume.
ON OFF
E-PORT
Insert a game controller (optional).
Brightness
Adjust the picture brightness. To
adjust brightness for both monitors,
press Setup on the remote and select
Video Setup.
A/V
Insert the A/V
cable to play
to additional
monitors or
receive input from
additional devices
(optional).
MONITOR
Insert the mini-DIN cable to play to
the other monitor (included). You can
also play to additional monitors or
receive input from additional devices
(not included).
Out / In
Select either DVD output from the
built-in player, or to receive input from
other devices.
Power
Insert either the A/C adapter or the
car power adapter.
Stand (On Back)
Pull out stand to prop the
DVD player.
Right
Side

8
Monitor Features
A/V INPUT
Connect the A/V cable to
optional A/V equipment (not
included).
Front
SELECT
Switch between the video
1 and video 2 input.
VOLUME.
Adjust the sound
volume.
ON OFF
Picture
Select to adjust the picture
brightness, contrast, color,
and tint. Use the + and
- buttons to adjust the
setting.
WIDE
Switch between the 16:9
and 4:3 display size ratio.
Front

9
Headphone jacks
Insert one or two sets of 1/8-inch (3.5
mm) headphones for private listening.
Mount
Mount the monitor
on a tripod or stand
(optional).
Bottom
MONITOR PORT
Insert the mini-DIN cable to receive
input from the DVD player (included). Or,
receive input from additional devices (not
included).
Right
Side
Power
Insert an A/C adapter
or a car power
adapter for use with
additional equipment
(not included).
MONITOR PORT
Insert the mini-DIN cable to receive
input from the DVD player (included). Or,
receive input from additional devices (not
included).
Bottom
Right
Side

10
Remote Control Features
DISPLAY
Press to display disc information including
language, chapter, and title information.
REPEAT
Repeat a DVD chapter or
title, or a single track or
the entire MP3 CD.
PREV and NEXT
Skip titles, chapters, or
tracks.
MENU
DVD menus vary
according to how each
DVD disc is formatted
and is separate from the
DVD player’s features.
SKIP
Press SKIP to hide or activate
a channel by selecting
between “Skip Mode ON” and
“Skip Mode OFF.”
SETUP
Access the SETUP menu
screen.
TV/CATV
Switch between DVD
playback and television
mode.
AUTO
When setting up for
TV, search for channels
automatically.
STOP /
Stop playback.
Angle Mark
Press to change angle if
available on disc.

11
and ENTER
Use to highlight and
confi rm selections on a
menu screen.
FAST REW and FF
Scan forward or backward
at 2, 4, 8, and 20 X normal
speed.
CH
Press to select channel.
AUDIO
Select one of the language
audio soundtracks
programmed on a DVD or
audio output mode on an
audio CD.
NUMBER KEYS
(0—9 and --)
Use to select channels,
enter levels, or chapters.
PLAY / PAUSE
Start or pause playing a
disc.
Replacing the Battery in your
Remote Control
Press the tab on the battery
compartment tray, slide the battery
compartment tray out, and insert
a new battery plus “+” side up.
Slide the tray back into the battery
compartment until it clicks.
Battery Notes:
• Keep button-cell batteries away
from children. Swallowing a button-
cell battery can be fatal.
• Dispose of the old battery promptly
and properly. Do not burn or bury it.
• Use only a fresh battery of the
required size and recommended
type.
SUB
Press SUB repeatedly to
select the desired subtitle
language. To turn subtitles
off, press SUB until OFF
displays.

12
Display Feature
The Display feature shows language, title, chapter, and time information
for a DVD that is playing:
To display the DVD playback information during playback, on the remote
press Display once for the following DVD display options:
Current title, chapter, and elapsed time
ß
TT 1/3 CH 2/23
Ì
00:02:04
Press Display again to show the following menu options:
Current language and subtitle information
1/6 ENG 5/1 CH 5/12 CH 1 OFF
Current title
number
Total number
of titles
Current chapter
number
Total number of
chapters
Elapsed play time for
the title
Current number of
audio languages /
total number of audio
languages
Current audio
language
Audio channel
mode
Current subtitle
language
Current subtitle language
number / total number of
subtitle languages
Angle Mark

13
Press Display repeatedly to view the following DVD and music CD time
related information in sequence in the last column.
Elapsed chapter time
ß
TT 1/3 CH 2/23
Ì
00:02:04
Remaining chapter time
ß
TT 1/3 CH 2/23 C-00:00:39
Elapsed title time
ß
TT 1/3 CH 2/23 T00:19:39
Remaining title time
ß
TT 1/3 CH 2/23 T-01:00:13

14
DVD Player System Setup
Complete the following steps to change your DVD player’s system settings,
including default language, video and password settings.
The following DVD player settings apply to DVD playback only, and not all
DVDs can use these features.
In order for changes to take effect, you must make them before loading the
DVD.
Access and Change System Settings
To access the DVD Player Setup menu, press the Setup button on the
remote.
Using the arrow keys, select a system setting (see the following tables for
descriptions) and press Enter to select.
System Setup
Screen Saver On/Off: When enabled, the DVD player will go into
Screen Saver mode after five minutes.
Angle Mark On/Off: If enabled, the angle mark icon will display
in the Display menu if different angles are available
on a disc. The different angles are accessed by
selecting Angle on the remote.
TV Display • 4:3 Pan Scan - When wide-screen video material
is played in this mode, the right and left side of
the image is clipped.
• 4:3 Letter Box - When wide-screen video material
is played in this mode, black bands appear at the
top and bottom of the screen.
• 16:9 - The correct mode for playing wide-screen
discs on a wide-screen TV..
Last Memory On/Off: When enabled, the DVD will return to last
position on the disc when the DVD is restarted.
NOTES:

15
Language Setup
OSD Language You can change the DVD player system menu
language to one of the following: English (player
default), Spanish, French. Note: you must change
the Menu Language language setting before
changing the DVD disc menu language.
*Audio Language The default language audio track is automatically
used during DVD playback if available on a DVD.
Select from the following audio languages: English
(player default), French, Spanish, German, and
Japanese.
*Subtitle Language This default language is automatically used for
subtitles during DVD playback if available on a
DVD. Select from the following subtitle languages:
English (player default), French, Spanish, German,
and Japanese.
*Menu Language The DVD menu displays in the default language
automatically if available on a DVD. Select from the
following DVD disc menu languages: English (player
default), French, Spanish, German, and Japanese.
* These settings are DVD disc specific and may not be available on all discs.
Video Setup
Brightness Select a setting between 0 and 12. The default is 6.
Contrast Select a setting between 0 and 12. The default is 6.
Hue Select a setting between -6 and +6. The default is 0.
Saturation Select a setting between 0 and 12. The default is 6.
Password Setup
Password To change the password or rating, enter the default
password: 3308. Then press ENTER to open the lock.

16
Rating You cannot play DVDs rated higher than the level
you selected unless you cancel the parental lock
function.
The parental lock level is equivalent to the following
ratings:
Level 1: G Level 2: PG Level 3: PG-13
Level 4: R Level 5: NC-17 Level 6: Disable
Default Setup
Default Select to Reset the DVD player to its factory default
settings.
When finished changing system settings, press Setup again to exit the
Setup menu.
Why won’t my disc play?
There are several possible causes:
• Make sure there is a disc in the disc tray.
• Insert the disc correctly with the playback side facing front in the disc tray.
• Clean the disc.
• Condensation may have formed inside the unit due to a sudden change
in temperature. Wait about an hour for it to clear and try again.
• Check the back of the DVD box to see if it states that the DVD is for PC
DVDs. Not all DVD players can play PC DVDs. There are some DVDs that
can read CD-X formats as well as CD-R and CD Extra.
Do not use irregularly shaped discs such as heart or star-shaped discs, as
they may cause the DVD player to malfunction.
Do not stick paper, tape or glue on the disc.
Do not expose the disc to direct sunlight or heat sources.
Do not touch the surface of disc. Handle the disc by its edge.
Clean the disc by wiping the disc from the center out with a clean cloth.
Refer to any instructions supplied with the discs for additional features.
The number of languages available depends upon the disc. This function
Frequently Asked Questions (FAQ)
NOTES:

17
can only be used for discs on which subtitles have been recorded in
multiple languages.
On some DVDs, subtitles are activated from the main menu of the DVD.
Press MENU to activate the main menu.
What is region encoding?
DVD players are designed to play movies coded by regions and will only play
movies coded to their particular region. The list below shows the movie regions
by number. This coding is used because a movie may be released on DVD before
it is available in theaters in some countries.
Region 1: Canada, United States and Territories
Region 2: Europe, Middle East, South Africa, Japan
Region 3: Southeast Asia
Region 4: Australia, New Zealand, Mexico, and Central and South America
Region 5: Africa, Russia and rest of Asia
Region 6: China
Can I play MP3 or picture discs?
Yes, you can play DVDs, MP3 discs, and many picture discs.
What if Appears?
The feature or action cannot be completed because:
• The disc’s software restricts it.
• The disc’s software does not support that feature (for example: angles).
• The feature is not available at the moment.
• You have requested a title or chapter that is out of range.
Why won’t the player turn on?
• Check that the AC power cord is connected.
Its center tip must be set to positive and its plug must fit the
DVD player’s DC 12V jack. The supplied AC adapter meets these
specifications.
Do not leave the adapter plugged into the AC outlet or connected
to the DVD player when you are not using it.
The adapter might become warm after extended periods of use.
CAUTION!

18
Why is there no picture or the picture jumps?
There are several possible causes:
• Make sure that the region number of the disc matches the region number
of the player.
• Stop the DVD player and clean the disc.
• Check the disc for scratches. If there are scratches, the disc may not play.
Why is there no sound?
There are several possible causes:
• Make sure the system is not in pause mode. Press the PLAY or Enter button
to return to normal play mode.
• Check the speaker settings. Mute may be on or the volume may be low.
• If you have headphones plugged into headphone jack 1 on the DVD
player, the sound mutes. Unplug the headphones.
How do I connect to additional hardware?
You can connect the DVD player to a TV (not included):
1. Connect one end of the supplied A/V cable’s stereo plug into the DVD
player’s A/V OUTPUT jack.
2. Connect the other end to the AUDIO INPUT and VIDEO INPUT jacks
on your TV (white = left channel, red = right channel, yellow = video)
through an A/V cable with stereo phono plugs.
3. On the side of the player, select either Out or In depending on whether
you are sending output to a monitor or TV, or are receiving input from
another source such as a video game console (not included).

19
SPECIFICATIONS
Compatible discs...................................................................................................................DVD/JPEG/CD/MP3
Laser type ...................................................................Semiconductor laser, Wave Length: 650nm/795nm
Signal system .....................................................................................................................................................NTSC
Video output level ......................................................................................................................1 Vp-p (75 ohm)
Audio output level .................................................................................................................1.4 Vrms(10k ohm)
S/N ratio: ...............................................................................................................................................................60dB
Dynamic range: ................................................................................................................................................. 85dB
Power supply ..............................................................................................................................................DC 9-12V
Power consumption .........................................................................................................................................12 W
Dimension ............................DVD Player W212 x H55 x D173 mm, Monitor W201 x H34 x D164 mm
Specifications are typical; individual units might vary. Specifications are subject to change and
improvement without notice. Actual product may vary from the product images in this document.
Region Management Information
This DVD player is designed and manufactured to respond to the region management information
that is recorded on a DVD. The region number of this DVD player is 1 (USA/CANADA). If the region
(local) number of the disc that you attempt to play differs from the region number of the unit,
“Incorrect Region Code” appears on the TV screen, and the DVD player cannot play that disc.

©2006. Innovation One, Inc. All rights reserved.
Accurian is a trademark used by Innovation One.
This product is warranted by Innovation One against manufacturing defects in material and workmanship
under normal use for ninety (90) days from the date of purchase from authorized Innovation One dealers. For
complete warranty details and exclusions, check with your dealer or contact Innovation One directly.
Innovation One, Inc.
350 North Henderson Street
Fort Worth, TX 76102 04/05
LIMITED WARRANTY
APD-3911
01A06
Printed in China
This equipment has been tested and found to comply with the limits for a Class B digital
device, pursuant to Part 15 of the FCC Rules. These limits are designed to provide reasonable
protection against harmful interference in a residential installation. This equipment generates,
uses, and can radiate radio frequency energy and, if not installed and used in accordance with
the instructions, may cause harmful interference to radio communications. However, there is
no guarantee that interference will not occur in a particular installation. If this equipment does
cause harmful interference to radio or television reception, which can be determined by turning
the equipment off and on, the user is encouraged to try to correct the interference by one or
more of the following measures:
• Reorient or relocate the receiving antenna.
• Increase the separation between the equipment.
• Connect the equipment to an outlet on a circuit different from the device.
Consult your local Innovation One dealer or an experienced radio/TV technician for help.
If you cannot eliminate the interference, the FCC requires that you stop using your device.
WARNING: Changes or modifications not expressly approved by Innovation One dealers may
cause interference and void the user’s authority to operate the equipment.
This device complies with Part 15 of the FCC Rules. Operation is subject to the following two
conditions: (1) This device may not cause harmful interference, and (2) This device must accept
any interference received, including interference that may cause undesired operation.
This Class B digital apparatus complies with Canadian ICES-003.
Cet appareil numérique de la classe B est conforme à la norme NMB-003 du Canada.
RF EMISSIONS INFORMATION
Table of contents