Accusys ExaSAN A12S2-SJ 6Gb SAS JBOD User manual

April, 2012
Quick Start Guide
A12S2-SJ
JBOD
Includes hardware Installation information
for: ExaSAN JBOD System Model: A12S2-SJ


Introduction
The ExaSAN A12S2-SJ 6Gb SAS JBOD Storage Expansion system is a 2U 12-bay rackmount enclosure for up
to 12 SAS/SATA disk drives. Designed to be used with the A12S2-PS RAID storage system, The A12S2-SJ JBOD
from Accusys meets the highest standards of easily deployable storage capacity expansion, redundancy and fault
tolerance, data transfer and system integration. The A12S2-SJ JBOD works is unison with the A12S2-PS RAID
storage system.
The A12S2-SJ is designed with the following features:
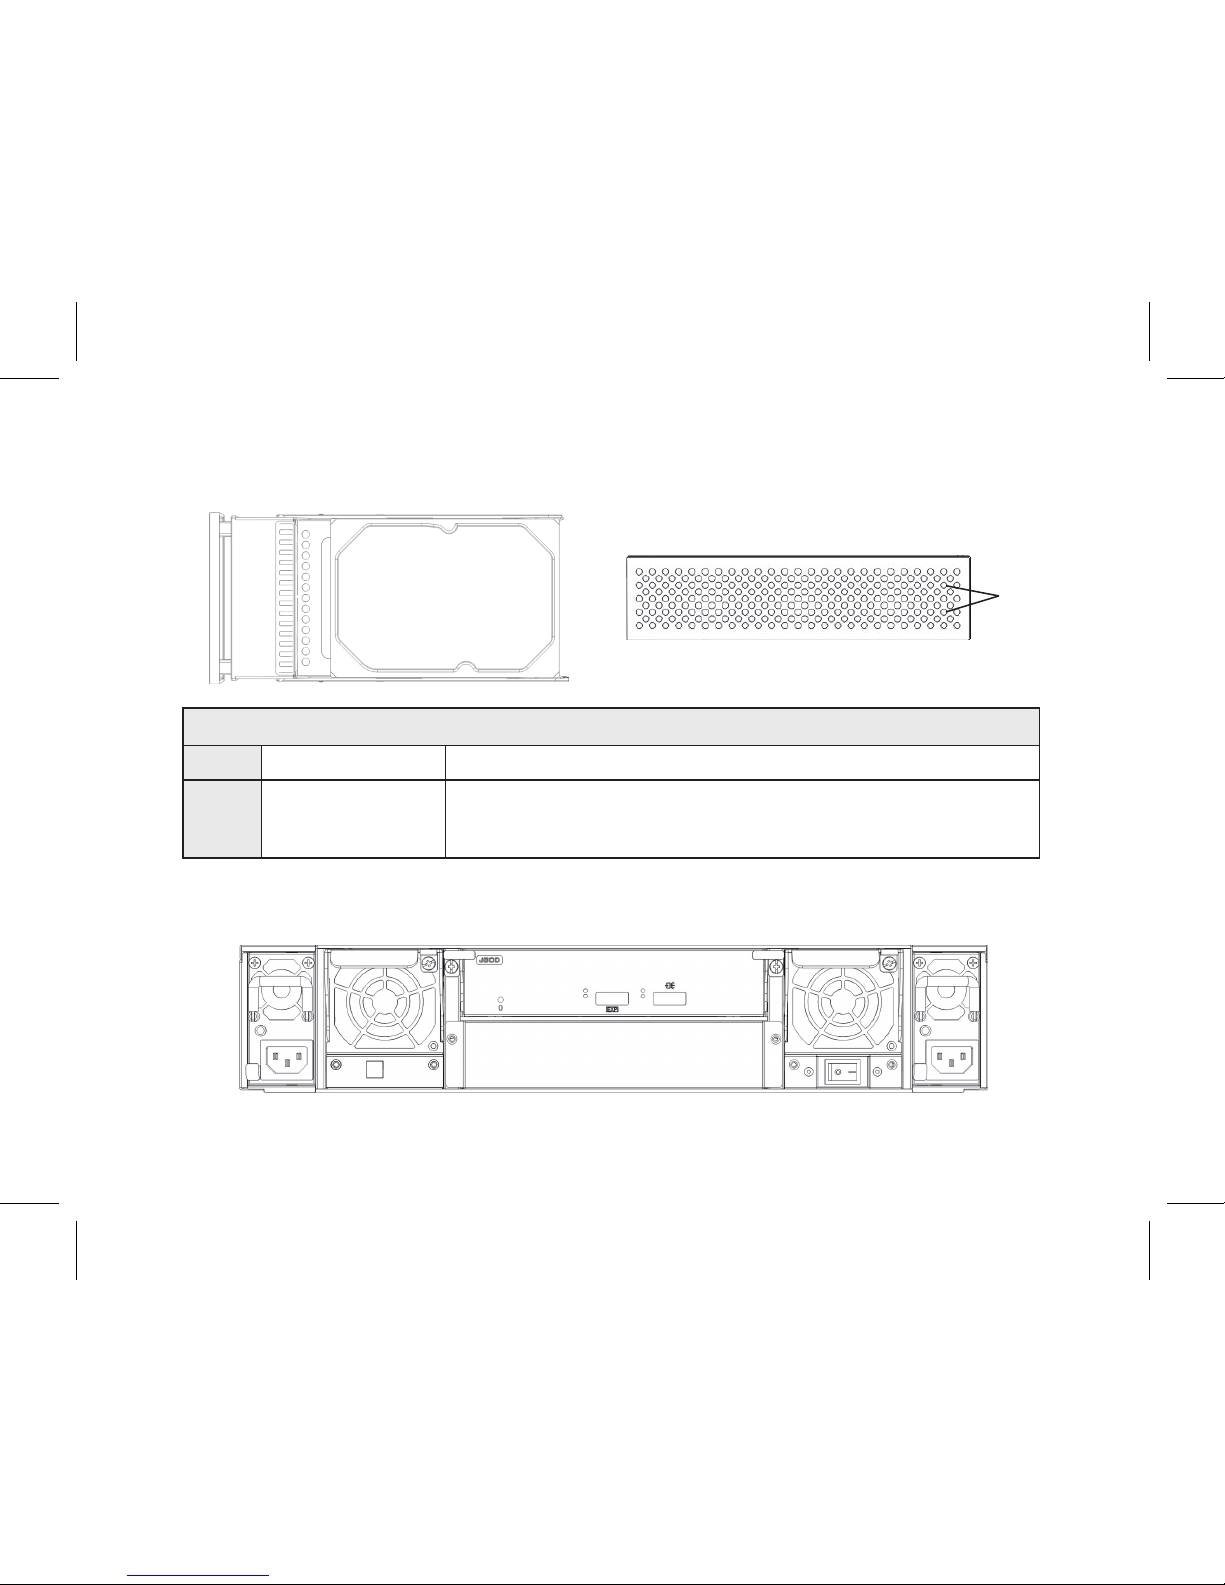
■ Module design for chassis components.
■ Module design for disk channels to support up to 12 SAS/SATA channels
■ Built-in status LED interface for local operation monitoring.
■ Supports hot swappable cooling fan modules
■ Supports hot swappable redundant 400W power supply
P1
Throughout this guide, the A12S2-SJ JBOD is installed and configured for a DAS (Direct-Attached Storage)
environment. However, the A12S2-SJ JBOD can also be easily configured to work in a SAN (Storage Area
Network) environment with other Accusys equipment, such as the SW04/08 SAN switch. In addition, Up to three
(3) A12S2-SJ JBOD storage expansion units can be connected to the A12S2-PS RAID storage system to achieve
maximum storage capacity.

ExaSAN A12S2-SJ JBOD
Quick Start Guide Table of Contents
Quick Start Guide
Page#
Introduction...................................................................................................................................................1
Hardware Installation.......................................................................................................................................3
Step 1: Unpacking the JBOD System.................................................................................................4
Step 2: Making Connections.................................................................................................................9
Step 3: Powering on the System.......................................................................................................11
Software Installation and Configuration...............................................................................................13
Step 4: Host Configuration...................................................................................................................14
Step 5: Powering Off the System.......................................................................................................18
Technical Support............................................................................................................................................19
P2

Quick Start Guide
Hardware
Installation
1
P3

P4
Step1:
Unpacking the JBOD System
The following items come with the A12S2-SJ JBOD
storage expansion system package, if any item is
missing or damaged, please contact your supplier:
1. Hard disk tray: x 12 unit
2. Rail x 2 set
3. Quick Start Guide
4. External SAS cable (For SAS controllers only)
5. Screw pack x2
6. Power cable x 2
7. Rail extender x 2 set
8. JBOD system
Quick Start Guide
For installation of the A12S2-SJ JBOD storage expansion system, Follow the steps below for complete hardware
installation instructions to achieve the best results.
1
4
3
2
57
8
6

Checking the Equipment You’ll Need
Below is a complete list of all the equipment you’ll need to set up the ExaSAN A12S2-SJ JBOD system.
Your A12S2-SJ JBOD package consists of the standard components listed below. Verify that you have all of the
system components and accessories before beginning hardware installation.
Item Item Image Item Description
1 A12S2-SJ A12S2-SJ JBOD,
Hard Disk Tray.
2 SAS Cable External SAS cable
(For SAS controllers only)
3 Power Cord x 2 Power cord for
A12S2-SJ
Quick Start Guide P5

4Screw pack x 2 Used for attaching the
A12S2-SJ
5Rail x 2 set and rail
extenders x 2 set
Us e d f o r mou ntin g t h e
A12S2-SJ on a rack mount
Note: Package include Quick Start Guide(with User Manual)
Additional requirements for the A12S2-SJ JBOD and A12S2-PS RAID storage system:
1. Host server requirements:
■ Host server with PCIe 2.0 x4 or above (such as x8, x16 PCIe slot) and CD-ROM drive or network connection
for software and driver installation.
■ Windows: XP, 2003, Vista, 2008, and Windows 7
■ MAC: 10.5, 10.6, 10.7 or earlier
■ Linux: Kernel 2.4 or above, with the necessary tools installed, such as GCC and XWindow
2. Hard drives:
■ 12x 2.5" or 3.5” hard disk drives (HDD)
■ A12S2-PS RAID controller supports 6Gb SAS, SATA II drives
Quick Start Guide
P6
Caution:
Please place the HDD trays properly to avoid the energy hazard.

P7
Front Panel View
JBOD: Front panel detail and handle LED lights
NO. Item Description
A JBOD Disk trays 12 removable disk trays
B System Ready Blue: System ready
(Note: ashing indicates read/write accessing is in progress.)
C Fan Blue: Fan normal
Red: Fan faulty and beeper alert
D Temperature Blue: Temperature normal
Red: Temperature too high
E Voltage Blue: Voltage normal
Red: Voltage over or below specications
F Beeper Mute alarm beeper
Quick Start Guide
A
B
C
D
E
F

Disk Tray
Rear Panel View
JBOD: Front of tray with HDD
NO. Item Description
A Tray Status
Green: Normal HDD
Blue: Accessing HDD
Red: Faulty HDD
P8 Quick Start Guide
A

Step 2: Making Connections
The JBOD system has one controller with two x4 SAS ports that enables you to connect to a host computer,
a RAID system or expand the JBOD enclosure. To use a x4 SAS cable to connect the JBOD system to a host
computer or to a RAID system. Follow the procedures below:
Host Sever
HBA
Figure 1-2 A12S2-SJ JBOD connection with a host server (workstation computer) and the A12S2-PS RAID storage system.
Quick Start Guide P9

You can establish the connection of one or more A12S2-SJ JBOD units. Up to three A12S2-SJ JBOD expansion
storage expansion units can be linked to a A12S2-PS RAID. See below:
1. Connect the RAID system EXP port to the SAS port (see port with the SAS icon on the rear panel ) of the
JBOD1 using an SAS cable.
2. To connect to the next JBOD, connect the EXP port of JBOD1 to the SAS port (see port with the SAS icon on
the rear panel ) of the JBOD2 using an SAS cable.
3. Follow the same procedures to connect an additional JBOD3, also using the SAS cable.
4. Set the chassis ID:
• A12S2-PS (RAID) = 0
• A12S2-SJ (JBOD1) = 1
• A12S2-SJ (JBOD2) = 2
• A12S2-SJ (JBOD3) = 3
chassis ID
Quick Start Guide
P10

Step 3: System Power-on
Connecting the Power
1. Insert the left power cable into the rear panel left AC power port.
2. Similarly, Insert the right power cable into the rear panel right AC
power port.
3. Plug both power cords into the power source (outlet).
4. Once all the components and cables have been connected, the
system can now be powered on using the Power On/Off Switch.
JBOD Operation
Follow the procedures below in the sequence shown.
Warning: Changing the sequence of the steps below may result in damage to this device.
1. Power on the JBOD.
2. Power on the RAID (controller).
3. Insert the HBA into the host (workstation) PCIe slot.
4. See Blue "System Ready" LED light on (See page7 for more details).
5. Power on the host.
6. Download and install HBA driver from the Accusys Web site.
7. Reboot host.
Caution:
Please power off the A12S2-SJ JBOD and unplug the power
cord before inserting or removing the power cord.
P11

Quick Start Guide
P12

Software Installation
and Conguration
2
Quick Start Guide P13

Quick Start Guide
P14
Step 4: Host Configuration
V i e w T h e A12S 2 - P S R A I D R A I D G u a r d X
GUI(Graphic User Inter face) to confirm the
A12S2-SJ JBOD conguration, see below:
1. Select a “RAID.”
2. Select a “RAID level description.”
3. Click “JBOD 2.”
4. Click “Unselect all spare drives.”
5. Click “Create Array.”
Note:
This will show either JBOD1, JBOD2, or
JBOD3. (See step 2)
Suggested or
you may choose.

Quick Start Guide P15
6. See information appear.
7. See volume (Example: 1.4 TB ACCUSYS A12S2-SJ…)
8. Click “Disk Utility.”
9. Select “Go” from the top tool bar (MAC).
10. Select “Utility.”
11. Select “Disk Utility.”

Quick Start Guide
P16
12. Click “Continue.”

13. Click “Restart” to reboot.
14. Click Apple icon in tool bar (MAC).
15. Select “About this MAC.”
16. Select “More info” from the MacOSX window.
17. Select “Extension.”
18. See information (For example: ACS6xxxx).
Note: This information must appear. If it does
not appear, check connections, reinstall the
driver, or contact service for assistance.

Quick Start Guide
P18
Step 5: Powering Off the System
Follow the procedures below to power off the system:
1. Stop all applications running in the host server.
2. Turn off the host server.
3. Close any GUI applications.
4. Power off the RAID system using the power switch.
5. Power off the JBOD system using the power switch.
Caution:
Disconnect all AC power cords from the MAINS to completely power
off the devices.
Table of contents
Other Accusys Network Storage Server manuals
Popular Network Storage Server manuals by other brands

Overland Storage
Overland Storage SnapServer XSR 120 quick start guide

Compaq
Compaq StorageWorks TM RAID Array 3000 Pedestal Storage... user guide

Silicon Graphics
Silicon Graphics ISS3124-RP2 Setup guide

Dell
Dell PowerVault NX3200 Setting up

Western Digital
Western Digital Sentinel DX4000 Quick install guide

Sony
Sony BSV-M1 - StorStation NAS Server operating instructions