ACME VR302 User manual

1
Model: VR302

2

3

4
EN 4K Sports & action camera USER MANUAL
Technical specications
Video resolutions: 4K/30 FPS, 4K/25 FPS (EIS),
2.7K/60 FPS, 2.7K/30 FPS (EIS), 1080p/100 FPS,
1080p/60 FPS (EIS), 720p/200 FPS.
Photo resolution: 12 megapixels.
Image stabilization: electronic image
stabilization (only in specied video modes).
Lens angle of view: 170°.
Connections: Wi-Fi, micro-USB, micro-HDMI.
Expandable memory: micro-SD up to 64 GB.*
*Minimum speed class: 10. The UHS 3 (U3) speed
class is required for resolutions above 1080p and
high frame rate modes.
Waterproof case: up to 30 m.
Remote control: 2.4 GHZ, splash-proof, up to 8
m distance.
Battery: user replaceable, Li-on.
Battery life: up to 80 minutes of video recording
(depends on video resolution).
Device requirements for the Ez iCam
application: Android 5.0 or later / iOS 10 or later.
Camera weight: 77 g (including the battery).
THE BASICS
Status lights
Battery door
Micro-SD slot
Shutter/select button
Speaker
Power/mode button
Micro-HDMI (cable
not included)
Microphone
Micro-USB port
Wi-Fi button
Touch display

5
INCLUDED ACCESSORIES
Waterproof housing Mount 1 Mount 2 Mount 3 Mount 4 Mount 5
Frame Handle bar/ pole mount Helmet mounts Tripod Battery Micro-USB cable
Bandage Tethers Remote control*
*Remote control comes with the user replaceable CR2032 type battery
preinstalled. Remove the protective lm from the remote control before
using it for the rst time.

6
BATTERY CHARGING
• Charge the battery by connecting the camera to
the USB charging adapter or another powered
USB port (power bank, computer, etc.) using the
included or another good quality micro-USB cable.
• During charging the status light on the camera
will be RED. The status light will turn o when the
battery is fully charged.
• Chargingtakesupto2hours.
• You can record videos and take photos while
charging the battery.
Camera usage in cold conditions
Cold temperature can decrease the battery life. For
better using experience in cold conditions, keep the
camera in a warm place prior to use. If the camera is
turned o and kept in cold temperature for too long,
battery voltage and charge state may decrease to a
critical level and the camera may not turn on –please
recharge the battery.
Waterproof camera housing
• The waterproof housing helps to protect
the camera from water, dirt, sand and other
environmental hazards.
• Rubber seals in the camera housing protect your
camera in wet or underwater conditions. Keep the
housing’s rubber seal clean. A small particle of dirt
or foreign material can cause a leak and damage
your camera.
• After use in salty water, rinse the outside of the
waterproof housing with non-salty water and dry it.
• Warrantydoesnotcoverwaterdamageresultedfrom
user’s errors.
• Touchscreencontrolswillnotworkwhenthecamera
is placed into the waterproof housing. Please use
physical buttons.
• Usingthecamerainthewaterproofhousingwillcause
lower audio recording quality.
STATUS LIGHTS
A B
Red status light A
It shows battery charging
status: During charging, it
glows RED, when the battery
is full, the LED light will be OFF.
Blue status light B
In a video mode: When a
video is being recorded, it will
constantly blink.
In a photo mode: When you
press the shutter/select button
, the status light will blink
once after a photo is taken.
Powering ON/OFF
To power on: Press the power/mode button once.
To power o: press and hold the power/mode button for 3 seconds.
Inserting and removing the micro-SD card
The camera must be powered o before inserting or removing the card.
Please format the card in the settings menu when using it with the camera
for the rst time.
Slide the memory card with
your ngernail into the
card slot as shown in the
illustration.
When fully inserted, the card
clicks into the place.
Place your ngernail against
the edge of the memory card
and lightly press it further
into the camera.
The card springs out to be
removed.

7
0000 | 9999
12MP
00:00:00 | 01:20:20
720p 200
TOUCH DISPLAY
The integrated touch display lets you control your camera and its settings, play back videos and view photos.
Youcanalsouseitasaviewndersoyoucanseewhatyourcameraseesforshot-framing.
Turning the touch display on/o
The touch display automatically turns on/o when you power the camera on/o.
Touch display gestures
Use these gestures to navigate the touch display.When swiping, swipe from the edge of the screen.
Tap:
Select an item and
turn a setting on/o.
Swipe right:
Switch between video
and photo modes
when used from
the main screen.
Swipe left:
Access the other modes
window when used
from the main screen.
Swipe up:
Access advanced
settings when used
from the screens of the
following modes: video,
burst, time lapse video,
time lapse photo.
Camera display overview
Camera mode icon
Duration of the current video le
Number of photos saved into the micro-SD card
Maximum video
duration of the
video that can be
recorded into the
micro-SD card
Battery status icon
Photo brightness
slider: slide it
with your nger
to adjust
Video resolution
and frames
per second
Maximum number
of photos that can
be captured into
the micro-SD card
Photo resolution

8
Camera modes overview
Turn the camera on and repeatedly press the power/mode button or swipe the display to the right to cycle through camera modes.
The following modes can be accessed from the main screen:
00:00:00 | 01:20:20
720p 200
Video
Video mode
Record a video.
0000 | 9999
12MP
Photo
Photo mode
Capture a single photo.
The following modes can be accessed from the other modes screen:
Burst TL Video TL Photo
Video Photo Settings
Burst
Capture several photos in quick succession
by pressing the shutter/select button .
TL Video
Record a time lapse video.
TL Photo
Capture a series of photos at set time intervals.
Video playback
Playback recorded videos.
Photo playback
Playback recorded videos.
Settings
Adjust various settings of the camera.

9
VIDEO MODE
Be sure that the camera is in a video mode.
To start recording:
Press the shutter/select button . The camera will
emit a single beep sound and will start recording. The
blue status light will be blinking during the recording.
To stop recording:
Press the shutter/select button . The camera will
emit a single beep sound and will stop recording.
PHOTO MODE
Be sure that the camera is in a photo mode.
To take a photo:
Press the shutter/select button . The camera will
emit a camera shutter sound.
BURST MODE
To capture a series of photos, verify that the camera is
in a burst mode. In the burst mode your camera takes 3
photos in 1 second, 7 photos in 2 seconds, 15 photos in
4 seconds and 24 photos in 8 seconds.
To take a burst series:
Press the shutter/select button . The camera will
emit a camera shutter sound.
TL (TIME LAPSE) VIDEO
Be sure that the camera is in aTL video mode. In this mode your
camera captures a series of photos following second intervals:
0.5, 1, 2, 3, 4, 5, 10, 15, 20, 30, and 60. Captured photos will be
automatically combined into a single time lapse video le.
To record a TL video:
Press the shutter/select button . The camera will emit a
single beep sound and will start recording.
To stop recording:
Press the shutter/select button . The camera will emit a
single beep sound and will stop recording.
TL (TIME LAPSE) PHOTO
Be sure that the camera is in a TL photo mode.
In this mode your camera captures a series of photos following
second intervals: 3, 5, 10, 30, and 60.
Captured photos can be combined into a video le later by
using a computer and various video editing software.
To capture a TL photo series:
Press the shutter/select button . The camera will initiate a
countdown timer and emit a camera shutter sound each time
after a photo is taken.
Make sure that“TL Photo”is turned on in the advanced settings
menu of this mode, otherwise only a single photo will be
captured after a set time interval.
VIDEO/PHOTO PLAYBACK
1. Access the other modes window by pressing the power/mode button
.
2. Select video or photo mode playback by tapping the required
icon.
3. Press the shutter/select button or on-screen icons / II to play/pause
the video.
4. Swipe left or right to see other videos or photos.
5. Press the Wi-Fi button or on-screen icon to exit the playback
mode.
i
Time lapse photography is a technique of lming very slow actions
by taking a series of single pictures over a period of time and then
putting them together to show the action happening very quickly.
SETTINGS MENU
Enter the settings menu, use swipe up/down actions to scroll through
various menu items and tap the name of the required settings item.
The following menu items are available in the settings menu:
Video resolution – change the resolution of video capturing.
Photo resolution – shows default photo resolution. It can be adjusted on
some camera models.
Video interval – change the duration of video les for storage into the
micro-SD card: 1 or 5 minutes.*
*Multiple les are written to your memory card so that small segments of
video content can be overwritten during loop recording. When viewing this
content on a computer, you will see separate les for each time segment.

10
Looping video – when the micro-SD card memory is full, the
oldest video les will be overwritten with newer video les.
Time stamp – turn o or enable a time stamp on recorded
videos.
Exposure – adjust image quality (darkness and lightness) when
shooting in environments with contrasting lighting conditions.
Burst mode – select a desired number of photos for shooting
in a burst mode.
TL photo interval – select a time interval for photo capturing
in the TL photo mode.
TL photo – disable or enable continuous photo shooting in the
TL photo mode.
TL video resolution – select video resolution for capturing in
the TL video mode.
TL video interval – select a time interval for photo capturing in
the TL video mode.
Power frequency – select the correct electrical frequency
to avoid a video ickering eect in situations when ambient
lightning comes from light bulbs. In Europe this option should
be set to 50 Hz. In the auto mode the correct frequency will be
set automatically.
Language – select a camera system language from the
preinstalled languages list.
Remote control – disable or enable the camera control with the
dedicated remote control.
Date and time – set date and time. If the battery is empty or
removed from the camera, time settings will be reset.
Sound indicator – disable or enable the following camera
operating sounds and adjust volume: shutter sound, start-up
sound and system beeps.
Screen saver – the camera turns o the display after a set period
of time to save energy.
Power saver – the camera shuts down when not used for the
set period of time.
Format – micro-SD cards can be formatted for correct
functioning with the camera. Remember that recordings, photos
and other data stored in the micro-SD card will be erased.
Reset – reset all the settings of the camera to their default state.
Version – shows the camera model and rmware version.
ADVANCED SETTINGS MENU
Video, burst, time lapse video, time lapse photo modes have
their dedicated quick access settings menus.
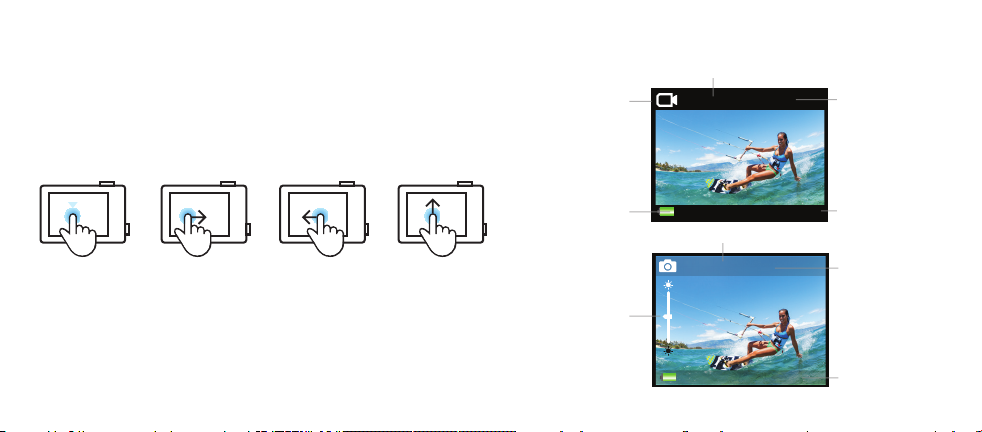
When you are in one of these modes, use the swipe up gesture
to quickly access the advanced settings menu and adjust
required options.
i
Electronic image stabilization (EIS) uses electronic
processing to control image stability. If the device sensors
detect a camera shake, EIS responds by slightly moving
the image to reduce visible image jittering.
VIDEO AND PHOTO RESOLUTIONS
Photos are captured in the 12 Mpix resolution.
Electronic image stabilization (EIS) is supported only in specied
video modes.
Supported video resolutions, frame rate (FPS) and image
stabilization:
4K/30: 3840 x 2160, 30 FPS +EIS
2.7K/60: 2560 x 1440, 60 FPS
2.7K/30: 2560 x 1440, 60 FPS +EIS
1080p/100: 1920 x 1080, 100 FPS
1080p/60: 1920 x 1080, 60 FPS
720p/200: 1280 x 720, 200 FPS
Requirements for micro-SD cards
This action camera is compatible with micro-SD, micro-SDHC
andmicro-SDXCmemorycardswithacapacityupto64GB.You
must use a micro-SD card with at least 8 GB capacity and the
minimum speed rating of Class 10 or UHS-I. 4K/4K and 100/240
FPS (frames per second) video recording modes require micro-
SD cards with the UHS-3 rating.

11
Video recordings storage capacity and duration in minutes
Resolution and frame rate
Micro-SD
card capacity 4K/30 2.7K/60 2.7K/30
(EIS) 1080p/100 1080p/60
(EIS) 720p/200
FPS 720p/200
FPS
32 GB 120 105 160 105 150 120 120
64 GB 240 210 320 210 300 240 240
Acme camera battery-life
This table indicates the approximate continuous recording time in various modes.
Actual performance depends on settings, environmental conditions and other factors. The maximum battery
capacity will normally decrease with time and usage.
Camera mode Time Camera mode Time Camera mode Time
1080p/60 FPS (EIS) 80 min 2.7K/60 FPS 70 min Time lapse video 70 min
4K/30 FPS 70 min 720p/ 200 FPS 70 min
Transferring les to a computer
• Connectthecameratoyourcomputerusingthemicro-USBdatacable.Yourcomputerwillshowthecameraasa
portable storage device. No installation of additional drivers is required.
• Youcanalsotransferlesusingacardreader(internalorexternal)withamicro-SDcardslot.
Remove the micro-SD card from the camera and insert it into the card reader.
• Nowyoucantransferlestoyourcomputerordeleteselectedlesonyourcard.
Playing back videos and photos on yourTV
Video Photo Preview
1. Connect the camera to a TV with a micro-HDMI cable (not included).
2. Select the correct HDMI input on your TV.
3. Power on the camera.
4. Press the power/mode or the Wi-Fi button to navigate the camera menu
and then press the shutter/select button to select one of the following
modes: VIDEO, PHOTO, PREVIEW.
VIDEO MODE:
Press the shutter/select button to play/pause the video les.
Press the power/mode button to change the video le.
Press the Wi-Fi button to exit the video mode.
PHOTO MODE:
Press the power/mode button to change the photos.
Press the Wi-Fi button to exit the photo mode.
PREVIEW MODE:
In this mode a TV screen will show a live video view from the camera lens.
Press the Wi-Fi button to exit the preview mode.
When the HDMI cable is plugged in, the camera screen will be turned
o.

12
CAMERA APPLICATION AND WI-FI CONNECTION
The Ez iCam app allows your smartphone or tablet connect to your action camera via Wi-Fi
connection.Youwillbeabletowatchtheliveviewfromthecameraonthesmartdevicedisplay,
remotely take pictures, record videos and download les.
QR code for quick application download (Android and iOS):
1. Download and install the Ez iCam application to your iOS or Android device from dedicated
application stores. (Accept all security requests of the application.)
2. Make sure the camera is turned on and then press the Wi-Fi button to enter the pairing
mode.
3. Open the Ez iCam application and tap“Connect device Wi-Fi”.
4. In the devices list iCam_VR302-*****(series of numbers) will be shown. Tap this device. (If the
device is not listed, tap the refresh icon .)
5. After successful connection you will be able to use the application and all its features.
6. Press the Wi-Fi button to turn o the Wi-Fi connection of the camera.
The application’s features, functionality and appearance may be changed after
installing updates. Proper functioning of the application and Wi-Fi connection also
depends on the hardware and rmware of the smartphone or tablet.
Safety information
• Conditions with low or high temperatures may irreversibly shorten the battery life or the
camera may stop working properly.
• Donotexposethecameratodirectsunlightorhightemperaturesforanextendedperiodof
time.
• Donotusethecameraandthebatteryiftheyarewet.
• Donotdrythecameraorthebatterywithexternalheatsources(hairdryer,microwaveoven,
etc.).
• Donotstorethebatteryinoneplacewithametalobject.Shortcircuitedbatteryterminalsmay
cause re.
• Donotdrop,disassemble,deformorcauseanyotherphysicaldamagetothebattery–itcan
cause re or an explosion.
• Donotusethecameraorthebatteryiftheywerephysicallydamagedorharmedbywater.

13
TROUBLESHOOTING
Problem description Possible causes and solutions
The camera does not turn on. • Makesurethebatteryischarged.
• Makesurethecamerawasnotkeptincoldconditionsfortoolong–rechargethebattery.
The camera gets stuck during operation and controls are
unresponsive. • The micro-SD card is defective or too slow for proper operation. Please use another card that meets required
specications for video recording.
• Thecameramaybeoverheated–letitcooldownandtrytouseitagain.
• Pressandholdthepresspower/modebutton until the camera turns o or open the battery compartment cover
and remove the battery.
The battery cannot be recharged. • TryanotherUSBchargerorcable.
• Trytouseanothercompatiblebattery.
The camera is not working via Wi-Fi connection. • Makesurethatallsecurityrequestsoftheapplicationwereacceptedduringtheinstallationandtherstlaunch.
• Checkforthelatestupdatesoftheapplication.
• MakesuretheWi-Ficonnectionofthesmartphoneorthetabletisworkingproperly.
Waste Electrical and Electronic Equipment (WEEE) Symbol
The use of the WEEE symbol indicates that this product may not be treated as household waste. By ensuring this product is disposed of correctly, you will help protect the environment. For
more detailed information about the recycling of this product, please contact your local authority, your household waste disposal service provider or the shop where you purchased the
product.

14
LT 4K Veiksmo kamera NAUDOTOJO VADOVAS
Techninės specikacijos:
Filmavimo raiška: 4K/30 FPS, 4K/25 FPS (EIS),
2.7K/60 FPS, 2.7K/30 FPS (EIS), 1080p/100 FPS,
1080p/60 FPS (EIS), 720p/200 FPS.
Nuotraukų raiška: 12 megapikselių.
Vaizdo stabilizacija: elektroninė vaizdo
stabilizacija (tik nurodytuose vaizdo režimuose).
Objektyvo matymo kampas: 170°.
Jungtys: „Wi-Fi“, „micro-USB“,„micro-HDMI“.
Išplėstinė atmintis: „micro-SD“ kortelė iki 64
GB.*
*Minimali greičio klasė: 10. 1080p viršijančiai
raiškai ir aukšto kadravimo dažnio režimams
reikalinga UHS 3 (U3) greičio klasė.
Vandeniui atsparus dėklas: iki 30 m.
Nuotolinio valdymo pultas: 2,4 GHZ, apsauga
nuo purslų, atstumas – iki 8 m.
Baterija: keičiama, ličio jonų.
Baterijos veikimo laikas: iki 80 minučių
lmavimo (priklausomai nuo lmavimo raiškos).
Įrenginio reikalavimai„Ez iCam“ programėlei:
operacinė sistema „Android 5.0“ arba naujesnė /
„iOS 10“ arba naujesnė.
Įrenginio svoris: 77 g (įskaitant bateriją).
PAGRINDAI
Būsenos
indikatoriai
Baterijos
dangtelis
„Micro-SD“ lizdas
Užrakto / parinkties
mygtukas
Garsiakalbis
Įjungimo / režimo
mygtukas
„Micro-HDMI“ (laidas
nepridedamas)
Mikrofonas
„Micro-USB“
„Wi-Fi“ mygtukas
Jutiklinis ekranas

15
KOMPLEKTACIJA
Vandeniui atsparus dėklas 1 stovas 2 stovas 3 stovas 4 stovas 5 stovas
Rėmelis Valdymo rankenos / tvirtinimo
ant lazdelės elementas
Tvirtinimo ant šalmo
elementai
Trikojis Baterija „Micro-USB“ laidas
Tvirtinimo juosta Diržai Nuotolinio valdymo pultas *Nuotolinio valdymo pulte įdėta keičiama CR2032 tipo baterija. Pirmą kartą
naudodami nuotolinio valdymo pultą, nuimkite apsauginę plėvelę.

16
BATERIJOS ĮKROVIMAS
• Baterija įkraunama pridedamu ar kitu geros
kokybės „micro-USB“ laidu prijungus kamerą prie
USB įkrovimo adapterio ar kito maitinamojo USB
prievado (išorinės baterijos, kompiuterio ir pan.).
• Įkraunantantkamerosesantisbūsenosindikatorius
šviečia RAUDONA spalva. Kai baterija visiškai
įkrauta, būsenos indikatorius užgęsta.
• Įkrovimasužtrunkaiki2valandų.
• Įkrovimometugalitefotografuotiirlmuoti.
Kameros naudojimas šaltyje
Dėl žemos temperatūros gali sutrumpėti baterijos
veikimo laikas. Siekdami geresnių kameros
naudojimo šaltyje rezultatų, prieš naudojimą kamerą
laikykite šiltai. Jei kamera išjungta ir per ilgai laikoma
šaltyje, baterijos įtampa ir įkrovimo lygis gali sumažėti
tiek, kad nebepavyks įrenginio įjungti. Tokiu atveju
prašome įkrauti bateriją.
Vandeniui atsparus kameros dėklas
• Vandeniui atsparus dėklas padeda apsaugoti
kamerą nuo vandens, purvo, smėlio ir kitų
pavojingų aplinkos veiksnių.
• Dėkle esantys guminiai tarpikliai saugo kamerą
drėgnomis sąlygomis ar po vandeniu. Pasirūpinkite,
kad dėklo guminiai tarpikliai būtų švarūs. Net ir dėl
mažiausios purvo dalelytės ar svetimkūnio gali
pratekėti vanduo ir taip pažeisti jūsų kamerą.
• Ponaudojimosūriamevandenyjenuskalaukitevandeniui
atsparaus dėklo išorę nesūriu vandeniu ir dėklą
nusausinkite.
• Garantija netaikoma vandens padarytai žalai, atsiradusiai
dėl naudotojo klaidų.
• Įdėjuskamerą įvandeniuiatsparųdėkląjutiklinioekrano
valdikliai neveiks. Prašome Naudokitės įprastais mygtukais.
• Naudojantkamerąvandeniuiatspariamedėklesuprastėja
garso įrašymo kokybė.
BŪSENOS INDIKATORIAI
A B
Raudonos spalvos būsenos
indikatorius A
Jis rodo baterijos įkrovimo
būseną: įkraunant indikatorius
šviečia RAUDONAI, o bateriją visiškai
įkrovus LED lemputė UŽGĘSTA.
Mėlynos spalvos būsenos
indikatorius B
Vaizdo įrašymo režimu: įrašant
vaizdą indikatorius nuolat mirksi.
Fotografavimo režimu: nuspaudus
užrakto / parinkties mygtuką ir
nufotografavus būsenos indikatorius
vieną kartą sumirksi.
ĮJUNGIMAS / IŠJUNGIMAS
Norėdami įjungti: vieną kartą spustelėkite įjungimo / režimo mygtuką .
Norėdami išjungti: nuspauskite ir 3 sekundes palaikykite įjungimo / režimo
mygtuką .
„Micro-SD“ kortelės įdėjimas ir išėmimas
Prieš įdedant ar išimant kortelę kamera turi būti išjungta. Jei kortelę
kameroje naudojate pirmą kartą, nustatymų meniu atlikite jos
formatavimą.
Nagu įstumkite kortelę
į atminties kortelės
skyrelį, kaip pavaizduota
iliustracijoje.
Tinkamai įstatyta kortelė
užsiksuoja vietoje.
Uždėkite nagą ant kortelės
briaunos ir švelniai
stumtelėkite ją giliau į
kameros vidų.
Kortelė iššoks ir galėsite ją
išimti.

17
0000 | 9999
12MP
00:00:00 | 01:20:20
720p 200
JUTIKLINIS EKRANAS
Integruotas jutiklinis ekranas leidžia valdyti kamerą ir jos nustatymus, peržiūrėti vaizdo įrašus bei
nuotraukas. Ekraną galima naudoti ir kaip vaizdo ieškiklį, t. y. matyti per jį tai, ką mato fotografavimui ar
lmavimui paruošta kamera.
Jutiklinio ekrano įjungimas / išjungimas
Įjungus / išjungus kamerą, jutiklinis ekranas įsijungia / išsijungia automatiškai.
Jutiklinio ekrano naudojimo judesiai
Jutikliniame ekrane naudokite tam tikrus judesius. Kai braukiate per ekraną, braukite nuo ekrano krašto.
Lietimas:
Pasirinkite elementą
ir įjunkite / išjunkite
nustatymą.
Braukimas dešinėn:
Keiskite vaizdo įrašymo
ir fotografavimo režimus
pagrindiniame ekrane.
Braukimas kairėn:
Atidarykite kitų
režimų langus
pagrindiniame ekrane.
Braukimas į viršų:
Atidarykite išplėstinius
nustatymus, kai naudojate
šiuos režimus: vaizdo
įrašymo, nepertraukiamo
fotografavimo, lmavimo
laiko intervalais (time-
lapse) ir fotografavimo
laiko intervalais.
Kameros ekrano apžvalga
Kameros režimo
piktograma
Šiuo metu lmuojamo įrašo trukmė
Nuotraukų, išsaugotų„micro-SD“ kortelėje, skaičius
Maksimali vaizdo
įrašo trukmė,
kurią galima
įrašyti į esamą
„micro-SD“ kortelę
Baterijos būklės
piktograma
Nuotraukų
ryškumo valdiklis
– reguliuokite
stumdami pirštu
Vaizdo įrašo
raiška ir kadrų per
sekundę skaičius
Maksimalus
nuotraukų, kurias
galima išsaugoti
esamoje„micro-SD“
kortelėje, skaičius
Nuotraukų raiška

18
Kameros režimų apžvalga
Įjunkite kamerą ir keletą kartų paspauskite įjungimo / režimo mygtuką arba perbraukite dešinėn per ekraną, kad pereitumėte per kameros režimus.
Šiuos režimus galima pasiekti iš pagrindinio ekrano:
00:00:00 | 01:20:20
720p 200
Video
Vaizdo įrašymas
0000 | 9999
12MP
Photo
Fotografavimas (pavienių kadrų).
Šiuos režimus galima pasiekti iš kitų režimų ekranų:
Burst TL Video TL Photo
Video Photo Settings
Burst
Keleto kadrų nepertraukiamas fotografavimas,
nuspaudus užrakto / parinkties mygtuką
TL Video
Filmavimas laiko intervalais.
TL Photo
Kadrų serijos fotografavimas,
nustatytais laiko intervalais.
Video playback
Išsaugotų vaizdo įrašų peržiūra.
Photo playback
Išsaugotų nuotraukų peržiūra.
Settings
Įvairių kameros nustatymų reguliavimas.

19
VAIZDO ĮRAŠYMO REŽIMAS
Įsitikinkite, kad kamera nustatyta vaizdo įrašymo režimu.
Norėdami pradėti lmuoti:
paspauskite užrakto / parinkties mygtuką . Kamera vieną
kartą pyptelės ir pradės lmuoti. Įrašant vaizdą mirksi mėlynos
spalvos būsenos indikatorius.
Norėdami baigti lmuoti:
paspauskite užrakto / parinkties mygtuką . Kamera vieną
kartą pyptelės ir nustos lmuoti.
FOTOGRAFAVIMO REŽIMAS
Įsitikinkite, kad kamera nustatyta fotografavimo režimu.
Norėdami fotografuoti:
paspauskite užrakto / parinkties mygtuką . Pasigirs užrakto
pasislinkimo garsas.
NEPERTRAUKIAMO FOTOGRAFAVIMO
REŽIMAS
Norėdami nepertraukiamai fotografuoti keletą kadrų, įsitikinkite,
kad kamera nustatyta nepertraukiamo fotografavimo režimu.
Naudojant nepertraukiamo fotografavimo režimą kamera
fotografuoja 3 kadrus per 1 sekundę, 7 kadrus per 2 sekundes, 15
kadrų per 4 sekundes ir 24Kadrus per 8 sekundes.
Norėdami nepertraukiamai fotografuoti:
paspauskite užrakto / parinkties mygtuką . Pasigirs užrakto
pasislinkimo garsas.
VAIZDO ĮRAŠYMAS LAIKO INTERVALŲ (TL)
REŽIMU
Įsitikinkite, kad kamera nustatyta vaizdo įrašymo TL režimu. Šiuo
režimu kamera nufotografuoja seriją kadrų 0,5, 1, 2, 3, 4, 5, 10, 15,
20, 30 ir 60 sekundžių intervalais. Užksuoti kadrai automatiškai
sujungiami į vieną vaizdo įrašą su laiko intervalais.
Norėdami įrašyti vaizdą su laiko intervalais:
paspauskite užrakto / parinkties mygtuką . Kamera pyptelės
ir pradės lmuoti.
Norėdami baigti lmuoti:
paspauskite užrakto / parinkties mygtuką . Kamera pyptelės
ir nustos lmuoti.
FOTOGRAFAVIMAS LAIKO INTERVALŲ (TL)
REŽIMU
Įsitikinkite, kad kamera nustatyta fotografavimo TL režimu.
Šiuo režimu kamera nufotografuoja seriją kadrų 3, 5, 10, 30 ir 60
sekundžių intervalais.
Nuotraukos vėliau kompiuteriu ar kuria nors vaizdo įrašų
tvarkymo programa gali būti sujungtos į vieną vaizdo įrašą.
Norėdami fotografuotiTL režimu:
paspauskite užrakto / parinkties mygtuką . Kameroje
įsijungs atvirkštinio skaičiavimo laikmatis ir kaskart, kai bus
fotografuojama, pasigirs užrakto pasislinkimo garsas.
Įsitikinkite, kad šio režimo išplėstinių nustatymų meniu įjungta
parinktis „TL Photo“, nes kitu atveju, praėjus nustatytam laiko
intervalui, bus nufotografuotas pavienis kadras.
VAIZDO ĮRAŠŲ / NUOTRAUKŲ PERŽIŪRA
1. Spustelėję įjungimo / režimo mygtuką , atidarykite į kitų
režimų langą.
2. Palietę reikiamą piktogramą, pasirinkite vaizdo įrašų ar
nuotraukų peržiūros režimą.
3. Spustelėkite užrakto / parinkties mygtuką arba ant
ekrano esančias piktogramas / II , kad paleistumėte /
sustabdytumėte vaizdo įrašą.
4. Perbraukite ekraną į dešinę arba į kairę, kad surastumėte kitus
vaizdo įrašus ar nuotraukas.
5. Norėdami išeiti iš peržiūros režimo, spustelėkite „Wi-
Fi“ mygtuką arba ekrano piktogramą arba ekrano
piktogramą .
i
Fotografavimas laiko intervalais – tai labai lėtų veiksmų
ksavimo technika, kuomet per tam tikrą laiko tarpą
nufotografuojama serija pavienių kadrų ir jie sujungiami į
vieną seką, atvaizduojančią pagreitintą veiksmą.

20
NUSTATYMŲ MENIU
Atidarykite nustatymų meniu, braukite per ekraną į viršų ar
žemyn ir taip peržiūrėkite įvairius meniu elementus; palieskite
reikiamo nustatymo pavadinimą.
Nustatymų meniu rasite šiuos meniu elementus:
„Video resolution”(Vaizdo įrašų raiška) – keiskite vaizdo įrašų
raiškos nustatymus.
„Photo resolution”(Nuotraukų raiška) – nurodyta numatytoji
nuotraukų raiška. Kai kurių modelių kamerose ją galima keisti.
„Video interval” (Vaizdo įrašų intervalas) – keiskite vaizdo
failų trukmę saugojimui„micro-SD“ kortelėje: 1 ar 5 minutės.*
*Į jūsų atminties kortelę įrašoma daug failų, kad ant nedidelių
vaizdo įrašų segmentų būtų galima įrašyti pakartotinai (loop
recording). Žiūrėdami vaizdo įrašus kompiuteriu, matysite
atskirus failus kiekvienam laiko segmentui.
„Looping video” (Įrašymas ant viršaus) – užsipildžius „micro-
SD“ kortelės atminčiai, ant seniausių vaizdo įrašų bus įrašyti
nauji.
„Time stamp”(Laiko žyma) – išjunkite arba įjunkite laiko žymą,
rodomą vaizdo įrašuose.
„Exposure” (Išlaikymas) – fotografuodami kontrastingo
apšvietimo sąlygomis, reguliuokite nuotraukų kokybę (tamsumą
ir šviesumą).
„Burst mode” (Nepertraukiamo fotografavimo režimas)
– pasirinkite pageidaujamą nepertraukiamai fotografuojamų
kadrų skaičių.
„TL photo interval” (Fotografavimo laiko intervalais
intervalas) – pasirinkite laiko intervalą, fotografavimo laiko
intervalais režimu.
„TL photo”(Fotografavimas laiko intervalais) – išjunkite arba
įjunkite nepertraukiamą fotografavimą laiko intervalų režimu.
„TL video resolution” (Filmavimo vaizdo intervalais raiška)
– pasirinkite vaizdo įrašymo raišką lmavimui vaizdo intervalų
režimu.
„TL video interval” (Filmavimo vaizdo intervalais intervalas)
– pasirinkite laiko intervalą kadrų ksavimui, lmuojant laiko
intervalų režimu.
„Power frequency” (Maitinimo tinklo dažnis) – siekdami
išvengti vaizdo mirgėjimo tais atvejais, kai artimiausias šviesos
šaltinis yra elektros lemputės, pasirinkite tinkamą elektros dažnį.
Europoje šis dažnis turėtų būti nustatytas ties 50 Hz verte.
Automatinio lmavimo režimu reikiamas dažnis bus nustatytas
automatiškai.
„Language” (Kalba) – iš įdiegto kalbų sąrašo pasirinkite
kameros sistemos valdymo kalbą.
„Remote control” (Nuotolinis valdymas) – išjunkite arba
įjunkite kameros valdymą tam skirtu nuotolinio valdymo
pulteliu.
„Date and time” (Data ir laikas) – nustatykite datą ir laiką.
Išsikrovus baterijai ar ją išėmus, datą ir laiką teks nustatyti iš
naujo.
„Sound indicator”(Garso indikatorius) – išjunkite arba įjunkite
šiuos kameros veikimo garsus ir reguliuokite jų garsumą: užrakto
pasislinkimo garsas, įjungimo garsas, sistemos pyptelėjimai.
„Screen saver” (Ekrano užsklanda) – siekiant taupyti energiją
nustatytą laiko tarpą nenaudojamos kameros ekranas išsijungia.
„Power saver” (Energijos taupymas) – kamera išsijungia, jei
nėra naudojama nustatytą laiko tarpą.
„Format” (Formatavimas) – „micro-SD“ kortelės gali būti
formatuojamos, kad sėkmingai veiktų pasirinktoje kameroje.
Nepamirškite, kad formatuojant kortelėje laikomos nuotraukos,
įrašai ir kiti duomenys bus pašalinti.
„Reset” (Pakartotinis nustatymas) – pakeičia visus kameros
nustatymus į gamyklinius.
„Version” (Versija) – rodo kameros modelį ir programinės
įrangos versiją.
IŠPLĖSTINIAI NUSTATYMAI
Vaizdo įrašymo, nepertraukiamo fotografavimo, lmavimo laiko
intervalais ir fotografavimo laiko intervalais režimam galima
naudoti jiems skitus greitosios prieigos nustatymų meniu.
Jei esate įsijungę kurį nors iš šių meniu, perbraukite ekraną
į viršų, kad įeitumėte tiesiai į išplėstinių nustatymų meniu ir
galėtumėte reguliuoti norimus elementus.
i
Elektroninė vaizdo stabilizacija (EIS) naudoja
elektroninį vaizdo apdorojimą, kad būtų užtikrintas
vaizdo stabilumas. Jei įrenginio jutikliai aptinka kameros
sudrebėjimą, EIS truputį sujudina vaizdą taip, kad vaizdo
virpėjimas būtų kuo mažiau pastebimas.
VAIZDO ĮRAŠYMO IR FOTOGRAFAVIMO RAIŠKA
Nuotraukos ksuojamos 12 Mpix raiška.
Elektroninė vaizdo stabilizacija (EIS) palaikoma tik nurodytuose
vaizdo įrašymo režimuose.
Table of contents
Languages:
Other ACME Action Camera manuals