Acorp MD221AFD User manual

0
1
Please NOTE: THE MP3 PLAYER STARTS INITIALIZE AND ICON APPEARS
SIMULTANEITY AFTER POWER-ON,ICON DISAPPEARS, THE MP3 PLAYER
WILL ENTER MAIN MENU AUTOMATICALLY.
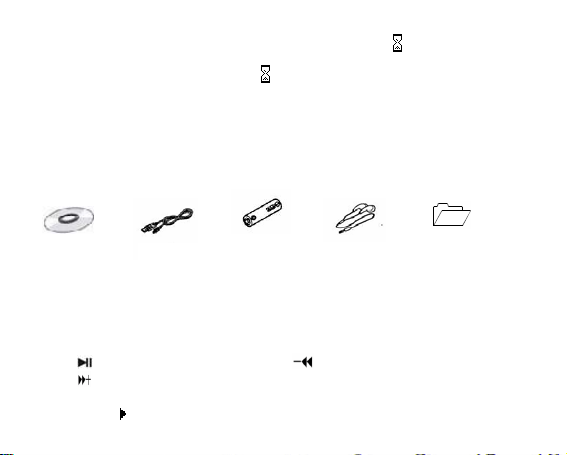
Accessories
①②③④⑤
Buttons and the function
1. 【】: Play/pause button 2. 【 】: Backward
3. 【】:Forward 4. REC/VOL(R/V)
5. 【MENU】: Menu /confirm button
6. 【HOLD 】:Lock/Unlock button(write protection)switch
USB cable AAA Alkaline
Batter
y
Earphone Quick Start
Guide
Installation CD

2
Play MP3 Music
To Start:
1. Connect earphone to earphone jack.
2. Switch “【HOLD 】” to “Unlock’”position
3. Long press 【】button to start.
4. Short press【】/【 】 button to select “MSC” mode.
5. Short press【MENU】button to confirm.
6. Short press【】button to play music.
Short press【MENU】to enter into sub menu and short press【】/【 】 button to select
your desired mode (e.g. Repeat, Equalizer, Tempo rate, Replay, Replay times, Replay
gap, LRC)
To return main-Menu: Long press 【MENU】button.
To Pause play: Short press 【】button. While paused, and short press 【MENU】to
enter into sub menu (e.g. Play List, Artists, Album, Genre, Composers, License Inf. Local
folder, Delete file, Delete all )
Note:” Play List, Artists, Album, Genre, Composers, License Inf.” are effect in Media
Device, they are no effect in USB Disk. (See “SYS” Online Device)
To resume play: Short press 【】button again .
To change tracks: Short press 【】/【 】 button.
To turn unit off: Long press 【】button.
Repeat:
1. Select repeat mode and short press 【MENU】button to enter into.( e.g. Normal,
Repeat One, Folder, Repeat Folder, Repeat All, Random, Intro. )

3
2. Short press 【MENU】button to confirm.
Equalizer:
1. Select Equalizer mode and short press 【MENU】button to enter into.
2. Short press【】/【 】 button to select your desired opinion ( e.g. Natural, Rock,
Pop, Classic, Soft, JAZZ, DBB )
3. Short press 【MENU】button to confirm.
Replay:
1. Select Replay mode and short press 【MENU】button to confirm.
2. Short press 【REC/VOL】button to select “A” point and short press 【REC/VOL】
button again to select “B” point.
3. Short press 【MENU】button to cancel “Replay” mode.
Replay Times:
1. Select replay times mode and short press 【MENU】button to enter into.
2. Short press 【】/【 】 button to select the times from 1 to 10.
Adding/ Removing MP3 Files
1. Plug USB connector into computer, the player will Display
2. Adding files to the USB storage‘s folder, the player will Display “ ”.
3. Deleting any files from the USB storage’s folder, the player will Display
“”.
4. Close the USB Storage’s folder (right click on icon).
5. Follow Operating system guidelines for removal of unit.
4
6. Remove unit from Computer.
Menu Navigation
¾【MENU】button: Enter Main-Menu or Sub-Menu or Confirm.
¾Skip button (【】/【 】): Shift menus.
¾Play/Pause button (【】): Play, pause or return
¾REC/VOL button: Voice recording or Volume adjust or A-B repeat.
Adjust Volume
In MP3 Play ,RPL,FM mode, short press【REC/VOL】button, then press 【】/【 】
to turn up/down the volume.
REC mode
There are two ways to enter REC mode.
①Long press 【REC/VOL】button to enter into REC mode in any mode.
②Long press 【MENU】button to enter main-Menu.
1. Press【】/【 】 button to select “REC” Menu.
2. Short press 【MENU】button to confirm.
3. Short press 【MENU】button to enter into sub menu
(e.g. Voice Record: Local folder, REC type
MP3 Record: Local folder, Track mode, Encoding mode, Record from)
NOTE: Select voice record or MP3 Record to see the “REC type” from “SYS” mode.
Short press 【REC/VOL】button to start Recording.
Short press 【 】 button to enter pause state.
5
To stop REC and saving file, Long press 【 】button
To exit “REC” mode, Long press 【MENU】button to enter Main-Menu.
REC type (Voice Record)
Press 【】/【 】 button to select your opinion (e.g. Fine REC, Long REC, Fine
VOR, Long VOR)
Track mode (MP3 Record)
Press 【】/【 】 button to select your opinion (e.g. Track on, Track off)
Encoding mode (MP3 Record)
Press 【】/【 】button to select your desired opinion (e.g. 192K BPS, 128K BPS,
64K BPS)
Record from (MP3 Record)
Press 【】/【 】button to select your desired opinion (e.g. Audio Input, Microphone)
RPL (play the recording file)
In main menu to choose RPL mode and short press 【MENU】button to enter into RPL
mode.
FM Receiver (Optional function and only for MP3 player with “FM” function.)
1. Long press【MENU】button to enter main-Menu.
2. Press 【】/【 】button to select “FM “ mode.
3. Short press 【MENU】button to enter “FM” mode.
4. Short press 【MENU】button to enter sub menu (e.g. Save, FM Record, Delete,
Delete all)
Preset stations (default): up to 20 preset stations can be stored for easy tuning. There are
two ways to search the stations

6
Method A: Long press 【 】/【 】button to cause auto search the stations.
Method B:
1. Short press【】/【 】to tune in 0. 05MHz.
2. Short press【MENU】button to enter sub-menu.
3. Short press【MENU】button to select “save” menu and store station
FM Record
1. Select FM Record mode and short press 【MENU】button to enter.
2. Short press 【REC】button to record.
3. Short press【MENU】button to enter into sub menu(e.g. Local folder, Track mode,
Encoding mode)
4. Long press【MENU】or long press【】button to save the record.
Tel Book
1. Long press【MENU】button to enter main menu.
2. Press 【】/【 】button to select “Tel Book” mode and short press【MENU】
button to enter.
3. Press【】/【 】to choose your desired mode(e.g. Browser Tel, Import Tel file,
Export Tel file)
4. Short press【MENU】button to confirm.
Browser Tel
User can browser the Tel Book information in MP3 player
Import Tel file
Use the telephone directory processing tool can create the Tel Book file of
Tel_save.bin in PC, put it in the root directory of U-disk, this function can import it in MP3
player.

7
Export Tel file
This function can export the Tel Book information from MP3 player and save it that
make a readable text file of Tel_Expt.bin in root directory of U-disk.
SYS (system)
1. Long press【MENU】button to enter main menu.
2. Short press【】/【 】button to select “SYS“ mode.
3. Short press 【MENU】button to confirm.
4. Press 【】/【 】 to choose your desired mode (e.g. REC type, Backlight,
Language, Power off, Replay mode, Contrast, Online Device, Online Mode,
Memory info. Firmware Version, Firmware Upgrade, DRM Time.)
5. Short press 【MENU】button to confirm.
REC type:
1. Select REC type and short press 【MENU】button to confirm REC type
2. Short press【】/【 】to select your desired opinion(e.g. Voice Record, MP3
Record)
Note: Voice record create file format is played in RPL mode; in MP3 record create file
format is played in Music mode.
Language:
1. Select language mode and short press 【MENU】button to confirm.
2. Short press 【】/【 】to select your desired opinion (e.g. Simple Chinese,
English, Trade Chinese, Japanese(SJIS), Korean, German, French, Italian,
Spanish, Portuguese, Danish, Swedish, Dutch, Russian, Czechish, Polish, Thai)
3. Short press 【MENU】button to confirm.

8
Power off:
Short Press【】/【 】button, Choose the Number(Off time :0-60;Sleep time:0-120)
In Off time mode, time unit is second; In Sleep time mode, time unit is minute.
Replay mode:
Short press 【】/【 】to select manual replay and auto replay.
Contrast:
Short Press【】/【 】button, select the Number from 1 to 15.
Online Device (The time of play the WMA mode with DMR)
Short Press【】/【 】button to select Media Device and USB Disk
Online mode
Short Press【】/【 】button, select multi drive, normal only and encrypted only.
DRM (Optional Function and no this icon in System if MP3 has no “DRM” Function.)
NOTE: The computer OS is Windows XP system and the computer has Media player 10
to operate DRM function.
1. Short Press【】/【 】button to select “DRM Time” mode.
2. Short press【MENU】button to enter the DRM Time interface.
3. Press 【REC/VOL】to set time Sequence of ”YY-MM-DD” (Press【】/【 】
to set time ) and Short press【MENU】button to confirm the effective time.
4. Plug in the Player to the USB port of the PC.
5. Enter the Media Player mode in the computer automatically to operate
synchronous.
CD disk using specification
(1)USB Flash Disk driver for windows98SE (If the user’s computer OS is Windows98SE,

9
please install the driver at first.)
(2) USB Flash Disk firmware upgrade tool
①Download the latest firmware version from the my company network
②Turn on the MP3 and choose “SYS” mode ,choose “Firmware upgrade” mode
③Connect MP3 player to the computer by USB cable
④Click “Begin” in computer and choose “ Program ” then choose ” MP3 Player Utilities
x.xx ”
⑤Click “Choose new version firmware file” to install the firmware file from my company
network.
⑥Click “Begin upgrade” to upgrade
(3) USB Flash Disk tool
①After install CD disk ,
②Connect MP3 player to the computer by USB cable
③Click “begin” in computer and choose “ Program “ then choose “ MP3 Player Disk
tool “ x.xx ” to format and sub area )
(4) MP3 Player recorded file convert tool.
①After install the tool ,
②Connect MP3 player to computer by USB cable
③Click “begin” in computer and choose “Program“ then choose “Sound Convert x.xx ”
convert “act“ format to ADPCM format(.wav)
④After converting, the file can play in computer, if not, can not play in computer.
(5) Tel_book tool
①Put the CD disk into the CD driver.
②Click the “Tel_book tool”
This manual suits for next models
2


