Across International AccuTemp Series User manual

ACCUTEMP SERIES
VACUUM DRYING OVENS
USER’S MANUAL
www.AcrossInternational.com
AINEWJERSEY
111 DORSA AVE, LIVINGSTON NJ 07039
888-988-0899
SUPPORT@ACROSSINTERNATIONAL.COM
AINEVADA
1197 GREG ST, SPARKS, NV 89431
775-360-2332
SUPPORT@ACROSSINTERNATIONAL.COM
@AcrossIntl

ACCUTEMP SERIES 480°F VACUUM DRYING OVEN USER’S MANUAL
- 1 -
PRECAUTIONS ...………………………………………………………………………….……2
1. INTRODUCTION …….…………………………....…………………………………………3
2. SPECIFICTIONS ……..…………………………....…………………………………………4
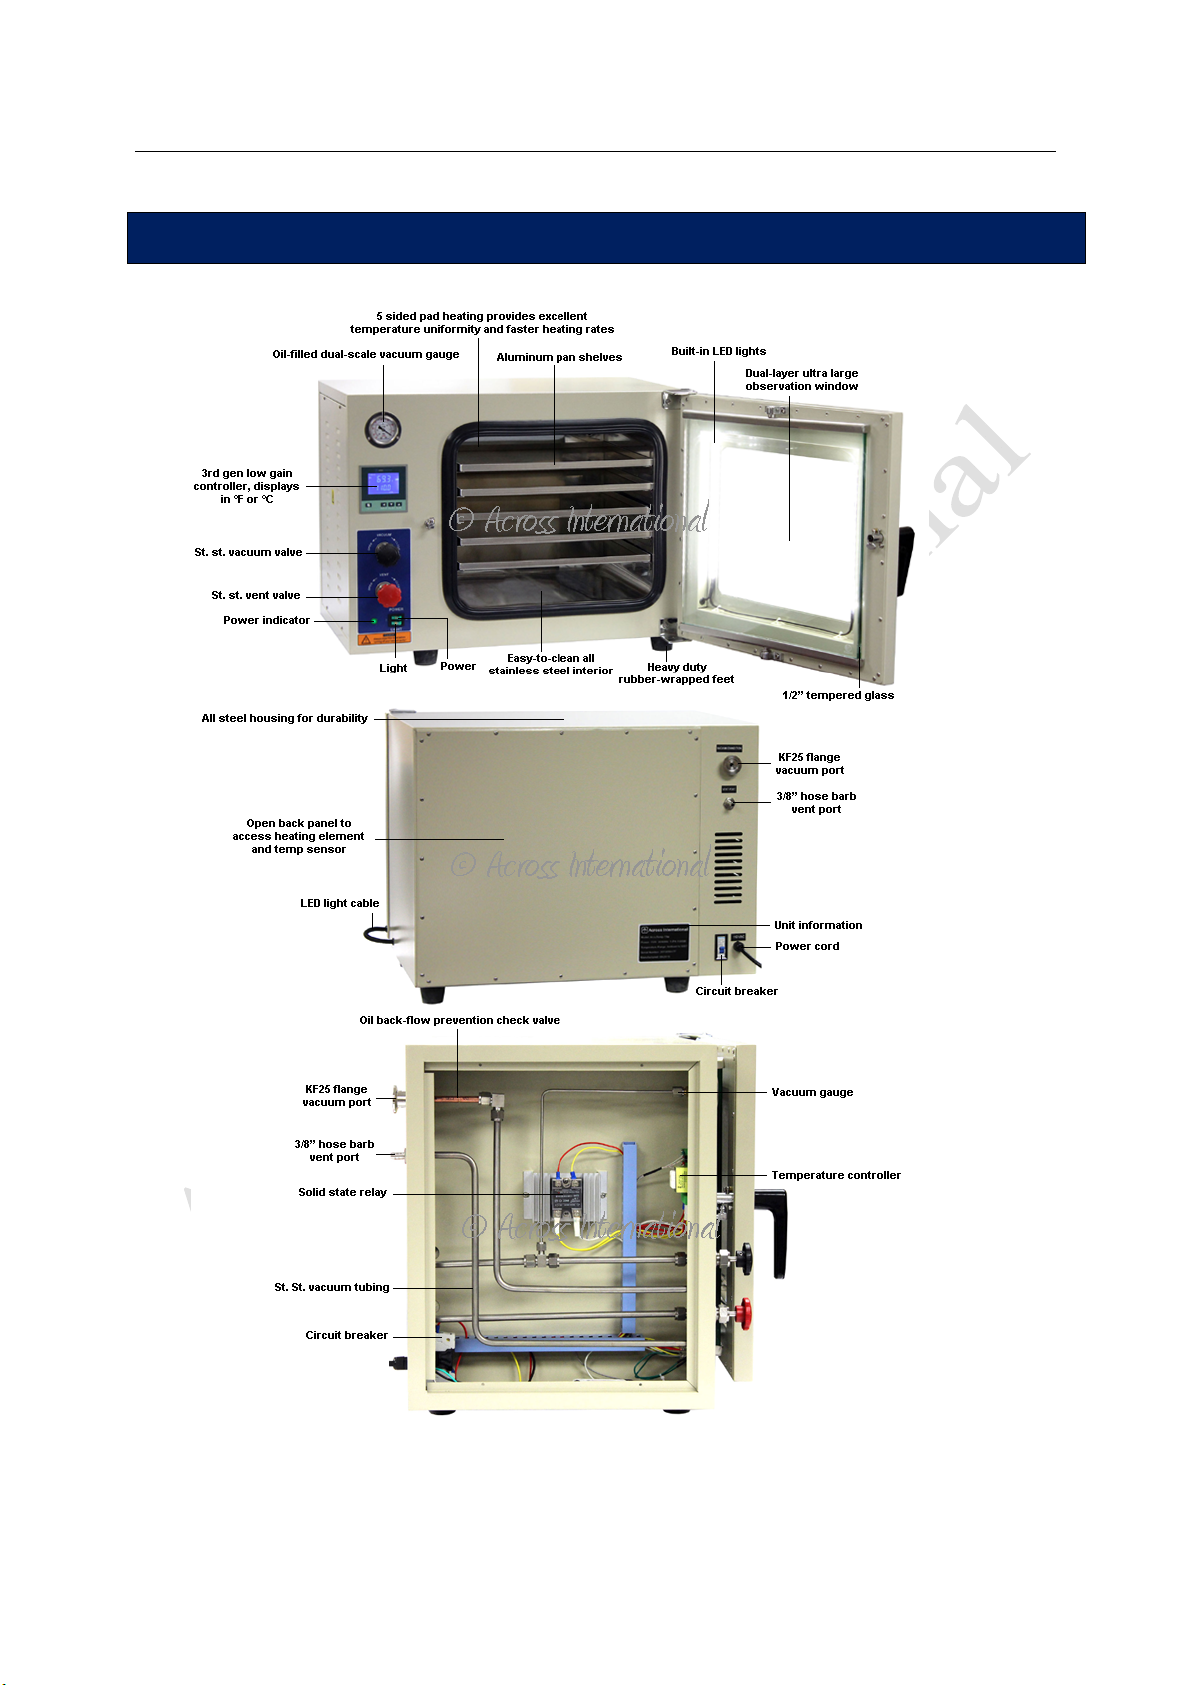
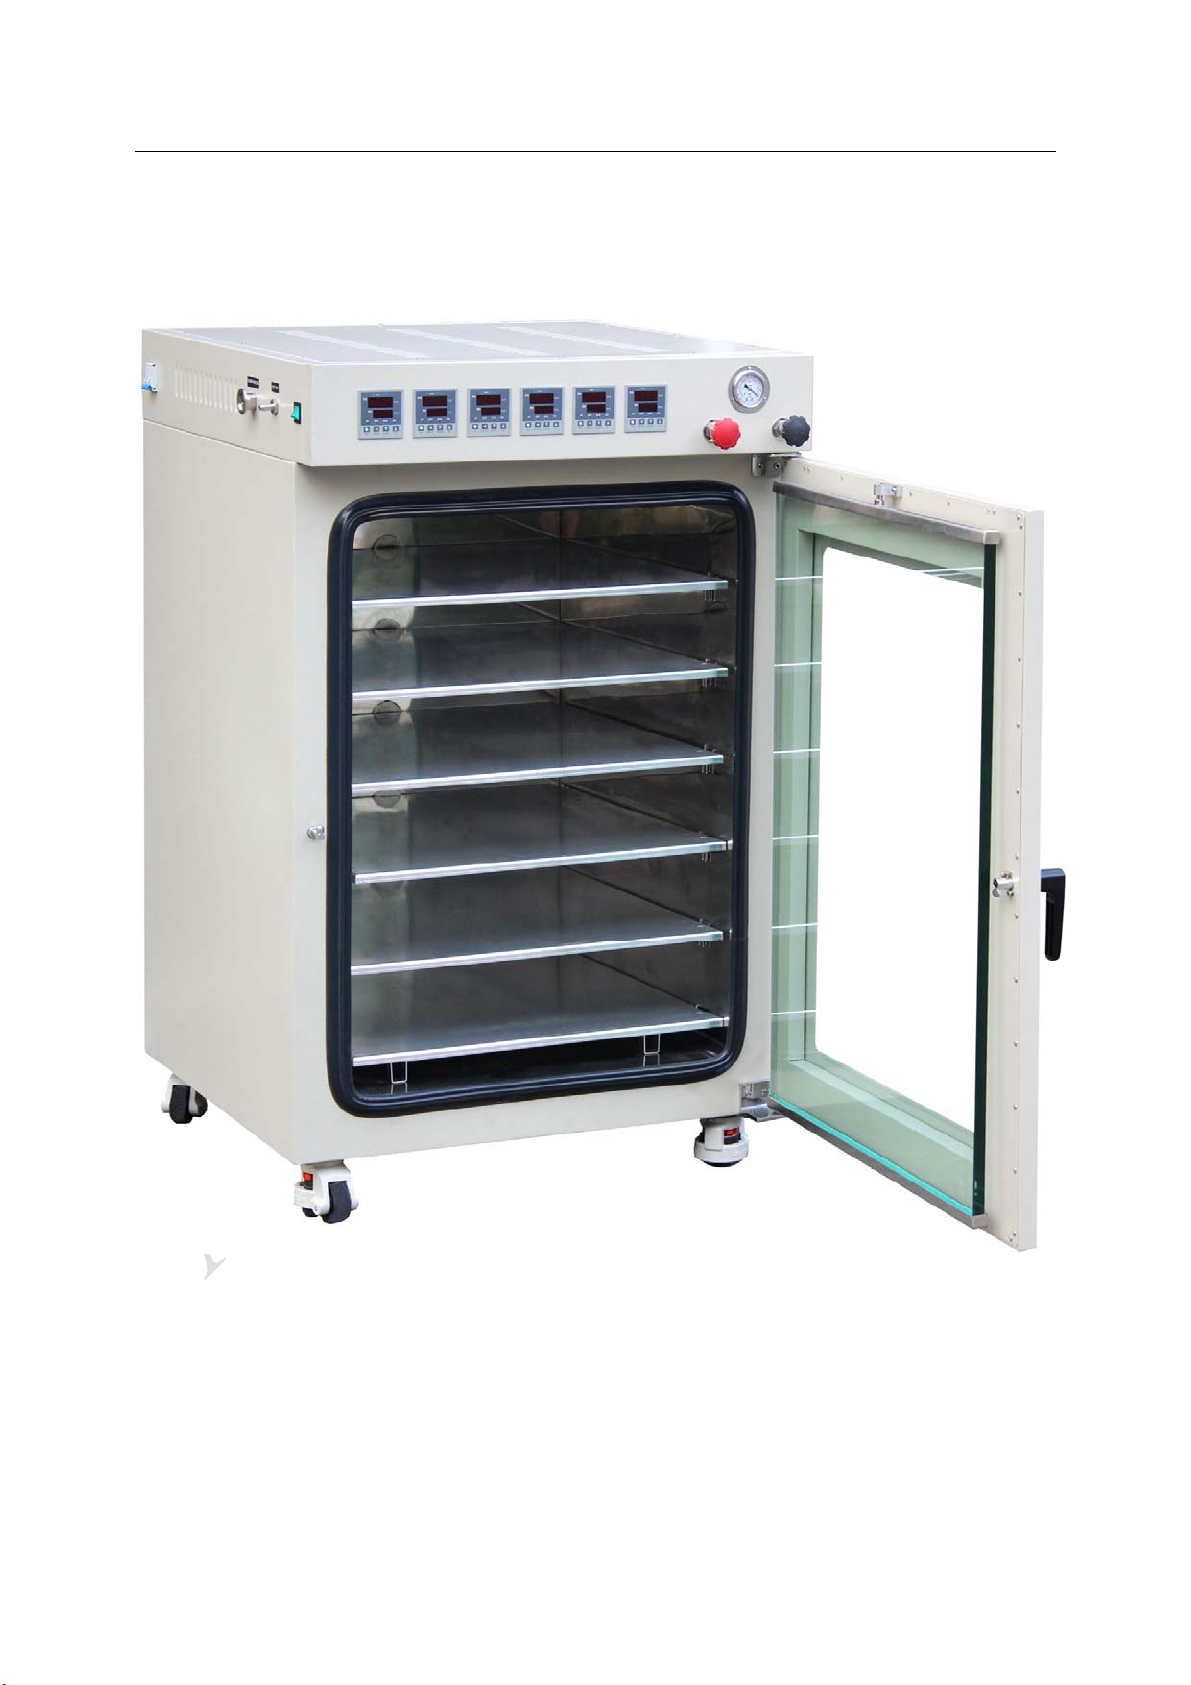
3. OVEN COMPONENTS …………...……………………………………………….…………5
4. PREPARATION …………………...…….……………………………………………………8
5. OVEN OPERATION …..…………………………..…………………………………………9
6. AUTO TUNE (AT) CALIBRATION …………………..…………………..…………….…10
7. ADVANCED SETTINGS (FOR 1-SEGMENT CONTROLLER) ….………….…………13
8. MULTI-SEGMENT RAMP TEMPERATURE CONTROLLER OPERATION……..…15
9. TROUBLESHOOTING …………………………………………………………………..…19
10. MAINTENANCE ….……………………………………………………………………..…21
11. ULTIMATE VACUUM LEVELS AT DIFFERENT ALTITUDES….………………..…22
12. PRESSURE VS VAPORIZATION….…………………………………………………..…23
13. PARTS LIST….…………………………………………………………………………..…25
14. SCHEMATICS AND CONTROLLER CONNECTION….…………………………...…26
15. WARRANTY……….………………………………………………………………...…..…29
TABLE OF CONTENTS

ACCUTEMP SERIES 480°F VACUUM DRYING OVEN USER’S MANUAL
- 2 -
Thank you for choosing our AccuTemp series vacuum drying oven. Please read this manual
carefully before operating the unit. Keep this manual on-hand, so that it can be used by all
operators of the unit. Across International is not responsible for any injury or damage
caused by misuse. If the equipment is used in a manner not specified by Across
International, the protection provided by the equipment may be compromised.
PRECAUTIONS
oIMPORTANT! NEVER LEAVE YOUR OVEN UNATTENDED WHILE OPERATING. Across
International is not responsible for any loss of material inside of the oven.
oTHIS IS NOT AN EXPLOSION PROOF OVEN. THIS OVEN IS NOT SUITABLE FOR USE IN
CLASS I, II, OR III LOCATIONS, AS DEFINED BY THE NATIONAL ELECTRICAL CODE,
NFPA 70.
oIt is important to use vacuum grade tubing for all vacuum hookups. Other types of tubing may
collapse and prevent complete evacuation.
oThe vacuum chamber should be thoroughly cleaned and disinfected prior to use. There are many
commercially available disinfectants that are non-corrosive, non-abrasive, and suitable for use
on stainless steel surfaces. Choose the one that will work best for your application.
oNever clean the unit with flammable cleaners. Assure that all cleaning agents are completely
evaporated and dried before reconnecting the unit to the power supply.
oDo not try to heat flammable, combustible or explosive materials, or other materials that may
release corrosive substances.
oDo not heat sealed containers in the oven. The pressure differential under vacuum can could
potentially cause the container to explode.
oAvoid exposing the unit to vibrations or any corrosive/erosive gases.
oAlways wear thermal gloves and protective goggles during operation.
oAlways use the power cord that comes with the unit. Never modify the cable.
oKeep oven away from any electromagnetic interference. Do not unplug the oven during normal
operation.
oDo NOT use the vacuum oven as a positive pressure vessel.
oWhen vacuuming is complete, close the vacuum valve before turning off your vacuum pump.
This will prevent pump oil from back flowing into the oven, if you are using an oil vane pump.
oConsider conditions that may affect your oven’s ability to accurately control its temperatures.
Examples include extreme heat from radiators, stoves, other ovens, autoclaves, etc. Avoid direct
sun, fast-moving air currents, and heating/cooling ducts.
oTo ensure proper air circulation around the oven, allow a minimum of 10 inches between the oven
and any walls or partitions.
oA separate circuit for the oven and the pump is strongly recommended to prevent possible loss of
product, either due to overloading or failure of other equipment on a shared circuit.
oReturning shipments: Save the original shipping crate until you are sure your unit is consistently
working properly. If for any reason you must return the unit, first contact AI for a return
authorization (RMA).
oIt is strongly advisable to have at least two people lift or move all desktop models.

ACCUTEMP SERIES 480°F VACUUM DRYING OVEN USER’S MANUAL
- 3 -
This ACCUTEMP DESKTOP series (0.9 and 1.9 cu ft) digital vacuum oven features an easy-to-clean
stainless steel chamber with a large tempered glass safety window. Each unit comes standard with
aluminum shelves, which provides excellent temperature uniformity inside the chamber. They also feature
adjustable gas back fill capability with a needle valve and vent port. The low proportional gain temperature
controller keeps your oven temperature within +/- 1°F accuracy, in either °F or °C.
The ACCUTEMP SHELF-HEAT series (3.2, 7.5 and 16 cu ft) digital vacuum oven features a larger,
production sized chamber with easy-to-clean stainless steel, as well as a large observation window with
heavy duty 3/4" tempered safety glass. With our unique SHELF-HEAT technology, each shelf in these
ovens comes with its own heat source, in-shelf temperature sensor and temperature controller. The result is
perfect uniformity, accurate temperature, super-fast heating rates, minimum heat loss, and very low power
consumption.
Features
oDual layer observation window with tempered safety glass.
oRadiant wall heating (0.9 and 1.9 cu ft models) provides optimal uniformity and conserves chamber
space.
oNew SHELF-HEAT technology with in-shelf temperature sensors give you perfect uniformity,
super-fast heating rates and very low power consumption (3.2, 7.5 & 16 cu ft models).
oEasy-to-clean, heavy duty stainless steel interior for exceptional durability and ease of maintenance.
oForce-adjustable latch and one-piece door sealing gasket maintains consistent vacuum levels.
oBuilt-in check valve prevents vacuum oil back flow.
oBuilt-in alarm alerts you when oven has been shut down by the safety circuitry, due to excessive
variance in temperature.
oOptional sliding and stackable shelves maximize your production scale. Many different types of
shelving materials are available.
Every one of our vacuum ovens goes through a 2-time, 24-hour vacuum leak test, and is quality controlled in
New Jersey or Nevada, USA, before leaving our warehouses.
For best performance and faster heating rates, perform an Auto-Tune before initial use.
Instructions can be found in section 6 of this manual.
1. INTRODUCTION
ACCUTEMP SERIES 480°F VACUUM DRYING OVEN USER’S MANUAL
- 4 -
Model
AccuTemp-09
AccuTemp-19
AccuTemp-32
AccuTemp-75
AccuTemp-75a
AccuTemp-160
Electrical requirements 110V or 220V 50/60Hz 1-PH 220V 50/60Hz 1-PH
Chamber capacity 0.9 cubic foot 1.9 cubic foot 3.2 cubic foot 7.5 cubic foot 7.5 cubic foot 16 cubic foot
Chamber dimensions
(WxDxH) 12 x 12 x 11” 16 x 14 x 14” 18 x 18 x 18” 22 x 23 ½ x 25” 22 x 23 ½ x 25” 25 ½ x 30 ½ x 35 ½”
Chamber material 3mm thick stainless steel
Output 1200 watts 1500 watts 1500 watts 1500 watts 1500 watts 3000 watts
Warm-up time to
100°F 60 minutes 60 minutes 35 minutes 45 minutes 50 minutes 55 minutes
Shelf
Maximum 4
sliding shelves
Maximum 5
sliding shelves
3 heated shelves,
holds another
maximum of 3
stackable shelves
3 heated shelves,
holds another
maximum of 6
stackable shelves
5 heated shelves,
holds another
maximum of 5
stackable shelves
6 heated shelves,
holds another
maximum of 6
stackable shelves
Distance between
shelves 2 inches 2 inches 4 ¾ inches 7 inches 4 ¼ inches 5 inches
Number of temperature
controllers 1 1 3 3 5 6
Observation window 1/2” tempered
safety glass
1/2” tempered
safety glass
5/8” tempered
safety glass
3/4” tempered
safety glass
3/4” tempered
safety glass
3/4” tempered safety
glass
Unit weight 90 Lb 140 Lb 280 Lb 400 Lb 430 Lb 710 Lb
Shipping weight 150 Lb 200 Lb 350 Lb 500 Lb 530 Lb 940 Lb
Unit dimensions
(WxDxH) 24x20x18” 28x22x22” 30x24x29” 35x31x38” 35x31x38” 33x36x53”
Shipping dimensions
(WxDxH) 28x24x24” 32x27x28” 34x30x35” 38x35x43” 38x35x43” 43x40x60”
Temperature range Ambient to 480°F in 0.1°F steps
Ambient to 250°F in
0.1°F steps
Temperature controller Low proportional gain with LCD screen. Microcomputer-controlled automatic PID selection
Temperature units Fahrenheit or Celsius
Temperature accuracy +/- 2°F
Temperature
uniformity +/- 6% of set point (After target temperature fully stabilized)
Dwelling timer range 1 to 9999 minutes
Va c u u m l e v e l Better than 500 microns/millitorrs
Maximum vacuum 29.9 inches of mercury (may vary based on your local altitude)
Vacuum gauge range 0 to 30 inches of mercury
Door gasket material Silicone
Vacuum connection KF25 flange
Safety Built-in circuit breaker, over-heat protection
2. SPECIFICATIONS
ACCUTEMP SERIES 480°F VACUUM DRYING OVEN USER’S MANUAL
- 5 -
0.9 and 1.9 cubic foot models
3. OVEN COMPONENTS

ACCUTEMP SERIES 480°F VACUUM DRYING OVEN USER’S MANUAL
- 6 -
3.2 cubic foot model
ACCUTEMP SERIES 480°F VACUUM DRYING OVEN USER’S MANUAL
- 7 -
7.5a cubic foot model

ACCUTEMP SERIES 480°F VACUUM DRYING OVEN USER’S MANUAL
- 8 -
4.1. Your oven should be placed on a sturdy platform that is approximately 30 inches off the ground,
or the same distance your building code requires for a water heater.
4.2. Best practices for vacuum operations:
a. Place all shelves that you will use inside oven, make sure vent port, vacuum port are closed, and
oven door is closed securely.
b. Connect vacuum pump with KF25 stainless steel bellow, clamps and o-rings.
c. Turn on your vacuum pump.
d. Open vacuum port on the oven and watch the vacuum level on the vacuum gauge.
e. When desired vacuum level is reached, close the vacuum port FIRST, and then turn off your
vacuum pump. (It is a good idea to leave the pump on at all times during the heating process, and
then for an additional 30 to 60 minutes afterwards, to allow the pump to clear out any moisture
that may have been pulled into it during the vacuuming process.)
4.3. Guidelines for using the vacuum oven
a.
Put your sample into the oven. Close the door securely, then close the vacuum release, open the
vacuum valve, and turn on the power to the vacuum pump to start the purging process. When your
vacuum level inside the oven is where you want it to be, close the vacuum valve first, then turn off
the vacuum pump.
b.
Turn on the oven and set your target temperature. Temperature in the oven will start to rise and the
heating indicator will blink. Usually, the oven enters into temperature-dwelling mode within 30 to
120 minutes, depending on your target temperature.
c.
If your target temperature is low, you can set your temperature at two intervals to minimize
temperature spikes. For example, if your target temperature is 100°F, the first target temperature
value can be set to 90°F, and when temperature reaches that point, set the temperature one more
time to 100°F. By doing so, temperature overshooting can be reduced or prevented and
temperature dwelling state can be started as soon as possible.
d.
The length of drying time should be selected based on the humidity level of your sample. In case
drying time is long and vacuum level reduces due to off-gassing, etc, it is necessary to purge the
oven again to restore desired vacuum level. (Make sure your vacuum pump can work at your target
temperature when doing this).
e.
After the drying process is done, turn off the oven, open the vacuum release valve, then open the
door. It is possible that the sealing gasket may become stuck to the door glass, causing the door to
not open easily. If this happens, wait a few minutes until the gasket restores itself before trying to
open the door again.
We recommend using our T series cold trap in between your oven and vacuum pump, to
protect your pump from damage caused by the extraction of solvents or other gases.
4. PREPARATION
ACCUTEMP SERIES 480°F VACUUM DRYING OVEN USER’S MANUAL
- 9 -
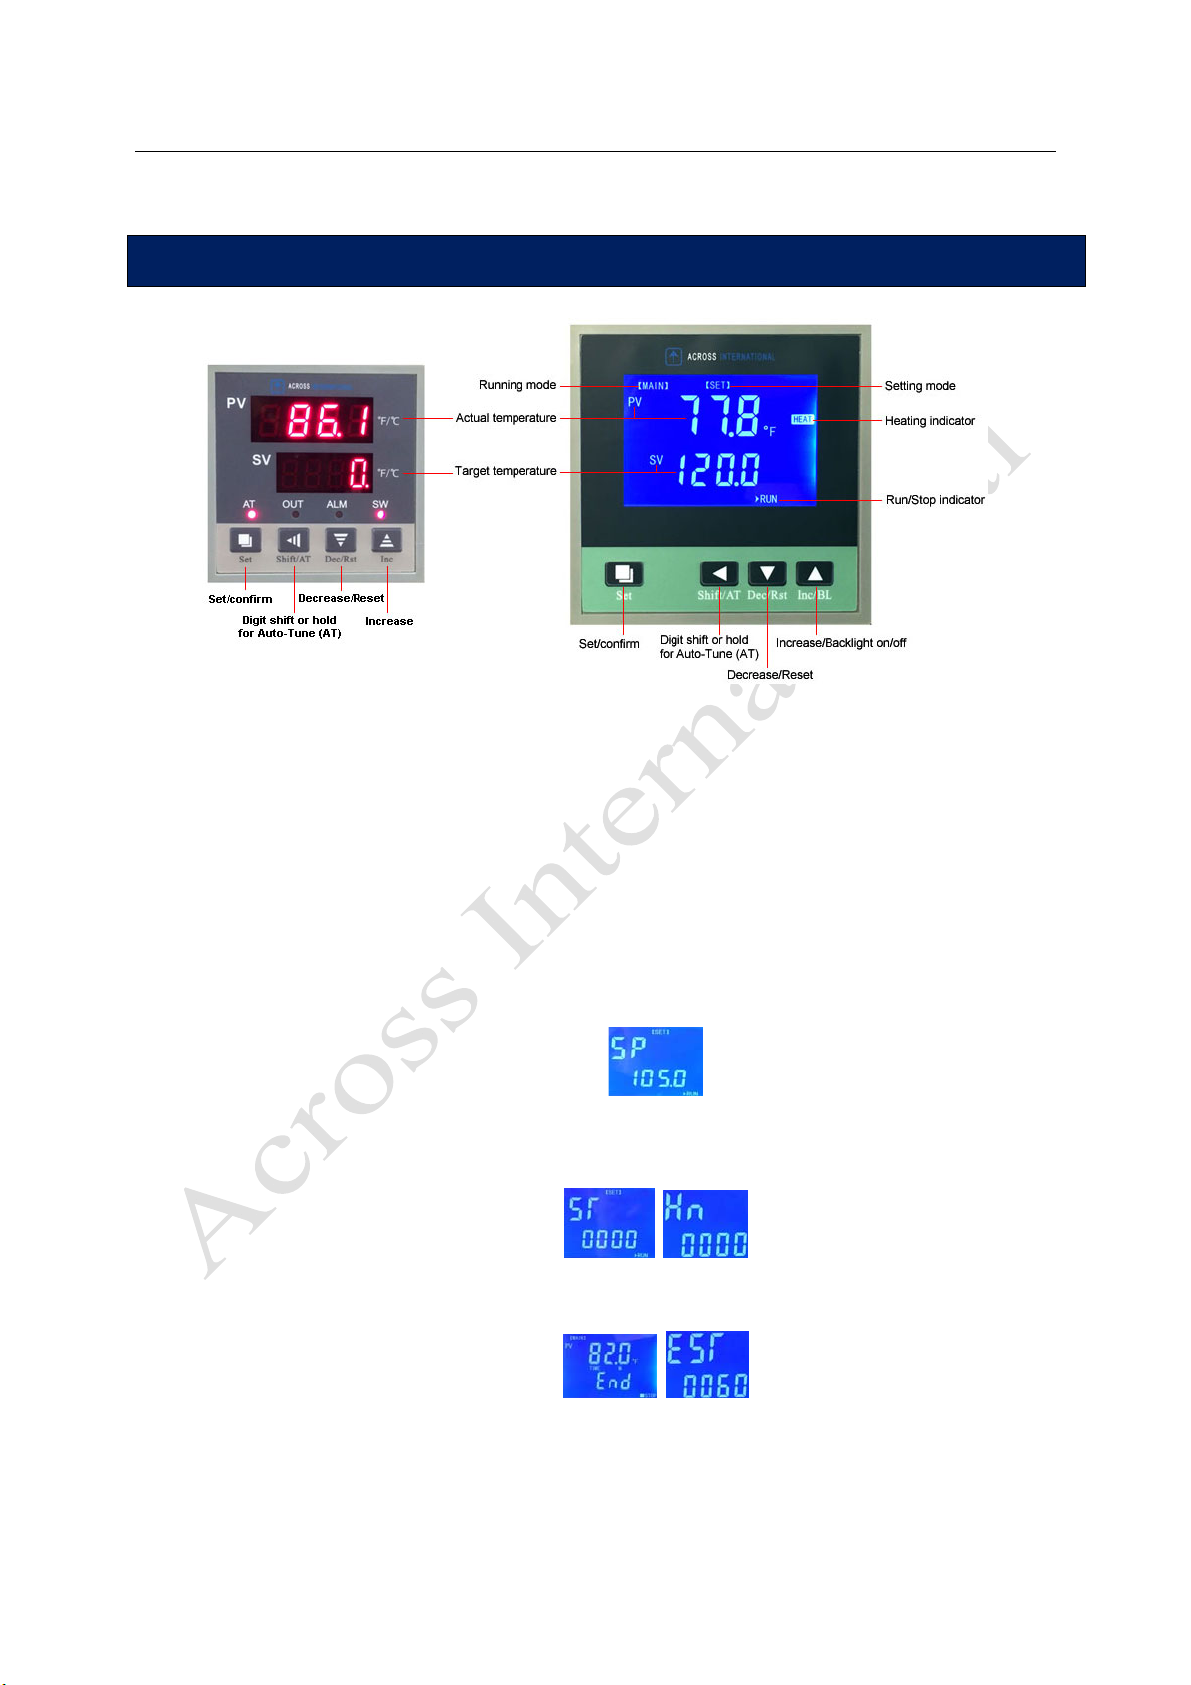
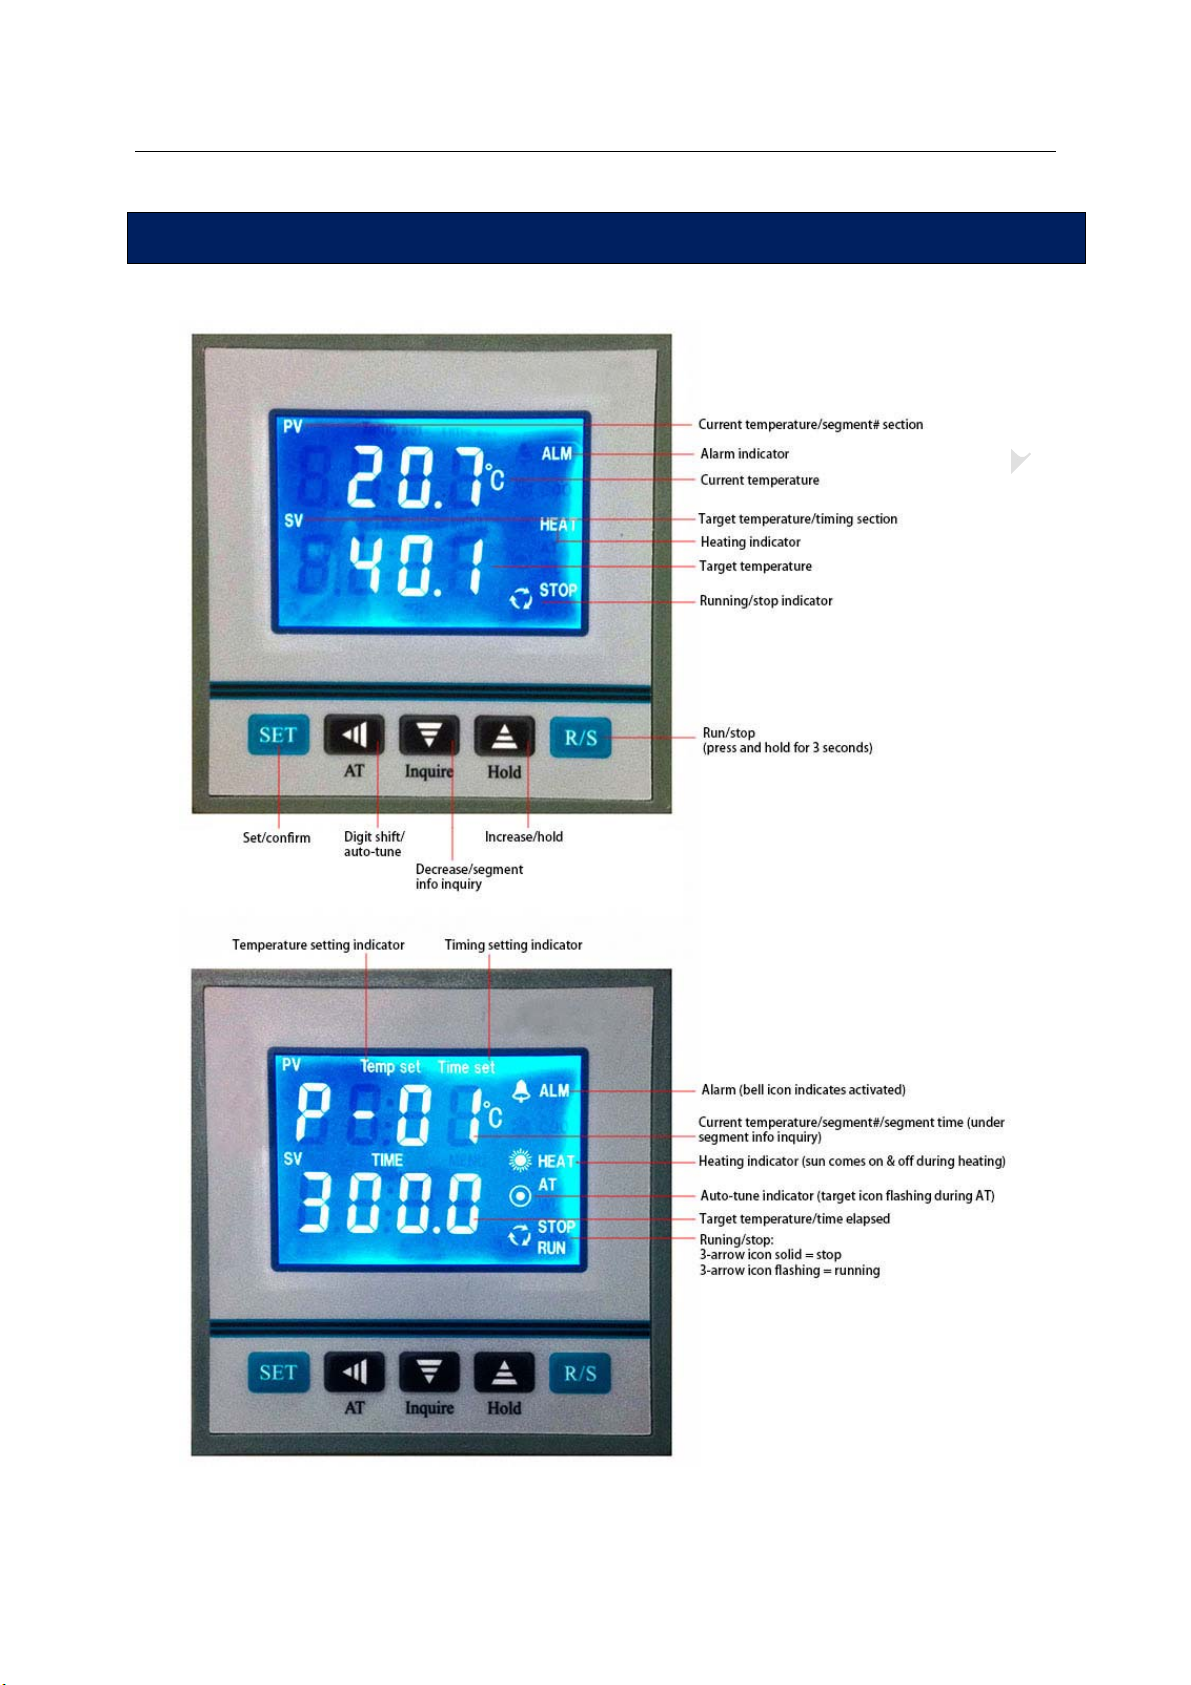
[MAIN] mode: After the oven is first turned on, controller enters into [MAIN] (running) mode.
[SET] mode: Hold and press “Set” button for 3 seconds in [MAIN] mode to enter into the [SET] (setting)
mode.
[AT] indicator: Light blinks when auto-tune is in progress. Blinking indicator stops when auto-tune is done.
[ALM] indictor: Light turns solid if over-temperature alarm is triggered. Flashes if under-temperature alarm
sounds. Turns off when oven is under normal operation.
[HEAT] indicator: Turns on when oven is being heated.
[RUN/STOP] indicators: Turns off when dwelling time is completed.
5-1. Basic settings: Target temperature and dwelling time
a.
Plug in the power cable, switch on the circuit breaker in the back, and turn on the oven.
b.
Press the ‘Set’ button once. The controller will display “SP”. Now use “Shift”, “Decrease” or “Increase”
button to set your target temperature.
c.
Press ‘Set’ again to confirm the temperature. The controller will display “ST”. Use “Shift”, “Decrease”
or “Increase” button to set the dwelling time in minutes. You can set it to display in hours with the “Hn”
setting. (The timer will start as soon as the actual temperature reaches target temperature.) If “ST” is set
to zero, the oven will continue to run at the target temperature until it is turned off manually.
d.
Press ‘Set’ again to confirm all settings.
e.
When the dwelling time is complete, the controller will display “End” and buzz for 60 (or value in EST)
seconds. It can be muted by pressing any button.
f.
Press and hold the “Dec/Rst” button for 3 seconds to restart oven operation.
g.
During heating, if the alarm is set and the actual temperature is over that limit, a buzzer will sound
continuously and the “ALM” light will come on. Press any key to mute it.
5. OVEN OPERATION
ACCUTEMP SERIES 480°F VACUUM DRYING OVEN USER’S MANUAL
- 10 -
Prom
p
t Name Descri
p
tion Ran
g
e
(
factor
y
value
)
SP Target temperature Set target temperature in °F or °C. use code “FC” to set
tem
p
erature unit.
SPL to SPH (see parameter table #2)
ST Dwelling time 0 = continuous heating. Use code “Hn” to set timing unit 0-9999 (0) minutes or hours
5.2. Finishing your process
After purging and heating is done, turn off the main power switch. If you wish to fill your oven with inert gas,
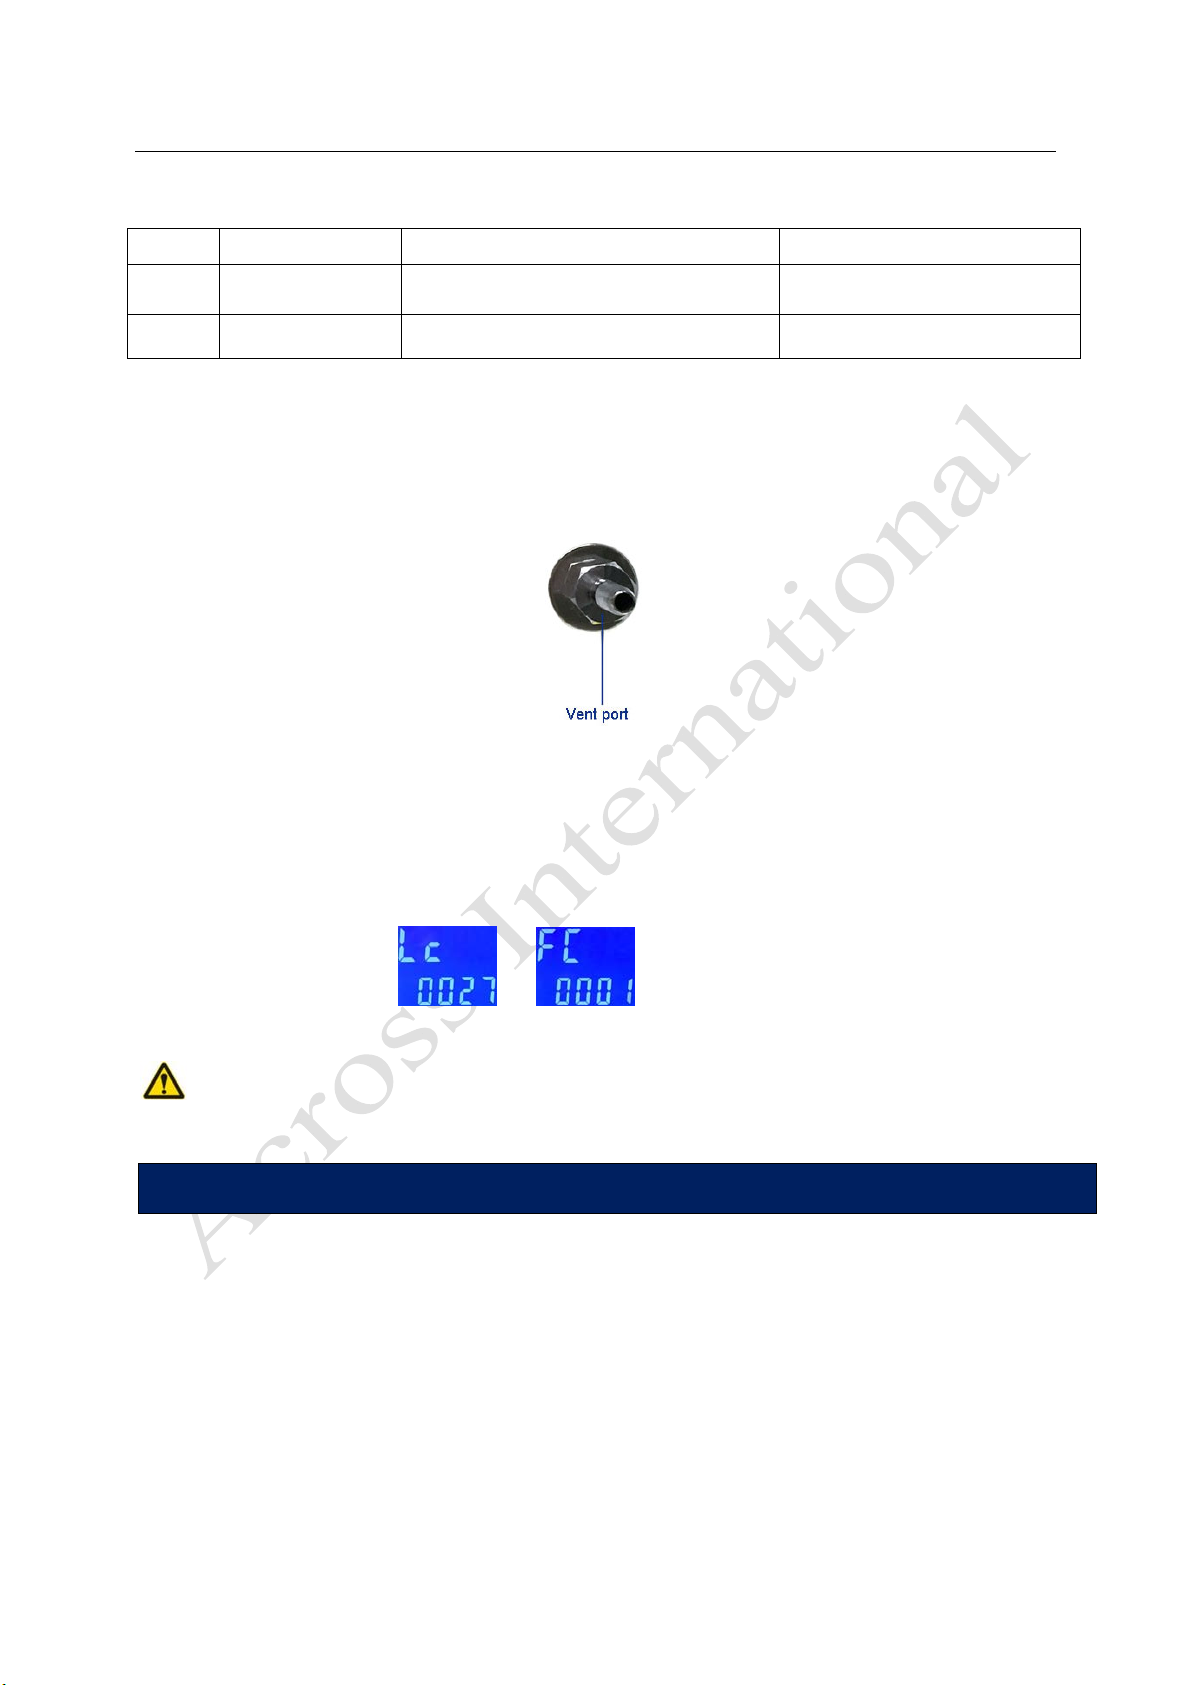
use the vent port (shown below) to connect to a nitrogen, argon, etc. source. Open the vent port and let the
vacuum level restore to atmospheric pressure, then open the door and remove your samples (caution: surfaces
may be hot!).
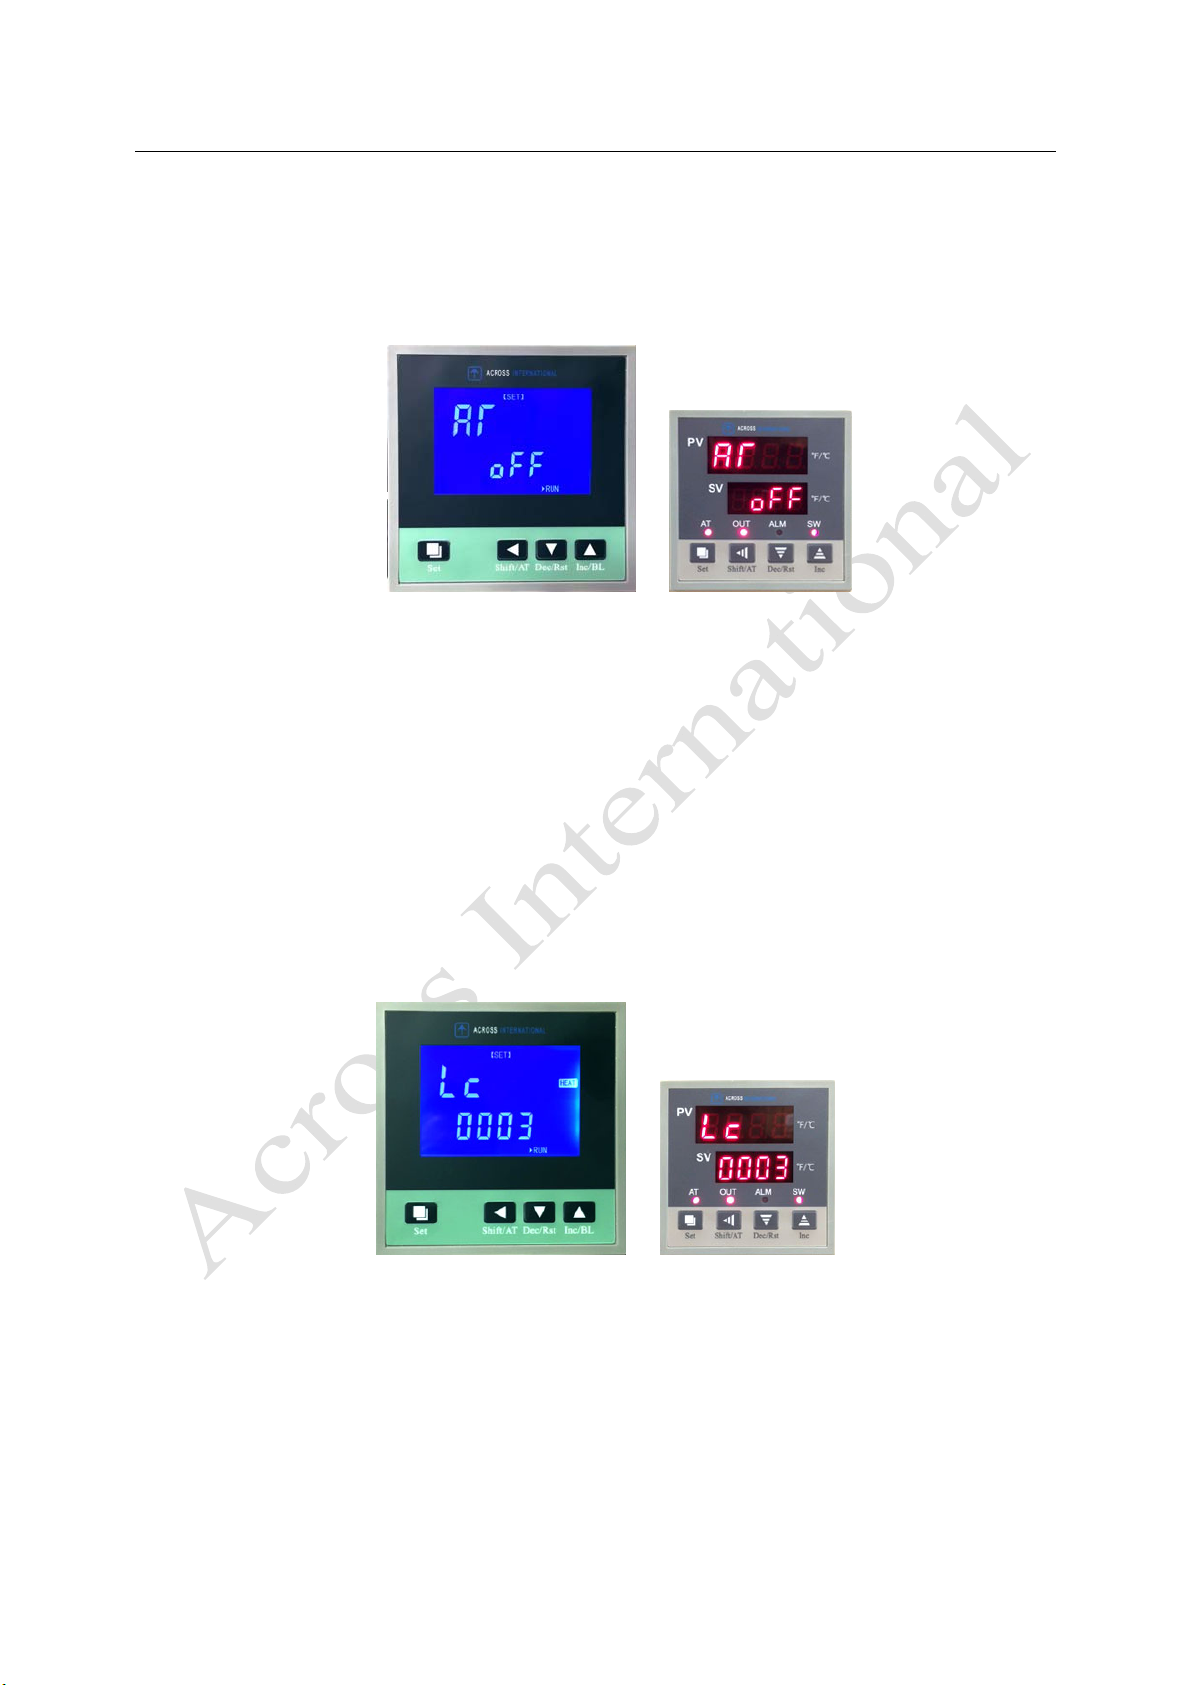
5.3. Switching the temperature display between Fahrenheit (°F) and Celsius (°C)
Under [MAIN] mode, press and hold the “Set” button for 3 seconds. The controller will display “Lc”, shown
below. Enter 27 and press “Set” to access the “FC” (temperature display) setting screen, also shown below.
Set “FC” to 0 to display the temperature in Celsius, or 1 for Fahrenheit. When done, press and hold “Set” for
3 seconds to save and exit to [MAIN] mode.
(0001 = Fahrenheit °F)
For optimal uniformity, allow 60 to 90 minutes for oven temperature to stabilize after target
temperature is reached.
6.1. What is Auto Tune (AT)?
Auto tune is a process of optimizing your oven’s performance. It helps increase heating rates, minimize
temperature differences, and prevents overshooting. A set of optimal PID values will be saved
automatically after AT is done.
6.2. When should you perform an AT?
a. If your target temperature is above 200 °F or higher, the first time you are using your oven. (If less
than 200 ºF, you can skip this process.)
b. If you’ve recently changed or replaced any parts inside your oven.
c. If you see a big temperature difference between controller display and actual oven temperature.
6. AUTO TUNE (AT) CALIBRATION
ACCUTEMP SERIES 480°F VACUUM DRYING OVEN USER’S MANUAL
- 11 -
6.3. Calibration by Auto-Tune (AT)
Follow the steps below to perform a standard Auto Tune:
a.
Under [MAIN] mode, press and hold the “Shift/AT” button for six seconds, until you see the screen below.
b.
Press the “Inc/BL” button and set AT to “on”, then press “Set” to confirm. The controller will display a
flashing [AT] light, indicating that auto-tune is in progress. After a few cycles of fluctuation, auto-tune will
complete and the [AT] light will turn off. This could take a few hours. The “Set” button is disabled during
this period.
c.
If necessary, press and hold the “Shift/AT” button for six seconds during the auto-turn process to
abort. The [AT] light will turn off.
d.
A new set of optimized PID values will be automatically saved for future use.
e.
Now set the target temperature. You are ready to use the oven.
6.4. Calibration by formula
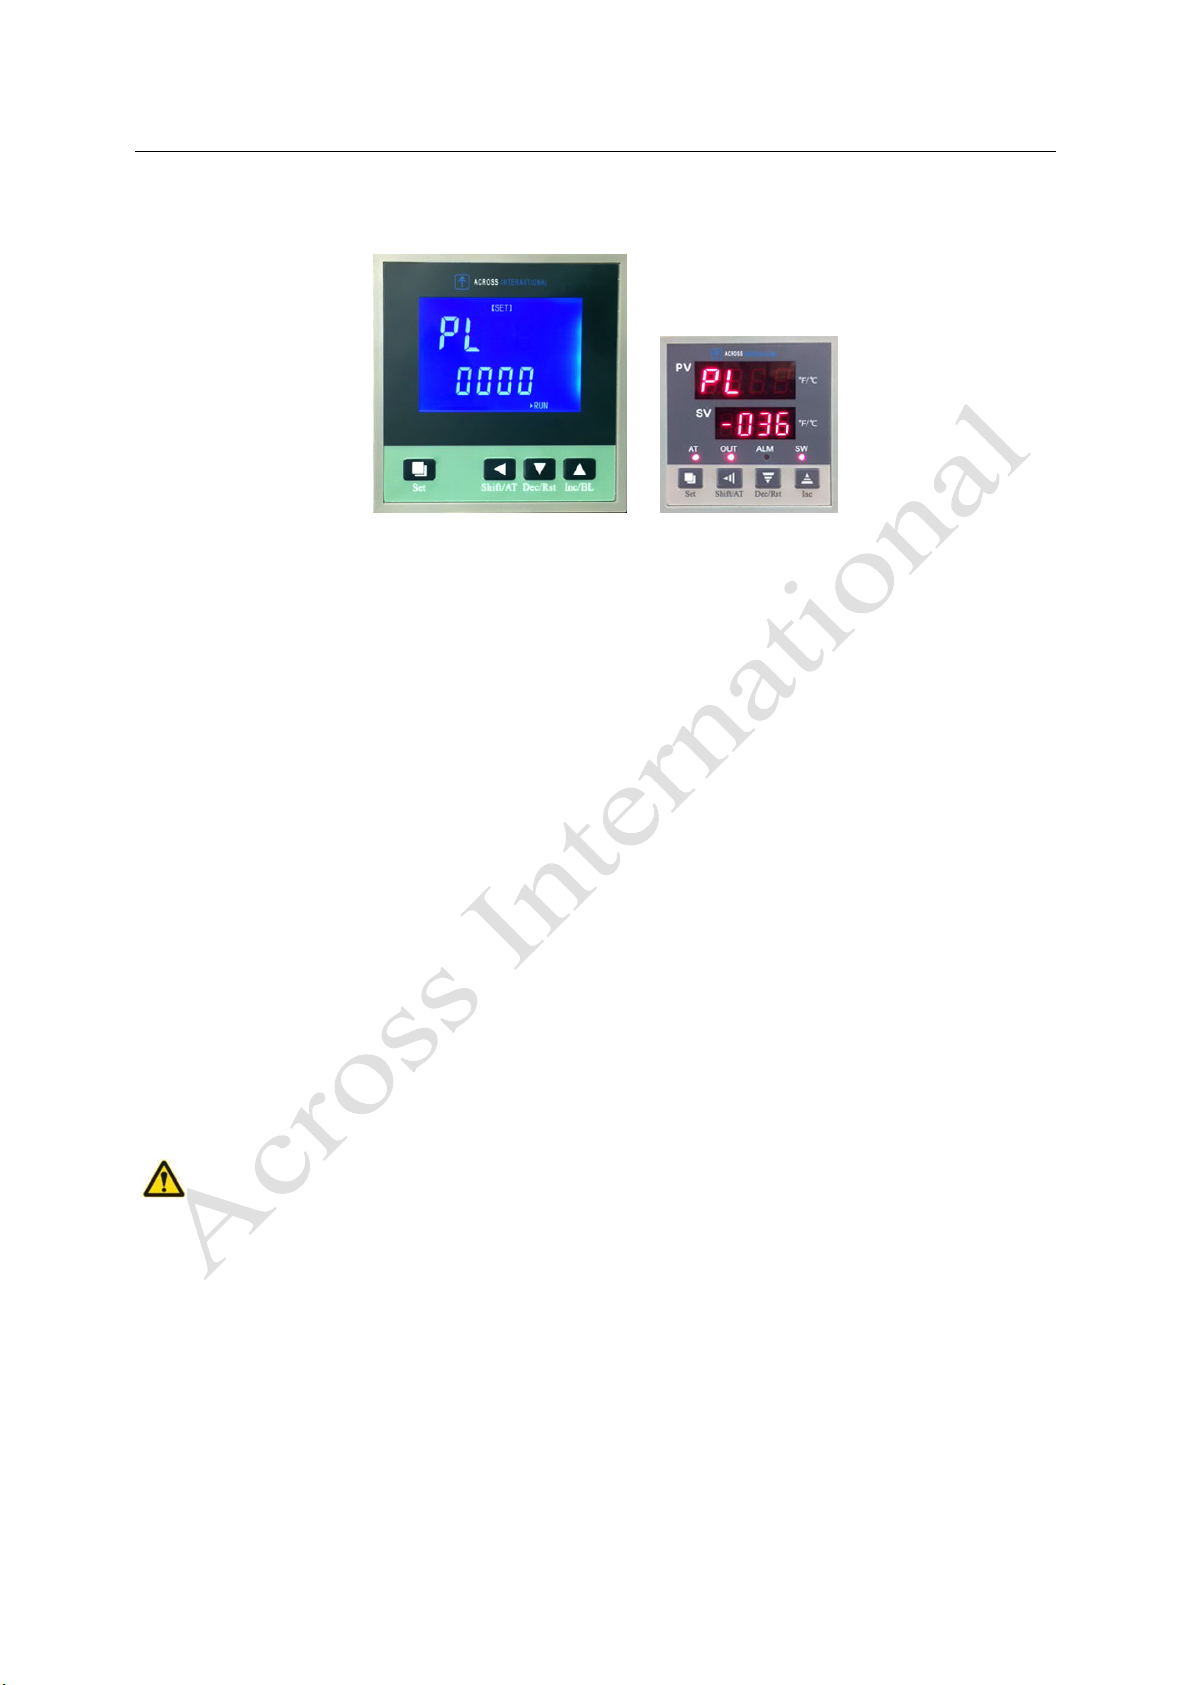
Offset the temperature difference between temperature controller and your reference value manually.
6.4.1. First, calculate the offset value using the formula on the next page (in blue). Press and hold “Set” button
for 3 seconds; controller will display “Lc” as below.
ACCUTEMP SERIES 480°F VACUUM DRYING OVEN USER’S MANUAL
- 12 -
6.4.2. Enter 3 and press “Set”. Continue to press “Set” until you see “PL”, as shown below.
6.4.3. Use the formula below to calculate the offset value, then set PL to your calculated offset value.
Offset value = (temperature measured by exterior thermocouple(s) – temperature displayed by controller [PV]) x
1000 / temperature displayed by controller [PV]
6.4.4. Press and hold “SET” for 3 seconds to confirm and return to [MAIN] mode.
6.5. Calibration by adjusting PID manually (requires experience and practice)
After an auto-tune, if you still feel that temperature is unstable, you can manually adjust the PID values. PID
adjustment is very useful for you to control the oven temperature in an acceptable range, but requires some
practice and patience.
a.
“P” represents proportion adjustment. Increasing “P” reduces temperature overshooting, while decreasing
“P” allows for a faster heating rate. (You may need to try this step a few times before you get the best result).
b.
“I” represents integral time. Increase “I” to lower temperature fluctuation. It can be used to eliminate the
steady state error after the system enters a steady state by correctly setting “P”. In other words, “I” is often
used after “P”. Give “I” a big value before decreasing “P” a little, in order to get to a steady state, and then
decrease I to eliminate errors under the steady state. Check if the PV is in your desired range. Continue to
try to change “P” and “I” to get the best result.
c.
“D” represents differential time, which can overcome the unstable and oscillating state. Adjust “D” to
reduce temperature overshooting. It is usually set after the “I” adjustment. Firstly, set “D” to 0, then
gradually increase it to check if you have an acceptable result (In this process, “P” and “I” may also be
changed). “D” is usually set anywhere between 1/5 to 1/4 of the value of “I”.
Every oven has been calibrated and tested before leaving our factory. Under normal circumstances,
self-calibration is not necessary. However, if the temperature requirements are very strict, or if target
temperature is set around the upper or lower limits of the oven temperature range, the measured temperature
might not be accurate against the actual temperature in the oven.
ACCUTEMP SERIES 480°F VACUUM DRYING OVEN USER’S MANUAL
- 13 -
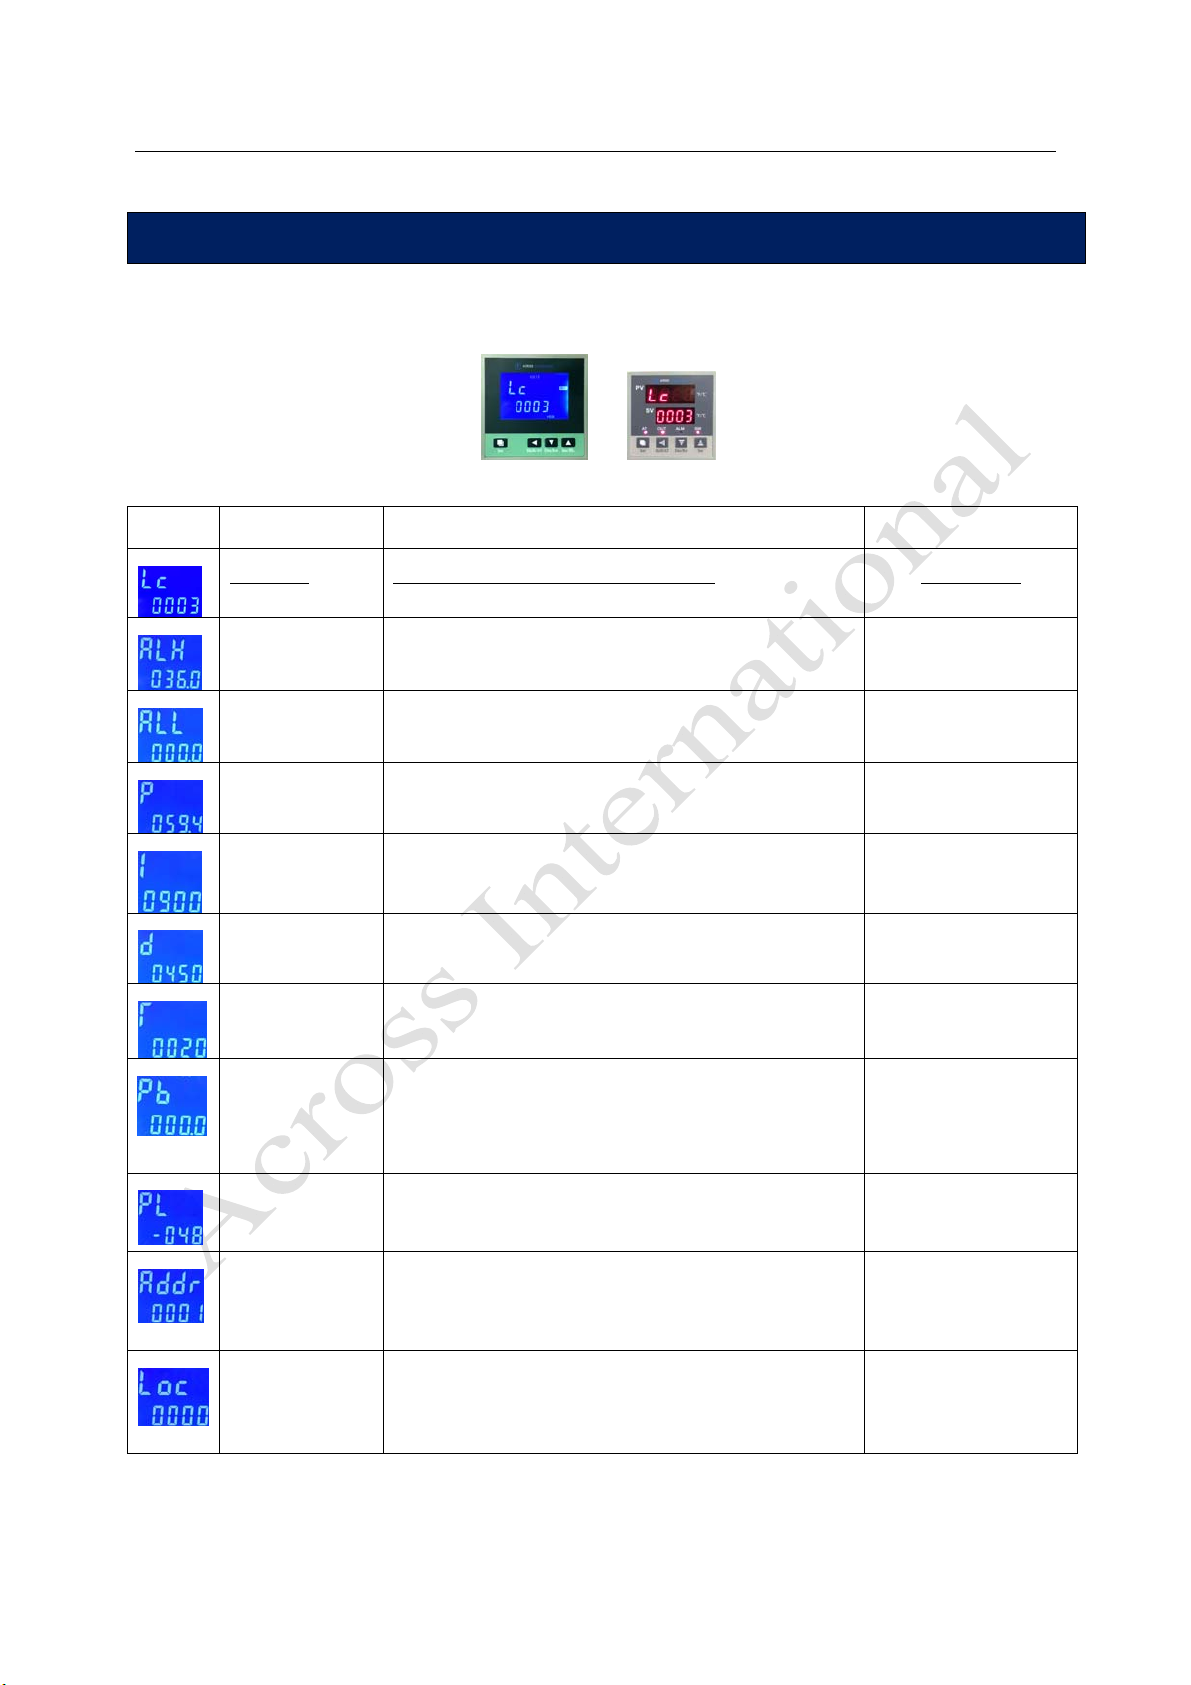
Under [MAIN] mode, press and hold the “Set” button for 3 seconds. The controller will display “Lc” as shown on the
next page. Enter 3, 9, 27 or 567 and press “Set” to access the advanced setting tables on the following page Press and
hold “Set” for 3 seconds to save and exit to [MAIN] mode.
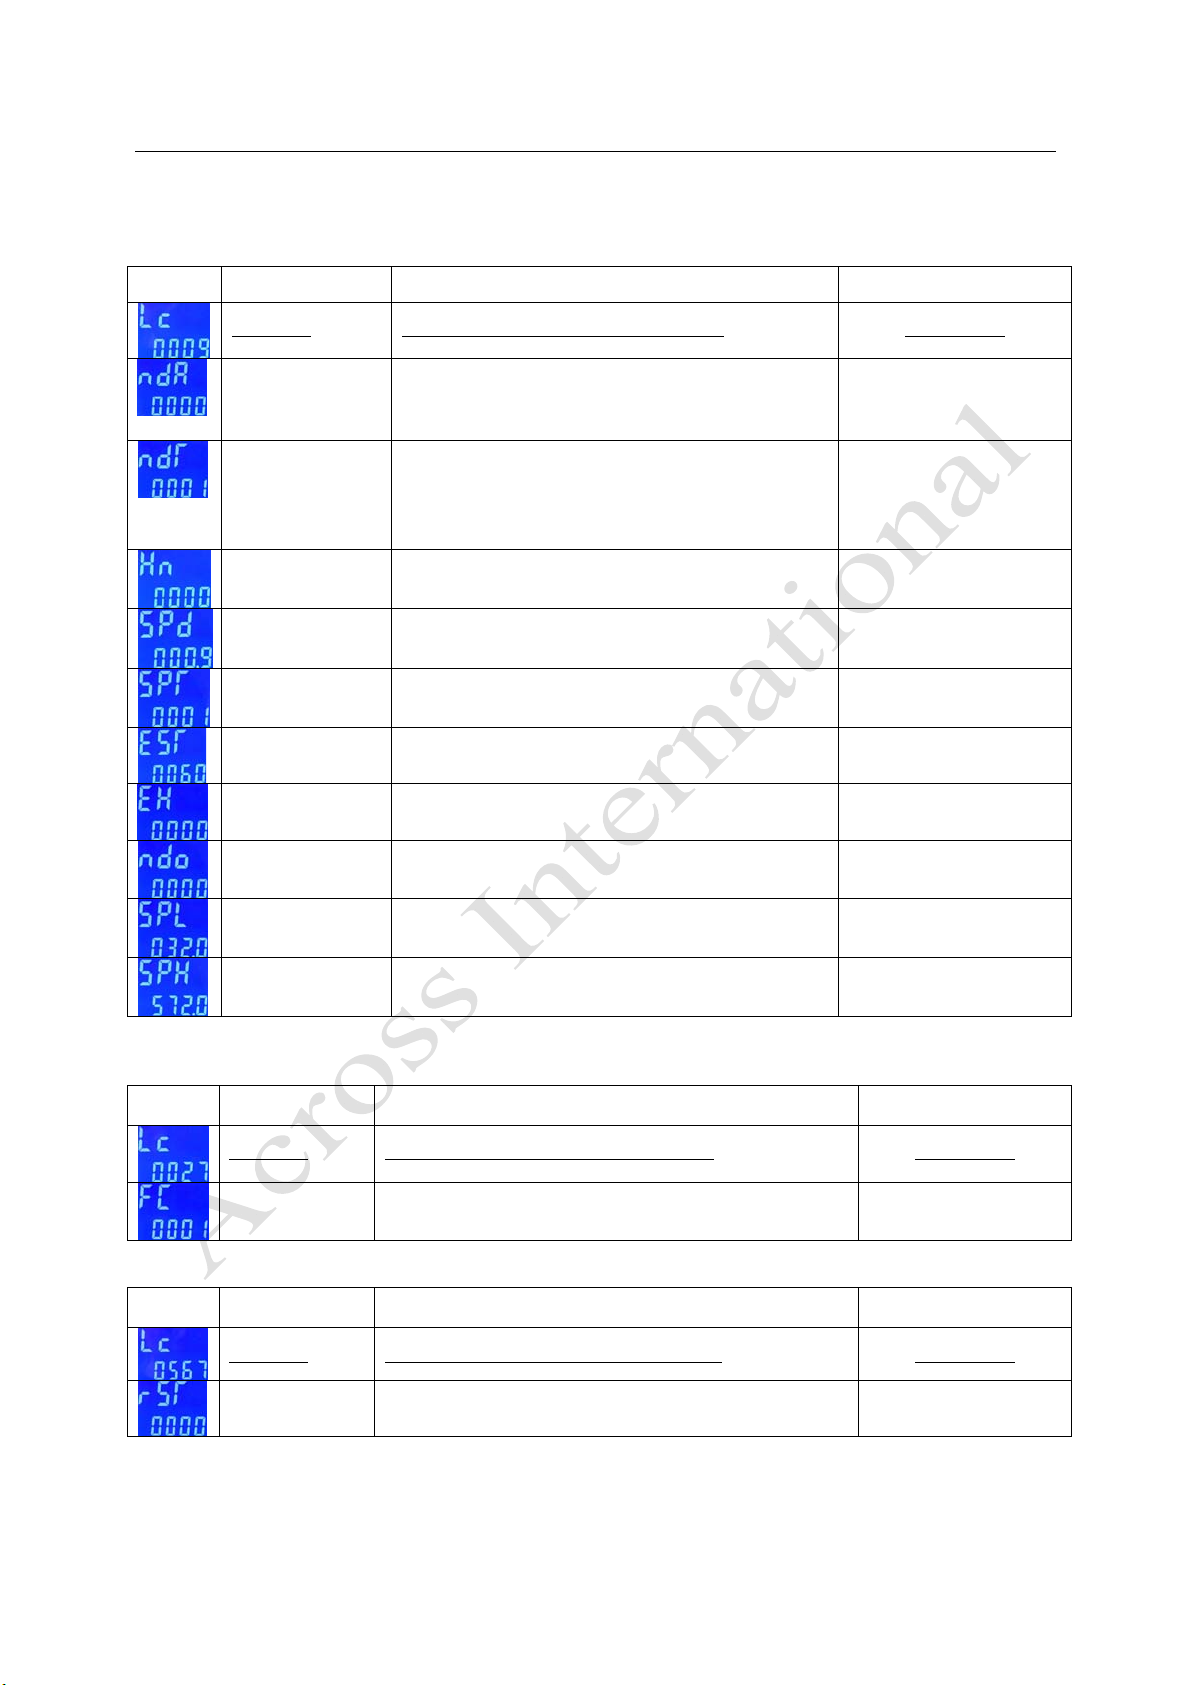
Table 1
Prompt Name Description Range (factory value)
Lc: Pass key When Lc = 3, controller enters into the menu below 3, 9, 27, 567 (0)
ALH: Over-temp
alarm If SV>(SP+ALH), ALM light comes on, buzzer sounds, and oven stops
heating. 0-180 (36) under °F mode
0-100 (20) under °C mode
ALL: Under-temp
alarm If SV<(SP-ALL), ALM light will flash and buzzer will sound. Under-temp
is not active if ALL is set to 0.
0-180 (0) under °F mode
0-100 (0) under °C mode
P: Proportional Increasing P may reduce temperature overshooting. Decrease P to allow
for a faster heating rate. 1-540 (60) under °F mode
0.1-300 (60) under °C mode
I: Integral Increase I to lower temperature fluctuation. 1-2000 (900) seconds
d: Differential Adjusted to reduce temperature overshooting. Usually set to 1/5 to 1/4 of
“I” value. 0-1000 (450) seconds
T: Control cycle Heating control cycle in seconds. 1-60 (20) seconds
Pb: Ambient
adjustment Corrects the difference between ambient temperature and what the
controller is reading.
Pb = Temperature measured by the exterior thermocouple(s), vs. the
temperature displayed by controller.
-90 to 90 (0) under °F mode
-50 to 50 (0) under °C mode
PL: Hot adjustment Offset the temperature difference between the controller and actual
reading inside the oven. (Use the calibration formula in section 6.4)
-999 to 999 (0)
Addr Communication address. 1-32 (1)
Loc: Lock Temperature and time setting: 0 = enabled 1 = disabled 0-1 (0)
7. ADVANCED SETTING (FOR 1-SEGMENT CONTROLLER)
ACCUTEMP SERIES 480°F VACUUM DRYING OVEN USER’S MANUAL
- 14 -
Table 2 (Do NOT modify unless instructed by an AI technician.)
Prom
p
t Name Descri
p
tion Ran
g
e
(
factor
y
value
)
Lc: Pass key
When Lc = 9, controller enters into the menu below
3, 9, 27, 567 (0)
ndA: Temp alarm mode
0: with over-temp alarm only
1: with over-temp alarm and under-temp alarm
0-1 (0)
ndT: Timer mode
0: no timer function
1: with timer function, SV window will display dwelling time after
oven temperature reaches target temperature.
2: with timer function, SV window will always display dwelling
time.
0-2 (1)
Hn: Timer unit
0: displays timer in minutes 1: displays timer in hours
0-1 (0)
SPd: Constant
temperature deviation
When PV > SV – SPd, oven is under constant temperature state
0.1-180 (0.9) under °F mode
0.1-100 (0.5) under °C mode
SPT: Constant temp
state buzzing time
Set buzzing time in seconds when oven enters into constant temp
state. Buzzer will sound constantly if SPT is set to 9999.
0-9999 (0) seconds
EST: Dwelling time up
buzzing time
Set buzzing time in seconds when the dwelling time is up. Buzzer
will sound constantly if EST is set to 9999.
0-9999 (60) seconds
EH: Continue to heat
after dwelling time ends
0: Turns off heating when dwelling time is over 1: Continues to keep
the oven at constant temperature, even after dwelling time is over.
0-1 (0)
ndo: Output mode
0: Output after dwelling time over. 1: Output after over-temp
2: Output when oven enters into constant temperature state.
0-2 (0)
SPL: Min temperature
Set minimum temperature the controller can go to.
-58 to 122 (32) under °F mode
-50 to 50 (0) under °C mode
SPH: Max temperature
Set maximum temperature the controller can go to.
32-752 (572) under °F mode
SPL to 400 (300) under °C mode
Table 3
Prompt Name Description Range (factory value)
Lc: Pass key
When Lc = 27, controller enters into the menu below
3, 9, 27, 567 (0)
FC: Temperature
display mode
0: Celsius 1: Fahrenheit
0-1 (0)
Table 4
Prompt Name Description Range (factory value)
Lc: Pass key
When Lc = 567, controller enters into the menu below
3, 9, 27, 567 (0)
rST: Factory reset
0: Do not reset to factory settings 1: Reset to factory settings
0-1 (0)
ACCUTEMP SERIES 480°F VACUUM DRYING OVEN USER’S MANUAL
- 15 -
8.1. Controller components
8. MULTI-SEGMENT RAMPTEMPERATURE CONTROLLER OPERATION

ACCUTEMP SERIES 480°F VACUUM DRYING OVEN USER’S MANUAL
- 16 -
Prompt Name Description Range
SV Target temperature Target temperature for each segment 0 to max temp (SPH)
PV Current temperature Current temperature in the oven
SP Segments SP00 displays current temperature and is non-editable SP00 to SP30
St Time St00: 0-9999, St01-31: -002 to 9999 St01 to St31
8.2. Operation
1) When the controller is switched on, display windows show “Pt” and the value of temperature range for 3
seconds, then it starts running.
2) “◄” button: In the setting mode, click the button to shift the digit.
3) “▼” button: In the setting mode, click the button to reduce the set value. Press and hold the button to reduce the
value continuously.
4) ”▲” button: In the setting status, click the button to increase the set value. Press and hold the button to increase the
value continuously. It can also turn the backlight on or off.
5) In the setting mode, if the controller is idle for more than one minute, it will automatically return to normal mode.
6) Temperature and time setting
Press the “SET” button. The controller will display: SP00; St01, SP01; St02, SP02 ... St30, SP30; St31”.
SP00 is the current measured temperature and cannot be modified.
If “St > 0”, this refers to the time the oven takes to get to target temperature of a segment.
If “St = 0”, the oven will heat to the target temperature of that segment in shortest period of time.
If “St = -1”, the oven will heat to target temperature and stay there until shut off manually.
If “St = -2”, the oven will shut off automatically when target temperature is reached.
During the setup process, press and hold the “SET” button for 3 seconds to exit. The settings will be saved
automatically.
In the setup process, first press the “◄”, then click the “SET” button to view on a set value.
EXAMPLE:
1. Heat oven to 80 degrees, from room temperature, in 20 minutes.
2. Remain at 80 degrees for 30 minutes.
3. Raise the heat to 120 degrees in 40 minutes.
4. Stay for 30 minutes at the 120 degrees.
5. Turn off the oven.

ACCUTEMP SERIES 480°F VACUUM DRYING OVEN USER’S MANUAL
- 17 -
STEPS:
SP00 (current measured temperature, cannot be modified)
St01 = 20, SP01 = 80
St02 = 30, SP02 = 80
St03 = 40, SP03 = 120
St04 = 30, SP04 = 120
St05 = -002
7) Press and hold the “R/S” button for 2 seconds until you see “RUN” come on, then release the button to start the
heating cycles. (The circular arrow icon will flash and the sun icon to the left of “HEAT” will come on and off
periodically).
8) During the heating process, the PV will display the current temperature and SV will display the amount of time that
has elapsed.
9) During heating process, press the “Inquire” button once. The controller will display the current segment number.
Press the “Inquire” button again, and the PV will display the timed setting of the segment. The SV will display time
elapsed.
10) To stop the oven manually, press and hold the “R/S” button for 2 seconds, until you see the “STOP” light come on,
then release the button.
11) When the over-temperature alarm is triggered, a buzzer will beep continuously. The "ALM" light will come on.
Press any button to stop the buzzer.
12) If PV displays “----”, the thermocouple or temperature controller may be faulty. Please check the
thermocouple and wiring, or replace your temperature controller.
8.3. Multi-segment controllerAuto-Tune
Use the auto-tuning function for optimal temperature control. During auto-tuning, the “AT” indicator will flash.
After auto-tuning is done, the “AT” stops flashing. The parameters and values will be saved automatically.
In stop mode, press and hold the “AT” button for 5 seconds. The controller will display “AT”. If “AT” = 0, the
controller will quit and return to normal display. If “AT” = 1, the controller displays “AtSP”. After adjusting the
“AtSP” value, press the “SET” button again to start auto-tuning.
During the auto-tuning process, press the hold “AT” button for 5 seconds to quit manually.

ACCUTEMP SERIES 480°F VACUUM DRYING OVEN USER’S MANUAL
- 18 -
8.4. Advanced settings
Press and hold the “SET” button for 5 seconds. The controller will display “Lc”. Enter your pass key and then
press “SET” to enable the advanced setting menus. Press and hold the “SET” button for 5 seconds to quit.
Prompt Name Description Range
(factory value)
Lc Pass key When Lc = 3, the controller enters into the menu
below 0
AL Alarm
When temperature is beyond “SP+AL”, the ALM
indicator will turn on. The buzzer will sound and
the oven will turn off.
0.0 to 100.0Ԩ(20.0)
T Control cycle The control cycle of temperature control. 1 to 60s (5)
P Proportional
Increasing P may reduce temperature
overshooting. Decrease P to allow faster heating
rates.
1.0 to max temp set in
next table or SPH (35.0)
I Integral Increase I to lower temperature fluctuation. 1 to 1000s (200)
d Differential Adjusted to reduce temperature overshooting.
Usually set to 1/5 - 1/4 of the value of I. 0 to 1000s (100)
Pb Ambient
adjustment
Corrects the difference between ambient
temperature and what the controller is reading.
Pb = Temperature measured by the exterior
thermocouple(s), vs. the temperature displayed by
controller.
-12.0 to 12.0Ԩ(0.0)
PK Hot
adjustment
Adjust when the temperature of the
controller is different from the actual temperature
inside of the oven.
PK = (actual value - target value) x 1000 /
maximum controller temperature
-999 to 999 (0)
Prompt Name Description Range
(factory value)
Lc Pass key When Lc = 9, the controller enters into the menu
below. 0
Pon Not used. 0 to 2 (0)
Stn Not used. 0 to 0 (0)
odr Not used. 0 to 5 (0)
Addr Communication address. 1 to 16 (1)
SPH Max Temp
Sets the maximum temperature the controller can
go to (Do NOT modify. Setting max temperature
too high could permanently damage your oven!)
0 400 (300)

ACCUTEMP SERIES 480°F VACUUM DRYING OVEN USER’S MANUAL
- 19 -
9.1. Issue: Oven temperature is consistently overshooting
Solution: It is normal for temperatures to overshoot in a vacuum oven, prior to stabilization. A generally
accepted range of temperature overshoot within 2 to 5 degrees. Once stable, the oven should maintain
within the specified uniformity. If the oven is overshooting and remains too hot, check the following:
a) Temperature controller set drastically higher than where it was calibrated.
b) The oven is not under vacuum. Always run the oven under vacuum.
c) The oven needs to be re-calibrated under Auto Tune.
9.2. Issue: Temperature displayed and reference value are different
Solution 1: Because there is no air in the chamber, the heat must radiate and conduct across the shelves
and through the chamber, it takes a lot of time for the temperature to stabilize. It is common for shelves to
be much cooler than the walls for a number of hours during the warm up process. When using an
independent thermocouple to verify temperature, pay attention to the following:
Always have the unit under vacuum when checking temperature.
Allow time for the oven to stabilize. We recommend anywhere from 1 to 4 hours.
Attach the probes to the shelves with heat-resistant tape.
The reading should be within the uniformity tolerance in the specifications. It might not match
exactly, but it should be very close.
If the shelves run cooler than you would like, you can use the temperature setting to increase the heat.
Turn the oven up until the parts on the shelves are at your desired temperature.
Solution 2: Offset the temperature differences manually in the advanced settings by using the
“Calibration by Formula” process, described in section 6.4.
9.3. Issue: Oven cannot hold vacuum properly
Solution: Before calling AI for technical support, please check the following:
Is the vacuum port open, the vent port closed, and pump connected properly to the vacuum port?
Check the door’s sealing gasket and make sure it is clean, well seated, and has no splits, cracks,
flattened, or melted spots, or any other defects.
Check the door alignment. When you close the door, is it making good contact with the gasket all the
way around? When in doubt, use a little vacuum grease on the door gasket, then shut the door. Did the
grease transfer all the way around the gasket to the glass when opened? If not, realign the door.
9.4. Issue: Oven vacuum gauge cannot get to ultimate 30 inches of mercury vacuum
Solution: Make sure your vacuum pump is right size for your oven, and the pump is getting the right
amount of power. Check if there is a large amount of off-gassing coming from the samples, and that the
door is sealed properly. Your altitude in relation to sea level is also a big factor. Please refer to section 11.
9. TROUBLESHOOTING
This manual suits for next models
6
Table of contents


