Action S002144 User manual
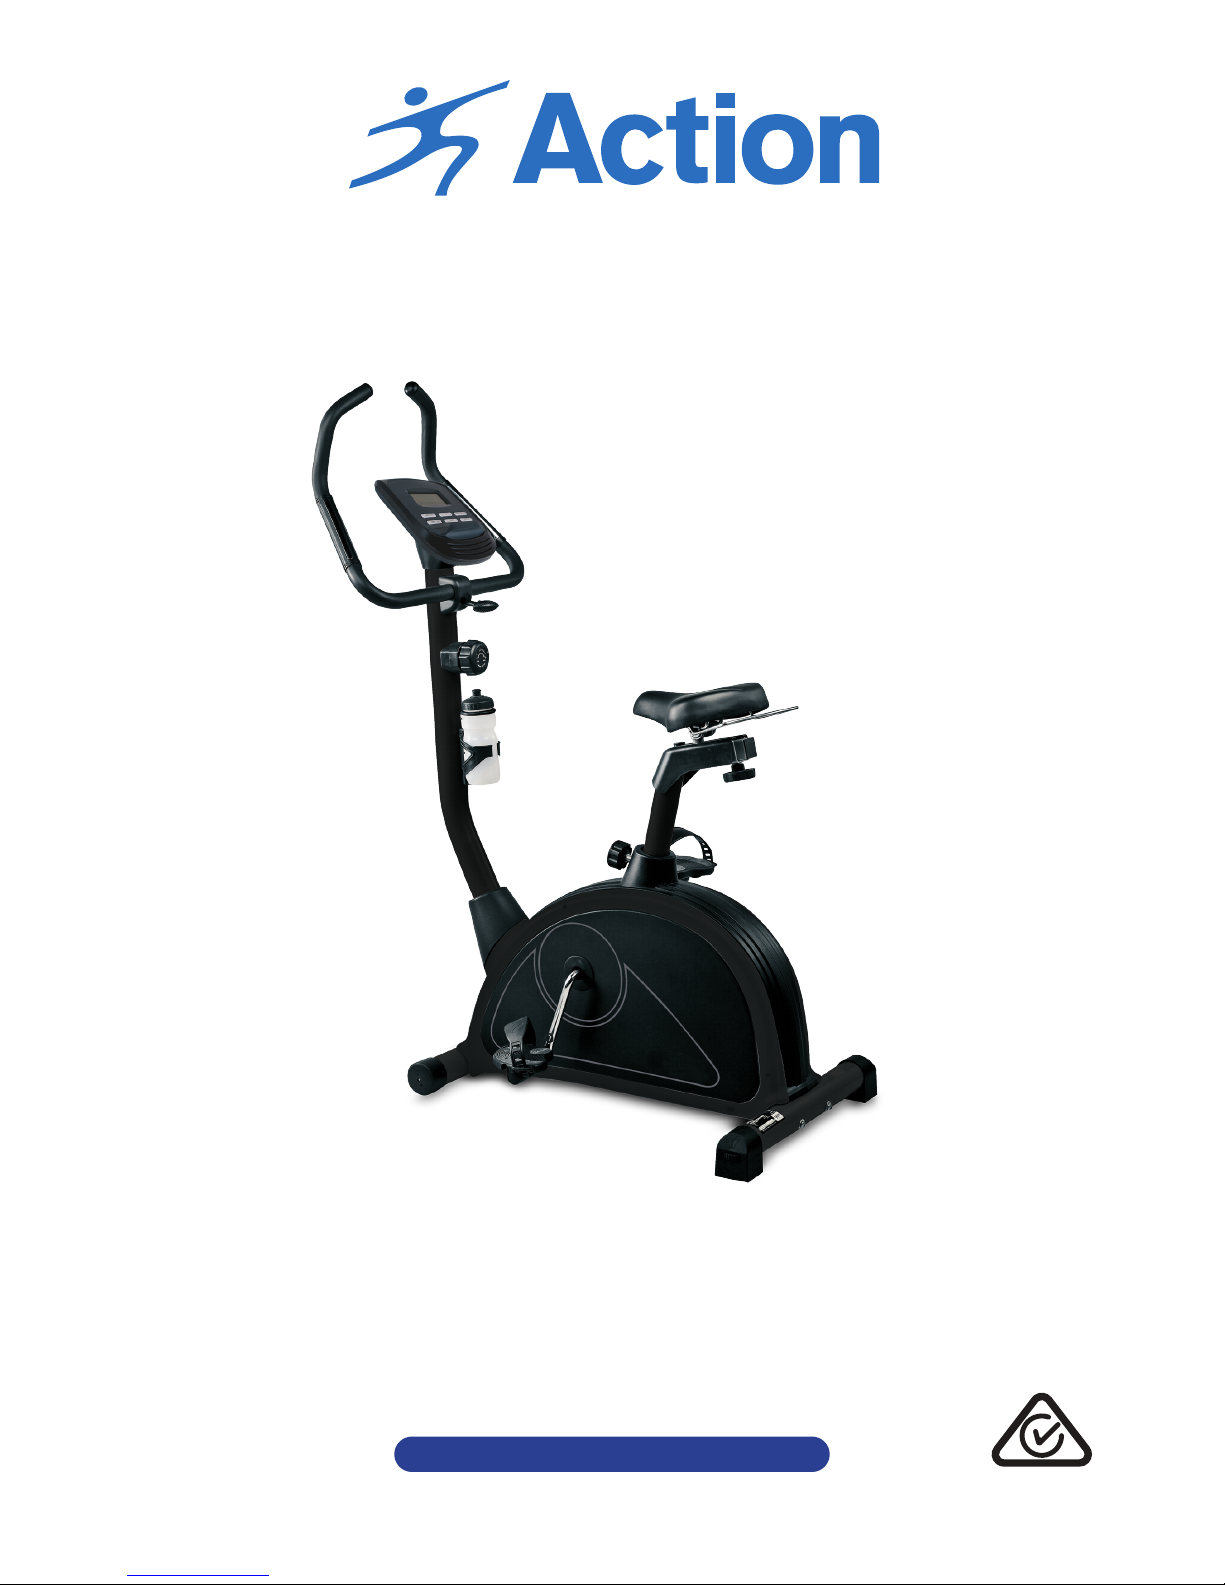
MAGNETIC UPRIGHT
EXERCISE BIKE
Model Number: S002144
INSTRUCTION MANUAL

MODEL: S002144
AFTER SALES SUPPORT
1800 465 070 2
Introduction
Congratulations!
You have made an excellent choice with the purchase of this quality CRANE® product.
By doing so you now have the assurance and peace of mind which comes from purchasing a product that has been
manufactured to the highest standards of performance and safety, supported by the high quality standards of
ALDI.
We want you to be completely satisfied with your purchase so this CRANE® product is backed by a comprehensive
manufacturer’s 2 year warranty and an outstanding aer sales service through our dedicated Helpline.
We hope you will enjoy using your purchase for many years to come.
If you require technical support or in the unlikely event that your purchase is faulty please telephone our Helpline
for immediate assistance. Faulty product claims made within the 2 year warranty period will be repaired or
replaced free of charge provided that you have satisfactory proof of purchase (keep your till receipt safe!). This does
not affect your statutory rights. However, be aware that the warranty will become null and void if the product is
found to have been deliberately damaged, misused or disassembled.
Getting Started
Before you begin to assemble the product, remove all the parts from the packaging and check that you have every
part from the parts list on page 10 & 11. If you are missing any parts please call our
Service Centre on 1800 465 070. Once you have checked all the parts, please read through the instructions again
carefully and then you are ready to get started. Ensure you assemble the Exercise Bike on a level surface and
check that all the hardware is fitted tightly before use.
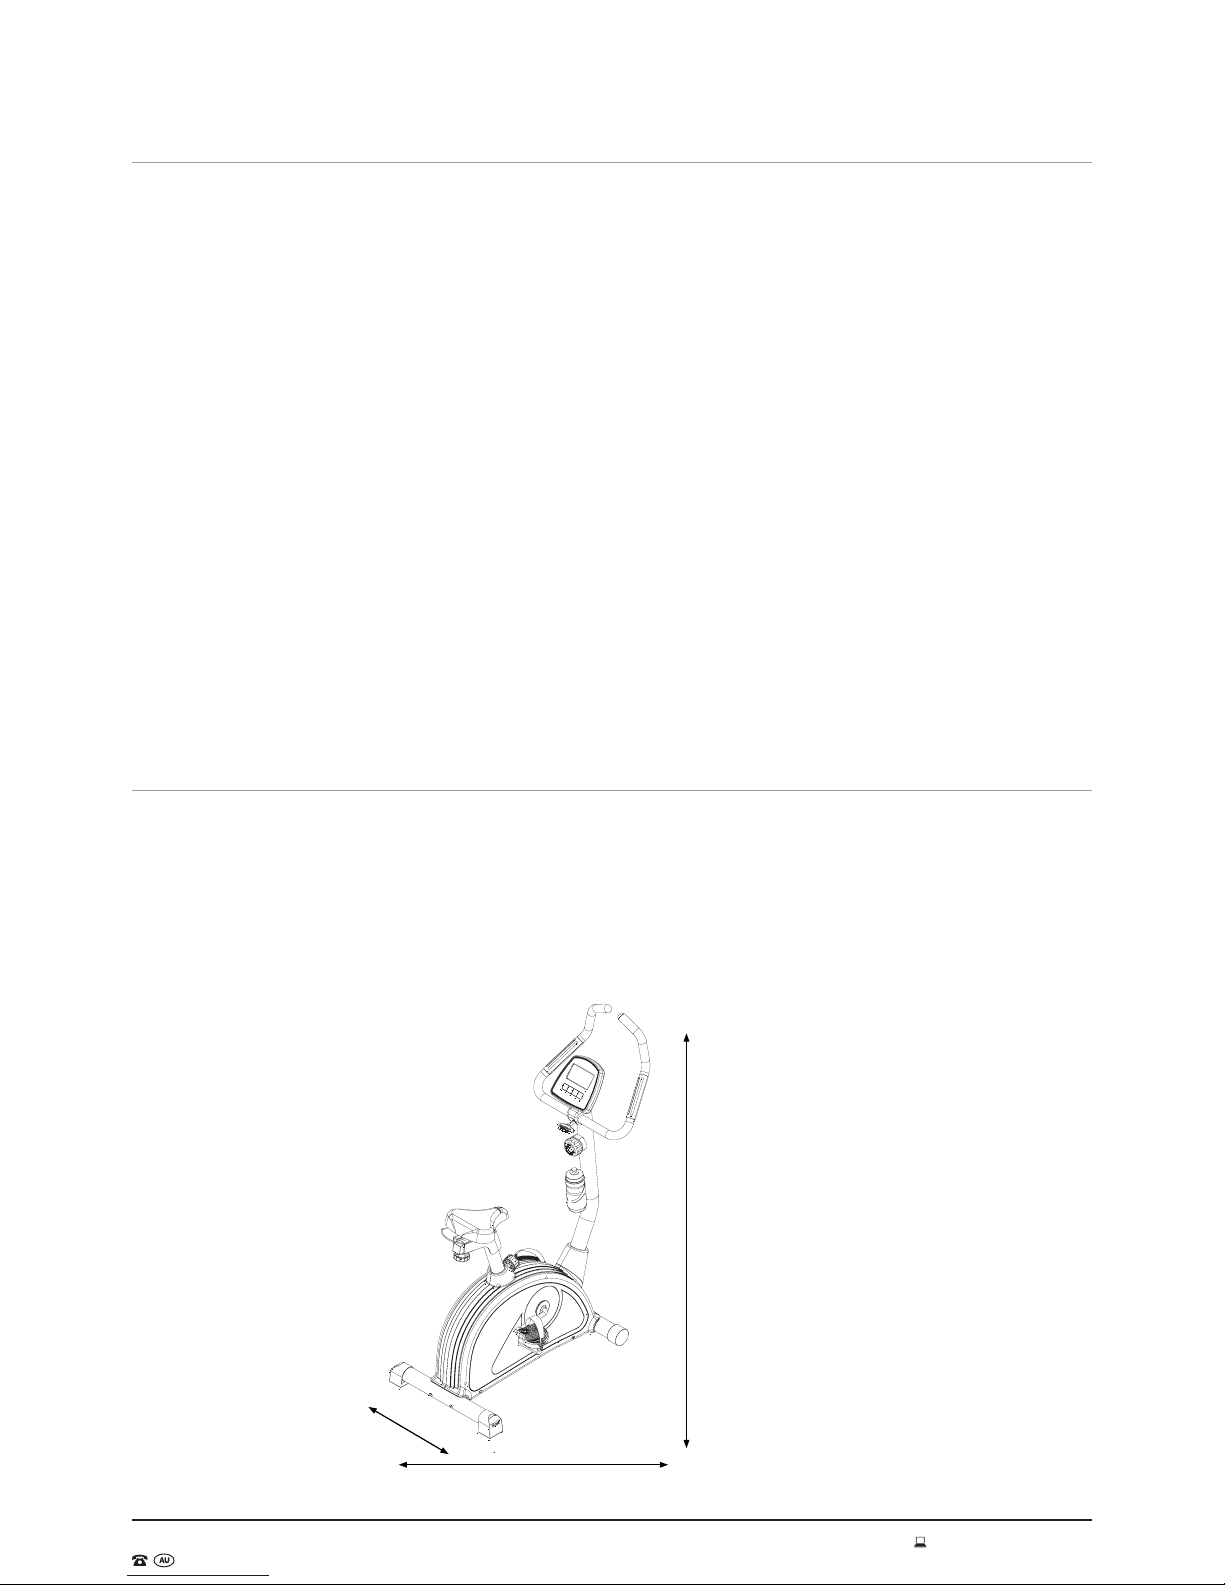
Weight: 27kg
146cm
91cm
60cm

MODEL: S002144
AFTER SALES SUPPORT
1800 465 070 3
Contents
2Introduction
2Getting Started
4General Information and Safety Instructions
7Assembly and Parts List
13 To use the Exercise Bike
14 Console Operation
15 Functions/Features
17 Error Message
17 Other Useful Information
18 Workout Area
19 Exploded Diagram

MODEL: S002144
AFTER SALES SUPPORT
1800 465 070 4
General Information and Safety Instructions
Save These Instructions
WARNING! To ensure your safety, please do not attempt to use this product without reading this instruction
manual carefully. Failure to comply with this warning may result in injury or property damage.
WARNING! To ensure proper use and safety of the Exercise bike, it is the responsibility of the owner to ensure that
all users are adequately informed of all warnings and precautions.
WARNING! This product is not intended for use by persons with reduced physical, sensory or mental capabilities;
or lack of experience and knowledge unless they have been given supervision or instruction concerning use of the
product by a person responsible for their safety.
WARNING! This product is not suitable for use by children.
Please make sure that all users read the Instruction Manual before use. Only use this Exercise bike in the manner
as described in this manual. To reduce the risk of serious injury, read the entire manual before you assemble the
bike. Please keep this manual in a safe place for future reference.
Safe Disposal Of Product And Packaging
Unpacking
Unpack the unit where it will be used. Place the Exercise bike carton on a level flat surface. When unpacking the
unit, remove any packaging materials from the interior. Keep the original packaging carton and materials in a safe
place. It will help prevent any damage if the product needs to be transported in the future. Plastic wrapping can be
a suffocation hazard, so please ensure all packaging materials are kept safely away from children and babies.
Packaging Disposal
Government guidelines ask that we reduce the amount of waste material disposed of in land fill sites. We therefore
ask that you dispose of all packaging waste responsibly and recycle where possible.
End of Life Disposal
We hope you enjoy many years of use from your Exercise Bike. However, a time will come when your Exercise
Bike will come to the end of its working life. You are responsible for the appropriate disposal of your unit to a
recognised public collection facility or council disposal service.
At the end of its working life, do not throw this equipment out with your household rubbish. Electrical and
electronic products contain substances that can have a detrimental effect on the environment and human health if
disposed of inappropriately. Observe any local regulations regarding the disposal of electrical consumer goods and
dispose of it appropriately for recycling. Contact your local authorities for advice on recycling facilities in your area.
Please keep the original packaging carton and materials in a safe place. It will help to prevent any damage if the
product needs to be transported in the future. In the event it is to be disposed of, please recycle all packaging
material where possible.
If you require another copy of this instruction manual, please contact service@actionspares.com.au to obtain an
electronic copy.

MODEL: S002144
AFTER SALES SUPPORT
1800 465 070 5
General Information and Safety Instructions (cont)
WARNING!
To reduce the risk of serious injury, read the entire manual before you assemble or operate this equipment.
In particular, please note the following safety precautions. Please keep this manual in a safe place for future
reference.
The safety level of this exercise bike can only be maintained if it is examined regularly for damage and wear. Before
each use and at least every two months pay particular attention to the tightness of bolts and all connection points.
This is particularly true for the attachment of the handlebars, middle handlebars, footplates and front and rear
bottom tubes.
1. Please note, prior to assembly, this exercise bike includes small parts/accessories that are not suitable for
children under 15 years of age. They may cause a choking hazard.
2. This product should be assembled by two adults.
3. It is strongly recommended that you consult your physician prior to beginning an exercise program. If
dizziness, nausea, chest pains, or any other abnormal symptoms are experienced while using this equipment,
stop the workout at once and consult a physician immediately.
4. The maximum user weight for this exercise bike is 120kg.
5. It is the responsibility of the owner to ensure that all users of this exercise bike are adequately informed of all
warnings and precautions. This exercise bike is not intended for use by persons with reduced physical, sensory
or mental capabilities; or lack of experience and knowledge unless they are being supervised by the person
responsible for their safety. Keep unsupervised children away from the exercise bike at all times.
6. This exercise bike is categorised as Class H and is for home use only. It is not intended for commercial use.
Only use this exercise bike in the manner as described in this manual.
7. Keep the exercise bike indoors, away from moisture and dust. Do not put the exercise bike in a garage, covered
patio or near water.
8. Place this exercise bike on a level surface with at least a 2m diameter of clear space surrounding the unit. To
protect your floor, it is recommended that you place a non-slip mat underneath the
exercise bike.
9. Never allow more than one person to use the exercise bike at any time.
10. The pulse sensor is not a medical device; various factors including the user’s movement may affect the
accuracy of the readings. The pulse sensor is intended only as an exercise aid in determining heart rate trends
in general. The pulse sensor is not a medical device; various factors including the user’s movement may affect
the accuracy of the readings. The pulse sensor is intended as an exercise aid in determining heart rate trends in
general and is not suitable for high accuracy purposes.
11. Always wear appropriate exercise clothing when using the exercise bike, do not wear loose clothing that could
become caught. Always wear appropriate running shoes; never use the exercise bike with bare feet, wearing
only stockings or in sandals.
12. Care must be taken when liing or moving the equipment, to ensure you don’t injure your back. Always use
proper liing techniques.
13. Do not place the exercise bike in the vicinity of obstacles, paths, doorways or corridors. Only use on a level
surface.

MODEL: S002144
AFTER SALES SUPPORT
1800 465 070 6
14. Always examine your exercise bike before use to ensure all parts are in working order and all the hardware is
fitted tightly.
15. This appliance is not intended for use by persons (including children) with reduced physical health, Injuries to
health may result from incorrect or excessive training. Excessive exercising may have serious complications. If
you feel faint, dizzy or short of breath, stop exercising immediately and seek medical advice.
16. Replace defective components immediately and/or keep the equipment out of use until repair.
17. Children should be supervised to ensure that they do not play with the appliance.
18. This exercise bike conforms to AS4902-1993.
WARNING: Over exercising may result in serious injury or death. If you feel faint stop exercising immediately
WARNING: Please keep children away from the exercise bike when it is in use. This can lead to injuries.
WARNING: Before each use, please ensure that all guards are fitted correctly to the exercise bike. If the bike is
operated in the vicinity of children and the guards are not correctly fitted, injuries can occur - including injuries
from finger entrapment.
WARNING: Use only on a level surface. Ensure correct adjustment of the seat before use.
General Information and Safety Instructions (cont)

MODEL: S002144
AFTER SALES SUPPORT
1800 465 070 7
Assembly and Parts List
Parts Diagram

MODEL: S002144
AFTER SALES SUPPORT
1800 465 070 8
Assembly and Parts List (cont)
Hardware List
5mm Allen key
Sleeve spanner
Multi-functional spanner
M5 x 25 Screw
(1 Piece)
Spring washer
M8 x 2.0T
(5 Piece)
Arc washer
0D20 x 1D8.5 x 1.5T
(4 Piece)
Flat washer
OD12 x 1D8.5 x 1.5T
(1 Piece)
Handle bar knob bushing
(1 Piece)
M8 x 72 screw (4 Piece)
66
13
811 12
14
16
Handle bar knob (1 Piece)

MODEL: S002144
AFTER SALES SUPPORT
1800 465 070 9
Assembly and Parts List (cont)
Parts List
Nr. Name & Specification Qty
1 Handle Bar Foam (1) 2 39 Crank 1
2 Hand Pulse 2 40 Adjust Wheel Gapbushing 1
3 Handle Bar Foam (2) 2 41 Adjust Wheel 1
4 Hand Pulse Wire 2 42 Od14*id10.5 *1.5T Flat Washer 1
5 Hand Pulse Screw 6 43 M10*6.35t Nylon Cap 4
6 Handle Bar 1 44 Curve Washer 1
7 Handle Bar End Cap 2 45 Adjust Wheel Fixer 1
8 M5*25 Cross Screw 1 46 Adjust Wheel Spring 1
9 Computer 1 47 Space Washer 1
10 M5*16 Round Screw 2 48 Od20*id10.5*2.0t Flat Washer 3
11 Od12*id8.5*1.5t Flat Washer 1 49 Semi-Circle Washer (with φ12 Axle) 2
12 M8*2.0T Spring Washer 5 50 Flywheel Axle 1
13 Handle Bar Knob 1 51 6901 Bearing 1
14 Handle Bar Knob Bushing 1 52 Small Belt Roller 1
15 Computer Post 1 53 One Way Bearing Bushing 1
16 Od20*id8.5*1.5t Arc Washer 8 54 Copper Bushing 1
17 M8*20 Inner Hexagon Screw 4 55 6904 Bearing 1
18 Sensor Wire Upper Section 1 56 HF2016 One Way Bearing 1
19 Lower Computer Post Cover 1 57 Flywheel Sets 1
20 TCD Lower Section 1 58 6001 Bearing 1
21 Water Bottle Bracket 1 59 M5*30 Outer Hexagon Screw 1
22 Water Bottle 1 60 Magnetic Spring 1
23 TCD Upper Section 1 61 Magnetic Group 1
24 M4*20 Flat Screw 18 62 M5 Nut 2
25 Sensor Wire Lower Section (With Sensor
and Sensor Fixer)
1 63 M10*100 (25mm)
Outer Hexagon Screw
1
26 Seat Adjustment Bar 1 64 Rear Stabilizer End Cap 2
27 Seat Adjustment Clip 1 65 Rear Stabilizer 1
28 Seat Adjustment End Cap 1 66 M8*72 Inner Hexagon Screw 4
29 Seat Adjustment Knob 1 67 Front Stabilizer end Cap 2
30 Seat Post 1 68 Front StabIlizer 1
31 Seat Post Bushing 1 69 Pedal Strap (L+R) 2
32 Quick Release Knob 1 70 Pedal (L+R) 2
33 Seat (With Towel Rack) 1 71 Crank Hole Cover 2
34 M4*8 Round Screw 1 72 Left Body Cover 1
35 Seat Post Cover 1 73 Right Body Cover 1
36 Belt 1 74 Wire Cap 2
37 Belt Plate 1 75 Handle Bar Knob Housing 1
38 Bushing Group (10 pieces) 1 76 Main Frame 1

MODEL: S002144
AFTER SALES SUPPORT
1800 465 070 10
Assembly Instructions (cont)
NOTE: Check against the parts list that all parts have been included before assembly. If there are any missing
parts, please contact the Service Centre to order replacements.
Step 1 - Front Stabiliser
Attach the front stabiliser (68) to the front of the main
frame using M8 x 72 inner hexagon screw (66), M8 spring
washer (12) and OD20 x ID8.5 x 1.5T arc washer (16) (See
Fig. 1).
Step 2 - Rear Stabiliser
Attach the rear stabiliser (65) to the rear of the main
frame. Use two M8 x 72 inner hexagon screw (66), M8
spring washer (12) and OD20 x ID8.5 x 1.5T arc washer
(16) to lock them up (See Fig. 2).
Step 3 - Pedals
1. Attach the pedal straps (69) on to the pedals (70),
ensuring the le strap is attached to the le pedal, and
the right strap is attached to the right pedal (See Fig.
3, 4, 5 and 6).
2. Attach the le pedal with strap to the le side of the
crank (39) and screw it anti-clockwise until tight.
3. Attach the right pedal with strap to the right side of
the crank (39) and screw it clockwise until tight.
68
66
12
16
Fig. 1
66
65
12
16
Fig. 2
Fig. 3 Fig. 4
Fig. 5 Fig. 6

MODEL: S002144
AFTER SALES SUPPORT
1800 465 070 11
Assembly Instructions (cont)
Step 4 - Computer Post
You may need a second person to assist with this part of the assembly (See Fig. 7).
1. Adjust the TCD (tension control device) knob on the computer post (15) to the lowest tension level. This will
assist with assembly of the computer post.
2. Remove the four pre-assembled M8 x 20 inner hexagon screws (17) and OD20 x ID8.5 x 1.5t arc washers (16)
from the computer post (15).
3. Slide the computer post lower cover (19) onto the computer post (15) and hold it up close to the tension
adjustment knob while completing step 4.4.
4. Hold the computer post (15) close to the lower computer post, and connect the sensor wire upper section (18)
with the sensor wire lower section (25), and connect the TCD upper section (23) with the TCD lower section (25)
(as pictured below).
5. Attach the computer post (15) to the lower computer post using the M8 x 20 inner hexagon screws (17) and
OD20 x ID8.5 x 1.5t arc washers (16) that were removed in step 4.2.
6. Slide the computer lower post cover (19) down to the bottom of the computer post (15) so it is tight against the
main frame.
Fig. 7

MODEL: S002144
AFTER SALES SUPPORT
1800 465 070 12
Assembly Instructions (cont)
Step 5 - Handle Bar
1. Move the handle bar (6) close to the computer post (15) and feed the
hand pulse wires (4) through the holes of the upper computer post.
2. Place the handle bar (6) in the bracket at the top of the computer post,
and then cover it with the handle bar knob housing (75). Adjust the
handle bar to the desired angle and lock it in place with the handle bar
knob housing (13), handle bar knob bushing (14), M8 spring washer (12)
and flat washer OD12 x ID8 x 1.5T (11) (See Fig. 8).
Step 6 - Computer
3. Move the monitor (9) close to the monitor post (15) and connect the
sensor wire upper section (18) to the sensor wire on the back of the
monitor housing (B) and connect the hand pulse wire (4) to the hand
pulse wire (A).
4. Slide the monitor (9) over the top of the monitor post (15) and attach
with the M5 x 25 flat screw (8) (See Fig. 9).
Step 7 - Seat
5. Place the seat (33) on the seat adjustment bar (26) and use the spanner
to tighten it.
6. Pull out the quick release knob (32) and insert the seat post (30) into
the main frame. Adjust to the desired height and re-insert the quick-
release knob (32) to secure. Please ensure the
quick-release knob (32) is secured tightly through the seat post (30) to
avoid injury when using this bike (See Fig. 10).
7. Remove the seat adjustment knob (29) and move the seat to the desired
position. Re-insert the seat adjustment knob (29) to secure the seat in
place.
NOTE: Please adjust the seat and its support to resist failure which could
impale or injure the user.
Step 8 - Water Bottle Holder
Remove the pre-assembled M5 x 16 screws (10) from the computer post
(15) and attach the water bottle bracket (21) to the computer post (15)
using the removed screws (see Fig. 11).
9
4
15
8
18
15
14
13
12
11
75
8
4
6
33
26
29
30
32
Fig. 8
Fig. 9
Fig. 10
Fig. 11

MODEL: S002144
AFTER SALES SUPPORT
1800 465 070 13
To use the Exercise Bike
Getting on and off Your Exercise Bike Safely
Care should be taken when getting on and off your Exercise Bike. To get onto the Exercise Bike ensure the le
pedal is in the lowest position. Grip the handlebars which are stationary. Then put le foot on the le pedal and get
secure. Then li your right foot over the machine and place on the right pedal
Before using the machine balance yourself. You may then pedal forward and the monitor should start.To get off
the machine, ensure that it has come to a complete stop and the le pedal is in the lowest position. Using the
handlebars to steady yourself, li your right leg over the machine and step onto the ground. You may then step off
the machine.
Adjusting the Tension
Increasing or decreasing the tension allows you to add variety to your workout sessions by adjusting the
resistance level of the bike. To increase tension and increase resistance (requiring more strength to pedal), turn
the Tension Control Knob to the right.
To decrease tension decrease resistance (requiring less strength to pedal), turn the Tension Control Knob to the
le.
Adjusting the Seat
To adjust the seat height, slacken the spring knob on the vertical post stem on the main frame and pull back the
knob. Position the vertical seat post for the desired height so that holes are aligned, then release the knob and
retighten it.
To move the seat forward in the direction of the handlebar or backwards away from it, loosen the adjusting knob
and washer and pull the knob back. Slide horizontal seat post into desired position. Align holes and then retighten
the adjusting knob.
23

MODEL: S002144
AFTER SALES SUPPORT
1800 465 070 14
Console Operation
1. Insert the included 2 x AA batteries into the console, and the buzzer will sound and all functions will display on
screen for about 2 seconds.
CAUTION: To prevent battery leakage:
• Be sure to insert batteries correctly and always follow manufacturer’s instructions.
• Never mix old and new batteries (replace all batteries at the same time).
• Never mix alkaline, standard and rechargeable batteries.
• Use only batteries of the same or equivalent type as recommended.
• Do not charge non-rechargeable batteries.
• Always remove exhausted or dead batteries from the product; do not dispose of batteries in fire, batteries may
explode or leak.
• Remove batteries from product before extended storage.
• Do not short circuit the supply terminals.
• Batteries may explode or leak if misused.
The things you should know before exercising
A. User Data:
You should input your personal data before workout. Press BODY FAT key to enter your personal data of age, sex,
weight and height then the monitor will save the data unless you take out the batteries.
B. Clock Mode:
1. The monitor will enter the sleep mode when there is no signal input or no keys are being pressed aer 4
minutes. You can press ENTER key to switch the clock and temperature in sleep mode or press other keys to
quit the sleep mode.
2. You can set up the TIME or ALARM by holding the ENTER key for over 2 seconds. Then you can set up TIME and
ALARM by pressing the UP or DOWN keys.
3. By holding the ENTER and UP keys together for over two seconds, you can check the current time at “NO
SPEED” mode.

MODEL: S002144
AFTER SALES SUPPORT
1800 465 070 15
Functions/Features
1. CLOCK: Display the current time in hour, minutes and seconds.
2. ALARM: You can set up an alarm on this monitor. The alarm will beep for 1 x minute when your set time is
reached.
3. TEMPERATURE: Display the current temperature.
4. SCAN: During the exercise stage, the monitor will automatically scan the function of TIME, SPEED,
DISTANCE,CALORIES, PULSE, RPM,BODY FAT and PULSE RECOVERY for 6 seconds unless press the ENTER
key is pressed to exit the auto-scan function. When the monitor exits the manual-scan, the message window
will show “SCAN” for 2 seconds then switch to auto-scan function.
5. TIME: Shows your elapsed workout time in minutes and seconds. Your monitor will automatically count up
from 0:00 to 99:59 in one second intervals. You many also program your monitor to count down from a set
value by using the UP and DOWN keys. If you continue exercising once the time has reached 0:00, the monitor
will begin beeping, and reset itself to the original time set, letting you know your workout is done.
6. SPEED: Displays your workout speed value in KM per hour. If there is no speed signal input then the monitor
will display “NO SPEED” on the window.
7. DISTANCE: Displays the accumulative distance travelled during each workout up to a maximum of 99.9KM.
8. CALORIES: Your monitor will estimate the cumulative calories burned at any given time during your workout.
9. PULSE: Your monitor displays your pulse rate in beats per minute during your workout. If there is no pulse
signal input then the monitor will display “NO pulse” on the window.
10. RPM: Your pedal cadence.
11. AGE: Your monitor is age-programmable from 10 to 99 years. If you do not set an age, this function will always
default to age 35.
12. PULSE RECOVERY: During the START stage of your workout, leave your hands on the handle bar grips then
press “PULSE RECOVERY” key, then the monitor will show “HOLD SENSOR” to remind you. Time starts
counting from 01:00 - 00:59 - - to 00:00. As soon as 00:00 is reached, the monitor will show your heart rate
recovery status with the grade F1.0 to F6.0 and message window will show your workout situation. The details
as follows,
1.0 means OUTSTANDING
1.0 - 2.0 means EXCELLENT
2.0 - 2.9 means GOOD
3.0 - 3.9 means FAIR
4.0 - 5.9 means BELOW AVERAGE
6.0 means POOR
NOTE: If there is no pulse signal input, then the monitor will show “P” on the PULSE window. If the monitor shows
“ERR” on the message window, please re-press PULSE RECOVERY and make sure your hands are placed well on
the grips

MODEL: S002144
AFTER SALES SUPPORT
1800 465 070 16
Functions/Features (cont)
Key function:
There are 6 button keys and the function description as follows:
1. UP: During the setting mode, press the key to increase the value of Time, Distance, Calories, Age, Weight,
Height etc. and to select sex. During the CLOCK mode, you can set up clock and alarm by using this key.
2. DOWN key: During the setting mode, press the key to decrease the value of Time, Distance, Calories, Age,
Weight, Height etc. and to select sex. During the CLOCK mode, you can set up clock and alarm by using this
key.
NOTE: During the setting mode, you can hold UP and DOWN keys together for over two seconds then the setting
value will reset to Zero or default value.
3. ENTER/RESET:
a. Press the key to accept the current data entry.
b. During the “NO SPEED” mode, by holding this key for over two seconds then the monitor will re-power-on.
4. BODY FAT: Press the key to enter your personal data before to measure your body fat ratio.
5. MEASURE: Press the key to get your body fat ratio, BMI and BMR.
a. FAT %: Indicates your body fat percentage aer measurement.
b. BMI (Body Mass Index): BMI is a measure of body fat based on height and weight that applies to both adult
men and women.
c. BMR (Basal Metabolic Rate): Your Basal Metabolic Rate (BMR) shows the number of calories your
body needs to operate. This doesn’t account for any activity, it’s simply the energy needed to sustain a
heartbeat, breathing and normal body temperature.
6. PULSE RECOVERY: Press the key to activate heart rate recovery function.
F=1.0 means OUTSTANDING
1.0 < F < 2.0 means EXCELLENT
2.0 < F < 2.9 means GOOD
3.0 < F < 3.9 means FAIR
4.0 < F < 5.9 means BELOW AVERAGE
F=6.0 means POOR

MODEL: S002144
AFTER SALES SUPPORT
1800 465 070 17
Error Message
E:
Excessive speed will result in the monitor displaying “E”.
Err:
When measuring the body fat or pulse recovery, if there is no pulse signal input within 20 seconds then the monitor
will display “Err”. You can repress any key to quit the “Err” message.
Other Useful Information
Specification Table
MODEL: S002130V
DIMENSIONS: Assembled dimensions: 146 x 60 x 91cm
Class HC, speed-independent system
SEAT HEIGHT: 84.5cm - 103cm
NET WEIGHT: 27.0kg
WARRANTY: 2 Year
This Bike/Trainer complies with Standard: ISO 20957-1 : 2013 & ISO 20957-5 : 2016
Version No: 1.2
Issue Date: 20 March 2018

MODEL: S002144
AFTER SALES SUPPORT
1800 465 070 18
Workout Area
Free area and training area.
The free area should be no less than 0.6m greater than the training area in the directions from which the
equipment is accessed. The free area must also include the area for emergency dismount. Where equipment is
positioned adjacent to each other the value of the free area may be shared.

Table of contents
Popular Exercise Bike manuals by other brands

Impex
Impex Marcy NS-1201U owner's manual

Vision Fitness
Vision Fitness E3200 Frame 9 Assembly guide

Tomahawk
Tomahawk IC-TKIC7B manual

Stairmaster
Stairmaster MOMENTUM 3400 CE owner's manual

BH FITNESS
BH FITNESS Class Bike IIH9166 Instructions for assembly and use

Sports Art Industrial
Sports Art Industrial C545U owner's manual