Action S002475 User manual
Magnetic Rowing Machine
S002475
Instruction Manual

2S002475 Magnetic Rowing Machine
Contents
3Warnings
5Installation Instructions
6Care and Maintenance Instructions
7Safety Information
10 Basic Skills
12 Basic Landing Positions
14 Parts List
15 Assembly Instructions
22 Inspection Check List
23 Warranty Information
3S002475 Magnetic Rowing Machine
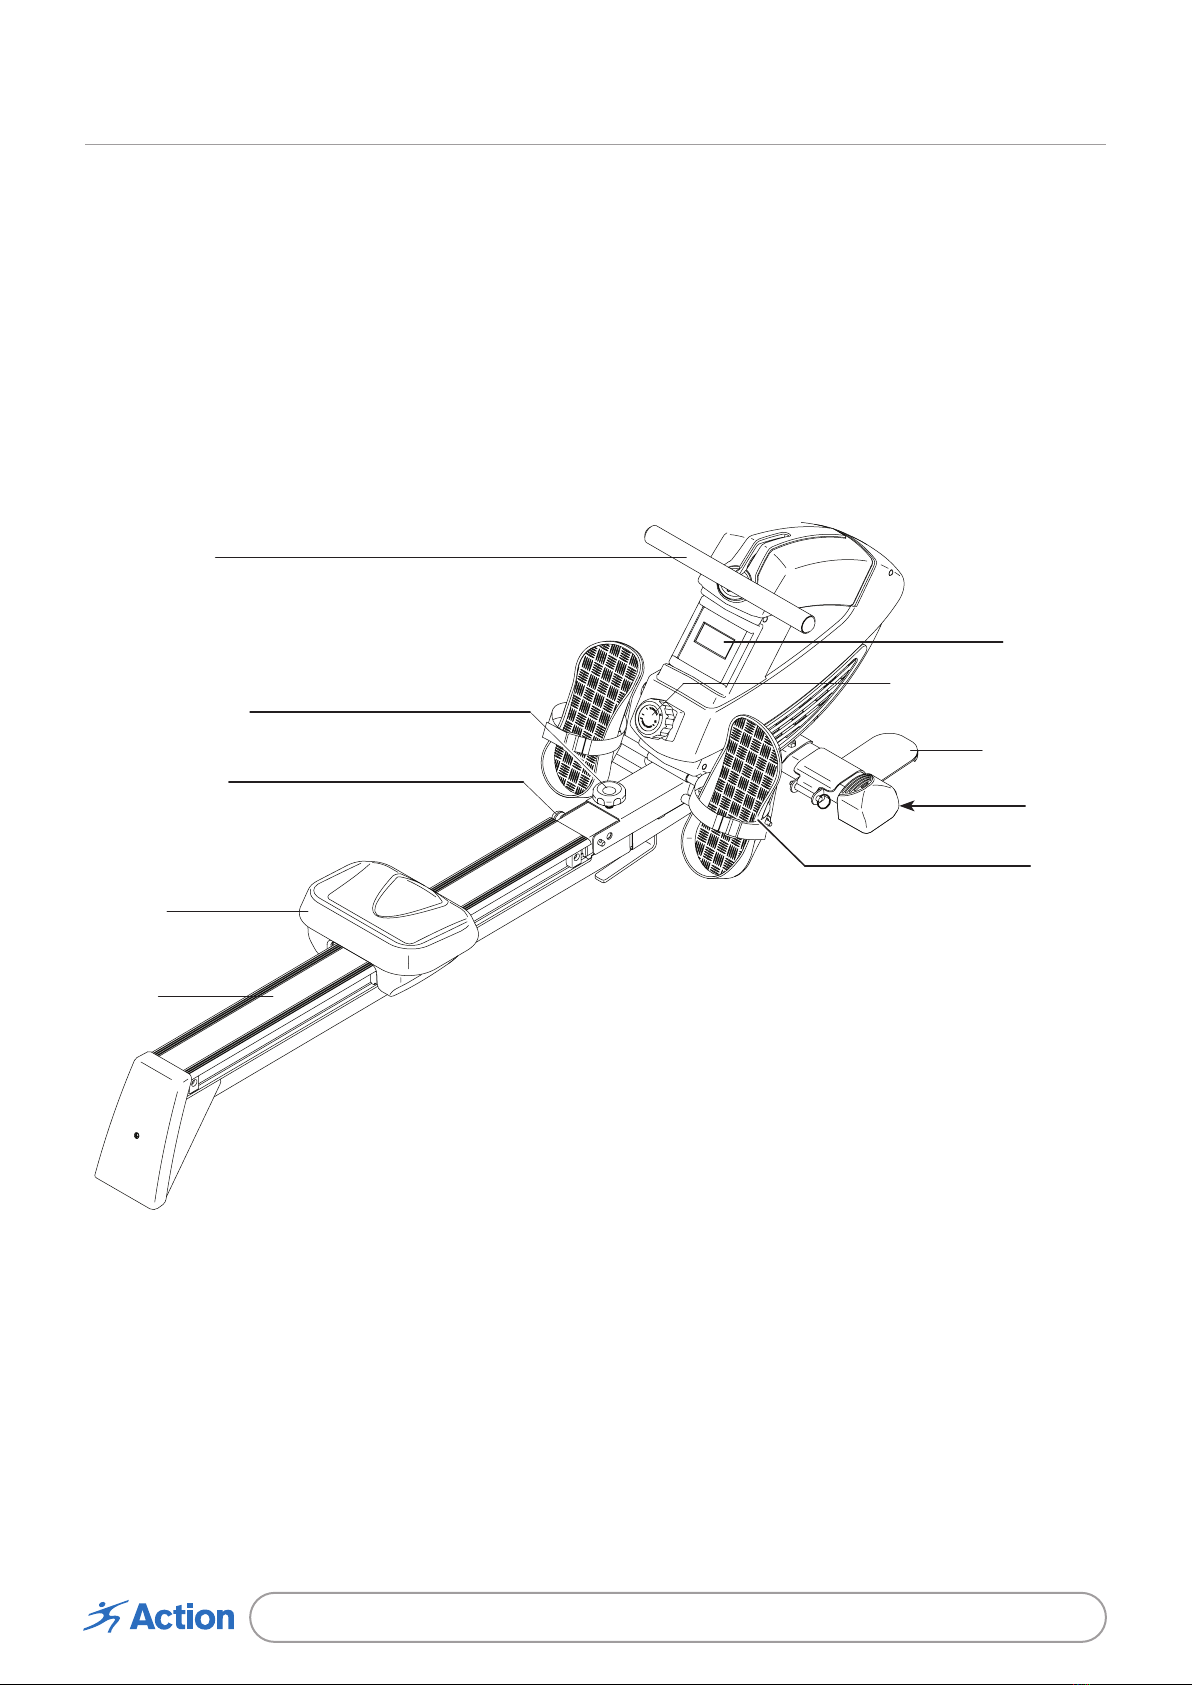
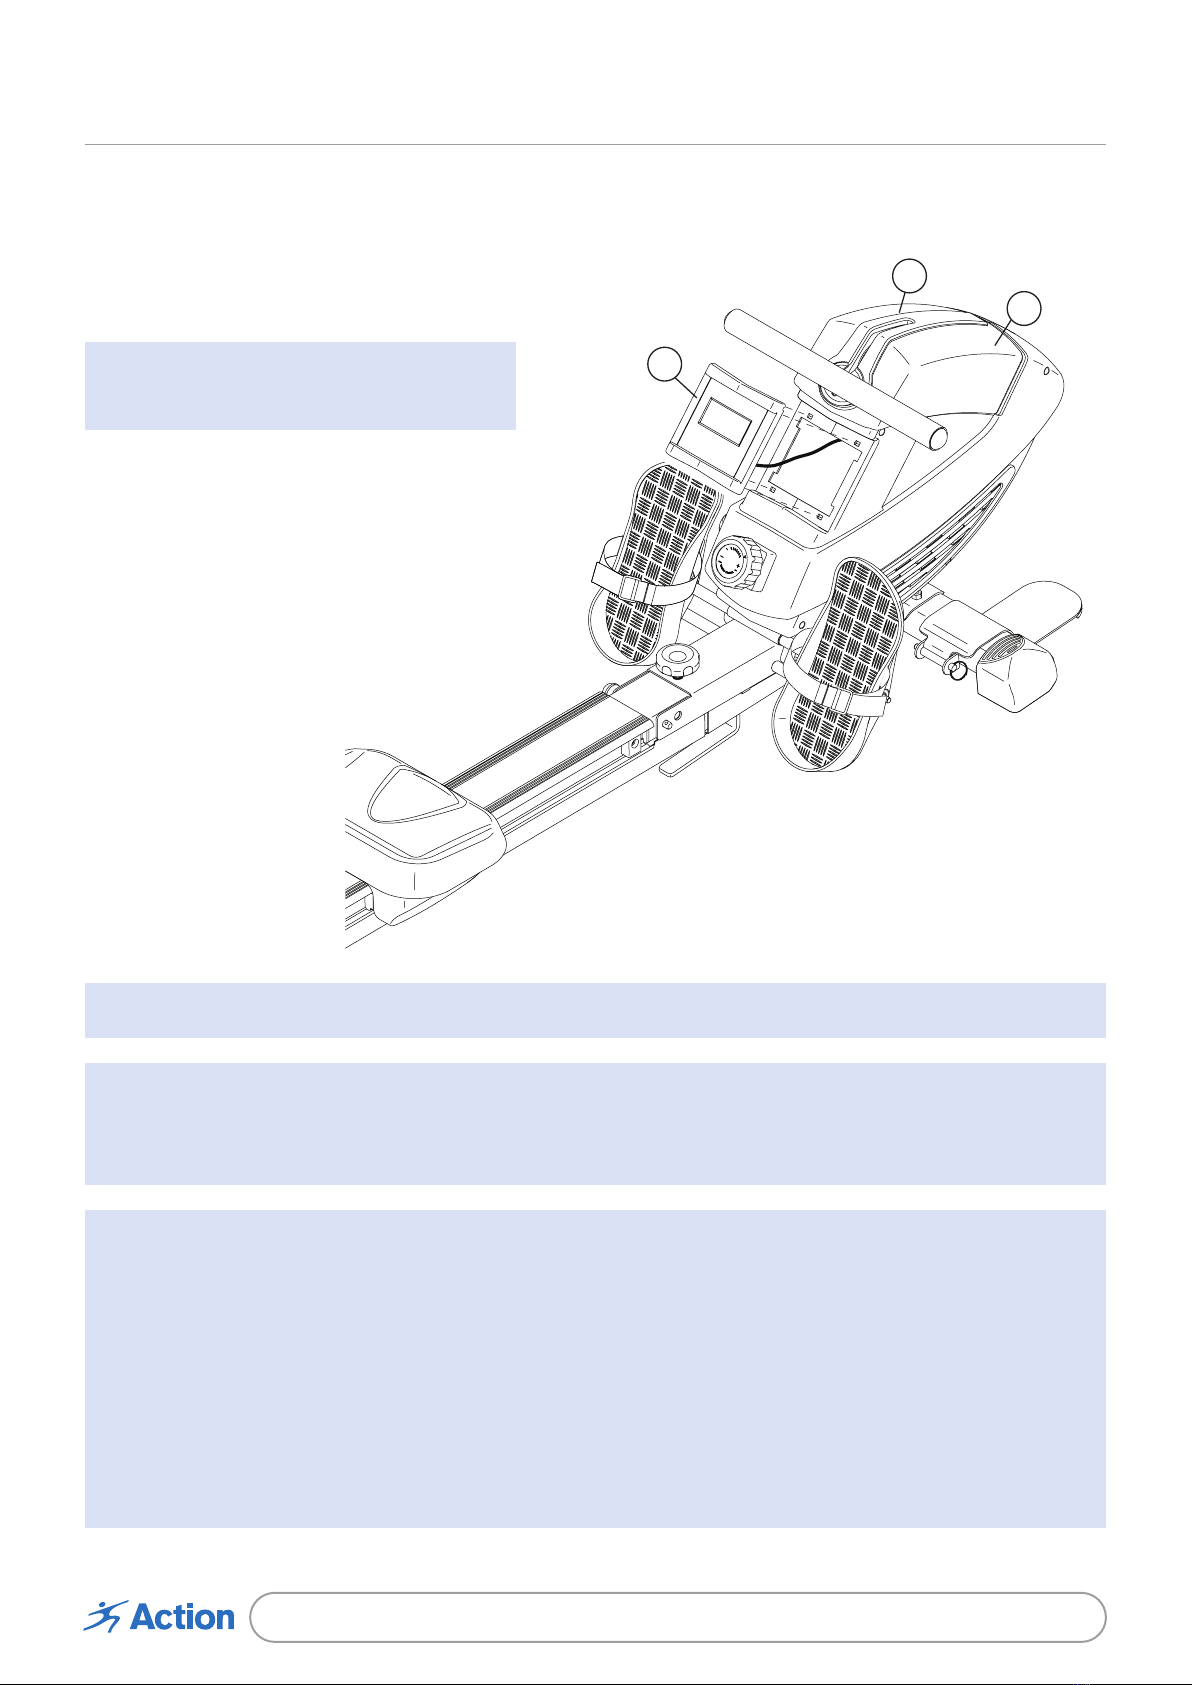
Foot Plate
Wheel
Pedal
Seat
Console
Resistance Control
Frame Pin
Frame Knob
Rail
Row Bar
Getting Started
Before you begin to assemble the product, remove all the parts from the packaging and
check that you have every part from the parts list on page 6 and 7. If you are missing
any parts please call our Service Centre on 1800 465 070. Once you have checked all the
parts, please read through the instructions again carefully and then you are ready to get
started. Ensure you assemble the Rowing Machine on a level surface and check that all
the hardware is fitted tightly before use.
4S002475 Magnetic Rowing Machine
Warnings
To reduce the risk of serious injury, read the entire manual before you assemble or
operate this rowing machine. In particular, please note the following safety precautions.
Please keep this manual in a safe place for future reference. Any defective components
should be replaced or repaired immediately and the rowing machine should not be used
until the repair has occurred.
WARNING: It is strongly recommended that you consult your physician prior to
beginning an exercise program. If dizziness, nausea, chest pains, or any other
abnormal symptoms are experienced while using this rowing machine, stop the
workout at once and consult a physician immediately.
1. It is the responsibility of the owner to ensure that all users of this rowing machine
are adequately informed of all warnings and precautions. This rowing machine is not
intended for use by persons with reduced physical, sensory or mental capabilities;
or lack of experience and knowledge unless they are being supervised by the person
responsible for their safety.
2. Keep children and pets away from this rowing machine at all times.
3. This rowing machine is not suitable for persons under the age of 15.
4. The maximum user weight for this rowing machine is 120kg, Class HC, speed-
independent system.
5. This rowing machine should be assembled by an adult. During assembly, keep
children away from the work area as this rowing machine contains small parts that
may cause a choking hazard.
6. Only use this rowing machine as described in this manual.
7. Place this rowing machine on a level surface with at least a 2m diameter of clear
space surrounding the unit. To protect your floor, it is recommended that you place an
anti-slip mat underneath the rower.
8. Keep the rowing machine indoors, away from moisture and dust. Do not put the
rowing machine in a garage, outbuilding, covered patio or near water.
9. Never allow more than one person to use the rowing machine at any time.
10. Always examine your rowing machine before use to ensure all parts are in working
order and all of the hardware is fitted tightly.

5S002475 Magnetic Rowing Machine
11. Always wear appropriate exercise clothing when using the rowing machine, do not
wear loose clothing that could become caught. Always wear appropriate running
shoes; never use the rowing machine with bare feet, wearing only stockings/socks or
in sandals.
12. Care must be taken when liing or moving the rowing machine, to ensure you don’t
injure your back. Always use proper liing techniques.
13. Always keep your back straight while using the rower, do not arch your back.
14. Do not release the row bar while the cord is extended.
15. Care should be taken when getting on and off the Rowing Machine. To get onto the
machine, stand on the le side and ensure the le pedal is in the lowest position. Grip
the handle bars, place your le foot onto the le footplate and li yourself onto the
machine, stabilizing yourself by gripping the stationary handles. Once you feel stable
and secure, li your right foot over the machine and place it on the right foot plate.
Before starting any movement, stand tall, brace your midsection and balance yourself.
Start moving by pedaling the legs and moving the arms back and forth in time with
the legs. As you push down with your right leg, pull back with your right arm and vice
versa. Keep your eyes forward and upper body upright throughout the movement. To
get off your rowing machine you must first slow down until the machine comes to a
complete stop. Then remove yourself in the same manner you got onto the machine.
Warnings (cont)

6S002475 Magnetic Rowing Machine
Part No. Description Qty
2 Rear Stabiliser Cover 1
3 Rear Stabiliser 1
8 Rail 1
18 Rail Cover 1
29 Pedal Strap 2
30 Right Pedal 1
32 Pedal Spacer 2
34 Pedal Stop 2
Part No. Description Qty
35 Stop Rod 1
39 Frame 1
50 Front Stabiliser 1
51 Foot Plate Pin 2
52 Foot Plate 2
57 Le Pedal 1
58 Pedal Axle 1
NOTE: Some parts may be supplied pre-assembled.
Parts List

7S002475 Magnetic Rowing Machine
Hardware
Part No. Description Qty
12 M5 x 8mm Screw 4
101 M5 x 10mm Screw 1
14 M8 x 20mm Screw 2
46 M10 x 52mm Screw 2
31 M8 Acorn Nut 4
Part No. Description Qty
15 M8 Split Washer 4
16 M8 x 20mm Washer 6
47 M10 x 20mm Washer 2
33 M13 x 22mm Washer 2
88 M13 x 32mm Washer 1

8S002475 Magnetic Rowing Machine
50
39
47
47
46
46
45
39
36
37 54
33
33
Assembly Instructions
Find a clean flat surface to unpack and assemble your rowing machine. Prior to beginning
assembly, ensure that you have all of the parts listed in the Assembly Parts List and
Hardware Identification Chart.
If you’re missing any parts, please contact our Service Centre on 1800 465 070 or email
service@actionspares.com.au to arrange for replacement parts to be sent to you.
Step 1
Attach the Front Stabiliser (50) to the
Frame (39) using M10x52mm Bolts
(46) and M10x20mm Washers (47).
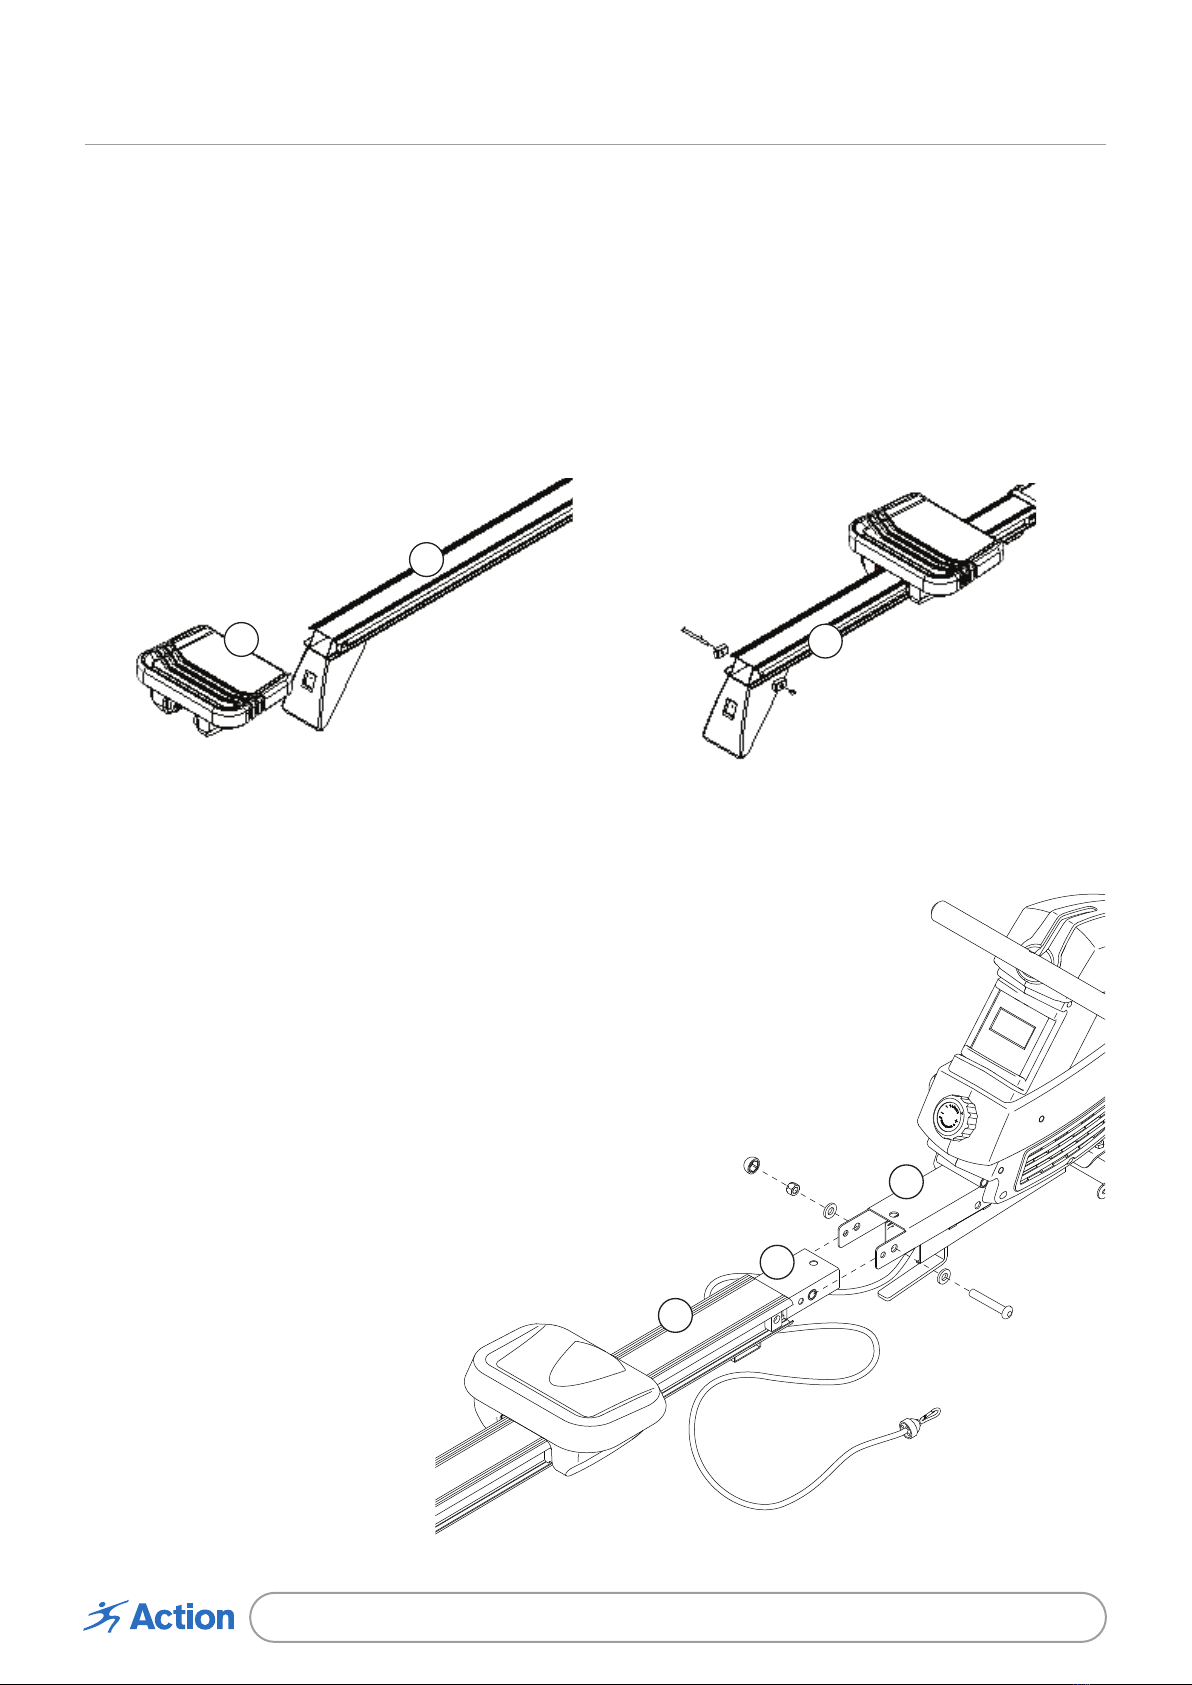
Step 2
Remove the Frame Pin (37) from the
Frame (39). Unwrap the Cord (45)
from the Frame (39).
Remove 1/2” Locknut (54),
M13x22mm Washers (33) and
1/2”x100mm Bolt (36) from the
Frame (39).
NOTE: The parts that you
removed will be used in later
steps.
9S002475 Magnetic Rowing Machine
41
8
8
28
8
39
54
33
33
36
55
9
10
11
Step 3
Remove the M6x12mm Bolt (9), Carriage Bumpers (10) and Frame Bushing (11) which are
pre-assembled on the rear end of the Rail (8).
Slide the Seat (28) onto the rail and assemble the removed M6x12mm Bolt (9), Carriage
Bumpers (10) and Frame Bushing (11) at the end of the rail.
Assembly Instructions (cont)
Step 4
Attach the Rail Bracket (41) located at
the front of Rail (8) to the Frame (39)
using 1/2”x100mm Bolt (36), M13x22mm
Washers (33) and 1/2” Locknut (54) that
were removed in Step 2.
Cover 1/2” Locknut (54) with Nut Cap (55).

10 S002475 Magnetic Rowing Machine
Hole
8
8
28
3
41
37
14
14 16
16
Step 5
Move the Seat (28) to the front of
the Rail (8).
Raise the Rail (8) to the vertical
position and insert the Frame
Pin (37) into the hole on the Rail
Bracket (41), so that it holds the
Rail (8) in place.
Step 6
Attach the Rear Stabiliser
(3) to the Rail (8) using
M8x20mm Bolts (14) and
M8x20mm Washers (16).
Assembly Instructions (cont)

11 S002475 Magnetic Rowing Machine
Hole
2
3
3
101
45
45
43
97
5
3
Step 7
Cut the retaining tie off the cord.
Wrap the end of the Cord (45)
around the Small Pulley (5) on the
Rear Stabiliser (3). Make sure that
the Cord (45) is not twisted and
attach the Clip (97) at the end of
the Cord (45) to the hole in the Rail
Attachment Bracket (43).
Step 8
Attach the Rear Stabiliser
Cover (2) to the Rear
Stabiliser (3) using
M5x10mm Bolt (101).
Assembly Instructions (cont)

12 S002475 Magnetic Rowing Machine
18
8
12
12
12
12
8
41
39
37
88
87
Step 9
Attach the Rail Cover (18) to the
Rail (8) and secure in place using
M5x8mm Bolts (12).
NOTE: To attach the Rail
Cover (18) you will need to
remove the Frame Pin (37).
Be careful to ensure that the
Rail (8) does not fall over and
strike you.
Step 10
Lower the Rail (8) onto the floor and
insert the Frame Pin (37) back through
the Frame (39) and Rail Bracket (41).
Place M13x32mm Washer (88) onto the
Frame Knob (87), insert the Frame Knob
(87) into the Frame (39) and tighten.
Assembly Instructions (cont)

13 S002475 Magnetic Rowing Machine
39
35
35
15
34
16
31
15
34
16
31
39
30
57
33
32
58
15
16
31
Step 11
Insert the Stop Rod (35) into
the Frame (39) and center it.
Place a Pedal Stop (34), an
M8x20mm Washer (16) and
an M8 Split Washer (15) onto
each side of the Stop Rod
(35).
Secure in place using M8
Acorn Nut (31) on each
end of the Stop Rod (35).
Step 12
Insert the Pedal Axle (58) into the welded
tube on the Frame (39) and center it.
Place Pedal Spacer (32) and M13x22mm
Washer (33) onto each side of the Pedal
Axle (58).
Slide the Right Pedal (30) onto the
right side of the Pedal Axle (58), and
slide the Le Pedal (57) onto the
le side of the Pedal Axle (58).
Secure the pedals in place using
M8x20mm Washer (16), M8
Split Washer (15) and M8
Acorn Nut (31) on each side
of the Pedal Axle (58).
Assembly Instructions (cont)

14 S002475 Magnetic Rowing Machine
29 57
29
30
50
52
51
Step 13
Insert a Pedal Strap (29)
through the Right Pedal (30)
and wrap the end of the Pedal
Strap (29) through the buckle
on the Pedal Strap.
Repeat this the Le Pedal (57).
Step 14
Attach Foot Plates (52) to the
Front Stabiliser (50) on both
sides using and secure using
Foot Plate Pins (51).
Assembly Instructions (cont)
15 S002475 Magnetic Rowing Machine
44
66
69
Step 15
Carefully pry the Console (66) out of
the Shields (44 and 69).
NOTE: Be careful not to pull on
the wire attached to the console.
Remove the screw and the battery
cover from the back of the console.
Insert batteries into the battery
compartment. Reattach the battery
cover and secure into place with the
screw and press the Console (66) into
the Shields (44, 69).
NOTE: The console requires 2 x AA batteries (included).
WARNING: Batteries must be inserted according to the correct polarisation (+ and -).
If the rowing machine is not going to be used for a long period of time, we recommend
the batteries are removed.
WARNING: To prevent battery leakage;
• Be sure to insert batteries correctly and always follow the battery manufacturer’s
instructions.
• Never mix alkaline, standard or rechargeable batteries.
• Use only batteries of the same or equivalent type as recommended.
• Always remove exhausted or dead batteries from the product and do not dispose of
batteries in fire, batteries may explode or leak.
• Do not short circuit the supply terminals.
Assembly Instructions (cont)
16 S002475 Magnetic Rowing Machine
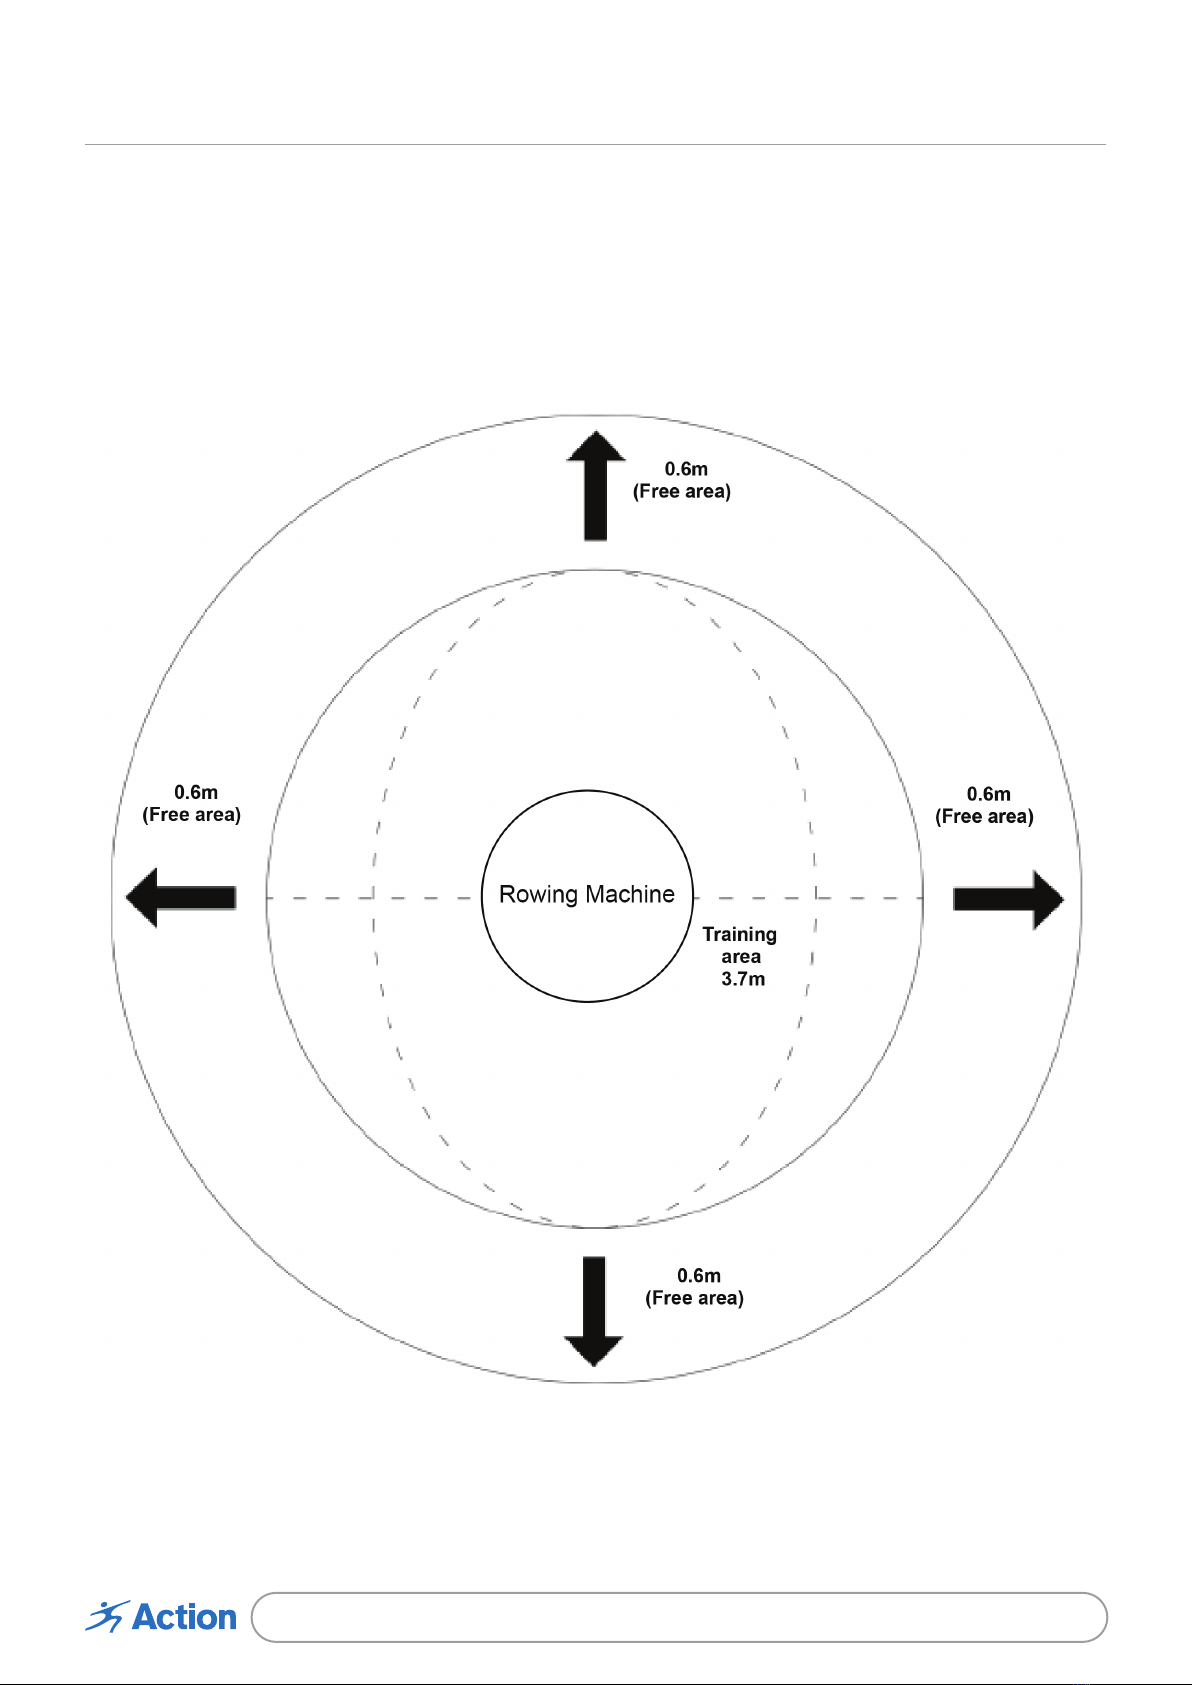
Workout Area
Free area and training area.
The free area should be no less than 0.6m greater than the training area in the directions
from which the equipment is accessed. The free area must also include the area for
emergency dismount.Where equipment is positioned adjacent to each other the value of
the free area may be shared.

17 S002475 Magnetic Rowing Machine
How To Use The Rower
HOW TO MOVE THE ROWER
Stand behind the rower and li the rear stabiliser until the rower will roll on the wheels.
Then, carefully move the rower to the desired location, and lower it to the floor.
HOW TO ROW ON THE ROWER
Sit on the seat, place your feet in the pedals, and adjust the straps to fit your feet. Hold the
row bar with an overhand grip.
Correct rowing form consists of three phases:
1. The first phase is the CATCH. Slide the seat forward until your knees are almost
touching your chest. Pull the row bar until your hands are above your feet.
2. The second phase is the DRIVE. Push backward with your legs. Lean back slightly at
the hips (not at the waist), keeping your back straight. As you straighten your legs,
pull the row bar toward your chest. Keep your elbows outward.
3. The third phase is the FINISH. Your legs should be nearly straight. Continue to pull the
row bar until your hands are even with your chest.
Aer the finish phase, extend your arms forward and pull the seat forward using your
legs. Repeat this sequence, moving through all three phases with a smooth, fluid motion.
Remember to breathe normally as you row; never hold your breath.
HOW TO ADJUST THE TENSION
To vary the intensity of your exercise, you can adjust the resistance that you feel when you
pull the row bar.
To increase the resistance, turn the resistance control clockwise; to decrease the
resistance, turn the resistance control counterclockwise. IMPORTANT: To avoid damaging
the resistance control, stop turning it when turning becomes difficult.

18 S002475 Magnetic Rowing Machine
How To Use The Rower (cont)
FEATURES OF THE CONSOLE
The easy-to-use console features several display modes that provide instant exercise
feedback during your workouts. The display modes are described below.
Strokes/Min.—This shows the number of rowing strokes you are completing per minute.
Calories—This mode shows the approximate number of calories you have burned during
your workout.
Total Strokes—This mode shows the total number of rowing strokes you have completed
since the console was last reset.
NOTE: To reset the console, remove the batteries from the console and then reinsert
them.
Time—This mode shows the elapsed time.
Scan—This mode shows the time, distance, strokes, total strokes, calories, and strokes
per minute modes, for a few seconds each, in a repeating cycle.
Strokes—This mode shows the number of rowing strokes you have completed during
your workout.
Distance—This mode will take turns to show kilometres(KM) and nautical miles(NM)
every 5-6 seconds.
HOW TO USE THE CONSOLE
Make sure that batteries are installed in the console. If there is a sheet of clear plastic on
the console, remove the plastic.
1. To turn on the console, press the Mode button on the console or simply begin rowing.
2. Select one of the display modes.
Scan mode—To select the scan mode, press the Mode button repeatedly until an arrow
appears next to the Scan label.
Strokes per minute, calories, total strokes, time, or strokes—To select one of these
modes for continuous display, press the Mode button repeatedly until an arrow appears
next to the label for the desired mode. Make sure that an arrow does not appear next to
the Scan label.

19 S002475 Magnetic Rowing Machine
How To Use The Rower (cont)
3. Begin rowing and follow your progress with the display. As you exercise, the console
will display the mode that you select. To reset the display to zero, press and hold the
Mode button for several seconds.
4. When you are finished exercising, the console will turn off automatically. If the row bar
does not move for a few seconds, the console will pause. The console has an auto-off
feature. If the row bar does not move and the Mode button is not pressed for a few
minutes, the power will turn off automatically to save the batteries.
HOW TO FOLD AND STORE THE ROWER
The rower can be stored in a folded position to conserve space. Store the rower in a
location where children cannot tip it. Remove the batteries from the console when storing
the rower for extended periods of time.
To store the rower, remove the Frame Knob (87) and the M13x32mm Washer (88). Next,
remove the Frame Pin (37). Keep the Frame Knob and the Washer in a place where they
will not become lost.
Raise the Rail (8) to the vertical position. Then, fully insert the Frame Pin (37) into the Rail
Bracket (41) so that it holds the Rail in place.
HOW TO UNFOLD THE ROWER
Remove the Frame Pin (37), and lower the Rail (8) to the floor. Next, insert the Frame Pin
into the Frame (39) and into the Rail Bracket (41). Then, tighten the Frame Knob (87) and
the M13x32mm Washer (88) into the Frame and into the Rail Bracket.

20 S002475 Magnetic Rowing Machine
Maintenance
MAINTENANCE
Inspect and tighten all parts of the rower regularly. Replace any worn parts immediately.
To clean the rower, use a damp cloth and a small amount of mild detergent.
WARNING: To avoid damage to the console, keep liquids away from the console and
keep the console out of direct sunlight.
HOW TO GREASE THE PEDAL AXLE
If the pedals squeak when you use the rower. Remove the Right and Le Pedals (30, 57),
and apply a small amount of grease to both sides of the Pedal Axle (58). Then, reattach the
Pedals.
HOW TO GREASE THE ROLLERS
If the rollers beneath the seat squeak when you use the rower, apply a small amount of
grease to a paper towel, and spread a thin layer evenly along the rail where the rollers
move. Then, wipe off any excess grease.
Other Action Home Gym manuals


