Actionbikes Spyder A228 Manual

Luxurious Four-Wheel Battery Operated Car
GUIDE BOOK
Manual book only for your reference, products features may vary from
the pictures in book, configuration based on your order!
Please read the operating instuctions carefully before using.

*1
*2
9P$
Contents
Brief Instruction and Model - - - - - - - - - - - - - - - - - - - - -
Safety Instruction - - - - - - - - - - - - - - - - - - - - - - - - - - -
Packing List - - - - - - - - - - - - - - - - - - - - - - - - - - - - - - -
Parts Diagram - - - - - - - - - - - - - - - - - - - - - - - - - - - - -
Assembly Steps - - - - - - - - - - - - - - - - - - - - - - - - - - - -
How to Operate Your Vehicle - - - - - - - - - - - - - - - - - - -
Charging Your Vehicle - - - - - - - - - - - - - - - - - - - - - - -
Caring For Your Vehicle - - - - - - - - - - - - - - - - - - - - - -
Problems and Solution Guide - - - - - - - - - - - - - - - - - -
Disposal Of Battery - - - - - - - - - - - - - - - - - - - - - - - - -
Special explaintion - - - - - - - - - - - - - - - - - - - - - - - - - -
Remote Operation Explanation - - - - - - - - - - - - - - - - -
Brief Instruction and Model
Thank you for choosing our vehicle. Each vehicle pattern is
designed upon a unique mold: such as the realistically imitated
vehicle and cute series, which bring different fun and feeling for
your children.
We wish our vehicle to accompany your children for a happy
childhood and your family will be filled with joy and happiness.
Suitable Age 37-95 Months
Load Capacity
KG
<
Speed KM/H Size of Car CM
Charger
Input:110 or 220-240v, 50Hz
Output
Output
Battery
Power Way Charging Type
Charging Time
Hours
Fuse
Average Battery Life
Approximately 300
Important Safety Instructions
Read carefully and follow all the instructions
WARNING
CAUTION
Assembly/Used
Product requires adult assembly.
. Children can be harmed by small parts,sharp
edges and sharp points in the vehicle’s unassembled state.
Care should be taken in unpacking and assmbly of the vehicle. Children should
not handle parts, or help in assembly of the vehicle.
Always properly handled the protective material and poly bags before assembly.
Forbidden to children’s play and have suffocation danger!
Suitable for age 37~95 months; Maximum user weight is 25 Kgs.
Choking hazard----small parts. This product is forbidden to children under 3 years.
Direct Adult Supervision Required. Never leave child unattended by himself.
Always keep child in view when he is in vehicle.Teach appropriate safety rules to
your child before allowing operation of this vehicle.These rules should also be
reviewed with other playmates who want to drive this vehicle.
Make sure children know and follow these rules for safe driving and riding:
Always wear shoes;
Always sit on the seat;
Always wear a helmet when riding;
Only one rider at a time.
The toy should be used with caution since skill is required to avoid falls or collisions
causing injury to the users or third parties.
Keep children within safe riding areas, these areas must be:
Away from steps/cars/driveways/roads and alleys;
Away from sloped/inclined surfaces/swimming pools or other bodies of water;
Away from other dangerous places;
Only outdoors. Generally flat ground/playground /Garden asphalt and other
hard surfaces;
Never use in the dark. A child could encounter unexpected obstacles and have an
accident. Operate the vehicle only in the daytime or a well-light area.
Before using, adult should check the main components whether in
good condition:
Battery plug should been plugged in, power is switched; battery/charge/wire/plug/
car body and other parts whether is damage;whether screw loose;whether have
another demage problems. To avoid using damaged car until it repaired.
To avoid demaging the motors and gears, stop the vehicle before shifting from
forward to backward switch.
Please turn forward/stop/backward switch to “O” in the state of no-driving.
Turn off power switch.(notice:this switch only control the parts of drive.)
Do not let any child touch the wheels or near them when the car is moving.
This vehicle has adjustable play seat belts. Please instruct children how to tie the
safety belt before using, guarantee the securit
y.
Do not tow anything behind the vehicle or overload it, do not exceed the maximum
weight capacity of 25 kgs.

Important Safety Instructions
Battery /Charger /Alkaline Batteries
Do not mix old and new batteries or batteries of different types: alkaline,
standard (carbon-zinc) or rechargeable (nickel-cadmium).
The battery/ charge/ alkaline batteries are not toy, strictly children play.
Non-rechargeable batteries are not to be recharged. Do not charge
non-rechargeable batteries.
Battery charging must be done by adults only.
Remove rechargeable batteries from the vehicle before charging.
Insert batteries are correct polarity inside the battery compartment.
Remove exhausted batteries from the product.
Remove batteries during long periods of non-use.
Never short-circuit the battery terminals.
Use only with manufacturers prescribed rechargeable battery and charger.
DO NOT use the battery or charger for any other product. Could cause
overheating, fire or explosion.
DO NOT open the battery and the charger.
DO NOT charge battery upside down.
Always maintain battery dry. Do not let the vehicle contact fresh water or salt water.
Charge
Charge 4-6 hours before the first time using, but not charge over 10 hours.
Only adult may handle or charge the battery.Never allow child to do that.
Turn off power switch before charge the battery.
When the vehicle’s normal speed apparent slow down or after each use,
recharge the battery for 8-12 hours, never charge the battery longer than 18 hours.
Examine the battery, charger and their connectors for excessive wear or damage
each time you charge the battery. If damage or excessive wear is detected, do not
use the charge or the battery until you have replaced the worn or damaged parts.
Charge the battery in a dry area ONLY.
It is normal that charger and battery are tepid while charging.
Charge the battery at least once per month, even if the vehicle has not been used.
In room temperature below 5 degrees centigrade, charging the actual to lengthen
3-5 hours. Below -5 Celsius please do not use this product.

15
Packing List
Please identify all parts before assembly and save all packaging materials until
assembly is complete.
Main Body Charger Rearview Mirror
Steering Wheel Seat Wheel-4
Guide book
Wheel Cup-4 Guide Book Remote Control
Motor Accessory Package Wind Frame
Door Direction Lever

∮10 Bushing
M5*33
M5
Parts Diagram
Assembly must be done by adults, it almost takes 20 minutes.
Some parts should be assembled on both sides.Notice:
Tools Required
Screwdriver
(Not included)
Pliers
(Not included)
Rear Axle
Motor
Wheel
Washer
Screw
Hubcap
Front Axle
Door
Direction Lever
Steering Wheel
Screw
Screw
Wind Frame
Rearview Mirror
Seat

ėėė
ėėė
ėėė
ėėė
Assembly Steps
Notice:
Loosen the two screws in the seat cover position of vehicle body. Unplug the
wire connector from the gear box connector, take out motor and charger.
When in assembling any wheel to the axles,we provide two gaskets. Please
decide whether to increase gaskets to adjust tightness degree of the wheels
free to turn. Motor should be assembled as the mark on the car body prompts
Picture-1
Picture-2
Picture-3
Driving Connection Assembly
Turn the vehicle body over
Insert direction lever into the white
hole in the gear motor.(P-2) Make
the directionlever pass through the
instrument panel. Direction lever must
be inserted into the hole.(P-3)
The hole on the directionlever should
be inserted into the hole of the motor
then use M4*22 round screws fix the
gear motor tightenly.(P-1)
On the right after
turning over the car
Driving Wheel Assembly
Motor
Bushing
Nut
Wheel Washer
Hubcap
Decoration
Hubcap
Inserting rear axle from the right side to
the left side, assembling spare parts
according to the picture at left.
Motor
Bushing
Wheel
Bushing
Washer Nut Hubcap Decoration
ėHubcap
If two motors, the assembly way is the
same
(If single motor, assembling on the left side which is
marked “L”, if two motors, the marks “L” and “R” on
the motor and car body should be corresponding)
(Be sure that bushing is put into the wheel completely)
Another Rear Wheel Assembly
On the left after
turning over the car
Bushing
Nut
Wheel
WasherHubcap
Hubcap
Decoration
Assembling accroding to the picture at left.
Washer
Bushing
Wheel
Bushing
Washer Nut Hubcap Decoration
ė
Hubcap

WasherėBushingėWheelėBushing
ėWasherėNutėHubcap Decoration ė
Front Wheel Assembly
Bushing
Nut
Wheel
Hubcap
Decoration
Washer
Hubcap
On the left after
turning over the car
Assembling accroding to the picture
at left.
Hubcap
Car Door Assembly
Inserting the car door into the right
place on the car.
Using the screw to tighten the car
door and the car.
Inserting
Nut
Machine Screw
Steering Wheel Assembly
Screwing off machine screw on
the steering wheel
Inserting steering wheel into
direction lever, then using the
machine screw to tighten.

Wind Frame Assembly
Pressing the wind frame into the right
place on the car, then using screw to
tighten
Pressing
Pressing
Rearview Mirror Assembly
Pressing the wind frame into the right
place on the car until hearing the
“crack”, then using screw to tighten.
Picture-9-1
Grab
Groove
Seat Assembly
Remove the screw from the car for
using, pressing the seat into the
right place according to picture-9-1
using the screw to tighten the
and the seat.
then
car

Car connector
Motor connector
Red line
Black line
Inserting
Connecting Motor Line
Inserting red wire into red column
(Avoiding inserting into the black
column)
Connecting Battery Line
Inserting red wire into red column
(Avoiding inserting into the black
column)
Black column
Red column
Red wire
Black wire
Battery
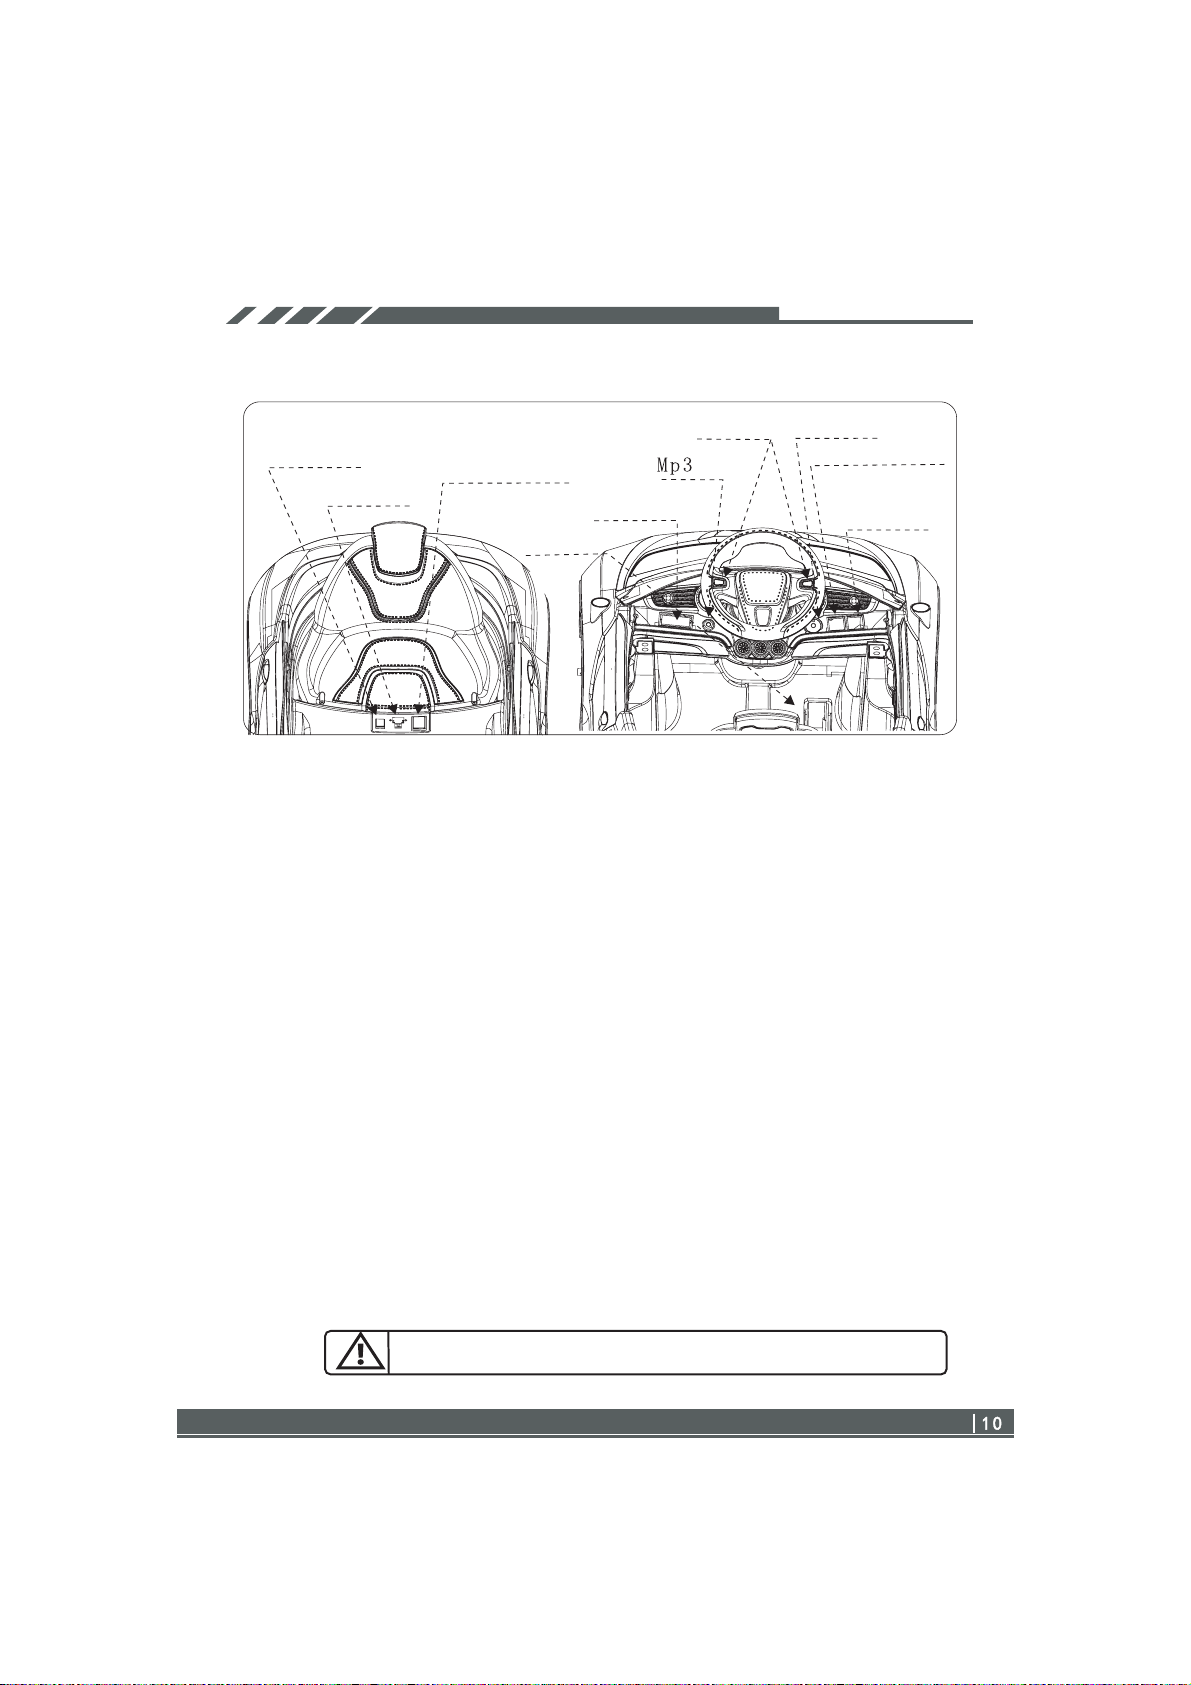
power switch
charging hole
high/low speed switch
according to your order
pedal switch
battery indicator
slot
music buttonvolume adjuster
rc-manual switch
according to your order
forward/backward
switch
power switch, forward/backward switch, rc manual switch, high/low speed switch are on
the instrument platform, pedal switch is on the right.
Power switch: Press the power switch to open, it will turn off if press again
Battery indicator: If you bought one battery, one motor, the highest volt is 6.54V. When the volt is
under 6V, you have to charge the car.
If you bought two batteries, two motors, the highest volt is 13.1V. When the volt
is under 12V, you have to charge the car.
Pedal switch Forward
1. Press the manual button
2. Press the forward button
3. Tread the pedal, the car will move forward
Backward
1. Press the manual button
2. Press the backward button
3. Tread the pedal, the car will move backward
Remote control 1. Press the rc button
2. Then adults can control the direction of the car
High/low speed
switch
(according to your order)
Press the high/low speed switch into high or low speed
Press the forward/backward switch into forward or backfard position
Tread the pedal, the car will move forward or backward in high or low speed
When using remote control, switch the high/low speed into high or low speed to
control the car(high/low speed switch is an optional choice, according to your order)
For children’s safety, parents should be sure your children have good driving skills
when driving in high speed.
Turn on the power botton, inserting Mp3/Mp4 wire into Mp3 slot, then adjusting
the volume adjuster as you like.
Music
Press the music botton, music will be played. If there is no more press, music
will stop automatically
Do not be close to the ear, improper use can cause hearing damage.
How to Operate the car
Notice: When you changing the tap position,please make sure the vehicle has completely
stopped, otherwise it will damage the gear box and the motor.
If using the remote control operation, please refer to guide book page 14.

Charge
Plug the charge port into the input socket;
Plug the charger into a wall outlet. The
battery will begin charging.
Caring For Your Vehicle
Vehicle body is modeled by polypropylene. Solarize or in -15°C use are strictly
prohibited. Vehicle should be far away from hot objects, like an oven and heate
plastic parts may melt beside.
Avoid operating the vehicle in wet or snowy conditions, and do not spray the car
with a hose. Do not wash the vehicle with soap and water. Water or moisture in th
e
motors or electrical switches can cause them to corrode and can cause switch or
motor failure.
Avoid operating the vehicle on sand, loose dirt or gravel. Sand, loose dirt or gravel
in the motors or electrical switches can case them to jam, and could cause switch
or motor failure.
The vehicle can be wiped down with a soft, dry cloth for a shiny finish, you can wipe
plastic parts with a non-wax furniture polish applied to a soft-cloth. Do not use
automotive wax. Do not use soap or water or spray the vehicle with a hose.
Do not modify the electric system. When the fault oppears and they must be
maintained by professional. Alterations could cause a fire resulting in serious
injury and can also ruin the electrical system.
Use for about half month, check the wheels turning agilely or not, motor work is
normal or not. Using infuse lube to lubricate moving parts.
1.
2.
3.
4.
5.
6.
Problems and Solutions Guide
Problem The vehicle does not run
Cause: The battery may low on power.
Afrer each use and once a month minimun, charge the battery for 8-12 hour.
Do not charge over 18 hour.

Problems and solutions guide
Cause: Thermal fuse has tripped. The vehicle is equipped with a self-resetting fuse
.
When the vehicle is overloaded or operated incorrectly, the self-resetting fuse will
be cut off for 2 minutes before becoming operational again. The self-resetting fuse
is under the seat(refer to the picture)
self-resetting fuse
Cause: battery connector or wires are loose
Make sure the battery connectors are firmly plugged in to each other.
Cause: battery is dead
Please contact retailer or manufacturer.
Cause: electric system is damaged
Please contact retailer or manufacturer.
Cause: motor is damaged
The motor needs professional repair. Please contact retailer or manufacturer.
Problem: The battery will not recharge
Cause: battery connector or adapter connector is loose.
Make sure the battery connector and adaptor are firmly plugged together.
Cause: charger is not plugged in.
Make sure the charger is plugged into the wall outlet and the power flow to the
outlet is on.
Cause: charger is not working
Is the charger warm while charging? If not, the charger may be broken and please
connect retailer and manufacturer.
Problem: The vehicle does not run very long
Cause: battery may be undercharged
You may not be charging the battery long enough. After each use, or once a
month minimum, charge the battery for 8-12 hour. Do not charge over 18 hour.
good
bad

Disposal of Battery
Do not throw into a fire. The battery may explore or leak.
Your sealed lead-acid battery must be recycled or disposed of in an
environmentally sound manner.
Return an exhausted battery to your local approved lead-acid battery recycle.
Warnings
Special Explaination
12. Only audlt can operate the remote chontrol, and must keep distance within 10m
for remote control and car. In the same place, must not have two or two above cars
using remote control.
1.The product is not a transport, do not drive on the street, using the product under
adult’s guardianship.
2. Do not allow children under 36 months use the product.
3. Overage and overload are forbidden. Maximum load: 25KG.
4. The car should be assembled and checked by adults, guarantee safety before using.
5. Do not wash the product with water, wiping the car using a soft wet cloth only.
6. Battery charging should be handled by adult only, the charging is not toy, do not let
children play the charger.
7. Driving on public avenue, street, slope, pool side, stair head and other danger area
are strictly forbidden.
8. Do not use this product in high-voltage line, trandfprmer station, gas station,
hospital.
9. Must use this product with shoes, with safe-belt.
10.Please read carefully and keep this manual book for your children’s safety.
11. In order to prevent a child from suffocation, keep plastic bags away ftom children.

14
Remote Control Operation
Only audlts can use remote control
Remote control assembly: Insert the antenna to remote control’s upper hole, tighten
the remote antenna, make elongatest and turn to sky, also make the received remote
antenna straighten.
Battery assembly: remove the screw from the remote control’s battery cover, open
the cover, put two AA batteries(not included) into it according to the direction of the
+/-, then put the battery cover.
Indicator light
Left/right button
Forward/backward
button
Power switch
How to use the remote control:
1. Put on batteries, open the “power” button, outstretch the remote antenna, then can
operate the remote control.
2. Pish the “forwasrd/backward button” to the front, the vehicle goes forward, pull the
button to the back, the vehicle goes backward.
3. Push the “left/right button” to the left, the car turns left, pull the button to the right, the
car turns right.
4. With the operation of remote control’s left and right button together
interesting.
5. Do not use this product in high-voltage line, transformer station, gas station, hospital.
6. Only adults can operate the remote control, and must keep distance within 10m for
remote control and car. In the same place, must not have two or teo above cars using
remote control.
7. When use the remote control to turn left/right, the button couldn’t push more than 10
seconds, otherwise will burn the gear motor
All buttons on the remote control play together will be more fun.
, make driving mor
e
If the battery is short of engery, the remote control only can control
forward, cannot control turning. Please replace new battery.
When under remote control condition, please do not step on pedal
switch, or may effect the car normal playing.
Please do not play the car at these areas: highline, transformer
substation, gas station, hospital
Remote control only can operate by adults. Remote control distance is
10 meters. One area can only play one car, two cars may interference
each other.

Other Actionbikes Motorized Toy Car manuals


