Active Care Medical TD-4121 User manual

1
ActiveCare TD-4121
Blood Glucose
Multi-Functional Monitoring System
Owner’s Manual

2

3
Dear Owner of ActiveCare TD-4121
Blood Glucose Monitoring System Owner:
Thank you for purchasing the ActiveCare TD-4121 Blood Glucose Monitoring
System. This manual provides important information to help you use the system
properly. Before using this product, please read the following instructions
thoroughly and attentively.
Regular monitoring of your blood glucose levels can help you and your doctor
gain better control of your diabetes. You can use the ActiveCare TD-4121 to
easily monitor your blood glucose levels by yourself anywhere and anytime.
If you have other questions regarding this product, please contact the local
customer service or place of purchase for assistance.

4
IMPORTANT SAFETY PRECAUTIONS
READ BEFORE USE
The meter and lancing device are for single patient use. Do not share them
with anyone, including other family members! Do not use on multiple patients!
All parts of the kit are considered biohazardous and can potentially transmit
infectious diseases, even after you have performed cleaning and disinfection.
Do NOT use this device to be close to your head since GPRS will be
activated under two conditions to prevent any body damages.
Pressing phone call button, or
Uploading data after completion of measurement within 10 minutes
1. Use this device ONLY for the intended use described in this manual.
2. Do NOT use accessories which are not specified by the manufacturer.
3. Do NOT use the device if it is not working properly or if it is damaged.
4. Do NOT, under any circumstances, use the device on neonates or infants.
5. This device does NOT serve as a cure for any symptoms or diseases. The
data measured is for reference only.
6. Before using this device to test blood glucose, read all instructions thoroughly.
Carry out all the quality control checks as directed.
7. Keep the device and testing equipment away from young children. Small items
such as the test strips, lancets and vial caps are choking hazards.
8. Use this device in a dry environment. Be aware of the presence of synthetic
materials, such as clothing, carpets and so on, which might give rise to
damaging static discharges that may produce incorrect results.
9. Do NOT use this instrument in close proximity to sources of strong
electromagnetic radiation, as these may interfere with the accurate operation.

5
10.Proper maintenance and periodically control solution test are essential to the
durability of your device. If you are concerned about its accuracy, please
contact TaiDoc or place of purchase for help.
Action upon Delivery: Unpacking; checking delivery for completeness; checking
for damage during transport.
KEEP THESE INSTRUCTIONS IN A SAFE PLACE

6
TABLE OF CONTENTS
IMPORTANT SAFETY PRECAUTIONS..........................................................4
BEFORE YOU BEGIN.....................................................................................7
Important Information.............................................................................7
Intended Use...........................................................................................8
Test Principle ..........................................................................................8
Contents of System................................................................................9
Meter Overview .....................................................................................10
Display Screen......................................................................................11
Test Strip ...............................................................................................12
SETTING THE METER..................................................................................13
Meter Setting.........................................................................................13
Calling....................................................................................................19
Touchscreen Calibration......................................................................22
BEFORE TESTING .......................................................................................23
Control Solution Testing ......................................................................23
Performing a Control Solution Test.....................................................23
TESTING WITH BLOOD SAMPLE ...............................................................25
Preparing the Lancing Device for Blood Testing ...............................25
Preparing the Puncture Site.................................................................25
Performing a Blood Glucose Test .......................................................29
Reviewing Memory Record..................................................................32
MAINTENANCE ............................................................................................33
Battery ...................................................................................................33
Recharging the Battery ........................................................................33
Caring for Your Meter ...........................................................................34
Caring for Your Test Strips...................................................................34
Important Control Solution Information..............................................36
SYSTEM TROUBLESHOOTING...................................................................37
Result Readings....................................................................................37
Error Messages.....................................................................................37
Troubleshooting....................................................................................39
DETAILED INFORMATION ...........................................................................40
SPECIFICATIONS.........................................................................................40
SYMBOL INFORMATION..............................................................................42

7
BEFORE YOU BEGIN
Important Information
Severe dehydration and excessive water loss may cause readings which are
lower than actual values. If you believe you are suffering from severe
dehydration, consult a healthcare professional immediately.
If your blood glucose results are lower or higher than usual, and you do not have
any symptoms of illness, first repeat the test. If you have symptoms or continue
to get results which are higher or lower than usual, follow the treatment advice of
your healthcare professional.
Use only fresh capillary whole blood samples to test your blood glucose. Using
other substances will lead to incorrect results.
If you are experiencing symptoms that are inconsistent with your blood glucose
test results and you have followed all the instructions given in this owner’s
manual, contact your healthcare professional.
We do not recommend using this product on severely hypotensive individuals or
patients in shock. Readings which are lower than actual values may occur for
individuals experiencing a hyperglycaemic-hyperosmolar state, with or without
ketosis. Please consult the healthcare professional before use.
The measurement unit used for indicating the concentration of blood or plasma
glucose can either have a weight dimension (mg/dL) or a molarity (mmol/L). The
approximate calculation rule for conversion of mg/dL in mmol/L is as following:
For example:
1) 120 mg/dL ÷ 18 = 6.6 mmol/L
2) 7.2 mmol/L x 18 = 129 mg/dL approximately.
mg/dL
Divided by 18
= mmol/L
mmol/L
Times 18
= mg/dL

8
Intended Use
This system is intended for use outside the body (in vitro diagnostic use) by
people with diabetes. It is designed for home use and by health care professionals
in clinical settings as an aid to monitoring the effectiveness of diabetes control. It
is intended to be used for the quantitative measurement of glucose (sugar) in
fresh capillary whole blood samples (from the finger, palm, forearm and upper arm)
and from venous whole blood. This system is intended to be used by a single
person and should not be shared.
It should not be used for the diagnosis of, or screening for diabetes, or testing on
neonates.
Professionals may test with capillary and venous blood sample; home use is
limited to capillary whole blood testing.
Test Principle
Your system measures the amount of sugar (glucose) in whole blood. The
glucose testing is based on the measurement of electrical current generated by
the reaction of glucose with the reagent of the test strip. The meter measures the
current, calculates the blood glucose level, and displays the result. The strength of
the current produced by the reaction depends on the amount of glucose in the
blood sample.

9
Contents of System
Your new ActiveCare system kit includes:
1. Meter
2. Owner’s Manual
3. Quick Start User Guide
4. Test Strips
5. Protective wallet
6. 1 x 3.7V Li- Polymer rechargeable battery
7. Lancet
NOTE:
If any items are missing from your kit or opened prior to use, please contact local
customer services or place of purchase for assistance.
10
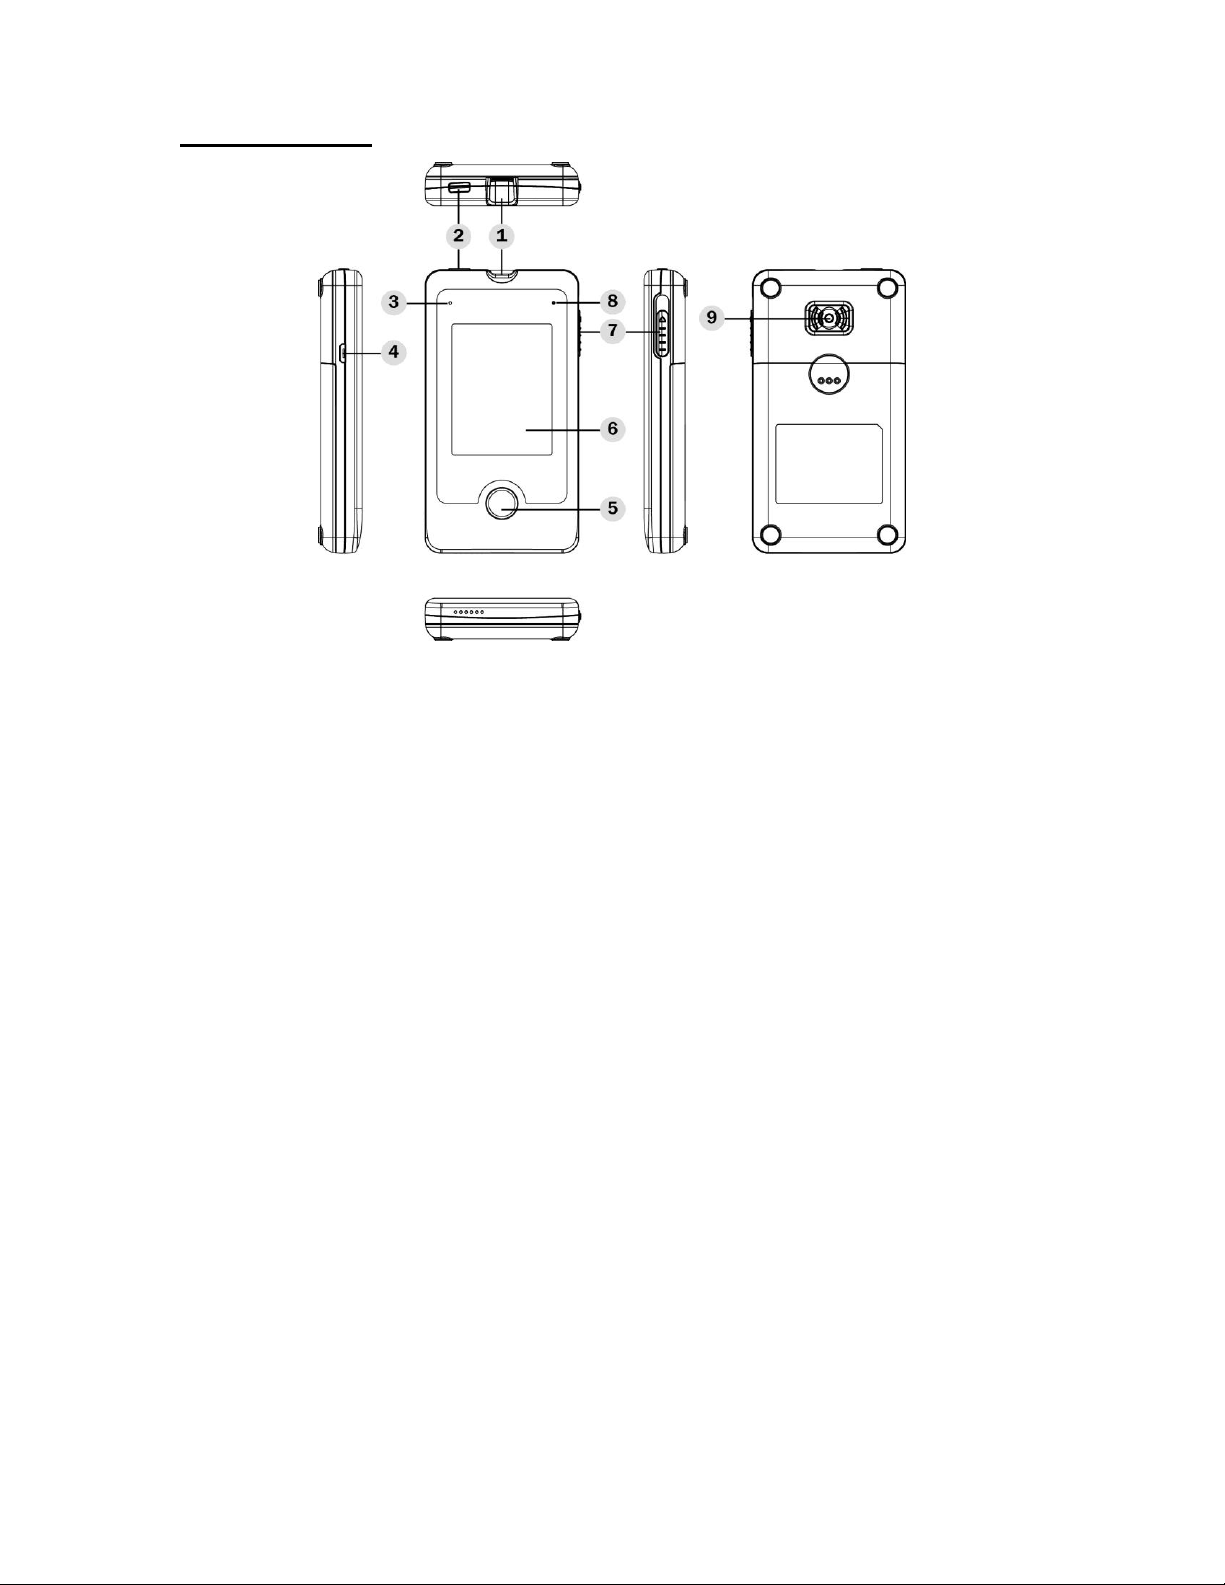
Meter Overview
1. Test Strip Slot with Strip Indication Light
Insert test strip here for testing.
2. Power Button
Press to turn on/off the meter.
3. Recharge Indicator
4. USB Port (only for charge)
For battery recharge
5. Home Button
To enter the meter function, and click for confirmation or exit.
6. Display Window and Touchscreen
The touchscreen allow users to interact with what is displayed directly by the
finger.
7. Test Strip Ejector
Eject the used test strip by pushing up this button.
8. Microphone
9. Emergency Call Button
Press to call the service center directly for further assistance or critical health
condition.
11
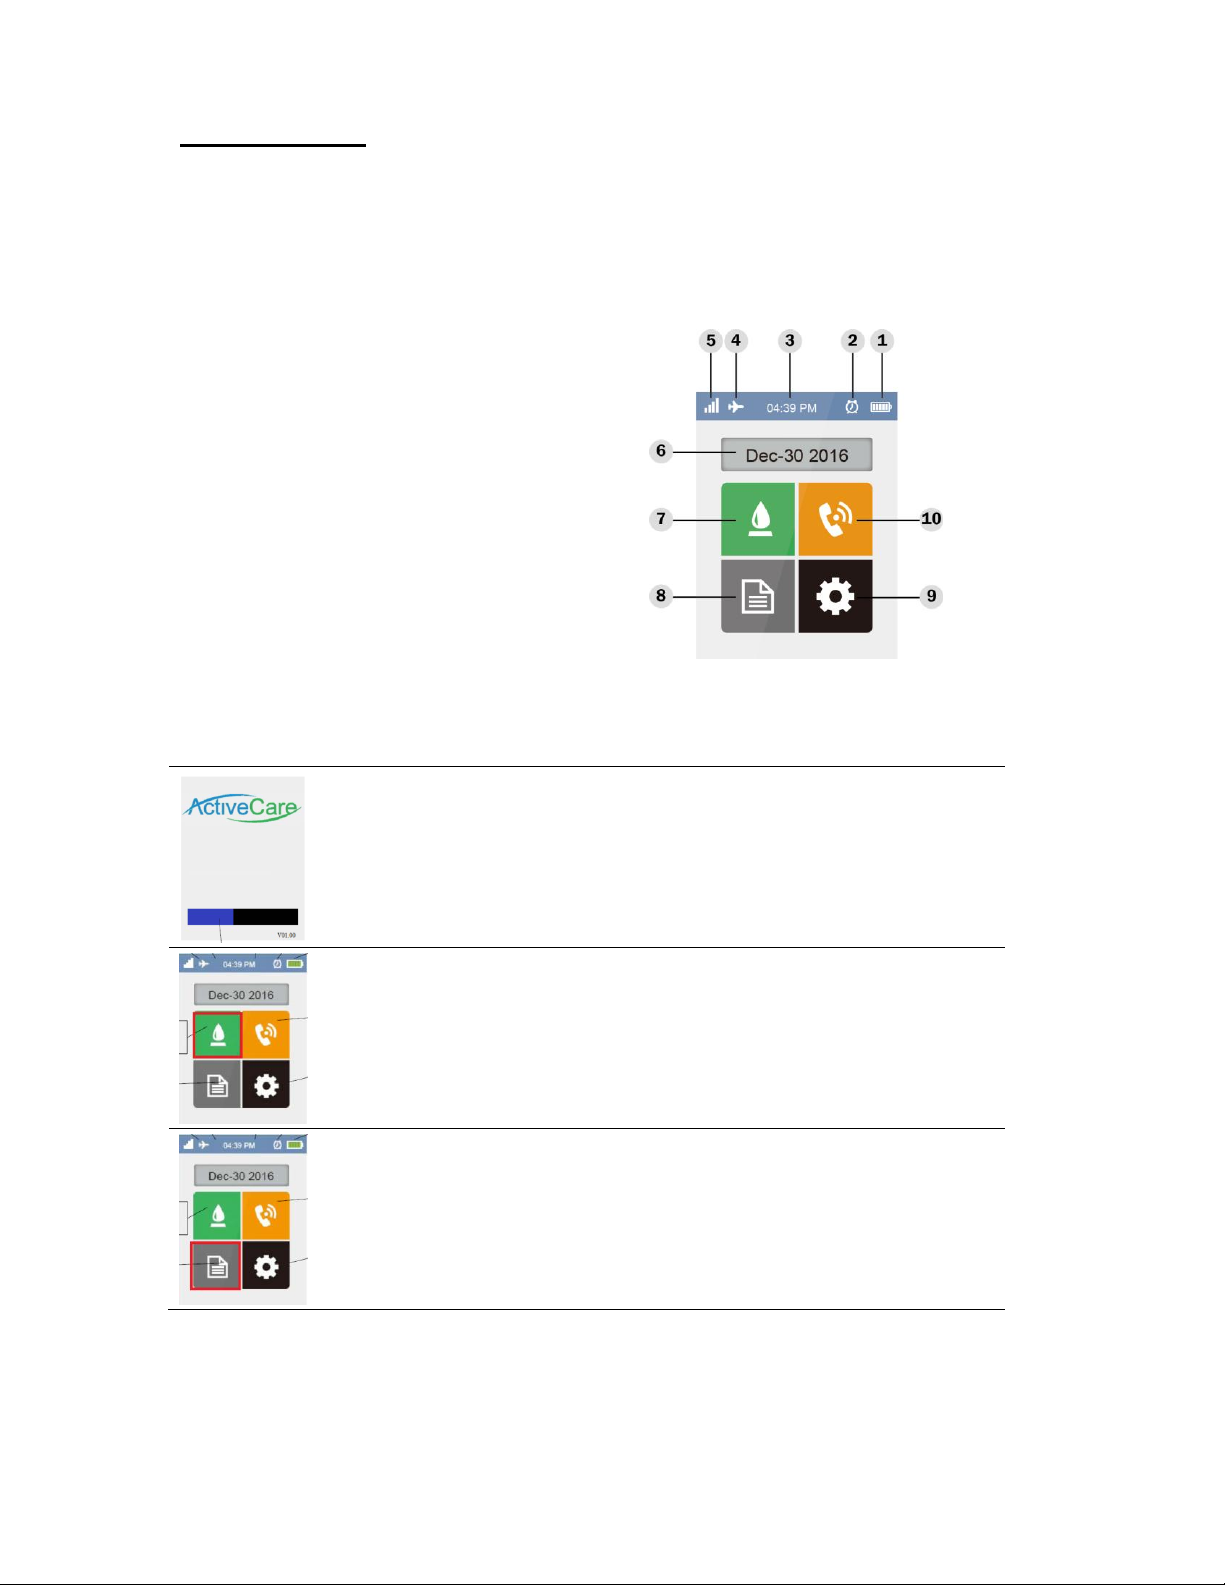
Display Screen
The display window and touchscreen allows you to interact with what is displayed.
The meter features 4 main functions: measuring, calling, memory and setting,
which are shown on the main page. Other icons on the Main Page are introduced
as below:
1. Battery
2. Alarm Icon
3. Time
4. Flight Icon
5. GPRS Signal
6. Date
7. Measuring
8. Memory
9. Setting
10. Calling
Indicator
Meaning / You can do this
The welcome screen that appears when you turn on the
meter.
Measuring:
Perform your blood glucose tests.
Memory:
Review your glucose test results.
12
Setting:
Set up date, time, reminder alarm, measuring units,
displayed languages and so on.
You may also turn on/off airplane mode from here.
Calling:
Call out to the service center or answer phone calls. This
function activates for only 10 minutes after each
measurement, allowing the service center to contact with
users directly.
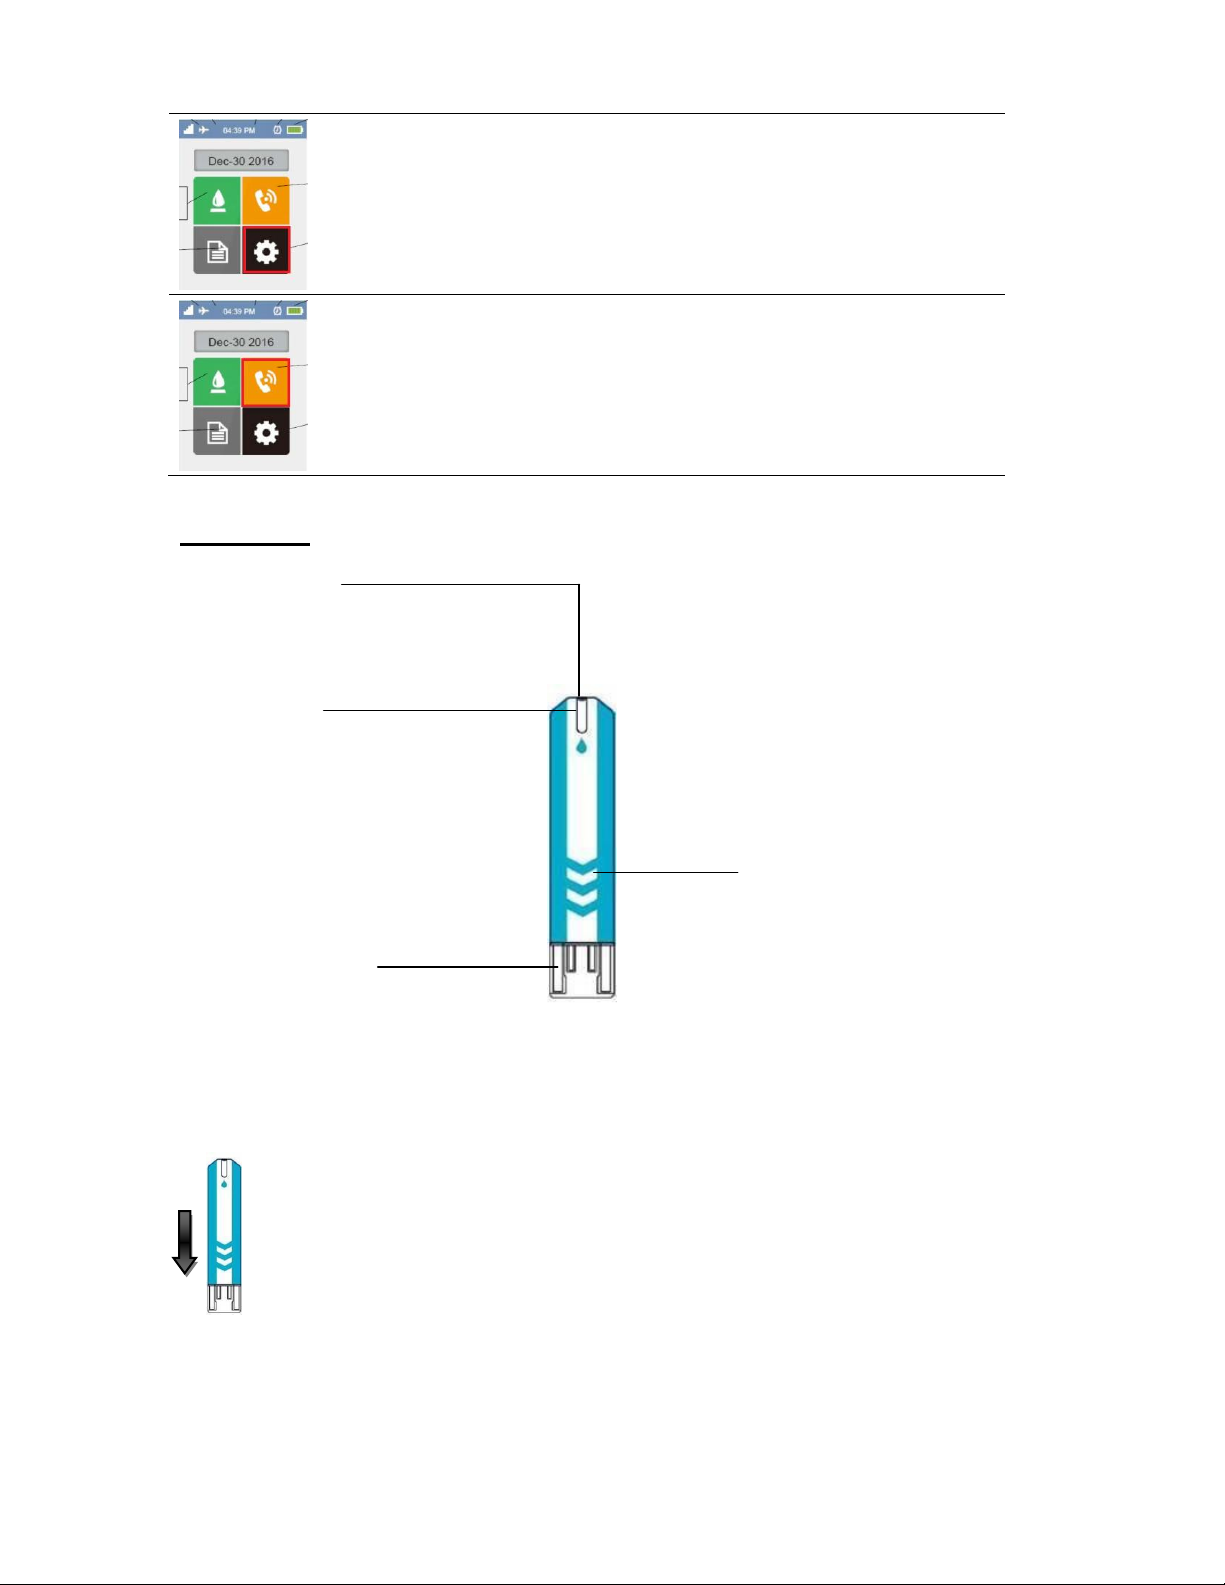
Test Strip
Absorbent Hole
Apply a drop of blood here.
The blood will be automatically absorbed.
Confirmation
Window
This is where you confirm
if enough blood has been
applied to the absorbent hole in
the test strip.
Contact Bars
Insert this end of the
test strip into the meter.
Push it in firmly until it will
go no further.
Attention
The front side of test strip should face up when you insert test
strip.
Test results might be wrong if the contact bar is not fully
inserted into the test slot.
Test Strip Handle
Hold this part to insert the
test strip into the slot.
13
NOTE:
The ActiveCare TD-4121 should only be used with ActiveCare Blood Glucose
Test Strips. Using other test strips with this system can produce inaccurate results.
SETTING THE METER
Before using your meter for the first time, you should check and update these
settings.
The touchscreen allows users to communicate with the meter by simply tapping
on the screen with fingers.
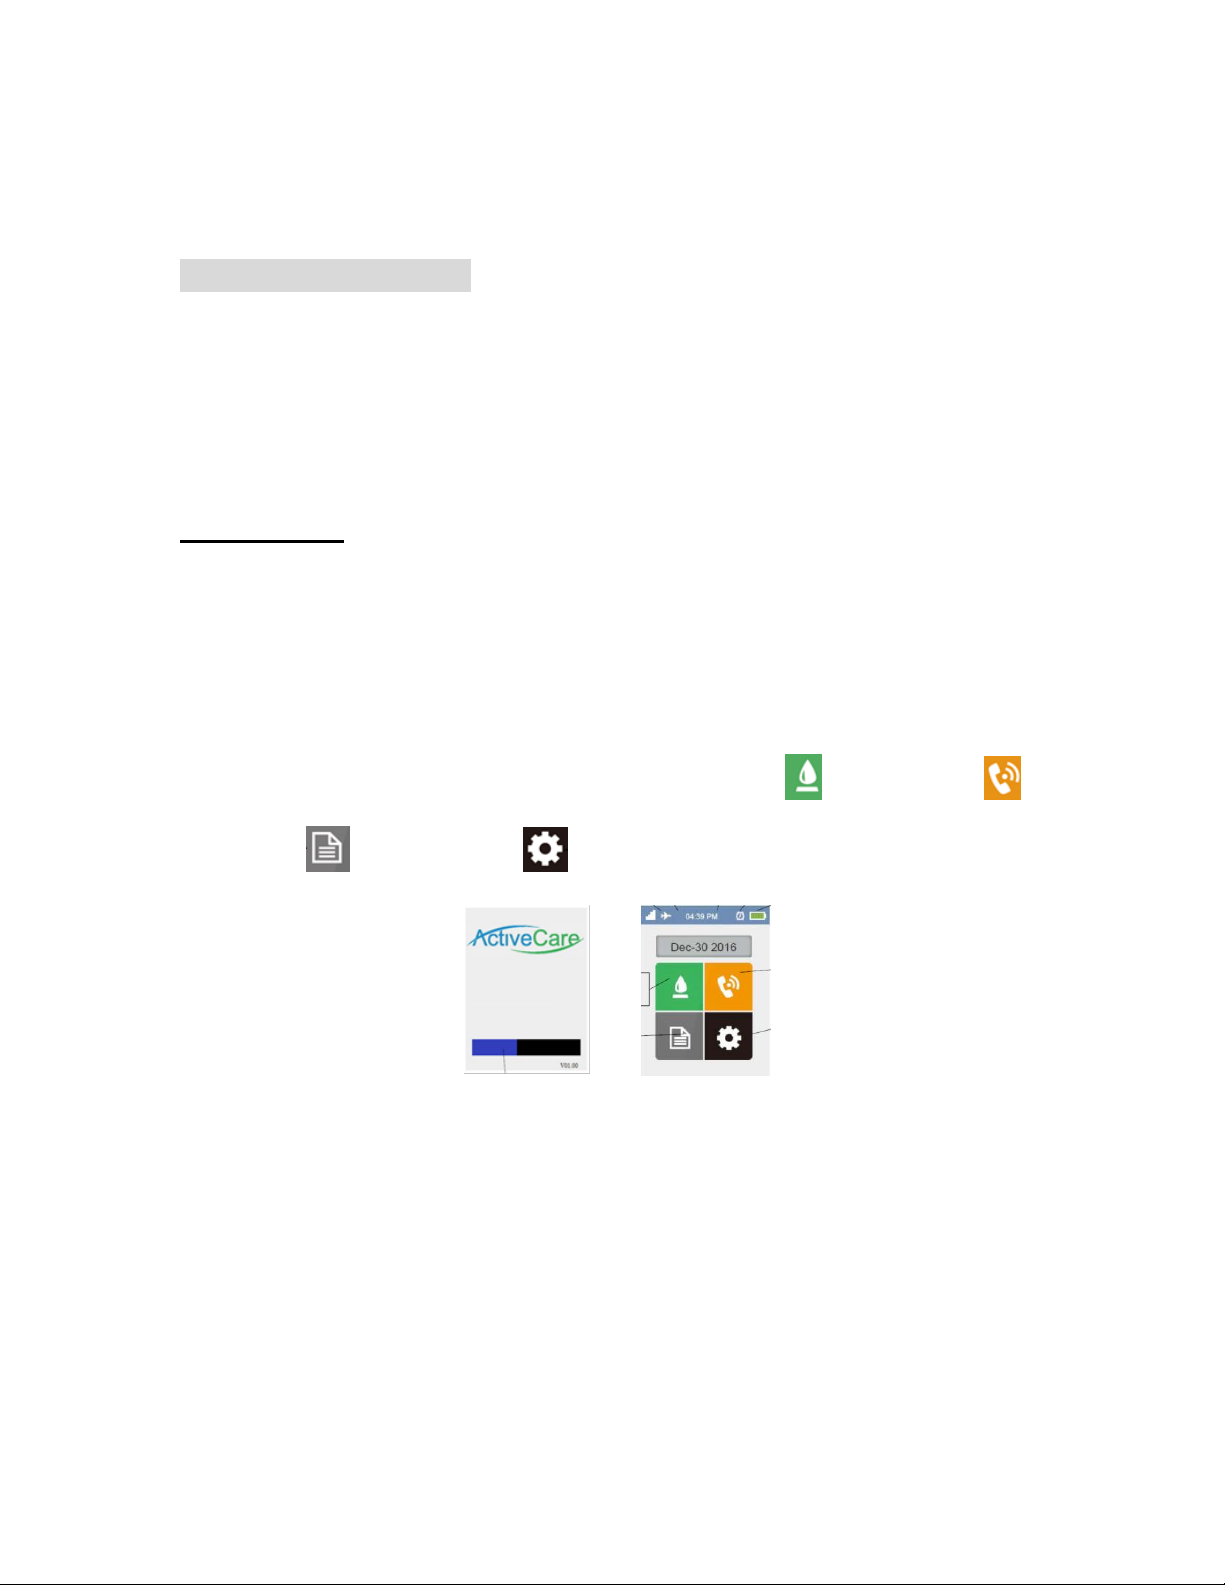
Meter Setting
1. Start with the system off.
Press the power button for 1 second to activate the meter.
The meter displays ActiveCare logo with a loading bar showing the process
of time/date synchrony.
You will see the main page, showing 4 features: (measuring),
(calling), (memory) and (setting), on the display.
NOTE:
The backlight of the meter will turn low if the meter is idle for 1 minute.
If continually left idle with low backlight for another 10 minutes, the meter
will then enter the halt state, as if the meter is turned off. Press the power
button for 1 second to restart the system.
Press the power button for 3 seconds to turn off the meter.
14
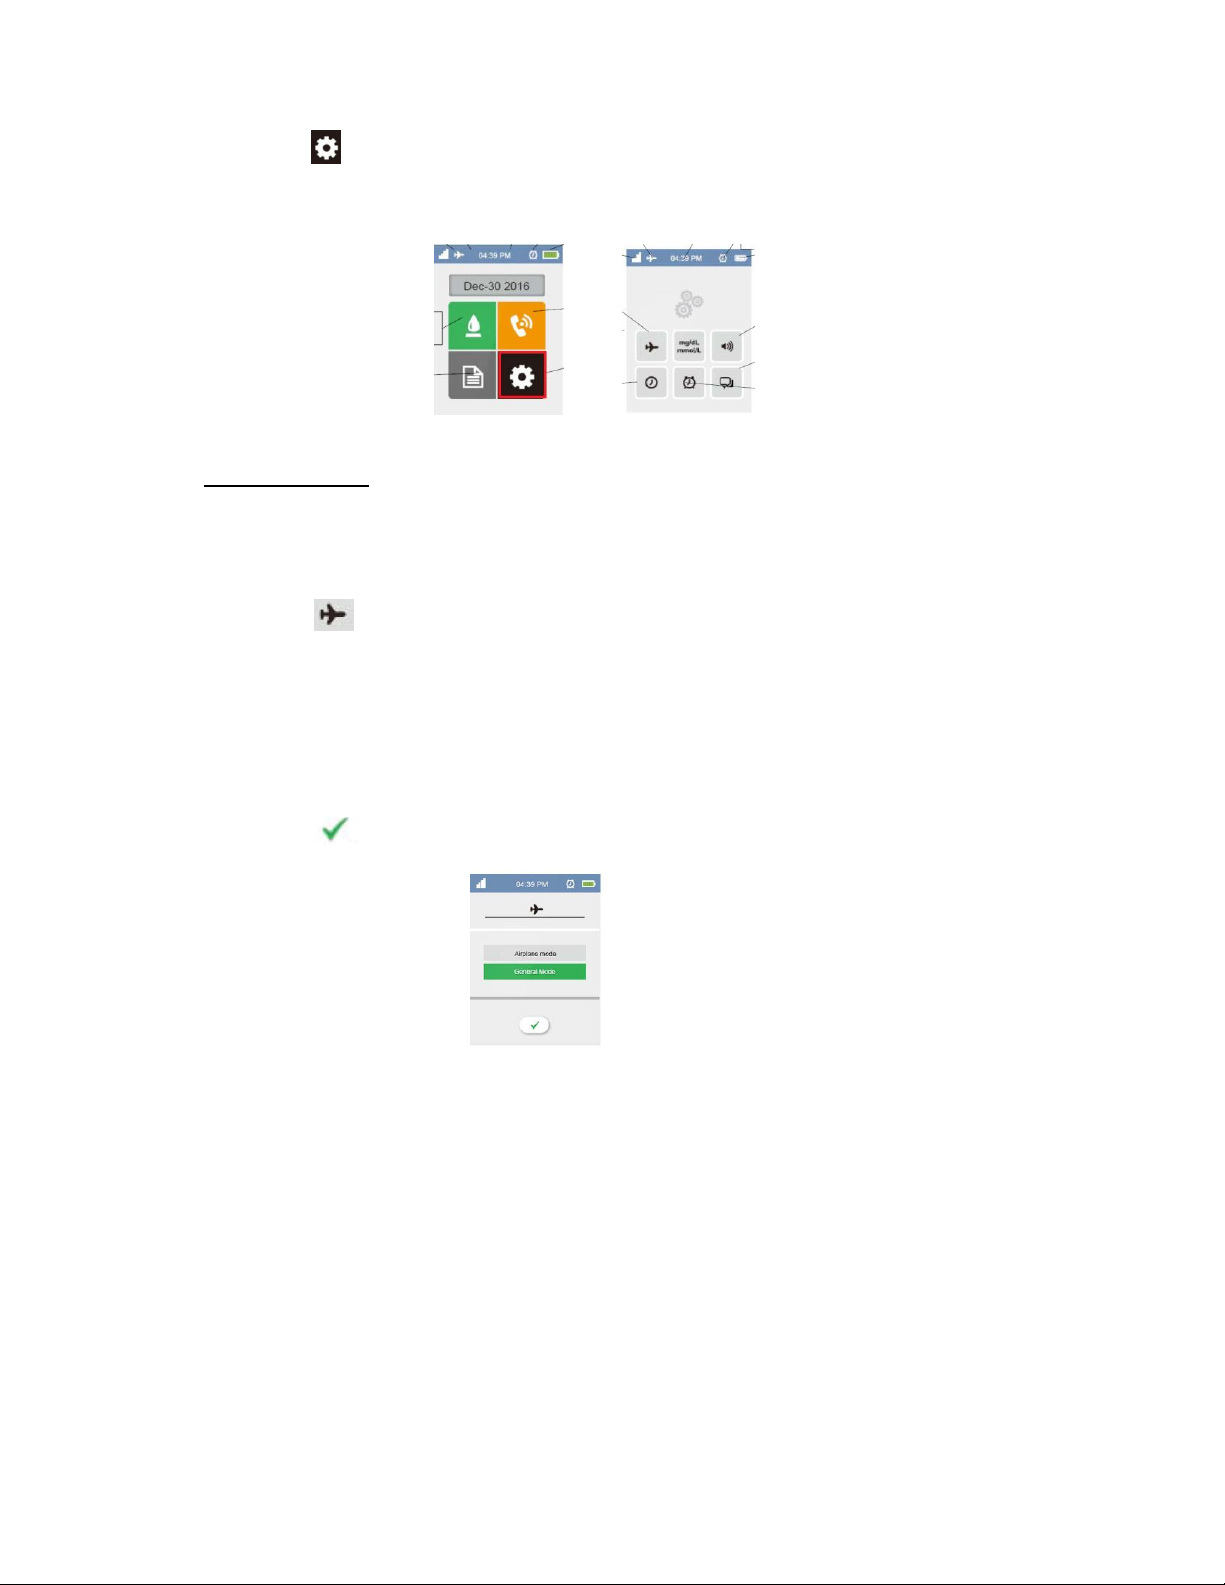
2. Tap on , and there are 6 sections: airplane mode, measuring units, volume,
time/date, reminder alarms and language on display.
Airplane Mode
The airplane mode will terminate the meter’s cellular telephony and
transmitting functions.
1.Tap on to enter the airplane mode setting page.
2.Tap on the preferred mode (airplane or general) for preference.
Select the airplane mode when necessary, or “general mode”to activate
the meter’s telecommunication function.
3.Tap on to save and exit.
Note:
The airplane mode allows users to measure their blood glucose values in flight or
in places where radio-frequency signal transmission must be suspended. The
measuring result will be saved in the memory, and later be transmitted to the
server when the meter is set in the general mode with available GPRS signals.
15
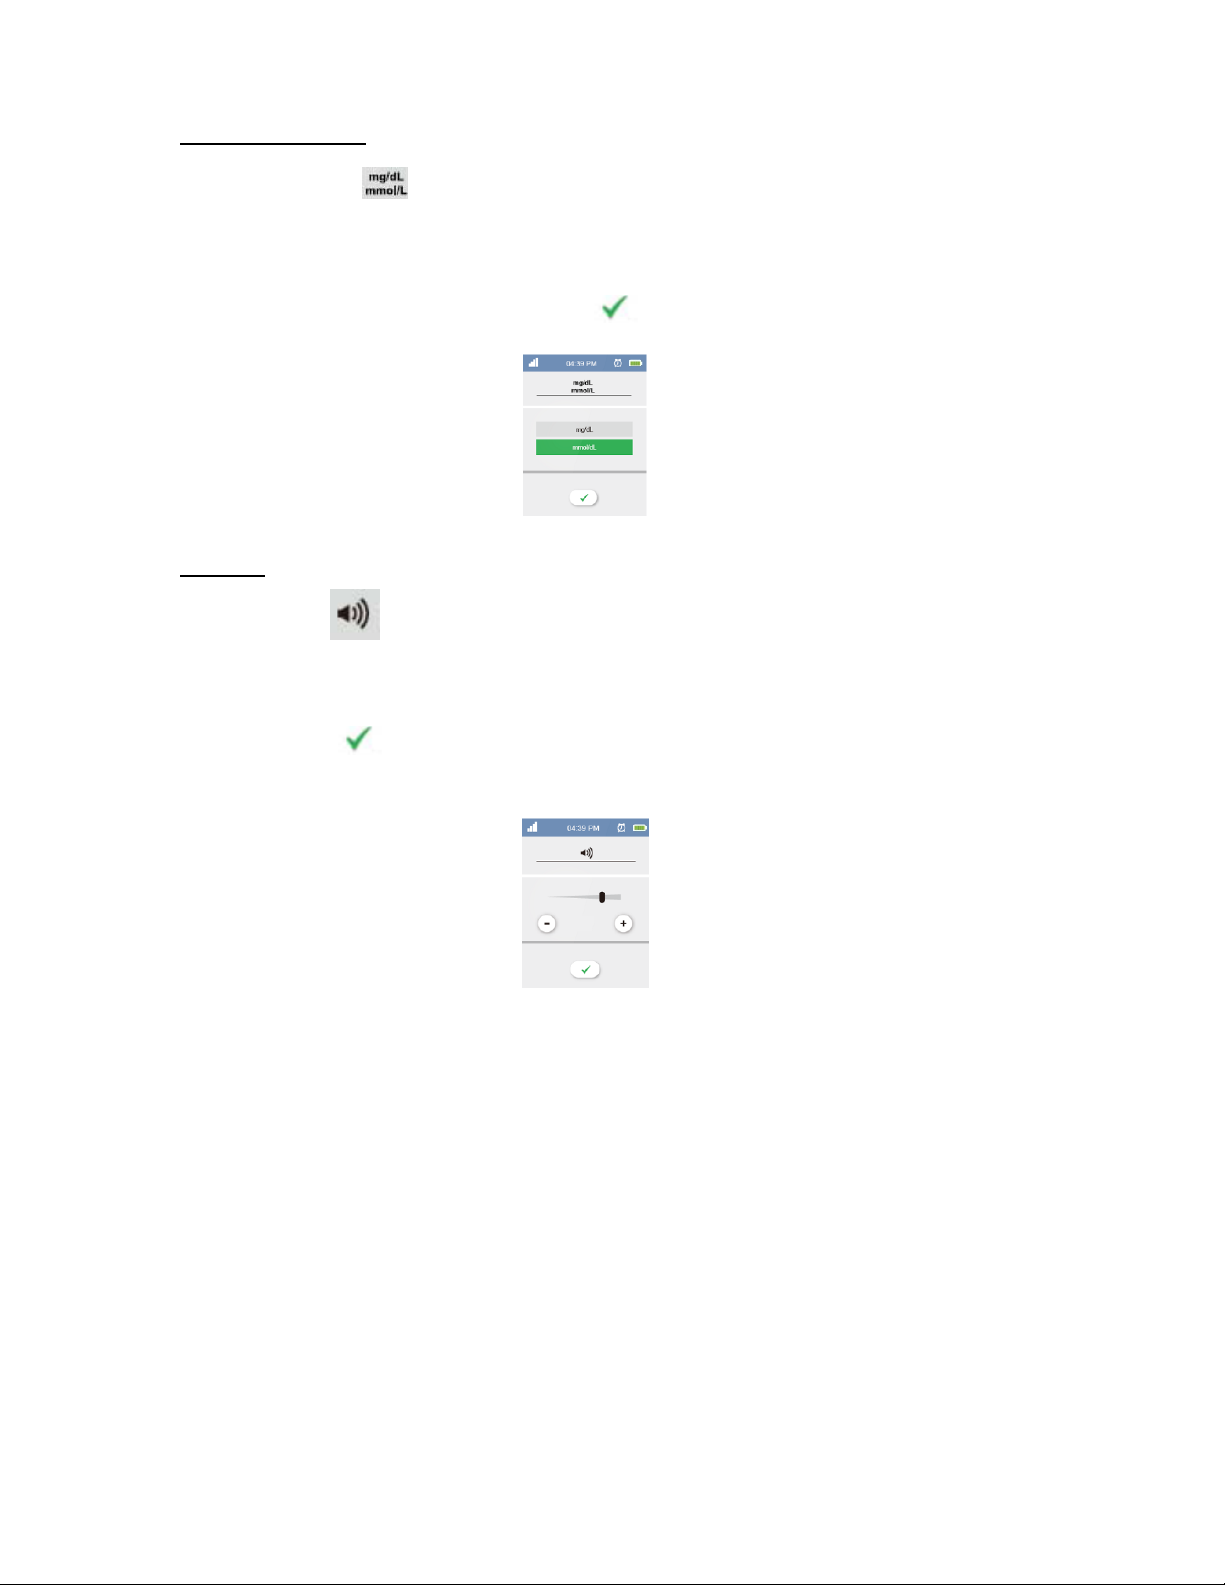
Measuring Units
1. Tap on to set the measuring unit.
There are two measuring units to choose from: mg/dL and mmol/L.
2. Tape on the desired one and to save and exit.
Volume
1. Tape to set up the volume.
2. Tape on the “+”or “-”to adjust the volume.
3. Tap on to save and exit.

16
Time and Date
There are two ways to set date and time: automatic or manually.
IN AUTOMATIC MODE:
1. Tap on to set time and date. Choose the “12”or “24”bar to set
your preferred time system.
2. Tap on automatic mode. In this mode, time and date are synchronized
once the meter’s GPRS (General Packet Radio Service) is in service.
Please contact your mobile communication providers for further
information on GPRS.
3. Tap on to save the setting and exit.
IN MANUALLY MODE:
1. Tap on or if to select the manually mode.
2. Tap on to save the setting.
3. Tap to continue setting time.
4. Tap on or to set time.
5. Tap on to save and exit.

17
Reminder Alarms
1. Tap on to set the alarm.
You may set up any or all of the reminder alarms (1 - 4).
2. Tap on □to put/remove as set/cancel the reminder alarm.
3. Tap on to set the time by tapping on or . In 12-hour time setting,
you may choose from AM and PM along with time adjustment.
4. Tap on to save and exit.
5. Press the home button to leave the alarm setting page and back to the main
page.
Note:
At the time of your alarm, the meter will beep. Please tap on or press the
home button to dismiss the alarm. If not, the alarm will continue beeping for 10
minutes.
18
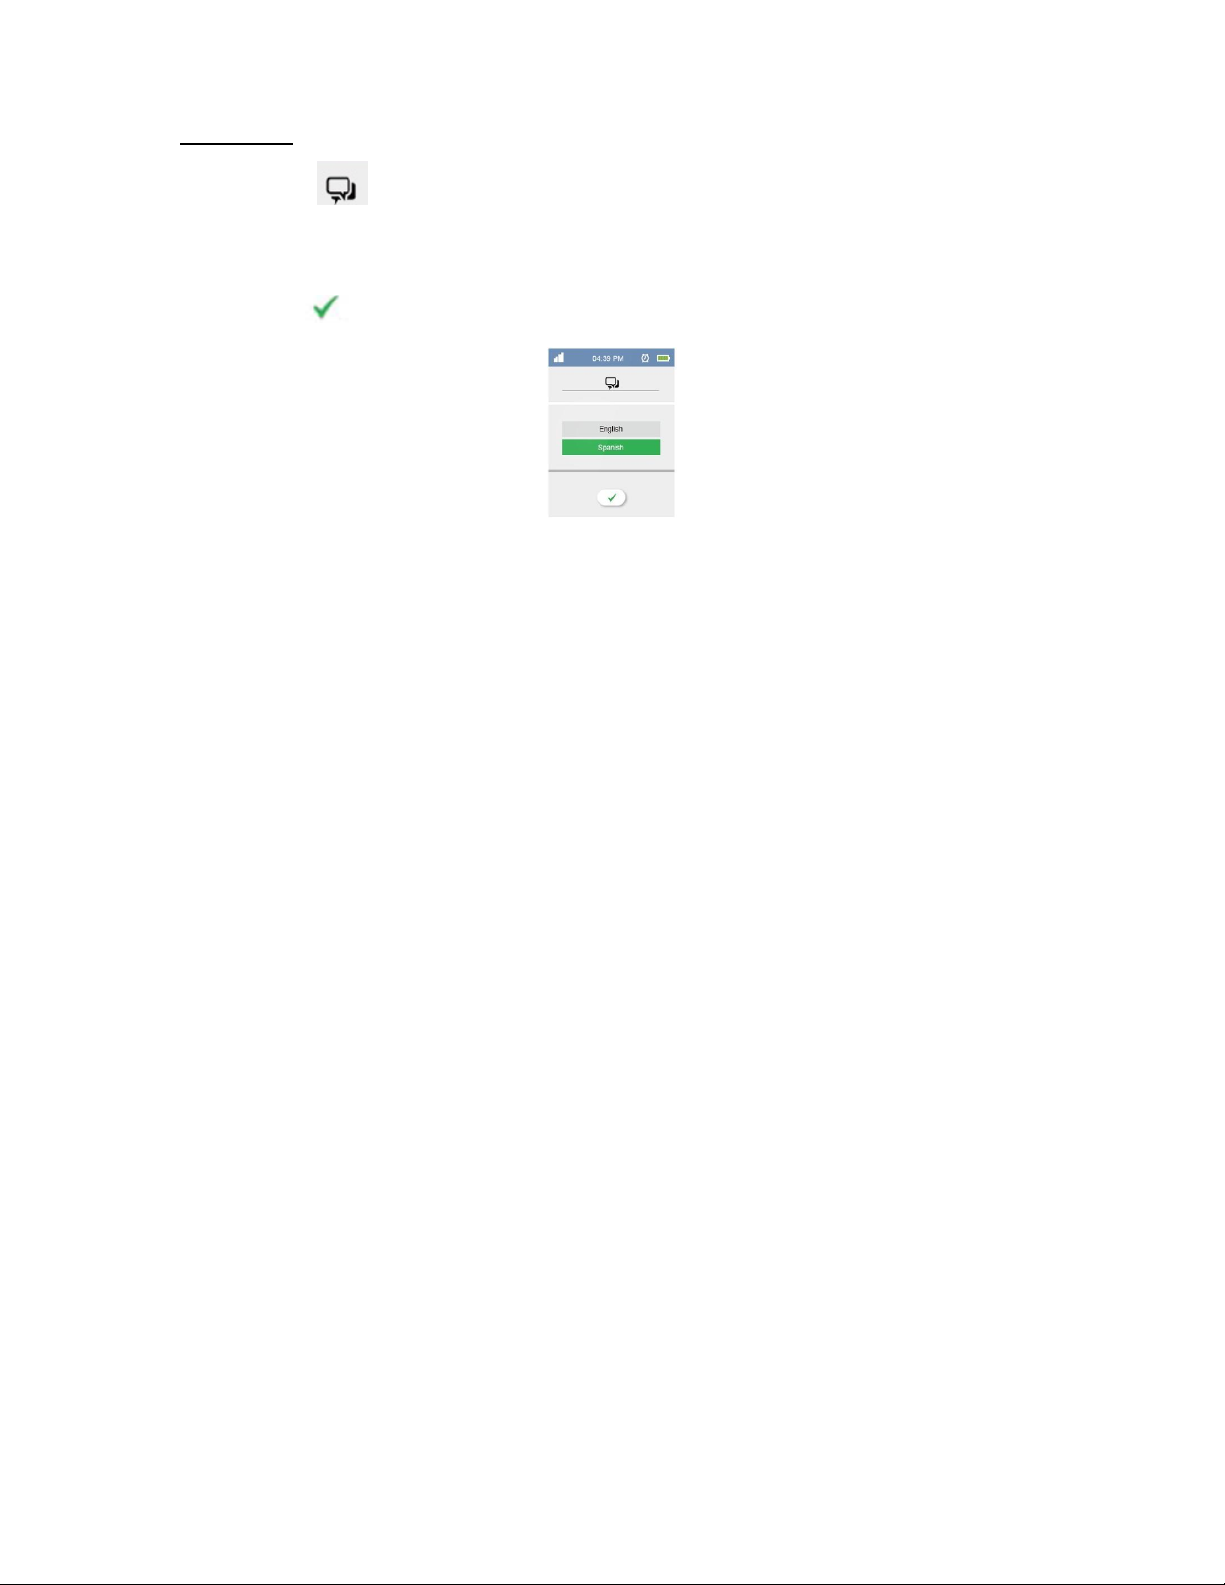
Language
1. Tap to set the displayed language. The default language is English.
2. Tap on the preferred language bar.
3. Tap to save and exit.
Congratulations! You have completed all settings!
NOTE:
These parameters can ONLY be changed in the setting mode.

19
Calling
ActiveCare TD-4121 Blood Glucose Monitoring System is equipped with
GPRS (General Packet Radio Service) that allows users to call out directly to
the service center, receive calls and stream data to the server.
Calling feature is activated under 3 conditions and functional for 10 minutes
only.
1. After every blood glucose measurement:
To transmit the test result to the server. The service center will phone in if
the uploaded result is atypical.
2. At 6 o’clock every morning:
To transmit data to the server automatically, providing that the meter is not
in the airplane mode.
3. Emergency:
Whenever the call button at the back of the monitor is triggered.
The following display will be shown in the calling page:
MESSAGE
WHAT IT MEANS
Appears when the calling function is initiating.
Wait for a few seconds to proceed.
Appears when the meter calls out to the service center.

20
MESSAGE
WHAT IT MEANS
Appears when a call is connected.
Tap on to end the call.
Appears a call comes in.
Tap on to take or to reject the call.
Appears when you are answering the phone.
Tap on “-”or “+”to adjust the volume.
Tap on to hang up the phone.
Appears when the meter is searching for available GPRS
signal for data transmission.
Data is loading.
Table of contents


