Adams Fiber MediaRoom User manual

MEDIAROOM
USERGUIDE
powered by

This material may not be duplicated, in whole or in part, by any means, without the
express written consent of Co-Mo Comm Inc., Tipton, MO 65081 USA.

WELCOME TO MEDIAROOM
Digital TV is different than anything you have seen before. It
isn’t cable…it’s better. Digital TV offers great channels, many
features and many choices. Watch what you want –sports,
movies, news, cartoons, dramas, comedies –anything you
can imagine is there.. Watch how you want –high quality
digital video and sound. So sit back, relax and enjoy the
future.
The New Way
to Watch


TABLE OF CONTENTS

TABLE OF CONTENTS

USING YOUR REMOTE
1POWER Switches the power on/off for TV and Set
Top Box
2INPUT Changes the current A/V input of the
selected device
3SETUP Setup remote (see reverse side of
remote)
4POWER Turn selected device on or off
5DEVICE
CONTROL
Send commands to DVD, Audio, TV or Set
Top Box
6ON DEMAND Opens the On Demand menu
7GUIDE Displays the on-screen program guide
8MENU Displays on-screen menu
9DAY -/ DAY + Moves Guide 12 hours ahead or back
10 ARROW
buttons
Navigates up, down, left and right within
the on-screen guide or menus
11 OK Enter a choice you have made
12 BACK Goes back to the previous screen
13 EXIT Exits the current menu item
14 INFO Displays on-screen information about the
current TV / DVR program.
15 LAST Changes channel to the most recently
viewed channel
16 VOL +/-Increases or decreases volume of the
currently selected device
17 CH/PG Changes channel up/down or goes page
up/down on-screen program guide
18 MUTE Turns the volume of the currently
selected device on/off
19 DVR Opens DVR recordings screen
20 RECORD Starts recording current program
21
PLAYBACK
CONTROL
BUTTONS
Controls video for LIVE TV/DVR
REPLAY: Plays back a few seconds
REW: Rewinds video
FF: Fast forwards video
SKIP: Skips ahead in 30 second
increments
PAUSE: Pauses video
PLAY: Plays video or resumes from pause
STOP: Stops playback of video
22 NUMBER
Buttons
Allows direct access to specific channels
and menu items
23 DELETE / * For future use. Currently unassigned
24 ENTER / # For future use. Currently unassigned
25 PHONE For future use. Currently unassigned
26 ZOOM For future use. Currently unassigned
27 LIVE TV Returns programming to Live TV
3
8
2
5
9
13
11
15 17
20
21
27
4
6
10
12
16
7
14
19
22
24
26
23
25
18
Remote Functions
1

USING YOUR REMOTE
Step 1
•Press and hold SETUP
until the device
control button blinks
twice.
Step 2
•Press the device
control button for the
device you wish to set
up. The device control
button will stay lit.
Step 3
•Press and hold the OK
button. Release the
OK button when your
device turns off.
Step 4
•Repeat steps 1-3 for
each applicable
device (DVD and AUX).
For additional programming information, visit:
Programming Your Remote
2

WATCHING TV
The device selection buttons tell your remote whether you want
to control your set top box or your television. Note: your remote
control must have the remote code programmed before it can
send the correct signals for your TV. If the list of TV brand
codes was not included in your installation pack, please
contact subscriber support or see the notes at the bottom of
this page for programming information. Note: remotes are
multifunctional (DVD, audio, TV, STB). If you’re having
difficulties, press the STB button before desired command.
After pressing the STB button, wait a moment before pressing
the next command.
To turn both your TV and STB on or off, press the Watch TV
button at the top of your UEI Eclypse remote.
To turn only your TV on or off, press the TV button then the
power button.
To turn only your set top box on or off, press the STB button
and then the power button.
Turn Your Set Top Box or TV On or Off
Changing Channels
The CH ^/v button will change channels up or down one at a
time.
The Number Pad can be used to directly enter a channel
number.
Mediaroom also gives subscribers the option to browse other
channels while watching TV. Pressing the down arrow button
will bring up the Info Bar. From there, you can use the up and
down arrows to surf through the surrounding channels to see
what is on. Once you find what you want to watch, press your
OK button to go to that channel.
3
WATCHING TV
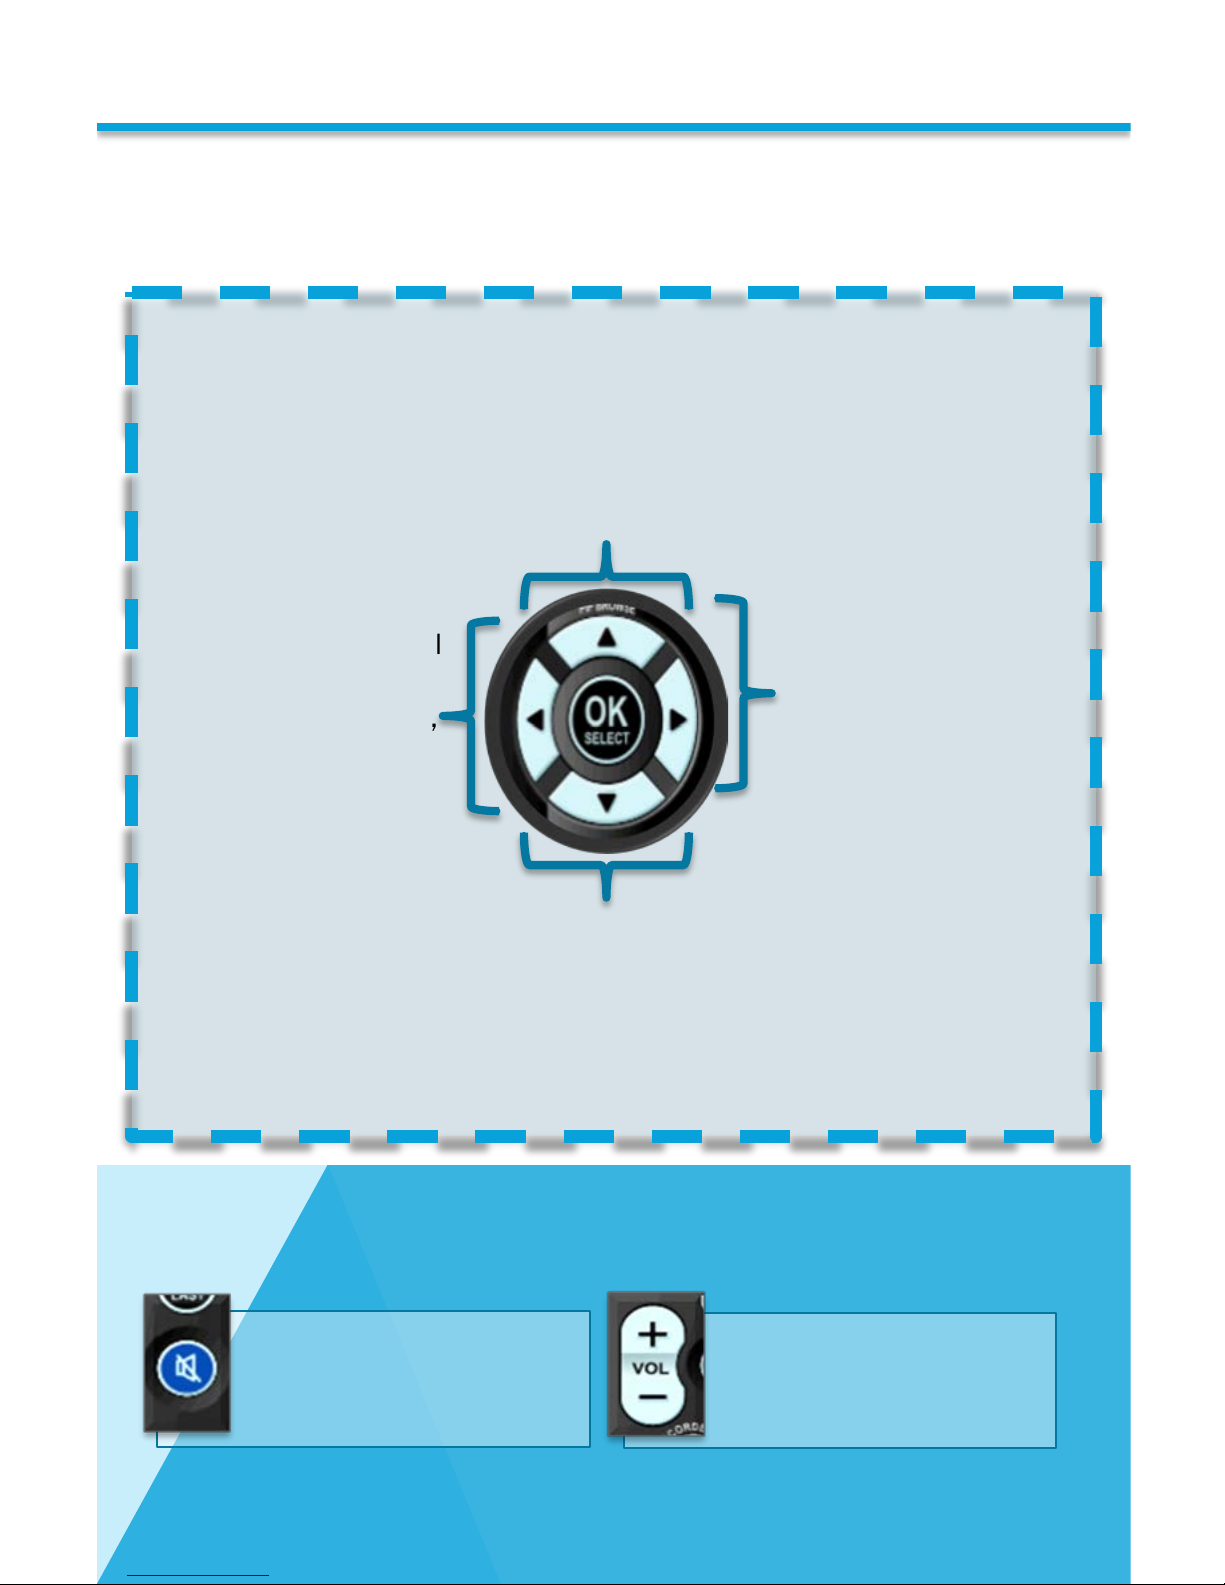
Adjusting Volume
There are a number of buttons on your remote that display
different features of your service.
System Buttons
Up Arrow Button
The up arrow button will allow you to see
the 5 most recent channels you have
viewed. You can go back to one of these by
highlighting the channel and pressing the
OK button.
The down arrow button will allow you to
surf through the surrounding channel
info to see what else is currently
playing. You can change the channel
from here by pressing the OK button.
Down Arrow Button
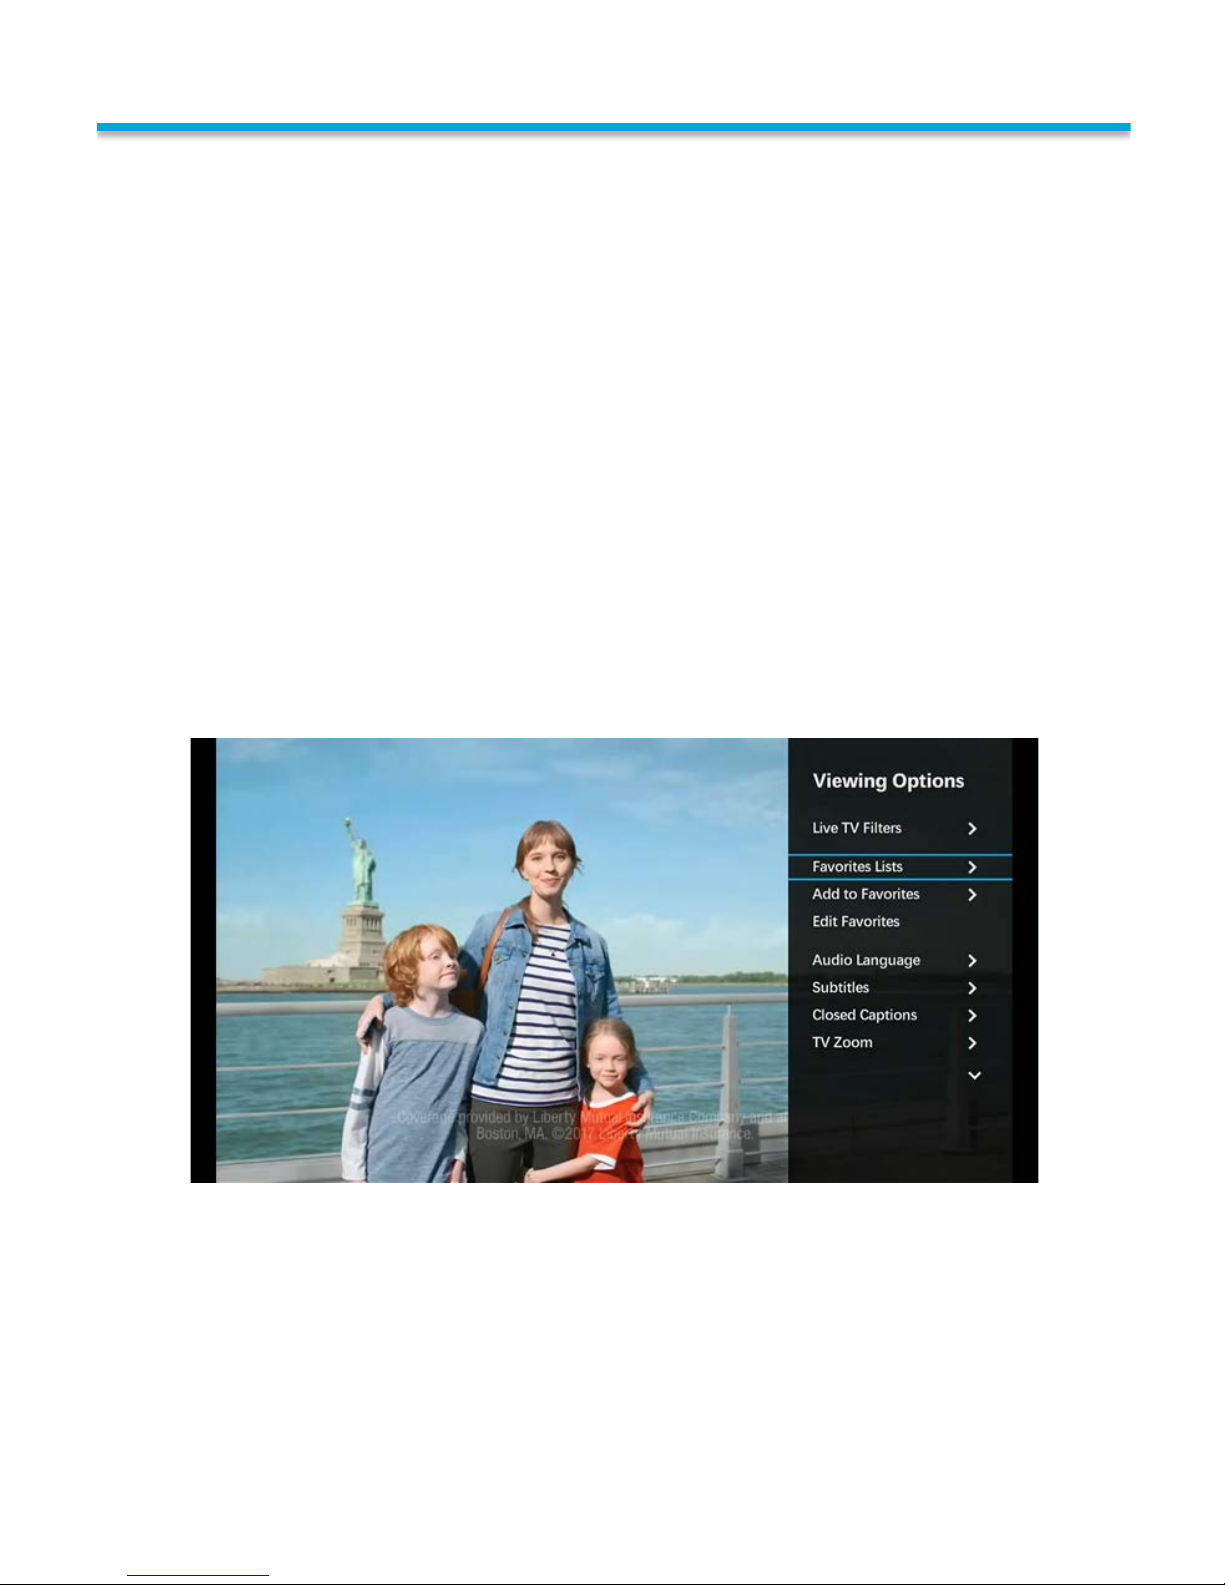
The Right arrow
button will allow
you to see viewing
options. Such as:
Live TV Filters,
Favorite List
Options, Closed
Caption and Zoom
Options.
The Left Arrow
button will allow
you to see the
Menu Bar. This will
give you the
options to Search,
Browse Live TV in
the Guide, On
Demand,
Recorded TV and
Settings.
Right Arrow Button
Left Arrow Button
The Mute Button
•Turns the sound on or off.
The VOL +/-Button
•Adjusts the TV volume
gradually.
4

WATCHING TV
**Please keep in mind, these functions will only be available to subscribers who are
subscribed to a DVR package**
→Pause a live TV show for a snack, then resume playing where you left off – even
skip commercials after you’ve paused TV. Pressing the pause button will pause
the program for up to 90 minutes. To resume playing, press Pause again or
press Play. If no action is taken, the program will resume playing from the place
it was paused after 90 minutes of inactivity. A progress bar at the bottom of the
screen will show how long the program has been paused and how much time is
remaining. You can see the progress indicator bar by pressing play.
→Press the rewind button to rewind or press it two or three times to increase
rewinding speed.
→Missed something? No problem, press the skip backward button to back up 7
seconds.
→If you’ve paused and replayed live TV, or you’re watching recorded content, you
can use the fast forward and skip forward buttons to go forward if you have not
changed channels.
→FF can also be pressed two or three times to increase speed.
If your set-top box isn't responding when you use your remote control, press
the STB button in the upper right corner of your remote to ensure you're in
the correct mode. If your other devices are not working properly, make sure
you press the corresponding mode button that you programmed for that
device, and check your batteries.
Rewind Fast Forward
Skip Backward Skip Forward
Pause Play
Play, Pause, Rewind
5
WATCHING TV
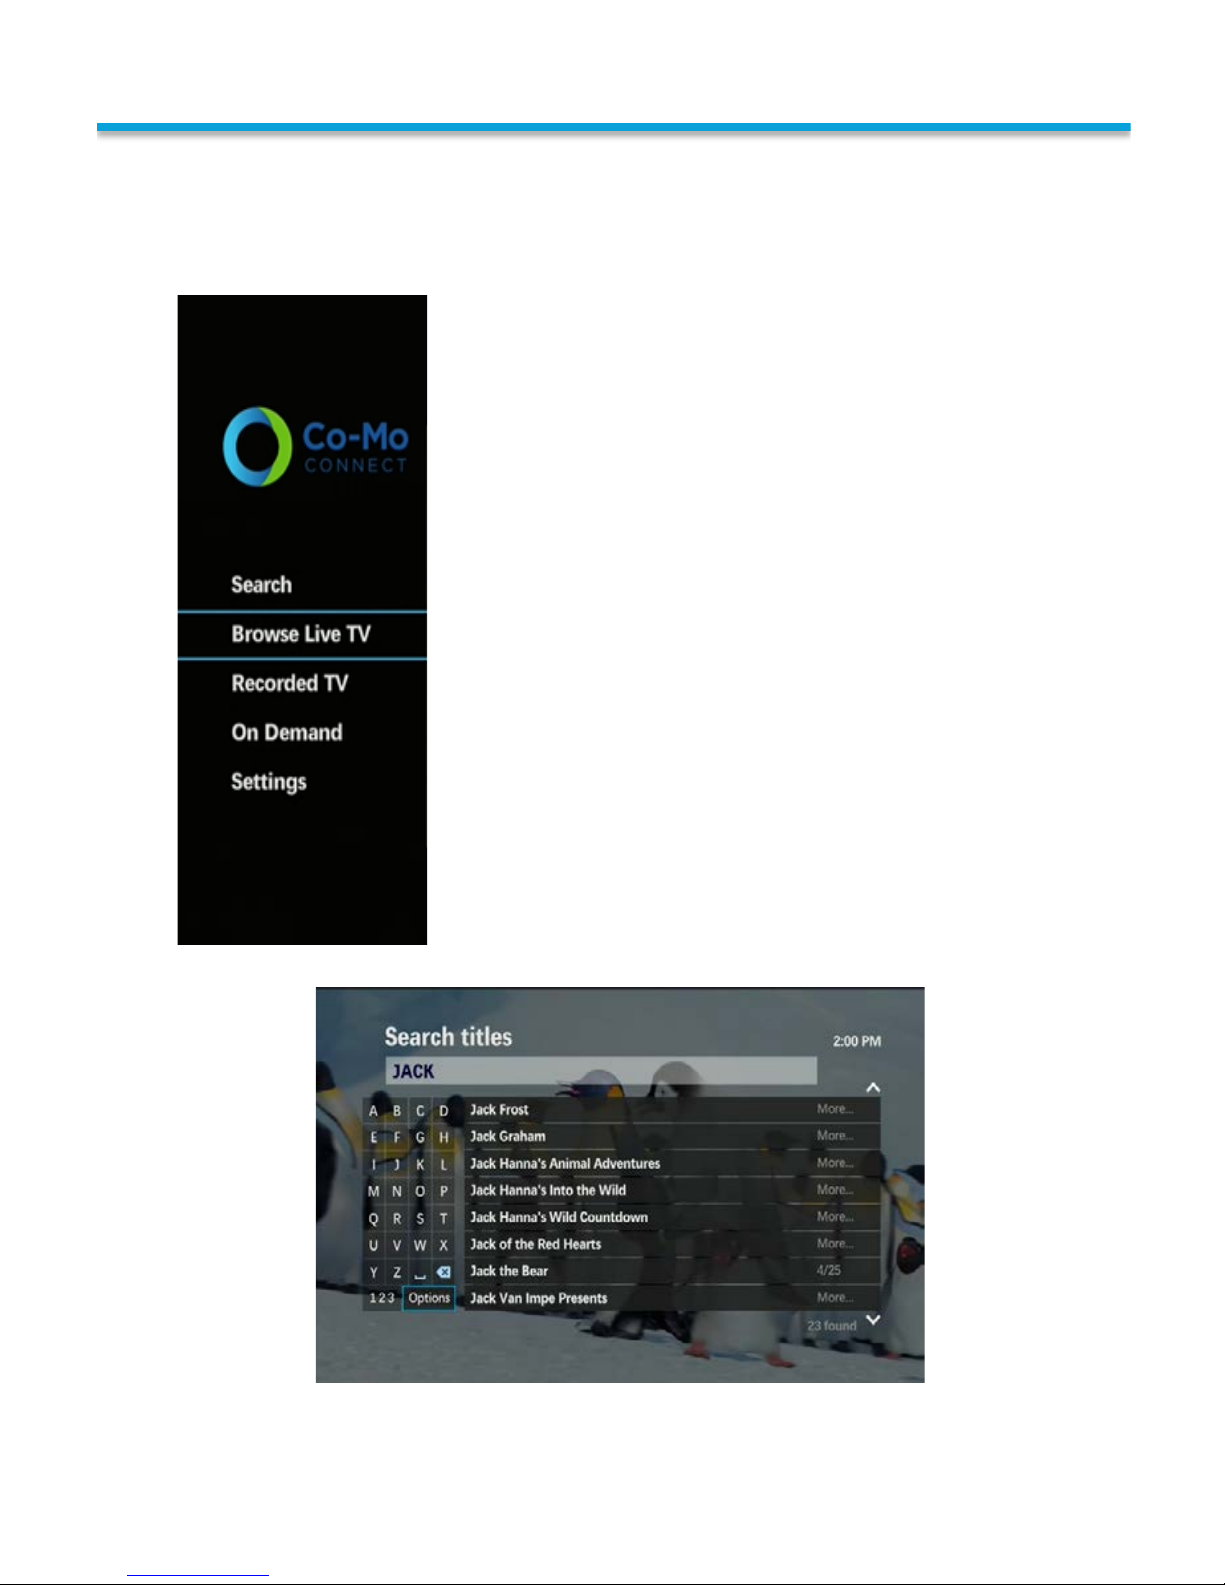
You can search the guide by TV show, movie title or actor in the very
easy-to-use Search feature.
To bring up the Search feature, you can press either the
Menu button or the Left Arrow button on your remote to
bring up the Menu. Use your arrow buttons on your
remote to highlight the Search option then press OK.
There are two ways to input your Search query:
→By using the arrow buttons on your remote control
→By using the number buttonpad on your remote
control
Using the arrow buttons: Highlight the letters of your
search query by navigating to the letter and pushing OK
to make your selection. As you spell out your query,
search results will automatically populate to the right
side of the screen.
Using the number button pad: The numbers 2 through 9
can be used to input letters, where one quick push of the
number 2, will enter the value for A; two quick pushes of
the number 2 will enter the value for B; and three quick
pushes of the number 2 will enter the value for C. As you
spell out your query, search results will automatically
populate to the right side of the screen.
→You can use the “123” button to input numeric values.
→The options button on screen will allow you to filter your results.
→If you need to delete a letter, simply press the * button at the bottom of the
buttonpad on your remote.
Search For Programming
6

WATCHING TV
Using the Program Info Screen
Whether you are watching live TV or browsing the Program Guide,
the Info button on the remote is a great tool that will give you
additional information about the program you are considering.
From this screen, you will be able to see additional information
about the program including an episode title, the time it is
playing, a description, actors names, rating and the original air
date.
You will also notice a couple additional features on this page. On
the left navigation pane there is a More Showtimes button; this
will show all the instances where an individual program will be
showing for the next seven days.
At the top of the page you will notice a tab labeled Cast & Crew.
By using your arrow buttons and selecting this option, you will
bring up a list of available actors, producers and directors. You
can then highlight a name and press the OK button on your
remote allowing you to see all programming that person is
involved with for the next seven days. You have the ability to sort
these by title or by date. You can use these titles to set episodes
to record if the program is in the future or you can watch it now if
the program is currently playing.
These search features do also provide results from On-Demand or Pay-Per-View. Any
charges from On-Demand or Pay-Per-View purchases will be automatically added to your
monthly bill. For more information on On-Demand or Pay-Per-View, please refer to pages
19 through 23. 7
WATCHING TV
Favorites
There are two different ways to access your favorite channels. First, you can display
viewing options while watching live TV by pressing the right arrow button on your
remote. Viewing options will allow you to add the channel that you are watching to
your Favorites List. This menu will also allow you to quickly edit your Favorites List. By
selecting the Edit Favorites option.
If you would prefer, you can also choose to access your Favorites by pressing the
Menu button on your remote. Use your arrow keys to select settings and press OK. Go
to the Television option and press OK. You will then see an option to set up favorites.
All channels with a check mark next to them are included in that Favorites List.
Switching Between Favorites and All Channels
To activate your Favorites List, select the option Favorites Lists and highlight the list
you would like to utilize and press OK. This will filter both the Guide and the channels
you will see when you are pressing the Channel up and down buttons on your remote.
8

USING THE GUIDE
Using The Guide
→To access the guide screen, press the Guide button on your remote
control.
→You can use the up and down arrow buttons to browse programs by
channel.
→Use the right and left arrows to go forward and backward in time.
→You can use the fast forward and rewind (>> and <<) buttons to jump a
full day ahead or back in the program guide. This function is not
available in the OnNow Guide. The OnNow Guide will only show the
program that is on now and the program that immediately follows.
→Press the INFO button to see more information about the highlighted
program such as a brief description and cast.
→Press the BACK button to return to the guide.
→If you are highlighting a show that's currently airing, press OK to view
that program and EXIT the guide.
→You may also choose to use the guide rotation to rotate through the
different guides with the press of the Guide button.
Recording a Program From the Guide
Press the Guide button to see the program guide. Use the arrow buttons to
select a program.
→Press the red record button once to record the program.
→Press the red record button twice to record the series.
→Or press the red record button three times to cancel the
recording.
Press Guide or Exit to TV at any time to return to watching live TV.
Mediaroom offers three separate guides for the subscriber to use.
Once you decide which guide you prefer, you can visit the Menu
Settings and set that as your Primary Guide Style. The next couple
pages will go over the features of each guide.
For more information on how to set your default Guide, please refer to page 34.
Please note: In all guides you have useful options such as live TV filters,
jump to day, settings and favorites options, by selecting enter or the #
button on the remote.
9

OnNow Guide
The OnNow Guide gives you a live snap shot of every program that is
on now and lets you see what is on next. This is the default guide
that is used when your service is first installed. This option will allow
you to see the title of the program, as well as an episode name for
many recurring TV shows. This will show the release year for all
movies. The Yellow Bar under the run time of the programming is a
progress bar used to show how much of the program is already
shown. You will also notice that on the right side of the row, an icon
will show if Closed Caption and HD Content are available for that
program.
USING THE GUIDE
For more information on how to set your default Guide, please refer to page 34.
10

Grid Guide
The familiar Grid Guide lists shows by channel and time. This is a
more typical programming guide of the three options. Like most
service providers, this will offer a two-hour programming guide for six
channels. You will be able to see live feed of the highlighted channel
in the bottom left hand corner of the guide. If the highlighted
programming is not currently airing, this spot will advise you of the
time that program is expected to begin. This guide will also show you
the Title of the movie or show that is highlighted, episode name for
recurring television shows, the scheduled run time for the title, how
many minutes are left in the current show, the rating of the title, the
release date or year and whether closed captioning is available for
that title. The last line of information will rotate every few moments
to also provide some names of actors or actresses in the selected
title.
USING THE GUIDE
For more information on how to set your default Guide, please refer to page 34.
11

Channel Line-Up Guide
The Channel Line-up is useful for subscribers who prefer to only see
programming for one channel at a time. This option will show you the
current program and the next four titles showing on that channel.
You will be able to see live feed of the highlighted channel in the
bottom left hand corner of the guide. If the highlighted programming
is not currently on this spot will advise you of the time that program
is expected to begin. This guide will also show you the Title of the
movie or show that is highlighted, episode name for recurring
television shows, the scheduled run time for the title, how many
minutes left in the current show, the rating of the title, the release
date or year, and whether closed captioning is available for that title.
The last line of information will rotate every few moments to also
provide names of actors or actresses that can be seen.
USING THE GUIDE
For more information on how to set your default Guide, please refer to page 34.
12

USING YOUR ON DEMAND
Once you find the title you would like to rent or view more information on,
highlight it using the arrow keys. Once the picture of the title you wish to view is
highlighted, press OK on your remote.
**Please note: You will see 2 pictures of most titles; one being Standard Definition and the
other High Definition.
With Adams FiberTV,you now have the ability to rent movies,
concerts, sporting events, and shows all at the click of a button
without ever leaving your home! Any charges will just be added to
your monthly bill.
Browsing On-Demand Titles
First, press the On-Demand button on your remote tolaunch the On-Demand menu.
Next, use your Up and Down Arrow keys to browse the available titles. The videos
will be sorted into different categories like Events, Free Movies, Free On Demand,
etc. The Movies will also besorted into categories like Foreign Flix, In Theaters Now,
Just In.
This will bring up the Title Summary. This will give you information about this title
including, the year it was released, cast & crew information, rating, length, etc.
13

To Rent the selected title, highlight the Rent
button (shown to the right) with the arrow
button on your remote and press OK to select.
USING YOUR ON DEMAND
When you press this button, a screen will come up advising you that you are about to
rent this title, the cost, and how long the title will be available to you. To proceed you
will press the OK button on your remote with the Rent in “SD or HD” for “the price”.
This selection is shown in the screen below as “Rent in SD for $2.99”.
To cancel and go back to the last screen, just highlight Don’t Rent using your arrow
buttons on your remote and press OK.
As a final confirmation, a confirmation screen will
come up advising that your account will be charged for
this rental as shown to the right. To proceed, highlight
Rent Now and press OK.
To cancel renting this title, press Don’t Rent.
Your screen will now say “Thank You for Your
Rental” and will begin playing the title you just
rented.
Renting On-Demand Titles
14
Table of contents


