Adaptivlite ADVL-AU5 User manual

1
WWW.ADAPTIV-MULTIMEDIA.COM

ADVL-AU5
2
CONTENTS
Contents
About 3
Connection Diagram 4-5
Quick Start Guide 6-7
System 8
Sound Settings 9
DAB 10-11
Video - HDMI 12
Video - DVBT 13-14
Video - AV In 15
Media - USB/SD 16-20
File Transfer 21-22
Info/Update 23
Technical Specications 24

3
WWW.ADAPTIV-MULTIMEDIA.COM
ABOUT
Adaptiv
Adaptiv lite is a new brand from Connects2, which allows extensive multimedia
upgrades to the OEM screen.
The plug and play, all in one interface adds USB/SD, AV In and an
input for an aftermarket reverse camera. Optional modules allow the ability to add
DAB Digital Radio (ADV-DAB), DVBT TV (ADV-DVBT) and Bluetooth (ADV-BT). All
features are controlled via the supplied touchpad controller.
Application
Audi A1 2010> Vehicles with 5.8” Colour Centre Display & Concert Head Unit. For
Vehicles with Electronic Air Conditioning Control Panel and Factory Aux Input Only
Kit Includes
Adaptiv Interface, LVDS In/Out Cables, Car specic T-Harness*, AV In Cable, USB
extension cable, Touchpad and HDMI Adapter.
*Two T-Harnesses are supplied, a 40 Way Quadlock and 52 Way Quadlock. Please
verify the type on the vehicle this kit is to be tted to. The other harness is not
required.
Prior to installation
Read the manual prior to installation. Technical knowledge is necessary for installa-
tion. The place of installation must be free of moisture and away from heat sources.
Connects2 cannot be held responsible for the installation of this product.
Technical Support
Connects2 want to provide a fast and suitable resolution should you encounter any
technical issues. With this in mind, when contacting Connects2, try to provide as
much Information as possible. This will speed up the process and help us to help you.
Please use our dedicated online technical support centre: support.connects2.com
ADVL-AU5
4
CONNECTION DIAGRAM

5
WWW.ADAPTIV-MULTIMEDIA.COM
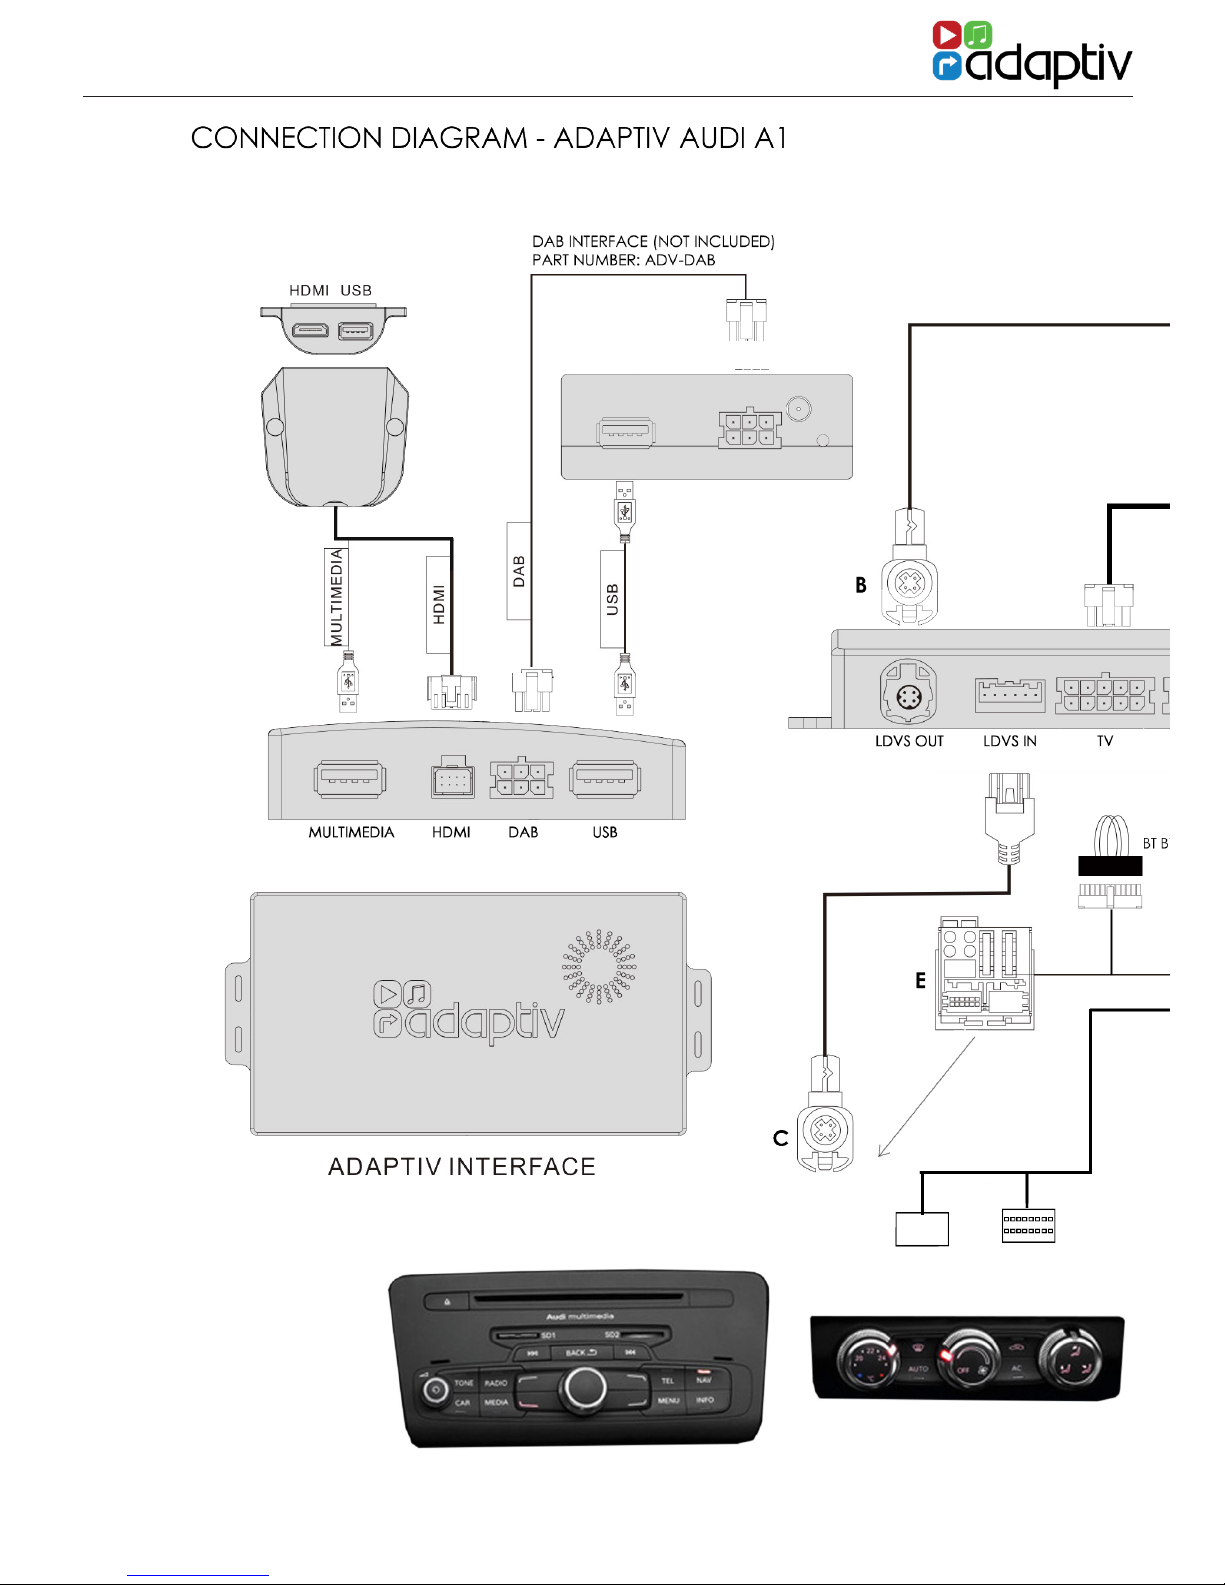
1. Remove the OEM head unit and disconnect the main power Quadlock (A).
2. Disconnect the Pink LVDS connector (B) from the rear of the OEM head unit.
3. Connect this LVDS to the female LVDS OUT on the Adaptiv interface.
4. Connect the LVDS cable supplied (C) back into the OEM head unit,
connect the other end of this cable to “LVDS IN” on the Adaptiv interface.
5. Disconnect the 16 way connector from the rear of the climate panel and connect to (G). Connect (H)
back into the climate panel and ret.
6. Make all required module connections such as DAB, DVBT, HDMI.
7. When not using accessory Bluetooth module, plug 16 pin Bluetooth bypass loom, with the multi-coloured wire
loops, to the 16 pin connector from the main wiring loom.
8. Connect the supplied 24 way power and speaker connector (F) to the Adaptiv
interface, connect the male Quadlock connector (E) into the OEM head unit.
9. Connect the female Quadlock connector (F) into the OEM male Quadlock
connector (A) disconnected in Step 1.

ADVL-AU5
6
2. In order to activate your Adaptiv product, press the HOME button
on the supplied touchpad controller. The screen will switch to the
Adaptiv start up screen.
Verify the Adaptiv homescreen is displayed correctly on the vehicle
display. If it is not, you may need to disconnect power to the
Adaptiv interface, and adjust dipswitch 1 according to the screen
resolution of the display in the vehicle.
QUICK START GUIDE
1. Before using your Adaptiv product, please ensure that the Aux in
option is selected on your OEM head unit. This allows the
Adaptiv product to use the Aux In source for its wide range of
multimedia inputs. You may require an Audi AMI aux cable if you do
not already have one.
Home -
Enter Adaptiv
Car
Exit Adaptiv
Back -
Returns to previous
menu
Scroll - Use the centre of the touchpad
to scroll up/down, left/right.
Tap - Tap the centre of the touchpad to
select.

7
WWW.ADAPTIV-MULTIMEDIA.COM
3. Main Menu - Use the touchpad controller to scroll left across to the
System icon. Tap in the centre of the touchpad to select System.
QUICK START GUIDE
QUICK START GUIDE
4. Scroll down on the touchpad to Language and select the
required language.
5. Scroll up and select Media In and ensure Adaptiv is selected
from the drop down menu.
6. In order to exit Adaptiv and return to the OEM head unit menu,
tap the Car icon on the touchpad controller.

ADVL-AU5
8
SYSTEM
Video in Motion Enable
Enables/Disables video playback whilst the vehicle is in motion.
This feature is turned off by default. It is the drivers
responsibility to obey local trafc laws.
Aftermarket Camera Enable
The Adaptiv interface allows the input of an aftermarket
camera into the OEM screen. This feature is turned off by
default and should only be enabled if an aftermarket camera
is connected. If an OEM camera is tted, this will continue to
function as normal.
Media In
This allows the user to switch between Adaptiv and Car as an
audio source. When using Adaptiv, ensure that Adaptiv is
selected from the drop down list. Should you wish to use an
OEM audio source, select Car.
HDMI Input
Switch between Apple and Android devices. Apple or
Android specic connections are not
included.
Colour
Allows the user to change the colour scheme. The colour is set
to red/white by default.
The System menu allows the user to customise
and select various options.
Language
Allows the user to change language of the Adaptiv interface.
The interface is set by default to English.
Video Input
Change the Brightness/Contrast of the picture for AV In.

9
WWW.ADAPTIV-MULTIMEDIA.COM
SYSTEM
SOUND SETTINGS
The sound settings menu allows the user to set the volume level of
an audio source independantly. When switching the source, the
volume level will be automatically adjusted to the user dened
level.
If the level slider controller is in the 0 position the volume that is set
by the master volume control. Move the volume controller up or
down to increase or decrease the volume gain level.

ADVL-AU5
10
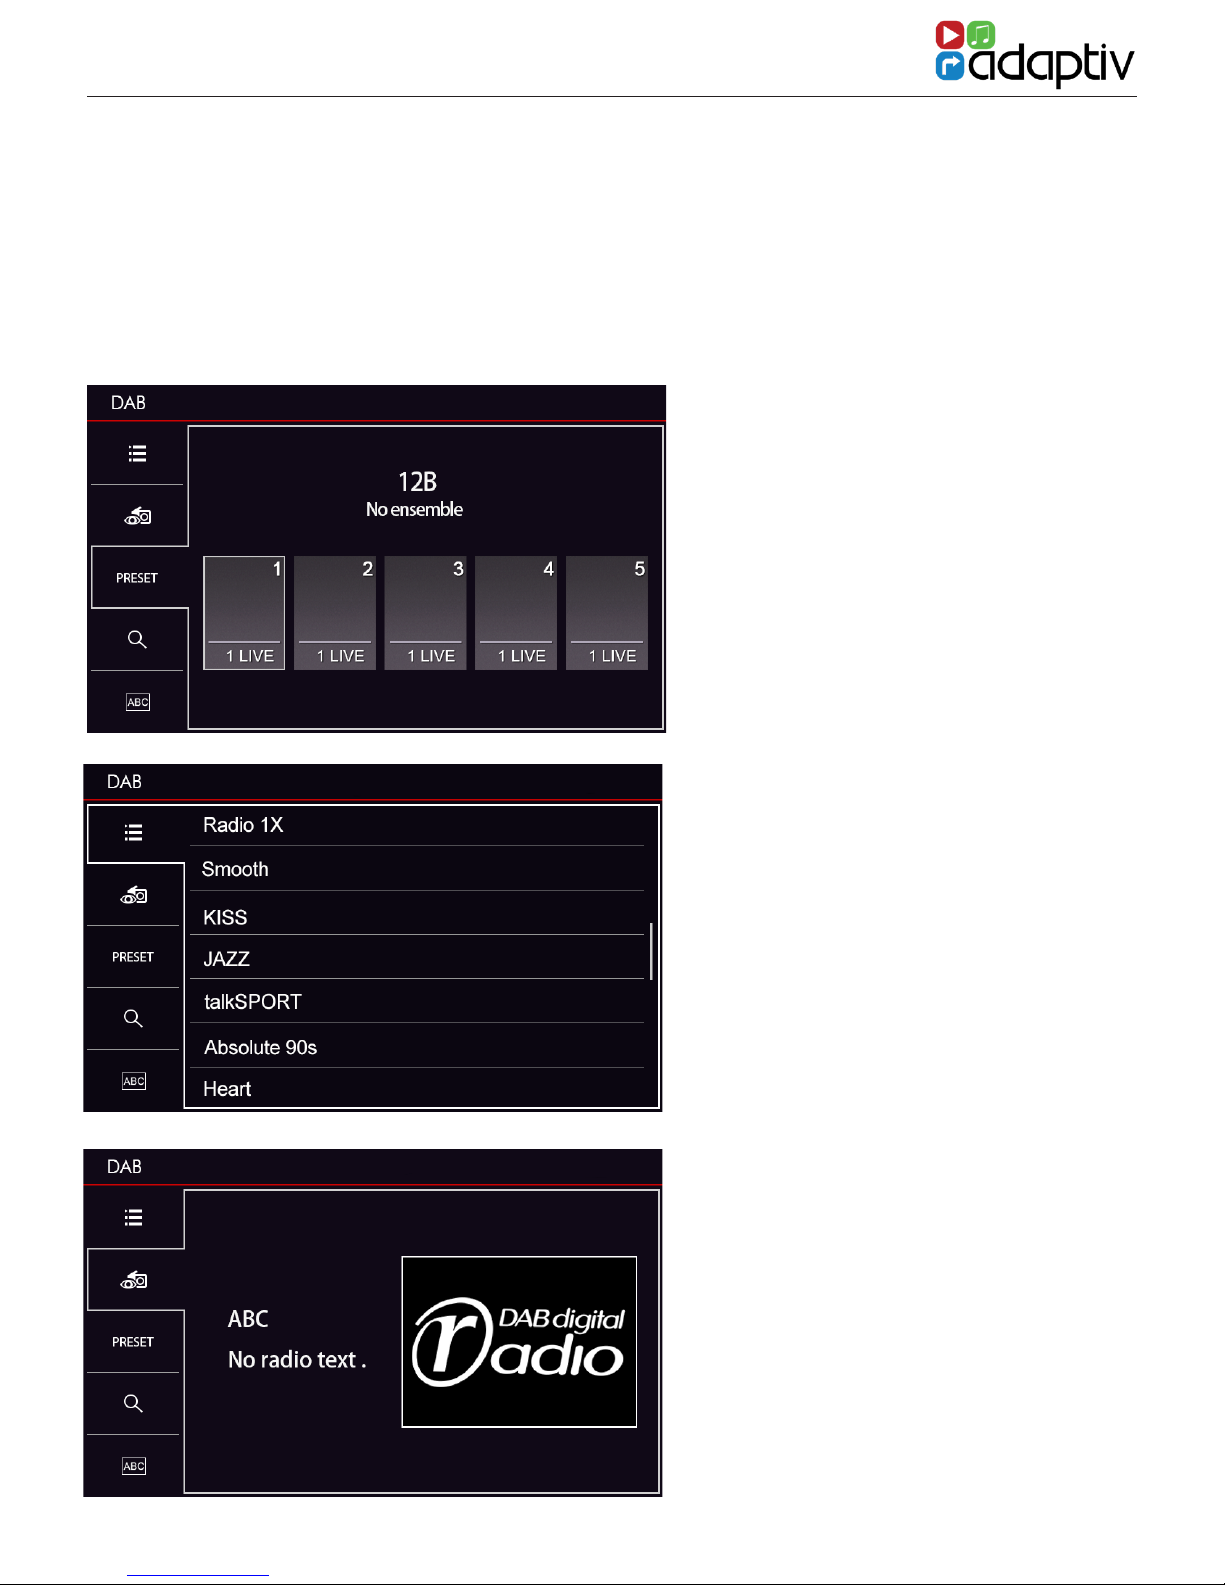
DAB DIGITAL RADIO
Before Use
Please ensure the optional ADV-DAB module is connected to the
Adaptiv interface and that the DAB antenna is connected. Note
that the dipswitch on the ADV-DAB module should be in the On
position. This outputs 5V power to the DAB antenna.
Selecting DAB
Scroll to the DAB icon on the Adaptiv homescreen.
Scanning
When DAB is rst selected, you must scan in order to nd available
DAB stations. Select the Scan icon . After scanning, the rst
available station will be heard and will be shown on the display.
Key to Icons
Scan
Station List
Current station Info
Alphabetical
View
Ensemble View
11
WWW.ADAPTIV-MULTIMEDIA.COM
DAB DIGITAL RADIO
DAB DIGITAL RADIO
Radio station info display
Storing Presets
To store a preset, select the desired radio station. Select the Preset
icon from the right hand side of the display. Scroll to the required
preset button (1-10) on the station presets display. Press and hold in
the centre of the touchpad to save the preset. The station name will
then be shown within the preset icon. It is possible to store 10
presets.
Station Presets display
Station List display

ADVL-AU5
12
VIDEO - HDMI
Before Use
Please ensure the ADV-HDMI module is connected to the
Adaptiv interface. The ADV-HDMI module is supplied with a
female HDMI socket which allows connection of Apple/Android
devices with HDMI out (Device specic adapters not included).
Selecting HDMI
Scroll to Video on the Adaptiv homescreen and select with the
touchpad Select the HDMI icon .
Playback
The HDMI source allows high resolution multimedia playback from
a variety of Apple/Android devices. The multimedia content must
be controlled from the device itself.
Exit HDMI
Press the back button on the touchpad.

13
WWW.ADAPTIV-MULTIMEDIA.COM
VIDEO - HDMI
Left direction Right direction
Up direction Down direction
Search channel
VIDEO - DVBT TV
Before Use
Please ensure the optional ADV-DVBT module is connected to the
Adaptiv interface and the DVBT antennas are connected.
Selecting TV
Scroll to Video on the Adaptiv homescreen and select the TV icon
with the touchpad.
Scanning
When TV is rst selected, you must scan in order to nd available TV
stations. Select the Scan icon located on the lower menu
bar on the second menu page.
Key to Icons
Select
Back Channel
Information
Record Duration
(Requires USB key
to be connected
to the DVBT Tuner)
System setting
menu

ADVL-AU5
14
Exit TV
Press the back arrow on the touchpad.
VIDEO - DVBT TV

15
WWW.ADAPTIV-MULTIMEDIA.COM
VIDEO - DVBT TV
VIDEO - AV IN
The AV In feature allows audio/video input of any devices with a
composite output (Aux L, Aux R and Video). Control is from the
connected device.
Selecting AV In
Scroll to Video on the Adaptiv homescreen. Select the AV In icon
on the Adaptiv homescreen.
Exit AV In
Press the back button on the touchpad.
Aftermarket Reverse Camera Input
The supplied AV In cable also includes an option to connect an
aftermarket reverse camera. This option can be enabled in the
System settings menu under ‘Aftermarket Camera Enable’.

ADVL-AU5
16
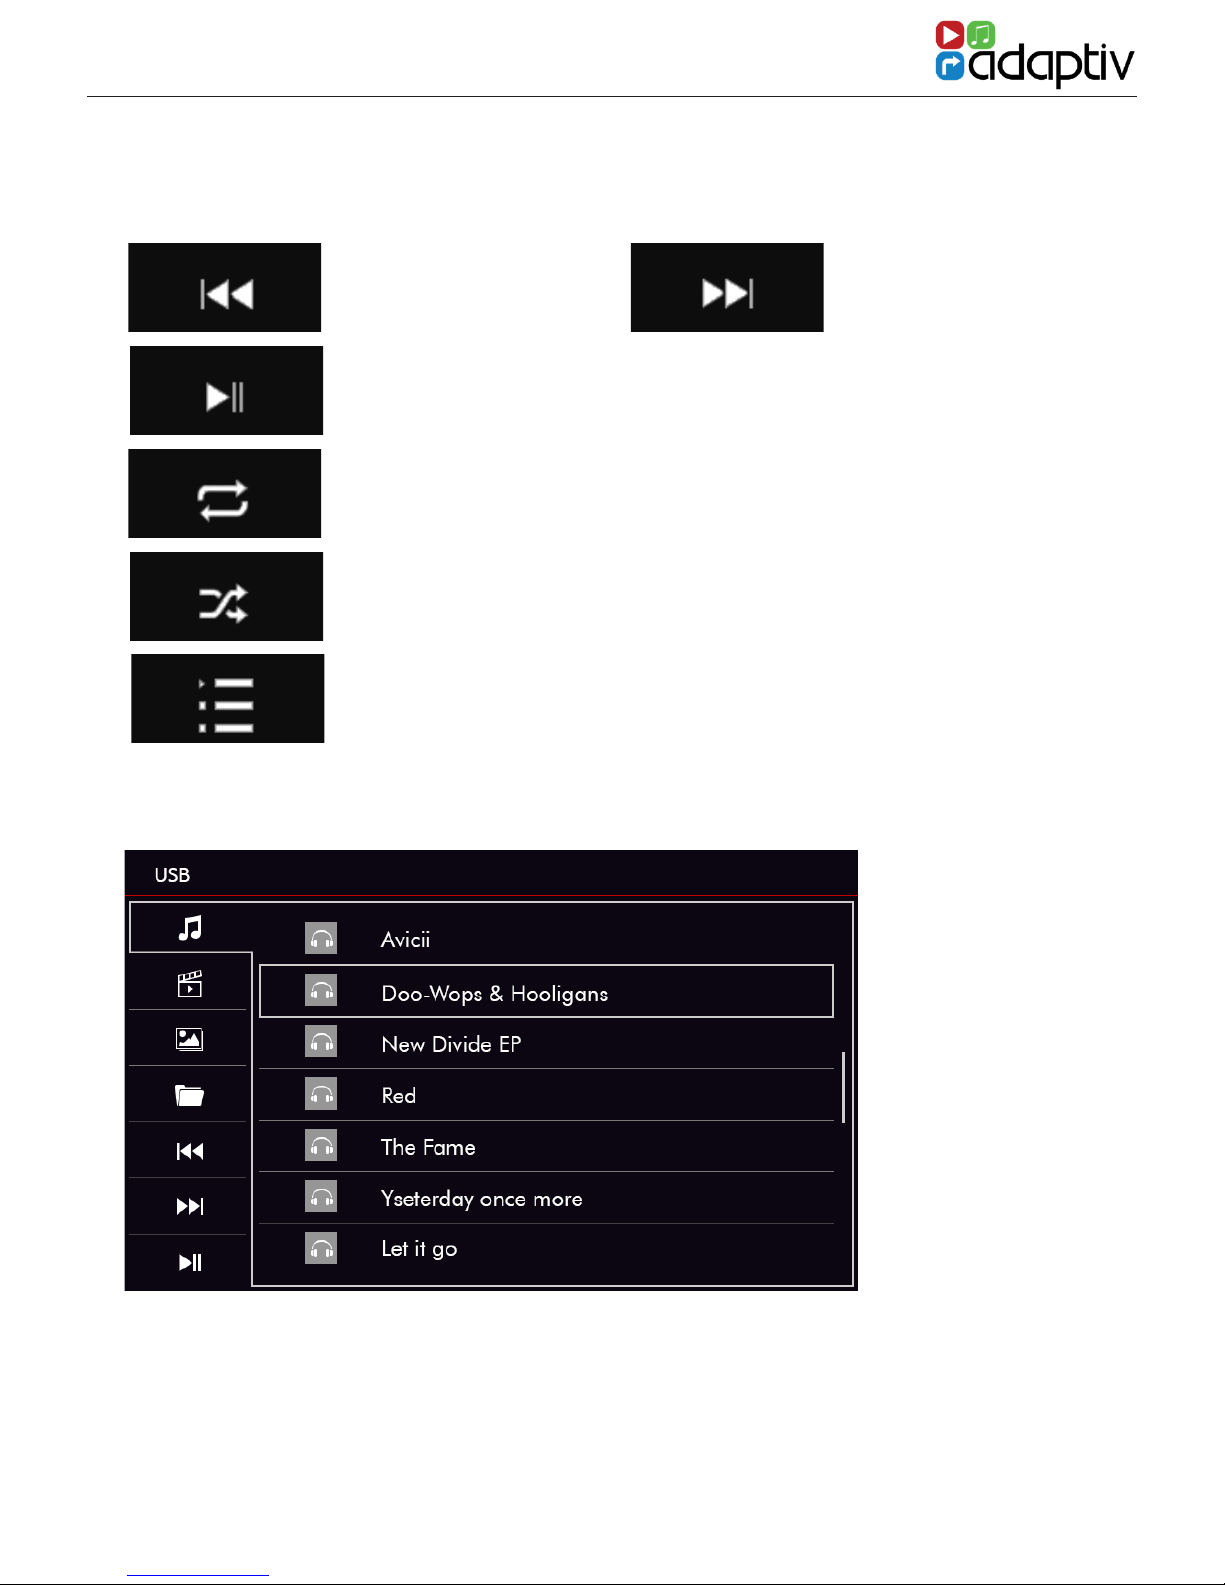
Selecting USB/SD
Ensure that a USB or SD card is inserted into the Adaptiv interface
Multimedia socket or HDMI module. Scroll to Media on the Adaptiv ho-
mescreen. Select the USB icon or the SD icon as required.
MEDIA - USB/SD
The operation and features are the same
when using USB or SD.
File Formats Supported
The following le formats are supported:
Audio
- MP3
- AAC
- FLAC
- APE
Video
- MPEG
- AVI
- FLV
- WMV
- MP4
- MKV
- OGM
Image
- JPEG
- PNG
- GIF
USB/SD Playback
USB/SD Playback display
17
WWW.ADAPTIV-MULTIMEDIA.COM
MEDIA - USB/SD
The operation and features are the same
when using USB or SD.
Previous track Next track
Play / Pause
Repeat
Shufe
Play list
Select once to repeat the song
Select twice to repeat/loop.
Select this to shufe and play
tracks at random.
MEDIA - USB/SD
Key to Icons
ADVL-AU5
18
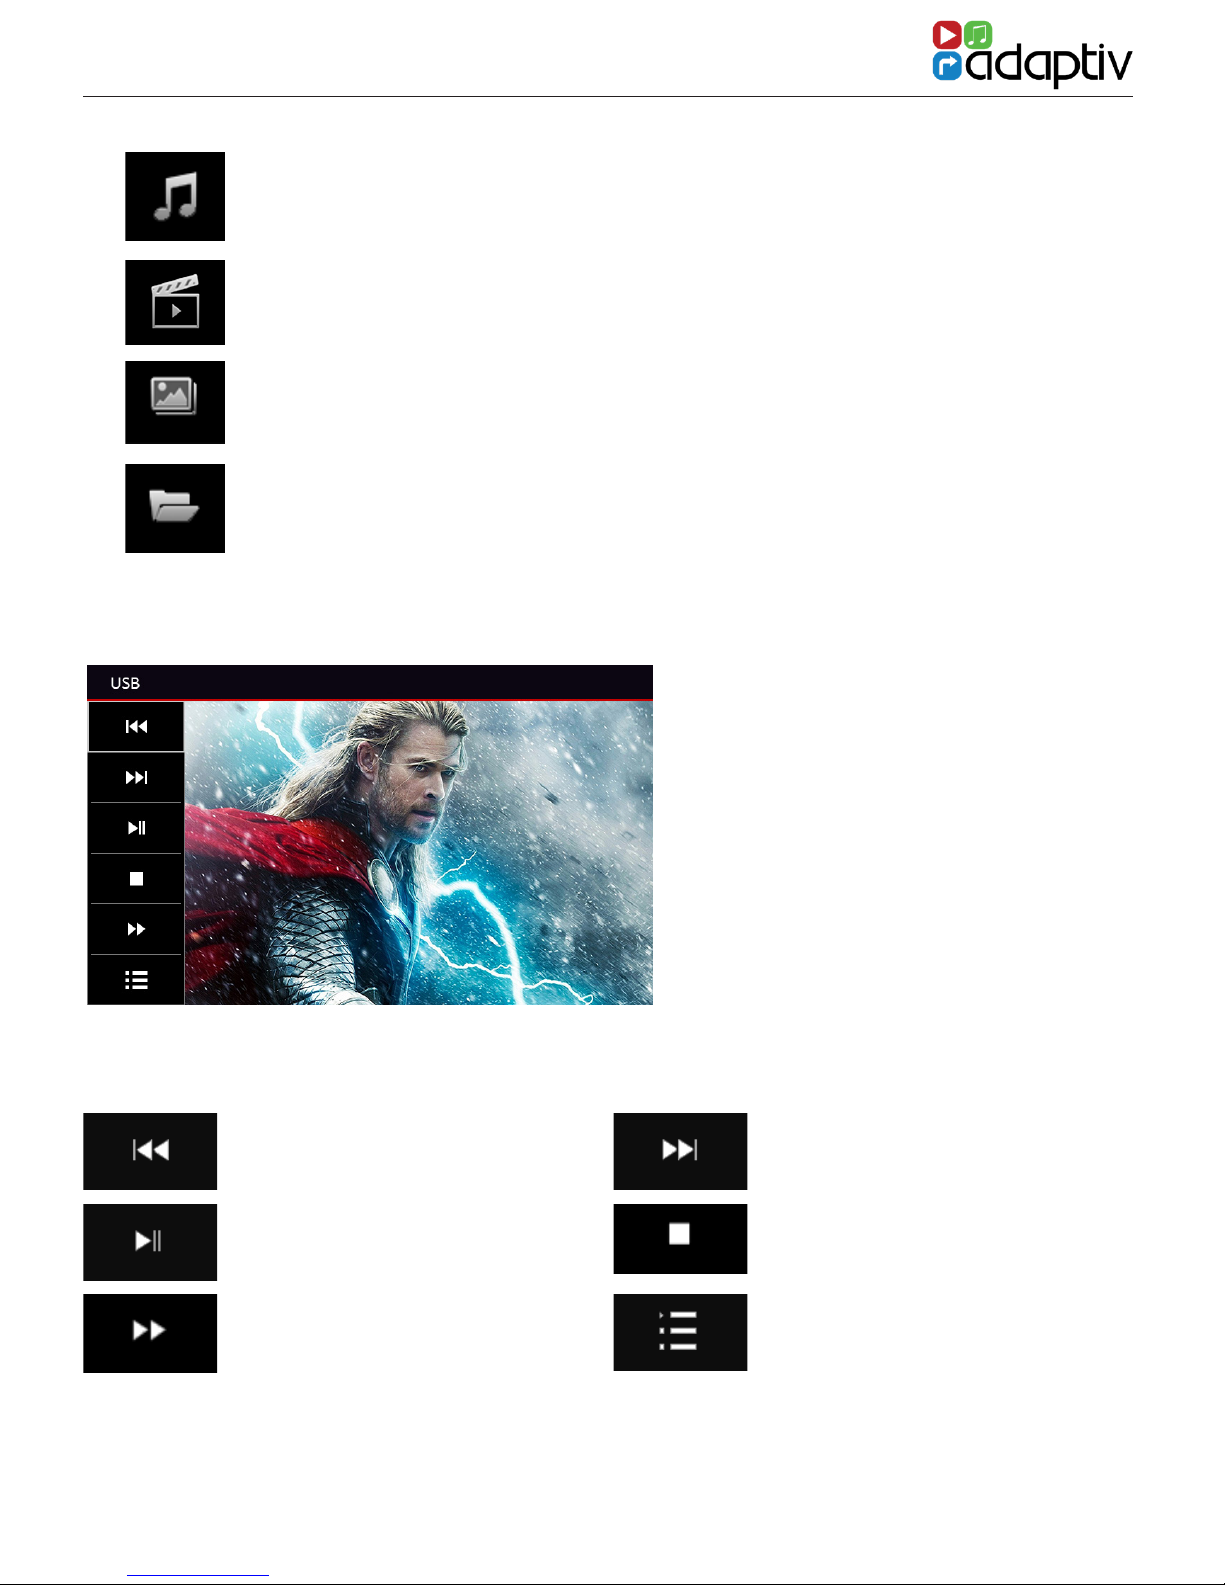
Open music les on USB/SD media
Open movie les on USB/SD media
Open image les on USB/SD media
Open all les on the USB/SD media (Folder Structure)
MEDIA - USB/SD
Key to Icons - Movie playback
Previous track Next track
Play / Pause Stop
Fast forward Back to previous menu
Movie playback

19
WWW.ADAPTIV-MULTIMEDIA.COM
MEDIA - USB/SD
Images - Menu
MEDIA - USB & SD CARD OPERATION
Images which are saved on the SD-Card or USB device can be
displayed on the Adaptiv unit startup screen.
Any supported image format can be used. To do this, select the icon
in the bottom left corner, as shown in the picture above.

ADVL-AU5
20
MEDIA - USB & SD CARD OPERATION
Folder Structure Menu
Select a folder. If the folder has a sub-folder this can also be selected
from this page.
The chosen image is saved as the start screen. This will be conrmed
by the green icon in the bottom left corner, as shown in the picture
above.
To delete the startup image, select the memory button as shown
above.
A red symbol appears to conrm the image was deleted as the start
screen.
Table of contents
Other Adaptivlite Automobile Accessories manuals

Popular Automobile Accessories manuals by other brands


Whelen Engineering Company
Whelen Engineering Company Dash-Miser Plus installation guide

Discount Car Stereo
Discount Car Stereo A2D-SRX manual

STO N SHO
STO N SHO SNS 288 Installation procedures

Thule
Thule RAPID SYSTEM 1452 Fitting instructions

Thule
Thule 1091 instructions

CrimeStopper
CrimeStopper CS-870OEM supplementary guide