Schnierle SL 3 User manual

Instruction manual
Name:
BA-KD-015 – Instruction manual SL3
Revision:
05 – 02.01.2023
Page 1of 13
©Copyright by Hermann Schnierle GmbH, Dieselstrasse 43, 86368 Gersthofen
SL 3
The comfortable seat-bench system for
minibuses, vans & motorhomes

Instruction manual
Name:
BA-KD-015 – Instruction manual SL3
Revision:
05 – 02.01.2023
Page 2of 13
©Copyright by Hermann Schnierle GmbH, Dieselstrasse 43, 86368 Gersthofen
The latest version of this instruction
manual is always available from the
manufacturer or can be downloaded
directly from our homepage using
the QR code provided.
Before using your new SL3 seat-bench-
combination for the first time, please read
this manual carefully and observe
the guidelines and notes.
We wish you much pleasure with your new SL3 seat-bench-combination and may
you always have a good trip!
Your Schnierle team
Content
1. Guide and introduction......................................................................................... 3
1.1. Intended use.............................................................................................. 3
1.2. Product specific data ............................................................................... 3
1.3. Introduction/notes ................................................................................... 3
1.4. Use of the operating instruction.............................................................. 3
2. Commissioning, control, service/maintenance and care.................................. 4
2.1. Commissioning......................................................................................... 4
2.2. Controls.................................................................................................... 5
2.3. Service and maintenance ........................................................................ 5
2.4. Care .......................................................................................................... 5
2.4.1. Belt/Restraint system ........................................................................... 5
2.4.2. Seat-bench combination ...................................................................... 6
3. Operation of the seat-bench combination......................................................... 6
3.1. Headrests ................................................................................................. 6
3.2. Safety belts .............................................................................................. 6
3.3. Child safety systems (ISOFIX & Top-Tether) ......................................... 8
3.3.1. ISOFIX Fastening................................................................................... 8
3.3.2. Top-Tether Fastening........................................................................... 8
3.4. Making the bench and seat function....................................................... 9
3.5. Setting options .......................................................................................11
4. Product information and dimensions................................................................12
4.1. Product description.................................................................................12
4.2. Variants/Versions ...................................................................................12
4.3. Scope of application ...............................................................................12
4.4. Dimensions .............................................................................................12
4.5. Load limits...............................................................................................13
5. Notes on disposal ................................................................................................13

Instruction manual
Name:
BA-KD-015 – Instruction manual SL3
Revision:
05 – 02.01.2023
Page 3of 13
©Copyright by Hermann Schnierle GmbH, Dieselstrasse 43, 86368 Gersthofen
1. Guideline and introduction
1.1. Intended use
•The inteded use for your seat-bench combination is sitting while driving for the purpose
of passenger transport. Of course, the seat-bench combination can be used as such
when the vehicle is stationary.
•All use cases varying from the intended use can cause damages and functional errors,
which can affect safe use of your seat-bench-combination.
•Not complying the descriptions contained in this instruction manual may adversely
affect your warranty. Hermann Schnierle GmbH does not accept any warranty or liability
for resulting damage in the event of improper assemly, use and repair.
•Any change to the standard condition (e.g. by retrofitting non-original retrofit and spare
parts from Hermann Schnierle GmbH) may invalidate the tested and approved condition.
Functions may be impaired, endangering your safety.
For this reason any structural modification to the seat-bench combination or the seat is
strictly prohibited unless this has been/will be expressly approved in writing by Hermann
Schnierle GmbH.
Caution
Note: Schnierle seating systems may only be used in combination with the
matching Schnierle leg and floor systems!
1.2. Product specific data
•Please refer to your order and the delivery note for the scope of delivery according to
the variant you have selected and ordered. P. 12
1.3. Introduction/Notes
This instruction manual provides you with all the information you need for safe and efficient
use of your seat-bench combination.
You are obliged to comply with the applicable laws and regulations of the country in which
you are located. These may differ from the information in this instruction manual.
The operating instructions of the vehicle and body manufacturers must also be observed
and are also applicable.
•The latest version of this instruction manual is available from the manufacturer or can
be downloaded directly on our homepage using the QR code provided.
•The operating instructions must be read in full before putting into operation.
•Always keep the instruction manual and the QR code within easy reach in case of need.
•We reserve the right to make changes due to further developments.
1.4. Use of the instruction manual
•In this instruction manual all options and features available for this model are described.
Some descriptions may not apply due to the model variant selected.
•The table of contents at the beginning of the operating instructions will help you to
orientate yourself quickly.
•Directional indications such as left/right or front/rear always refer to the direction of tra-
vel.

Instruction manual
Name:
BA-KD-015 – Instruction manual SL3
Revision:
05 – 02.01.2023
Page 4of 13
©Copyright by Hermann Schnierle GmbH, Dieselstrasse 43, 86368 Gersthofen
•Danger, Warning and Caution
Danger Warning Caution
Texts marked with
Danger indicate a risk of
serious injury. Failure to
comply this warning may
endanger life.
Texts marked with
Warning indicate risks of
accident and injury. Failure to
observe the descriptions may
result in injury.
Texts marked with
Caution indicate possible
damage to your Schnierle
product. Failure to follow
the description may result in
damage to the product.
•Symbols
Warning – relevant to safety
Danger of crushing
Do not touch the part or use it as a lifting or carrying point
Risk of breakage due to overloading
Top-Tether fixing lugs
Page references (means see page …)
2. Putting into operation, control, service/maintenance and care
Regular inspections, maintenance and care are important and necessary for the operational
and road safety as well as the value retention of your seat-bench combination.
2.1. Putting into operation
•Improper installation may result in injuries or material damages and the function of the
seat or attached parts cannot be guaranteed.
•Remove the packaging material (cardboard boxes, foils etc.) completely before using
the seat-bench combination.
Danger
To avoid the risk of accidents, check that all functions of your seat-bench combination
are in place before putting it into operation.
The seat-bench combination, in particular safety-relevant assemblies (e.g. safety
belts, belt buckle, head restraints) should also be checked for damage, strength and
function before driving (see also 2.2. Checks).

Instruction manual
Name:
BA-KD-015 – Instruction manual SL3
Revision:
05 – 02.01.2023
Page 5of 13
©Copyright by Hermann Schnierle GmbH, Dieselstrasse 43, 86368 Gersthofen
2.2. Checks
Warning
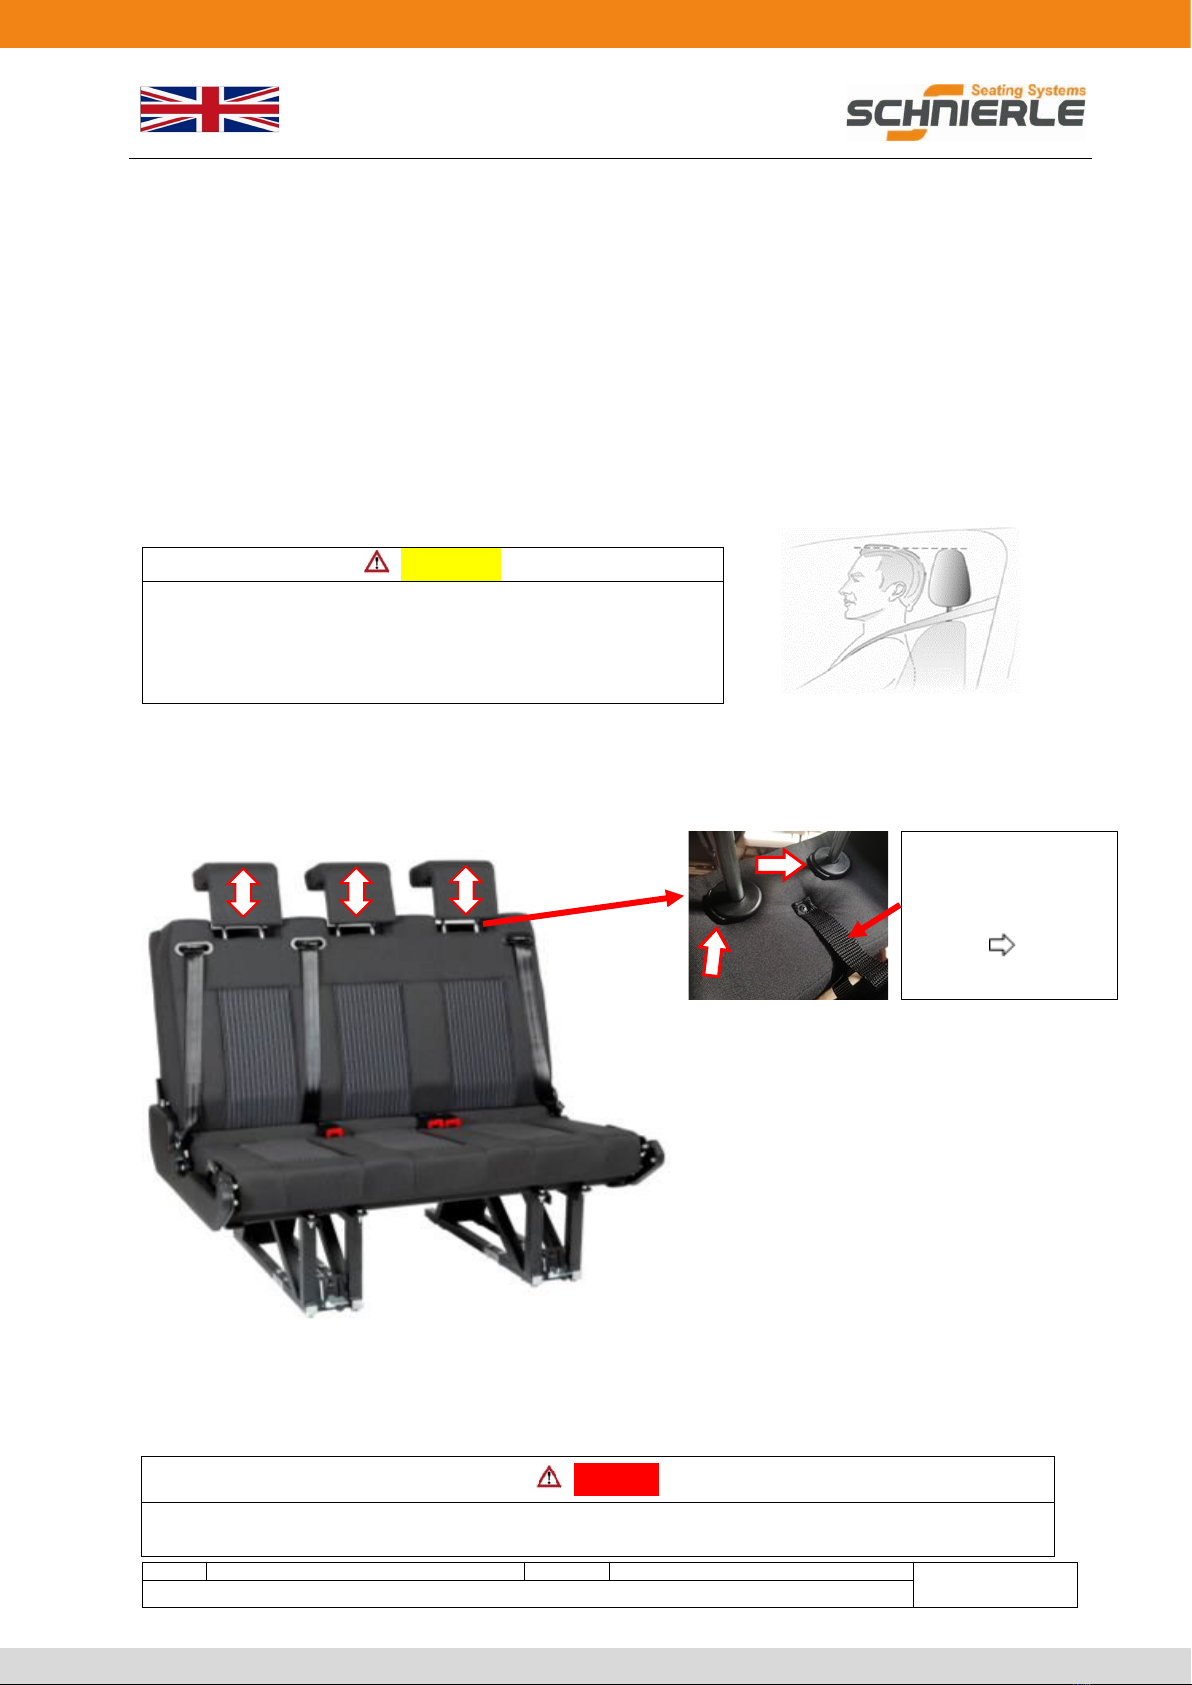
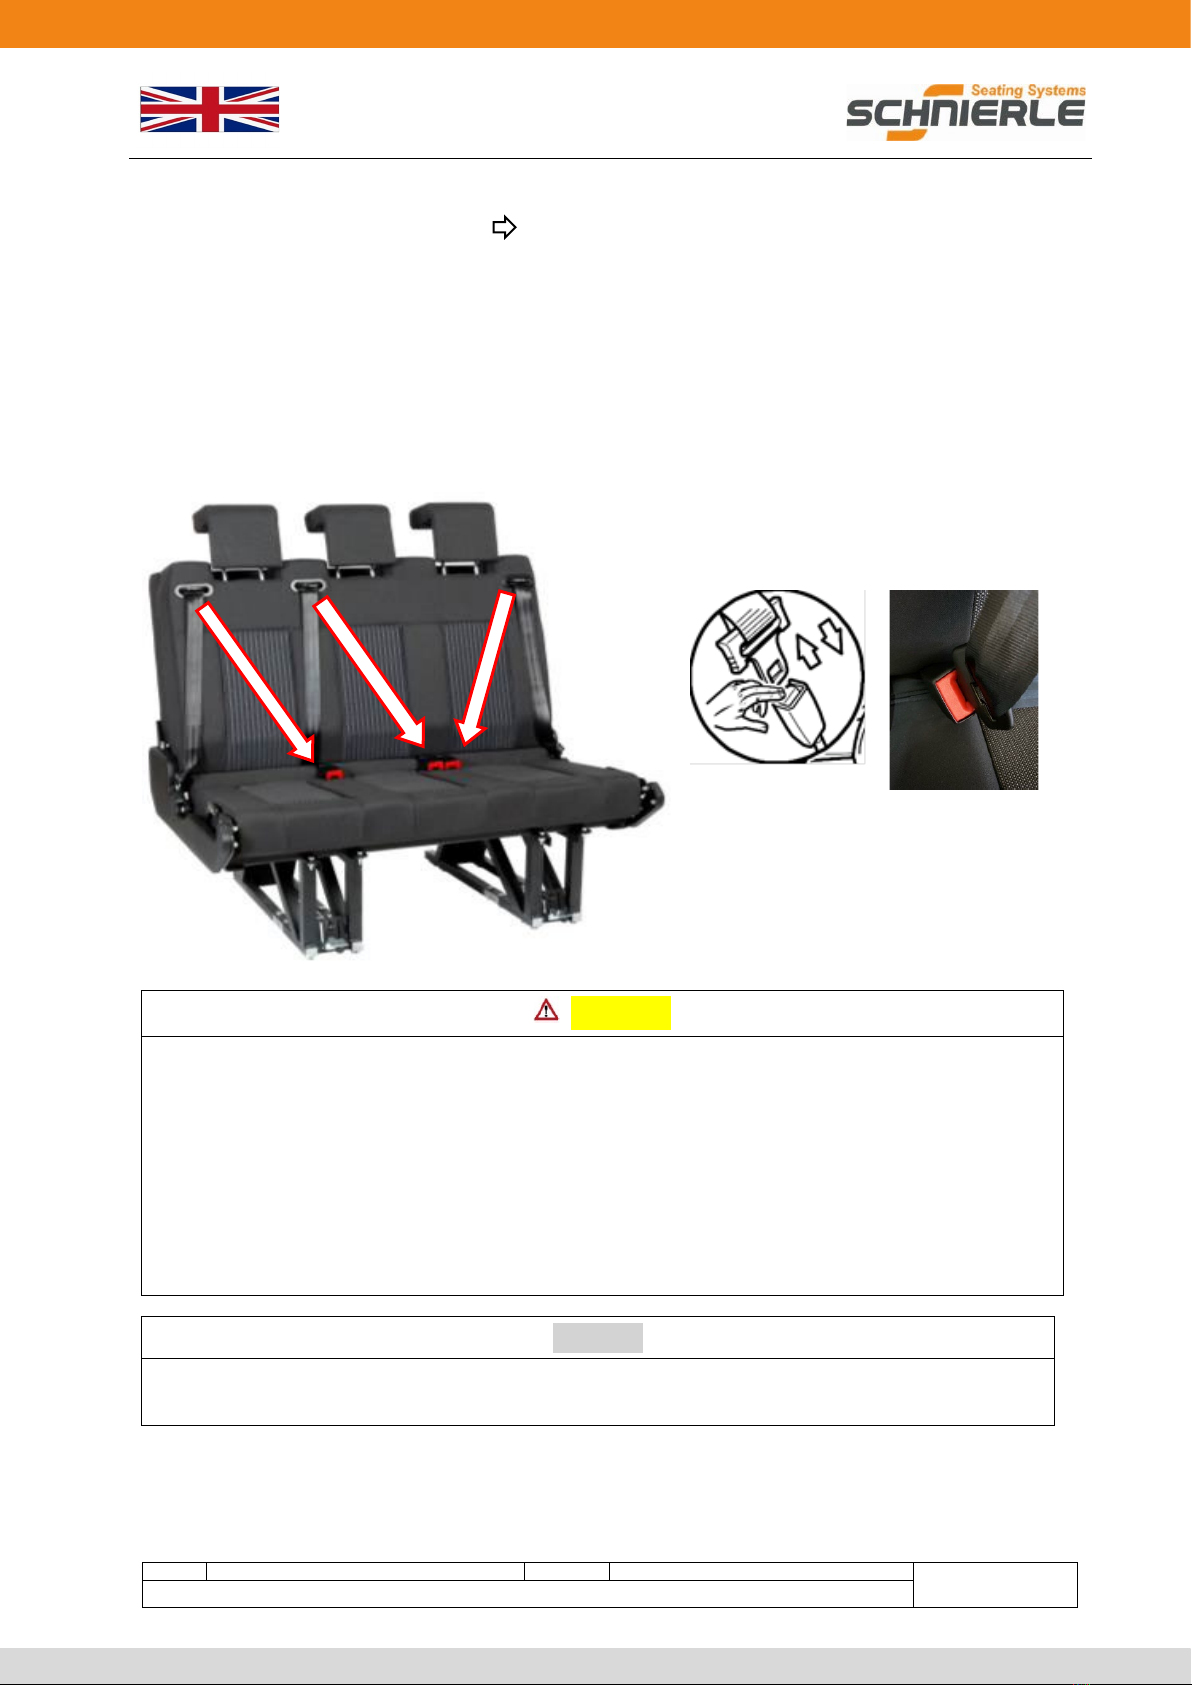
Regularly check of the restraint system (Recommended: before each journey).
Check that the seat belt is not cut, damaged or frayed and has not been contaminated
with dirt, oil or chemicals.
Check that the metal and plastic parts are not worn, broken or damaged.
Check all fitting parts such as screws, nuts etc. for tightness.
Check the anchorages of the shoulder straps for correct position and the shoulder
straps themselves for correct function. When putting on the seat belt, a clicking
sound must be heard (engaged in the belt buckle).
2.3. Service and maintenance:
•The maintenance of your seat-bench combination with restraint systems must be
carried out by an authorised specialist company at the same time as the regular vehicle
maintenance, but after 1 year at the latest, unless otherwise described.
•If defects are found during the inspections (e.g. screw connection loose, parts damaged,
belt frayed …), these must be repaired immediately and exclusively by competent
persons (e.g. authorised repair shop of the vehicle manufacturer).
•After an accident, the affected restraint belts must be replaced.
Fruthermore, after an accident, the seat-bench combination, the seat attachment and
the components of the seat-bench combination must be checked by qualified specialist
staff.
•The belt buckle attached to the seat is replaceable. The replacement of the seat belt
buckle is only possible after prior approval by Hermann Schnierle GmbH.
•If necessary, the guide sleeves for the headrests may only be replaced by qualified
personnel (e.g. authorised repair shop of the vehicle manufacturer).
•Modification or retrofitting work on the seat-bench combination of Hermann Schnierle
GmbH may only be carried out by authorised specialist repair shops, trained personnel
or after approval by Hermann Schnierle GmbH, taking into account the applicable work
instructions and country-specific regulations.
In case of improper installation, there is a risk of injury or material damage and the func-
tion of the seat-bench combination or the attached components cannot be guaranteed.
2.4. Care
General: Dirt can impair the function of your restraint system and the seat-bench
combination, therefore keep both clean and avoid contamination where possible!
2.4.1. Belt/restraint system
•Clean the belts with mild, neutral soap and water when necessary.
•After cleaning, pull out the webbing completely. Note that the belt may only be retracted
after it is completely dry.

Instruction manual
Name:
BA-KD-015 – Instruction manual SL3
Revision:
05 – 02.01.2023
Page 6of 13
©Copyright by Hermann Schnierle GmbH, Dieselstrasse 43, 86368 Gersthofen
2.4.2. Seat-bench combination
•Regular contamination should be cleaned with a vacuum cleaner. In the case of heavier
contamination, these can be cleaned using commercially available upholstery, leather or
plastic cleaners. The compatibility should be tested prior on concealed, smaller surfaces.
Please follow the instructions of the cleaning agent manufacturer.
•Upholstery does not have to be detached and removed from the seat frame for care.
Furthermore, the seat-bench combination must not be cleaned of dirt with unsuitable
cleaning agents (e.g. high-pressure cleaners etc.).
•When cleaning the upholstered surfaces, avoid soaking the upholstery.
3. Operation of the seat-bench combination
3.1. Head restraints
The upper edge of the head restraint should align with the upper edge of the head. If this is
not possible for very tall people, set the highest position, for very short people the lowest
position.
To retract and extend the headrest,
press the catch on the left headrest
sleeve and push the head rest down-
wards or pull it upwards to adjust it to
the appropriate height. The headrest
must be unlocked and must not be
pulled out suddenly. Make sure that
the headrest clicks into place (click
sound).
To remove the headrest, also press in the left catch and pull out the headrest completely.
When inserting, press in the catch again and carefully push the headrest into
the receptacles.
3.2. Safety belts
Danger
Fasten seat belts before every journey. People, who are not wearing seat belts
endanger themselves and other passengers in the event of an accident.
Warning
Position of the head restraints:
Only drive with correctly adjusted head restraints.
Incorrectly adjusted head restraints can cause serious
neck injuries in the event of an accident.
Retaining strap as
folding aid (left
and right respec-
tively) P. 10

Instruction manual
Name:
BA-KD-015 – Instruction manual SL3
Revision:
05 – 02.01.2023
Page 7of 13
©Copyright by Hermann Schnierle GmbH, Dieselstrasse 43, 86368 Gersthofen
The safety belts are designed for only one person at a time.
Child safety systems see 3.3. P. 8
Check all components of the seat belt system for damages and proper function.
Loose or bulky clothing will impair the tight fit of the safety belt. Do not place objects
such as e.g. purses or mobile phones between the seat belt and the body.
Pull the belt webbing out of the retractor, place it untwisted over the body and insert the
buckle tongue into the buckle until it you hear it click into place. Make sure that the belt is
tight against the body while driving.
Warning
Objects and loads must not be secured by the belt system. This can cause injuries by
objects flying around and damage your belt system.
Improper operation and self-performed removal or installation (only permitted by
authorised specialist workshops) can cause loss of function and thus endangering of
the passengers.
Do not run the safety belt over hard or fragile objects in the pockets and clothing.
Putting on the safety belt during pregnancy:
The webbing running over the pelvis must run as low as possible over the pelvis to
avoid pressure on the abdomen.
Caution
Do not place any loads on the belt buckle. This can cause damages and impair
the function.
To release the belt buckle, press the
red button.

Instruction manual
Name:
BA-KD-015 – Instruction manual SL3
Revision:
05 – 02.01.2023
Page 8of 13
©Copyright by Hermann Schnierle GmbH, Dieselstrasse 43, 86368 Gersthofen
3.3. Child safety systems (ISOFIX & Top-Tether)
The seat-bench combination supports the following fixing types for child safety systems:
3-point safety belt, ISOFIX and Top-Tether
Note:
When using a child safety system, please always follow the instructions for use, installation
and operation provided by the respective manufacturer. Always make sure that local and
national regulations are followed. In some countries, the use of child restraint systems is
prohibited on certain seats.
3.3.1. ISOFIX attachment
The ISOFIX–brackets are
located under a zip (label
with sewn-on „ISOFIX“
label) that can be opened
to the centre on the right
and left.
After opening the zip, push
the seat foam slightly to
the side, then the locking
arm or locking rail can be
carefully inserted.
Caution
Additional to the ISOFIX attachments, always use either a top tether strap or a support
leg.
3.3.2. Top-Tether attachment
The Top-Tether attachment eyelets are located on the back of the bench,
below the back cushion on the rear leg attachment.

Instruction manual
Name:
BA-KD-015 – Instruction manual SL3
Revision:
05 – 02.01.2023
Page 9of 13
©Copyright by Hermann Schnierle GmbH, Dieselstrasse 43, 86368 Gersthofen
3.4. Create bench and seat function
1. Push in the head restraints (for details
see also chapter 3.1. P. 6
2. Pull the front part of the seat section up-
wards, the head restraints must be retracted
3. Pull out the seat section to the front
4. Fold the seat section upwards
5. Fold down the seat section
6. Pull the release lever upwards while hold-
ing the retaining lug (see also warning note
danger of crushing)P.10

Instruction manual
Name:
BA-KD-015 – Instruction manual SL3
Revision:
05 – 02.01.2023
Page 10 of 13
©Copyright by Hermann Schnierle GmbH, Dieselstrasse 43, 86368 Gersthofen
7. Fold the backrest forward and hold
the retaining lug (left/right on the back) to
prevent uncontrolled folding down
8. Backrest completely folded
9. Fold the additional lounger backwards
10. Seat-bench combination completely
folded down
Note: Fold in reverse order (sequence of images backwards 10-1)
Danger
Passenger transportation in lying position is strictly prohibited!
Failure to observe this warning can result in serious injuries due to the lack of restraint
protection, which can also be fatal. You endanger other vehicle passengers and
yourself.
Passengers may only be transported when the seat-bench combination is in the
seated position and the persons are wearing safety belts.
Warning Danger of crushing
Crushing of fingers possible due to carelessness
Only work with full concentration on the release lever.
Only operate the release lever if crushing of other persons
is impossible.

Instruction manual
Name:
BA-KD-015 – Instruction manual SL3
Revision:
05 – 02.01.2023
Page 11 of 13
©Copyright by Hermann Schnierle GmbH, Dieselstrasse 43, 86368 Gersthofen
Caution
Do not use or load the cross strut as a lifting or carrying aid!
This can be damaged and thus impair the function of the seat-bench
combination.
3.5. Adjustment options
There are screws with nuts on
both sides of the seat-bench
combination.
The desired inclination of the
additional lounger can be
adjusted with the adjusting
screw Aleft & right.
The desired inclination of the
seat frame can be adjusted at
adjusting screw Bleft & right.
Warning Danger of crushing
Crushing of fingers possible due to carelessness
Only work with full concentration on the adjusting screws.
Only operate the adjusting screws when crushing of other persons is
impossible.
B
A

Instruction manual
Name:
BA-KD-015 – Instruction manual SL3
Revision:
05 – 02.01.2023
Page 12 of 13
©Copyright by Hermann Schnierle GmbH, Dieselstrasse 43, 86368 Gersthofen
4. Product information and dimensions
4.1. Product description
•Seat-bench combination with contoured seat cushions and straight lying surface
•Fully protected 3-point belts
•Height adjustable headrests
•Integrated additional cushion for extending the lying surface
•2 x ISOFIX with Top-Tether left and right side
•TÜV-tested M1 and TÜV-tested installation variants
4.2. Variants/Versions
Scope of delivery according to selected and ordered variant (see order/delivery note)
•SL3 3-seater available in widths of 1140 mm/1200 mm/1295 mm
•SL3 2-seater in width of 970 mm
•Legs fixed mounting or with quick release fastener in heights of 260 mm and 300 mm
•Various fabric versions
4.3. Scope of application
Recreation vehicles, motorhomes, minibuses and vans
4.4. Dimensions

Instruction manual
Name:
BA-KD-015 – Instruction manual SL3
Revision:
05 – 02.01.2023
Page 13 of 13
©Copyright by Hermann Schnierle GmbH, Dieselstrasse 43, 86368 Gersthofen
4.5. Load limits
Caution
Risk of breakage due to overloading!
Overloading could damage your seat-bench combination and cause
safety defects.
The load limits of the respective seat-bench elements must be observed
(see below).
5. Notes on disposal
It is generally possible to dispose your seat-bench combination via the dealer.
If you dispose of waste yourself, please observe the disposal regulations of your
country, these may differ from the table below.
Care must be taken to ensure that the waste is disposed of properly and in an
environmentally friendly manner.
Disposal
Packaging
Cardboard, wood
(e.g. pallet), foil
Disposal as cardboard (paper waste)/wood
waste/foil waste
Disposal of
individual
parts
Cover
Disposal as residual waste
Plastic parts and upholstery
Disposal as plastic waste (according to
labelling and type of plastic)
Metal parts
Disposal as scrap iron
Belt straps
Disposal as plastic waste – polyester
Buckle & tongue
Disposal as residual waste
Imprint:
Hermann Schnierle GmbH
Dieselstrasse 43
86368 Gersthofen
Tel: +49 821 299 930
E-Mail: [email protected]
www.schnierle.de
Managing director: Martin Schnierle, HRB Augsburg 7256
The information contained in this publication corresponds to the status stated below. Hermann Schnierle GmbH reserves the right to make changes to the
technology, equipment and form of our products compared to the information in this publication as well as changes to this publication itself.
Table of contents
Other Schnierle Automobile Accessories manuals
Popular Automobile Accessories manuals by other brands

AUTOTECH
AUTOTECH 10.251.134K installation instructions

APS Auto Parts Specialist
APS Auto Parts Specialist IA20SJE8B installation instructions

GReddy
GReddy Full Auto Timer instruction manual

Thule
Thule WanderWay instructions

Raptor Series
Raptor Series MAGNUM RT GTS10FD manual

Carcomm
Carcomm CHFS-33 HTC Sonata installation manual

Circontrol
Circontrol Wallbox eNext Series installation manual

Warn
Warn 102946 installation instructions

Dakota Digital
Dakota Digital Odyssey ODY-07-1 quick start guide

Continental Refrigerator
Continental Refrigerator SMK user manual

MLT
MLT T205 user manual

Master Tailgaters
Master Tailgaters MR-43E2DVR1 user manual