ADB Stagelight ORKIS Series User manual

www.adbstagelight.com
Congratulations on choosing an ADB product! We thank you for your custom.
Please note that this xture - like all the others in the wide ADB range - has been designed and made with total
quality assurance to ensure excellent performance and best meet your expectations and requirements.
EN
ORKIS
INSTRUCTION MANUAL
ORKIS FRESNEL M
ORKIS PEBBLE M


3
ORKIS FRESNEL M - ORKIS PEBBLE M
EN
I
DE
ES
FR
RU
How to get your SAFETY INSTRUCTIONS in multilingual version.
You may always download the multilingual Safety Instruction manual for
this ADB product from:
www.adbstagelight.com
Rif: FIS01N - Safety Information ORKIS series
Come ottenere le INFORMAZIONI DI SICUREZZA nella versione
multilingue.
Puoi sempre scaricare la versione multilingue delle Informazioni di
Sicurezza per questo prodotto ADB al seguente link:
www.adbstagelight.com
Rif: FIS01N - Safety Information ORKIS series
So erhalten Sie Ihr INFORMATIONEN ZUR SICHERHEIT in der
mehrsprachigen Version.
Sie können die mehrsprachige Version des Handbuchs mit
Sicherheitshinweisen für dieses ADB Produkt unter folgendem ink
herunterladen:
www.adbstagelight.com
Rif: FIS01N - Safety Information ORKIS series
Cómo obtener tu INFORMACIONES DE SEGURIDAD en la versión
multilingüe.
Siempre puedes descargar la versión multilingüe del Manual de
Instrucciones de Seguridad para este producto ADB en el siguiente
enlace.
www.adbstagelight.com
Rif: FIS01N - Safety Information ORKIS series
Comment obtenir votre CONSIGNES DE SÉCURITÉ dans la version
multilingue.
Vous pouvez toujours télécharger la version multilingue du Manuel
d’Instructions de Sécurité pour ce produit ADB au lien suivant :
www.adbstagelight.com
Rif: FIS01N - Safety Information ORKIS series
Где достать ИНСТРУКЦИЮ ПО ТЕХНИКЕ БЕЗОПАСНОСТИ на
нескольких языках.
Вы всегда ожете скачать ногоязычную инструкцию по технике
безопасности для данного изделия ADB пo ссылке:
www.adbstagelight.com
Rif: FIS01N - Safety Information ORKIS series
1. SAFE Y INFORMA ION

4
ORKIS FRESNEL M - ORKIS PEBBLE M
Warning:
Please keep this User Guide for future consultation. If you sell the unit to another user, be sure that they also receive this instruction manual.
Unpack and check carefully there is no transportation damage before using the unit.
The unit is for indoor use only. Use only in a dry location.
The unit must be installed in a location with adequate ventilation, at least 50cm from adjacent surfaces. Be sure that no ventilation slots are blocked.
Disconnect main power before replacement or servicing.
Make sure there are no flammable materials close to the unit while operating as it is fire hazard.
Use safety cable when fixes this unit (Optional 105041/001). Handle the unit by taking its plastic handle or the metal yoke.
Turn off the power and allow about 15 minutes for the unit to cool down before replacing or serving.
In the event of serious operating problem, stop using the unit immediately. Never try to repair the unit by yourself. Repairs carried out by unskilled
people can lead to damage or malfunction. Please contact the nearest authorized technical assistance center. Always use the same type spare parts.
DO NOT touch any wire during operation as high voltage might be causing electric shock.
To prevent or reduce the risk of electrical shock or fire, do not expose the unit to rain or moisture.
DO NOT open the unit within five minutes after switching off.
The housing, the lenses, must be replaced if they are visibly damaged.
Caution:
There are no user serviceable parts inside the unit. DO NOT open the housing or attempt any repairs yourself. In the unlikely event your unit may require
service, please contact your nearest dealer.
Installation:
The unit should be mounted via its screw holes on the bracket. Always ensure that the unit is firmly fixed to avoid vibration and slipping while operating.
And make sure that the structure to which you are attaching the unit is secure and is able to support a weight of 10 times of the unit’s weight. Also always
use a safety cable that can hold 12 times of the weight of the unit when installing the fixture.
The equipment must be fixed by professionals. And it must be fixed at a place where is out of the touch of people and has no one pass by or under it.

5
ORKIS FRESNEL M - ORKIS PEBBLE M
2. ECHNICAL SPECIFICA IONS
ELEC RICAL
• Power consumption: 300VA at 230V 50 HZ
Voltage range: 100-240 V
Frequency: 50/60 Hz
OP ICAL
• ight source: 6-Color ED (Red, Green, Blue, Amber, Cyan, ime)
• CRI: 97 at any color temperature
• Color temperature range: 2500K - 8000K
• Motorized zoom
• Fresnel lens (standard):
- Beam angle: 15° to 54°
- Field angle: 22° to 87°
• PC lens (optional):
- Beam angle: 14.5° to 56°
- Field angle: 26° to 80°
PHO OME RICS (illuminance @ 3200K)
• Fresnel narrow beam @ 5m = 2375 ux
• Fresnel wide beam @ 5m = 305 ux
• PC narrow beam @ 5m = 1668 ux
• PC wide beam @ 5m = 280 ux
CON ROL
• Control modes: DMX 512, RDM, ArtNET
• ocal control: Zoom, Intensity, CTO, Green-Magenta adjustment
• 16-bit ultra-smooth dimming
• IHM: color touch-screen & 3 push encoders
• Color control modes: Hue Saturation, RGB, CMY
PHYSICAL
• Aluminium & metal die-cast housing
• Color: black
• Standard accessories:
- Metal filter frame 215 x 215 mm
- Neutrik PowerCON TRUE1 1.5 m power cable, bare ends
• Optional accessories:
- 8 leaves barndoors 215 x 215 mm
WEIGH
• 11.5 Kg
508 (20”)
279 (10.9”)
256 (10”)
540 (21.2”)
279 (10.9”)
256 (10”)
1
Fresnel lens (standard):
PC lens (optional):
6
ORKIS FRESNEL M - ORKIS PEBBLE M
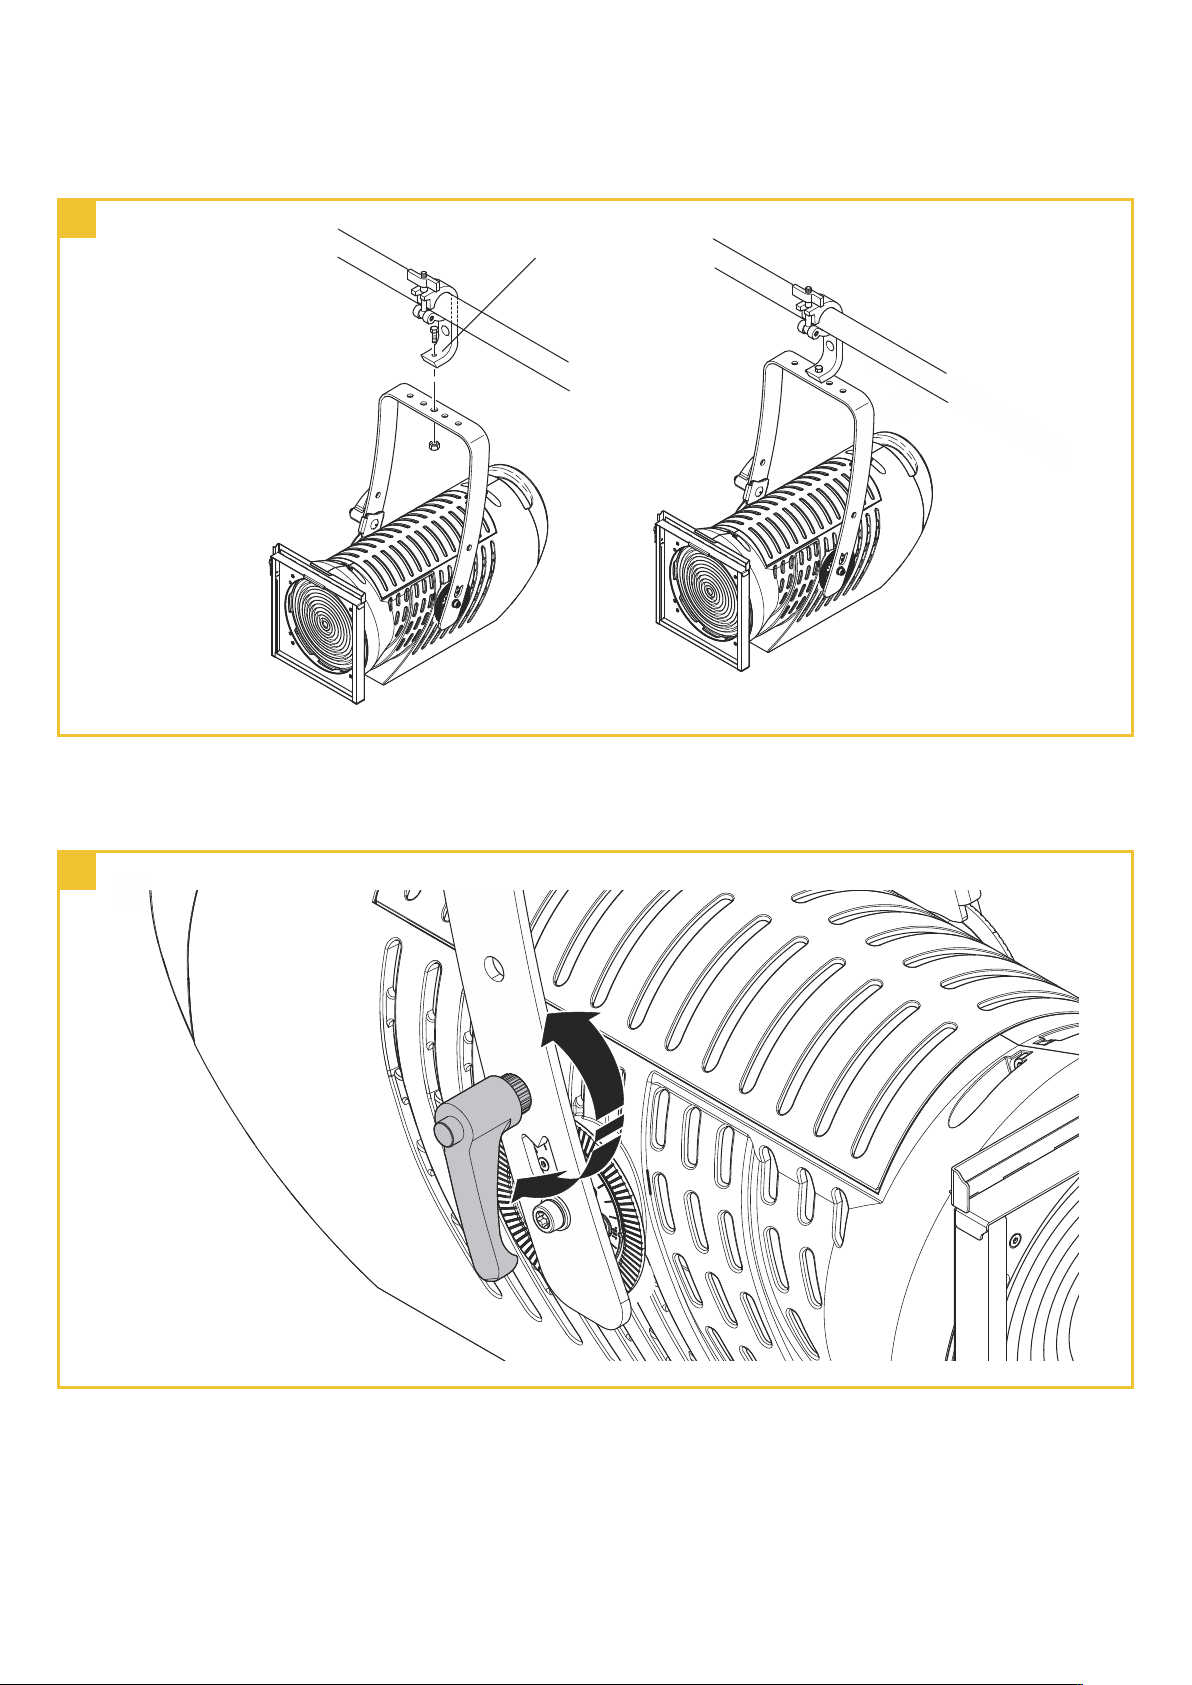
2.1 Lamp Hook Installation
Attach the clamp using the screw to the lamp hanger of the fixture as shown above, and fasten the screw.
ose the tilting knobs, leaving the fixture free to be tilted.
2
3
not included into packaging
7
ORKIS FRESNEL M - ORKIS PEBBLE M
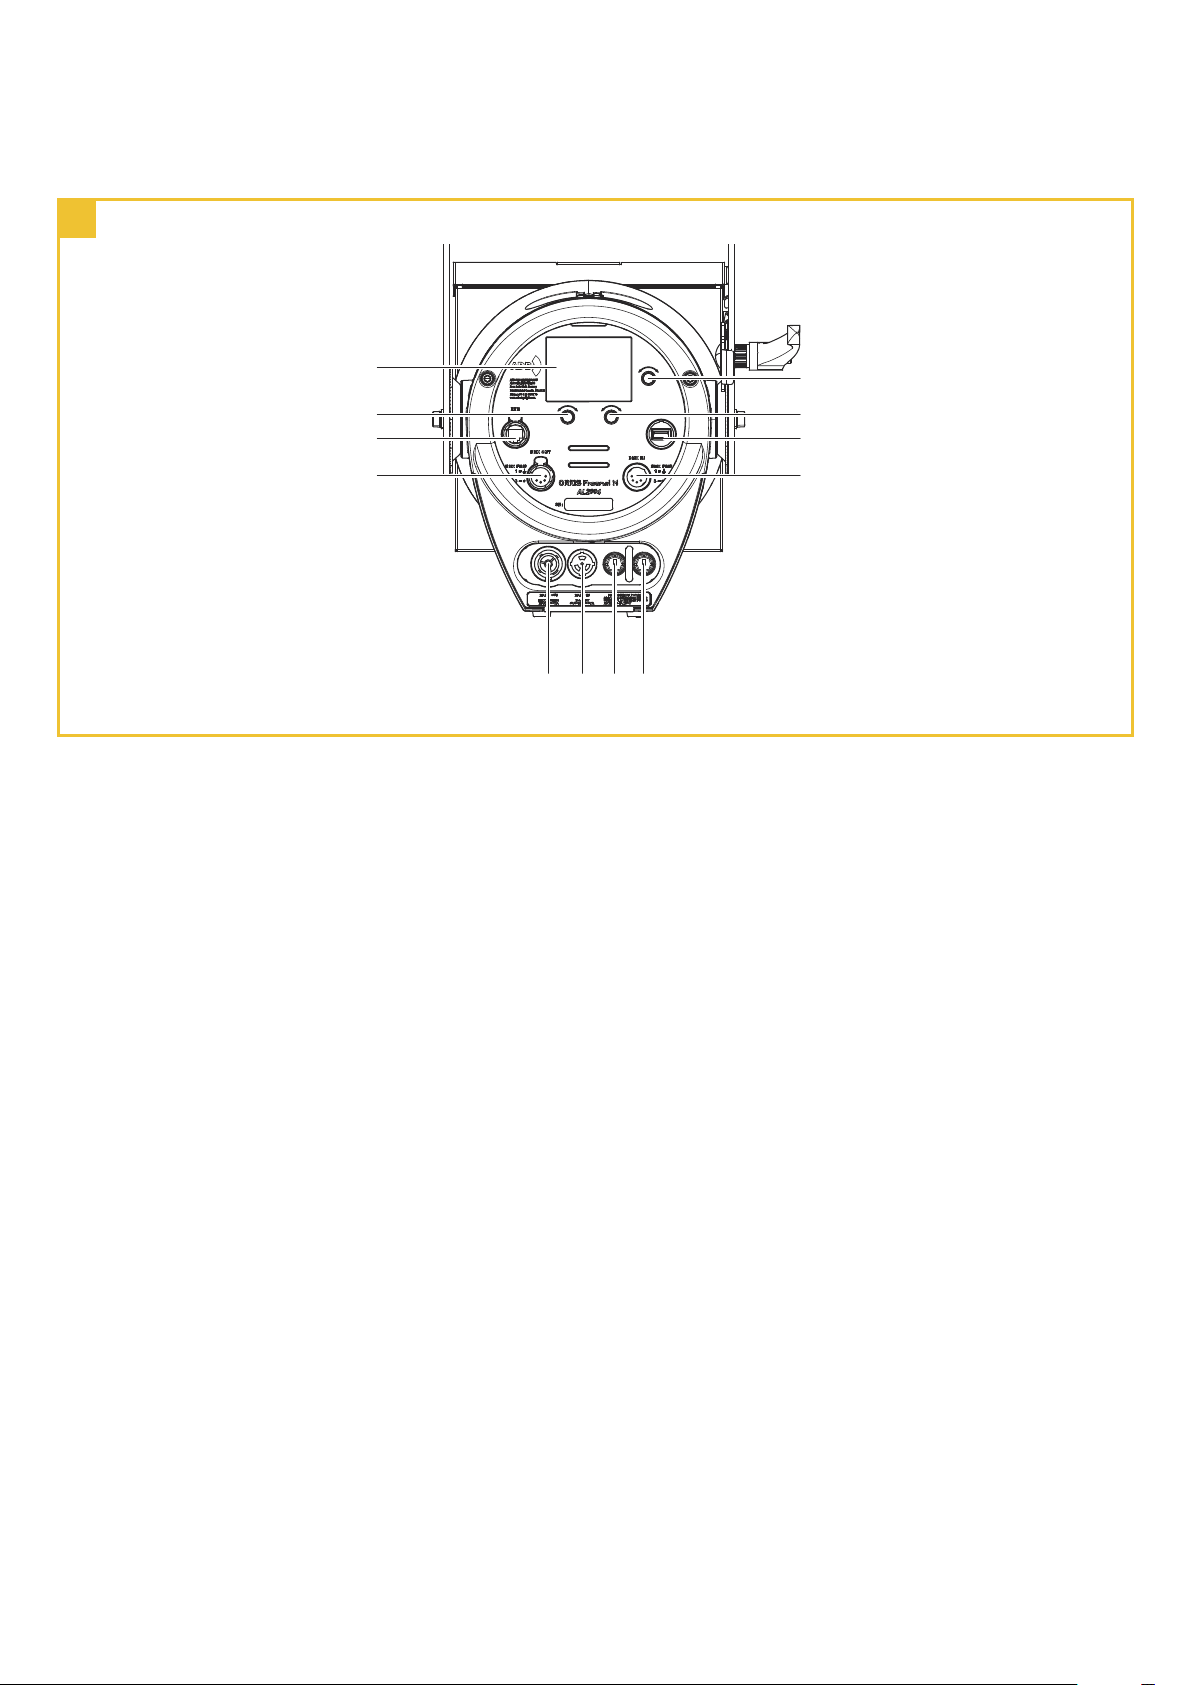
3.1 Control panel
1. Display
2. inear potentiometer
3. Ethernet Input
4. DMX input
5. Powercon output
6. Powercon input
7. Fuse 1
8. Fuse 2
9. inear potentiometer
10. inear potentiometer
11. USB input (only for firmware upgrade)
12. DMX output
3.2 Main Functions
see Orkis Fresnel M / Pebble M UserMenu
3. HOW O SE HE UNI
5 6 78
3
4
1
2
11
12
9
10
4
4.1 DMX 512 Configurations
see Orkis Fresnel M / Pebble M_DMXChannels
4. HOW O CON ROL HE UNI
8
ORKIS FRESNEL M - ORKIS PEBBLE M
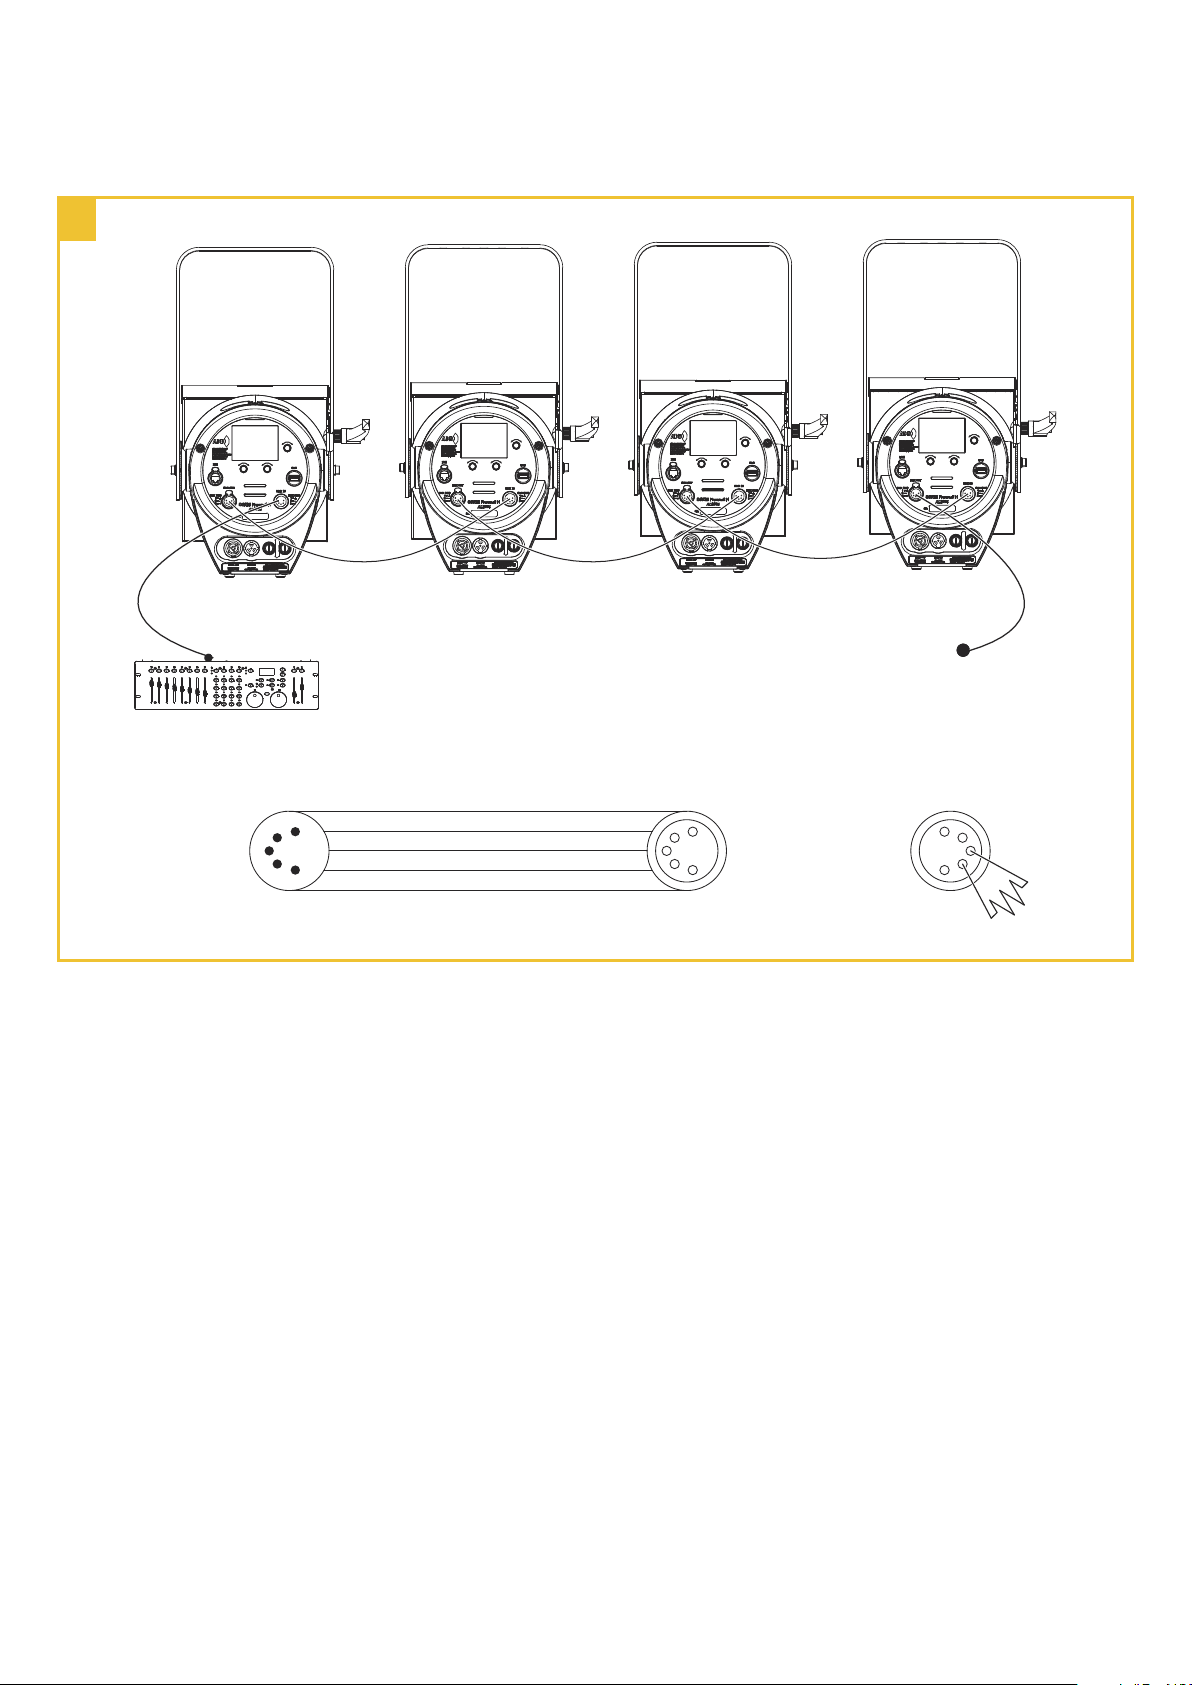
The DMX512 is widely used in intelligent lighting control, with a maximum of 512 channels.
1. Use a cable conforming to specifications EIA RS-485: 2-pole twisted, shielded, 120Ohm characteristic impedance, 22-24 AWG, low capacity. Do not
use microphone cable or other cable with characteristics differing from those specified. The end connections must be made using X R type 5-pin
male/female connectors. A terminating plug must be inserted into the last projector with a resistance of 120Ohm (minimum 1/4 W) between terminals
2 and 3.
IMPOR AN : he wires must not make contact with each other or with the metal casing of the connectors. he casing itself must be con-
nected to the shield braid and to pin 1 of the connectors.
2. Connect the fixture together in a “daisy chain” by X R plug cable from the output of the fixture to the input of the next fixture. The cable cannot be
branched or split to a “Y” cable. Inadequate or damaged cables, soldered joints or corroded connectors can easily distort the signal and shut down
the system.
3. The DMX output and input connectors are pass-through to maintain the DMX circuit when one of the units’ power is disconnected.
4. Each lighting fixture needs to have an address set to receive the data sent by the controller. The address number is between 1-512.
5. 5 pin X R: Pin 1: GND, Pin 2: Negative signal (-), Pin 3: Positive signal (+), Pin4, Pin5 not used
5. DMX 512 CONNEC IONS
1
2
45
3
1
2
45
3DMX OUTPUTDMX INPUT
COMMON
DMX -
DMX +
Not Used
Not Used
54
2
1
3
DMX Controller
DMX OUT
4

9
ORKIS FRESNEL M - ORKIS PEBBLE M
Following are a few common problems that may occur during operation. Here are some suggestions for easy troubleshooting:
A. he unit does not work, no light and the fan does not work
1. Check the connection of power and main fuse.
2. Measure the mains voltage on the main connector.
3. Check the power on Fixture.
B. Not responding to DMX controller
1. Check DMX connectors, cables to see if link properly.
2. No response to the channel, check the address settings and DMX polarity.
3. If you have intermittent DMX signal problems, check the pins on connectors or on PCB of the unit or the previous one.
4. Try to use another DMX controller.
5. Check if the DMX cables run near or run alongside to high voltage cables that may cause damage or interference to DMX interface circuit.
C. One of the channels is not working well
1. The stepper motor might be damaged or the cable connected to the PCB is broken.
2. The motor’s drive IC on the PCB might be out of condition
6. ROUBLESHOO ING
The cleaning of internal and external optical lenses and/or mirrors must be carried out periodically to optimize light output. Cleaning frequency depends
on the environment in which the fixture operates: damp, smoky or particularly dirty surrounding can cause greater accumulation of dirt on the unit’s optics.
• Clean with soft cloth using normal glass cleaning fluid.
• Always dry the parts carefully.
• Clean the external optics at least every 20 days. Clean the internal optics at least every 30/60 days.
7. FIX URE CLEANING

10
ORKIS FRESNEL M - ORKIS PEBBLE M

11
ORKIS FRESNEL M - ORKIS PEBBLE M

I - 24068 Seriate (BG) - via Pastrengo, 3/b
Phone +39 035 654311 - www.adbstagelight.com
IST01K-001 - EN - 11/2019
This manual suits for next models
2
Table of contents
Other ADB Stagelight Dj Equipment manuals


Popular Dj Equipment manuals by other brands


Microh
Microh LED Quadpar TRI MKII user manual

Chauvet
Chauvet Amhaze Stadium user manual

EuroLite
EuroLite AKKU TL-3 QCL RGB+UV Trusslight user manual

LichtLogistik LED Support
LichtLogistik LED Support theREALthing#1 manual

Equinox Systems
Equinox Systems EQLED082 user manual

Monacor
Monacor DMP-130MIXBT instruction manual

Equinox Systems
Equinox Systems Fusion 200 Zoom Spot user manual

Martin
Martin MAC 2000 Profile II Leaflet

Behringer
Behringer 914 Fixed Filter Bank quick start guide

Cameo
Cameo CLTW100W user manual

Pioneer
Pioneer DJM-850 Firmware update manual

EuroLite
EuroLite LED Panel for LED CB-16 IR Controller user manual