Adedad PL10W User manual


2

3
Technical data .................................................................................................3
Introduction ....................................................................................................4
Safety information ..........................................................................................4
General safety rules ........................................................................................5
Special safety rules for cordless impactwren.ch …………………… ……… …7
Symbols........................................................................................................................................8
Knowing your cordless impact wrench...........................................................9
Assembly instruction ......................................................................................10
Operating instruction .....................................................................................11
Maintenance....................................................................................................13
Trouble shooting............................................................................................ 15
Warranty............................................................................................................................16
TECHNICAL DATA
Cordless Impact Wrench Model:PL10W
Rated Voltage: 20V
No-load Speed:0~2900rpm
Square Drive: 1/2inch
Torque force: 240 ft-lbs
Battery type: 20V Lithium-ion, 2.0Ah
Battery model: B-AD2002
Charge time: 1.5 hour
Charger model: BC-AD2002
Package dimensions (L x W x H): 10.3 x 6 x 2.7inches
Weight: 6.2lb.

4
ThankYou for Purchasing a ADEDAD Product.This manual provides information regarding the safe operation and
maintenance of this product.Every effort has been made to ensure the accuracy of the information in this manual.
ADEDAD reserves the right to change this product and specifications at anytime without prior notice.
Please keep this manual available to all users during the entire life of the powertool.
This manual contains special messages to bring attention to potential safety concerns, power tool
damage as well as helpful operating and servicing information.Please read all the information carefully
to avoid injury and machine damage.
Please contact our Customer Service Dept.with any questions and/or comments, either by Email:
Before operating this powertool, read and observeall warnings,cautions,and instructions on the power tool
and in this Owner’s Manual.
NOTE: The following safety information is not meant to cover all possible conditions and situations that may
occur.Read the entire Owner’s Manual for safety and operating instructions. Failure to follow instructions and
safety information could result in serious injury or death.
This safety alert symbol is used to identify safety information about hazards that can result in personal injury.
A signal word (DANGER, WARNING, or CAUTION) is used with the alert symbol to indicate
the likelihood and the potential severity of injury. In addition,a hazard symbol may be used to
represent the type of hazard.
Indicates a hazard,which, if not avoided,will result in death or serious injury.
Indicates a hazard,which, if not avoided,could result in death or serious injury.
Indicates a hazard,which, if not avoided,might result in minor or moderate injury.
Without the alert symbol,indicates a situation that could result in damage.

Safety is a combination of common sense, staying alert, and knowing how your power tool works.
.
Do not operate this unit until you read this instruction manual for safety,
operation and maintenance instructions. Failure to follow all instructions listed below may
result in electric shock, fire, and/or serious personal injury.
Keep your work area clean and well lit. Cluttered benches and dark areas invite accidents.
Do not operate power tools in explosive atmospheres, such as in the presence of flammable liquids,
gases, or dust. Power tools create sparks which may ignite the dust or fumes.
Keep bystanders, children, and visitors away while operating a power tool. Distractions can cause
you to lose control.
Power tool plugs must match the outlet. Never modify the plug in any way. Do not use any adapter
plugs with earthed (grounded) power tools. Unmodified plugs and matching outlets will reduce risk
of electric shock.
Avoid body contact with earthed or grounded surfaces such as pipes, radiators, ranges and
refrigerators. There is an increased risk of electric shock if your body is earthed or grounded.
Do not expose power tools to rain or wet conditions. Water entering a power tool will increase the
risk of electric shock.
Do not abuse the cord. Never use the cord for carrying, pulling or unplugging the power tool. Keep
cord away from heat, oil, sharp edges or moving parts. Damaged or entangled cords increase the risk
of electric shock.
When operating a power tool outdoors, use an extension cord suitable for outdoor use. Use of a cord
suitable for outdoor use reduces the risk of electric shock.
If operating a power tool in a damp location is unavoidable, use a ground fault circuit.
Stay alert, watch what you are doing and use common sense when operating a power tool. Do not use
a power tool while you are tired or under the influence of drugs, alcohol or medication. A moment of
inattention while operating power tools may result in serious personal injury.
Use safety equipment. Always wear eye protection. Dust mask, non-skid safety shoes, hard hat, or
hearing protection must be used for appropriate conditions.
Dress properly. Do not wear loose clothing or jewelry. Contain long hair. Keep your hair, clothing,
and gloves away from moving parts. Loose clothes, jewelry, or long hair can be caught in moving
parts.
Avoid accidental starting. Be sure switch is off before connecting to power source and/ or battery
pack, pick up or carrying the tool. Carrying power tools with your finger on the switch or energizing
power tools that have the switch on invites accidents.
Remove any adjusting key or wrench before turning the power tool on. A wrench or a key left
attached to a rotating part of the power tool may result in personal injury.
Do not overreach. Keep proper footing and balance at all times. Proper footing and balance enable
better control of the power tool in unexpected situations.
If devices are provided for the connection of dust extraction and collection facilities, ensure theses
are connected and properly used. Use of dust collection can reduce dust-related hazards.

6
Do not force power tool. Use the correct power tool for your application. The correct power tool will
do the job better and safer at the rate for which it is designed.
Do not use the power tool if switch does not turn it on or off. Any power tool that cannot be
controlled with the switch is dangerous and must be repaired.
Disconnect the plug from the power source before making any adjustments, changing accessories, or
storing the power tool. Such preventive safety measures reduce the risk of starting the power tool
accidentally.
Store idle power tools out of reach of children and other untrained persons. Power tools are
dangerous in the hands of untrained users.
Maintain power tools with care. Keep cutting tools sharp and clean. Properly maintained power tools,
with sharp cutting edges are less likely to bind and are easier to control.
Check for misalignment or binding of moving parts, breakage of parts, and any other condition that
may affect the power tools operation. If damaged, have the power tool serviced before using.
Use the power tool, accessories and tool bits etc. in accordance with these instructions, taking into
account the working conditions and the work to be performed. Use of the power tool for operations
different from those intended could result in a hazardous situation.
Save these instructions. Refer to them frequently and use them to instruct others who may use this
tool. If you lend this tool to someone else, also lend them these instructions.
Recharge only with the charger specified by the manufacturer. A charger that is suitable for one type
of battery pack may create a risk of fire when used with another battery pack.
Use power tools only with specifically designated battery packs. Use of any another battery packs my
create a risk of injury and fire. Use only ADEDAD battery (Model:B-AD2002)
When battery pack is not in use, keep it away from other metal objects, like paper clips, coins, keys,
nails, screws or other small metal objects, that can make a connection from one terminal to another.
Shorting the battery terminals together may cause burns or a fire.
Under extreme usage or temperature conditions, battery leakage may occur. If liquid comes in contact
with your skin, wash immediately with soap and water, then neutralize with lemon juice or vinegar. If
liquid gets into your eyes, flush them with clean water for at least 10 minutes, then seek immediate
medical attention. Following this rule will reduce the risk of serious personal injury.
Tool service must be performed only by qualified repair personnel. Service or maintenance
performed by unqualified personnel could result in a risk of injury.
When servicing a tool, use only identical replacement parts. Follow instructions in the Maintenance
section of this manual. Use of unauthorized parts or failure to follow Maintenance Instructions may
create a risk of electric shock or injury.

7
Hold power tools by insulated gripping surfaces when performing an operation where the cutting
tools may contact hidden wiring. Fasteners contacting a "live" wire may make exposed metal parts of
the power tool "live" and could give the operator an electric shock.
Wear ear protectors with. Exposure to noise can cause hearing loss.
Check the impact socket carefully for wear, cracks or damage before installation.
Hold the tool firmly.
Keep hands away from rotating parts.
Always be sure you have a firm footing.Be sure no one is below when using the tool in high
locations.
The proper fastening torque may differ depending upon the kind or size of the bolt. Check the torque
with a torque wrench.
Some dust created by power sanding, sawing, grinding, drilling, and other construction activities
contains chemicals known to cause cancer, birth defects or other reproductive harm. Some examples
of these chemicals are:
•Lead from lead-based paints,
•Crystalline silica from bricks and cement and other masonry products,
•Arsenic and chromium from chemically-treated lumber.
Your risk from these exposures varies, depending on how often you do this type of work. To reduce
your exposure to these chemicals: work in a well ventilated area, and work with approved safety
equipment, such as those dust masks that are specially designed to filter out microscopic particles.

8
Some of the following symbols may be used on this product. Please study them and learn their meaning.
Proper interpretation of these symbols will allow you to operate the product better and safer.
SYMBOL
NAME
DESIGNATION/EXPLANATION
Volts
Voltage
Amperes
Current
Hz
Hertz
Frequency (cycles per second)
Watts
Power
MIN
Minutes
Time
Safety Alert
Precautions that involve your safety.
Li-ion RBRC seal
Designates Li-ion battery recycling program
Read the user’s
manual
To reduce the risk of injury, user must read and understand user’s
manual before using this product.
Eye protection
Wear eye protection when operating this equipment.
Hearing protection
Use proper hearing protection when operating this equipment.
Wet conditions alert
Do not expose to rain or use in damp locations.
Electric shock alert
Beware of electric shock hazard.

9
1 Square drive anvil 2 Worklight
3 Trigger switch
5 Handle
4 Forward/Reversing lever & trigger lock
6 Battery
7 Battery capacity display and Reverse stop
Unpack the power tool and all its parts, and compare against the list below. Do not discard the carton or
parts are damaged or missing.
Including: Cordless impact wrench / Battery and Charger / Screw / User manual Accessories:
2PCS Screwdriver bits (PH2/ PZ2) ,
4PCS Impact sockets (22mm/20mm/17mm/14mm)
2PCS Connecting sockets(13/10)
1PCS Connecting holder.
1
2
3
6
7
5
4
10
Do not use this product if any parts on the packing list are already assembled to your product
when you unpack it. Parts on this list are not assembled to the product by the manufacturer
and require customer installation. Use of a product that may have been improperly assembled
could result in serious personal injury.
If any parts are damaged or missing do not operate this product until the parts are replaced.
Use of this product with damaged or missing parts could result in serious personal injury.
Do not attempt to modify this product or create accessories not recommended for use with
this product. Any such alteration or modification is misuse and could result in a hazardous
condition leading to possible serious personal injury.
Do not connect to power supply until assembly is complete. Failure to comply could result in
accidental starting and possible serious personal injury.
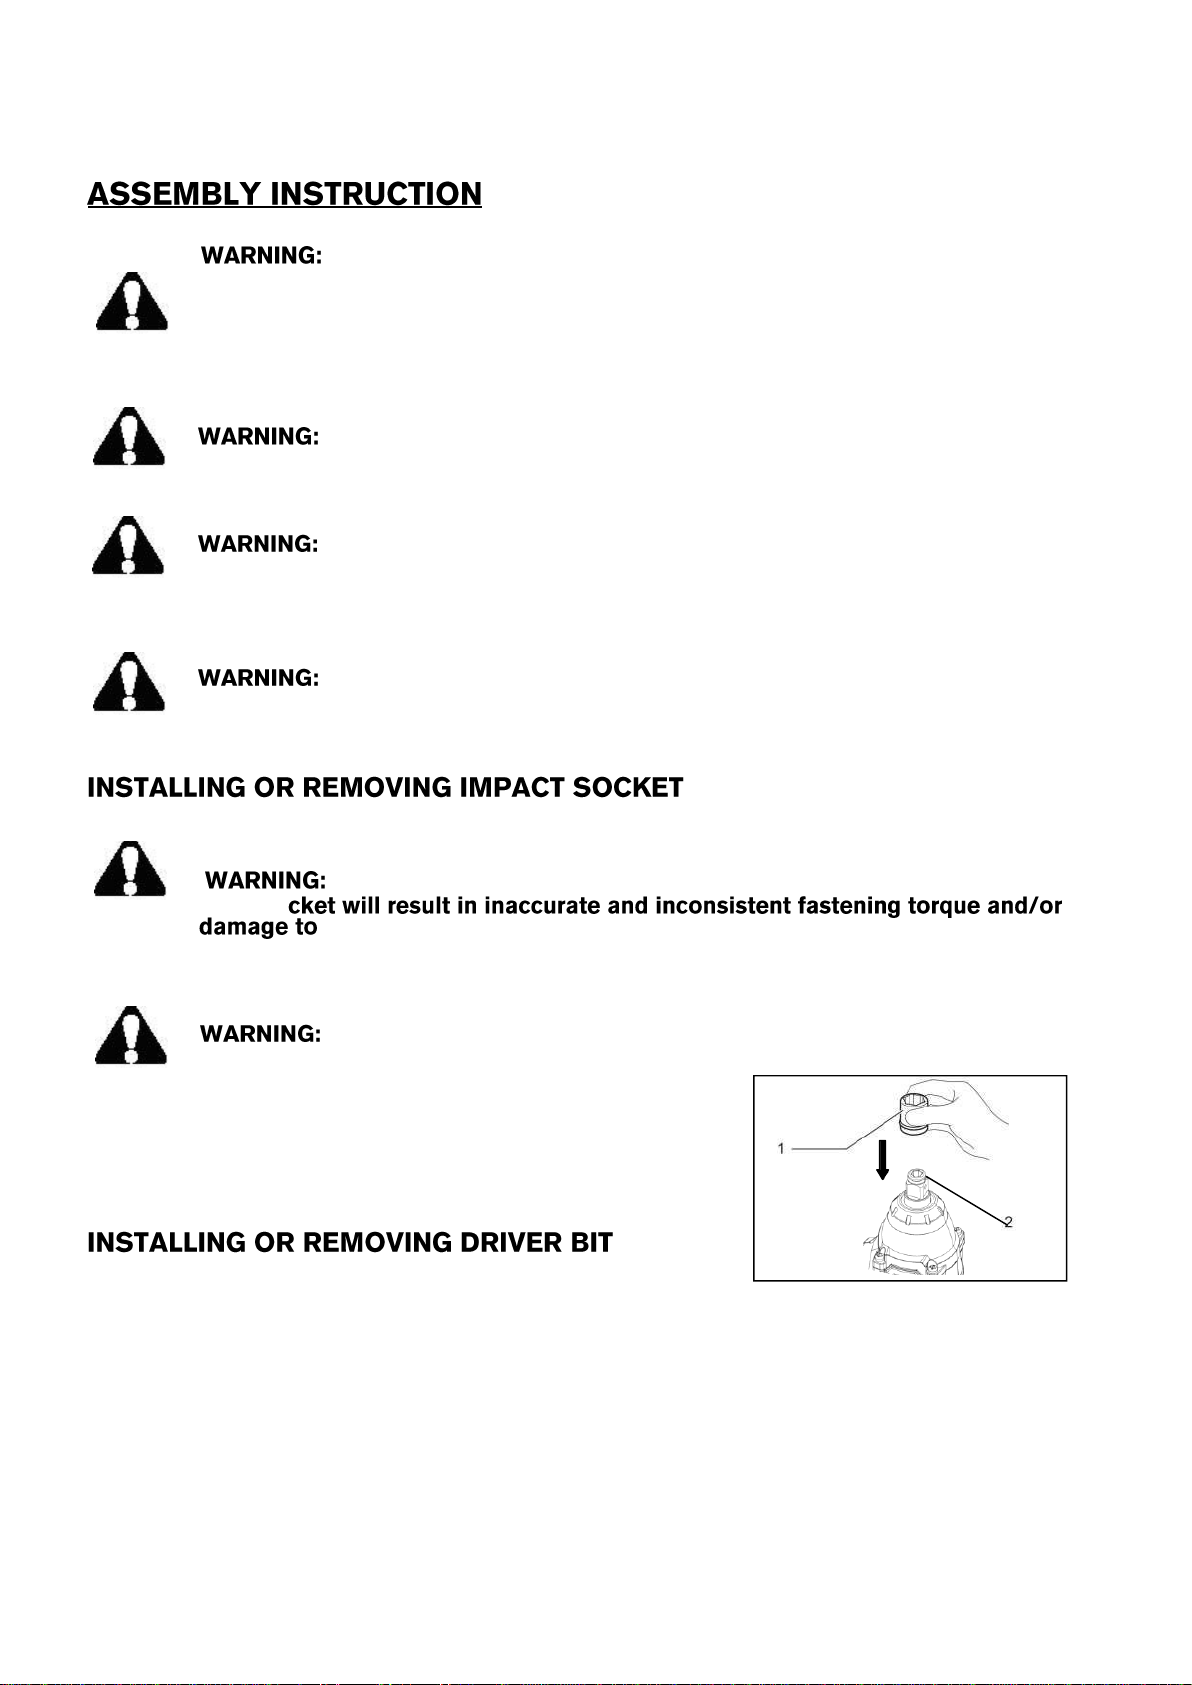
Always use the correct size impact socket for bolts and nuts. An incorrect size
impact so the
bolt or nut. Make sure that the impact socket and the mounting portion are not damaged before installing
the impact socket.
After inserting the impact socket, make sure that it is firmly secured. If it
comes out, do not use it.
Press the impact socket onto the anvil until it clicks (See Fig.2).
To remove the impact socket, simply pull the socket it off.
To install the driver bit, need insert the connecting
holder into the anvil as far as it will go first ,then itsert
the bit
To remove the driver bit, pull the driver bit out.
Fig.2

11
: Always be sure that the tool is switched off and the battery cartridge is
removed before carrying out any work on the tool.
Align the belt hook with the mounting hole of the base and tighten the screw. The belt hook can be
installed from the other side according to the operation habit.
The battery pack is not charged when it is purchased. Before using the power tool for the first time, place
the battery pack in the battery charger and charge. Make sure to read all safety precautions, and follow the
instructions in the battery charger section.
To install the battery pack into the bottom of the handle, align the rails of the battery pack
with the rails in the handle and push the battery into the handle. To connect the battery, slide
the
battery pack fully forward. Until the latch locks into place.
Follow these instructions in order to avoid injury and to reduce the risk of electric shock or
fire:
•Replace the battery pack or the charger immediately if the battery case or charger cord is damaged.
•Verify that the battery pack is removed before inspecting, adjusting, or performing maintenance on
any part of the power tool.
•Read, understand, and follow the instructions.
To turn the tool on, squeeze the trigger switch . To turn the tool off, release the trigger switch.
Your tool is equipped with a brake. The anvil will stop when the trigger
switch is fully released. The variable speed switch enables you to select
the best speed for a particular application. The more you squeeze the
trigger, the faster the tool will operate. For maximum tool life, use
variable speed only for starting holes or fasteners.
Continuous use in variable speed range is not recommended. It
may damage the switch and should be avoided.
Trigge
r
switch
Fig.4

12
After tool use, lock trigger in “OFF” position to help prevent accidental starts
and accidental discharge.
Your tool is equipped with a forward/ reversing lever and trigger lock located above the trigger (fig. 1).
This lever was designed for changing rotation of the bit, and for locking the trigger in an “OFF” position.
For forward rotation, (with chuck pointed away from you) move the lever to the far left.
For reverse rotation move the lever to the far right.
To activate trigger lock move lever to the center off position.
Do not change direction of rotation until the tool comes to a complete stop.
Shifting during rotation of the chuck can cause damage to the tool.
Do not look in the light or see the source of light directly.
There is a worklight above the trigger switch (See Fig.1). The worklight is activated when the trigger
switch is depressed, and will automatically turn off 10 seconds after the trigger switch is released.
If the trigger switch remains depressed, the worklight will remain on.
The worklight is for lighting the immediate work surface and is not intended to be used as a
flashlight.
Ensure fastener and/or system will withstand the level of torque generated by
the tool. Excessive torque may cause breakage and possible personal injury.
The longer a bolt, screw, or nut is impacted, the tighter it will become. To help prevent damaging the
fasteners or workpieces, avoid excessive impacting. Be particularly careful when impacting smaller
fasteners because they require less impacting to reach optimum torque.Practice with various fasteners,
noting the length of time required to reach the desired torque. Check the tightness with a hand-torque
wrench. If the fasteners are too tight, reduce the impacting time. If they are not tight enough, increase the
impacting time.
Oil, dirt, rust or other matter on the threads or under the head of the fastener affects the degree of
tightness.The torque required to loosen a fastener averages 75% to 80% of the tightening torque,
depending on the condition of the contacting surfaces.On light gasket jobs, run each fastener down to a
relatively light torque and use a hand torque wrench for final tightening.

13
When the temperature of battery is too high and the machine switches off automatically.
•Switch the power tool off.
•Allow the battery to cool down before continuing to work.
When the power tool is blocked and switches off automatically.
•Remove the power tool from the workpiece.
•As soon as the blockage is corrected, the power tool will continue to work at the set stroke rate.
Battery packs are shipped in a low charge condition to prevent possible
problems. Therefore, you should charge them before first use.
•Use only ADEDAD battery charger (BC-AD2002)
•Charge time is approximately 1hour, and is dependent upon the type of battery pack.
•Make sure the power supply is normal household voltage, 110V, AC only, 60Hz.
•Attach the battery pack to the charger by aligning the raised ribs on the battery pack with thegrooves
in the charger, then slide the battery pack onto the charger.
•Press down on the battery pack to be sure contacts on the battery pack engage properly with contacts
in the charger. Latches should snap into ensure charger is correctly connected.
•Do not place the charger in an area of extreme heat or cold. It will work best at normal room
temperature.
•The battery pack may become slightly warm to the touch while charging. This is normal and does not
indicate a problem.
•The red LEDs will remain on while charging.
•When the green LEDs is light, this indicates the battery is fully charged.
•To remove the battery pack from the charger, depress latches and pull up on the battery pack.
•When the battery pack is fully charged, remove it from the charger.
In order to avoid personal injury and the risk of fire and electric shock,
remove the battery pack before adjusting, inspecting, or cleaning the power tool.
When servicing, use only identical replacement parts. Use of any other parts
could create a hazard or cause product damage.
Be alert for battery packs that are nearing their end of life. If you notice decreased tool performance or
significantly shorter running time between charges then it is time to replace the battery pack. Failure
to do so can cause the tool to operate improperly or damage the charger.
Ventilation openings and switch levers must be kept clean and free of foreign matter. Do not attempt
to clean by inserting pointed objects through opening.
Avoid using solvents when cleaning plastic parts. Most plastics are susceptible to damage from
various types of commercial solvents and may be damaged by their use. Use clean clothes to remove
dirt,oil,grease,etc.

14
Read instruction manual first! Remove battery pack from the tool before
making adjustments or assembling accessories.
1. Battery pack not charged.
2. Battery pack not installed properly.
3. Battery pack temperature is too hot or cold for operation.
4. Burned out switch.
1. If equipped, check battery charge condition lights for charge status. Charge
battery if needed.
2. Confirm battery is locked and secured to the tool.
3. Let battery sit a few minutes or until it reaches normal operating temperature.
4. Replace the switch provided by ADEDAD.
1. Charger not plugged into outlet.
2. Battery pack not completely inserted into charger.
1. Confirm charger is plugged into outlet.
2. Confirm battery pack is inserted into charger completely.


16

17
Table of contents


