AdobeAir MW5500 User manual
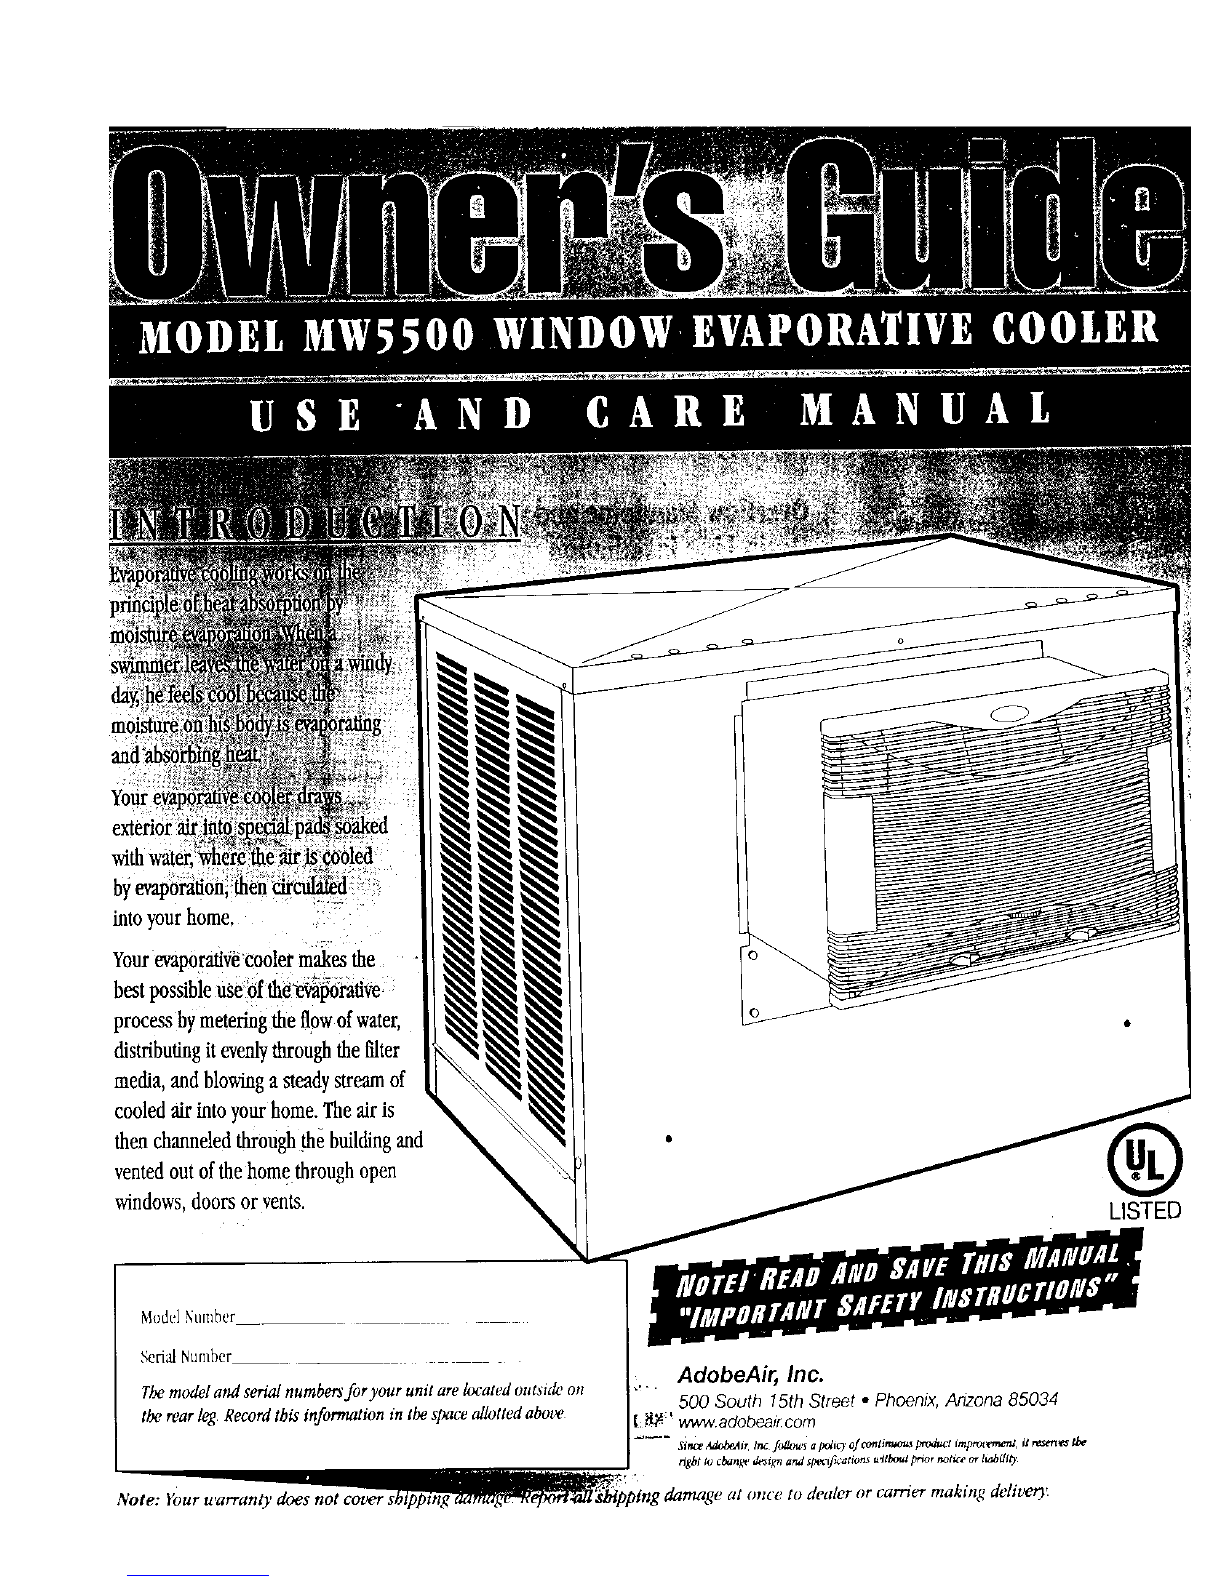
intoyourhome,
Yourevapo_ve_cooler makesthe
best possible use_f th_'e_oratJ-ce
process by metering the flowof water,
distributing it evenlythroughthe filter
media, and blowing a steady stream of
cooledair intoyourhome. The_r is
thenchanneledthroughthe buildingand
ventedout ofthe home throughopen
windows,doorsor vents.
ModelNumber
_rial Number
Themodel and serial numbeesfor your unit are located outstde on
the rear leg Record tbis information in the space allotted abot*
Note: Your warrant)
LISTED
, damage at once to dealer or carrier making deliver)!

INSTALLATION
MountingOfYourModelMW5500EvaporativeCooler
I_ Read these instructions
carefully before installing,
operating or servicing your
evaporative cooler.
SAFETY
Caution'. Unplug the electrical cord
to the cooler before attempting to
work on or service your cooler.
1. Checklocalcodesandutilitystandard&The
installationmust complywiththeirrules.
2. Yourcoolerwillranon 120voltAC,60Hz
(cycle)currentonly.
3. Vseagroundedoutletto
protectyoufrom shock.
g _ outletyouplan
to useis a2-prong
(Vpe,do not remove
theplug grounding
prong, tlavean
electricianreplacethe2-
prongoutletwithagrounded3-prongoutlet.
Location
Installcoolerso onlyfreshoutsideair ispermitted
toenterthecoolingsystem,preferablyonsideof
buildingfacingprevailingwinds.Installunitthrough
windowofroomwheremaximumcoolingis desired.
Airaowcunbedirectodthroughhousebynsing
otherwindowsasexhaustopenings.Avoidinstalling
unitinsidedosedin areas,suchasanatticor
storageroomwhichrestrictsfreeairmovement
aroundcooler.Avoidinstallationnearventpipes,
kitchenexhaust,etc.,asodorsorfamesmaybe
drawnintounits.
Mounting Stand
Thiscoolercomeswithaheavy-dutymountingstand
whichincludesinstructionsforproperassemblyand
installation.Unitshouldbeproperlymountedprior
towaterandelectricalhunk-up.
Electrical Wiring
Ynnrnnit[_sbeenpre-wired_ thefactoryso
furtherwiringisnotnecess_.F'gureIshowsthe
wiringdiagnmofyunrunitiacnseofelectrical
componentreplacement.
at _50o _terat/_ c,oo/_ f./ttat_dtT_ J_ttt, a/
Power Supply
Besuretoconnectto120volts,60Hz
woundedpowersupply.Note:Improper
voltagewillburnout motorandpumpwindingsand
voidthewarranty.
OverflowStandpipeand
DrainLineInstallation
1. Installoverfowdrainbushinginbottomof
cooler.
2. Screwoverflowstandpipeintodrainbushing
andtightensnuglytopreventleakage.
3. Sliderubberwasheroverdrainbushingpush
drainbushingthroughbottomofcooler,and
tightennut.
4. Connect(copper/pvc/gurdenhose)to drain
bushinganddrainin accordancetolocal
codes(seeFigure2).
ConnectWaterSupply
Awatervalveshonldbe installedataconvenient
locationtoallowthewatersupplytobeRLrnedon
andoff(seeFigure3); 1/4"tubingisusedto
providewatertothecooler.Awaterconnector
kit,availablefromyourdealer,providesthe
necessaryitems.
Note:Soflwaterequipmentshouldnot he
attachedtoany waterlinesgotngto acooler
Two Speed Motor Wiring
pUMp SWITCH MOTOR SWITCH
c¢_ otw
"Soflwater"willcausecomsiou anddecrease
effectivelifeof acooler.

FloatInstallation
Thefloatvalveis tapedtothebottomofthecoolerto
avoidshippingdamage,ffthecoolerisgoingtobe
permanentlyinstalled,attachthefloattothesideof
frontpanelinsidethecabinetwithholeprovided(see
Figure4).Connectcoppertubingfromwatersupplyto
coolerandconnecttotube(fromfloathive)
protrudingfromsideoffrontpanelusingferruleunion
providedinpartspackage.
Bracket
Nut V_
Nut LockVTaskerFIGURE4
AdjustingWaterLeveland
FloatValve
Ftllreservoirasfollows:
1.Turnwatersupplyon. Checkforgoodpressure
andflowfromfloatvalve.
2.Whenfloatvalveshutsoff,checkwaterlevel.
Waterleveishouldbe fromI/2"to1"below
top edge of overflow standl_ipe.
3.Adjustfloatvalvebybendingthe rod(see
Figure5).
Caution: To reduce
the risk of
electric shock,
connectonly
to an outlet
provided with
a gronndfault
circuit interrupting
device.
Caution: Do not allow pump
to topple over and become
submerged; water will
damage pump motor.
Never wash your
cooler cabinet with a garden
hose; water may harm motor
ond pump or seep into
blower housing.
InstallBleed-off
Ableed-offsystemisprovided
withyourMastercoulcooler.We
recommendthebleed-offbe
installedandmaintainedwhile
operatingthisunit.Itspurposeis
toeliminateasmallquantityof
waterfrommdrculatioothus
reducingscalebuild-up.Install
bleed-offasfollows:installI/4"
blackplastictubingintopompas
showninFigure6.
Insert3/16"blackplastictubinginto1/4"tubingas
showninFigure6.
Adjustbleed.offbyshortening3/16"tubetogetthe
properbleedrateof80secundstofilla12oz.can.
Disposalofbleed-offwatershouldcomplywithlocal
codes.Useofchemicaladditivesoranywater
treatmentotherthanbleed-offisnotrecommended
forthiscooler.Failuretousethebleed-offwith
MastetCoolpadgreatlyincreasesthemineral
depositsandreducestheerpectodlifeofthe
Mastercoulpad;andcouldresultinearly
replacementofthepadatyourexpense.
Seconds To Fill A 12 Oz. Can
Model Motor HP SeCOndsTo Fill
MW5500 1/2 80
ofscouringpadisnot recommended.Rinsethepad
framewithfreshwater,ffreversingmediapad,
rinsepadwithfreshwatertoremoveas much
depositbuild-upaspossible.
4. Laynewmediapadsinframe(orrotateold
padsandlayinflame).Remember,themedia
shouldbeplacedinframestartingatthebottom
ensuringtheedgeofthepadflamefitssnugly
intotheslotonthebottomofthemedis.Thetop
ofthemediahasthefeltsurfaceandshouldfit
tigh_againstthetrough.
5. Replacepadretainerfollowingsamemethod
aswhenitwasremoved,exceptincounter-clockwise
motion.
6. Pre-soakpadandre-installmediapadframeinto
cooler.
7. Startpumpandallowtroughstofill.., checkwater
levelintroughsbyslightlytiltingeachpadframeout.
RegularMaintenance
Regular,carefulmaintenancewillallowyoutoenjoya
long,moreefficientservicelifefromyourcooler.
Beforestartinganymaintenanceoperation,read
thoroughlyalloperatingandmaintenanceinstructions
andobserveallcautionsandwarnings.
Lubrication
Changing/ReversingCooler
MediaPads
Yourcoolermediapadsshouldbechangedatleast
everytwoyears.Checkandcleanthematthe
beginningoftheseasonandcleanandreversethem
inthemiddleoftheseason.Yourmediapadsmay
needtobechangedmorefrequently,dependingon
localair andwaterconditions.Forinstance,inareas
wheremtheralcontentofthewaterishigh,deposits
maybutldupinthecoolermediarestric_ngairflow.
Replaee/reversemediapadsasfollows:
1.RemovemediapadflamefromcabInet.
2.Carefullyremovethemetalpadretainer(use
pliersif
necessary)using
aclockwise
motionwhen
twistingthe
retainerout(see
rgure7).
3. Usingaimld
detergent,wash
dirtandacale
frommediapad
frame.Wire
brush_goruse
Blowershaftbearingsneedperiodiclubrication.Theoil
cupsontheblowershaftbearingsshouldbefilledwith
a goodgradeSAt/20Wor 30Wotlwhenneeessary.
Undernormaluse,oilingis requiredeverythree
monthsofoperation.1)oNot Over-Oil.Thepump
andblowermotorsdonotrequirelubrication.
Cleaning WaterPump
Disassembleandcleanwaterpumpasfollows(see
Figures8&9):
1.Withpowersupplydisconnected,unplugpumpcord.
2. Removepump.
3. Topreventbreakage,carefullyreleasethefoursnap-
outtabs,andliftimpellerbaseplatefromthepump
body.
4. Usinga milddetergentsulution,washalldeposits
frominsidearoundimpellerandimpellerbaseplate.
._s_
ltt,_5$#OEt,_mm_ Cae/er _aad _ Jaum/3

5. Spinimpellertodislodgeany
foreignmaterial.
6. Rinseandreinstallimpeller
baseplate.
7. Reinstallpump.
8. Conneetcord.
FIGURE9
]l,gAi_ Neveru_dJyourc_ler
cabinetvatbagardenbose
an_ umtermayharmnmtorand
pump orseepinto duam_k.
Replacement Parts
Yourwindowcooleris a high-
qualityevaporativecoler
des_ed tog_ yearsof
trnnble-frenservicewhenitis
properlymaintained.However,
shouldreplacementpartsbe
requieM,theyareavailable
throughyourdealer.
Troubleshooting
Thefollowingtroubleshootingguideis intendedtoaddressthemostcommonsymptomsandisbyno meansexhaustive.If
symptomspersist,callaqualifiedserviceman.Electricalworkshouldbecompletedbyacer_ed electrician.Tornoffall
powertothecoolerbeforeattemp_g totroubleshootanyofthefollowingsymptoms.
SYMPTOM POSSIBLE CAUSES REMEDY
Unitfallstostartordeliver_1.Noelectricalpowertounit 1.Checkpower
A.Fuseblown & Replacefuse*
B.Circuitbreakertripped B.Resetbreaker*
•Ifcond_t_np_aas, calla*amian
C.Cord(s)unpluggedor damaged C.Plugin cord(s) orreplaceif
damaged
2. Motoroverheatedand/orfrozen 3. Replacemotor
U_tstarts
butairdeliveryinadequate 1. Lackofsuf_cientair exhaust
2. Insufficientwater/mediapadnotwet
A.Mediapadsplugged
B.Dryspotson mediapads
C.Troughholesdogged
D.Pumpnotworldng
E.Looseconnectionsinwatersystem
E Distributorcloggedorcorroded
L Openwindowsordoorstoincrease
ventilation
2. Checkwaterdistributionsystem
A.Replacemediapads
B.Repackmediapads
B.Cleantroughsandunplugholes
n. Unplugpump.Cleanimpeller
housingofforeignmatterand
reinstall
E.Checkforleaksandcorrect
ECleanor replace
Waterdraining_m 1.Floatarmimproperlyadjusted L Adjustfloat
overflowStn_l_€ 2. Seatin floatvalveleaking 2.Replacefloatvalve
3. Standpipenot tight 3.'lightenstandpipe
[l_[ling or_found 1.Bearingdry 1. Rephtcemotor.
2. Wheelrubbingblowerhousing 2.Inspectblowershaft,collars,beltand
or rotatingoff-balance pulleyalignmentandmotormounting
3. Looseparts 3. Resecureor reconnect
Blowershakesorrattles 1,LooseBlowerWheel 1, Inspectandadjust,orreplace
asneeded.
huli_ hihOl_l¢ ,1.Inadequateexhaust 1. Opendoorsorwindowstoincrease
ventilation
lUStyOru_lt_lsat Odor 1. Staleorstagnantwaterin reservoir 1.Drain,flushandcleanreservoir,
in.rollblecd-offkit
2. Padsmildewedorclogged 2. Replacepads
3. Padsnotcompletelywetbefore 3. Tornnnwaterbeforestartingnnit
cooleristurnedon
NOTE
Do not use cooler cleaners, cooler treatments, or other additives in this
evaporative cooler. The use of any of these products will void your warranty and
may impair the life of your evaporative cooler.
4, _500 _qpor_ Cao/_- _,.,,d CareKm_M/
Other AdobeAir Freezer manuals

AdobeAir
AdobeAir S/D330 User manual

AdobeAir
AdobeAir MasterCool MD524 User manual

AdobeAir
AdobeAir L900790A User manual

AdobeAir
AdobeAir RS872 User manual

AdobeAir
AdobeAir MasterCool P500A User manual

AdobeAir
AdobeAir RW3000 User manual

AdobeAir
AdobeAir MasterCool II MC43 Instructions for use

AdobeAir
AdobeAir MasterCool MMPC12A User manual


