Adrenaline Technologies TouchFX TFX1 Installation and operating instructions

Operation & Service Manual
*Read this manual before use
TFX1 TFX3

If you encounter any difficulties or if you need support on how to update and/ or install
your TouchFX product, we invite you to contact your local distributor or reach us at
info@adrenalineamusements.com or by calling our support line +1.450.932.4205
!"
General Remark
Adrenaline Amusements Team

Table of Contents
#"
Chapter 01 – Introduction
Preface
Safety
FCC Notice (United States)
04
05
06
Chapter 02 – Product Features
Features
Voltage
Dimensions
07
07
07
Chapter 03 – Installation
Machine Installation 08
Chapter 04 – Operators’ Menu & Game Setup
Operators’ Menu & Game Setup
Product Default Settings
09
09
Chapter 05 – Service & Repair
Computer
Trouble Shooting
Screen
Calibration
Window booth Error
General
Replacement Part
Fluorescence Tube Replacement
Screen Assembly
Door Assembly
11
Chapter 06 - Diagrams & Schematics
Control Card
Wiring Diagrams
18
19
12
12
13
14
15
16
17

Preface
Please read this page before preparing your TouchFX product for game play
The following safety instructions apply to all game operators and service personnel. Specific warnings and
cautions will be included throughout this manual.
Use the following safety guidelines to help protect the system from potential damage and to ensure your
personal safety:
! Electronic components in the game cabinet run on 115VAC 60Hz (230V/ 50Hz in most of Europe,
the Middle East and the Far East delivered units).
! To help prevent electric shock, plug the system into a properly grounded power source. These
cables are equipped with 3-prong plugs to help ensure proper grounding. Do not use adapter plugs
or remove the grounding prong from a cable. If you must use an extension cable, use a 3-wire
cable with properly grounded plugs.
! To help protect your system from sudden increases and decreases in electrical power, use a surge
suppressor, line conditioner or Uninterruptible Power Supply (UPS).
! Be sure nothing rests on the system’s cables and that the cables are not located where they can
be stepped on or tripped over.
! Keep your system far away from radiators and other heat sources.
! Do not block cooling vents.
Precaution for Game Operation
Adrenaline Amusements Inc assumes no liability for injuries incurred while playing our games.
Operators should be aware that certain health and physical conditions may make people susceptible to
injury when playing video games.
Chapter 1
$"

Preface
Safety
Warning
Chapter 1
%"
To avoid electrical shock, unplug the cabinet before performing
installation or service procedures.
If a power cord is damaged, it must be replaced by the
equivalent power cord available from your distributor.
Adrenaline Amusement Inc assumes no liability for any
damages or injuries incurred while setting up or servicing
the cabinet. Only qualified service personnel should
perform installation or service procedures.
Environmental Conditions
Cabinet is intended for indoor use only. Be sure to keep the cabinet dry and maintain operating
temperatures of 59°-86° (15°-30°C).

Preface
FCC Notices (United States)
Electromagnetic Interference (EMI) is any signal or emission radiated in free space or conducted along
power or signal leads, that endangers the functioning of radio navigation or other safety service, or that
seriously degrades, obstructs, or repeatedly interrupts a licensed radio communications service. Radio
communications services include, but are not limited to, AM/FM commercial broadcast, television, cellular
services, radar, air-traffic control, pager, and Personal Communication Services (PCS). These licensed
services, along with unintentional radiators such as digital devices (Including computer systems) contribute
to the electromagnetic environment.
Electromagnetic Compatibility (EMC) is the ability of items of electronic equipment to function properly
together in the electronic environment. While this computer system has been designed and determined to
be compliant with regulatory agency limits for EMI, there is no guarantee that interference will not occur in
a particular installation. If this equipment does cause interference with radio communications services,
which can be determined by turning the equipment off and on, you are encouraged to try to correct the
interference by one or more of the following measures:
• Re-orient the receiving antenna
• Relocated the cabinet relative to the receiver
• Plug the game into a different outlet so that the computer and the receiver are on different branch circuits
If necessary, consult a Regulatory EMC representative of Adrenaline Amusements Inc or an experienced
radio/television technician for additional suggestions. You may find the FCC interference Handbook to be
helpful. It is available from the U.S. Government Print Office, Washington, DC 20402.
This device has been tested and complies with the limits for a Class A digital device pursuant to Part 15 of
the FCC Rules. These limits are designed to provide reasonable protection against harmful interference
when the equipment is operated in a commercial environment. This equipment generates, uses, and can
radiate radio frequency energy. If not installed and used in accordance with the instruction manual, it may
cause harmful interference with radio communications. Operation of this equipment in a residential area is
likely to cause harmful interference, in which case you will be required to correct the interference at your
own expense.
Operation is subject to following conditions:
• This device may not cause harmful interference.
• This device must accept any interference received, including interference that may cause undesired
operation.
Chapter 1
&"

Game Features
Chapter 2
'"
TFX$1$Cabinet$
()*+,-." /0.1,23-"
44%"(56" %"578"
!!9"(56" !:%"578"
"
Hardware features
• Mini ITX INTEL computer
• 46’’ FULL HD LCD monitor
• Multitouch screen, detects 6 simultaneous touches
Voltage
Cabinet FACTS
;.<-=+">"?!@@A"!:9?B"
C.<-=+">"$99"*DE"A"4?9F-""
TFX$3$Cabinet$
()*+,-." /0.1,23-"
44%"(56" 4%"578"
!!9"(56" ':%"578"
"
;.<-=+">"G4@@A"!:#4B"
C.<-=+">"G99"*DE"A"$99F-""

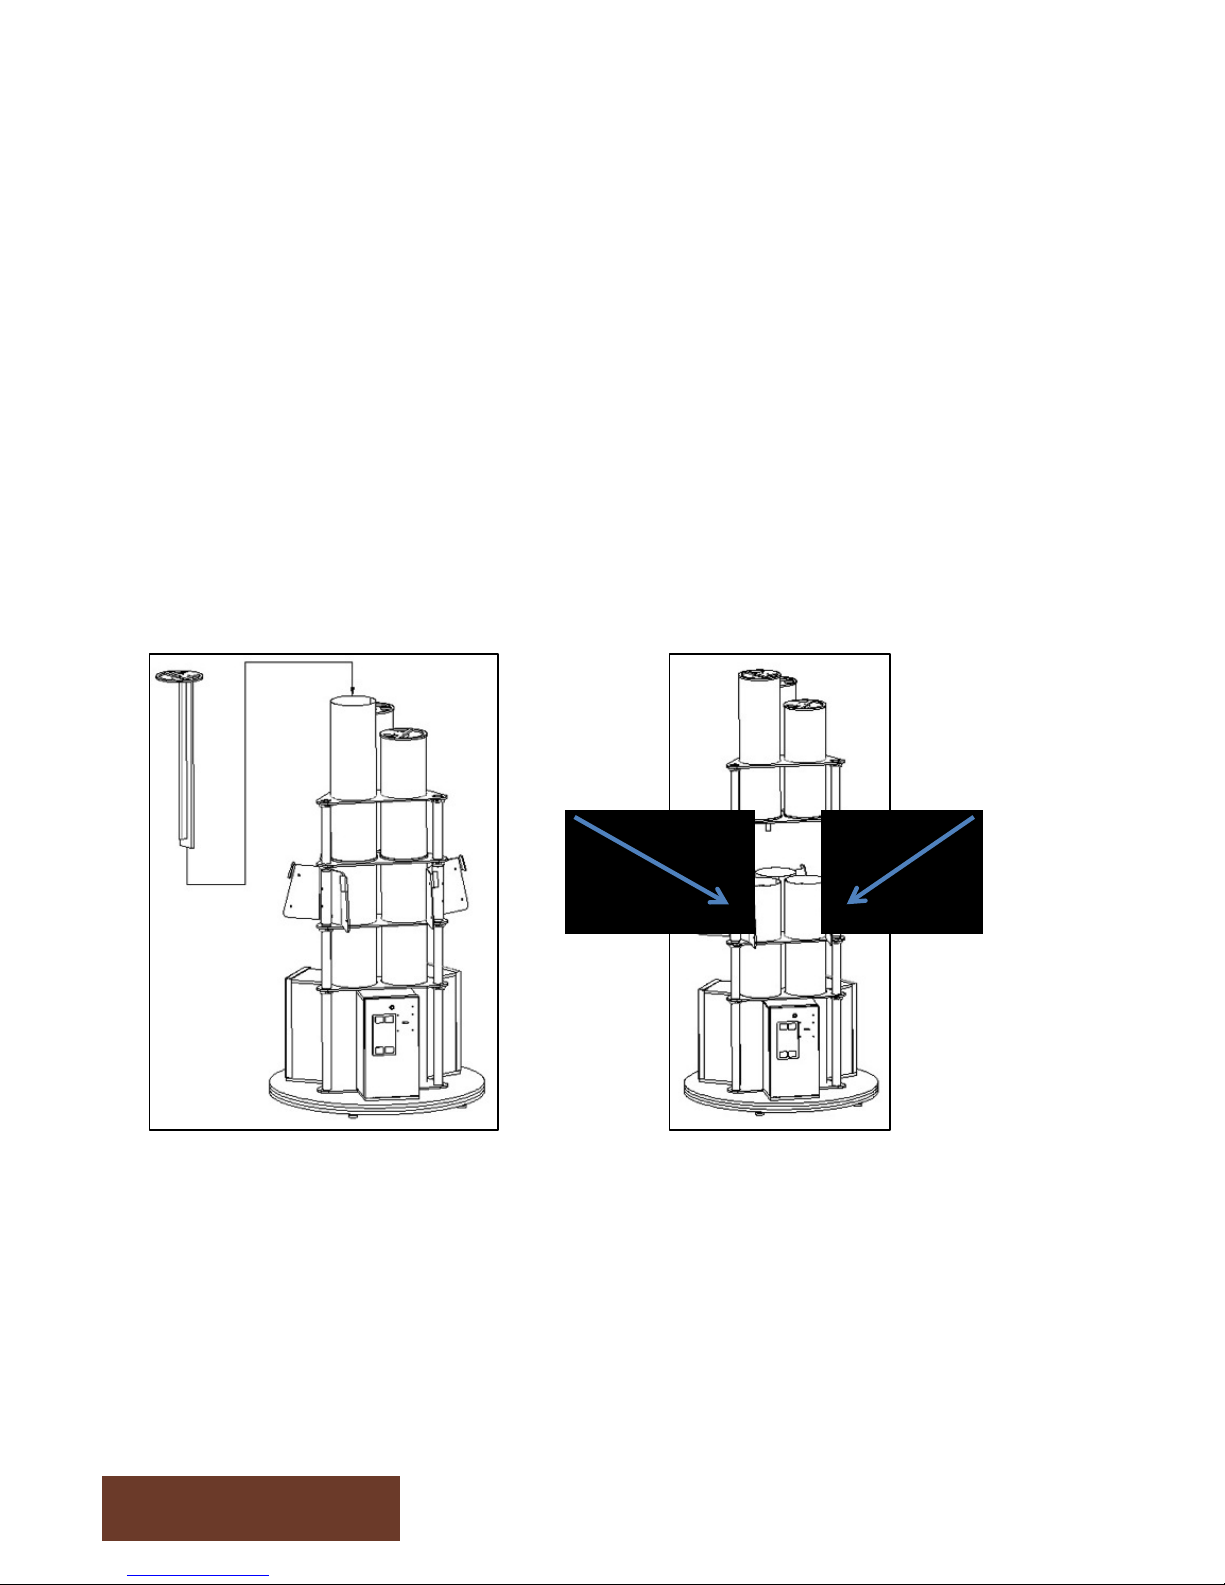
Machine Installation TFX3
Chapter 3
?"
1. Carefully remove the Cabinet from the shipping container giving yourself enough
space.
2. Move the cabinet to the desired location
3. Some TFX3 are shipped in 2 parts, insert the top part. (see fig 1)
4. Insert the 3 fluorescent kits in the blue tubes (see fig 2)
5. Open the coin doors and plug in all 3 plugs from the fluoresrencent to the main power
strip
6. Locate the power cord, you have 2 options: insert the power cord to the bottom of the
machine to power it from a floor outlet or run an extension cable through one of the
blue tube to power it from the ceiling.
7. Hang on screen to the support, insert the 4 bolts and then adjust to the desired height
(normaly in the middle position). Do the same for all the other screens (fig 3)
8. Plug in the connectors between stand and screen (USB, Network, AC Power, and DC
power)
Fig. 1 Fig. 2 Fig. 3

Operator Menu & Game Setup
This chapter describes how to use the Operator Control Panel to navigate
through the Operator Main Menu to set up your product and adjust all the game play
parameters.
The Operator Menu
To access the Operator Menu, use the Operator button located inside the coin door.
This screen will appear.
To navigate the menu, press on the line you want to change then press the arrows to
adjust the value.
Chapter 4
G"

Chapter 4
49"
Operator$Menu$ se5ng$ What$it$is$
61.H<+E"0.1"I,B." $" 61.H<+E"1.JK<1.H"+)"0*,L"
I,B."5KH<)"()*KB." ?" 5HMKE+"+=.",KH<)"N)*KB."<3""+=."-,B."
5O1,P+"B)H."()*KB." 4" 5HMKE+"+=.",KH<)"N)*KB.")Q"+=.",O1,P+"B)H."
6)K3+H)R3"5O1,P+"N<H.)"" %" S)"3)+"P=,3-."
6)K3+H)R3"T)<3"I,B." #9" U<B."+)"T)<3"7K*20*,L.1"I,B."
6)K3+H)R3"V*,H."
E.*.P2)3"49" U<B."Q)1"V*,H."E.*.P2)3"EP1..3"
W.+"+)"9"+)"1.B)N."+=.B.3K""
6)K3+H)R3"1.EK*+E"EP1..3" 4%" U<B."Q)1"1.EK*+E"EP1..3"
6)K3+H)R3".3+.1"L)K1"
3,B." #9" U<B.1"Q)1"X3+.1"Y)K1"Z,B."EP1..3"
[.H.B02)3" 4" 9"+)"H<E,D*.\"4"Q)1"2PF.+\"!"Q)1"6)K0)3E"
W<3-*."0*,L.1"0)<3+E"
H<N<H.1"49"
5HMKE+"0,L)K+"2PF.+E"Q)1"E<3-*."0*,L.1"-,B."DL"
H<N<H<3-"+=."EP)1.")Q"+=."0*,L.1"DL"+=<E"N,*K."+)"
H.+.1B<3.",B)K3+")Q""
7K*20*,L.1"R<33.1"2PF.+E" &9" 5HMKE+"+=."0,L)K+"2PF.+"Q)1"R<33.1"<3"
BK*20*,L.1"
7K*20*,L.1"H1,R"2PF.+E" !9" 5HMKE+"0,L)K+"Q)1".,P="0*,L.1"<3","2."EP)1."
-,B."
]<^.H"U<PF.+"8,L)K+" 9" _E.","`^"3KBD.1")Q"2PF.+"<3E+.,H")Q"EF<**"D,E.H"
U68"8)1+"%??'?" S)"3)+"6=,3-."
_S8"8)1+ "" %??'G" S)"3)+"P=,3-."
6,1H"[.,H.1" 9" W.*.P+"4"+)"H<E0*,L"P,1H"ER<0."<3E+.,H")Q"P1.H<+E"
U<B."0.1"[)K3H" &9" 5HMKE+"+=."*.3-=+")Q"+=."-,B."<3"E.P)3HE"
[.H.B02)3"_3<+"(,*K." 4" (,*K.")Q"+=."0,0.1"2PF.+"
T,0,3.E." 9" U)",P2N,+."T,0,3.E."N.1E<)3"

Service & Repair
Computer connections ADR-11-1002
Chapter 5
44"
Z.+R)1F"+)"[)K+.1"
V*K."S)3-*."
U)KP="EP1..3"
;S7a"+)"B)3<+)1"
_WV"+)"aA/"D),1H"
S6"Q1)B"8)R.1"EK00*L"
8)R.1"DKO)3"

Touch$screen$troubleshoo;ng$and$calibra;on$
• Disconnect the USB cable between cabinet and screen, connect the keyboard.
Press the letter Q, this should quit the game and fall back to the windows
desktop. Disconnect the keyboard and connect the mouse. Double click on the
Multitouch icon:"
"
• If window title screen says ‘device disconnected’
o "6=.PF"S6"B)*.^"P)33.P2)3"D.+R..3"P,D<3.+",3H"B)3<+)1:"C<+=","N)*+"B.+.1"P=.PF"<Q"
L)K"=,N."%(")3"1.H",3H"D*,PF"R<1."P)B<3-"Q1)B"P,D<3.+:"aQ"3)+"P=.PF"S6"0)R.1"EK00*L"
,PP.EE<D*."Q1)B"+=."P)<3"H))1"*)P,+.H"<3"+=."P.3+.1")Q"+=."P,D<3.+:"""
o aQ"%("<E")F\"[.B)N."B)3<+)1"D.b.*",3H"P)B0K+.1"D)O)B"P)N.1"cE.."P=,0+.1"&d",3H"P=.PF"
_WV"P)33.P2)3"D.+R..3"P)B0K+.1",3H"+)KP="EP1..3:"5*E)"P=.PF"<Q"1)K3H"D,11.*"
P)33.P2)3"<E")F"Q)1"S6"0)R.1"+)"+)KP="EP1..3:"
"
• If window title screen says “device connected”
o Click on calibration then follow the onscreen instructions. If touchscreen does not
respond as expected during calibration go to next step
o Click on advanced, OK, then ‘Reset TouchData’. It will ask you to wait 10 seconds
then click on yes. When done retry calibration.
4!"

Troubleshoo;ng=$Windows$boot$error$
At machine start up if you get a
windows error message
“Windows$boot$manager”$
The boot selection failed because a
required device is inaccessible.
4#"
• Disconnect the usb cable between cabinet and screen, connect the keyboard.
• Disconnect power and reconnect to restart computer.
• Press F8 repeatedly until you get to the windows boot selection
• If you get to a blue boot disk selection press Enter then press again on F8 repeatedly until
you get to the windows boot selection
• Select Normal boot then press Enter.
• Disconnect keyboard and reconnect USB connection
"
What you are required to do

Troubleshooting
Chapter 5
4$"
Video TroubleShooting
No picture and no audio Power Problem, check the power to monitor
loose or faulty connections between Monitor and
computer, make sure HDMI cable is connected
properly to both computer and LCD monitor
No power to computer, Verify the computer is ON
by the blue LED on the top of the computer.
Remove computer bottom cover and press the
RED power button. Make sure that the round power
plug is well connected. Check LED on Computer
external power supply. Check AC power cord to
computer external power supply
Bios setting has changed, If the computer does not
power automatically when machine is powered on,
check BIOS settings AC Power on function is set to
Power ON
Audio TroubleShooting
Low volume Increase the volume in the game by pressing the
operator button and adjust
Increase volume of the monitor by using the remote
control
Error Message Screens
Error when opening serial port Check that USB cable is connected from computer
to I/O board.
Chapter 5
4%"
]*K)1.EP.3+"+KD."1.0*,P.B.3+"cU]e#d"
]<-:"4"]<-:"!"
• Open the coin door and unplug the power cable of the Fluorescent assembly
• With a step ladder, lift the fluorescent assemblies from inside the blue tubes
• To replace the bottom fluorescent, remove the top bolt on each gray tube as indicated
by the arrows on figure 2. then with the 2 persons lift up, and remove the top part. You
will then have access to the bottom fluorescents.

4&"
Screen Assembly TF-00-1010
REF$ PART$ NUMBER$
4" 7)3<+)1"D,PF"Q1,B." U]f94f49!9"
!" $&@@"7)3<+)1" 5S[f49f4994"
#" U.B0.1.H"I*,EE" U]f49f4!!9"
$" $&@@"U)KP="EP1..3"Q1,B." 5S[f49f499!"
%" 7)3<+)1"Q1)3+"Q1,B." U]f94f49#9"
&" 6))*<3-"Q,3" U]f9%f4!%9"
'" U)KP=]e"6)B0K+.1" 5S[f44f499!"
?" 6)B0K+.1"D,PF"P)N.1"U]f94f49$9"
Replacement Parts
Chapter 5
Chapter 5
4'"
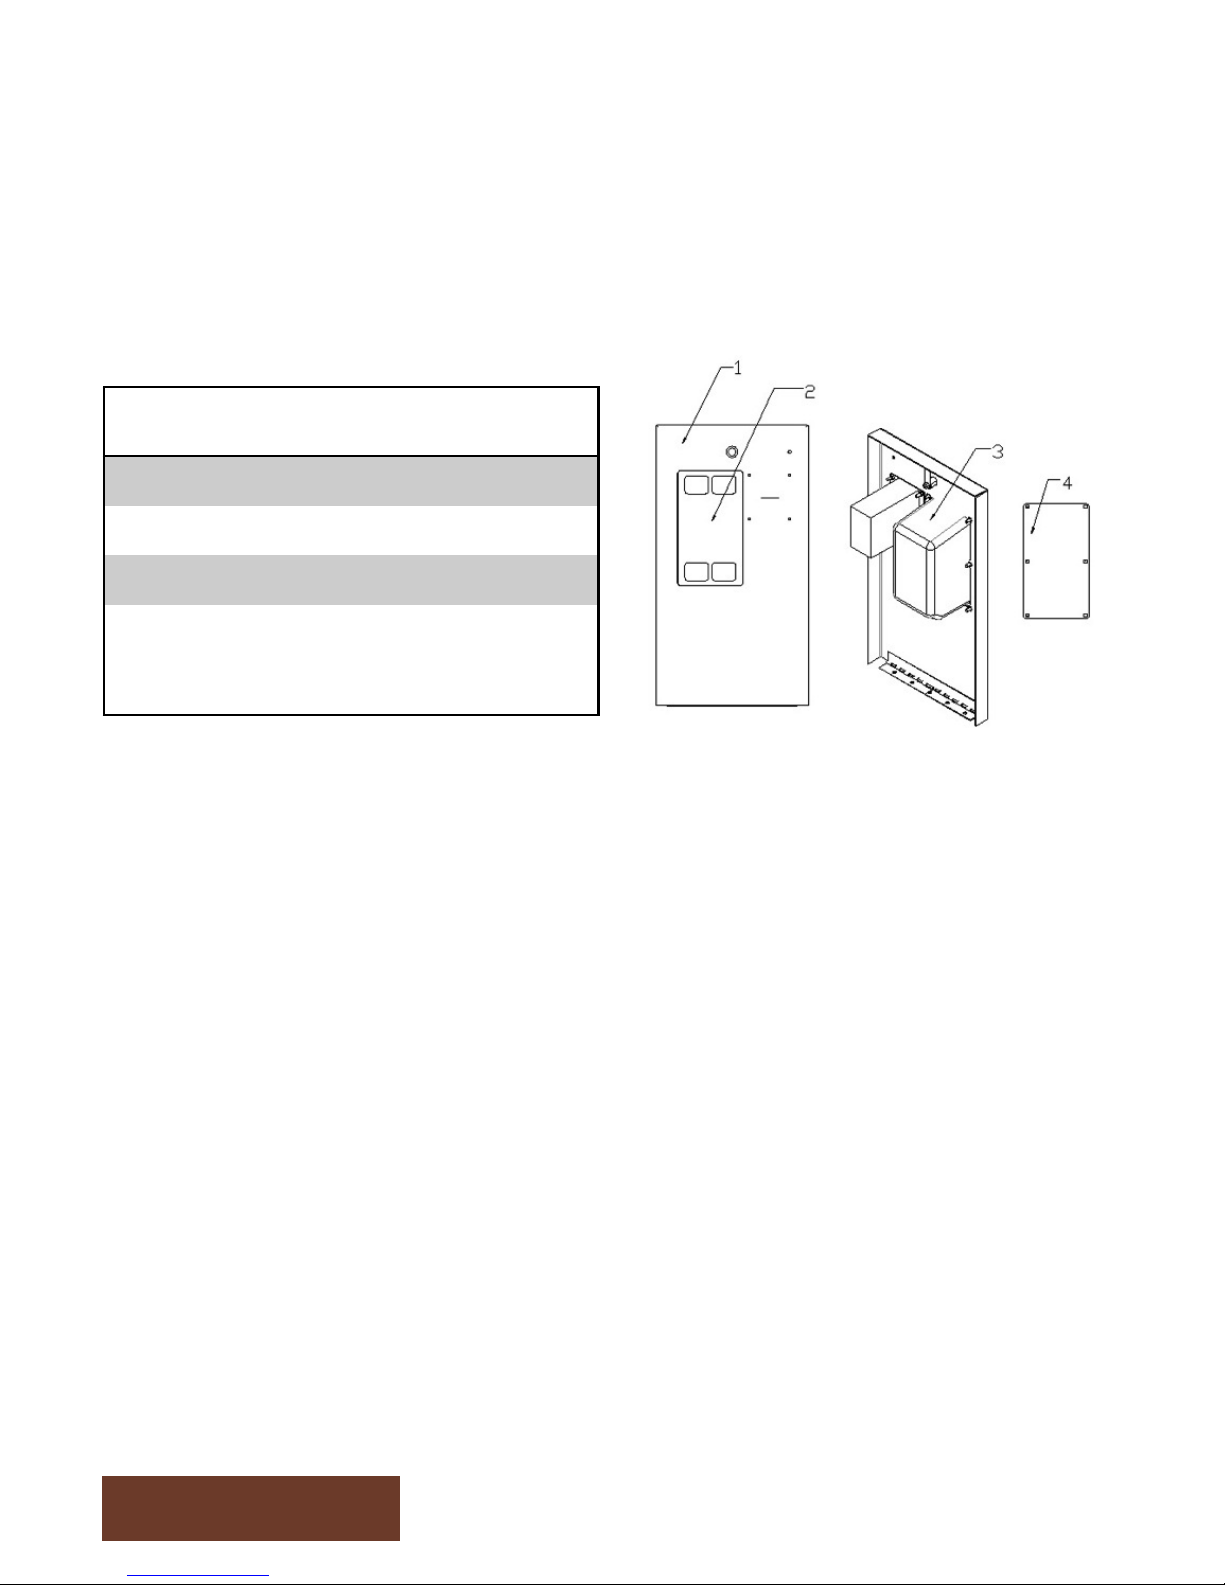
Door Assembly TF-00-1020
REF$ PART$ NUMBER$
4" S))1"8,3.*" g5f94f44#9f99"
!" 6)<3",PP.0)1" 5S[f49f994f99"
#" U<PF.+"Q..H.1" g,f94f44$9f99"
$"
V*,3F"0,3.*"Q)1"
P)<3",PP.0+)1"
c)02)3,*d"
g5f9$f994f99"

I/0 board TF-04-1200
Chapter 6
4?"
REF$ Link$$
T$" U)")0.1,+)1"DKO)3"
T?" Z)+"KE.H"
T&" U)"*)R"2PF.+"ER<+P="
T49" U)"2PF.+"H<E0.3E.1"
T44" U)"P)<3"H))1",3H"B.+.1E"

4G"
Chapter 6
!"
#$%
!"
#&%
'( ($) ($) *+,
-+!
*-.,
/!
0+,
-!
1$ !)2
3456789:;;<=8+,>-.,
?<@AB
(766C
?<:6
!"8D$
#345678"47E%
F4:AG'H8D>18I4@7E
J4CKL47
F48F4:AG89A766C8#+,%
/M
.
-
/
M.
-
N6E
?<@AB
?<@AB
O6<<45
!)NP$!&D$P8!JQ9PJP$F9808F1Q"R'H
?=S
)@L6 3@T6
)7@56E8I=S
!;;74U6E8I=S
,67KVK6E8I=S
374W6AL
$4L6S FKL<6
9!JQP&8&!$)NO
88>.
'K<6C@X6S
F4:AG'HYZK7KCTY)K@T7@X
--0[M0.[--
N6UK\K4C
[.
31ZPN8)D9FND?QFD1$8)D!(N!J
-

!9"
Chapter 6
!"#
$%&"
$%&!
'()
*!!
+("
+(!
'()
!"#
'()
$,&$"
$%&-
!"#
*!.
'()
$,&$!
$%&/
!"#
*0
'()
'()
%,
123
*/
)$4(
2(&25
!
!
!
!
0
/
/
6
&789:;
<:;:=
>?7@
<:;:=
>?7@
1A7;8B:C >?7@
37DB;C
!
"
-
/
!
"
-
/
'=::@
E:FF?A
G=?A@
GFH:
5:I
GFJ89
4B7;:
GFJ89
'=::@
4B7;:
5:I
'=::@
GFJ89
4B7;:
5:I
$K:=J;?=LGH;;?@
&789:;
)7CK:@C:=
&?H8BMNL+O$LG?J=I
P)<+L,?=;
*!-
%1GL,?=;
&?L<?@7;?=
>?QKH;:=
3?AL;789:;
L32)
3?AL;789:;
L1A7;8B
GFJ89
%1GL,?=; &?L&?H8BL18=::@
GFJ89
5:I
GFJ89
4B7;:
R)52(R3+(2LR<%12<2(&1LSL&$%>PMN
GTU
)J;: ,JD:
)=JA:ILVTU
RKK=?W:ILVTU
#:=7X7:ILVTU
,=?Y:8;
(?;:U &7;F:
1R<%23L3R()5E
LLO"
M7F:@JQ:U
&?H8BMNZ47=7@DZ)7JD=JQ
!!S.-S".!!
5:W7C7?@
."
)2&R+32)L4+5+('L)+R'5R<
"
This manual suits for next models
1
Table of contents
Popular Video Gaming Accessories manuals by other brands


Benchmark
Benchmark Ticket Station troubleshooting guide

Nitho
Nitho Hexagon MLT-EXAG-K quick start guide

Mightymast Leisure
Mightymast Leisure SMART Assembly instructions

High Score
High Score PACMAN MULTI KIT installation instructions

Thrustmaster
Thrustmaster TCA QUADRANT BOEING user manual

Thrustmaster
Thrustmaster T300RS user manual


