ADS AJ16US User manual

P/N:8021442 Version:BDate:2017-08-01
Installation manual
of AJ16US dental chair
http://www.adsequip.com/

Installation manual of AJ16US dental chair
Copyrights
ADS makes no warranty of any kind with regard to this
material , including but not limited to, the implied warranties
of merchantability and fitness for a particular purpose. ADS
shall not be held liable for any errors contained herein or any
consequential or other damages concerning furnishing,
performance or use of this material. The information in this
document is subject to change without notice . If you find
any problems in the documentation, please report them to us
in writing. ADS does not warrant that this document is error-
free.
No part of this document may be copied, reproduced, altered,
or transmitted in any form or by any means, electronic or
mechanical, including photocopying, recording, or by any
information storage and retrieval system, without prior
written permission from ADS.
The document is intended to be used in conjunction with the
equipment.
Comments and feedback
Please contact us if you have any feedback and opinions on
this document:
Add: 1590 S Milliken Ave., unit A, Ontario, CA 91761
Tel: (626) 620 0456
http://www.adsequip.com/
Product service
If you want to get service information, please contact the
local dealer authorized by ADS company.
Technical support tel: 800 488 9708

C O N T E N T S
Installation manual of AJ16US dental chair
1Introduction……………………………………………………………1
1.1 Products information…………………………………………1
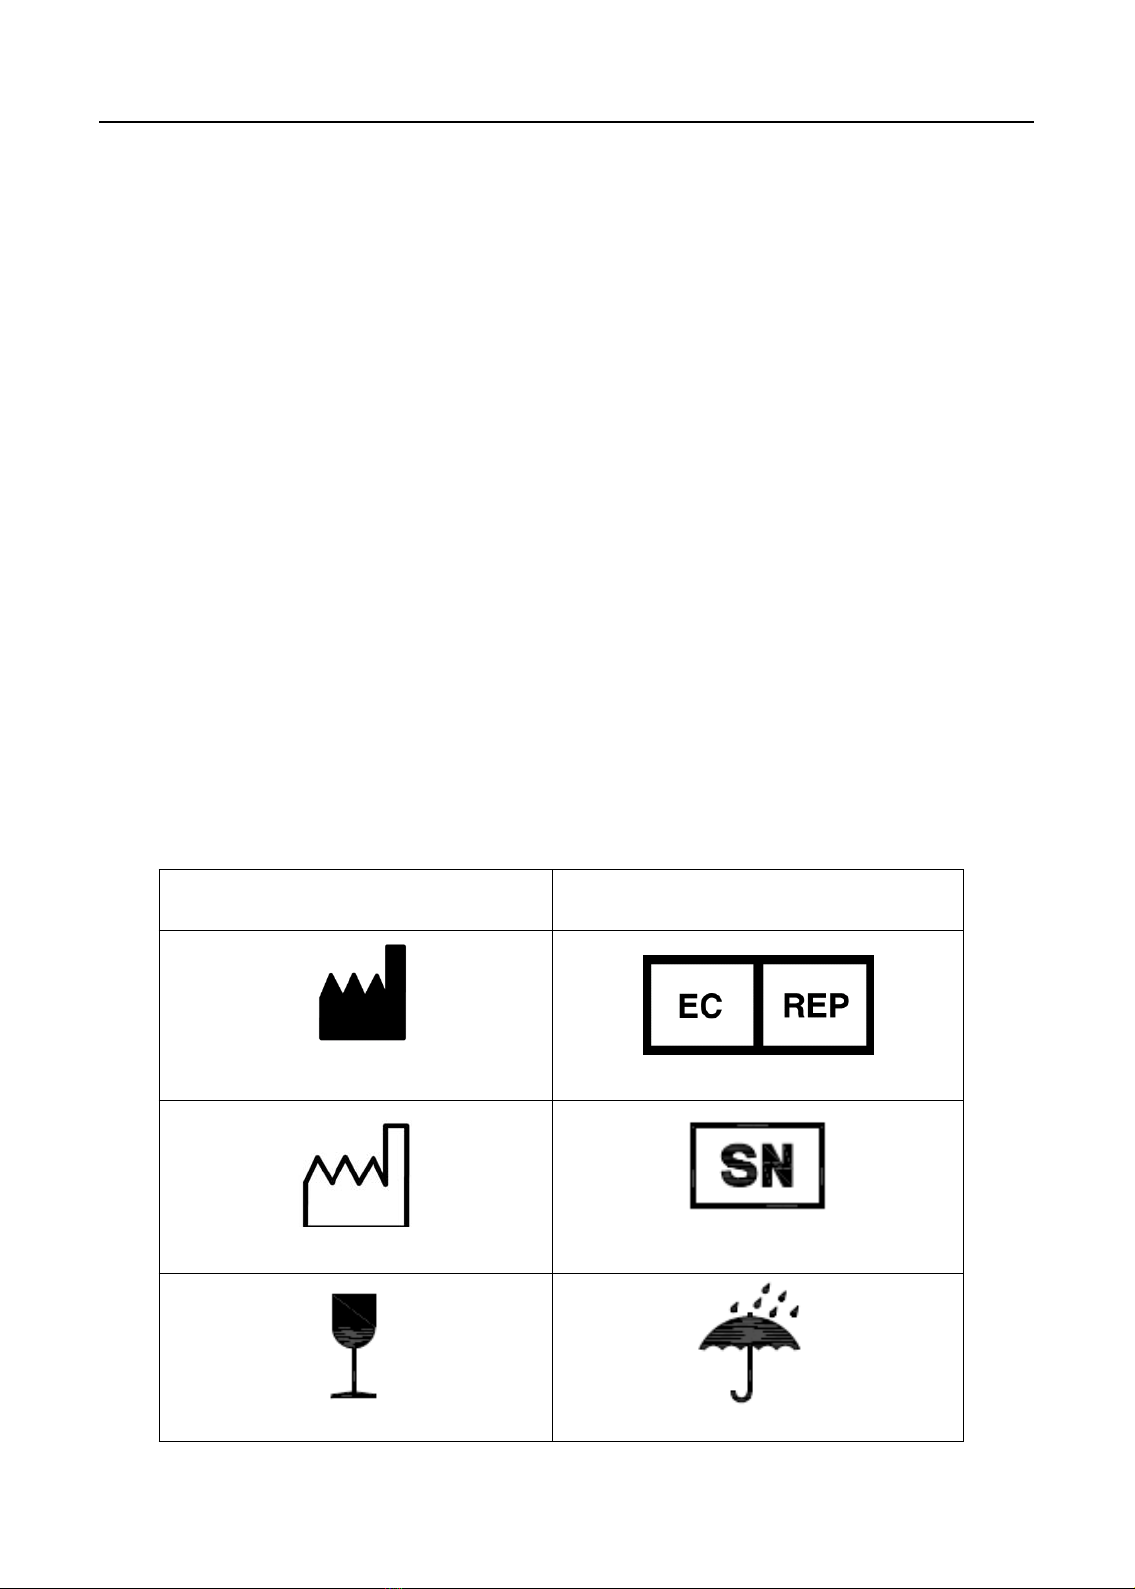
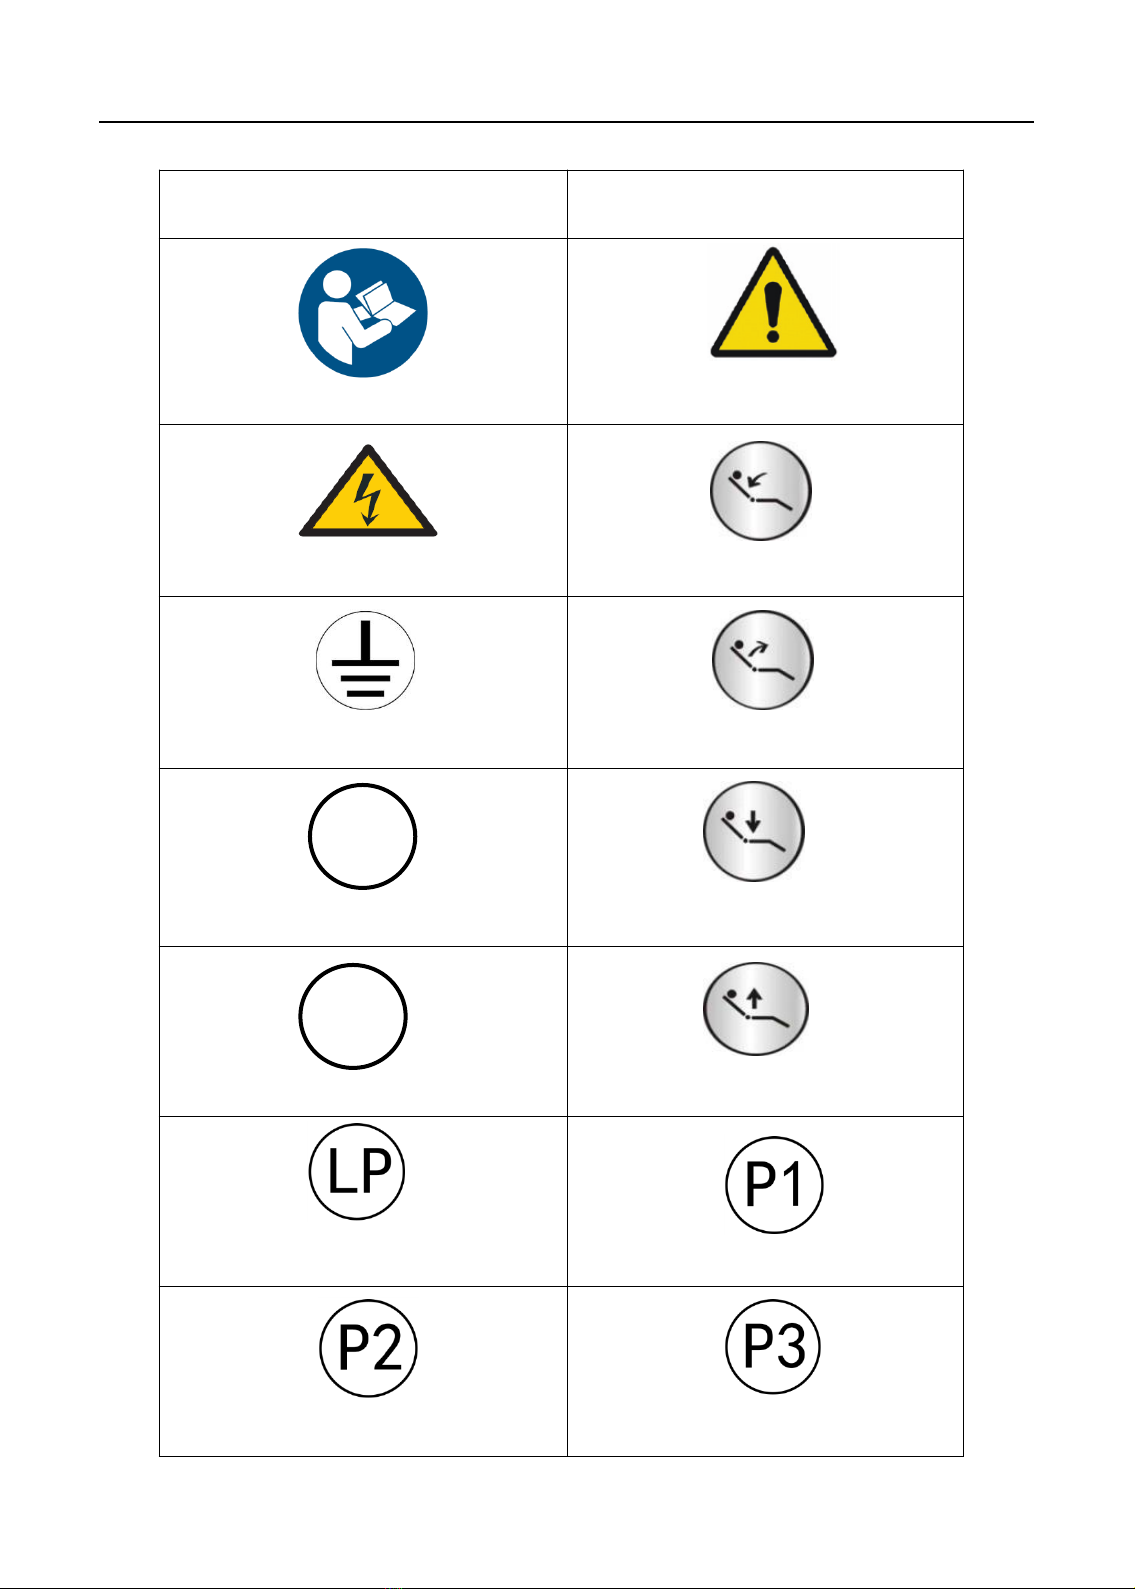
1.2 Symbols explanation……….…………………………………1
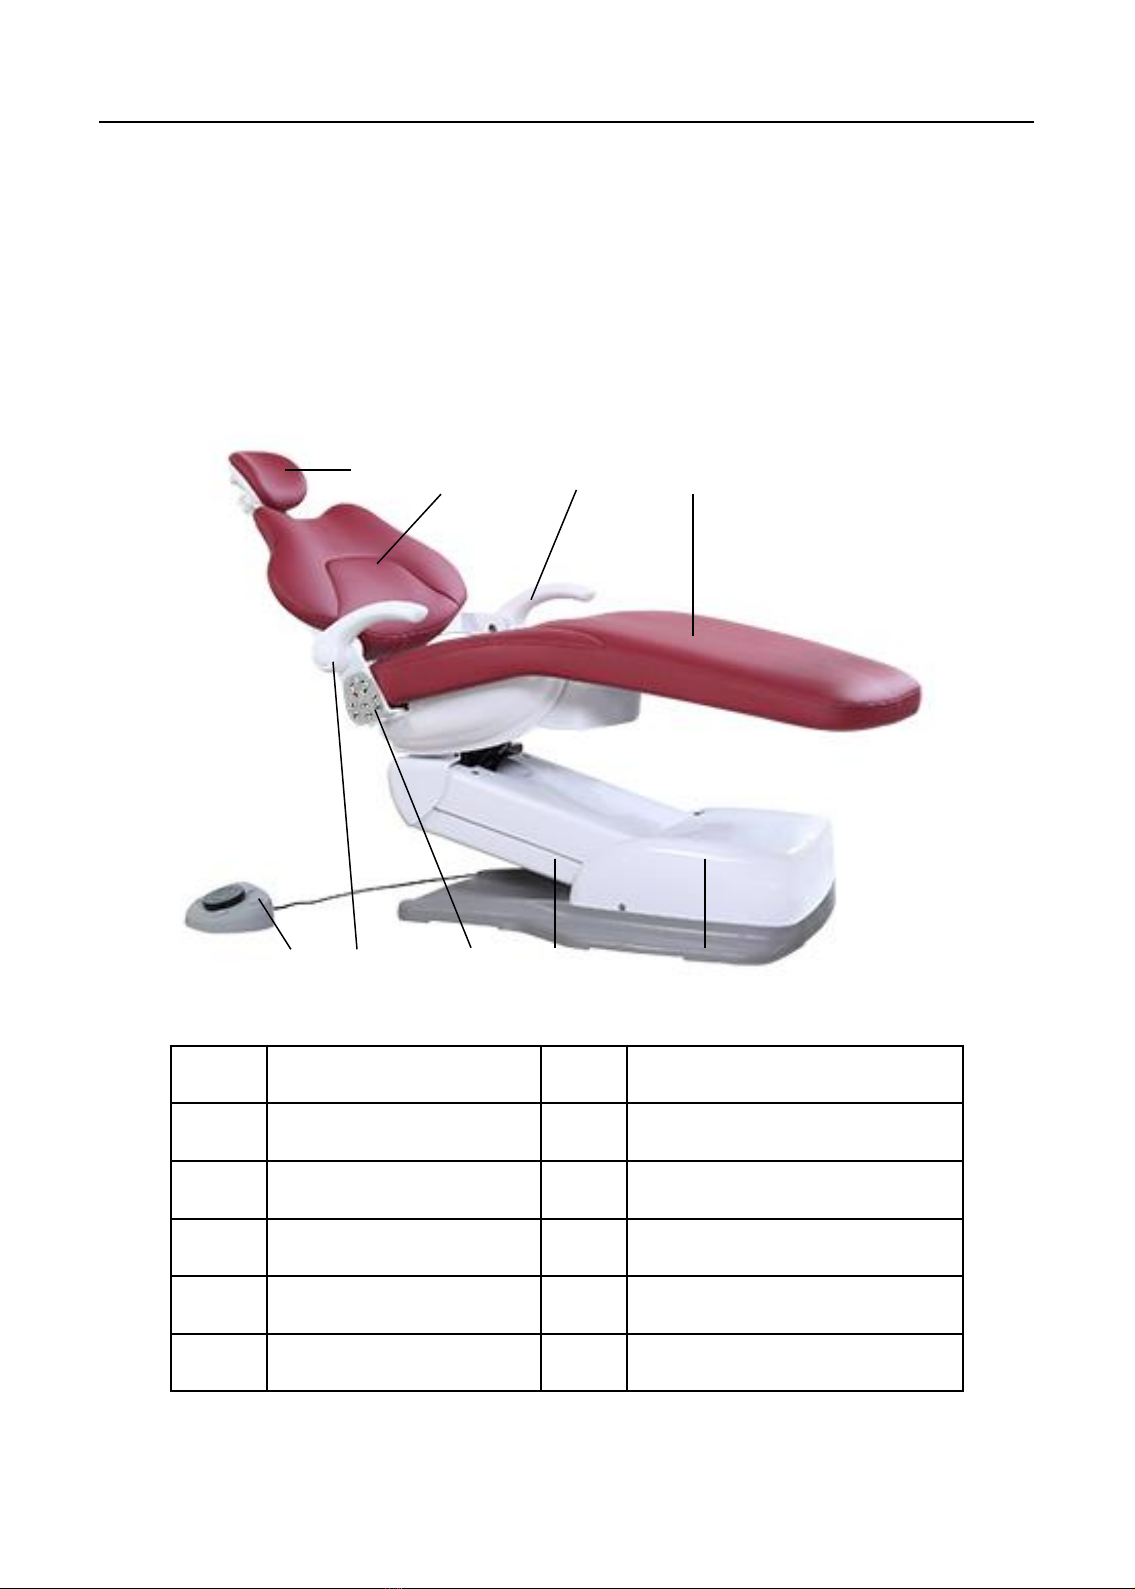
2Composition……………………………………..………………………3
3 Parameters………………..........………………………………………4
3.1 Specifications……………………………………………………4
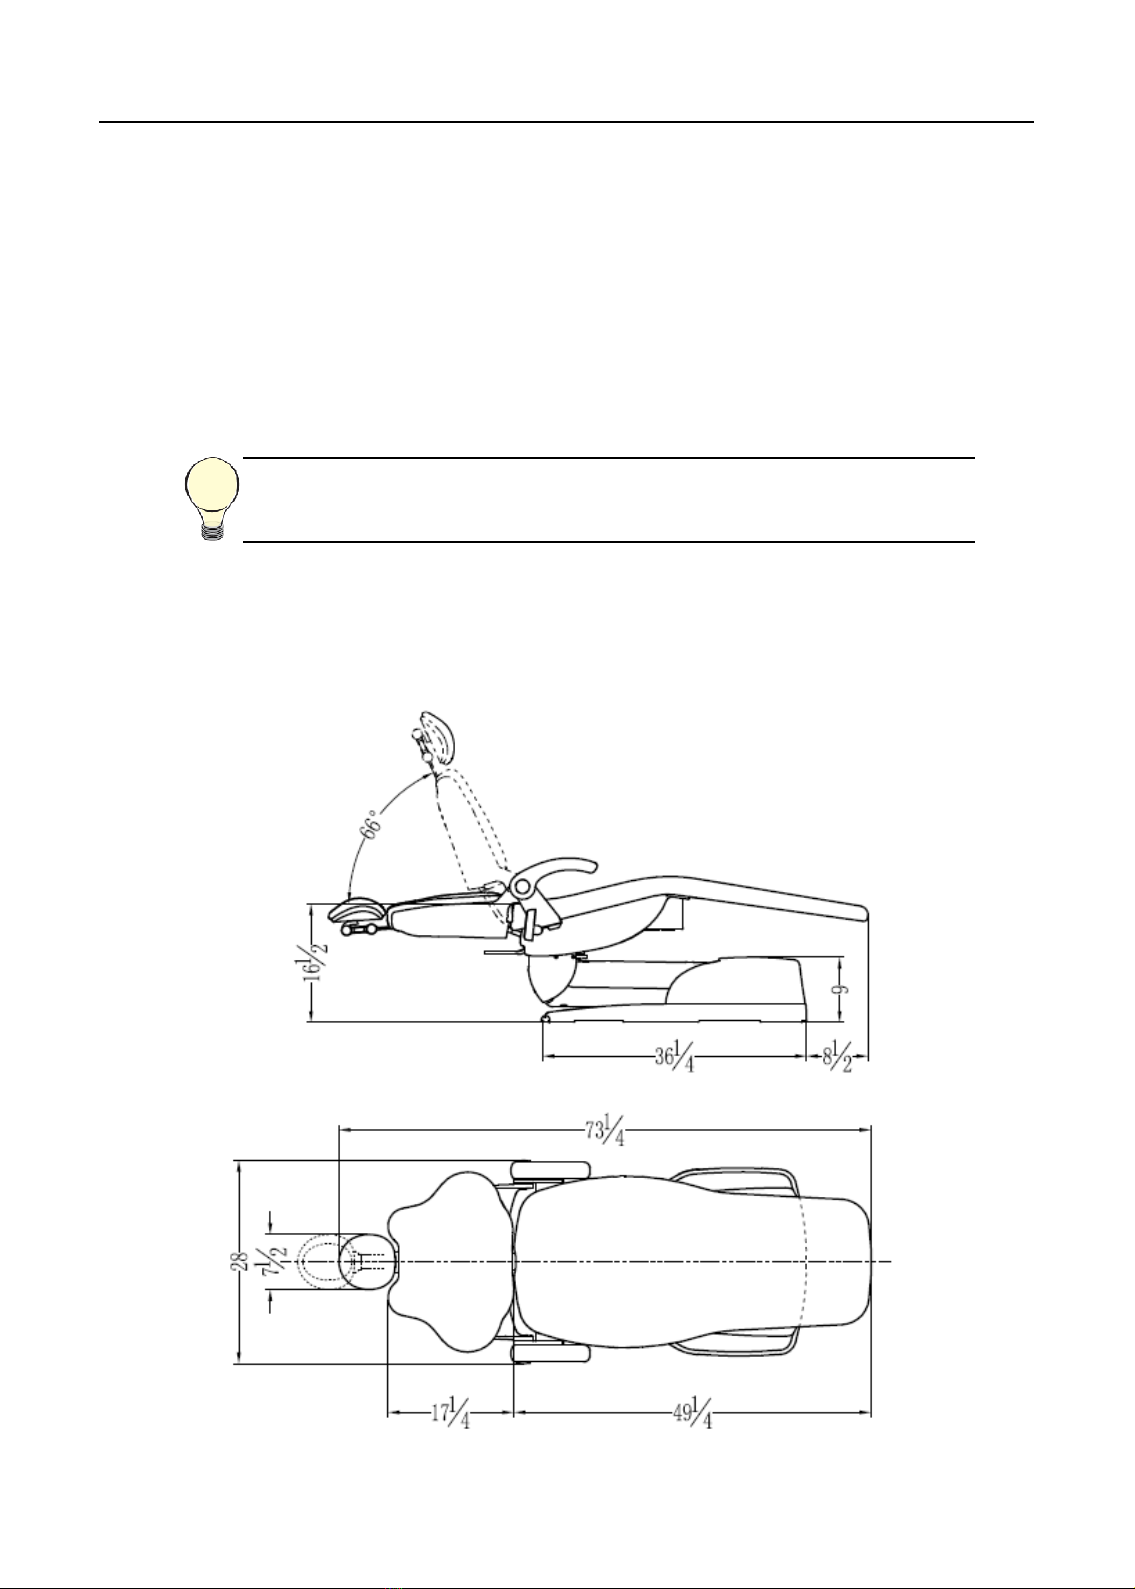
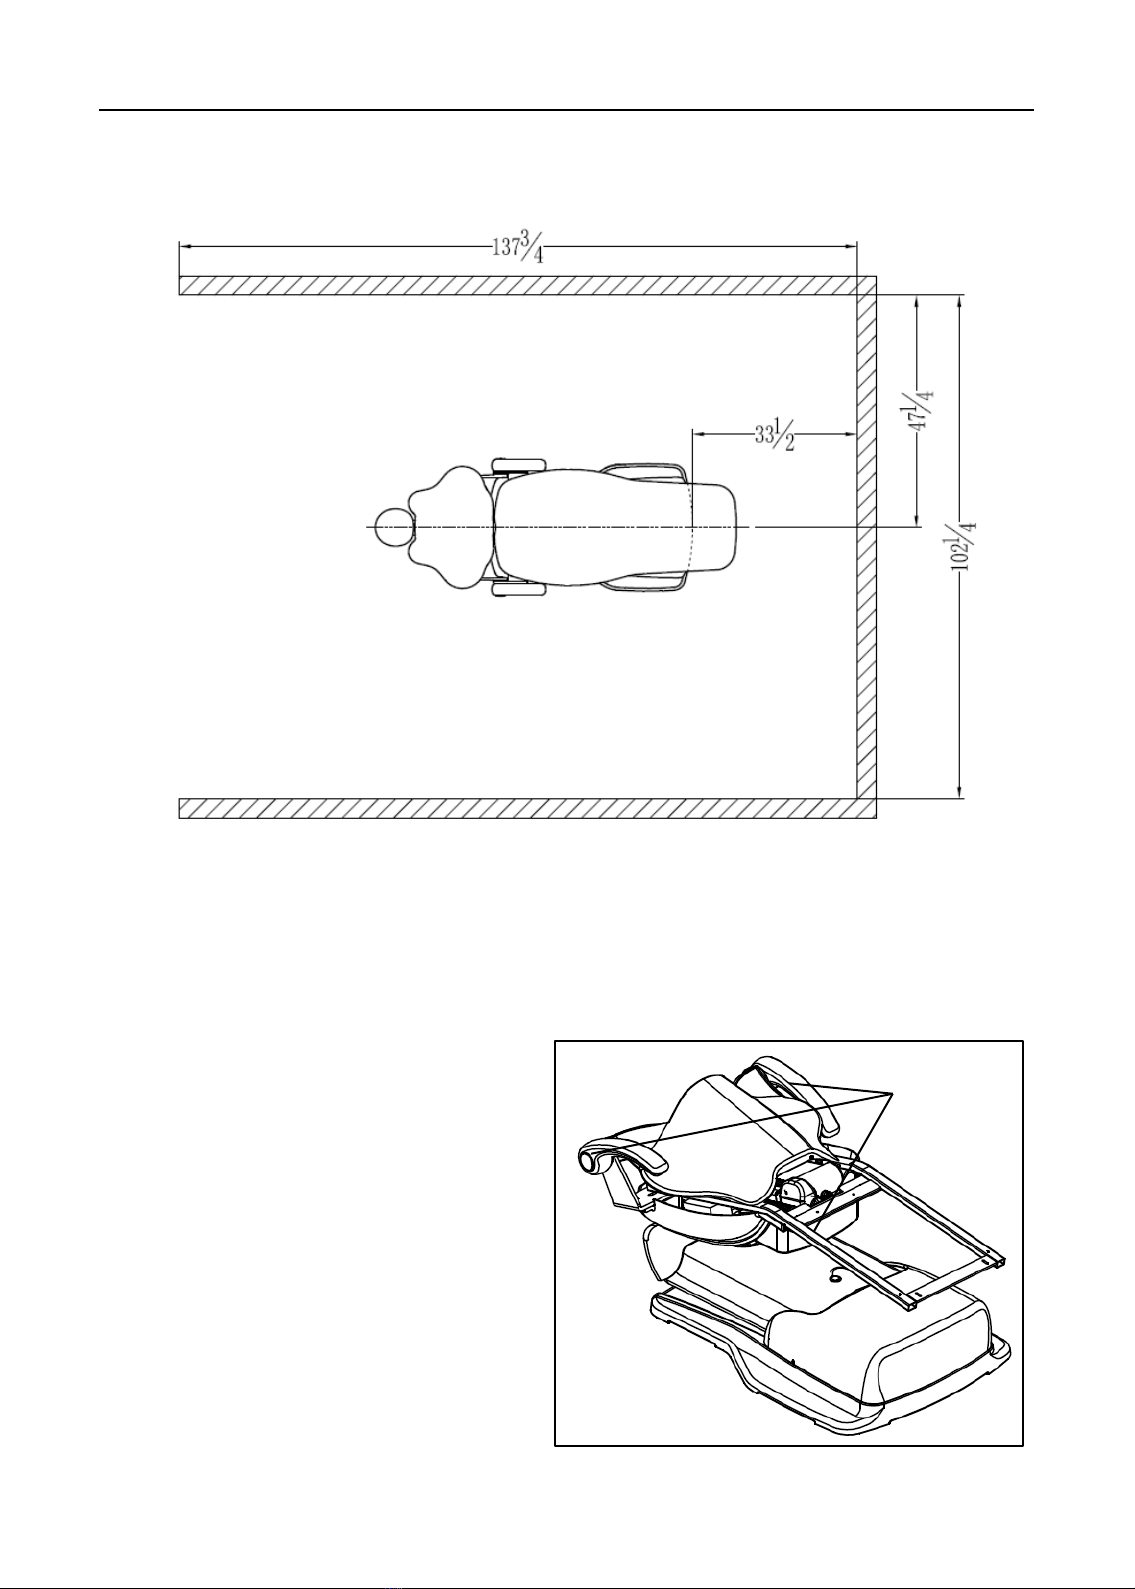
3.2 Size.…………………………………………………………4
4 Preparations………..……………………………………………………5
4.1 Attentions...…...……………………………………………………5
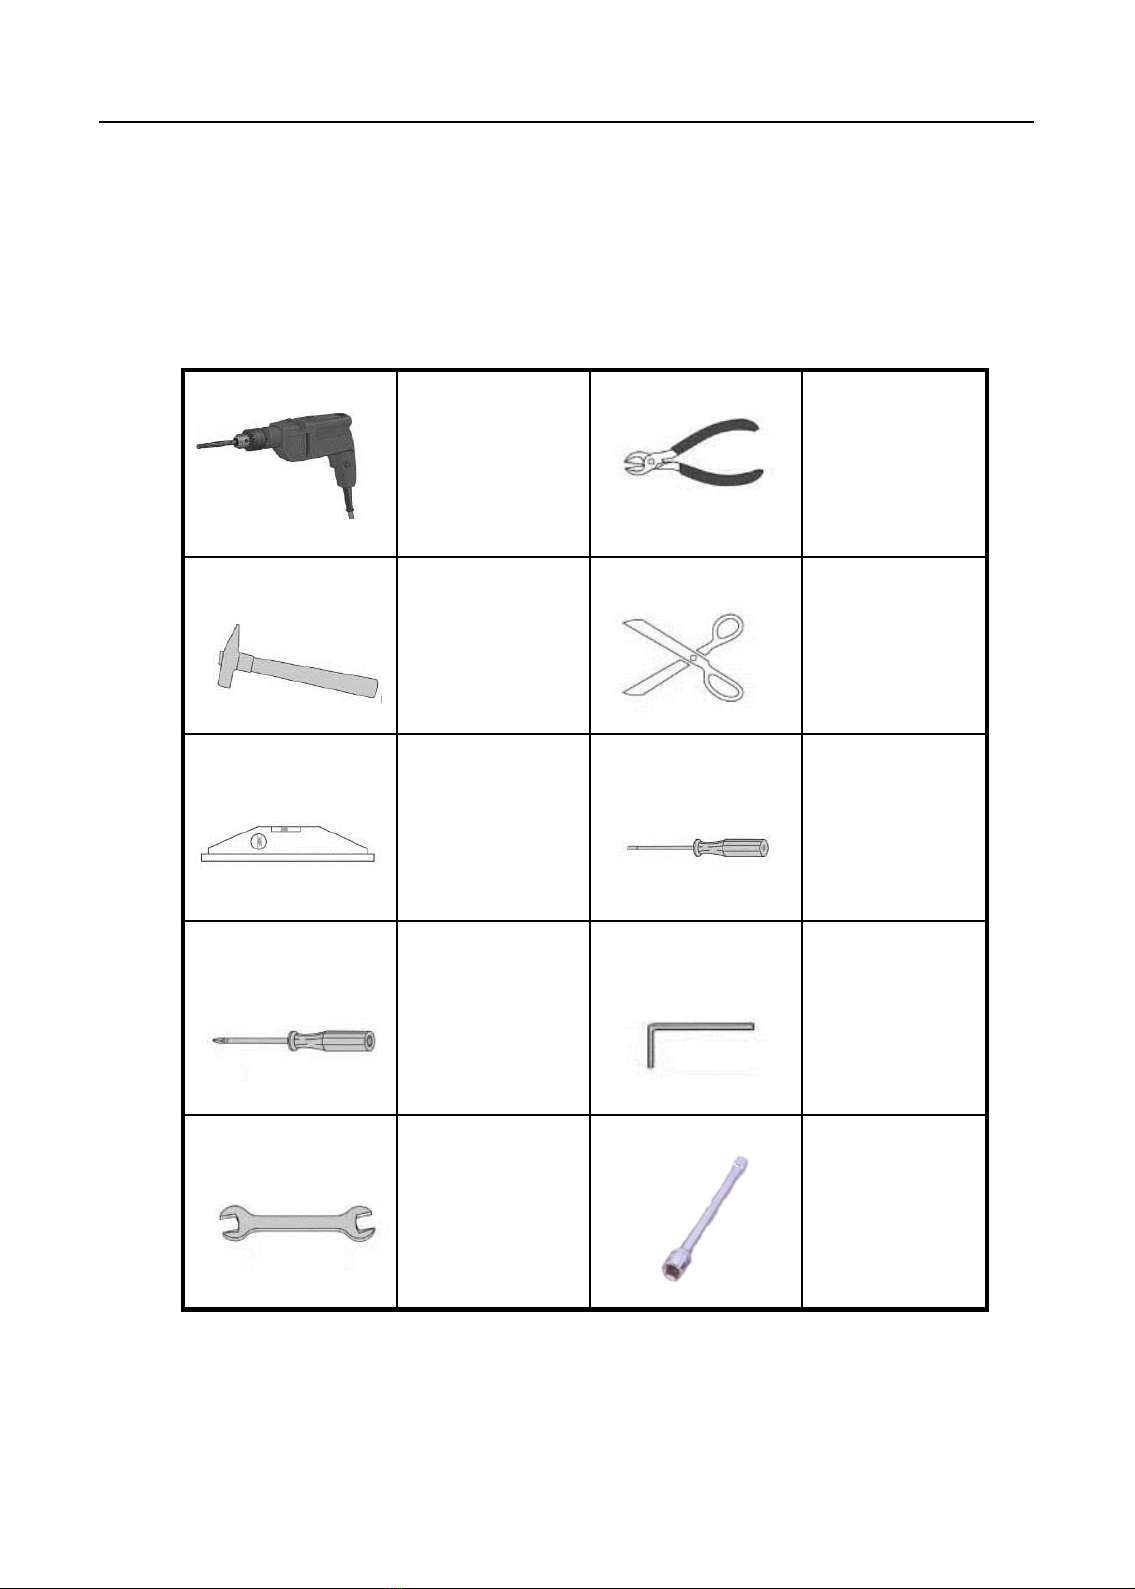
4.2 Tools recommended………………..…………….…………….6
4.3 Installation requirements………………………………………..7
5Installation…………………………………………………………7
5.1 Place the chair ...…………………………………………………7
5.2 Fix the chair………………………………………………………8
5.3 Install the backrest………………………………………………9
5.4 Install the headrest ……………………………………………10
5.5 Install backrest upholstery……...………………………………10
5.6 Install seat upholstery………………………………………11
6 Operations……………………………………………………………12
6.1 Power………….…………………………………………………12
6.2 Chair positioning…………………………………………13
6.2.1 Operate by foot control……………………………………13
6.2.2 Control panel and function set …………………………………14
6.2.3 System state ……………………………………………………14
6.2.4 Initial settings of the chair…………………...………...…………15
6.2.5 Initial settings description……………………………………16
6.2.6 Chair positions description……………………………………17
6.3 Dual articulating headrest……………………………………18
6.4 Armrest …………………………………………………………19
6.5 Chair rotation……………………………………………………20
7 Regulation & maintenance…………………………………………21
7.1 Remove the upholstery …………….……………………21
8 Reserved lines ………………………………………………………23
9 Upholstery Maintenance Instruction……………………………27
10 Connecting diagrams………...........…………………………………28

1
Symbol Explanation
Manufacturer EU representative
Producing date Serial number.
Place with care Keep dry
1 Introduction
1.1 Product information
1.2 Symbols explanation Table 1
Installation manual of AJ16US dental chair
•Name:Dental chair
•Model:AJ16US
•Working conditions:
①Ambient temperature:5 ℃~40 ℃;
②Relative humidity:≤ 80%;
③Air pressure:12.5~15.4psi;
④Nominal voltage:AC110 V±22 V;
⑤Nominal frequency:60 Hz±1 Hz;
P/N:8021442

2P/N:8021442
Symbol Explanation
Refer to attached document Notice
Avoid electric shock Backrest Down
Ground protection Backrest Up
Original position Chair Down
Set
Chair Up
Spitting position
Program Chair Position 1
Program Chair Position 2 Program Chair Position 3
P
0
Installation manual of AJ16US dental chair

3P/N:8021442
2 Composition
AJ16US dental chair (figure 1)combined with new design concepts ,
provide a good balance for usability ,simplicity and comfortability.
Figure 1 AJ16 US Dental Chair
Item Component Item
Component
1 Headrest 6 Armrest button
2 Backrest 7 Touch pad control panel
3 Armrest 8 Lifting arm
4 Seat 9 Junction box
5 Foot control
8 9
65 7
1 2 4
3
Installation manual of AJ16US dental chair

4P/N:8021442
3 Paremeters
3.1 Specifications
Load bearing
Patient bearing:Max 135kg
Tip: Specifications are subject to change without notice.
3.2 Size (unit: inches)
Installation manual of AJ16US dental chair

5P/N:8021442
4 Preparations
4.1 Attentions
Before install the unit, you should:
•Clear all the debris in the room ,and clean the floor thoroughly.
•Apply two manually operated valves for the air and water source.
•Exhaust the dirty water and air before connecting.
Before install the unit, please read the manual carefully:
•Input voltage AC110 V ,50/60 Hz.
•Make sure the dental unit is in good grounding .
•All the electrical components and connections should be made by an authorized
technician.
•Only fuse and accessories recognized by ADS technician can be used.
•This device should not operate in the environment of high temperature, high humidity,
vibration ,flammability, unbalance, or dusty.
•Only the authorized spare parts can be used in this device.
•This dental unit should not come into contact with any object in its operational range of
movement.
•This device can not be used in the environment of strong magnetic, electromagnetic.
Leather maintenance:
•1、No organic solvent or alkaline detergent (such as: gasoline、alcohol ,etc.), or the
leather will crack, be smelly or fade;
•2、No exposure, keep the room in good ventilation(exposure can cause the leather
crack,bad ventilation lead to go mouldy);
•3、Mention the patient to remove edged tools(like keys)before operation,to avoid
scratch the leather.
Installation manual of AJ16US dental chair

6P/N:8021442
4.2 Tools recommended
Electrical drill
Pincers
Hammer
Scissors
Leveling
instrument
Flat
-bladed
Screw driver
Phillip screw
driver
Allen wrench
Spanner
Hexagon
socket
wrench
The tools and instruments need to prepare before installation.
Installation manual of AJ16US dental chair

7P/N:8021442
4.3 Installation requirements
5 Installation
5.1 Place the chair
Holds
Installation manual of AJ16US dental chair
1. Remove all debris and cardboards
around the chair.
2. Hold the handrail and the front of
the frame, uplift the chair and
place the chair on the right place.
3. Remove binding belt and
packages.
4. Remove the front shell.
Size: inches

8P/N:8021442
5.2 Fix the chair
Attentions:
1.The chair must be fixed on the floor for ensuring stability, for it can
be seriously damaged by wrong fixation.
2.Check out the material of the floor on the installing place. Please
contact the authorized contractor to thickening the floor if its
thickness is less than 82 mm.
1、Power on and activate the unit.
2、Step the button on foot control , raise the unit.
3、Unit switched off and power disconnected.
4、Remove the cover and mark the installing position , then move the unit away.
Drill on the marked position, press the explosive bolt, then return the unit to its
position and tighten the screw.
Power switch
Installation manual of AJ16US dental chair

5.3 Install the backrest
9
1 Backrest
2 Fixing shaft
3 M6*20 Hexagon socket cap screw
assembly
4 GFM-1214-10 Slide bearing
5 Push rod
1
Figure 2
P/N:8021442
2
3
5
4
Pass the fixing shaft through the
backrest push rod,fix the shaft
on backrest with the cap screw
assembly.
Tool:
5mm Allen wrench
Installation manual of AJ16US dental chair

1 2 3
Figure 4
5.4 Install the headrest
10 P/N:8021442
Installation manual of AJ16US dental chair
Push the headrest glidebar into
the slot of the backrest.
Figure 3
5.5 Install backrest upholstery
1 Metal backrest
2 Fixing shaft
3 Backrest upholstery
When installing the upholstery, you should put the upholstery on the backrest
with the shaft head pass through corresponding keyholes of the upholstery,
then push the upholstery in force till it’s fixed.

5.6 Install the seat upholstery
11
Install the seat upholstery
Put the upholstery onto the chair frame, lock the bracket and the rear end of the chair
frame together, and tighten the two screws on the front end of the chair frame.
Figure 5
P/N:8021442
Installation manual of AJ16US dental chair
C
A B
A
Fixing bracket
B
Chair frame
C
M5*16 hex cap screws

6 Operations
6.1 Power
The power switch of the power box controls power supplying of the dental chair and its
delivery system.
Switch on and you can get the power,switch off for not using in a long term, or before
maintenance .
12 P/N:8021442
Installation manual of AJ16US dental chair
Figure 6

6.2 Chair positioning
You can operate the chair manually or by foot control.
6.2.1 Operate by foot control
Raise or low the chair by pressing base up/down button , step on the up/ down
arrow on the foot control till the chair is in best position.
Move the backrest by pressing backrest up/down button , step on the left/right arrow
till the chair is in best position
13
Figure 7
P/N:8021442
Original position
Program Chair
Position 1
Program Chair
Position 2
Set
Spitting position
Backrest down
Backrest up
Chair up
Chair down
0
1
2
LP
P
Installation manual of AJ16US dental chair

Original position
Program Chair
Position 1
Program Chair
Position 2
Program Chair
Position 3
Set
Spitting position
Backrest down
Backrest up
Chair up
Chair down
6.2.2 Control panel and function set
14
Figure 8
P/N:8021442
6.2.3 System state
If the indicator light is bright on the control panel, it indicating that the
system is normal,and you can operate normally.
0
LP
P
Installation manual of AJ16US dental chair

15
6.2.4 Initial settings of the chair
P/N:8021442
Installation manual of AJ16US dental chair
Caution: Electric motor system shall have the initial settings in
following situations:
First installation.
Motor replacement.
Main board replacement.
Limit switch readjustment or replacement.
Abnormal movement .
Electric motor system initial settings specification:
Press the “O” button on the main control panel of dentist unit to descend the chair motor
till the lower limit switch is triggered, raise the backrest motor till the higher limit switch
is triggered. System initialize automatically ,it can be normally performed after
initialization finished .
Hydraulic system initial settings specification :
1. Press ”P” button about 12 second until the buzzer sound 2 short beeps, enter
original setup status; press P1, the buzzer sound 1short beep, escape setup status.
This steep eliminates the original stroke parameters.
2.Press “P” button about 12 second until the buzzer sound 2 short beeps, enter
initial setup status , press the four moving chair button to make backrest up and
press”0”, and then press the four moving chair button again to make chair up to
the highest and the backrest is on the lowest. At this time, press ”LP”and then
finish the setting.

16 P/N:8021442
Caution :
When setting up the system, do not extent the maximum range of the
cylinder to prevent the hydraulic pump from not working properly!
Process or or
•Move the chair and backrest to the working position, and adjust dental light to the
desired condition ( On or Off), press the “P” button(12S),the indicator light is
on (beep 2 time),(loose button so as not to enter the original setting state),
enters the setup procedure.
•Press the “P1”button ,and then press the “P “button one time again,(beep1-2times),
setup finished and escape the setup procedure.
•P2, P3 position setup are same step as the P1.
P P
Installation manual of AJ16US dental chair
Caution: Hydraulic system shall have the initial settings in following
situations.
First installation or replacement of mainboard .
Insert/replace/repair any position feedback potentiometer or wiring.
Reset or replace the limit switch..
Reset the motion range of the chair.(Disabled to move or cannot move to
desired position.)
6.2.5 Settings of programming memory position

17 P/N:8021442
6.2.6 Chair positions description
NOTE: If you press the button continuously, when the chair backrest
reach the limit position, it will automatically stop the movement.
c. Chair up
Press this button continuously and the chair will move upwards. When the backrest
reach the desired position, stop pressing the button and the backrest will stop
immediately.
d. Chair down
Press this button continuously and the chair will move downwards. When the
backrest reach the desired position, stop pressing the button and the backrest will
stop immediately.
Installation manual of AJ16US dental chair
a. Backrest Up
Press this button continuously and the backrest will move upwards. When the
backrest reach the desired position, stop pressing the button and the backrest will
stop immediately.
b. Backrest Down
Press this button continuously and the backrest will move downwards. When the
backrest reach the desired position, stop pressing the button and the backrest will
stop immediately.
NOTE: If you press the button continuously, when the chair backrest
reach the limit position, it will automatically stop the movement.
NOTE: If you press the button continuously, when the chair backrest
reach the limit position, it will automatically stop the movement.
NOTE: If you press the button continuously, when the chair backrest
reach the limit position, it will automatically stop the movement.
Table of contents
Other ADS Dental Equipment manuals
Popular Dental Equipment manuals by other brands

KaVo
KaVo ESTETICA E70 Vision Short instructions for use

Air Techniques
Air Techniques ScanX Duo Touch J1200 Installation and operating instructions

Sam
Sam AXIOQUICK manual

Instrumentarium
Instrumentarium Orthoceph OC100 D Upgrade manual

KERR
KERR elements IC Instructions for use

parkell
parkell Foramatron D645 Instructions for use

Dentsply Sirona
Dentsply Sirona LEDview Plus operating instructions

Dabi Atlante
Dabi Atlante MICRO MOTOR INTRA 32MM C SPRAY TB owner's manual

Centrix
Centrix NoMIX Instructions for use

Dentsply Sirona
Dentsply Sirona CEREC AC operating instructions

DENTSPLY
DENTSPLY Cavitron Plus Ultrasonic Scaler Directions for use

Belmont
Belmont Voyager 2 installation instructions