Advance mobility Baby Jogger Freedom User manual
©2021 NWL0001236130C 08/21
ASSEMBLY INSTRUCTIONS
INSTRUCCIONES DEL ENSAMBLAJE
INSTRUCTIONS D’ASSEMBLAGE
INSTRUCCIONES DE MONTAJE
ISTRUZIONI PER IL MONTAGGIO
GEBRAUCHSANLEITUNG
MONTERINGSINSTRUKTIONER
KOKOAMISOHJEET
MONTAGEINSTRUCTIES
INSTRUKCJA MONTAŻU
MONTERINGSANVISNING
NÁVOD NA MONTÁŽ
SAMLINGSANVISNINGER
IMPORTANT: Read carefully and keep for future reference.Your child’s safety may be aected if you
do not follow these instructions.
Pushchair
Cochecito
Poussette
Silla de paseo
Passeggino
Buggy
Klapvogn
Rattaat
Wandelwagen
Wózek spacerowy
Sittvagn
Kočárek
Sportsvogn
Freedom
2
1
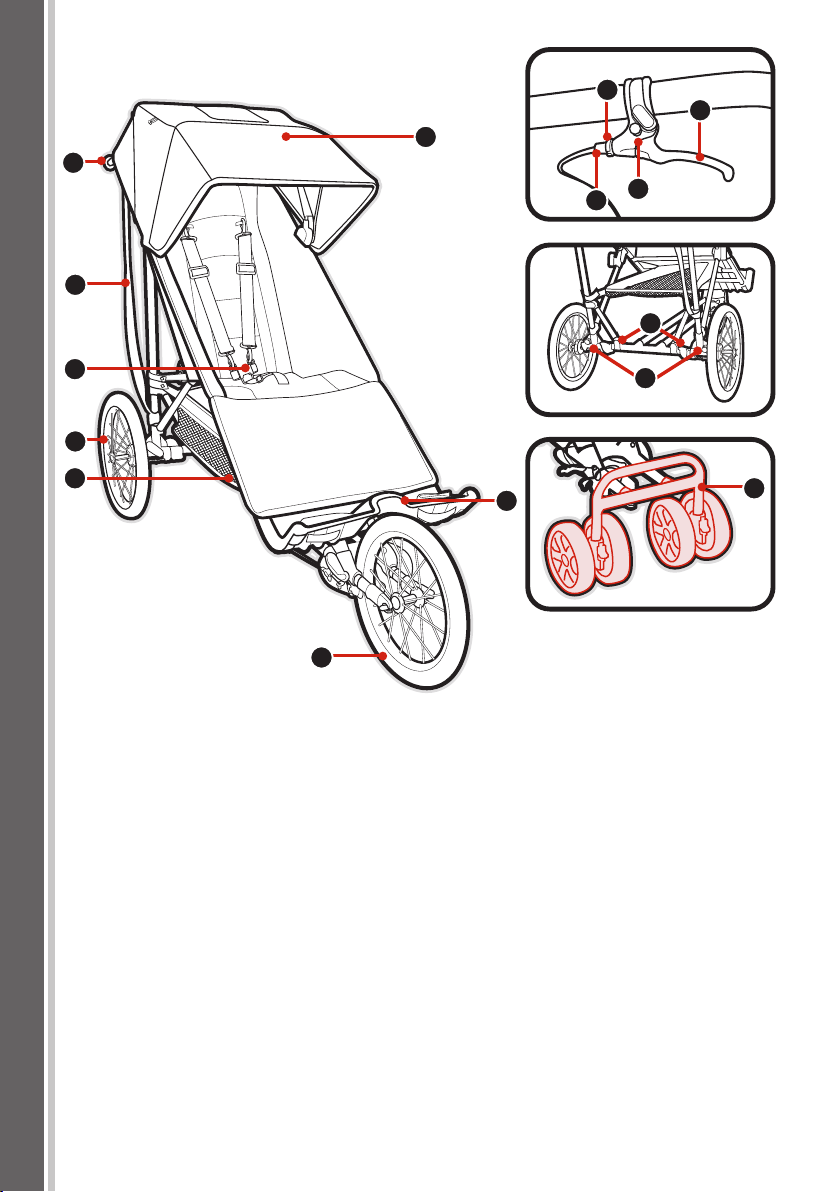
1 Handlebar 10 Cylinder Rin
2 Canopy 11 Parkin Button
3Wrist Strap 12 Brake Handle
4Harness Buckle 13 Rear Brakes
5Rear Wheel 14 Rear Wheel Release Button
6Storae Basket 15 Front Swivel Wheels
7Fixed Wheel
8 Footplate
9Small Rin
10
EN
7
8
2
4
3
5
9
11
12
14
15
13
6
3
1 Handlebar 10 Cylinder Rin
2 Canopy 11 Parkin Button
3Wrist Strap 12 Brake Handle
4Harness Buckle 13 Rear Brakes
5Rear Wheel 14 Rear Wheel Release Button
6Storae Basket 15 Front Swivel Wheels
7Fixed Wheel
8 Footplate
9Small Rin
2
1
6
3
5
4D-rin
D kroužek
Anillo D
D-renas
Pierścień D
Anello a D
Anneau en D

4
CLICK
7
9
8
CLICK

5
14 15
10
12
13
11
11
12
10
9

6
17 18
19
20 21
16

7
22
23 24
25
26 27
8
29
31
30
28
32

9
33 34
35
36

10
EN WARNING
IMPORTANT - Read carefully and keep
for future reference.
Your passener’s safety may be
aected if you do not follow these
instructions.
WARNING
• Never leave the passener
unattended.
• Always use the restraint system.
• This product is not suitable for
runnin or skatin.
• Ensure that all the lockin devices
are enaed before use.
• To avoid injury, ensure that the
passener is kept away when
unfoldin this product.
• Do not let the passener play with
this product.
• Do not use if any part of the
pushchair is broken, torn or missin.
ADDITIONAL SAFETY INFORMATION
• This pushchair seats one passener.
NEVER allow more than one
passener at a time on this
pushchair.
• Advance Mobility Freedom is
desined for an older child or youn
adult 10 years +, with a maximum
weiht of 90 k (200 lb).
• Total weiht load recommended
for this pushchair is 90 k (200 lb)
in the seat, 1 k (2.2 lb) in the seat
pocket and 4.5 k (10 lb) in the
basket.Excessive weiht may cause
a hazardous unstable condition to
exist.
• Parcels or accessory items, or both,
placed on the unit may cause the
unit to become unstable.
• Any load attached to the handle
and/or on the back of the backrest
and/or on the sides of the vehicle
will aect the stability of the vehicle.
• Lock the brakes before loadin
and unloadin the passener and
whenever the pushchair is not
movin.
• Ensure that the brake is properly
enaed by movin the pushchair
slihtly back and forth.
• Pushchair is not meant to be used
for transportin passener up or
down stairs or escalators.Damae
resultin to pushchair will not be
covered under warranty.
• Accessories which are not approved
by Advance Mobility shall not be
used.
• Watch out for cars - never assume
that a driver can see you and your
passener.
• The passener shall remain seated
(no standin in the pushchair).
• Always use your wrist strap – these
pushchairs can really roll, and the
wrist strap ives you control if you
should slip or fall down.
• Use only replacement parts supplied
or approved by Advance Mobility.
• In case of a serious incident with
the product, you should inform the
manufacturer and the competent
authority in your country.
• Be environmentally aware and
dispose of your pushchair properly.
Disposal is subject to national and
local requirements.

11
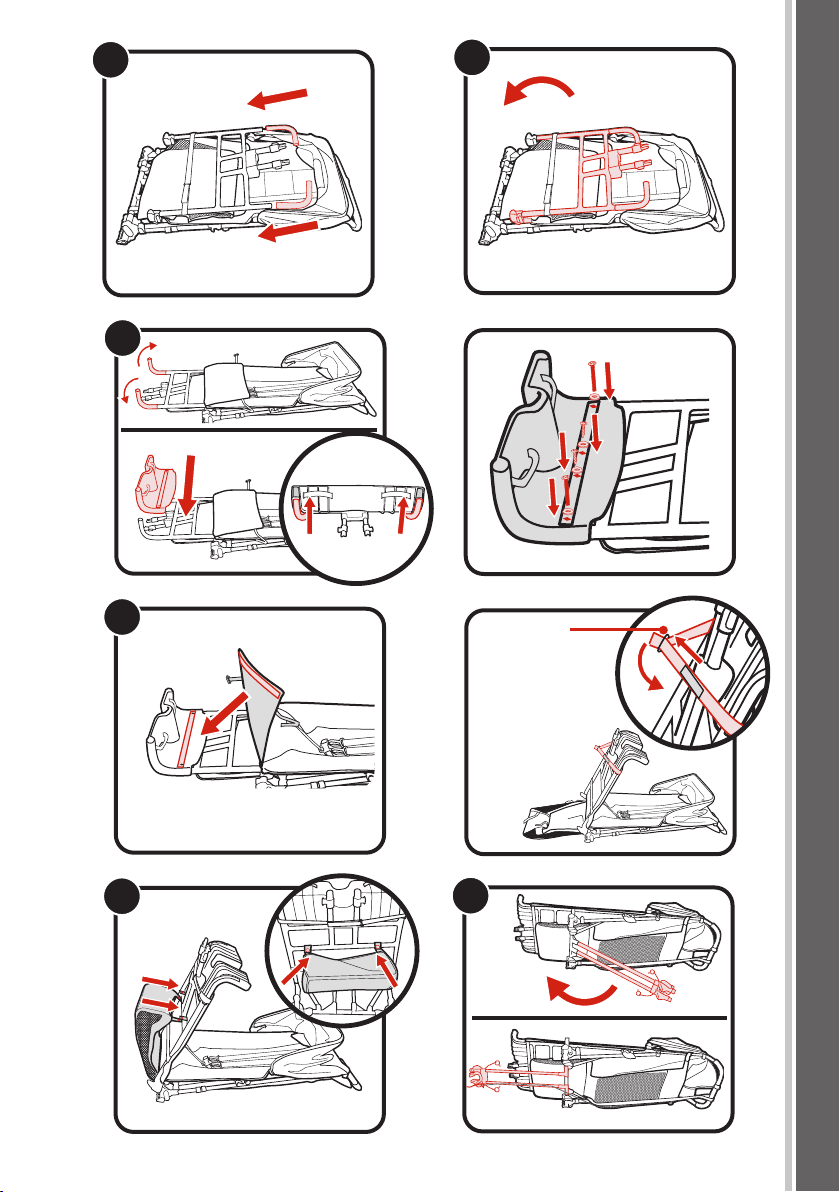
FRAME
1 Unpack the pushchair frame from the
box and set the wheels aside. If not
assembled, attach L shaped tubes to
frame as shown.
2 Unfold frame.
3 FOOTPLATE
• Rotate lower end tubes of pushchair
frame.
• Insert footplate onto the pushchair
frame.
• Secure footplate onto pushchair
frame usin the enclosed screws.A
phillips screwdriver will be needed.
Note: Use tapered screws to secure
the center of the footplate.
4 Attach foot end of seat pad to front of
footplate with hook and loop patches.
Wrap straps around bottom of
footplate, insert strap throuh D-rin
and attach hook and loop patches.
5 Check that basket is attached to foot
frame with snap straps as shown.
6 Swin bottom frame tubes toward
footplate.Insert bottom of footplate
into front tube connectors.Push up to
secure snap locks on both tubes.
7 Place the pushchair in the upriht
position. Swin side braces down to
mountin brackets. While pushin
latch button, slide side brace over
mountin bracket, release when pin
is alined with hole in bracket. Secure
side brace clamp.
Repeat on both sides.
WARNING: Ensure that all the lockin
devices are enaed before use.
FRONT WHEEL
8 Installation
• To install front wheel, lay pushchair
back so handle is restin on floor.
Open the calipers by flippin the
caliper lever toward the rear.
• Insert the front wheel assembly into
the front frame tubes until pin holes
are alined.
• Insert wheel pin on each side.
• Close caliper by flippin the caliper
lever toward the front.
Removal
• Reverse installation steps.
FRONT SWIVEL WHEELS
9 Installation
• To install front swivel wheels, lay
pushchair back so handle is restin
on floor.
• Insert the front wheel assembly into
the front frame tubes until pin holes
are alined.
• Insert wheel pin on each side.
Removal
• Reverse installation steps.
SWIVEL FEATURE
10 Push the swivel lock button up to lock
the front wheel to a fixed position.
11 Press the swivel lock button down
to allow the front wheel assembly to
swivel.
WARNING: When loadin and
unloadin passener, lock the front
wheels in a fixed position.Althouh
the front wheel of your pushchair
locks, it is not intended for join or
exercise purposes.
REAR WHEELS
12 Installation
• Alin the rear wheel axle with the
wheel mount on the pushchair
frame and insert it into the wheel
mount until it locks into place.You
will hear a click.
• Gently pull on the rear wheel to
make sure it is properly attached.
13 Removal
• While pressin down on the wheel
release button, ently slide the rear
wheel out of the wheel mount.
HAND BRAKE
Hand Brake with Parkin Button
14 To use the parkin button feature,
squeeze the brake handle (12) and
push the park brake button (11).
WARNING: Lock the brakes before
loadin and unloadin your passener
and whenever the pushchair is not
movin.
EN

12
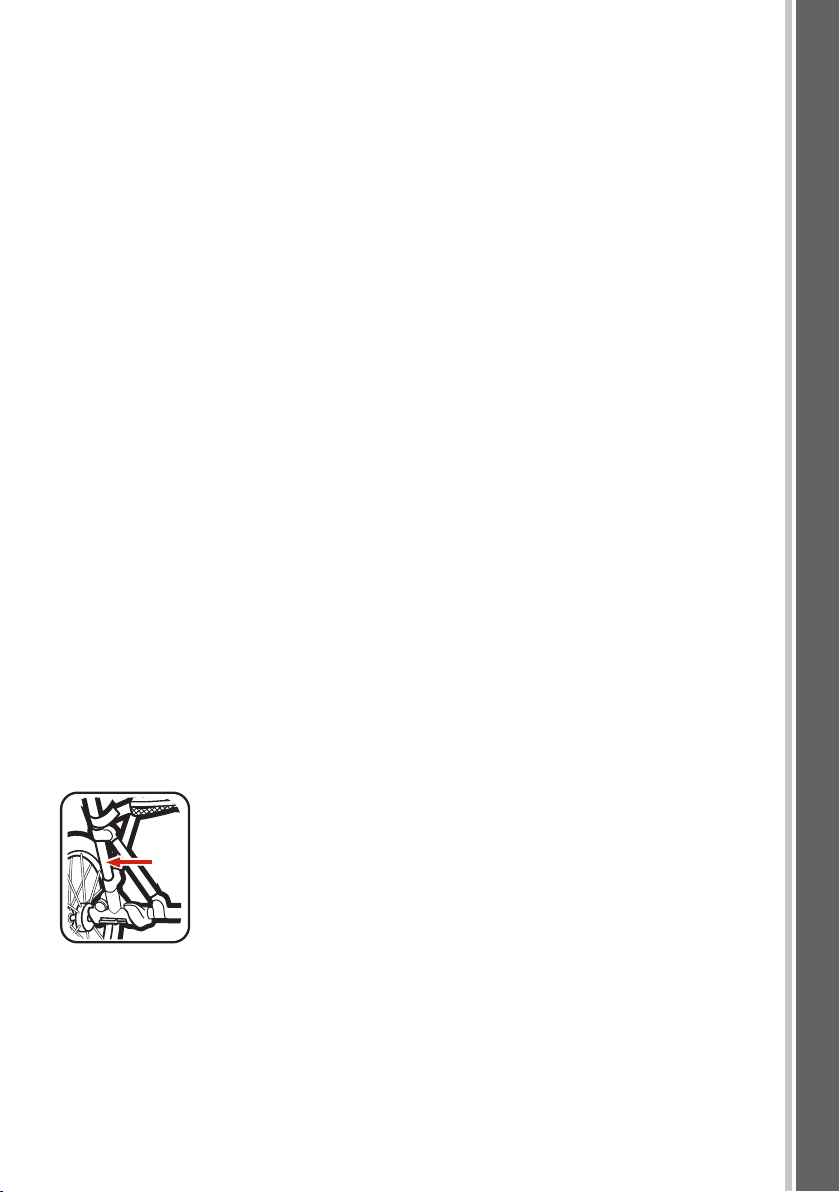
EN Adjustin the Brake
15 If you don’t have ood brakin action,
squeeze the brake handle five or six
times. If the problem persists, loosen
the brake’s cylinder rin (10) to adjust
the small rin (9), and then move the
small rin (9) away from the handle
to tihten the cable (Please do not
over tihten!).To lock the rins, tihten
the cylinder rin (10) aainst the
handle while holdin the small rin
(9) in place.
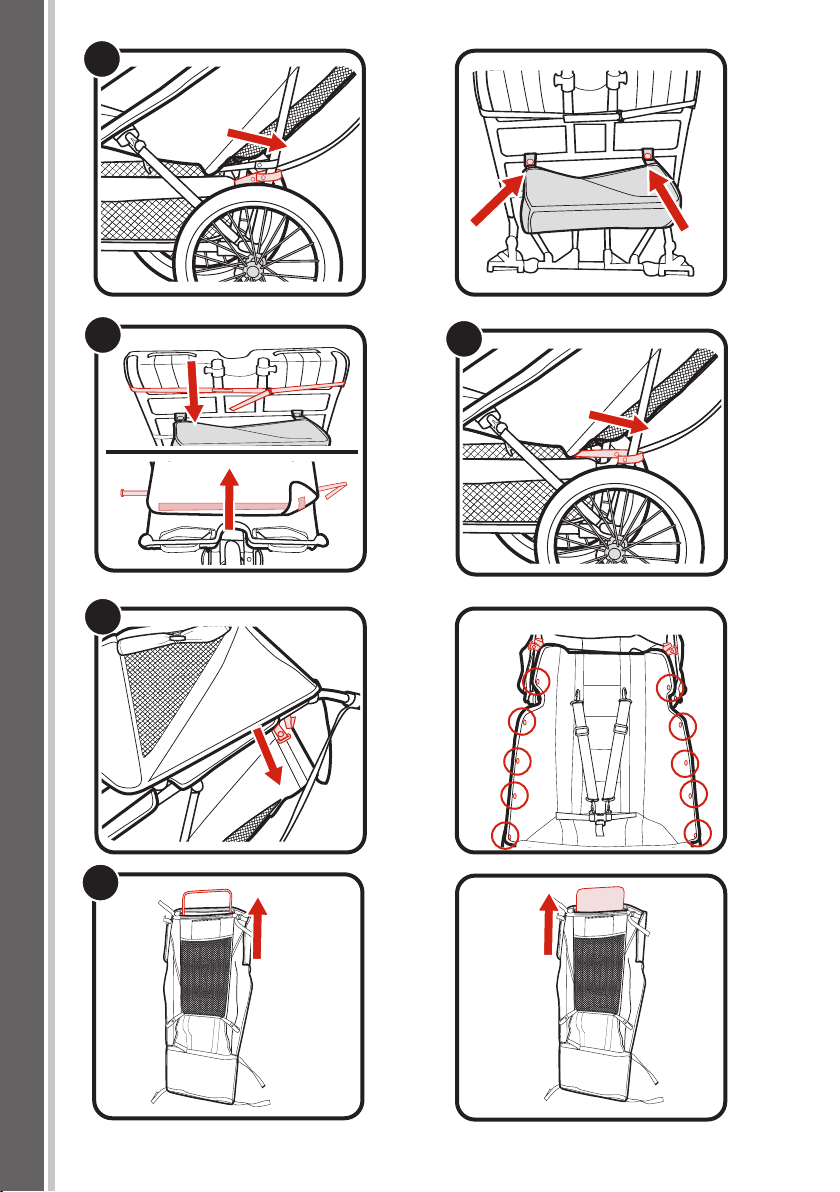
REAR PARKING BRAKES
16 Push brake pedals down to enae
brakes and lift up to release.
CANOPY
17 Pull forward to open canopy, push
backwards to close canopy.
18 Roll flaps up and secure as shown to
open windows and side flaps.
19 Roll flaps on top and sides of canopy
and secure with straps as shown.
ADJUSTING SAFETY HARNESS
20 Clip shoulder straps to upper fabric
loop that best suites passener then
attach lower clips to buckle bracket.
21 Adjust center safety strap as
necessary for passener comfort.
WARNING: Avoid serious injury from
fallin or slidin out.Always properly
adjust and fasten safety harness.
WARNING: Always use the crotch
strap in combination with the
shoulder straps and waist belt.
USING SAFETY HARNESS
22 Ensure shoulder strap clips are
attached to waist strap clips.
23 Insert connected harness and side
strap buckles into the sides of the
crotch buckle.
24 Press buttons on top and bottom of
crotch buckle to release.
25 Adjust waist and crotch straps as
necessary for passener comfort.
RECLINE THE SEAT
26 Adjust seat straps to desired deree
of recline.
27 Pull on strap when you want to return
the seat to its upriht position.
WARNING: When makin
adjustments to the pushchair seat,
make sure passener’s head, arms,
and les are clear of movin seat
parts and pushchair frame.
BASKET REMOVAL
28 Disconnect straps from around frame
at rear and bottom of frame as
shown. Reverse steps to re-attach.
REMOVING THE SEAT PAD
29 From the underside of the seat,
unfasten the hook-and-loop and slide
the strap throuh the D-rin and
disconnect foot end of seat pad from
footplate.
30 Disconnect snap strap on rear of seat
as shown.
31 Disconnect snaps and straps from
frame at top of seat pad and 10
snaps down sides of seat pad.
32 Remove wire and plastic board from
pocket in rear of seat pad. Reverse
steps to reattach.
WARNING: Make sure that all
fasteners are properly closed when
re-attachin the seat fabric.
FOLD STROLLER
33 Push down to open snap locks on
both tubes.
34 Press button on riht tube and
remove bottom of footplate from
tube connectors.
35 Swin side braces down to mountin
brackets. While pushin latch button,
slide side brace o of mountin
bracket, and rotate side braces to rear
of seat.
Repeat on both sides.
36 Fold seat back forward as shown.
IN MOTION
Steerin
• Steerin your pushchair is simple: it’s
balanced to turn with just a liht touch
on the handlebar. For tihter turns,
push down on the handlebar and raise
the front wheel to steer.

13
CARE AND MAINTENANCE
To preserve the lonevity of your
pushchair, it is important to perform
simple, reular maintenance.From time
to time, make sure that the joints and
foldin areas are still in ood condition.If
you hear any squeakin or feel tension,
you can take your pushchair to a local
bike shop for added lubrication.All
repairs should only be carried out by an
authorized dealer.
WASHING
Seat Fabric
• You can machine wash your
pushchair’s seat in cold water with a
mild deterent.
• Be sure to remove the metal frame
and plastic boards from the seat
before washin.
• Do not use solvents, caustic or abrasive
cleanin materials.
• To minimize shrinkae, simply reattach
the seat to the frame to dry.
• Do not press, iron, dry clean, tumble
dry or wrin the fabric.
• If the seat covers need to be replaced,
only use parts from an Advance
Mobility Authorized Dealer.They are
the only ones that are uaranteed to
have been safety tested and desined
to fit this seat.
• DO NOT machine wash your
pushchair’s canopy.
Plastic/Metal Parts
• Wipe clean usin a mild soap and
warm water.
• You must not remove, dismantle
or alter any part of the seat foldin
mechanism or brakes.
Wheel Care
• The wheels can be cleaned usin a
damp cloth. They will need to be dried
completely with a soft towel or cloth.
• Moisture – especially from the beach –
can rust the wheel bearin case.
Sprayin reularly with a silicone
lubricant will keep your wheels lookin
healthy.
• Also, if you use your pushchair for lare
amounts of miles, your Pushchair will
benefit from a yearly visit to the bike
shop for wheel alinment. Refer to
the number on the tire wall for the
optimum pressure for your tires.
STORING
• Sunshine can fade seat fabric and
dry out tires, so storin your pushchair
indoors will prolon its ood looks.
• DO NOT store outside.
• Ensure that the pushchair is dry before
storin for proloned periods.
• Always store the pushchair in a dry
environment.
• Store the pushchair in a safe place
when not in use (i.e.where children
cannot play with it).
• DO NOT place heavy objects on top of
the pushchair.
• DO NOT store the pushchair near a
direct heat source such as a radiator or
fire.
EN
Wrist Strap
• Make sure wrist strap is around your
wrist whenever your passener is in
the pushchair. The Advance Mobility
pushchair is lihtweiht and ready to
roll – with or without you – and the
wrist strap helps you ain control over
your pushchair.
In the Dark
• Since we are concerned about the
safety of you and your passener, we
recommend that you don’t use your
pushchair at niht. However, if you
choose to, please attach reflective
strips to the wheel spokes and the seat.
Bicycle lihts can also be mounted on
the handlebar.

14
1. ADVANCE MOBILITY™ PUSHCHAIRS’ LIFETIME WARRANTY ON PUSHCHAIR FRAMES*
Newell Rubbermaid UK Services Ltd, Halifax Avenue, Fradley Park, Lichfield, Staordshire, WS13 8SS (“Newell”)
oers a lifetime warranty on manufacturer defects (i.e.defects that occurred durin the production process)
reardin the frame of the pushchair for purchases made in the UK from the date of conclusion of the
purchase contract.“Lifetime” means that the defects described above are covered for the entire time of use
of the pushchair by the first-time user for children within the maximum weiht limit as stated specified in the
user manual.The first-time user must be in possession of the oriinal purchase receipt.Required is a proper
use, handlin and care of the pushchair in accordance with the user manual.In the event that the first-time
user discovers a defect in the frame of the pushchair that is covered by the Lifetime Warranty, he/she must
assert the resultin warranty claim aainst Newell within 6 years of this discovery of the defect.
THIS LIFETIME WARRANTY DOES NOT COVER:
• Corrosion or rust;
• Damaes due to incorrect installation or assembly of third party parts or accessories;
• Intentional damaes or damae due to misuse, accident, nelience or damaes due to use on stairs or
escalators;
• Attempts at repair by unauthorised persons or retailers; for information on authorised persons and retailers
please contact the Newell consumer services at (http://babyjoer.eu/contact-us)
• Commercial use.
CONDITIONS FOR CLAIMING THE LIFETIME WARRANTY:
• Presentation of the oriinal purchase receipt by first-time user;
• Presentation of serial number and manufacturin date which can be found on the
frame of the pushchair;
• Lifetime warranty claims must be reported to the consumer service at
(http://babyjoer.eu/contact-us), presentin the purchase receipt, serial number,
manufacturin date and an informative description of the manufacturer defect,
includin relevant imaes and/or video;
• In case of lifetime warranty claims meetin the above requirements (“Valid Warranty
Claim”), Newell will provide the first-time user with a pre-paid shippin label for
returnin the defective pushchair;
• If Valid Warranty claims are made outside of the country where the pushchair has been purchased,
additional shippin chares for the return of the pushchair which may apply will be at the consumer’s
expense;
• In case of valid warranty claims Newell will replace the aected component or the entire pushchair at its
discretion.
2. ADVANCE MOBILITY™PRODUCTS 2-YEAR WARRANTY
This warranty is oered in relation to the other components of the Advance Mobility™ pushchairs as well as
car seats and other accessories for 2 years from the date of purchase.
Proof of Purchase is required to make a warranty claim and the warranties are only iven to the oriinal first-
time user.
This warranty does not cover normal wear and tear; corrosion or rust; incorrect assembly or the installation
of third party parts or accessories not compatible with the oriinal desin; accidental or intentional damae;
misuse or nelect; commercial use; improper storae/care of the unit.
3. STATUTORY RIGHTS
Consumers have statutory rihts in relation to the Advance Mobility™ products and those rihts are not
aected by the commercial warranties oered in relation to the Advance Mobility™ pushchairs and other
accessories.
UK Advance Mobility™ WARRANTIES
15
US
Advance Mobility warrants that the frame is free of manufacturer defects for the
lifetime of the product.Manufacturer’s defects include but are not limited to the
breakin of welds and frame tube damae.Textile or soft side materials and all other
components shall be warranted for one year from the date of purchase (except for
tubes and tires).Proof of purchase is required to make a warranty claim and the
warranty is only extended to the oriinal purchaser.
THIS WARRANTY DOES NOT COVER:
• Normal wear and tear
• Corrosion or rust
• Incorrect assembly, or the installation of third party parts or accessories not
compatible with the oriinal desin
• Accidental or intentional damae, abuse or nelect, or use on stairs or escalators.
• Commercial use
• Improper storae/care of the unit
This warranty specifically excludes claims for indirect, incidental, or consequential
damaes.The implied warranties of merchantability and fitness for a particular
purpose is accordin to the specific warranty period for this model unit at time
of purchase.Some states do not allow the exclusion or limitation of incidental or
consequential damaes, so the above limitations or exclusions may not apply to you.
This warranty ives you specific leal rihts, and you may also have other rihts which
vary from state to state.To know what your leal rihts are in your state, consult your
local or state consumer aairs oce or your State’s Attorney General.
If your stroller was purchased outside of the United States, please contact the
distributor in the country nearest you.Their contact information can be found on our
website at http://www.babyjoer.com. Claims for warranty outside of the country in
which the product was purchased may incur shippin chares.
NOTE: When contactin Advance Mobility distributor reardin your
stroller, please have your stroller’s serial number ready.It can be
found on the inside of frame.
Advance Mobility’s Limited Lifetime Warranty:
Customer Care Contact Information:
E-Mail: customerservice@babyjoer.com
Call: 1-800-241-1848 8:30am - 5:30pm EST, Mon - Fri.
Fax: 1-804-262-6277
Mail: Newell Brands
4110 Premier Drive
Hih Point, NC 27265
www.babyjoer.com
PLEASE DO NOT CONTACT THE PLACE OF PURCHASE FOR PARTS OR WARRANTY ISSUES

16
1
1Manillar 10 Anillo del cilindro
2Capota 11 Botón de estacionamiento
3Correa para la muñeca 12 Manija de freno
4Hebilla del arnés 13 Frenos posteriores
5Rueda trasera 14 Botón de liberación de la rueda trasera
6Canasta de almacenamiento 15 Ruedas iratorias delanteras
7Rueda fija
8Placa para los pies
9Anillo pequeño
10
7
8
2
4
3
5
9
11
12
14
15
13
6
SP

17
SP
ADVERTENCIA
IMPORTANTE - Lea las instrucciones
detenidamente y uárdelas como
referencia futura. La seuridad del
pasajero podría verse afectada si no
siue estas instrucciones.
ADVERTENCIA
• Nunca deje al pasajero sin atender.
• Use siempre el sistema de sujeción.
• Este producto no es apto para correr
o patinar.
• Aseúrese de que todos los
dispositivos de bloqueo estén
activados antes de usarlo.
• Para evitar lesiones, aseúrese de
que el pasajero esté lejos cuando
desplieue este producto.
• No deje que el pasajero jueue con
este producto.
• No utilice si aluna pieza de la silla
de paseo está rota o desarrada o si
falta aluna pieza.
INFORMACIÓN ADICIONAL DE
SEGURIDAD
• Esta silla de paseo es para un
pasajero. NUNCA permita más de
un pasajero por vez en esta silla de
paseo.
• Advance Mobility Freedom está
diseñada para niños mayores o
jóvenes de 10 años o más, con un
peso máximo de 90 k (200 lb).
• La cara total de peso recomendada
para esta silla de paseo es 90 k
(200 libras), 1 k (2.2 libras) en el
bolsillo del asiento y 4.5 k (10 libras)
en la canasta. Un peso excesivo
puede causar que ocurra una
situación pelirosa de inestabilidad.
• Los paquetes o accesorios, o ambas
cosas, colocados sobre la unidad
pueden hacer que sea inestable.
• Cualquier cara sujetada a la manija
y/o la parte de atrás del respaldo y/o
en los costados del vehículo afectará
la estabilidad del vehículo.
• Trabe los frenos antes de carar y
descarar al pasajero y cuando la silla
de paseo no esté en movimiento.
• Aseúrese de que el freno está
correctamente activado moviendo la
silla de paseo hacia atrás y adelante.
• La silla de paseo no debe usarse para
transportar pasajeros al subir o bajar
escaleras o escaleras mecánicas.
Podría resultar en daños para la silla
de paseo que no están cubiertos bajo
la arantía.
• Los accesorios que no están
aprobados por Advance Mobility no
deben usarse.
• Preste atención a los automóviles;
nunca supona que un conductor
puede verlo a usted y a su pasajero.
• El pasajero debe estar siempre
sentado (no debe pararse en la silla
de paseo).
• Use siempre la correa para la
muñeca; las sillas de paseo pueden
rodar mucho y la correa para la
muñeca lo mantiene en control si se
resbala o cae.
• Use solamente piezas de repuesto
suministradas o aprobadas por
Advance Mobility.
• Debe informar al fabricante y a las
autoridades pertinentes en su país
en caso de accidente rave con el
producto.
• Respete el medio ambiente y
deseche la silla de paseo de manera
apropiada.Cómo desechar el
producto está sujeto a requisitos
locales y nacionales.

18
SP ARMAZÓN
1 Desempaque el armazón del cochecito
de la caja y deje a un lado las ruedas.Si
no están montados, conecte los tubos en
forma de L al armazón, como se muestra.
2 Desplieue el armazón.
3 PLACA PARA LOS PIES
• Gire los tubos del extremo inferior del
armazón de la silla de paseo.
• Introduzca la placa para los pies en el
armazón de la silla de paseo.
• Aseure la placa para los pies en el
armazón de la silla de paseo usando
los tornillos que se incluyen. Necesitará
un destornillador Phillips. Nota: Use los
tornillos cónicos para aseurar el centro
de la placa para los pies.
4 Conecte el extremo para los pies de la
almohadilla del asiento a la parte frontal de
la placa para los pies con los parches de
ancho y bucle. Envuelva las tiras alrededor
de la parte inferior de la placa para los
pies, inserte la tira a través del anillo D y
enanche los parches de ancho y bucle.
5 Compruebe que la cesta está sujeta al
armazón de los pies con las tiras de broche,
como se muestra.
6 Gire los tubos del armazón inferior hacia
la placa para los pies. Introduzca la parte
inferior de la placa para los pies en los
conectores frontales para los tubos. Empuje
hacia arriba para aseurar los bloqueos con
broche en ambos tubos.
7 Pona la silla de paseo en posición vertical.
Baje los refuerzos laterales a los soportes
de montaje. Mientras empuja el botón de
traba, deslice el refuerzo lateral sobre el
soporte de montaje; suelte cuando la clavija
esté alineada con el orificio del soporte.
Aseure la abrazadera del refuerzo lateral.
Repita el procedimiento en ambos
costados.
ADVERTENCIA: Aseúrese de que todos
los dispositivos de bloqueo estén activados
antes de usarlo.
RUEDA DELANTERA
8 Instalación
• Para instalar la rueda delantera, acueste
la silla de paseo hacia atrás, de modo
que la manija quede sobre el piso.Abra
las mordazas irando la palanca de las
mordazas hacia atrás.
• Inserte en ensamblaje de las ruedas
delanteras en los tubos del armazón
frontal hasta que los orificios y las clavijas
estén alineados.
• Introduzca la clavija de la rueda a cada
lado.
• Cierre las mordazas irando la palanca de
las mordazas hacia adelante.
Extracción
• Invierta los pasos de instalación.
RUEDAS GIRATORIAS DELANTERAS
9 Instalación
• Para instalar las ruedas iratorias
delanteras, acueste la silla de paseo hacia
atrás, de modo que la manija quede sobre
el piso.
• Inserte en ensamblaje de las ruedas
delanteras en los tubos del armazón
frontal hasta que los orificios y las clavijas
estén alineados.
• Introduzca la clavija de la rueda a cada
lado.
Extracción
• Invierta los pasos de instalación.
CARACTERÍSTICA GIRATORIA
10 Empuje el botón que traba la función
iratoria hacia arriba para trabar la rueda
delantera en una posición fija.
11 Oprima el botón que traba la función
iratoria hacia abajo para permitir que ire
el ensamblaje de la rueda delantera.
ADVERTENCIA: Bloquee las ruedas
delanteras en la posición fija cuando carue
y descarue a un pasajero. Aunque la rueda
delantera de la silla de paseo se bloquea,
no está diseñada para correr ni para hacer
ejercicio.
RUEDAS TRASERAS
12 Instalación
• Alinee el eje de la rueda trasera con el
montante de la rueda en el armazón de la
silla de paseo e insértelo en el montante
de la rueda hasta que se trabe en su luar.
Escuchará un clic..
• Tire suavemente de la rueda trasera para
aseurarse de que esté correctamente
sujetada.
13 Extracción
• Mientras oprime el botón de liberación
de la rueda, deslice suavemente la rueda
trasera fuera del montante de la rueda.
FRENO DE MANO
Freno de mano con botón de estacionamiento
14 Para usar el botón de estacionamiento,

19
SP
apriete la manija del freno (12) y oprima el
botón de freno de estacionamiento (11).
ADVERTENCIA: Trabe los frenos antes de
carar y descarar al pasajero y cuando la
silla de paseo no esté en movimiento.
Ajustar el freno
15 Si no consiue frenar bien, apriete la manija
del freno cinco o seis veces. Si el problema
persiste, afloje el anillo del cilindro del
freno (10) para ajustar el anillo pequeño
(9) y lueo mueva el anillo pequeño (9)
alejándolo de la manija para apretar el
cable (¡no apriete en exceso!). Para bloquear
los anillos, apriete el anillo del cilindro (10)
contra la manija mientras sujeta el anillo
pequeño (9) en posición.
FRENOS DE ESTACIONAMIENTO
TRASEROS
16 Empuje los pedales del freno hacia abajo
para activar los frenos y levántelos para
liberarlos.
CAPOTA
17 Tire hacia adelante para abrir la capota y
empuje hacia atrás para cerrarla.
18 Enrolle las aletas hacia arriba y sujételas
como se muestra para abrir las ventanas y
las aletas laterales.
19 Enrolle las aletas superiores y de los
laterales de la capota y sujételas con las
correas como se muestra.
AJUSTAR EL ARNÉS DE SEGURIDAD
20 Enanche las correas para los hombros al
bucle de tela superior que mejor se adapte
al pasajero y lueo conecte las presillas
inferiores al soporte de hebilla.
21 Ajuste la correa de seuridad central seún
sea necesario para la comodidad del
pasajero.
ADVERTENCIA: Evite serias lesiones
causadas por caídas o resbalones.Ajuste y
sujete siempre correctamente el arnés de
seuridad.
ADVERTENCIA: Use siempre la correa
de la entrepierna en combinación con las
correas de los hombros y el cinturón de la
cintura.
USAR EL ARNÉS DE SEGURIDAD
22 Aseúrese de que las presillas de la correa
para los hombros estén enanchadas a las
presillas de la correa para la cintura.
23 Inserte el arnés conectado y las hebillas de
las correas laterales en los costados de la
hebilla de la entrepierna.
24 Presione los botones en la parte superior e
inferior de la hebilla de la entrepierna para
liberarla.
25 Ajuste las correas para la cintura y la
entrepierna seún sea necesario para la
comodidad del pasajero.
RECLINAR EL ASIENTO
26 Ajuste las correas del asiento con el rado
de reclinación deseado.
27 Tire de la correa cuando quiera devolver el
asiento a la posición vertical.
ADVERTENCIA: Cuando realice ajustes al
asiento de la silla de paseo, aseúrese de
que la cabeza, brazos y piernas del pasajero
estén lejos de piezas móviles del asiento y
del armazón de la silla de paseo.
EXTRACCIÓN DE LA CANASTA
28 Desabroche las correas de alrededor del
armazón en la parte posterior e inferior
del armazón como se muestra. Invierta los
pasos para volver a sujetarlas.
SACAR LA ALMOHADILLA DEL ASIENTO
29 Desde abajo del asiento, desabroche el
ancho y bucle y deslice la correa por el
anillo D, y lueo desabroche la almohadilla
del extremo de los pies del asiento de la
placa para los pies.
30 Desabroche la correa con broche en
la parte posterior del asiento como se
muestra.
31 Desabroche las correas y los broches del
armazón en la almohadilla de la parte
superior del asiento y los 10 broches en los
costados de la almohadilla del asiento.
32 Retire el alambre y la tablilla de plástico
del bolsillo en la parte posterior de la
almohadilla del asiento. Invierta los pasos
para volver a colocarla.
ADVERTENCIA: Aseúrese de que todos
los ajustes estén cerrados de forma
adecuada cuando vuelva a colocar la tela
del asiento.
PLEGAR LA SILLA DE PASEO
33 Empuje hacia abajo para abrir los bloqueos
con broche en ambos tubos.
34 Presione el botón a la derecha del tubo y
retire la parte inferior de la placa para los
pies de los conectores del tubo.
35 Baje los refuerzos laterales a los soportes
de montaje. Mientras empuja el botón de
traba, deslice el refuerzo lateral sobre el
soporte de montaje y ire los refuerzos
laterales hacia la parte posterior del

20
SP
CUIDADO Y MANTENIMIENTO
Para preservar la durabilidad de la silla de
paseo, es importante realizar tareas simples
y periódicas de mantenimiento.De vez en
cuando, aseúrese de que las uniones y
luares con plieues todavía estén en buenas
condiciones.Si escucha alún ruido o siente
alo de tensión, puede llevar la silla de paseo
a un taller de bicicletas local para que le
areuen lubricación.Todas las reparaciones
solamente deben ser completadas por un
concesionario autorizado.
LAVADO
Tela del asiento/Capota
• Puede lavar a máquina el asiento de la silla
de paseo con aua fría y un deterente
suave.
• Aseúrese de sacar el armazón de metal y
las tablillas de plástico del asiento antes de
lavarlo.
• No use solventes, productos cáusticos o
materiales abrasivos para la limpieza.
• Para reducir el encoimiento, simplemente
vuelva a sujetar el asiento al armazón para
que se seque.
• No priense, planche, limpie en seco, seque a
máquina ni estruje la tela.
• Si las fundas del asiento deben reemplazarse,
use solamente piezas de un concesionario
autorizado de Advance Mobility.Ellas son las
únicas que pueden arantizar que han sido
probadas para seuridad y diseñadas para
que caben este asiento.
• NO lave la capota de la silla de paseo a
máquina.
Piezas de plástico/metal
• Limpie usando un jabón suave y aua tibia.
• No debe sacar, desarmar ni alterar ninuna
parte del mecanismo de plieue del asiento o
los frenos.
Cuidado de las ruedas
• Se pueden limpiar las ruedas usando un trapo
húmedo.Se deberá secarlas completamente
con una toalla o trapo suave.
• La humedad —especialmente de la
playa— puede oxidar la caja de los cojinetes
de las ruedas. Rociarlas reularmente con
un lubricante de silicona ayudará a que se
mantenan en perfecto estado.
• Además, si usa la silla de paseo para hacer
muchas millas, se beneficiaría de una visita
anual a la tienda de bicicletas para que alineen
las ruedas. Consulte la cifra en la tabla de
ruedas para saber la presión óptima para sus
ruedas.
ALMACENAMIENTO
• Los rayos del sol pueden desteñir la tela del
asiento y resecar los neumáticos, por lo tanto,
uardar el cochecito adentro prolonará su
buen aspecto.
• NO lo uarde al aire libre.
• Aseúrese de que la silla de paseo esté
seca antes de uardarla durante períodos
prolonados.
• Guarde siempre la silla de paseo en un
ambiente seco.
• Guarde la silla de paseo en un luar seuro
cuando no la esté usando.
(por ej., donde los niños no pueden juar con él).
• NO pona objetos pesados encima de la silla
de paseo.
• NO uarde la silla de paseo cerca de fuentes
de calor directas como un radiador o fueo.
asiento. Repita el procedimiento en ambos
costados.
36 Doble el respaldo del asiento hacia
adelante como se muestra.
EN MOVIMIENTO
Girar
• Girar la silla de paseo es muy sencillo: está
equilibrada para irar con un leve toque en
el manillar. Para iros más cerrados, empuje
el manillar hacia abajo y levante la rueda
delantera para irar.
Correa para la muñeca
• Aseúrese de que lleva la correa para la
muñeca puesta cuando su pasajero vaya en
la silla de paseo. La silla de paseo de Advance
Mobility es liera y está lista para rodar —
con usted o sin usted— y la correa para la
muñeca ayuda a mantener el control sobre
ella.
En la oscuridad
• Como nos preocupa su seuridad y la de
su pasajero, le recomendamos que no use
la silla de paseo de noche. Sin embaro, si
decide hacerlo, le pedimos que coloque las
tiras reflectantes en los radios de las ruedas
y el asiento. También puede montar luces de
bicicleta en el manillar.
Table of contents
Languages:
Other Advance mobility Stroller manuals


