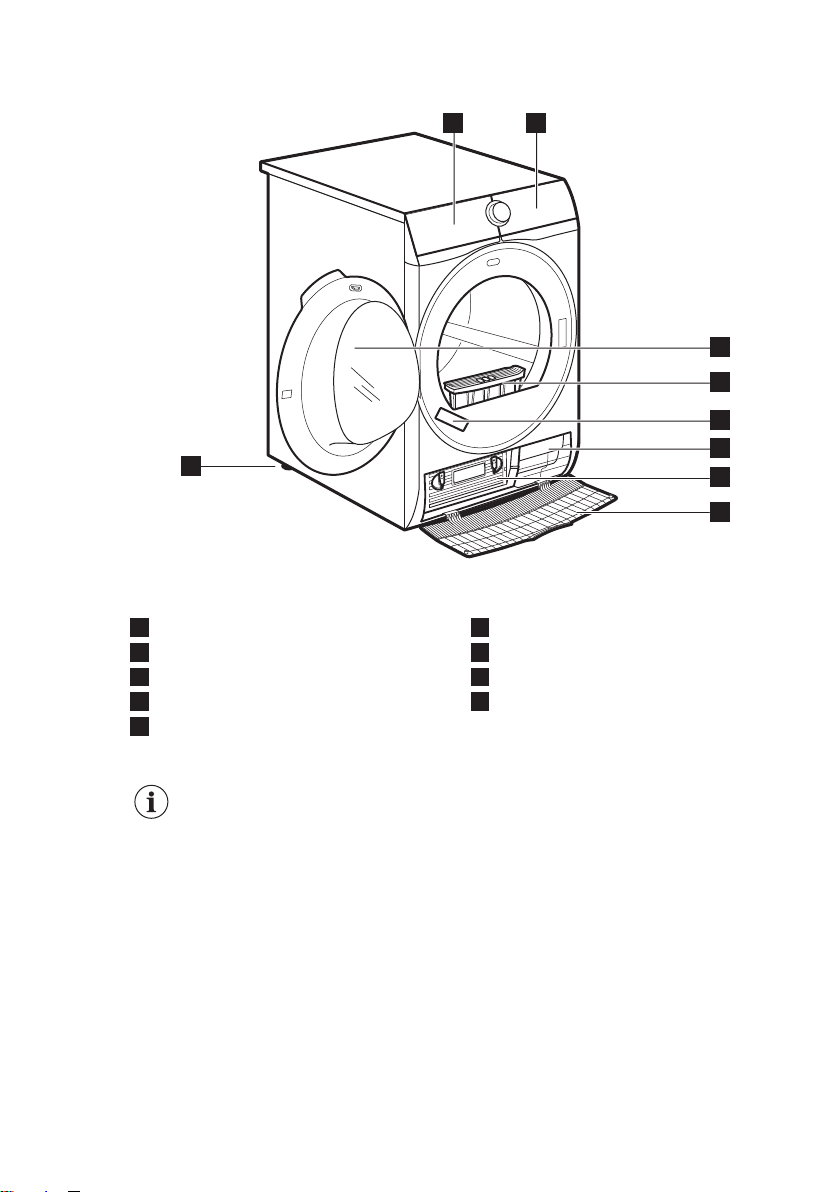
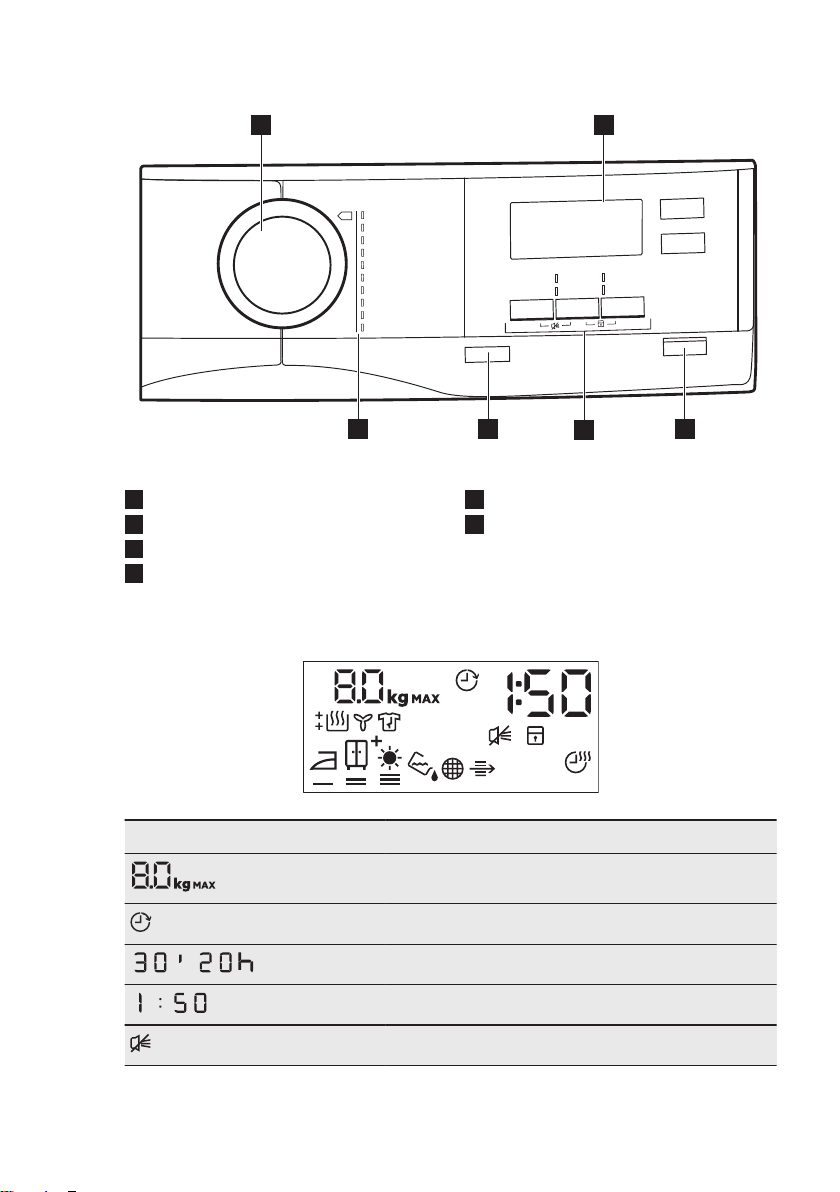
AEG T6DB682CBW User manual

USER
MANUAL
EN User Manual
Tumble Dryer
T6DB682CBW

CONTENTS
1. SAFETY INFORMATION......................................................................................3
2. SAFETY INSTRUCTIONS.................................................................................... 5
3. PRODUCT DESCRIPTION...................................................................................7
4. CONTROL PANEL................................................................................................8
5. PROGRAMMES....................................................................................................9
6. OPTIONS............................................................................................................11
7. BEFORE FIRST USE..........................................................................................12
8. DAILY USE......................................................................................................... 13
9. HINTS AND TIPS................................................................................................15
10. CARE AND CLEANING.................................................................................... 16
11. TROUBLESHOOTING......................................................................................19
12. TECHNICAL DATA........................................................................................... 22
13. ACCESSORIES................................................................................................ 24
14. PRODUCT INFORMATION SHEET IN REFERENCE TO E.U. REGULATION
1369/2017............................................................................................................... 25
15. ENVIRONMENTAL CONCERNS......................................................................26
FOR PERFECT RESULTS
Thank you for choosing this AEG product. We have created it to give you
impeccable performance for many years, with innovative technologies that help
make life simpler – features you might not find on ordinary appliances. Please
spend a few minutes reading to get the very best from it.
Visit our website to:
Get usage advice, brochures, trouble shooter, service and repair information:
www.aeg.com/support
Register your product for better service:
www.registeraeg.com
Buy Accessories, Consumables and Original spare parts for your appliance:
www.aeg.com/shop
CUSTOMER CARE AND SERVICE
Always use original spare parts.
When contacting our Authorised Service Centre, ensure that you have the
following data available: Model, PNC, Serial Number.
The information can be found on the rating plate.
Warning / Caution-Safety information
General information and tips
Environmental information
Subject to change without notice.
www.aeg.com2

1. SAFETY INFORMATION
Before beginning the installation and use of this
appliance, carefully read the supplied instructions. The
manufacturer is not responsible for any injuries or
damage that are the result of incorrect installation or
usage. Always keep the instructions in a safe and
accessible location for future reference.
1.1 Children and vulnerable people safety
WARNING!
Risk of suffocation, injury or permanent
disability.
•This appliance can be used by children aged from 8
years and above and persons with reduced physical,
sensory or mental capabilities or lack of experience
and knowledge if they have been given supervision or
instruction concerning the use of the appliance in a
safe way and understand the hazards involved.
•Children between 3 and 8 years of age and persons
with very extensive and complex disabilities shall be
kept away from the appliance unless continuously
supervised.
•Children of less than 3 years of age should be kept
away from the appliance unless continuously
supervised.
•Do not let children play with the appliance.
•Keep all packaging away from children and dispose of
it appropriately.
•Keep detergents away from children.
•Keep children and pets away from the appliance when
the door is open.
•If the appliance has a child safety device, it should be
activated.
•Children shall not carry out cleaning and user
maintenance of the appliance without supervision.
ENGLISH 3

1.2 General Safety
•Do not change the specification of this appliance.
•The appliance can be installed as freestanding or
below a kitchen counter with correct space (refer to
the Installation leaflet).
•Do not install the appliance behind a lockable door, a
sliding door or a door with a hinge on the opposite
side, that would prevent the appliance door from being
fully open.
•The ventilation opening in the base must not be
covered by a carpet, mat, or any floor covering.
•WARNING: The appliance must not be supplied
through an external switching device, such as a timer,
or connected to a circuit that is regularly switched on
and off by a utility.
•Connect the mains plug to the mains socket only at
the end of the installation process. Make sure that the
mains plug is accessible after installation.
•If the mains power supply cable is damaged, it must
be replaced by the manufacturer, its Authorised
Service Centre or similarly qualified persons to avoid
an electrical hazard.
•Do not exceed the maximum load of 8 kg (refer to the
"Programme chart" chapter).
•Do not use the appliance if items have been soiled
with industrial chemicals.
•Wipe away lint or packaging debris that has
accumulated around the appliance.
•Do not run the appliance without a filter. Clean the lint
filter before or after each use.
•Do not dry unwashed items in the tumble dryer.
•Items that have been soiled with substances such as
cooking oil, acetone, alcohol, petrol, kerosene, spot
removers, turpentine, waxes and wax removers
should be washed in hot water with an extra amount of
detergent before being dried in the tumble dryer.
www.aeg.com4

•Items such as foam rubber (latex foam), shower caps,
waterproof textiles, rubber backed articles and clothes
or pillows fitted with foam rubber pads should not be
dried in the tumble dryer.
•Fabric softeners, or similar products, should only be
used as specified by the product manufacturer’s
instructions.
•Remove all objects from items that could be a source
of fire ignition such as lighters or matches.
•WARNING: Never stop a tumble dryer before the end
of the drying cycle unless all items are quickly
removed and spread out so that the heat is dissipated.
•Before any maintenance operation, deactivate the
appliance and disconnect the mains plug from the
socket.
2. SAFETY INSTRUCTIONS
2.1 Installation
• Remove all the packaging.
• Do not install or use a damaged
appliance.
• Follow the installation instructions
supplied with the appliance.
• Always take care when moving the
appliance as it is heavy. Always use
safety gloves and enclosed footwear.
• Do not install or use the appliance
where the temperature can be lower
than 5°C or higher than 35°C.
• The floor area on which the appliance
is to be installed must be flat, stable,
heat resistant and clean.
• Make sure that there is air circulation
between the appliance and the floor.
• Always keep the appliance vertical
when it is being moved.
• The rear surface of the appliance
must be put against a wall.
• When the appliance is in its
permanent position, check if it is
levelled correctly with the aid of a
spirit level. If it is not, adjust the feet
accordingly.
2.2 Electrical connection
WARNING!
Risk of fire and electric
shock.
• WARNING: This appliance is
designed to be installed / connected
to a grounding connection in the
building.
• Make sure that the parameters on the
rating plate are compatible with the
electrical ratings of the mains power
supply.
• Always use a correctly installed
shockproof socket.
• Do not use multi-plug adapters and
extension cables.
• Do not pull the mains cable to
disconnect the appliance. Always pull
the mains plug.
• Do not touch the mains cable or the
mains plug with wet hands.
2.3 Use
WARNING!
Risk of injury, electric shock,
fire, burns or damage to the
appliance.
ENGLISH 5

• This appliance is for household
(indoors) use only.
• Do not dry damaged (torn, frayed)
items that contain padding or fillings.
• If laundry has been washed with a
stain remover, carry out an additional
rinse cycle before starting a drying
cycle.
• Dry only fabrics that are suitable to
dry in the appliance. Follow the
cleaning instruction on the item label.
• Do not drink or prepare food with the
condensed water/distilled water. It can
cause health problems to people and
pets.
• Do not sit or stand on the open door
of the appliance.
• Do not dry dripping wet clothes in the
appliance.
2.4 Care and cleaning
WARNING!
Risk of injury or damage to
the appliance.
• Do not use water spray and steam to
clean the appliance.
• Clean the appliance with a moist soft
cloth. Use only neutral detergents. Do
not use abrasive products, abrasive
cleaning pads, solvents or metal
objects.
2.5 Service
• To repair the appliance contact the
Authorised Service Centre.
• Use original spare parts only.
• Concerning the lamp(s) inside this
product and spare part lamps sold
separately: These lamps are intended
to withstand extreme physical
conditions in household appliances,
such as temperature, vibration,
humidity, or are intended to signal
information about the operational
status of the appliance. They are not
intended to be used in other
applications and are not suitable for
household room illumination.
2.6 Disposal
WARNING!
Risk of injury or suffocation.
• Disconnect the appliance from the
mains electrical and water supplies.
• Cut off the mains electrical cable
close to the appliance and dispose of
it.
• Remove the door catch to prevent
children or pets from becoming
trapped in the drum.
• Dispose of the appliance in
accordance with local requirements
for the disposal of Waste Electrical
and Electronic Equipment (WEEE).
www.aeg.com6

3. PRODUCT DESCRIPTION
1 2
7
3
4
5
6
9
8
1Water container
2Control panel
3Appliance door
4Filter
5Rating plate
6Airflow slots
7Condenser lid
8Condenser cover
9Adjustable feet
For ease of loading laundry
or ease of installation the
door is reversible. (see
separate leaflet).
ENGLISH 7

4. CONTROL PANEL
2
3
5
1
64
1Program dial
2Display
3Start/Pause button
4Options
5On/Off button
6Programs
4.1 Display
Symbol on the display Symbol description
laundry maximum load
delay start option on
-delay start selection (30min-20h)
cycle time indication
buzzer off
www.aeg.com8

Symbol on the display Symbol description
child lock on
, , , laundry dryness: iron dry, cupboard dry, cupboard dry
+, extra dry
indicator:
drain the water container
indicator:
clean the filter
indicator:
check the condenser
time dry option on
-time programme selection (10min-2h)
indicator:
drying phase
indicator:
crease guard phase
indicator:
cooling phase
5. PROGRAMMES
Program Load 1) Properties / Fabric mark
2) Cottons Eco 8 kg
Cycle to be used to dry cotton with
"cotton cupboard" dryness level,
with maximum energy saving.
/
Cottons 8 kg
Cycle defined to dry cottons items
of different size / different weaving
altogether.
/
Synthetics 3,5 kg Drying level: extra dry. /
Mixed 3 kg Cotton and synthetic fabrics. /
Delicates 3 kg Delicate fabrics. /
Easy Iron 1 kg (or 5
shirts)
Easy care fabrics for which a minimum of ironing
is necessary. The drying results can be different
from one type of fabric to another. Shake the
items before putting them in the appliance.
When the programme has ended, immediately
remove the items and put them on a hanger.
/
ENGLISH 9

Program Load 1) Properties / Fabric mark
Bed Linen 3 kg
Bed linen such as single and dou‐
ble sheets, pillowcases, duvet cov‐
er.
/
Duvet 3 kg
Single or double duvets and pil‐
lows (with feather, down or syn‐
thetic fillings).
/
Jeans 8 kg
Leisure clothing such as jeans,
sweat-shirts of different material
thicknesses (e.g. at the neck, cuffs
and seams).
/
Sport 2 kg Sportswear, thin and light fabrics, microfiber, pol‐
yester.
1) The maximum weight refers to dry items.
2) The Cottons Eco programme is the “Standard cotton programme” according to Commission
Regulation EU No. 392/2012. It is suitable for drying normal wet cotton laundry and it is the most efficient
programme in terms of energy consumption for drying wet cotton laundry.
5.1 Programmes and options selection
Options
Program1) Dryness
Level Sensitive Delicate Anti-
crease Time Dry
Cottons Eco
Cottons
Synthetics 2)
Mixed
Delicates
Easy Iron
Bed Linen
Duvet
Jeans
Sport
1) Together with the programme you can set 1 or more options.
2) -
cupboard dry+
of Dryness Level level is not available with Synthetics.
www.aeg.com10

5.2 Consumption data
Program Spun at / residual humidity Drying time 1)
Energy
consump‐
tion 2)
Cottons Eco 8 kg
cupboardDry
1400 rpm / 50% 120 min 4,10 kWh
1000 rpm / 60% 139 min 4,81 kWh
Cottons 8 kg
Iron Dry
1400 rpm / 50% 93 min 3,11 kWh
1000 rpm / 60% 110 min 3,81 kWh
Cottons Eco 4 kg
cupboardDry
1400 rpm / 50% 69 min 2,18 kWh
1000 rpm / 60% 79 min 2,52 kWh
Synthetics 3,5 kg
cupboardDry
1200 rpm / 40% 52 min 1,56 kWh
800 rpm / 50% 68 min 1,88 kWh
1) For partial loads, the cycle time is shorter and appliance uses less energy.
2) Improper ambient temperature and/or poorly centrifuged laundry can prolong cycle time and increase
the energy consumption.
6. OPTIONS
6.1 Dryness Level
This option helps to achieve requested
laundry dryness. You can select the level
of dryness:
ready to iron - iron dry level
ready to store - cupboard
dry level1)
ready to store - drier than
cupboard dry level
ready to store - extra dry
level
1) Default selection which is related to the pro‐
gramme
6.2 Delicate
Extra delicate drying of frequently-worn
clothes with reduced heat.
6.3 Sensitive
Delicate drying of frequently-worn
clothes. The heat is gradually reduced
until cycle end.
Sensitive and Delicate cannot be
selected together.
ENGLISH 11

6.4 Anti-crease
Extends up to 120 minutes the anti-
crease phase (30 minutes) at the end of
the drying cycle. After drying phase drum
rotates from time to time to prevent
creases. Laundry can be removed during
the anti-crease phase.
6.5 Time Dry
For cottons, synthetics and mixed. Lets
the user to set drying time from minimum
10 min to maximum of 2 hours (in 10 min
steps). When this option is maximum,
load indicator disappears.
The cycle lasts as long as
set drying time regardless of
the size of a load and its
dryness.
TIME DRYING RECOMMENDATION
10 - 20
min
action of cool air only (no heat‐
er).
20 - 40
min
additional drying to improve dry‐
ness after previous drying cy‐
cle.
TIME DRYING RECOMMENDATION
> 40
min
full drying of the small laundry
loads up to 4 kg, well spun
(>1200 rpm).
6.6 Delay Start
Lets to delay the start of a
drying program from
minimum of 30 minutes to
maximum of 20 hours.
1. Set the drying program and options.
2. Touch Delay Start button again and
again.
Time of delay is on the display (e.g.
if the program has to start after 12
hours.)
3. To activate Delay Start option, touch
the Start/Pause button.
Time to start decreases on the display.
6.7 Buzzer
The sound is heard at the:
• cycle end
• start and end of crease guard phase
The buzzer option is by default always
on. You can use this option to activate or
deactivate the sound.
7. BEFORE FIRST USE
Before you use the appliance to dry
items:
• Clean the tumble dryer drum with a
moist cloth.
• Start a 1 hour programme with moist
laundry.
7.1 Unusual smell
The appliance is tightly packed.
After product unpacking you can feel an
unusual smell. This is normal for brand
new products.
Appliance is built of several different
types of material which all together can
generate unusual smell.
Over usage time, after few drying cycles
unusual smell gradually disappears.
7.2 Noises
Different noises may be
heard at different times
during the drying cycle. They
are perfectly normal
operating sounds.
Rotating drum.
www.aeg.com12

Working fans.
Working pump and transferring
condensation to the tank.
8. DAILY USE
8.1 Preparing the laundry
Very often the clothes after
washing cycle are kneaded
and tangled altogether.
Drying kneaded and tangled
clothes is inefficient.
To assure proper air flow
and even drying it is
recommended to shake and
load one by one the clothes
to the tumble dryer.
To assure proper drying process:
• Close the zips.
• Close the fasteners of duvet covers.
• Do not dry ties or ribbons loose (e.g.
apron ribbons). Tie them before you
start a programme.
• Remove all items from pockets.
• Turn items with the internal layer
made of cotton inside out. Cotton
layer must be faced outwards.
• Always set the programme suitable
for the type of laundry.
• Do not put light and dark colours
together.
• Use suitable programme for cottons,
jersey and knitwear to reduce
shrinkage.
• Do not exceed the maximum load
stated in the programmes chapter or
shown on the display.
• Dry only the laundry that is suitable
for tumble drying. Refer to the fabric
label on the items.
• Do not dry large and small items
together. Small items can be trapped
inside the large items and remain wet.
• Shake the large clothes, fabrics
before placing in the tumble dryer. It is
to avoid moist places inside the fabric
after the drying cycle.
Fabric label Description
Laundry is suitable for tumble drying.
Laundry is suitable for tumble drying at higher temperatures.
Laundry is suitable for tumble drying at low temperatures only.
Laundry is not suitable for tumble drying.
ENGLISH 13

8.2 Loading the laundry
CAUTION!
Ensure the laundry is not
trapped between the
appliance door and the
rubber seal.
1. Pull open the appliance door.
2. Load the laundry one item at a time.
3. Close the appliance door.
8.3 Turning on the appliance
To turn on the appliance:
Push the On/Off button.
If the appliance is on, some indicators
appear on the display.
8.4 auto-off function
To decrease the energy consumption,
the auto-off function turns the appliance
off automatically:
• if the Start/Pause touch button is not
touched within 5 minutes.
• 5 minutes after a cycle ends.
Push the On/Off button to turn on the
appliance.
If the appliance is on, some indications
appear on the display.
8.5 Setting a programme
Use the programme dial to set the
programme.
The approximate programme duration
appears on the display.
Real drying time will depend
on type of the load (quantity
and composition), the room
temperature and the
humidity of your laundry
after spin drying phase.
8.6 Options
Together with the programme you can
set 1 or more special options.
To activate or deactivate an option touch
the relevant button or a two button
combination.
its symbol appears on the display or the
led above the corresponding button lights
up.
8.7 Child lock option
The child lock can be set to prevent
children from playing with the appliance.
The child lock option locks all touch
www.aeg.com14

buttons and the program dial (this option
does not lock the On/Off button).
You can activate the child lock option:
• before you touch the Start/Pause
button - the appliance cannot start
• after you touch the Start/Pause
button - programs and option
selection is unavailable.
Child lock option activation:
1. Turn the dryer on.
2. Select 1 of the available programs.
3. Touch and hold down 2 buttons at
the same time.
The symbol appears on the display.
4. To deactivate the child lock, touch
the above buttons again until the
symbol disappears.
8.8 Starting a program
To start the program:
Touch the Start/Pause button.
The appliance starts and the LED above
the button stops flashing and stays on.
8.9 Program change
To change a program:
1. Push the On/Off button to turn the
appliance off.
2. Push the On/Off button again to turn
on the appliance.
3. Set a new program.
8.10 Programme end
Clean the filter and drain the
water container after each
drying cycle. (See chapter
CARE AND CLEANING.)
If the drying cycle is finished, the symbol
appears on the display. If the Buzzer
option is activated, the acoustic signal
sounds intermittently for 1 minute.
If you do not turn off the
appliance, the anti-crease
phase starts (not active with
all programmes). Flashing
symbol signals the
execution of the anti-crease
phase. Laundry can be
removed during this phase.
To remove the laundry:
1. Push the On/Off button for 2 seconds
to turn the appliance off.
2. Open the appliance door.
3. Remove the laundry.
4. Close the appliance door.
Possible causes of unsatisfactory drying
results:
• Inadequate default dryness level
settings. See chapter
Adjustment of
default dryness level
9. HINTS AND TIPS
9.1 Ecological hints
• Spin the laundry well before drying.
• Do not exceed the load sizes which
are specified in the programmes
chapter.
• Clean the filter after each drying
cycle.
• Do not use fabric softener to wash
and then dry. In the tumble dryer
laundry becomes soft automatically.
• The water from the water container
can be used to iron the clothes. You
ENGLISH 15

must first filter the water to eliminate
remaining textile fibres (simple coffee
filter is suitable).
• Always keep the airflow slots at the
bottom of the appliance clear.
• Make sure there is good airflow where
the appliance is to be installed.
9.2 Adjustment of default
dryness level
To change the default dryness level:
1. Turn the appliance on.
2. Wait approximately 8 seconds.
3. Select 1 of the available
programmes.
4. Touch and hold down the Dryness
Level and Anti-crease buttons at the
same time.
One of the symbols appears on the
display:
- Maximum dryness
- Extra dryness
- Standard dryness
5. Touch the Start/Pause button
repeatedly until you reach the
desired dryness level.
Dryness
level Display symbol
Maximum
dryness
Extra dry‐
ness
Standard
dryness
6. To memorise the setting touch and
hold down the Dryness Level and
Anti-crease buttons at the same
time for approximately 2 seconds.
9.3 Deactivating the tank
indicator
The water container indicator is activated
by default. It illuminates at the end of the
drying cycle or during the cycle if the
water reservoir is full. If the draining kit is
installed the water container is drained
automatically and the indicator can be
deactivated.
To deactivate the indicator:
1. Turn the appliance on.
2. Wait approximately 8 seconds.
3. Select 1 of the available
programmes.
4. Touch and hold down Anti-crease
and Time Dry buttons at the same
time.
One of 2 configurations is possible:
• the Water container indicator:
is on if the symbol
appears - the water container
indicator is permanently activated
• the Water container indicator:
is off if the symbol
appears - the water container
indicator is permanently
deactivated
10. CARE AND CLEANING
10.1 Cleaning the filter
At the end of each cycle the
Filter
symbol comes on the display and you
must clean the filter.
The filter collects the lint
during the drying cycle.
To achieve the best drying
performances clean the filter
regularly , clogged filter lead
to longer cycles and energy
consumption increase.
Use your hand to clean the
filter , and if necessary , a
vacuum cleaner .
www.aeg.com16

CAUTION!
Avoid the use of water to
clean the filter. Instead throw
away lint in the dustbin
( avoid dispersion of plastic
fiber in water ambient).
To clean the filter:
1. Open the door. Pull the filter up.
2. Open the filter.
3. Gather lint with hand from both
internal parts of the filter.
Throw the lint in the dustbin.
4. If necessary clean the filter with a
vacuum cleaner. Close the filter.
5. If necessary remove lint from the
filter socket and gasket. You can use
a vacuum cleaner. Place the filter
back inside the filter socket.
10.2 Emptying the water
container
Empty the condensed water container
after each drying cycle.
If the condensed water container is full,
the programme stops automatically. The
Water container
symbol comes on
the display and you must empty the
water container.
To empty the water container:
1. Pull the water container out keeping
it in a horizontal position.
2. Pull the plastic connection out and
drain the water into a basin or
equivalent receptacle.
3. Push the plastic connection back in
and place the water container back
into position.
4. To continue the programme press
the Start/Pause button.
ENGLISH 17

10.3 Cleaning the condenser
If the symbol
Condenser
flashes on
the display, inspect the condenser and
its compartment. If it is dirty, clean it.
To inspect:
1. Open the door.
2. Open the condenser cover.
3. Turn 2 levers to unlock the
condenser lid.
4. Lower the condenser lid.
5. Catch the handle and pull the
condenser out from the bottom
compartment. Move condenser
horizontally to avoid spilling any
remaining water.
6. Clean the condenser in vertical
position over a basin. Rinse through
with a hand shower.
7. Put the condenser back inside the
bottom compartment.
8. Close the condenser lid.
9. Lock 2 levers until they snap.
10. Close the condenser cover.
10.4 Cleaning the humidity
sensor
CAUTION!
Risk of humidity sensor
damage. Do not use
abrasive materials or steel
wool to clean the sensor.
To assure best drying results the
appliance is equipped with metal
humidity sensor. It is placed on the inner
side of the door area.
Over usage time the surface of the
sensor may get dirty what deteriorates
the drying performance.
We recommend to clean the sensor at
least 3 or 4 times or if you observe the
drop of drying performance.
www.aeg.com18

To clean you can use harder side of
dish-washing sponge and bit of vinegar
or dish soap.
To clean the sensor:
1. Open the loading door.
2. Clean the surfaces of the humidity
sensor wiping off the metal surface
several times.
10.5 Cleaning the drum
WARNING!
Disconnect the appliance
before you clean it.
Use a standard neutral soap detergent to
clean the inner surface of the drum and
drum lifters. Dry the cleaned surfaces
with a soft cloth.
CAUTION!
Do not use abrasive
materials or steel wool to
clean the drum.
10.6 Cleaning the control
panel and housing
Use a standard neutral soap detergent to
clean the control panel and housing.
Use a moist cloth to clean. Dry the
cleaned surfaces with a soft cloth.
CAUTION!
Do not use furniture cleaning
agents or cleaning agents
which can cause corrosion.
10.7 Cleaning the airflow
slots
Use a vacuum cleaner to remove fluff
from the airflow slots.
11. TROUBLESHOOTING
WARNING!
Refer to Safety chapters.
11.1 Error Codes
The appliance does not start or it stops during operation.
First try to find a solution to the problem (refer to the table). If the problem persists,
contact the Authorised Service Centre.
WARNING!
Deactivate the appliance before carrying out any check.
In case of major problems, the acoustic signals operate, the display shows an
error code and the Start/Pause button may flash continuously:
Error code Possible cause Remedy
E5A
Appliance motor overloaded.
Too much laundry or entrap in the
drum.
The programme was not comple‐
ted. Remove the laundry from the
drum, set the programme and re‐
start the cycle.
ENGLISH 19

Error code Possible cause Remedy
E97
Internal fail. No communication be‐
tween electronic elements of the
appliance.
The programme was not finished
properly or the appliance stoped
too early. Switch the appliance off
and on again.
If the error code appears again,
contact the Authorised Service
Centre.
EH0
The mains supply is unstable. When the appliance is showing
EH0, please wait until main supply
is stable than press start. If the ap‐
pliance pause the cycle without
any indication then press the cycle
start. If the warning will occur
check the power cord / socket in‐
tegrity or main supply.
If the display shows other error codes, deactivate and activate the appliance. If the
problem continues, contact the Authorised Service Centre.
In case of different problem with the tumble dryer check the table below for possible
solutions.
11.2 Troubleshooting
Problem Possible cause Remedy
The tumble dry‐
er does not op‐
erate.
The tumble dryer is not connected
to the mains supply.
Connect it to the mains socket.
Check the fuse in the fuse box (do‐
mestic installation).
The door is open. Close the door.
The On/Off button was not pushed. Push the On/Off button.
The Start/Pause button was not
touched.
Touch the Start/Pause button.
The appliance is in standby mode. Push the On/Off button.
www.aeg.com20
Table of contents
Other AEG Dryer manuals

AEG
AEG TR708L0B User manual

AEG
AEG LAVATHERM T6DCE821B User manual

AEG
AEG LAVATHERM 7DBE38W User manual

AEG
AEG LAVATHERM 320 U User manual

AEG
AEG LAVATHERM T65170AV User manual

AEG
AEG TR858P4B User manual

AEG
AEG LAVATHERM 3200 User manual

AEG
AEG LAVATHERM 55370AH3 User manual

AEG
AEG LAVATHERM T76280IC User manual

AEG
AEG LAVATHERM 6DBG28S User manual

AEG
AEG T8DEE862 User manual

AEG
AEG TR838P4C User manual

AEG
AEG LAVATHERM 55800 Operation manual

AEG
AEG TR3051TW User manual

AEG
AEG TR808A2OB User manual

AEG
AEG Lavatherm 76280AC User manual

AEG
AEG LAVATHERM 76484EIH User manual

AEG
AEG LAVATHERM T57830 Operation manual

AEG
AEG T8DSC869C User manual

AEG
AEG TR718L2Z User manual