AEI VM-8208 Series User manual

SIP DECT Phone
QIG
V 1.00

1 Over view
This phone is a full-feature telephone that provides voice communication. Read this QIG carefully to learn how to
operate this product and take advantage of its features.
P
Pa
ac
ck
ka
ag
ge
e
C
Co
on
nt
te
en
nt
ts
s
When unpacking the phone, ensure all the following items are present and undamaged. If anything appears to e
missing or roken, contact your dealer for a replacement.
1. Base Unit
2. Cordless Handset
3. Stand
4. Battery
5. AC Ada tor
6. RJ-45 Cable
7. Quick Installation Guide (This document)
2 Product Descri tion
The following contains important information to help you familiarize with the functions of the VoIP phone.
F
Fr
ro
on
nt
t
V
Vi
ie
ew
w

1. Base unit keys
Name Descri tion
1 Display screen To display calls and status information.
3 SELECT SERVICES
key
Press enter service function
5 Alphanumerical keys Press these keys to enter phone num ers and texts.
Function keys
LINE 1 / LINE 2 To indicate a line een used as the following status:
- Idle: No LED indication.
- Pre-dialing a call: Green LED.
- In call: Red LED.
Hold Press to put an active call on hold.
Redial Press to call the last num er dialed.
Speaker Press to activate the speakerphone for hands free
conversations.
Volume up/down Press to increase or decrease the volume of the
ringer tone or speakerphone.
6
Message Press to retrieve voice messages.
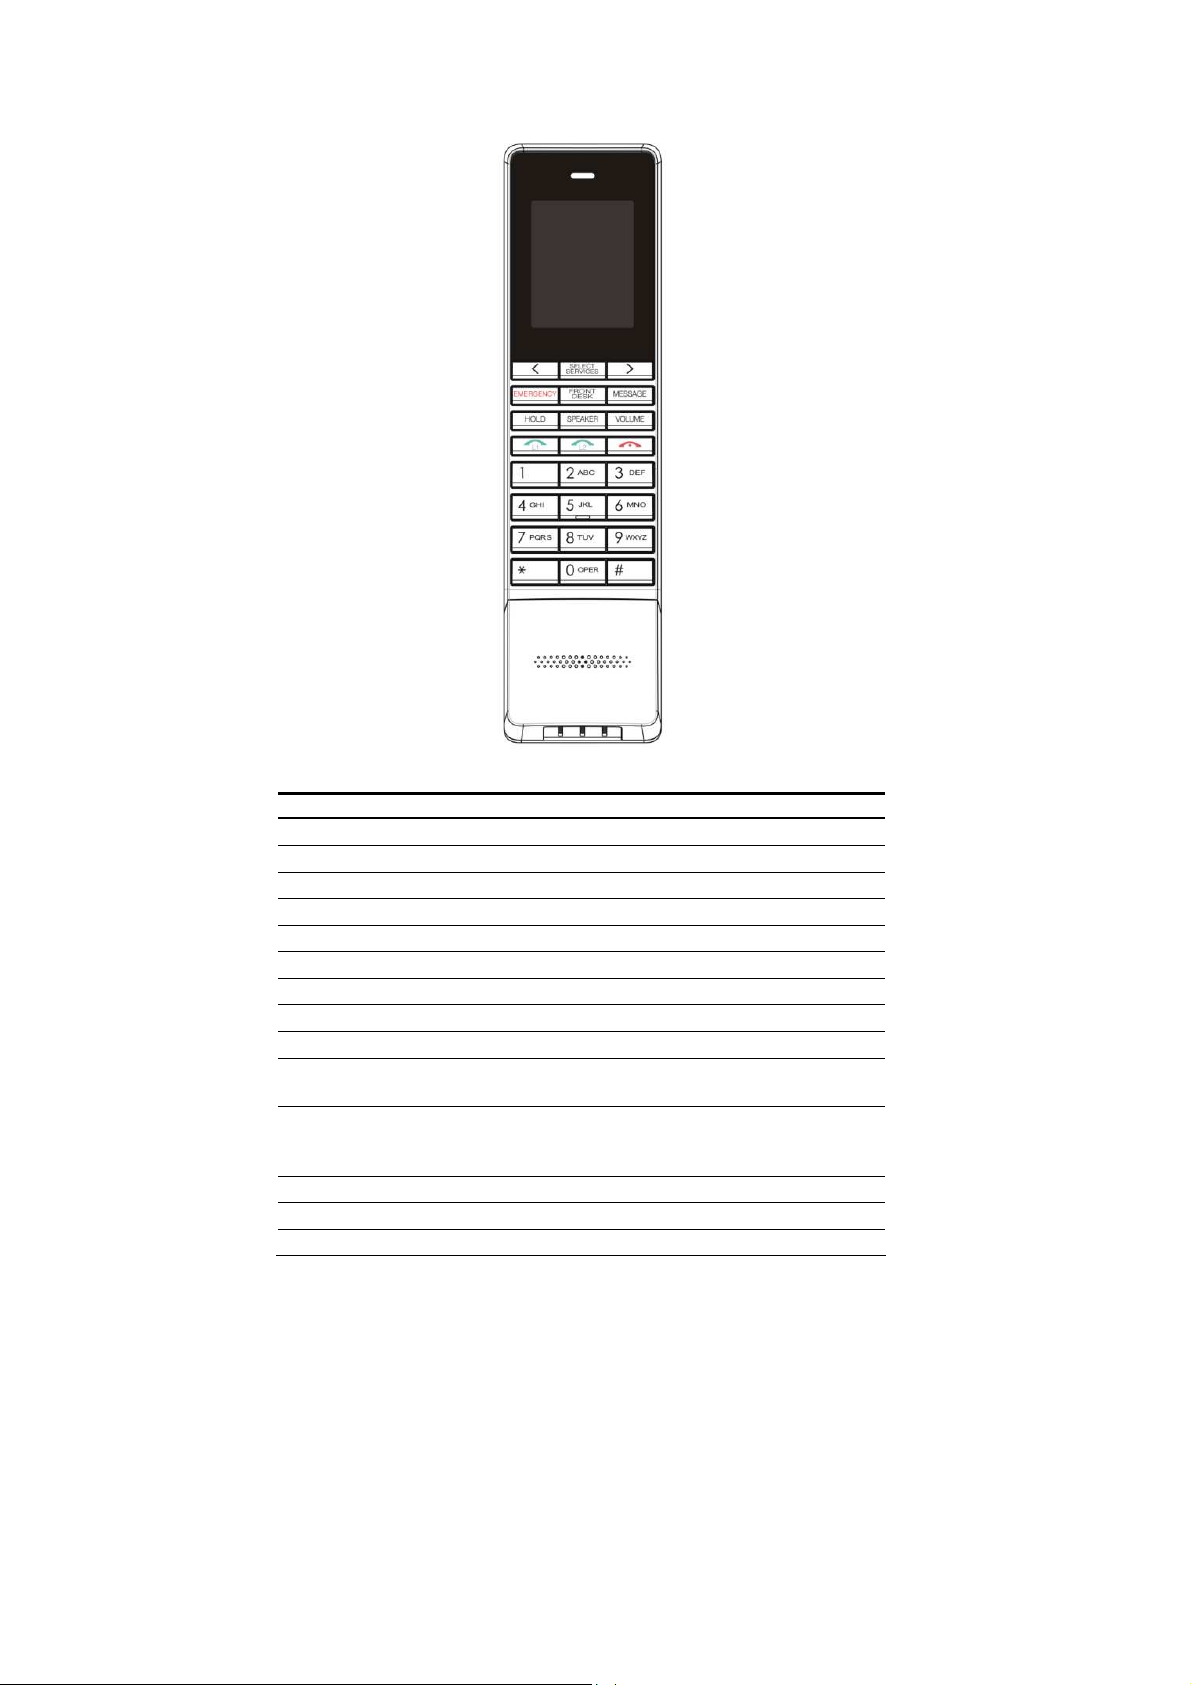
2 Handset keys
Name Descri tion
Display screen Displays calls and status information.
SELECT SERVICES key Press enter service function
Right / Left key Press to choose service function.
LINE 1 / LINE 2 There are two LINEs ottom in this handset.
END key Press to end the phone call
Alphanumerical keys Press these keys to enter phone num ers and texts.
Function keys
HOLD (2 line only) Press to put an active call on hold.
MUTE (single line only)
Press to mute MIC.
SPEAKER Activates the speakerphone to allow hands free
conversations.
VOLUME Press to increase or decrease the volume of the ringer
tone, handset, or the volume of the current call using
the speakerphone.
MESSAGE Press to listen to voice messages.
FRONT DESK Press to contact with front desk service.
EMERGENCY Press to make an emergency call.
B
Ba
ac
ck
k
V
Vi
ie
ew
w
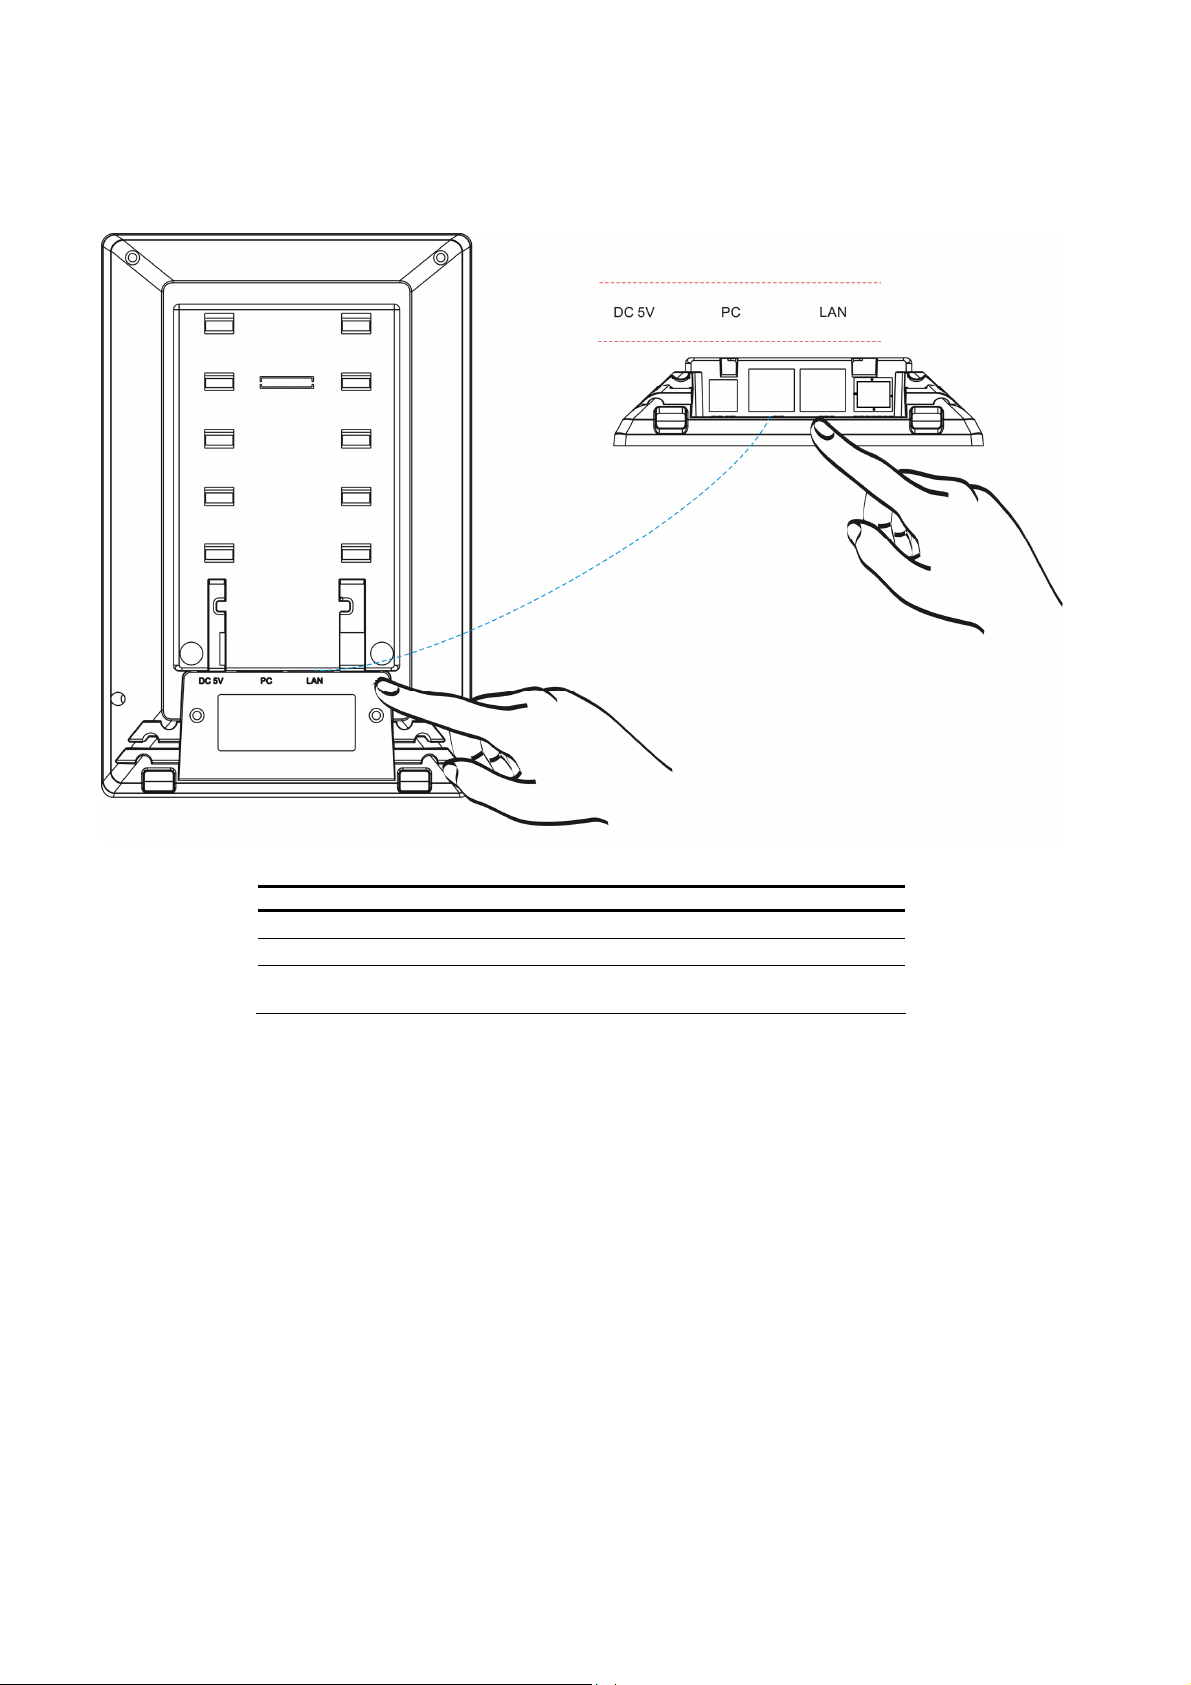
NO. Name Descri tion
1 LAN port Connects to HUB, ADSL, or Switch(PSE)
2 PC port Connects to computer
3 DC 5V Power jack
Connects to AC power adapter. (Optional. While ase
unit is not powered via a PSE)
C
Co
on
nn
ne
ec
ct
ti
in
ng
g
t
th
he
e
P
Ph
ho
on
ne
e
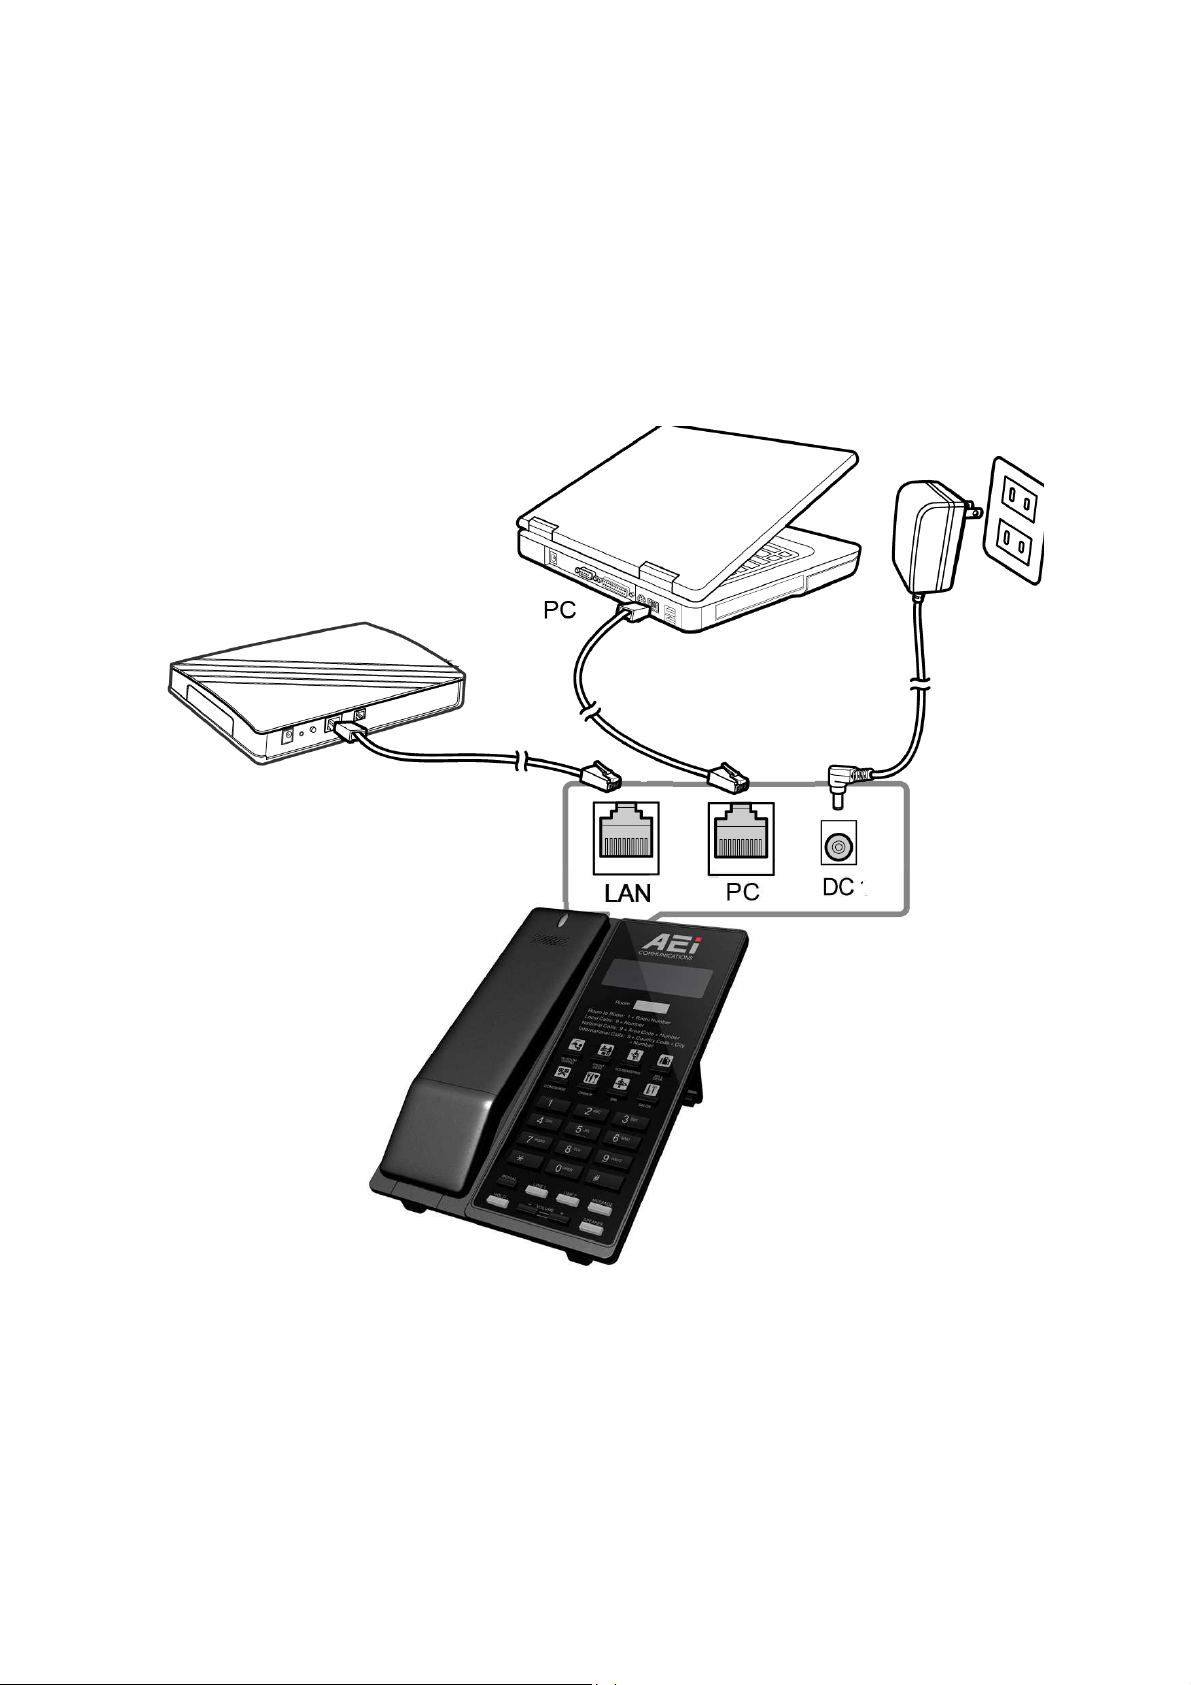
The following illustration shows how to connect the power, LAN and PC ports of VoIP phone.
Power outlet
HUB

The following illustration shows how to install the phone and stand.
The following illustration shows how to install the handset and attery.

3 O eration
A
An
ns
sw
we
er
ri
in
ng
g
a
a
C
Ca
al
ll
l
An incoming call is indicated y a ringing tone and a flashing indicator at the top of oth handset and ase units. You
can answer the call y doing one of the followings:
• Pick up the handset to answer the call.
• Press the Line (Line1/Line2) key on the ase or handset to answer the call.
M
Ma
ak
ki
in
ng
g
a
a
C
Ca
al
ll
l
Dialing with the Key ad
• Enter the telephone num er with the alphanumerical keypad.
• After entering the num er you want to call, press the # key to force dialing or wait for 4 seconds efore the num er
is dialed automatically.
U
Us
si
in
ng
g
t
th
he
e
S
S
e
ee
ed
d
d
di
ia
al
l
k
ke
ey
ys
s
You can use the 8 pre-assigned speed dial hotkeys, to configure the most commonly dialed num ers. Use the function
to dial a num er quickly, instead of keying in a complete num er.
To call a num er using speed dialing, follow the steps elow:
• Press the speed dial hotkey that has een pre-assigned to the phone num er and the call will start automatically.
C
Ca
al
ll
l
O
O
t
ti
io
on
ns
s
While a call is in progress, a num er of additional options are availa le.
U
Us
si
in
ng
g
t
th
he
e
S
S
e
ea
ak
ke
er
r
P
Ph
ho
on
ne
e
For hands free operation, you can use the uilt-in speaker to talk on the phone. To use the speakerphone, follow the
steps elow:
• While talking on the phone, press the S eaker key on the phone to ena le the Speakerphone function.
• Press Speaker key again to terminate the call.
P
Pu
ut
tt
ti
in
ng
g
a
a
C
Ca
al
ll
l
o
on
n
H
Ho
ol
ld
d
You may want to put a call on hold temporarily while doing some work or attending to a second incoming or outgoing
call. To put a call on hold, do one of the following:
• Press the Hold key on the phone to put the call on hold.
• When you receive a second call, press the next availa le LINE key to attend to the new call, and the first call will e
put on hold automatically.
C
Ch
ha
ar
rg
gi
in
ng
g
t
th
he
e
H
Ha
an
nd
ds
se
et
t
B
Ba
at
tt
te
er
ry
y
You would need to charge the handset attery efore using the handset.
• Install the attery into the handset.
• Place the handset onto the ase unit and ase unit will start to charge the handset automatically.
• The charging indicator lights up in red during charging progress. The LED goes off after the handset attery is
fully charged.
C
Ch
he
ec
ck
ki
in
ng
g
V
Vo
oi
ic
ce
e
M
Me
es
ss
sa
ag
ge
es
s
If the message waiting indicator at top of handset or ase unit lights up in red, it indicates that there are one or more
new messages in voicemail ox.
• Press the VOICE MAIL key on the phone to retrieve voice messages.
(An external ITSP or PBX must support voice message feature. And you need to set a voice message code efore using
the voice mail feature.)

Using the service function
You can use the pre-assigned service function, to configure the most commonly dialed num ers. Use the function to
dial a num er quickly, instead of keying in a complete num er.
To call a num er using speed service dialing, follow the steps elow:
•Press SELECT SERVICES key and use right/left key to select service.
•Press SELECT SERVICES key again to precede service dial.
Pairing handset and ase unit
To pairing handset and ase:
•Put handset on the ase, the ase will start pairing automatically.
•After finished pairing, the ase will play the eep tones.
Charging the Handset Battery
You would need to charge the handset attery efore using the handset.
•Install the attery into the handset.
•Place the handset onto the ase unit and ase unit will start to charge the handset automatically.
•This icon will show on your display during charging progress.

FEDERAL COMMUNICATIONS COMMISSION INTERFERENCE STATEMENT
This equipment has been tested and found to comply with the limit s for a Class B
digital device, pursuant to Part 15 of the FCC Rules. These limits are designed to
provide reasonable protection against harmful interference in a residential installation.
This equipment generates, uses and can radiate radio frequency energy and, if not
installed and used in accordance with the instructions, may cause harmful
interference to radio communications. However, there is no guarantee that
interference will not occur in a particular installation. If this equipment does cause
harmful interference to radio or television reception, which can be determined by
turning the equipment of f and on, the user is encouraged to try to correct the
interference by one or more of the following measures:
-- Reorient or relocate the receiving antenna.
-- Increase the separation between the equipment and receiver.
-- Connect the equipment into an outlet on a circuit different from that to which the
receiver is connected.
-- Consult the dealer or an experienced radio/TV technician for help.
CAUTION:
Any changes or modifications not expressly approved by the p arty responsible for
compliance could void the user's authority to operate the equipment.
This device complies with part 15 of the FCC Rules. Operation is subject to the following two
conditions: (1) This device may not cause harmful interference, and (2) this device must accept
any interference received, including interference that may cause undesired operation.
FCC RF Radiation Exposure Statement:
1. This Transmitter must not be co-located or operating in conjunction with any other antenna or transmitter.
2. This Base Unit complies with FCC RF radiation exposure limits set forth for an uncontrolled environment.
This equipment should be installed and operated with a minimum distance of 20 centimeters between
the radiator and your body.
Handset Unit SAR tests are conducted using standard operating positions accepted by the FCC with the
transmitting at its highest certified power level in all tested frequency bands. Before a new model
is available for sale to the public, it must be tested and certified to the FCC that it does not
exceed the exposure limit established by the FCC, Tests for each phone are performed in positions
and locations (e.g. at the ear and worn on the body)as required by the FCC.
Table of contents
Other AEI Cordless Telephone manuals

AEI
AEI VM-8208-SMKS User manual

AEI
AEI MIP-300 User manual

AEI
AEI VX-8208-SMBU User manual

AEI
AEI AGR-8106-SMK Non-Display User manual

AEI
AEI SGR-8106-SMKE User manual

AEI
AEI AGR-9206-SM User manual

AEI
AEI VM-8208-SMK User manual

AEI
AEI GR-8206-SPB User manual

AEI
AEI VX-8208-SMBU User manual

AEI
AEI VX-8208-SPB User manual


