AerialBox t2100 User manual

T2100
User Guide

2

3
Welcome
Thank you for choosing the Dish TV aerialBox T2100 FreeviewPlus™ Set
Top Box. You will be able to receive all Freeview High Denition and
Standard Denition digital channels, as well as FreeviewPlus™ bringing the
most popular shows from On Demand and Live TV together all free from
subscriptions.
iManual
A digital and up to date version of the Manual is built into your unit, we
update the iManual frequently so that you get the latest information.
To access the iManual go to Menu > User Manual

4
Connecting Up.....................................................................................................9
Getting Started....................................................................................................10
About your Set Top Box.........................................................................................
Main Features .................................................................................................
What’s in the Box?...........................................................................................6
6
ProductOverview..................................................................................................
Front and Back View.......................................................................................
Remote Control...............................................................................................7
8
Main Features.......................................................................................................
Changing the Channel ..................................................................................
Information Banner...........................................................................................
Service and Carrier Details.............................................................................
Quick Select....................................................................................................
TV / Radio Mode............................................................................................
Apps...................................................................................................................
Audio Descriptions............................................................................................
Subtitles.............................................................................................................
12
12
12
13
13
14
14
15
Contents
Electronic Programme Guide (EPG).................................................................16
FreeviewPlus™.....................................................................................................17
Main Menu..........................................................................................................24
Frequently Asked Questions..............................................................................52
Placing your Unit................................................................................................54
Technical Specications....................................................................................55
Quick Troubleshooting.......................................................................................56
Support Information............................................................................................57
38
40
41
42
43

5
a whole new way to enjoy TV

6
• Built in WiFi
• USB PVR Recording*
• The best of both worlds - Watch Live & On Demand**
• Switch easily between Live TV & On Demand content
• Featured Shows - for the latest & greatest in Free TV Entertainment
• Personalise your FreeviewPlus with Your Favourites
• Reminders to notify you when your show's about to start
• Search Live & On Demand by Genre/Title
• Enhanced TV Guide - 8-days forward and back in time
• Record* while watching On Demand**
• View iManual On Screen
What’s in the box?
Features
About Your Set Top Box
Some items missing?
Please contact the retailer or
store you purchased this from.
• 1x T2100 Unit with Power Pack
• 1x Remote Control
• 2x AAA Batteries
• AV Lead
• 1x Quick User Guide
*Recording - Requires an External USB Device (Not Supplied). Channel selection is limited when recording,
some combinations may not be available.
**On Demand - Requires broadband access through a service provider. FreeviewPlus™ is a metered service,
and usage will count towards the data limit of your broadband plan.

7
Front View
Back View
1. Cable In
Input from aerial.
2. Cable Out
Output to another device.
3. Ethernet Port
For Wired Internet connection.
4. USB
Media Playback/ Firmware
upgrade.
5. HDMI Output
6. Audio L and R
7. AV Video Out
Yellow connection to non HD TV.
8. Coaxial
9. DC 12V IN
Connect power supply.
1. Power Button
Switches on/off the receiver
2. USB Input Port
Plug in a USB drive for
recording.
1
2
1 2
4
3
5
6
Product Overview
7
89

8
Remote Control
Mute
Mute
Power
Library Back / Return
Channel + / -
Volume + / -
EPG / Guide
Apps Portal
Select Arrow Keys
Exit
Main Menu
Interactive Buttons
Rewind, Fast Forward
Play / Pause
Skip Back / Forward
Info Button
TV / Radio Toggle
Stop
Record
Network Stats
Settings
Teletext

9
Connect the cable from your aerial
to the CABLE IN socket in the back
of your receiver.
Connecting to your TV
Connecting using a HDMI Cable
Connect one end of the HDMI
cable into the HDMI socket on
the back of the receiver, then
connect the other end to the
HDMI input sockets on your HD
Ready TV.
Connecting using an AV Cable
If your TV doesn’t have HD
compatibility, you can connect
the receiver using the supplied AV
Cable, using the Red, White and
Yellow sockets on both your TV
and receiver.
Please note if you are using an AV
connection then it is not possible
to view programs in High Denition.
HD Ready TV
Connect your supplied AV
Cable into the correct Red,
White and Yellow sockets.
Connecting Up
Connecting to the Aerial
10
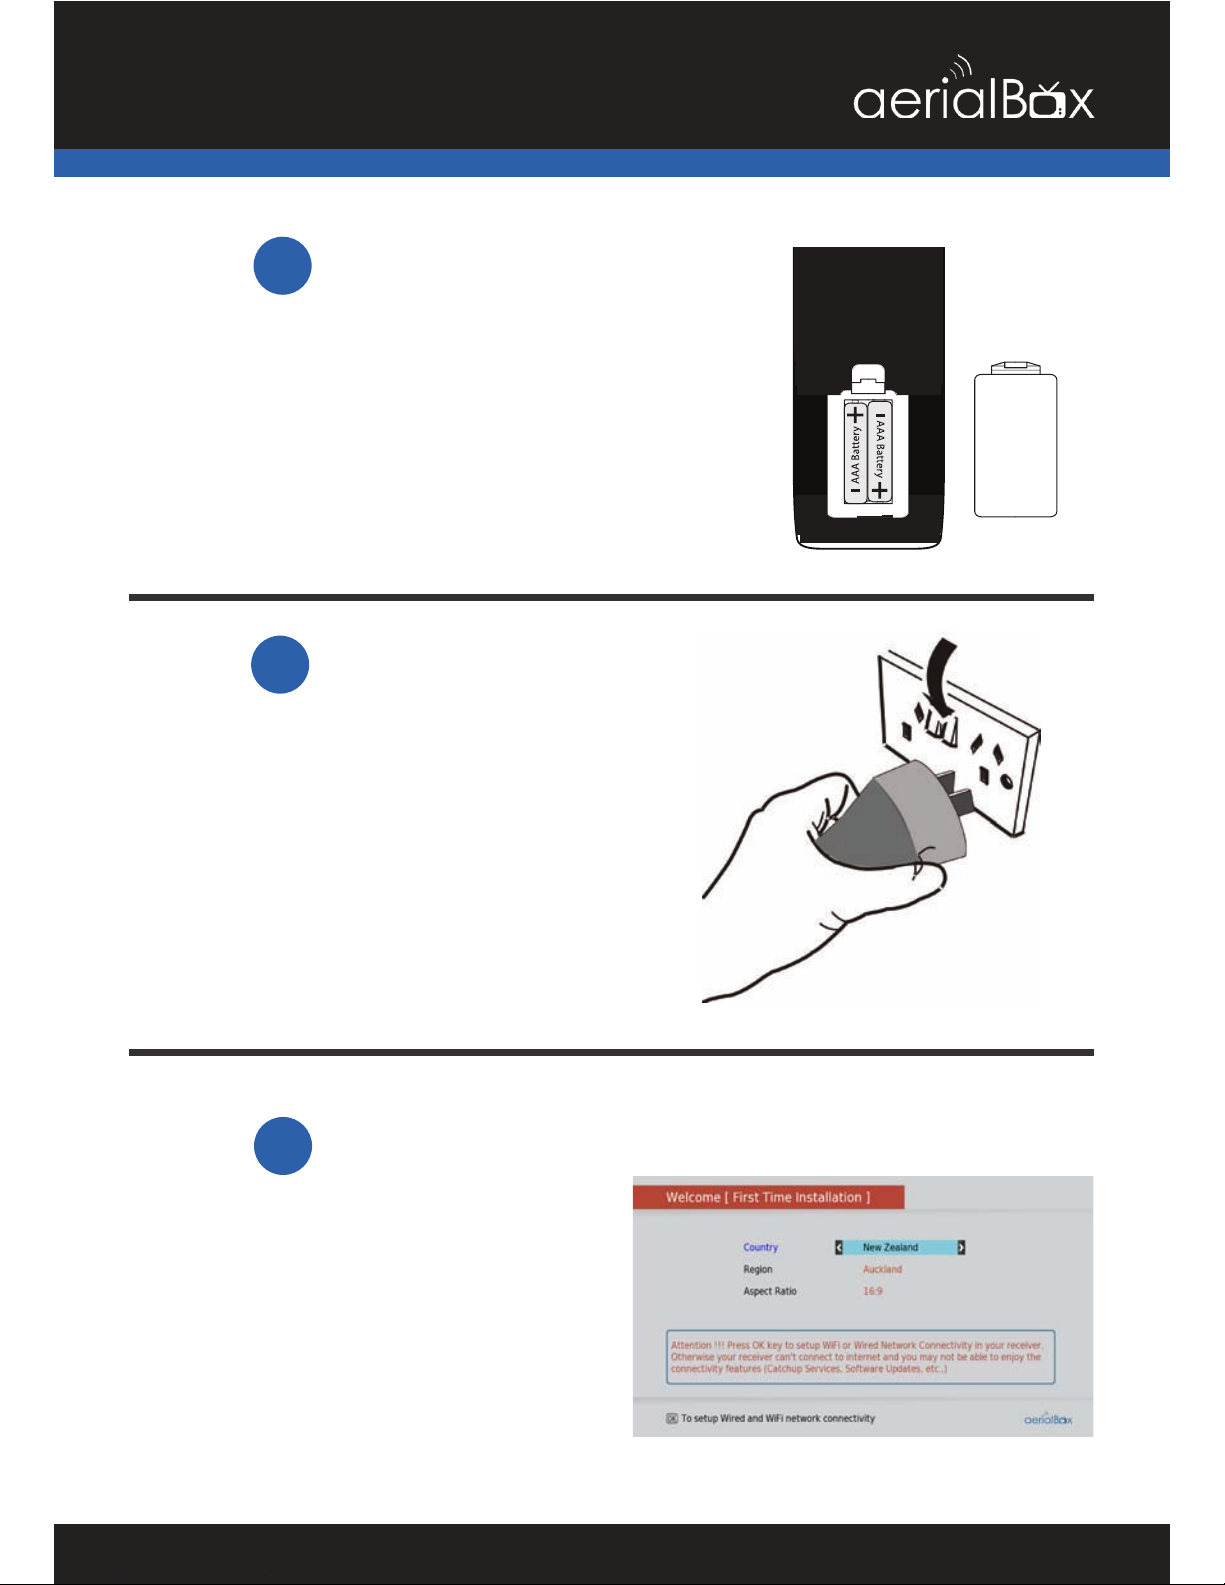
Open the battery cover of the remote
control and put two AAA size batteries
so the ‘+’ and ‘-’ marks on the batteries
match the ‘+’ and ‘-’ marks inside the
remote control. Replace the battery
cover.
Install batteries in the remote control
Plug the AC adapter into the wall
socket and switch on, then switch your
TV on and select the correct video input
(i.e. HDMI1 or AV)
The Receiver will take some time for it to
boot up as part of the initial installation.
Plug in and switch on
2
The welcome screen should appear on
your TV.
Select your Country, Region and Aspect
Ratio to begin the quick setup process.
First time installation screen
1
Step
3
Step
Step
Getting Started

11
1. Choose your Internet connection
type by selecting either Wired
(if you have a Ethernet cable
connected) or Wireless (if you have
a wireless router).
If you have no access to the
Internet, simply press the blue
button to skip and begin scanning
for Freeview channels. You can
always setup internet connectivity
later on if you wish.
2. Wait for the unit to scan for all
available channels, the amount
of channels vary between areas
which may take a few minutes to
tune in.
If you need to stop the tuning
process at any time, press the exit
button.
Installation Setup
No Channels?
Check for the following:
• Using a UHF aerial, not a dish?
• In the Freeview UHF area?
• Aerial aligned properly?
• Transmission Issues in your area?

12
Your Set Top Box comes packed full of great features which you can use right
away, this section will tell you the basic functions of the receiver so that you can
get used to it.
Changing the channel
Use your remote to quickly change
the channel, you can use either the
numeric pad on the top half of the
remote or you can use the + CH -
button.
Press the BACK button to view the
previous channel selected.
Info Banner
When you change the channel, the
Info Banner will display on the bottom
of your screen. This will tell you what
channel you are on and what the
current programme is and what’s on
next. Go to Page 19 to view more
on the mini guide that appears when
changing the channel.
1. Current Channel No. & Name
2. Current Programme
3. Rating
4. Date and Time
5. Channel Specs
15
23
Extended Service Information
Pressing the INFO button twice will
display the technical information
about the channel; including the signal
strength.
This is very useful when you want to
provide a support tech with additional
information
Main Features
4

13
Quick Select
Allows you to see the full list of channels
available to watch and quickly switch.
The HD icon on the right of some
channels let's you know that the
channel is broadcast in High Denition.
1. Press OK on your remote.
2. Use the ▼▲ keys to select a
channel.
3. Press OK to view that channel.
TV / Radio Mode
You can access either TV or Radio
channels by simply pressing the TV /
Radio button.
Radio Channels are audio only and
to preserve the screen from image
burning, a blank screen will appear
while audio is being played. You can
still access the Menu and Info options
on your remote and this will wake the
screen up.

14
Apps
Your online entertainment can be found
in the apps portal, here you can access
catch up services, games and more*.
Simply press the Apps button on the
remote and choose your service.
Some apps may require you to login to
an account to view content, in most
cases the services will be free unless
specied.
*Apps may be added or removed at any
time, all decisions about apps are made by
the broadcaster themselves and not by Dish
TV.
Audio Descriptions
Audio Descriptions are helpful for those
who are visually impaired, Audio
Descriptions narrate the programme
so that you can understand what is
happening in a scene.
Audio Descriptions are only available
on TV One and TV2 and with selected
programmes only with the icon in
the Freeview EPG.
1. Press the Settings key on the remote.
A menu will appear, select Audio
Selection.
2. One of the ENG audio streams will
have a small AD icon appear, select this
stream and press OK.
15
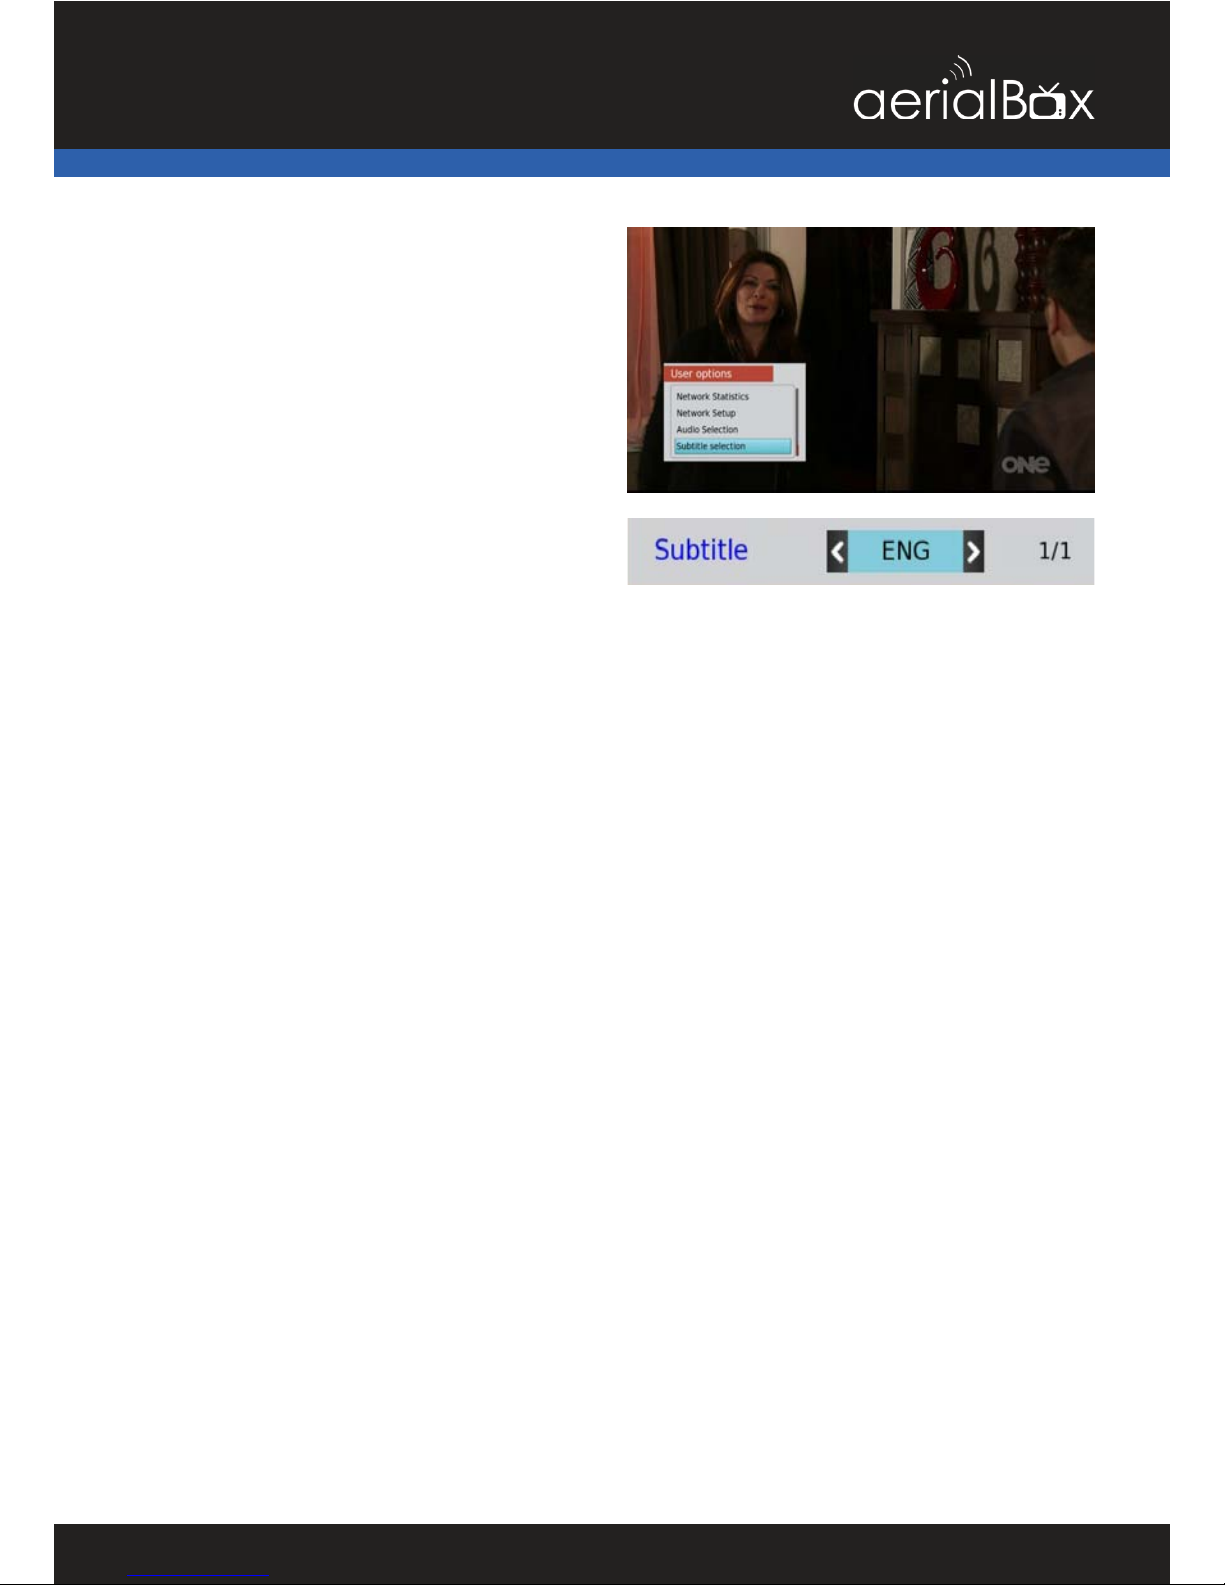
Subtitles
This feature is for those who are Hearing
Impaired.
1. Press the Settings key on the remote.
A menu will appear, select Subtitle
Selection.
2. Toggle so that ENG is selected, press
OK to conrm and the Subtitles will
appear shortly after.

16
Looking to Record?
You can nd out how to record from the
Freeview EPG on Page 34 REC2
Weekly EPG
Another way to get the guide is the
built in EPG, which does the same as
the Freeview EPG but displays data
differently.
Launching the Built-in EPG
1. Press the Menu > EPG
2. Wait for the guide to load.
3. You will have the EPG viewed with
the current channel listings.
Navigating Around
Use the ▼▲ keys to scroll up and down
on the channel’s schedule.
Use the ◀▶ keys to scroll through the
channels.
Press the Green Button to view the
schedule for the next day.
Press the Yellow Button to view the
schedule for the previous day.
Press the INFO button to view more
information about the highlighted show.
Press the Red Button to book a show to
record, confirm if you wish to record the
whole series or just the single episode.

17
A better way to TV! With FreeviewPlus™
The smartest way to enjoy TV bringing the most popular shows from On
Demand and Live TV together.
•Switch easily between Live TV & On Demand
•8-days forward & 8-days catch up TV Guide
•Easily nd & discover On Demand/Live TV shows
•Reminders notify you when your show is starting
•Personalise FreeviewPlus™ with Your Favourites
•Plus all the Freeview channels
Launching FreeviewPlus™
A prompt will appear on the top left
corner of your screen,
When the prompt appears, press the
Green Button on your remote to launch
the Mini Guide. Or if you wish to go
directly to the Catch Up App press the
Red Button.
The FreeviewPlus™ banner will look
different on certain channels, that is
because some channels do not have
any catch up service, the images on
the right show what the banner will look
like on certain channels and what this
means.
For more information
visit freeviewplus.com.au for more
info on FreeviewPlus. i
18
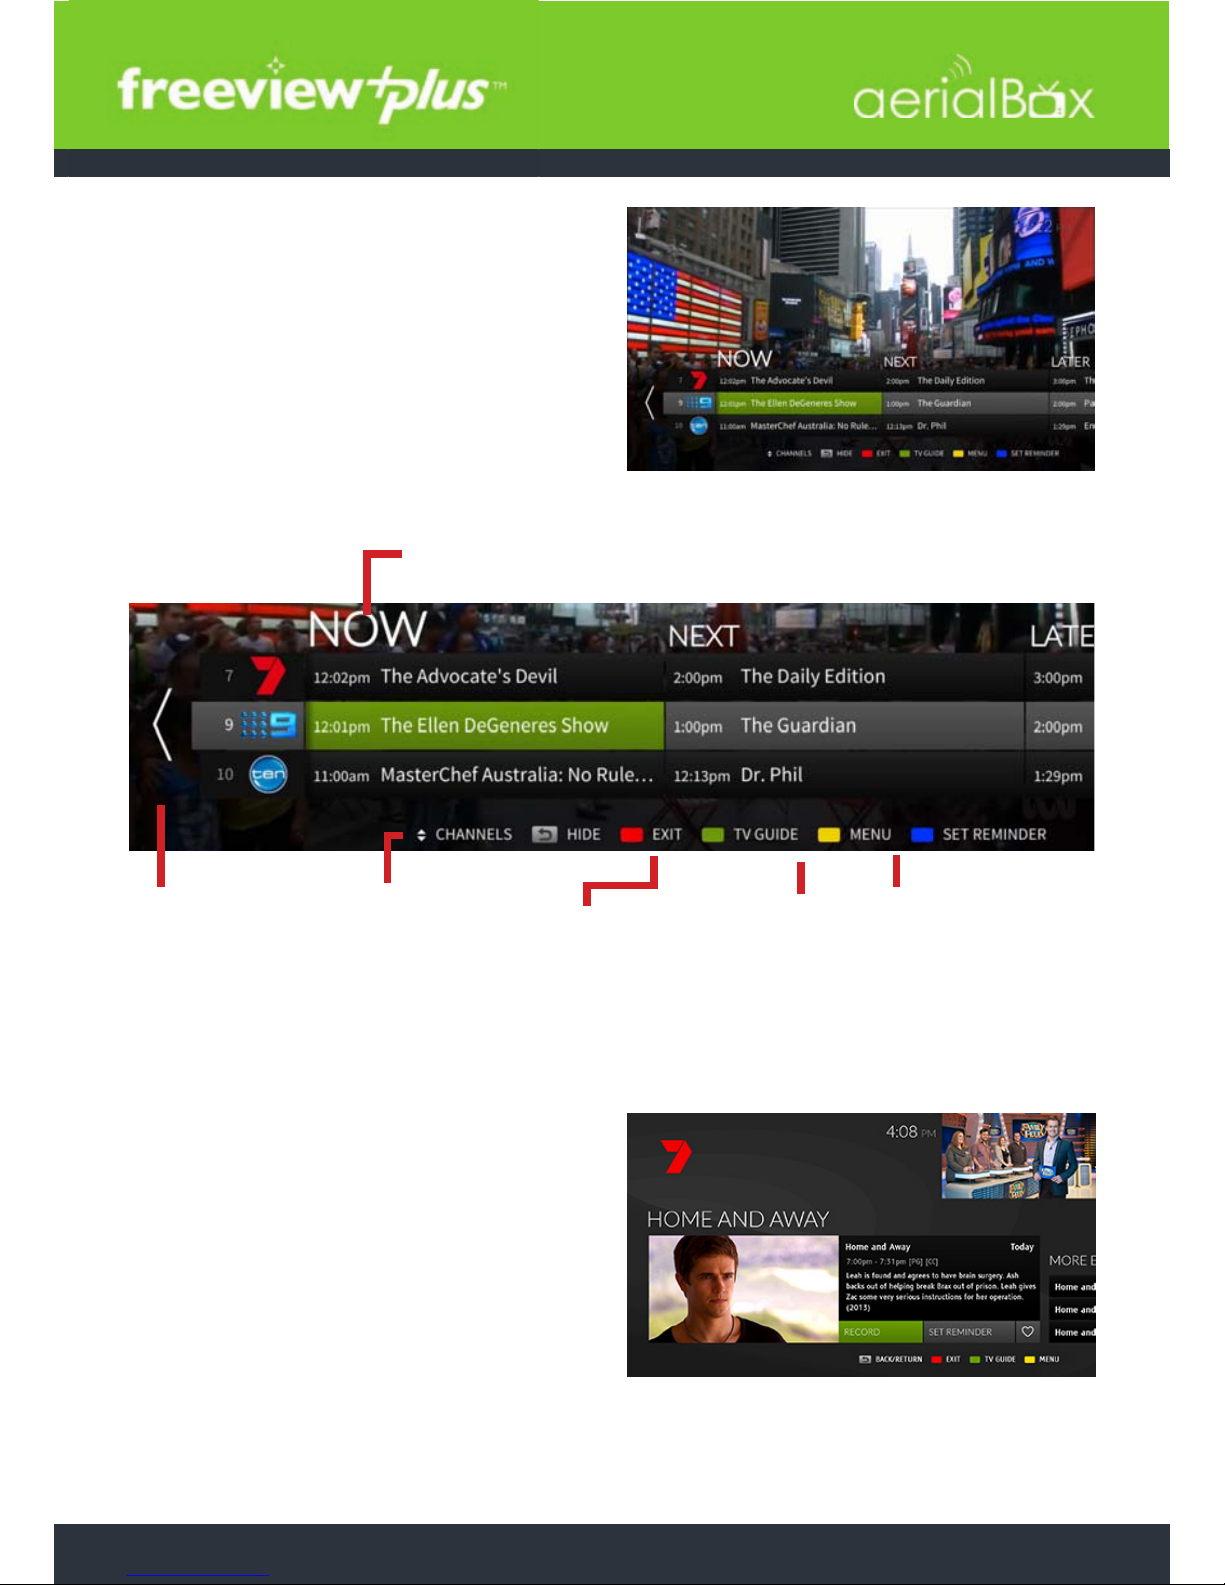
Mini Guide
The mini guide enables you to browse
through listings for the next 8 days
while watching the current channel
uninterrupted. To open the mini guide
press the red button at any time when
watching any channel on Freeview.
Go to Featured
Shows, Movies and
More plus adjust
any settings for
FreeviewPlus.
Access and choose
an On Demand
App to watch
online TV.
Previous Day Next Day
View Show Synopsis
Press the OK button on a show you
wish to view more information on,
from here you can choose to watch
the programme (If it’s on live TV right
now), Book the show to record, add the
programme to your favourites or set a
reminder.
What's On Now
Catchup Guide
View the last 8
days of catch
up TV from the
guide.

19
Full Guide
The full guide enables you browse
through more channel listings for the
next 8 days, to view the full guide,
open up the Mini Guide by pressing the
Green button, press the Green button
again to open the full TV guide.
Scroll through the
channel listings
using the ▼▲
keys on your
remote.
Alter the settings of
FreeviewPlus. Highlight
a show
and set a
reminder
Live TV preview
Selected show synopsis
Access the
catchup guide.
Close the
FreeviewPlus guide
and return back to
live TV.

20
Set a Reminder
1. Press OK on a show within the
FreeviewPlus™ guide that you
would like to set a reminder*.
2. Highlight and select then conrm
when you will be notied before
the show starts. You will then have
to set whether you would like to be
reminded for the entire series or just
the single episode.
3. A clock icon in the guide will
appear to let you know it’s set.
Favorite a Show
Set show favourites and build up a
collection of TV series or movies which
you can easily catch up on.
1. To set a favorite, nd a show in the
FreeviewPlus Guide and press OK to
view it’s synopsis
2. Highlight the Heart icon and press
OK to add the show as a favorite.
To view your favourites collection, simply
press the Yellow Button to open up the
side menu, then select Favourites to
view shows and movies you can catch
up on via the built in On Demand Apps.
*Pressing the BLUE button on a selected show within the
FreeviewPlus™ guide will also allow you to quickly set a
reminder.
Other manuals for t2100
1
Table of contents
Other AerialBox Receiver manuals


