Aervoe Sierra Wave EnerPlex 9700 User manual

OPERATING INSTRUCTIONS
#9700 EnerPlex
Power Center
AERVOE INDUSTRIES, INC.
Gardnerville, NV 89410 • 1-800-227-0196
www.aervoe.com • mailbox@aervoe.com
97000inst; cs05/18
TABLE OF CONTENTS Page No.
Important Warnings & Safeguards 2
FCC Requirements 3
Parts Identification 4
Set-Up Instructions 7
Charging & Storage 7
Using Power 8
Shutdown & Storage 10
Frequently Asked Questions 10
Care & Maintenance 10
Troubleshooting 11
Specifications 12
Typical Charging Times 13
Typical Operating Times 13
Warranty 14

2
#9700 SIERRA WAVE ENERPLEX POWER CENTER
EnerPlex Power Center by Sierra Wave is a reliable, portable energy source for times when standard
120V AC or 12V DC power is not available. Use it to operate your appliances when the power is out,
tools on the job, lighting while camping, or any time power is needed in a remote location. Unlike
gasoline generators, the EnerPlex Power Center doesn’t emit carbon monoxide and is completely silent
which makes it safe and convenient to use indoors.
The EnerPlex Power Center is equipped with a high-capacity 1200 watt-hour Samsung NMC lithium
battery for safe, reliable operation. It also includes a 1000-watt pure sine wave inverter to power AC
devices. The unit may be charged in 3 different ways and can be done while you operate your devices.
1. 120V AC (wall charger included)
2. 12V DC vehicle power (12V DC charger included)
3. Solar charging (sold separately) using either Sierra Wave #9680 80-watt or #9690 120-
watt Solar Panel or other compatible panels.
Multiple power outputs for devices.
1. 120V AC, 10A
2. 12V DC, 10A
3. 5V USB, 2.4A
4. 19V Laptop, 6.3A
IMPORTANT WARNINGS & SAFEGUARDS
1. Read all instructions thoroughly before operating this unit to avoid injury to self or property and
to avoid damaging the unit. Keep instructions handy for reference during use.
2. STOP! Charge the internal battery before using for the first time. See charging information
below.
3. WARNING: Do not disassemble unit. There are no user serviceable parts. Contact Aervoe
Industries, Inc. at 800-227-0196 for all repairs. Failure to do so can cause injury and voids the
warranty.
ENERGIZED EQUIPMENT - ELECTRICAL SHOCK & EXPLOSION HAZARDS
GENERATES LETHAL VOLTAGES
• Do not submerge in liquid or operate in wet environments. Device is not waterproof
or water resistant. Operate in dry environments only. Failure to do so could cause
injury and damage the unit.
• Do not operate in flammable or explosive environments
• Do not operate if the unit is damaged in any way including loose electronics or if
charging cords are frayed and wires are exposed.
• Do not plug inverter 120V AC outlets into external 120V AC outlets of any kind
• Do not place foreign objects inside the power outlets
• Do not use any AC powered devices over 1200W (10A) for risk of damage to the
batteries or inverter
• Monitor battery regularly during charging
• Consult your physician before using with CPAP devices or other non-life support
medical equipment
• Do not block the air inlets or vents
• Do not replace fuses with larger amperage values. Use only specified fuses.
• Not recommended for use or storage below 14º (-10ºC) or above 120ºF (49ºC).
• Place out of direct sunlight to prevent overheating.
• Administer close supervision when operating around children

3
DANGER: Contains lithium high-energy batteries. Follow all precautions to prevent injury, property
damage and fire at all times during storage and operation.
• Keep away from sparks, open flames and heat sources
• Do not drop, puncture or incinerate
• Stop use immediately if you notice a leak or damage to the battery or unit. If it
malfunctions, contact Customer Service at 800-227-0196.
• Battery SDS is available online at www.aervoe.com
• Follow your local battery disposal regulations
Battery SDS is available online at www.aervoe.com.
FCC REQUIREMENTS
Warning: Changes or modifications to this unit not expressly approved by the party responsible for
compliance could void the user’s authority to operate the equipment.
Note: This equipment has been tested and found to comply with the limits for a Class B digital device,
pursuant to Part 15 of the FCC Rules. These limits are designed to provide reasonable protection
against harmful interference in a residential installation. This equipment generates, uses, and can
radiate radio frequency energy and, if not installed and used in accordance with the instructions, may
cause harmful interference to radio communications. However, there is no guarantee that interference
will not occur in a particular installation. If this equipment does cause harmful interference to radio
or television reception, which can be determined by turning the equipment off and on, the user is
encouraged to try to correct the interference by one or more of the following measures:
• Reorient or relocate the receiving antenna
• Increase the separation between the equipment and receiver
• Connect the equipment into an outlet on a circuit different from that to which the receiver
is connected
• Consult the dealer or an experienced radio/TV technician for help
Operation is subject to the following two conditions: (1) this device may not cause harmful
interference, and (2) this device must accept any interference received, including interference that may
cause undesired operation.

4
PARTS IDENTIFICATION
110V-AC OUTLETS12V Output12V OutputsUSB Outputs 19V Outputs
POWER 12V DC Inputs
OFF ON/DC
OFF ON/AC
D
H
Power Button
A
LCD Display
B
AC/DC ON/OFF Switches
C
Anderson DC Input
D
7.4mm DC Inputs
E
Anderson DC Output
F
3 USB Outputs
G
19V DC Laptop Output
H
3 AC Outlets
I
12V Outputs
(barrel port & 6.5 x 3mm port)
J
I
G
F
E
C
B
A
J
FRONT INPUT BACK INPUT
FRONT OUTPUT FUSE COMPARTMENT
7.4mm DC Inputs
K
35 Amp ATO Fuse
M
Anderson DC Input
L
15 Amp ATO Fuse
N
Spare Fuse Holder
O
15
35
O
M N
LCD Display
K
L
12V DC Inputs
J
INPUT & OUTPUT IDENTIFICATION
5
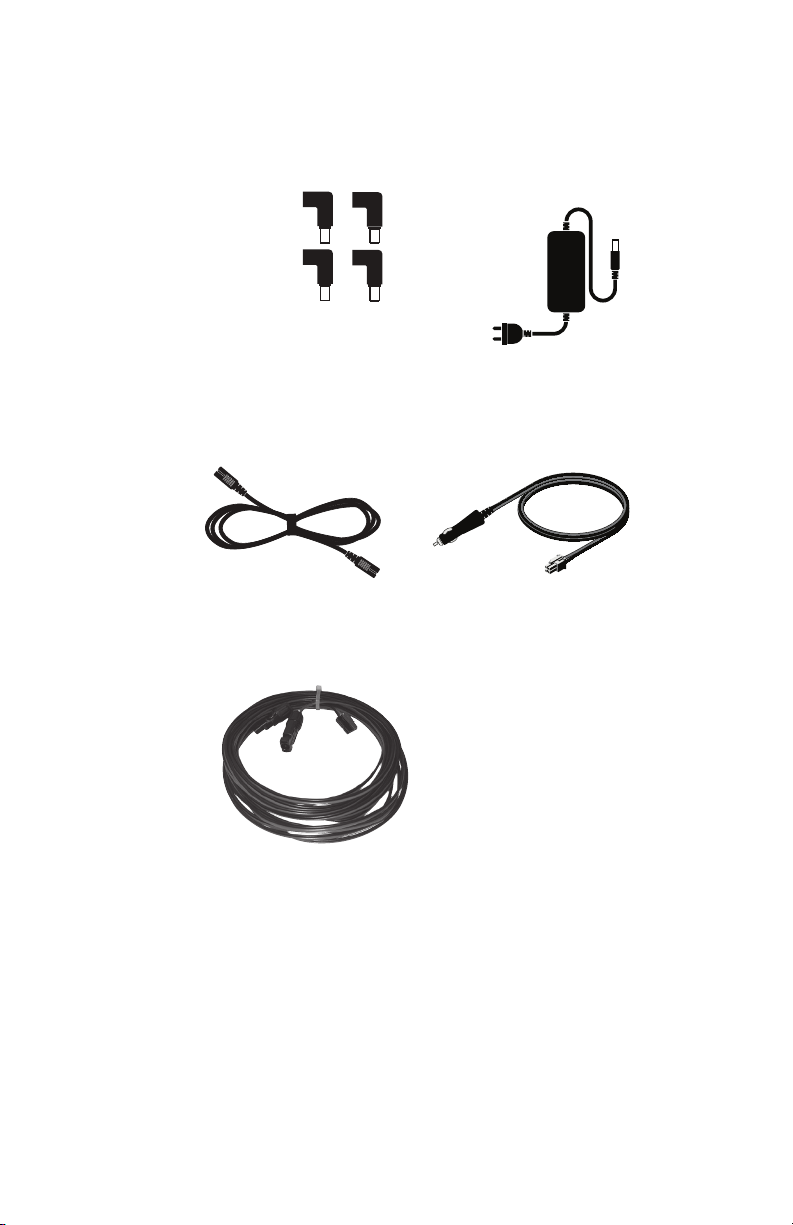
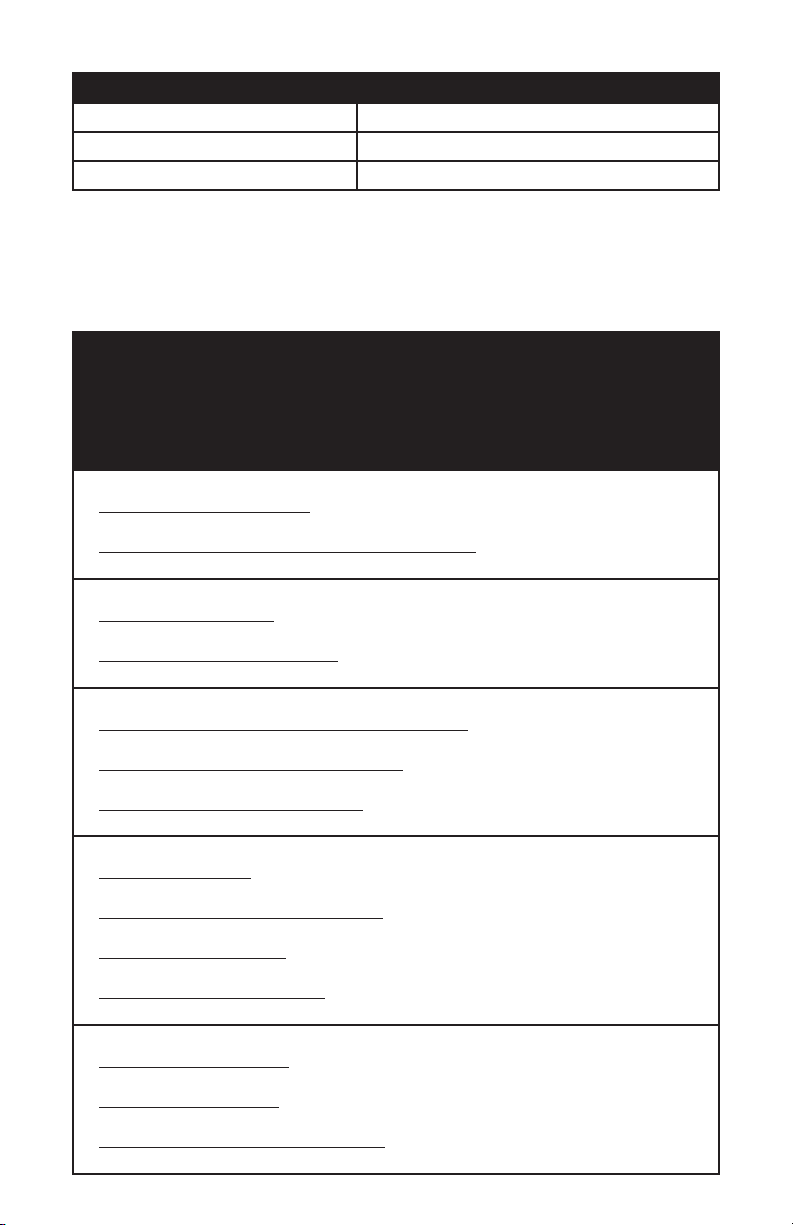
ACCESSORIES
M20 Tip for HP
M11 for Thinkpad
M20 Tip for HP
M9 Tip for Dell
M11 for Thinkpad
M20 Tip for HP
M9 Tip for Dell
M11 for Thinkpad
M9 Tip
for Dell
Use the corresponding tips with the laptop tip cable
to charge your laptop from the 19V output on the
front of the Generatr
M9 Tip
for Generatr
M20 Tip
for HP
M11 Tip
for Thinkpad
110V AC Wall Adapter
Laptop Tip Cable 12V to Anderson Cable
#9504 30 ft. Solar Connecton Cable
MC4 to Anderson
(sold separately)

6
LCD Screen Information
IN
OUT
OUT
Inputs
Wall Outlet Input
Icon will illuminate when charging from a wall outlet.
High Temp Alarm
The internal temperature is too warm, move to a cool location.
Low Temp Alarm
The internal temperature is too cool, move to a warm location.
Input Activated (when spinning)
When the Input Indicator is spinning, the unit is charging from one of its inputs.
Battery
Battery Level Indicator
• All segments lit = Battery full
• No segments lit = Battery empty
• Flashing segments = charging level
Battery Alarm
The unit is malfunctioning, disconnect all loads and reset the unit by
powering it off.
Repair Indicator
Requires repair, contact Aervoe Industries, Inc. for assistance.
Numeric Display
Shows the approximate hours and minutes left at the current discharge rate.
Outputs
Half Power Output
The unit has entered Safe Mode, disconnect all loads and reset by powering it off.
USB Output
Icon will illuminate when the unit is powered on.
12V Output
Icon will illuminate when the unitis powered on and DC switch is ON.
19V / Laptop Output
Icon will illuminate when the unit is powered on and DC switch is ON.
110V Output
Icon will illuminate when the unit is powered on and AC switch is ON.
Output Activated (when spinning)
When the Output Indicator is spinning, the unit is discharging from one of
its outputs.
Output Disabled (when blinking)
When the Output Indicator is blinking, the unit has disabled all outputs.
Refer to Troubleshooting for guidance.

7
SET-UP INSTRUCTIONS
Fuse Installation (included) and Power Check
1. Make sure the unit is off and everything is unplugged.
2. Open the fuse compartment on the back of the unit.
3. Fuses are provided. Firmly insert the 15A fuse first into the right slot and then the 35A fuse
into the left slot (see diagram). There may be a small spark when inserting the fuses. This
is normal as the electrical connection is now complete.
4. Close the compartment.
IMPORTANT: Incorrect placement may cause damage to the unit and not seating fuses
firmly can make the unit inoperable. Replacement fuses can be purchased at most
automotive retailers.
5. Verify the fuses are installed correctly by pressing the Power Button. The LCD Display will
turn on. Turn on the AC and DC switch, you should hear a beep and the cooling fan should
turn on. If nothing happens, remove the fuses and reinstall making sure they are in the
correct location. Replace the fuses if needed.
6. If the battery is too low these features may not activate. In either case, before using for the
first time allow the unit to charge completely without any devices plugged into the outputs
(see CHARGING SECTION).
CHARGING & STORAGE
For maximum efficiency and battery life, fully charge before first use and after each use. During long-
term storage, remove all cables and charge every 3 months. With routine charging the batteries will
maintain proper conditioning. Failure to do so can affect battery performance and life cycle.
Three methods of charging are available:
• 120V AC charger included
• 12V DC charger included
• Solar charging (Sierra Wave #9580 or #9690 Solar Collector is recommended. You will also
need #9504 30ft. Solar Charge Cable.)
Charging While Operating Devices
The Power Center allows you to use all outputs even while it is charging from any of the 3 listed
methods. IMPORTANT: If any output becomes disabled once the unit has been fully charged, simply
disconnect the charging method from the Power Center, operate your device for a few seconds, and
reconnect the charging method.
AC Charging (Only use the one included. Using other adapters can cause damage to the unit.)
Connect the AC plug into your 120V AC wall outlet and the other end with the 7.4 mm plug into 1 of
the 4 inputs (there are 2 on the front and 2 on the back).
The INPUT INDICATOR on the LCD screen will start spinning and the BATTERY INDICATOR will flash
and show the current charge level. Once fully charged, the Battery Indicator will show 5 solid bars. The
LED indicator on the AC charger will also illuminate.
1. Disconnect the charger when finished.
2. Estimate 14-16 hours to fully charge the battery if the level is between 0-1 on the Battery
Indicator.

8
12V DC Vehicle Charging (Only use the 12V to Anderson cable included. Using other adapters can
cause damage to the unit.)
Charge the EnerPlex from any vehicle with a 12V power receptacle.
CAUTION: To prevent a dead vehicle battery, keep your vehicle running while charging.
1. Connect the DC plug into your 12V DC vehicle power receptacle and the red/black
Anderson connectors into 1 of the 2 inputs (there is one on the front and one on the back).
2. The INPUT INDICATOR on the LCD screen will start spinning and the BATTERY INDICATOR
will flash and show the current charge level. Once fully charged, the Battery Indicator will
show 5 solid bars.
3. There is a replaceable protection fuse located inside of the 12V plug. Replace with a
250V/10A glass fuse if needed.
4. Disconnect the charger when finished.
5. Estimate 14-16 hours to fully charge the battery if the level is between 0-1 on the Battery
Indicator.
Solar Charging
This unit includes a built-in solar charge controller to prevent the internal battery from overcharging
and maximize charging efficiency. Charging times are estimated based on ideal sunlight conditions. To
maximize, we recommend angling the solar panel toward the sun as shown.
These instructions are written for use with a Sierra Wave brand solar collector.
1. Read the operating instructions for your solar panel carefully prior to connecting to the
EnerPlex Power Center.
2. Place the solar panel in a sunny location, preferably facing southwest and in direct sunlight.
3. If possible, place the EnerPlex indoors or out of direct sunlight and use the long 30 ft.
charge cable to connect it to the solar panel.
4. Connect the MC4 +/- ends of the 30 ft. cable to the MC4 ends on the solar panel. Connect
the red/black Anderson ends of the cable into 1 of the 2 inputs (there is one on the front
and one on the back).
5. The INPUT INDICATOR on the LCD screen will start spinning and the BATTERY INDICATOR
will flash and show the current charge level. Once fully charged, the Battery Indicator will
show 5 solid bars.
6. The EnerPlex power outputs may be used while it is being charged. This can help to
increase use time.
7. Disconnect the solar panel when finished.
8. Charging time will depend on the type and wattage of the solar panel and the amount of
sunlight hitting the panel. Estimate 14-16 hours to fully charge the battery when using the
Sierra Wave #9690 120W Solar Panel on a bright sunny day.
Solar charging times are estimates based on ideal sunlight conditions. To maximize
charging capabilities we recommend angling your solar panels toward the sun to
receive the most direct sunlight.
90°
Average Performance Best Performance

9
USING POWER
• Once fully charged, the unit is ready to be connected to your electrical devices using any of
the following power outputs. Additionally, the unit may be charged at the same time power
is used.
• Monitor the Battery Indicator in the LCD display for battery status. When the level drops
below 2 bars, stop using and recharge.
• If the battery level is fully discharged, the OUTPUT INDICATOR will flash. At this time all
outputs will be disabled. Once battery level is sufficient, they will function again.
• See troubleshooting section for other battery fault information.
CAUTION: DO NOT use with any life support system. Aervoe assumes no liability, written or implied,
when used with medical equipment.
AC Output – includes a pure sine wave inverter. Do not exceed 1000W or 9A total combined devices
usage.
1. Press the POWER BUTTON. The LCD display will turn on. Verify there is sufficient battery
power to operate your device.
2. Move the AC Switch to the ON/AC position. The cooling fan and inverter should be heard.
3. Plug in your AC device to any of the 3 110V outlets and operate normally.
4. The 110V OUTPUT icon will show in the LCD Display and the OUTPUT ACTIVATED icon will
spin indicating power is being provided to your device.
DC Output
There are 3 types of 12V DC power outputs available. They may be used simultaneously if needed.
• 12V DC/10A barrel power port - standard vehicle power receptacle style
• 12V DC/10A 6.5mm x 3mm power port
• Anderson power port - for devices using Anderson red/black power pole connectors.
CAUTION: Do not confuse this output with the 12V DC charging inputs. Damage could
occur if power input was plugged into this port.
1. Press the POWER BUTTON. The LCD display will turn on. Verify there is sufficient battery
power to operate your device.
2. Move the DC Switch to the ON/DC position.
3. Plug in your 12V device to any of the 3 12V DC outlets and operate normally.
4. The 12V OUTPUT icon will show in the LCD Display and the OUTPUT ACTIVATED icon will
spin indicating power is being provided to your device.
5V USB Output
There are 3, 5V/2.4A rated USB ports available. They may be used simultaneously if needed. All 3 have
the same rating, please disregard the printing for iPhone, General, and Galaxy under each port.
1. Press the POWER BUTTON. The LCD display will turn on. Verify there is sufficient battery
power to operate your device.
2. Plug in your USB device to any of the 3 outlets and operate normally.
3. The USB OUTPUT icon will show in the LCD Display and the OUTPUT ACTIVATED icon will
spin indicating power is being provided to your device.

10
19V DC Laptop Power Output
Four popular laptop adapter tips and charging cord are included to connect your laptop to the EnerPlex
19V DC output port. If your laptop requires a different connector you can use your laptop’s AC power
cord plugged into the 110V AC output.
1. Press the POWER BUTTON. The LCD display will turn on. Verify there is sufficient battery
power to operate your device.
2. Move the DC Switch to the ON/DC position.
3. Identify the correct adapter tip for your laptop and connect it to the charging cord and then
to your laptop. Plug the other end into the 19V DC output and operate or charge normally.
4. The LAPTOP OUTPUT icon will show in the LCD Display and the OUTPUT ACTIVATED icon
will spin indicating power is being provided to your device.
SHUTDOWN & STORAGE
• Disconnect all devices
• Turn off the AC and DC switches
• Press and hold the Power Button until the LCD display turns off
• To maintain battery life the unit should be charged every 3 months, even when not in use.
FREQUENTLY ASKED QUESTIONS
How often will I need to recharge?
All lithium-ion batteries will naturally lose charge over time. To ensure a healthy battery, recharge at
least every 3 months.
Can I replace the battery?
No. There are no user replaceable parts in this unit. Do not open the unit and attempt to replace the
battery or electronics under any circumstances. Injury, electric shock, and damage to the unit could
occur. Doing so will void the warranty If you have questions, please contact Aervoe Industries, Inc. at
800-227-0196.
Can I charge the EnerPlex while it is being used?
Yes, the power outputs can be used while you are simultaneously charging it. However, if the power
you’re drawing is more than the power going into it, the battery will slowly deplete. When the battery
is empty the outputs will become disabled. They will automatically function again when the battery
reaches 20%.
Can I charge it from any vehicle’s 12V power source (car, boat, RV)?
Yes, using the 12V charging feature is perfect for on-the-go charging. Use the 12V charger provided
with the unit. The vehicle should remain running while charging to prevent the vehicle battery from
going dead.
Can I operate multiple power outputs at the same time?
Yes, all of the power outputs can be used at the same time as long as the power requirements do not
exceed the specification for each power port and the battery’s charge level is maintained.
How long will my unit operate my connected devices on a full charge?
This depends on many factors including the charge capacity of the EnerPlex battery and the power
draw from the devices operated. See examples provided below.

11
CARE AND MAINTENANCE
• Charge and use routinely as described
• Dust with a clean dry cloth to prevent dust and dirt from building up on the vents and
power inputs and outputs. Do not use water, detergents, or other chemicals to clean the
unit
• Store in a clean, dry place when not in use
TROUBLESHOOTING
If you are experiencing a problem, please review the following information. If this does not correct the
issue please call our Product Management Department at 800-227-0196 for further assistance.
The power center doesn’t seem to be charging:
1. Make sure that for the chosen charging method, the charging cable is firmly seated in
the charging port and it is connected to the power source correctly (120V AC, 12V DC or
solar).
2. The Input Indicator on the LCD screen should be spinning and the Battery Indicator is
flashing.
3. For 120V AC charging the LED on the charger should be on.
4. For 12V DC charging make sure the fuse inside of the plug isn’t blown. If so, replace with
the same style fuse.
5. For solar charging, make sure the panel is clean and in direct sunlight.
The power center isn’t running my electronic device:
1. Make sure the Power Button is on and the LCD display is on. If it isn’t, the battery may be
too low and need recharging. Also check the fuse installation.
2. Check the battery level. If the battery becomes too low, it will shut down all power outputs.
Recharge if needed.
3. Depending on the device being operated, make sure the AC or DC power switch is on.
4. If you try to operate a device that requires too much working wattage the power outputs
will automatically shut down. Unplug it and allow the unit to reset. Check the device’s
power watt requirements against the EnerPlex specifications for compatibility.
5. Check the LCD display for an error message.
• Low and High Temp Alarm: If the EnerPlex is operating in an environment that is
either too warm or too cold the alarm will sound. Unplug all connected devices and
charges and move it to another location.
• Battery Alarm: The battery is malfunctioning. Immediately power-off and
disconnect all devices and chargers and let it cool down for several hours, then
restart.
• Safe Mode: The EnerPlex has detected an internal power output issue. Immediately
power-off and disconnect all devices and chargers. Let it cool down for several
hours, then restart.

12
SPECIFICATIONS
BATTERY TYPE Samsung lithium (NMC), 1231Wh/14.8V (83.2Ah) regulated
BATTERY LIFESPAN 300+ cycles (depending on charge and use)
REPLACEABLE FUSE Available at automotive supply stores:
Main Fuse, 35A cartridge
Display Fuse, 15A cartridge
120V AC ADAPTER
Meets CE, C-UL & FCC
requirements
Input: 100-240V, 50/60Hz, 1.6A
Output: 21V DC, 5.7A
Meets CE, C-UL & FCC requirements
DC INPUT • 12-24V DC max (120W total input max)
• 7.4mm adapter/solar input jacks 16-34V (2 front panel and 2
back panel)
• Anderson DC input (1 front panel and 1 back panel)
120V DC OUTPUT AC Inverter: pure sine wave
110V AC, 1000W continuous 9A, 2000W peak, 60Hz
3 - AC power outlets, total combined 1000W/9A
CAUTION: Do not use any device with a power rating exceeding 9A
or the overload protection circuit will activate. May cause damage
to the unit.
DC OUTPUT 3 - 5V DC USB ports, regulated 2.4A each
1 - 12V vehicle socket, regulated 12V DC, 10A, 120W
1 - 12V Anderson port, regulated 12V DC, 10A, 120W
1 - 12V 6.5mm x 3mm port, regulated 12V DC, 10A, 120W
1 - 19V laptop 7.44mm outlet, regulated 19V DC, 6.3A, 120W max
OPERATING TEMPERATURE 14º- 120ºF (-10º - 49ºC)
CHARGING & STORAGE
TEMPERATURE
32º - 120ºF (0º - 49ºC)
WEIGHT 42 lbs. (19 Kg)
DIMENSIONS 16” x 12” x 11.4” (40.9 x 30.5 x 29 cm)
13
TYPICAL CHARGING TIMES
120V AC/10A Wall Charger 14-16 hours
12V DC/10A Vehicle Charger 16-18 hours
120-Watt Solar Collector #9590 (7A max) 14-18 hours
The EnerPlex is rated in watt-hours (Wh). For example, if you connected a television drawing 100
watts of power you could operate it continually for 10 hours if the battery were completely full
(1000Wh EnerPlex / 100W device = 10 hours). To find your device’s power draw, identify the Amps,
Volts or Watts it uses. If watts are unknown, calculate it by amps x volts – watts.
TYPICAL OPERATING TIMES
Examples only and based on the wattage draw of connected devices and a fully charged
EnerPlex battery. Do not operate AC devices rated over 10A.
Actual operating times and number of recharges will vary during operation and include
normal power conversion losses of the EnerPlex battery. Charging the battery while
using power will extend the operating times listed.
REFRIGERATION
3.3 CU FT Refrigerator (120V AC)
• Operate up to 2+ days once internal temperature is reached.
Max Burton Thermoelectric Cooler/Warmer #6983 (12V DC)
• 4+ days depending on use
LIGHTING
60W Table Lamp (120V AC)
• 12+ hours
Sierra Wave 3W Area Lights (12V DC)
• 80+ hours
COOKING
600W Microwave Oven (120V AC). Do not exceed 1000W.
• 90 minutes continuous operation
Max Burton Digital Stove To Go #6905 (12V DC)
• 6+ hours depending on temperature setting
Max Burton Coffee To Go #6973 (12V DC)
• Brew up to 8, 4-cup pots of coffee
COMMUNICATION
Smart Phones (5V USB)
• 100+ recharges depending on phone model
Laptop (19V DC or laptop AC charging cable)
• 20+ recharges depending on laptop model
32” LED Television (120V AC)
• 10+ hours
2-Way Hand-held Radios (120V AC)
• 25+ recharges
COOLING
Portable Room Fan (120V AC)
• 15+ hours
Max Burton 8” Fan (12V DC)
• 40+ hours
Portable Room Evaporative Cooler (120V AC)
• 10+ hours

14
WARRANTY
1-year warranty to the original registered owner on all products from date of purchase. You may
submit your warranty online at www.aervoe.com/resource-center/ or complete the attached registration
form. User returns, exchanges and defective refunds must be made with Aervoe Industries, Inc., do not
return to place of purchase. There is no warranty for buyer’s remorse. Because Aervoe cannot control
Buyer’s handling or use of product, Aervoe makes no warranty expressed or implied when not used or
stored in accordance with directions. Aervoe shall not be liable for cost of labor, incidental or consequential
damages, and this warranty is limited to replacement or repair of product or credit of purchase. An out of
warranty unit could be eligible for repair and refurbish at customers expense.

15
Name
Address
City ST Zip
Email Address
How did you hear about our products?
Model # and Product purchased
Date of purchase
Purchased from
Please send me additional information on other products
Other products of specific interest
Additional comments
DETACH AND MAIL TO:
AERVOE INDUSTRIES, INC.
P.O. BOX 485
GARDNERVILLE, NV 89410
Table of contents
Other Aervoe Power Supply manuals


