AEV ACUO 908 Serie User manual

ACUO 908 Serie - AEV ON AIR CONSOLE
AEV Broadcast Srl, via della Tecnica 33 – 40050 Argelato (BO) Italy
Web site www aev eu e-mail info@aev eu
1
ACUO 9O8 Serie
AEV On Air broadcast console

ACUO 908 Serie - AEV ON AIR CONSOLE
AEV Broadcast Srl, via della Tecnica 33 – 40050 Argelato (BO) Italy
Web site www aev eu e-mail info@aev eu
2
Guarantee
The equipment is warranted for a period of 2 years from the date of invoice (ex-works) The
warranty does not cover faults provoked by carelessness, natural causes and parts subject
to wear In addition, the cost of shipment is not covered The warranty will be voided if the
equipment is mishandled
Technical Support
If you require technical support, contact AEV SERVICE giving a clear and concise account of
your speciic problem Quote the serial number of your equipment by referring to the AEV
nameplate attached to the equipment itself as this is the most important piece of information
to be provided
Telephone: +39 051 6630904 Fax: +39 051 893605
Factory Service and Repairs
If problems arise while the equipment is being installed, consult this manual and check that
the installation is being carried out properly If the problems still cannot be solved, call the AEV
SERVICE Department for further information If the problem is a minor one we can a telephone
call will probably sufice If, on the other hand, the equipment is to be shipped to AEV for
service or repairs
Shipping Instruction
When shipping the equipment to AEV, use the original package in order to be certain that it will
be fully protected during handling If you need the original package, call us for a new one
If you ship the equipment in a different packing container, take care to provide a double
package by interposing padding material between the two containers in order to fully protect
the equipment during shipment The package should be marked “FRAGILE” in red
Remember that the RMA number must be clearly visible on the package If it is not, the
equipment will not be accepted
IMPORTANT: Carefully read this paragraph as it contains important instructions concerning
operator safety and directions regarding the installation, operation and maintenance of the
equipment
Failure to observe the safety instructions and information given in this manual constitutes an
infringement of the safety rules and design specifications provided for this piece of
equipment
AEV Broadcast Srl declines all responsi ility if any one of the safety rules given here in is
not observed
AEV Broadcast Srl declines all responsi ility if the end-user resells the product
The equipment is to be used by people capable of operating it in a trouble-free manner and it
is assumed that they are aware of the following safety rules.
• Keep this manual with the utmost care and close at hand so that it can be consulted
whenever needed
• After unpacking the equipment, check it for condition
• Avoid banging the equipment
• The packing material (plastic bags, polystyrene, nails, etc ) must never be left within the
reach of the children, as these items are potential sources of danger
• Do not use the equipment in places where the temperature is not within the recommended
range, as specified by the manufacturer
• Before connecting the equipment, make sure the nameplate specifications correspond to the
mains electricity supply (the nameplate is located on the equipment enclosure)
• Do not remove the sticker from the equipment as it contains important specifications and the
relevant serial number
• To join the equipment to the mains supply, use the power cord purchased with the
equipment
• The equipment must be used only for the purpose it was designed for
ACUO 908 Serie - AEV ON AIR CONSOLE
AEV Broadcast Srl, via della Tecnica 33 – 40050 Argelato (BO) Italy
Web site www aev eu e-mail info@aev eu
3
• Abuse or misuse of the equipment is extremely dangerous for people, pets and property
The manufacturer declines all responsibility for damage and injury resulting from improper
use and mishandling
• Certain basic safety rules must be observed when using electrical equipment, in particular: -
Never touch the equipment with wet and/or damp hands or other parts of the body
- Keep the equipment away from drops of water or sprinkling systems
- Never use the equipment near high heat sources or explosive material
- Do not introduce any extraneous matter into the equipment
- Do not allow children or untrained people to use the equipment
• Before cleaning or servicing the equipment outside, disconnect it from the supply and wait at
least 2 seconds before working on it, as recommended by current safety regulations
• In the event of faults and/or improper operation, turn off the equipment, shut off the
electrical power and call your dealer
• Do not attempt to make repairs and/or adjustments when covers/guards or circuit boards are
to be removed
• Blown fuses inside the power supply indicate that there may be a fault in the power supply
itself The fuses must be replaced by qualified and authorised persons It is advisable to call
your nearest dealer
• Call your dealer for any repairs and be certain original spare parts are used
Failure to o serve this rule may adversely affect the safety level of your equipment
• The equipment is to be connected to the mains supply and provided with adequate and
efficient earth conductors
• The electrical wiring must be done in compliance with current electrical codes CEI 64-8
“Electrical specification for domestic buildings”
• When installing, leave a clearance of at least 1 cm around the equipment to allow air to pass
freely
NOTE. This piece of equipment has een manufactured to the highest standards of
workmanship. It must e used properly and serviced as recommended to ensure
long-term dependa le operation.
The installation must be done in order to be able to guarantee an easy access to the cable of
feeding
The device of dissection of the equipment is the cable of feeding, so it must be unconnected
from the equipment every time it is necessary to do any type of maintenance

ACUO 908 Serie - AEV ON AIR CONSOLE
AEV Broadcast Srl, via della Tecnica 33 – 40050 Argelato (BO) Italy
Web site www aev eu e-mail info@aev eu
4
Contents
Guarantee....................................................... 2
Technical Support .............................................. 2
Factory Service and Repairs .................................... 2
Shipping Instruction ........................................... 2
Precautions .................................................... 3
Contents ....................................................... 4
Features ....................................................... 5
Input unctions and channels ................................... 5
Input channel con iguration .................................... 5
Outputs ........................................................ 6
External controls .............................................. 5
Monitoring ..................................................... 5
Input con iguration ............................................ 5
Input setting .................................................. 5
Master outputs.................................................. 6
External control................................................ 6
Monitoring ..................................................... 6
Micro - Line channel ........................................... 7
Digital - Line Module .......................................... 8
USB - Line Module .............................................. 9
Monitoring section ............................................ 10
Telephone hybrid section ...................................... 10
Control Room & Control Studio section ......................... 11
Master setupu section ......................................... 11
Rear Panel — Connections ...................................... 12
RJ connectors pin out ......................................... 14
Logic GPI/O port .............................................. 14
Telephone hybrids - operation.................................. 16
Technical speci ications ...................................... 17

ACUO 908 Serie - AEV ON AIR CONSOLE
AEV Broadcast Srl, via della Tecnica 33 – 40050 Argelato (BO) Italy
Web site www aev eu e-mail info@aev eu
5
Features
audio inputs:
8 double-channels
balanced Micro and line inputs, digital AES/EBU, USB audio I/O interface
Faders:
Faders (100 mm) with A/B input selector, 3 bands tones control on each input
Input functions and channels
-Four Microphone inputs ( MIC1, ,MIC4 )
-Eitgh stereo line inputs ( LIN1, LIN8 )
-Two digital AES/EBU input ( DIG1, DIG2 )
-Two USB audio inputs ( USB1, USB2 )
Input channels configuration:
Channel 1 : MIC1 / LINE1
Channel 2 : MIC2 / LINE2
Channel 3 : MIC3 / LINE3
Channel 4 : MIC4 / LINE4
Channel 5 : DIG1 / LINE5
Channel 6 : DIG2 / LINE6
Channel 7 : USB1 / LINE7
Channel 8 : USB2 / LINE8
Input setting
All settings are independent for each input, via encoder
Channel setting:
- Gain / Level adjustment -12÷+12 dB
- Input balance -12÷+12 dB
- tone equalizer High, Medium , Low -14÷+14 dB
- Private tel OFF/ON
- Control Studio OFF/ON
- PGM assignement SPEECH/MUSIC
- C Room Mute OFF/ON
- ST MU OFF/ON
- Tally OFF/ON
- Talk back on C Studio OFF/ON
- Phantom Power (only for Micro inputs) OFF/ON
Also you can to select the Bus assignment pushing the following buttons:
-PGM
-UTL
-AUX
-CUE
ACUO 908 Serie - AEV ON AIR CONSOLE
AEV Broadcast Srl, via della Tecnica 33 – 40050 Argelato (BO) Italy
Web site www aev eu e-mail info@aev eu
6
Master Outputs
PGM:Analog balanced stereo with XLR connectors
UTL: Analog balanced stereo with XLR connectors
AUX: Analog balanced stereo with RJ45 connector
PGM Dig: digital AES/EBU stereo with RJ45 connector
UTL Dig: digital AES/EBU stereo with RJ45 connector
Auxiliary outputs
Control Room: Analog balanced stereo with RJ45 connector
Control Studio: Analog balanced stereo with RJ45 connector
Mute C. Studio: Analog balanced stereo with RJ45 connector
Headphone : Analog stereo with Jack 6,3 mm connector
Auxiliary input
External : Analog balanced stereo with RJ45 connector
External controls
- Remote Fader with logic controls, (START/STOP) with RJ45 connector
- GPI Opto-isolated logic inputs
- GPO Opto-isolated logic outputs
Monitoring
- Level control for headphone, Control Room, Control Studio mutable
- External inputs for Monitor
- Headphone with integrated amplifier
- double stereo digital VU-Meter on the TFT display PGM ( fixed ) SEL ( EXT, UTL, AUX )
inputs
encoder
channels fader
section
C.Room &
C.Studio section
Telephone hybrid
section
Encoder Master
VU display
section
Digital TFT
display
start channel
display
channels
assignement
busses
assignement

ACUO 908 Serie - AEV ON AIR CONSOLE
AEV Broadcast Srl, via della Tecnica 33 – 40050 Argelato (BO) Italy
Web site www aev eu e-mail info@aev eu
7
Micro - Line channel ( channels 1 – 4 )
All controls on the Micro-Line input channel are described below
1 – START lamp, it lights when the channel fader is
active
2 – knob jog ; directly it select the Gain input level the
range is -12 ÷ +12 dB;
in sequence, the following commands:
1th push-buttom Balance adjust (-12 ÷ +12 dB)
2th push-buttom Treble band adjust (-14 ÷ +14 dB)
3th push-buttom Middle band adjust (-14 ÷ +14 dB)
4th push-buttom Bass band adjust (-14 ÷ +14 dB)
5th push-buttom Private Tel active (OFF/ON)
6th push-buttom TB Studio to C Room active (OFF/ON)
7th push-buttom PGM bus selection ( Speech/ Music)
8th push-buttom Control Room Mute active (OFF/ON)
9th push-buttom Mute C Studio active (OFF/ON)
10th push-buttom Tally active (OFF/ON)
11th push-buttom TB Regia to C Studio active
(OFF/ON)
12th push-buttom Phantom power for the
condenser microphone active ( OFF/ON )
3 – MIC to activate the microphone source (only with
the channel in STOP)
microphones
4 – LINE to activate the line source (only with the
channel in STOP)
5 – PGM Button for routing the channel to the PGM bus
6 – UTL Button for routing the channel to the UTL bus
7 – AUX Button for routing the channel to the AUX bus
8 - Button enabling the preview CUE
9 - Fader
1
2
3
4
5
6
7
8
9
ACUO 908 Serie - AEV ON AIR CONSOLE
AEV Broadcast Srl, via della Tecnica 33 – 40050 Argelato (BO) Italy
Web site www aev eu e-mail info@aev eu
8
Dig - Line Module ( channels 5 – 6 )
All controls on the Dig-Line input channel are described below
1 – START lamp, it lights when the channel fader is
active
2 – knob jog ; directly it select the Gain input level
the range is -12 ÷ +12 dB;
in sequence, the following commands:
1th push-buttom Balance adjust (-12 ÷ +12 dB)
2th push-buttom Treble band adjust (-14 ÷ +14 dB)
3th push-buttom Middle band adjust (-14 ÷ +14 dB)
4th push-buttom Bass band adjust (-14 ÷ +14 dB)
5th push-buttom Private Tel active (OFF/ON)
6th push-buttom TB Studio to C Room active
(OFF/ON)
7th push-buttom PGM bus selection ( Speech/ Music)
8th push-buttom Control Room Mute active
(OFF/ON)
9th push-buttom Mute C Studio active (OFF/ON)
10th push-buttom Tally active (OFF/ON)
11th push-buttom TB Regia to C Studio active
(OFF/ON)
3 – DIG to activate the digital AES/EBU source (only
with the channel in STOP)
4 – LINE to activate the line source (only with the
channel in STOP)
5 – PGM Button for routing the channel to the PGM
bus
6 – UTL Button for routing the channel to the UTL
bus
7 – AUX Button for routing the channel to the AUX
bus
8 - Button enabling the preview CUE
9 - Fader
1
2
3
4
5
6
7
8
9

ACUO 908 Serie - AEV ON AIR CONSOLE
AEV Broadcast Srl, via della Tecnica 33 – 40050 Argelato (BO) Italy
Web site www aev eu e-mail info@aev eu
9
USB - Line Module ( channels 7 – 8 )
All controls on the USB-Line input channel are described below
1 – START lamp, it lights when the channel fader is
active
2 – knob jog ; directly it select the Gain input level the
range is -12 ÷ +12 dB;
in sequence, the following commands:
1th push-buttom Balance adjust (-12 ÷ +12 dB)
2th push-buttom Treble band adjust (-14 ÷ +14 dB)
3th push-buttom Middle band adjust (-14 ÷ +14 dB)
4th push-buttom Bass band adjust (-14 ÷ +14 dB)
5th push-buttom Private Tel active (OFF/ON)
6th push-buttom TB Studio to C Room active (OFF/ON)
7th push-buttom PGM bus selection ( Speech/ Music)
8th push-buttom Control Room Mute active (OFF/ON)
9th push-buttom Mute C Studio active (OFF/ON)
10th push-buttom Tally active (OFF/ON)
11th push-buttom TB Regia to C Studio active
(OFF/ON)
3 – USB to activate the digital usb source (only with the
channel in STOP)
4 – LINE to activate the line source (only with the
channel in STOP)
5 – PGM Button for routing the channel to the PGM bus
6 – UTL Button for routing the channel to the UTL bus
7 – AUX Button for routing the channel to the AUX bus
8 - Button enabling the preview CUE
9 - Fader
1
2
3
4
5
6
7
8
9

ACUO 908 Serie - AEV ON AIR CONSOLE
AEV Broadcast Srl, via della Tecnica 33 – 40050 Argelato (BO) Italy
Web site www aev eu e-mail info@aev eu
10
Monitoring section
1 - Button for selecting the EXT input on
Switched digital VUMeters
2 - Button for selecting the Master UTL
output on Switched digital VU-Meters
3 - Button for selecting the Master AUX
output on Switched digital VU-Meters
Telephone hy rids section
1A - HOOK button for telephone line 1 hook-up
1B - HOOK button for telephone line 2 hook-up
2A - Button for Stanby state for telephone line 1
2B - Button for Stanby state for telephone line 2
3A - Button for TX+ adjust for telephone line 1
3B - Button for TX+ adjust for telephone line 2
4A - Button for TX- adjust for telephone line 1
4B - Button for TX- adjust for telephone line 2
5A - Button for RX+ adjust for telephone line 1
5B - Button for RX+ adjust for telephone line 2
6A - Button for RX- adjust for telephone line 1
6B - Button for RX- adjust for telephone line 2
7A - Button for assigning the tel1 to the PGM bus
7B - Button for assigning the tel2 to the PGM bus
8A - Button for assigning the tel1 to the UTL bus
8B - Button for assigning the tel2 to the UTL bus
9A - Button for assigning the tel2 to the AUX bus
9B - Button for assigning the tel2 to the AUX bus
10A -Button for assigning the tel2 to the CUE
bus
10B -Button for assigning the tel2 to the CUE
bus
1
2
3
1
A
2A
3A
4A
5A
6A
7A
8A
9A
10A
1
B
2B
3B
4B
5B
6B
7B
8B
9B
10B
ACUO 908 Serie - AEV ON AIR CONSOLE
AEV Broadcast Srl, via della Tecnica 33 – 40050 Argelato (BO) Italy
Web site www aev eu e-mail info@aev eu
11
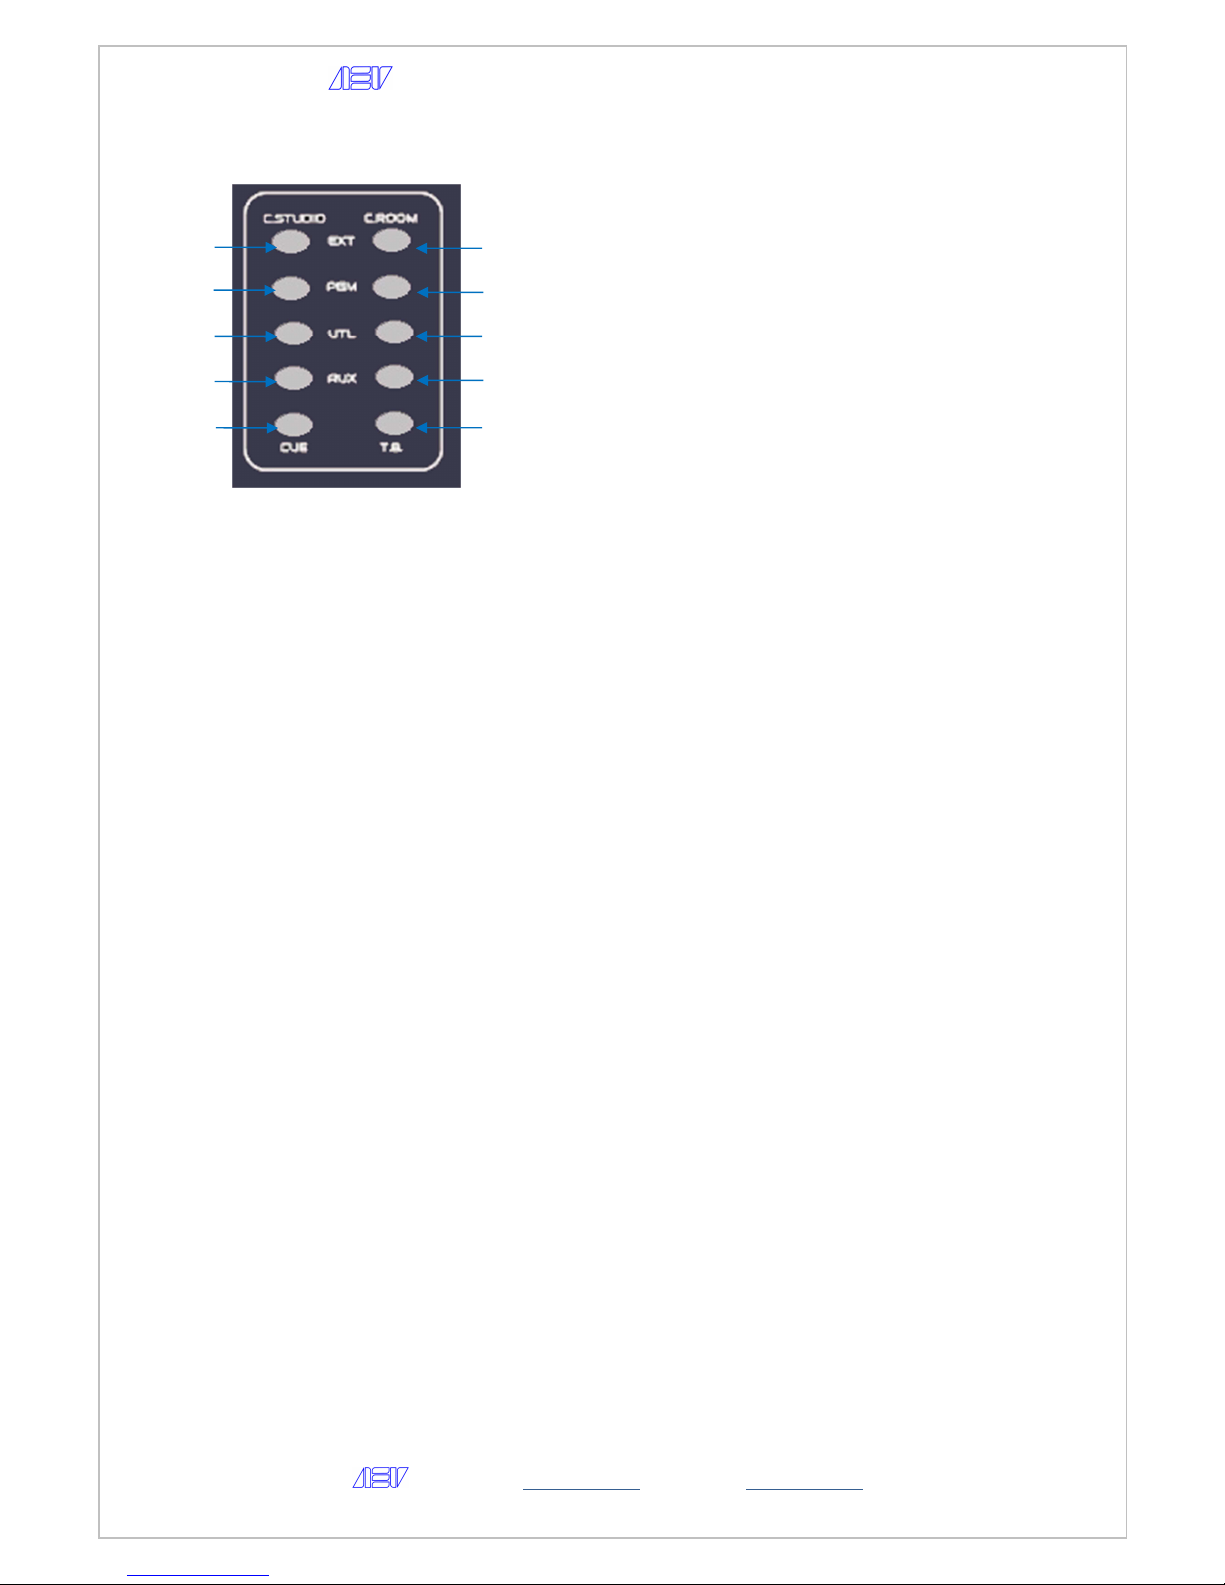
Room & Studio section
Control Studio selection
1 – Button for selecting the EXT input for
routing it to the Control Studio output
2 - Button for selecting the master PGM output
for routing it to the Control Studio output
3 - Button for selecting the master UTL output
for routing it to the Control Studio output
4 - Button for selecting the master AUX output
for routing it to the Control Studio output
5 - Button for selecting the CUE bus for routing
it to the Control Studio output
Control Room selection
6 – Button for selecting the EXT input for
routing it to the Control Room outputs
7 - Button for selecting the master PGM output
for routing it to the Control Room outputs
8 - Button for selecting the master UTL output
for routing it to the Control Room outputs
9 - Button for selecting the master AUX output
for routing it to the Control Room outputs
Talk Back
10 - Button to active the Talkback function to the
Control Studio outputs
Talk ack Regia to Studio:
When the TB (talk back) button is pressed, the
signal of the enabled microphone is sent to the
Control Studio output
•Channel with function talkback to studio
(TBST: ON)
•Channel in STOP
What happens:
•the Talk back button of the remote fader
lights
up
•
the previous selection of the Control Studio flashes
•
the audio signal present in the Control studio is
replaced by the channel selected in TB
Talk ack Studio to Regia :
(need the Remote Fader)
•Channel
connected to the Remote Fader unit
with
talkback function activated (STCR: ON)
•Channel in STOP
What happens when the remote TB (talk back)
button is pressed:
•the Talk back button of ACUO
flashes
•
the previous selection of the Control Room flashes
•
the audio signal present in the Control Room is
replaced by the channel connected to the Remote
Fader unit
•the signal of the enabled microphone is sent
to the Control Room output
Master setup
Master knob jog ; directly it select the Gain headphone level, the range is -∞ ÷ +8 dB;
in sequence, the following commands:
1th push-buttom Control Room level (-∞ ÷ +8 dB)
2th push-buttom Control Studio level (-∞ ÷ +8 dB)
3th push-buttom PGM output level (-12 ÷ +12 dB)
4th push-buttom External input level (-12 ÷ +12 dB)
5th push-buttom CUE interlock (OFF/ON)
6th push-buttom PGM Digital sample rate ( 32, 44 1, 48, 96 KHz )
7th push-buttom UTL Digital sample rate ( 32, 44 1, 48, 96 KHz )
8th channel selection to associate the command I / O Start/Stop A (GPIO 1)
9th channel selection to associate the command I / O Start/Stop B (GPIO 2)
10th channel selection to associate the command Out Start/Stop C
1
2
3
4
5
6
7
8
9
10
ACUO 908 Serie - AEV ON AIR CONSOLE
AEV Broadcast Srl, via della Tecnica 33 – 40050 Argelato (BO) Italy
Web site www aev eu e-mail info@aev eu
12
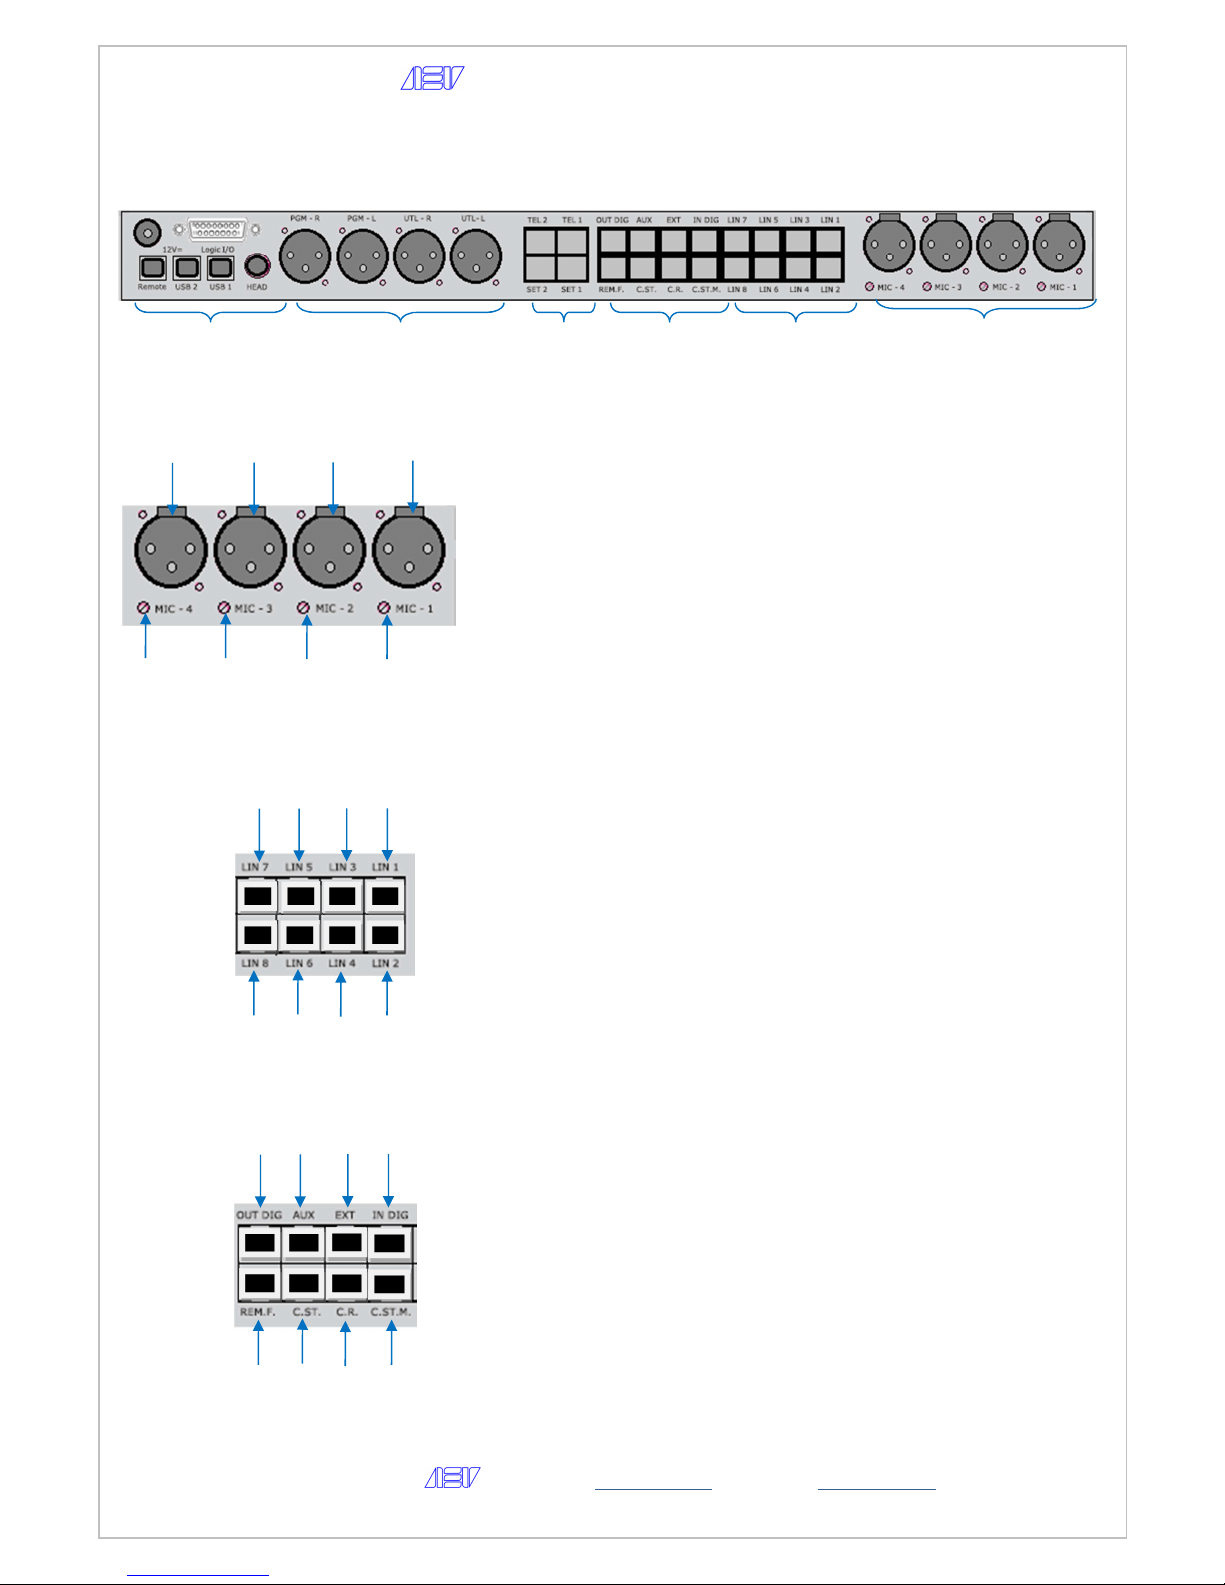
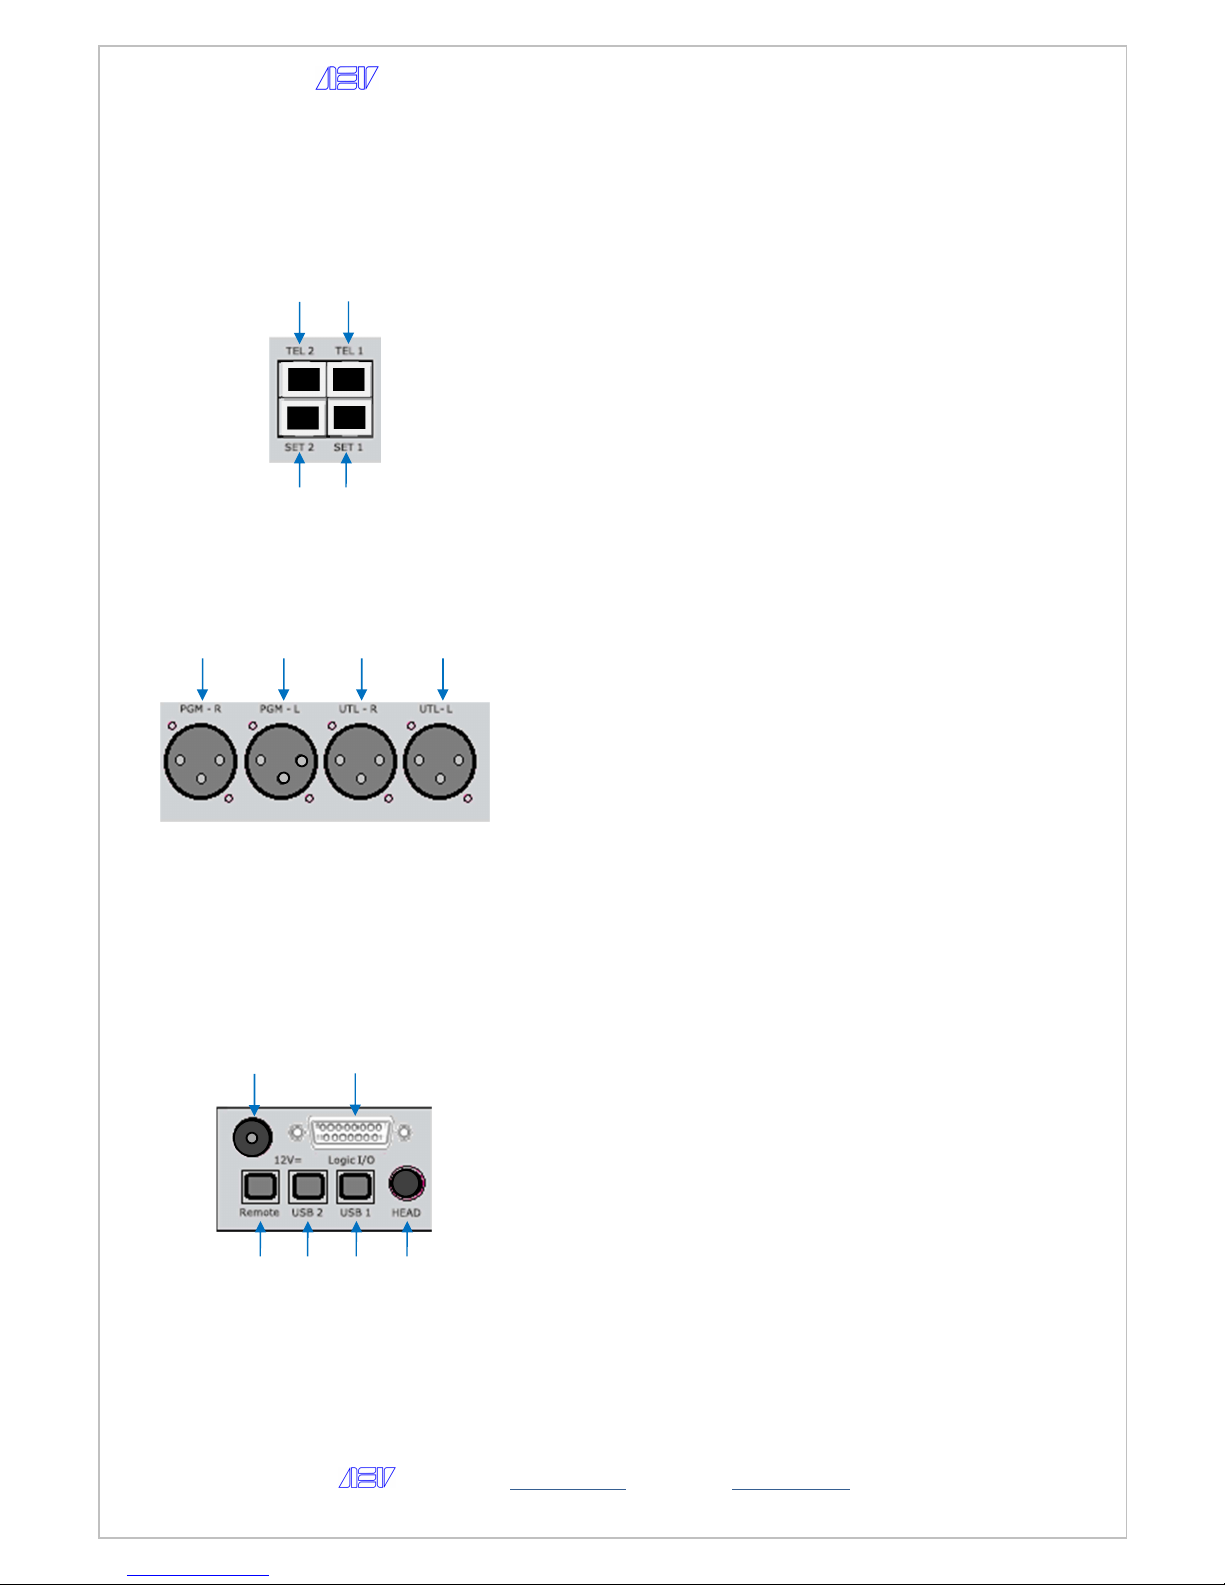
Rear panel – connections
Microphone inputs connection
Line inputs connection
Outputs & Ausiliary connection
1 – Microphone 1 input XLR F connector
2 - Trimmer adjusting the MIC 1 input level from 0 ÷
to +30 dB for very low volume microphones
3 – Microphone 2 input XLR F connector
4 - Trimmer adjusting the MIC 2 input level from 0 ÷
to +30 dB for very low volume microphones
5 – Microphone 3 input XLR F connector
6 - Trimmer adjusting the MIC 3 input level from 0 ÷
to +30 dB for very low volume microphones
7 – Microphone 4 input XLR F connector
8 - Trimmer adjusting the MIC 4 input level from 0 ÷
to +30 dB for very low volume microphones
9 – Line 1 input RJ45 connector
10 – Line 2 input RJ45 connector
11 – Line 3 input RJ45 connector
12 – Line 4 input RJ45 connector
13 – Line 5 input RJ45 connector
14 – Line 6 input RJ45 connector
15 – Line 7 input RJ45 connector
16 – Line 8 input RJ45 connector
17 – Dig1 & Dig2 input RG45 connector
18- Control Studio Mutable output RJ45 connector
19 – External input RG45 connector
20 – Control Room output RJ45 connector
21 – AUX output RJ45 connector
22 – Control Studio output RJ45 connector
23 – PGM Dig & UTLDig input RG45 connector
24 – Remote Fader RG45 connector
7
5
3
1
8
6
4
2
9
11
13
15
10
12
14
16
17
19
21
23
24
18
20
22
Microphone inputs
Line inputs
Outputs & ausiliary
Telephone
line
XLR Outputs
Head/USB/Logic & PWS
ACUO 908 Serie - AEV ON AIR CONSOLE
AEV Broadcast Srl, via della Tecnica 33 – 40050 Argelato (BO) Italy
Web site www aev eu e-mail info@aev eu
13
Telephone connection
Outputs XLR connection
Head/USB/Logic & PWS connections
25 - Connector RJ45 for telephone line 1
26 - Connector RJ45 for telephone service 1
27– Connector RJ45 for telephone line 2
28– Connector RJ45 for telephone service 2
29 - UTL left channel XLR connector
30 - UTL right channel XLR connector
31 - PGM left channel XLR connector
32 - PGM right channel XLR connector
33 – Logic I/O DB15 connector
34 – PWS connector
35 – Headphone jack 6,3 mm connector
36 – USB 1 connector
37 – USB 2 connector
38 – USB serial connection
26
28
33
34
35
36
37
38
32
31
30
29
25
27
ACUO 908 Serie - AEV ON AIR CONSOLE
AEV Broadcast Srl, via della Tecnica 33 – 40050 Argelato (BO) Italy
Web site www aev eu e-mail info@aev eu
14
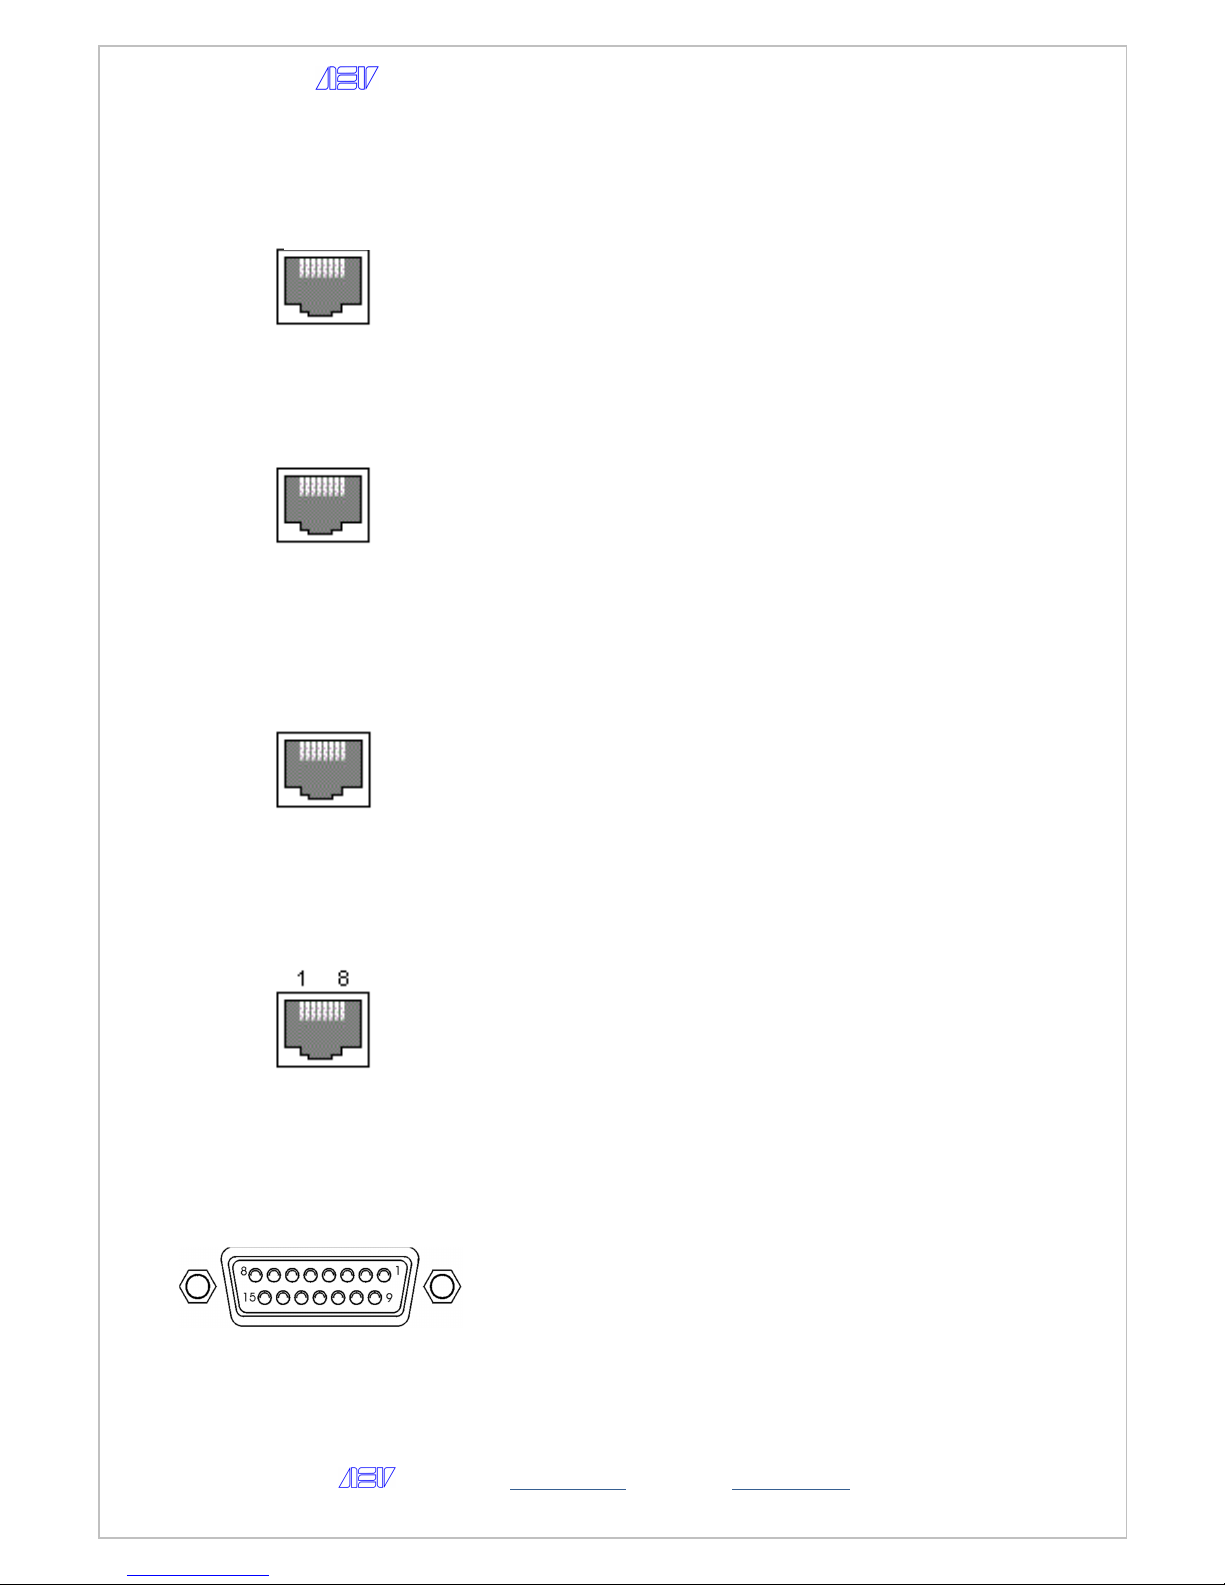
Line in /AUX/C.Room/C.Studio/Ext
RJ45 pin out
Digital Outputs RJ45 pin out
Remote fader RJ45 pin out
Tel line/ tel set RJ45 pin out
Logic I/O pin out
1e – left channel +
2e – left channel -
3e – right channel +
4e – GND
5e – N C
6e – right channel –
7e – N C
8e – N C
1o – UTL dig +
2o – UTL dig -
3o – PGM dig +
4o – GND
5o – N C
6o – PGM dig +
7o – N C
8o – N C
1p – +5v
2p – IN
3p – Start/Stop L
4p – Start/Stop S
5p – Talk Back L
6p – Talk Back S
7p – GND
8p – GND
1t – N C
2t – N C
3t – N C
4t – tel set
5t – tel line
6t – N C
7t – N C
8t – N C
1–9 – GPO1 Start/Stop A; Start=close,
Stop=open
2–10 –GPO2 Start/Stop B; Start=close,
Stop=open
3–11 – GPO Tally; (Start)+(Tally ON)
4–12 – GPO3 ; (Start) with selected channel
5-13 – GPI1 Start/Stop IN A ; Toggle
6-14 – GPI2 Start/Stop IN B ; Toggle
7 +5V
8 GND
15 GND
1o 8o
1p 8p
1e 8e
ACUO 908 Serie - AEV ON AIR CONSOLE
AEV Broadcast Srl, via della Tecnica 33 – 40050 Argelato (BO) Italy
Web site www aev eu e-mail info@aev eu
15
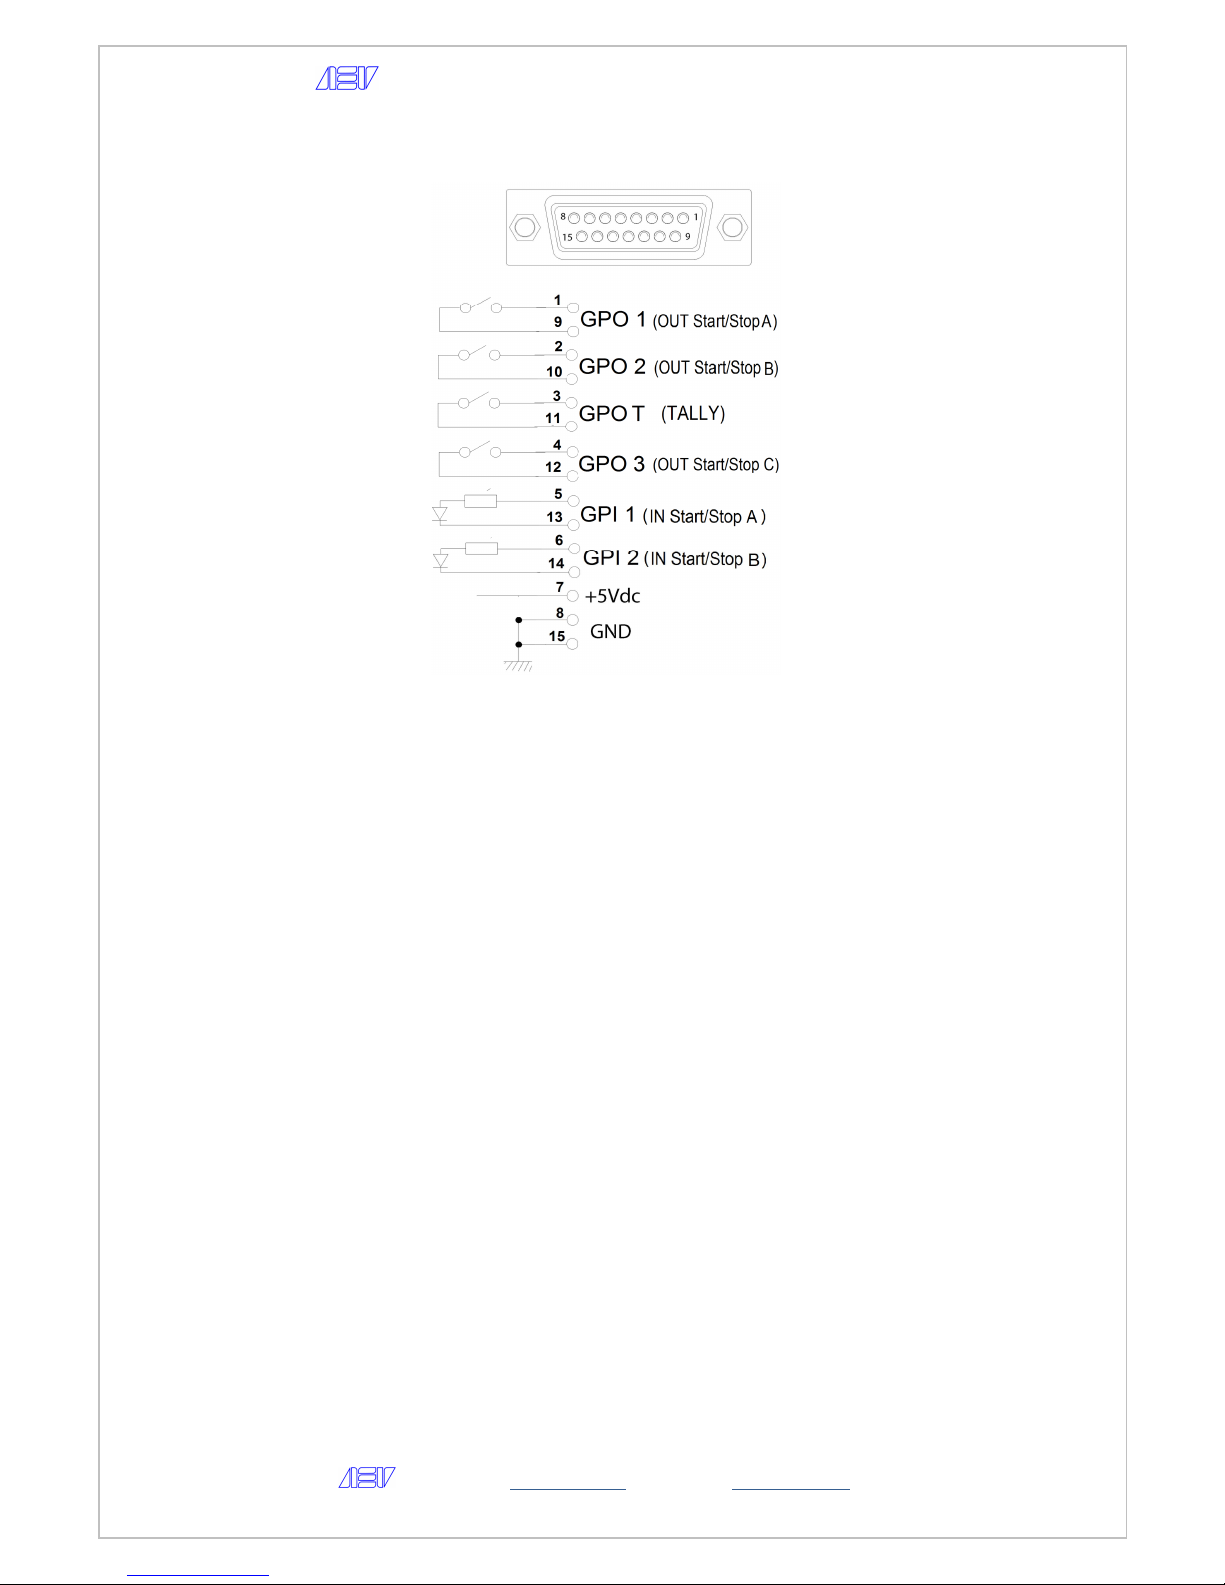
Logic GPI/O port
•GPO 1 Out ( Start / Stop A) through the encoder master to the voice GPIO1 (Start
/ Stop A) select the channel assignment, so when the channel will in Start, the
contact between 1 and 9 will close, with the channel in Stop the contact is open
•GPO 2 Out ( Start / Stop B ) through the Master encoder select GPIO2 (Start /
Stop B) and select the channel assignment, so when the channel will put in Start,
the contact between 2 and 10 will close , with the channel put in Stop the contact is
open
•GPO Tally : Endcoder in each channel, through the Encoder, to the item TALLY set
ON , so closes the contact between pins 3 and 11 will close when the channel is put
in Start
•GPO 3 : Endcoder by the Master, under GPO3 select the channel assignment , so,
the contact between pins 4 and 12 will close when the channel will put in Start in,
the contact will open when you put in Stop the channel
•GPI 1 ( In Start/Stop A) : through the Master encoder select GPIO1 (Start/Stop
A) and select the channel assignment, in which way , from the outside, through a
circuit to activate the photo - coupler placed between the pins 5 and 13, states Start
and Stop will alternate in the channel , the status of which will be remote using the
control Out Start/Stop A
•GPI 2 ( In Start/Stop B ) through the Master encoder select GPIO2 (Start/Stop
B) and select the channel assignment, in which way , from the outside, through a
circuit to activate the photo - coupler place between pins 5:13 states will alternate
start and stop of the channel , the status of which will be using the remote control
Out Start/Stop A
ACUO 908 Serie - AEV ON AIR CONSOLE
AEV Broadcast Srl, via della Tecnica 33 – 40050 Argelato (BO) Italy
Web site www aev eu e-mail info@aev eu
16
Telephone hy rids - operations
•Incoming Phone Call: HOOK button flashes
•Attach incoming call, press the HOOK key (it remains lit)
•Telephone call on hold:
obuttom HOOK in ON
oCUE (ON) of the bar phone selected
oPRIV TEL (ON) of the microphone channel
oRegia Microphone in STOP
•Meeting function:
o(STBY OFF) enabled on the same bus hybrids TEL1, TEL2 and possibly a
channel with microphone
oto listen to audio on your phone to activate the corresponding bus C Room
(Regia) and / or C Studio (studio)
oPRIV TEL (ON) of the microphone channel

ACUO 908 Serie - AEV ON AIR CONSOLE
AEV Broadcast Srl, via della Tecnica 33 – 40050 Argelato (BO) Italy
Web site www aev eu e-mail info@aev eu
17
TECHNICAL SPECIFICATIONS
Microphone Inputs
Input configuration Electronically balanced
Input Impedance 200 Ω
Sensitivity Level Range Adjustable from –70 ÷-40 dBu (Trimmer adj )
Input Level Range ±12 dBu (Digital adj step 0,5 dB)
Maximum Input Level - 30 dBu
Phantom Supply 48 Vdc selectable
100 mm Fader VCA Digital controlled
Connector XLR Female
Line Inputs
Input configuration Electronically balanced
Input Impedance 10 K Ω (600 Ω wired)
Input Level Range ±12 dBu (Digital adj step 1,0 dB)
Headroom + 18 dBu
100 mm Fader control VCA Digital controlled
Connector RJ-45
Digital inputs
Input configuration AES/EBU, IEC958,S/PDIF & EIAJ CP340/1201
Sample Rate Automatic 32, 44 1, 48, 96 KHz converter
100 mm Fader control VCA Digital controlled
Connector RJ-45
Telephone Hy rid
Input configuration Opto-coupled
Input impedance 600 Ω Bal
Line Compensation Automatically (max 5 Km)
Tx Level ±12 dBu (Digital adj step 0,5 dB)
Rx Level Range ±12 dBu (Digital adj step 0,5 dB)
Frequency response 300 Hz ÷ 3400 Hz (-2 dB) ; 300 Hz ÷ 3400 Hz (-1 5 dB)
Distortion < 1 5 %
Noise -60 dB
Analog Outputs
Output configuration Electronically balanced
Output Impedance 100 Ω
PGM Output Level Range -12 ÷ +12 dBu
Connector XLR male
UTL/AUX Output Level Range 0 dBu fixed
Connector RJ-45
C Room Mut Output Lev - 12÷ +12 dBu
Connector RJ-45
Digital Outputs
Output configuration AES/EBU, IEC958,S/PDIF & EIAJ CP340/1201
Sample Rate Automatic 32, 44 1, 48, 96 KHz converter
Connector RJ-45
Headphones
configuration Type Stereo unbalanced (C Room no Muted)
Output Impedance 50 Ω
Connector JACK 6,3 mm
Logic I/O
Configuration Optic solid state relay
Max Voltage 50 Vdc/ac
Max Current 100 mA
Connector DSUB 15 pole female
USB Port 2 x USB 2 0 interface
Dimensions 460 x 360 x 44 mm ( L x D x H )
This manual suits for next models
1
Table of contents
Other AEV Music Mixer manuals


