AFHCAN Horus 3 User manual
HG–0329 Horus 3 Mul-Purpose Exam Cam Copyright © 2022 Alaska Nave Tribal Health Consorum. All rights reserved.
AFHCAN
www.afhcan.org
Handy
Guide
HG–0329 Horus 3
Multi-Purpose Exam Camera
The Horus 3 exam camera is a versale device that can be used either for Store and Forward cases, or during
Live Video Visits. This Handy Guide provides an overview of the device, and instrucons for using it in tele-
health encounters.
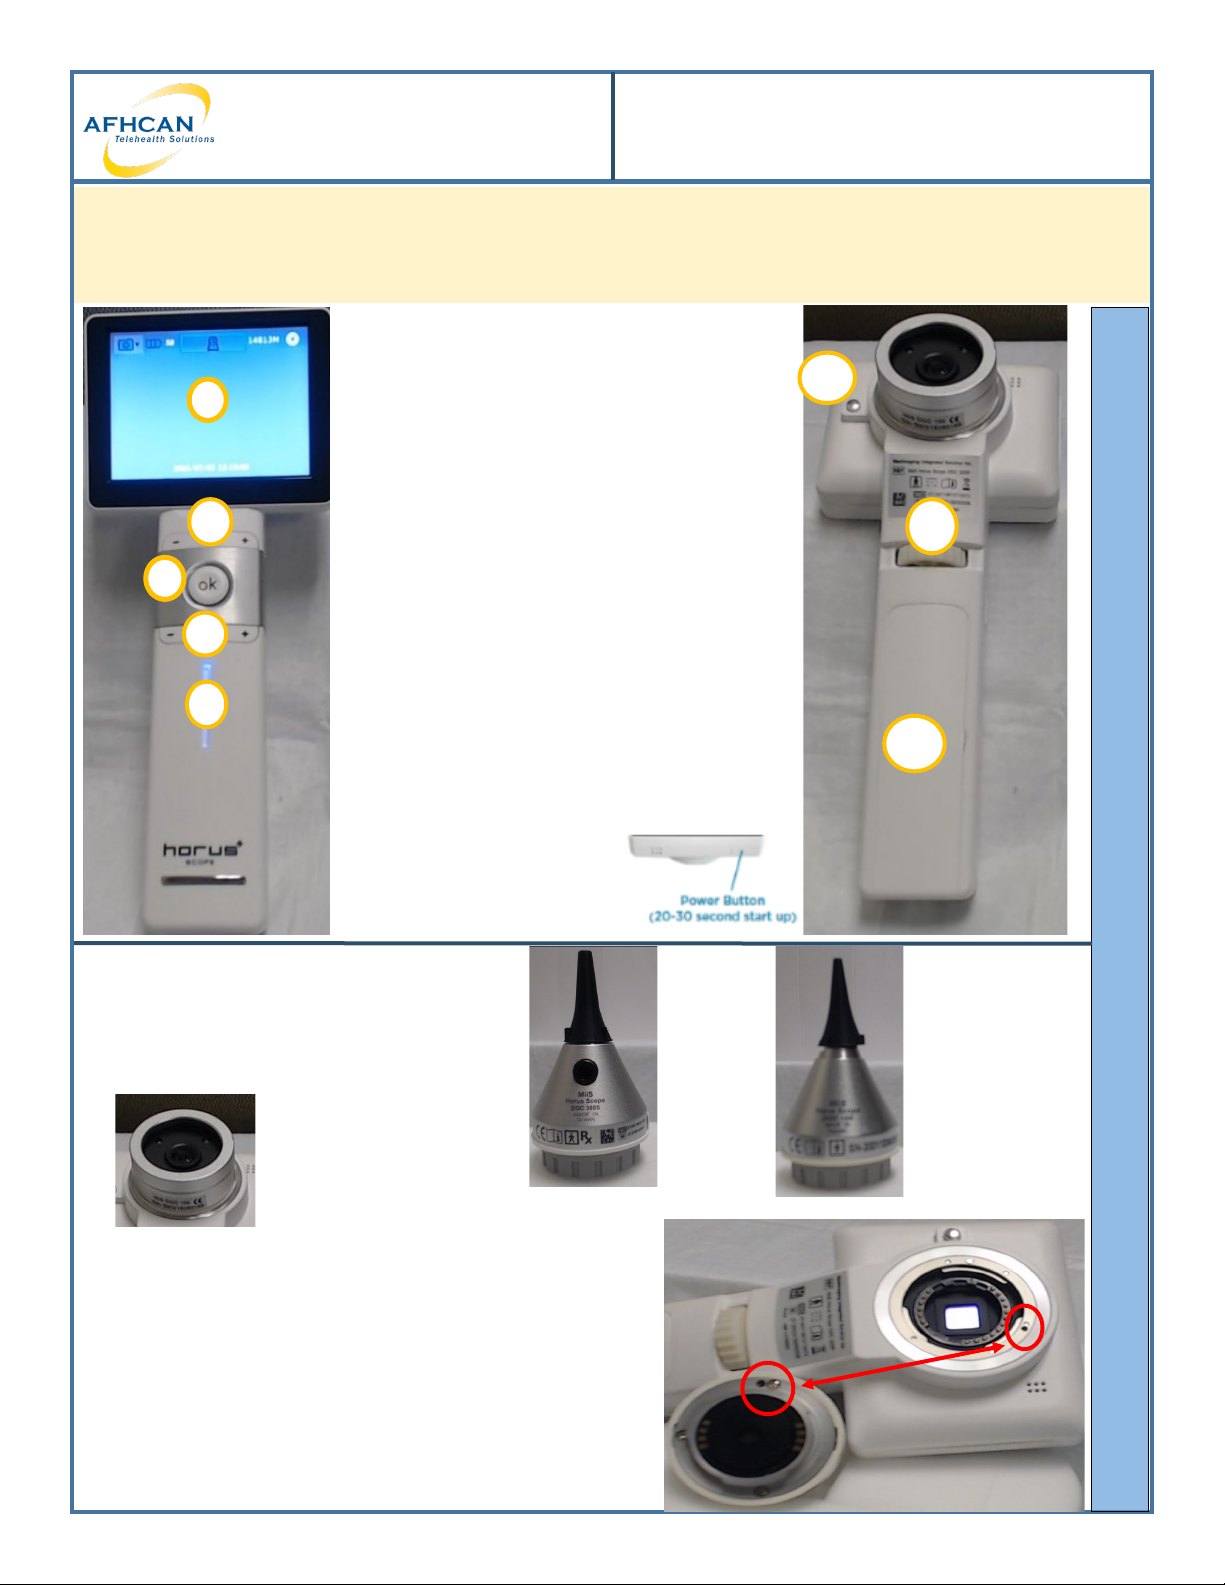
Device Overview:
a. LCD Touch Screen (Displays live and stored
image, sengs can be controlled from here)
b. Zoom Controls (Zooms in and out)
c. OK buon (Used to take photo and review
ones previously taken)
d. Focus Wheel (Rotate to adjust focus)
e. Brightness Controls (Adjusts levels of 1-10
for brightness)
f. Power Indicator (Blue when the power is on,
orange when charging)
g. Lens Lock (Used to release lens for changing.
Also must depress when applying lens)
h. Baery Compartment
DEVICE OVERVIEW
Interchangeable Lenses:
Changing Lenses:
Remove Lens– Press the lens lock then gently grasp the lens and turn
counterclockwise and li.
Aach Lens-Line up the black recessed dots (see image) on the lens
and camera. Seat the lens into the camera and twist clockwise while
depressing the lens lock to lock.
Otoscope lens
Capture intra-ear
images
Uses adult Welch-
Allen disposable ps
Exam Cam lens
Best for general
exam
c
a
b
e
f
d
g
h
Shown
with adult
disposable
p
Shown with
pediatric
disposable p.
You can see it
does not t
Lens lock
1
HG–0329 Horus 3 Mul-Purpose Exam Cam Copyright © 2022 Alaska Nave Tribal Health Consorum. All rights reserved.
AFHCAN
www.afhcan.org
Handy
Guide
HG–0329 Horus 3
Multi-Purpose Exam Camera
Powering On Device:
1. To Power on press and hold the Power buon on the top of the unit If the unit is not charged it can take up to 5
minutes to turn on. When powering on is complete, the Live View screen appears with a set of icons at the top
of the screen.
Reviewing Images:
1. Tap the Display Mode to view photos from the SD memory card.
2. To return to view mode press the OK buon.
Cleaning and Maintenance:
Power o the Horus 3 Scope before cleaning it.
Clean the LCD screen using an alcohol swab.
Use so lens cleaning cloth or ssues for lenses
Otoscope Lens: Clean the exterior of the Otoscope p with alcohol wipe and apply a new specula for each
paent.
Dermatology Contact Lens: Clean the contact plate with alcohol swab before and aer use with each new
paent.
Power on Device and Reviewing Images
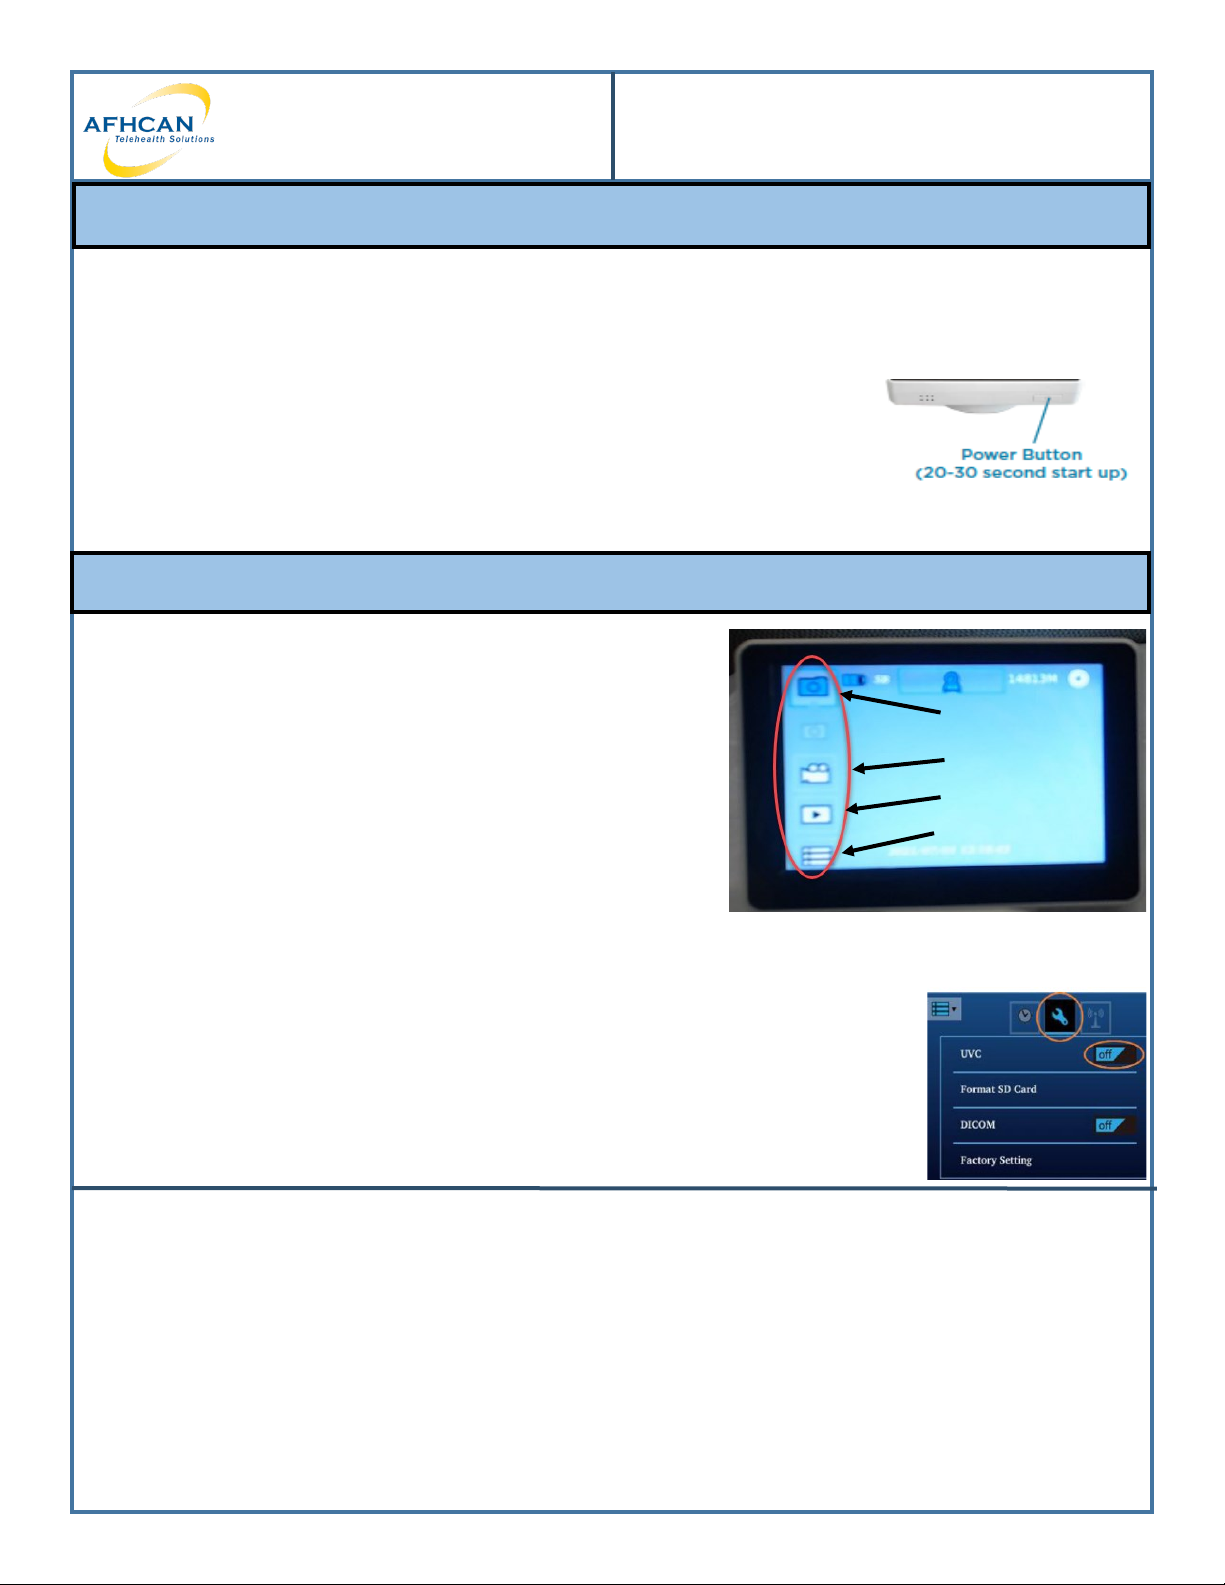
Photo Mode
Video Mode
Display Mode
Sengs
Device Modes
Photo Mode/Video Modes—These are used for taking pictures and
sharing those photos and videos.
Display Mode— This is used for viewing photos stored on the
SD memory card.
Sengs Mode— This is used for seng the date and me as well
as formang or deleng photos from the memory card.
How to get the Horus 3 into UVC mode for live video conferencing
and store and forward for transferring images --
Make sure the needed lens is aached prior to powering on the scope.
Verify the Horus 3 camera is connected to your device with the supplied USB cable.
Tap the Camera mode icon on the le top of the screen and select the sengs opon.
Touch the wrench icon to nd the UVC sengs. Then toggle the UVC to on from o,
Return to the view mode by pressing the OK buon on the device.
2

HG–0329 Horus 3 Mul-Purpose Exam Cam Copyright © 2022 Alaska Nave Tribal Health Consorum. All rights reserved.
AFHCAN
www.afhcan.org
Handy
Guide
HG–0329 Horus 3
Multi-Purpose Exam Camera
Using the Horus 3 for Store and Forward Telemedicine (AFHCAN)
Adding Sll Images to a Case:
1. Power on the Horus 3.
2. Take picture to capture an image.
3. While device is powered on connect the Horus 3 to your PC
with the USB cable that was supplied with the device (A).
4. Use the USB cable or SD card to transfer images from the Horus 3 to your
computer. (B)
5. Choose import on your computer screen. (C)
To AFHCAN cart:
1. On AFHCAN cart choose the Horus 3 camera from screen. You may need to choose video device input, if
applicable.
2. Select sengs on camera. Select the wrench icon. Toggle on UVC.
3. Select display mode on the camera touch screen (see page 2). You
may delete photo from camera here as well.
4. Click “Take picture” to capture an image. on AFHCAN cart.
5. Label picture
6. Save it to your case.
A
Transferring Images from Horus 3
Using the Horus 3 for Video Conferencing (Zoom)
When using Zoom :
1. Plug the Horus 3 into a USB port on your device.
2. Start or join meeng.
3. To change the camera feed to the Horus 3, click on up arrow next to
video camera icon located at the boom le of the screen.
4. Click the UVC camera.
Disconnecng Horus 3
Under the sengs , use the Format mode to clear all images from the device. Turn o camera. You can unplug or leave
plugged in so baery remains charged.
3
3
B
C
4
6
5

HG–0329 Horus 3 Mul-Purpose Exam Cam Copyright © 2022 Alaska Nave Tribal Health Consorum. All rights reserved.
AFHCAN
www.afhcan.org
Handy
Guide
HG–0329 Horus 3
Multi-Purpose Exam Camera
Adding Images to your AFHCAN case
9
3
6
7
1. Open AFHCANweb and log in.
2. Create or select desired case.
3. Select “Add Image/Video” from the Case Opons list. Note: If “Add Image/Video” opon does not
appear on your Case Opons list it can be found under “All Case Opons”
4. Click the “Browse…” buon to nd images from the Horus Make note when you saved your images
what le they went to.
5. Click on the desired image and select open to select that image to be added to your AFHCAN case.
6. Be sure to add a descripve label to the image.
7. Click “Add Aachment”
8. You will need to repeat steps 4-7 for each image added to your case.
9. Complete and Send your case.
4
4
Disconnecng Horus 3
Under the sengs , use the Format mode to clear all images from the device. Turn o camera. You can
unplug or leave plugged in so baery remains charged.
This manual suits for next models
1


