afterNOON CIM-15 Series User manual
eesisserreseeiririeriireeer
isseriserereCeriisissririieirirreC
I/Mer1
serM
OO
M
seiieser
Seeiieiier
riesieeseieriie
iriisiees1ies
Siersiser
Sieeeesi
ireserieiserserie
eerserer
Seireeieerireiseres
/Snow ICE / FAST SLOW
SELECTION / CLEAN
/Snow ICE / SELECTION SLOW
Please read this user manual prior to use to ensure proper usage of the product.
Comply with warnings and cautions in this user manual before using.
Keep this user manual in an easilyaccessible place.
etain this user manual as it includes the warranty.

Contents
1
Seiii
1
seei
1
rr
1
Isi
11
erIsi
1
se
1
Cei
15
CeereeesrSerie
15
rrrsis
risCisrSe
-er
5
-Isi
-ii
esrs
seCre

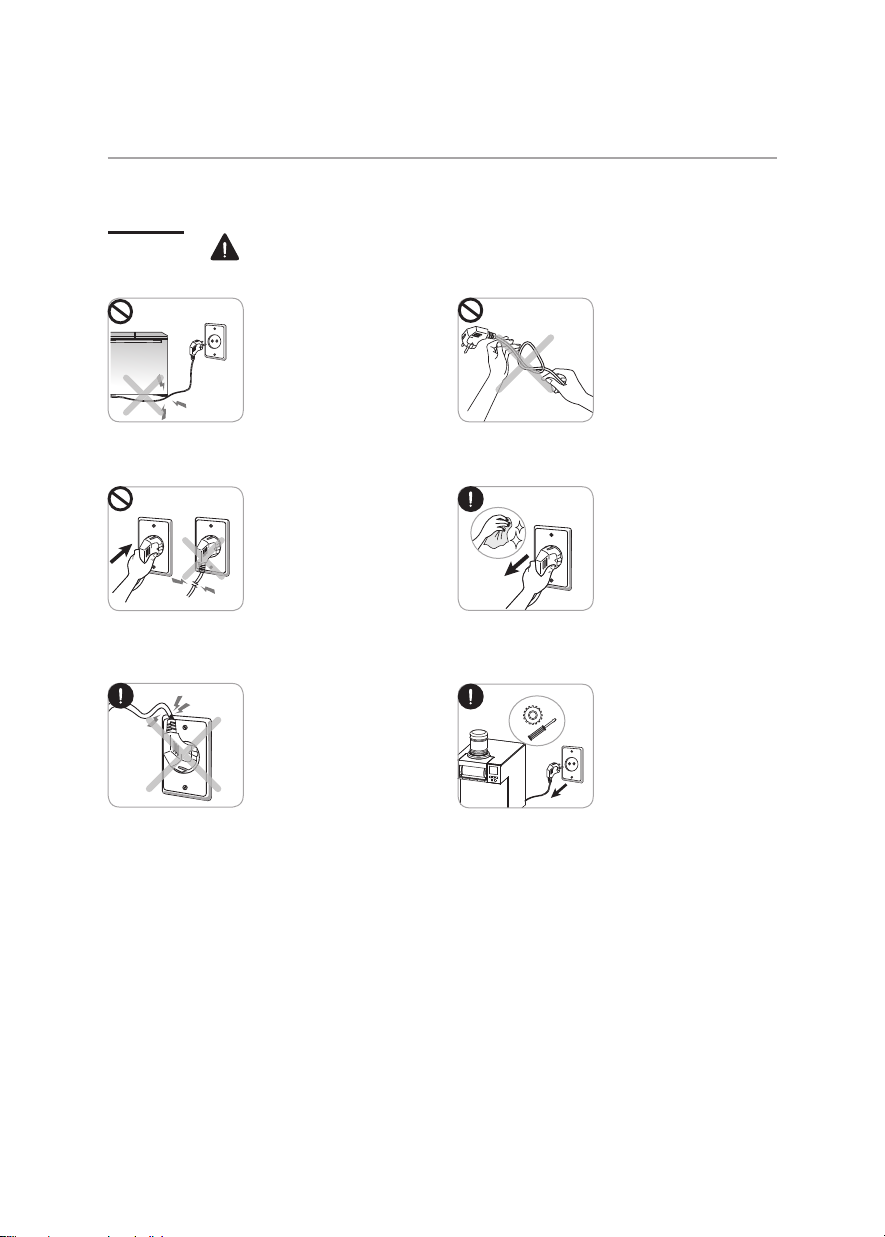
arnings and Cautions for Safet
3
er
I
WI nly fill with edible water.
e careful not to use peopleincluding children who cannot use the device safely without supervision or instruction
because of lack of physical, sensory, mental ability or lack of experience and knowledge.
e careful not to let children play with the device.
Use the new hose kit supplied with the instrument and do not reuse old hose sets.
These instructions ensure user safety and prevent damage to user property. It is strongly recommended to carefully read these
instructions for proper use of product.
This product uses 0, 50z. Plug into the proper outlet.
I
CI
azardous events that could cause death or severe inury
if not observed.
azardous events that could cause wounding or severe
inury if not observed.
The compulsoryInstructionmark indicates information that must be observed.
TheProhibition mark for a certain action indicates actions that are prohibited.
Use a grounded outlet rated C
0, over . Do not plug
cords for several procucts into
one outlet.
This may cause electric shock or fire.
Do not pull the power cord when
unplugging. old head of plug
and pull out the power cord.
Failure to do so may cause electric
shock or fire.
Wipe the power plug terminals
or contact parts with a dry cloth
to remove dust or water on a
regular basis.
Do not wipe with a wet cloth.
This may cause electric shock or fire.
Do not plug in or pull the power
cord with a wet hand.
This may cause electric shock or fire.
er
I
arnings and Cautions for Safet
온수
온수
온수
온수
온수
e careful not to allow the power
cord to be pressed by a heavy
obect or damage it by a sharp
obect.
This may cause electric shock or fire.
Do not forcibly bend or pull the
power cord.
This may cause electric shock or fire.
e sure to plug the power cord
firmly into the outlet. Do not use
damaged power cord or power
plug or a loose outlet.
This may cause electric shock or fire.
Do not replace damaged power cord
or power plug. Contact the customer
service center for a replacement
Plug the power cord facing down
ward.
Failure to do so may cause electric
shock or fire.
Unplug the power cord for the
maintenance or repair of the
product or replacement of any
parts.
Failure to do so may cause electric
shock or fire.
Unplug the power cord in case
of water leakage or for cleaning.
Failure to do so may cause electric
shock or fire.

Warranty or free customer service is not available for unauthorized installation.
isreiseeserserieeeresieisC
Isi
I
arnings and Cautions for Safet
1er
Do not install in spaces with
excessive humidity or dust.
This may cause electric shock or fire.
Do not install on a mat, a cushion,
or pad or uneven surface.
This may cause electric shock or fire.
Maintain proper hydraulic
pressure, water temperature
and ambient temperature.
Use this product only in a space
whose hydraulic pressure is over
.kPa over, water temperature
is , and ambient temperature
is 00.
Connect to the cold water pipe
when installing the product.
Connection to a hot water pipe
will cause the failure of the
product.
Connect to a water pipe when
installing the product. If no water is
supplied, the prduct will not work
properly.
This may cause external dis
tortion of the product.
Keep at least 0cm from the wall
to allow for ventilation behind the
product.
Keep out of direct sunlight
and high temperatures.
Failure to do so may cause electric
shock or fire.
Do not install near heating
appliances or in a place with
the possibility for gas leakage.
This may cause electric shock or fire.
riressre
11er
ereerre
55
ieeerre
1
C
er
er

ii
CI
arnings and Cautions for Safet
30
6
30minutes after installation,plug
the power cord to the outlet.
Prior to use, allow 30 minutes
after installation to ensure stable
operation of the compressor inside.
Failure to do so may cause poor
cooling or degrade performance.
Comply with the description in the
User Manual for safe operation.
This User Manual includes the
Warranty inside.
Keep and display the Warranty inside
this User Manual for customer service.
Do not move the product while it is
in operation.
This may cause failure, electric shock of fire.
Do not place medicine, water bottles
or small pieces of metal on the
product.
If any such materials enter the product it may
cause fire or damage the product.
Do not allow any person except the
service engineers to disassemle
or repair the product.
Failure to do so may cause failure, electric
shock or fire.
Do not clean the product with
water, benzene or thinner.
This may cause electric shock or fire.
If water leaks inside the product
or collects around the product,
close the water supply valve,
unplug the power cord and
contact the customer service center.
Do not place or use heating
appliances such as electric
ovens or electric toasters on
the product.
This may cause electric shock or fire.
In the case of unusual loud noises,
the smell of burning, or smoke
from the product, immediately
unplug the power cord, close the
water supply valve and contact
the customer service center.
Failure to do so may cause electric
shock or fire.
Do not remove the hose at the
back of the product while it is in
operation.
This may cause electric shock or water
leakage.
Unplug the product during cleaning.
Failure to do so may cause operational
failure, electric shock or fire.
Do not lean on or apply severe
impact to the product.
Distortion or damage by leaning
or impact may degrade performance.
ieser
ier
Manual

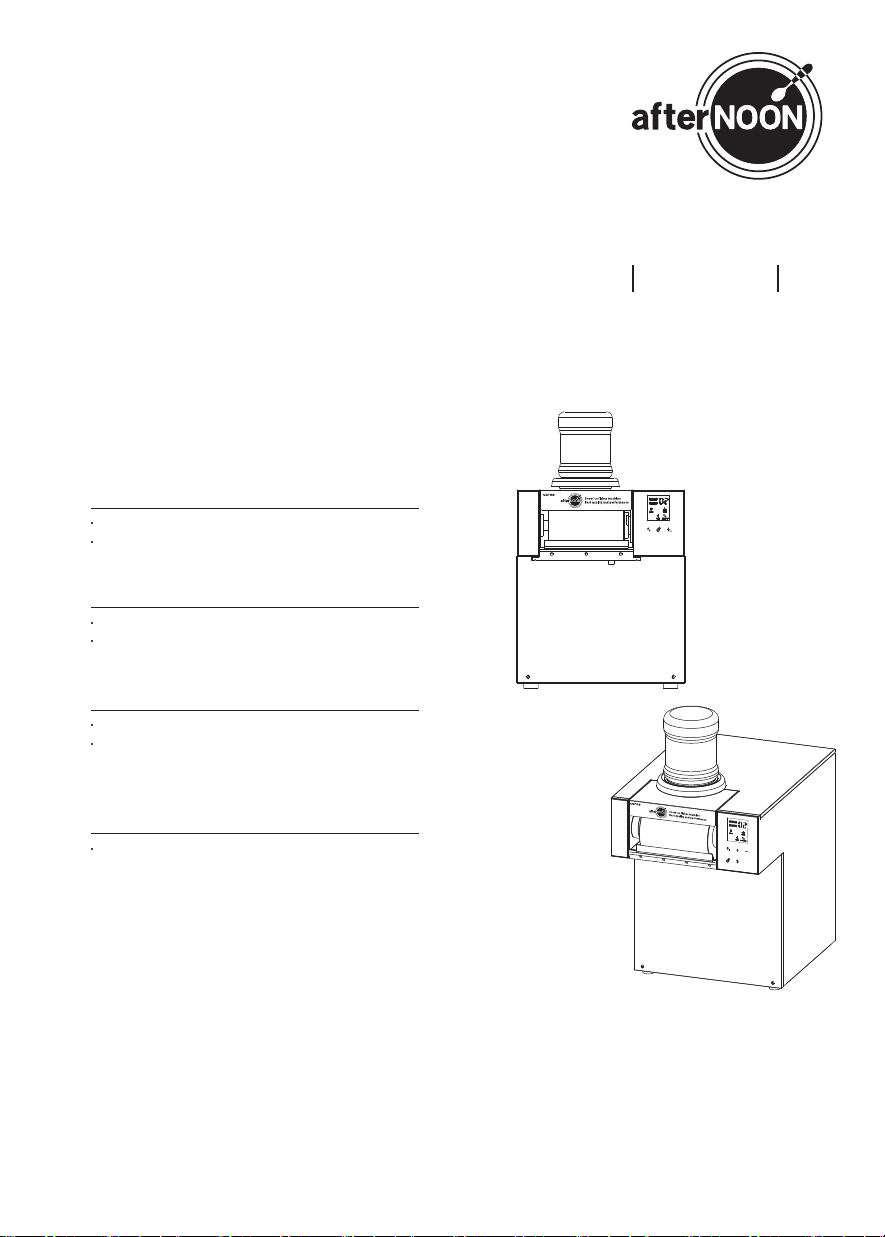
ames of arts
IerSrreie
CIM-15/5Series
erie
Knife
Drum
Tank utter
utton
Control Panel
/Snow ICE / FAST SLOW
SELECTION / CLEAN
Cooling Water
Control witch
Fuse
Power witch
Water upply for
Ice Making
Power Cable
Coolant Drain
Coolant upply
dustment egs
CIM-15/Series
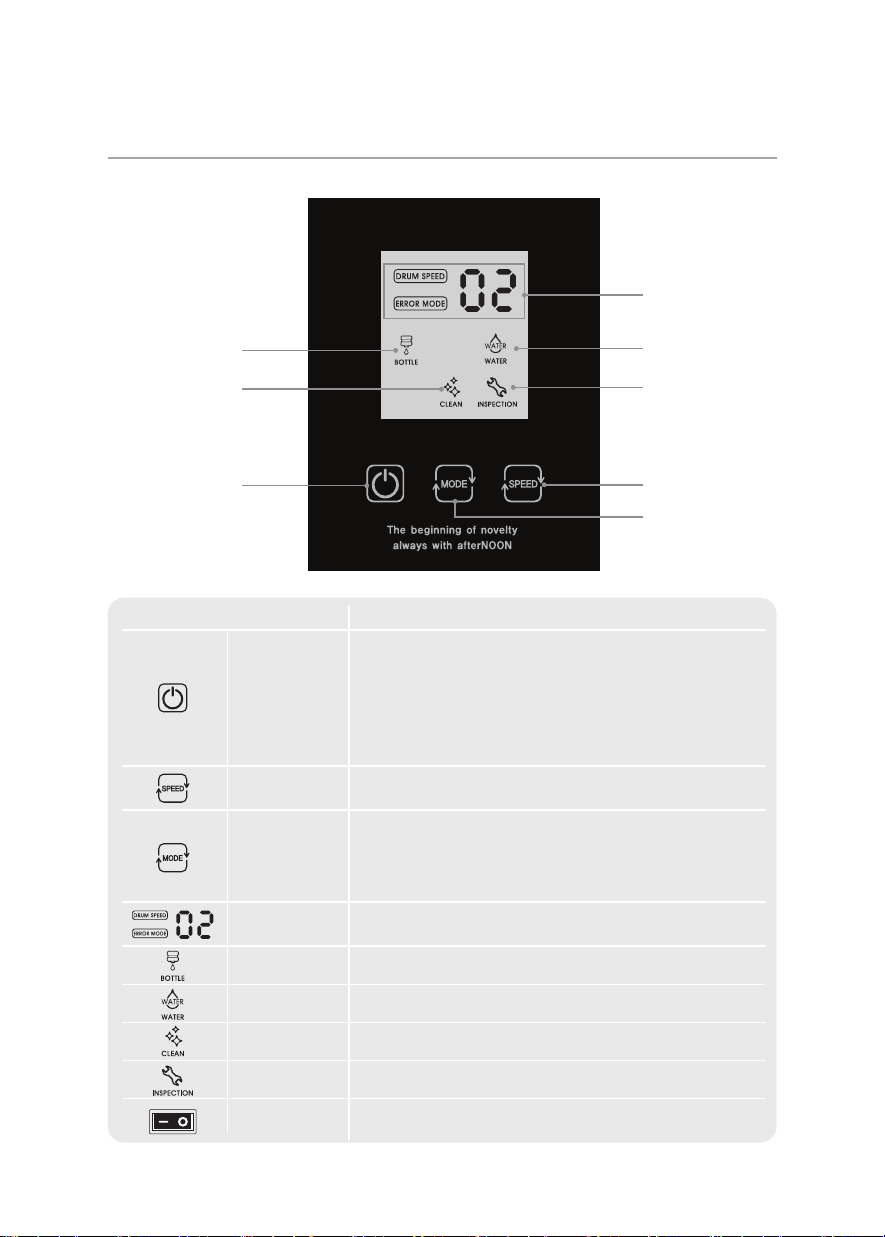
ow to se Control anel
Sr/S
CeiMe
Cier
Meis
/
Me
rrris
erMe
is
rSee
rrrCeis
esss isss
Sr/S
/
Me
rSee
rrrCeis
Cier
Meis
Ce
rrris
erMe
is
tart or stop the operation.
hortpress the switch to start or stop operation.
Press the Cleaning Mode button for seconds to clean the drum and the tank.
The C icon will turn on the CD screen and the product will automatically
clean for one minute.
To release the Cleaning Mode, press the tarttop button and the Cleaning Mode
button and the Cleaning Mode will be released.
When the Cleaning Mode is used at first, only the drum is cleaned.
Press the Mode button, and the Water upply alve wil be opened or closed.
et the drum speed.
et the drum speed from to .
Drum peed and rror Codes are displayed depending on the operating mode.
efer to the rror Codes Table on the page for the rror Codes.
This is displayed when the Container Mode is activated.
This is displayed when the Water Mode is activated.
This is displayed when the Cleaning Mode is activated.
This is displayed when errors occur.
Cier
CrSi
dust the swich depending on the cooling water temperature.
very time the button is pressed, the operating mode will change from Container Mode
to Water Mode and from Water Mode to Container Mode.
The default mode is Container Mode.
Container Mode elect for pouring milk in the container to make ice snowflakes.
efer to the page for the description on the mode.
Water Mode elect for making ice snowflakes with a water supply.
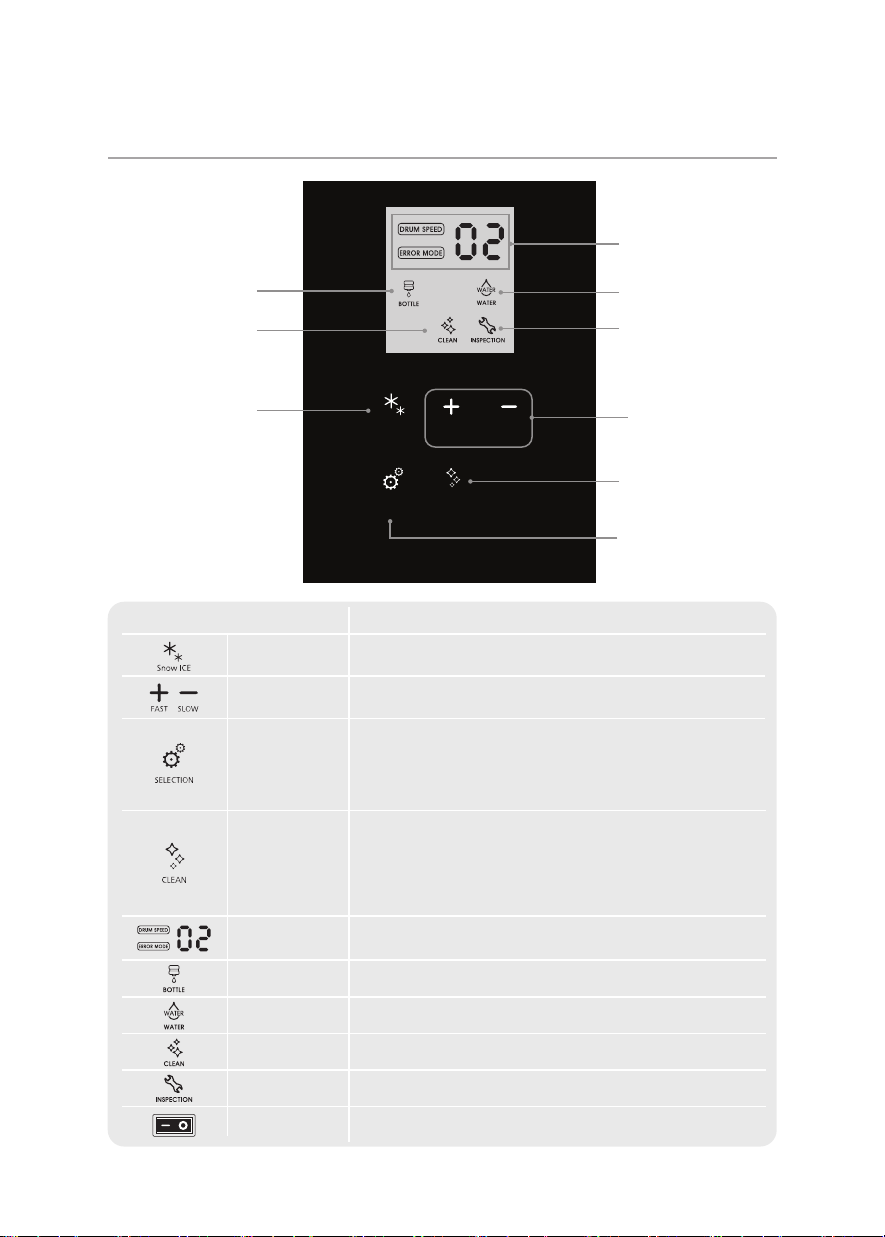
CIM-5/Series
ow to se Control anel
/Snow ICE / FAST SLOW
SELECTION / CLEAN
Sr/S
CeiMe
Cier
Meis
/
Me
rrris
CeiMe
erMe
is
rSee
rrrCeis
esss isss
Sr/S
/
Me
rSee
rrrCeis
Cier
Meis
Cei
Meis
rrris
erMe
is
tart or stop the operation.
Press for seconds, and the product will start or stop operation.
et the drum speed.
et the drum speed from to .
Drum peed and rror Codes are displayed depending on the operating mode.
efer to the rror Codes Table on the page for the rror Codes.
This is displayed when the Container Mode is activated.
This is displayed when the Water Mode is activated.
This is displayed when the Cleaning Mode is activated.
This is displayed when errors occur.
Cier
CrSi
dust the swich depending on the cooling water temperature.
very time the button is pressed, the operating mode will change from Container Mode
to Water Mode and from Water Mode to Container Mode.
The default mode is Container Mode.
Container Mode elect for pouring milk in the container to make ice snowflakes.
efer to the page for the description on the mode.
Water Mode elect for making ice snowflakes with a water supply
Ce
Press the Cleaning Mode button for seconds to clean the drum and the tank.
The C icon will turn on the CD screen and the product will automatically
clean for one minute.
To release the Cleaning Mode, press the tarttop button and the Cleaning Mode
button at the same time for seconds, and the Cleaning Mode will be released.
When the Cleaning Mode is used at first, only the drum is cleaned.
Press the Mode button, and the Water upply alve wil be opened or closed.
0
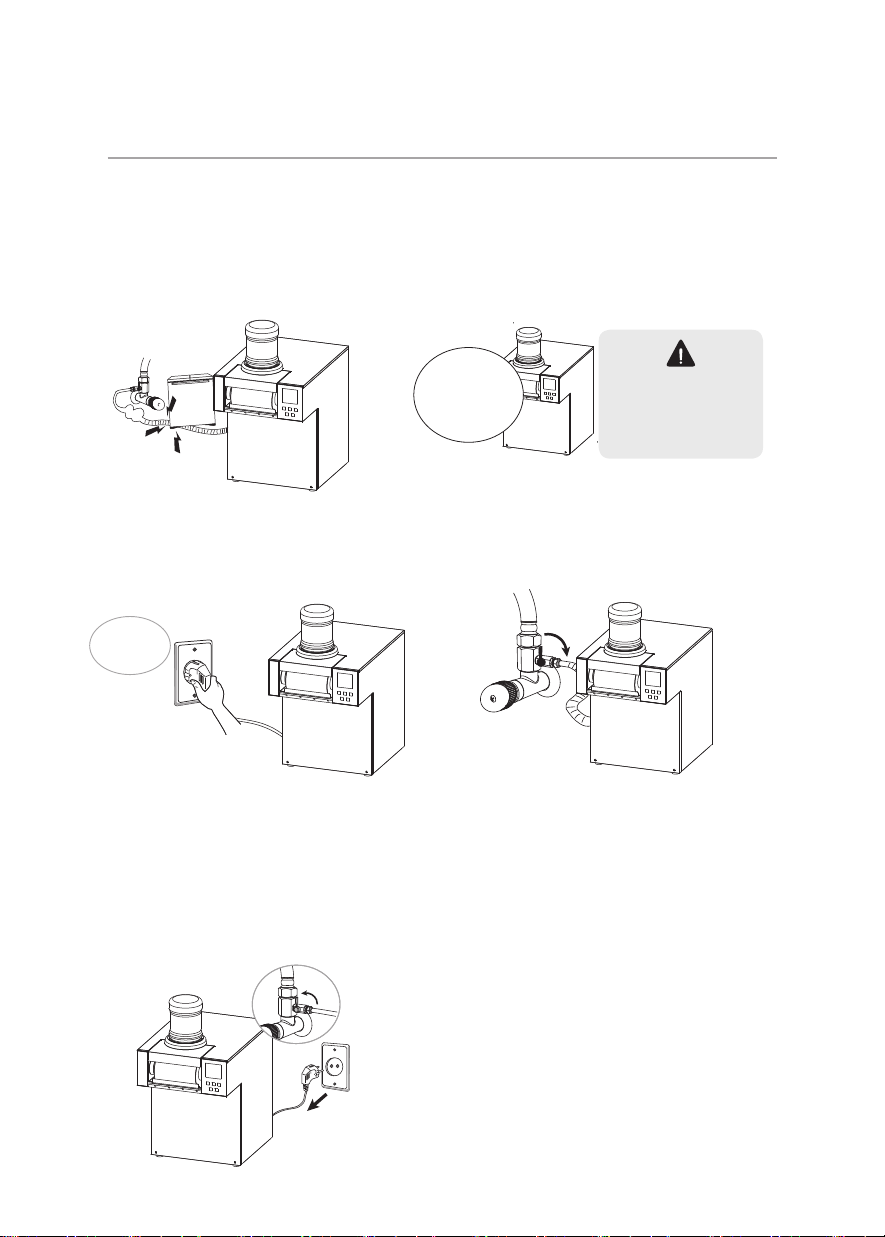
Place the nowflake Ice haver where it will be installed and adust the eg Control crew to level it in all directions.
1 iIeSer
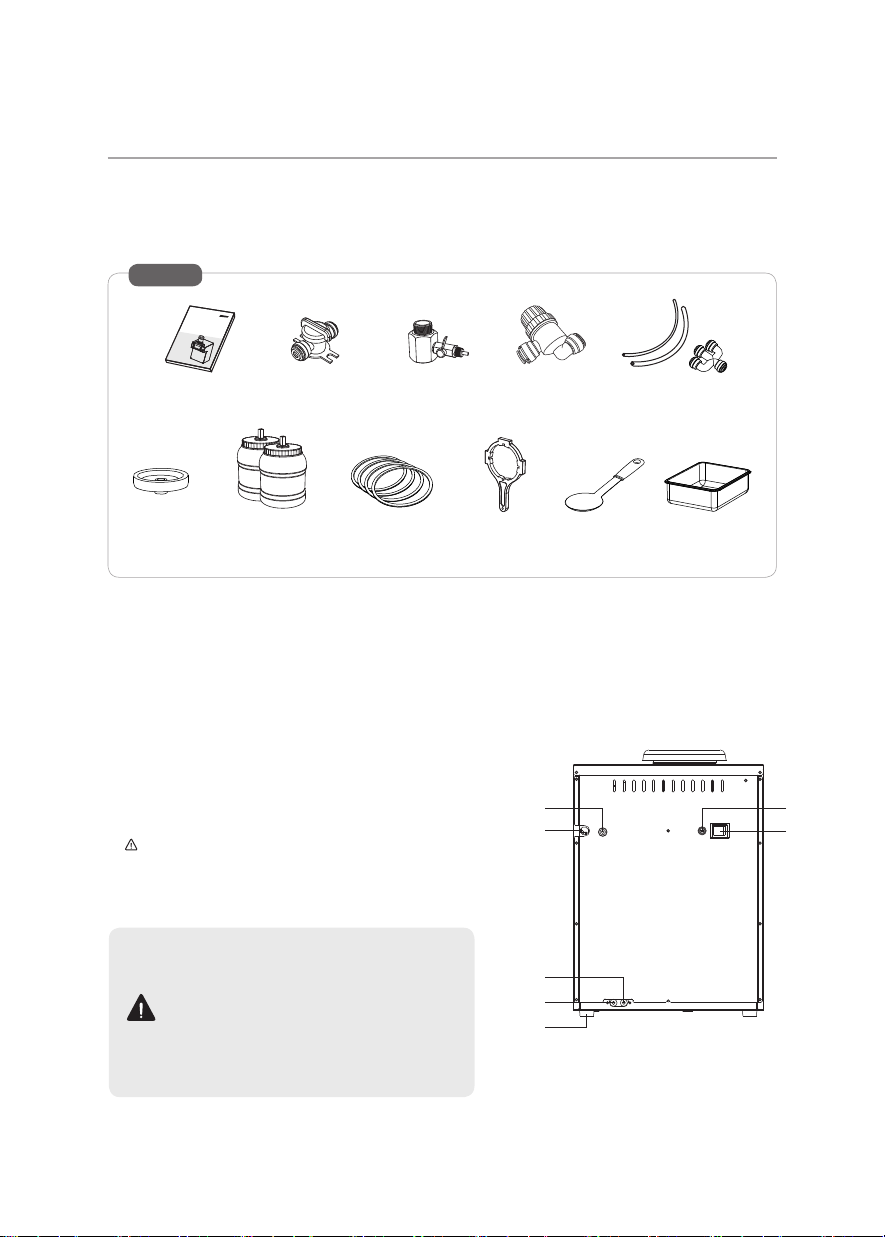
emove the packing box of the ice shaver and take the parts out of the accessory box.
riCr
The pipe supplying water to the condenser is for coolant only to
secure the proper performance of the product.
The coolant drain hose must be up to 3mm is recommended
to secure the proper performance of the product.
erSIeSerCeiri
nstallation
rs
Container
Container Cap
upport
Cap
Container Cap
pen Wrench
eserve
Packing
at patula
Mesh Fiter
3dapter all alve 3Tubing ine
Tubing ine
33 Way Connector
User Manual
Manual
Fuse
Power witch
Water upply
for Ice Making
Power Cable
Coolant Drain
Coolant upply
dustment
egs
n additional monitor may be reuired depending on the
length of the drain hose.
Connect the pipes for coolant supply and drainage
and water supply for ice making to each port on
the rear side of the product.
erify that there is no water leakage after connecting
the pipes to each port.
The manufacturer will not assume any responsibilities
for damage by water leakage caused by installation
errors.
erie
reierSse
Do not place heavy obects on or step on the
water supply hose.
rerriressreer
eerreieeerre
Use this Ice haver only in the space where
hydraulic pressure is over .kPa,
water temperature is ,
and ambient temperature is 00.
After nstallation
15
030
5
15
030
15
030
15
030
Ierisseiir
see1i
rrereiee
rieree
The machine is designed for 0 and 50z,
so the exclusive outlet should be used.
1erCei
emove all water inside be aware of the
danger of freezing and bursting in winter
and unplug the product when the product
will not be used for a long time.
When draining reuired please contact
authorised service center or dealer.
reeerei
pen the tap and supply water.
erS
e
riressre
11
ereerre
55
ieeerre
1

Press the tarttop button for seconds
to stop the product.
Press the tarttop button to use up any
water or additives remaining in the tank.
The product will continue to operate for
minute and then stop.
ow to se
sec
sec
Plug the power cord into the outlet and turn the Main Power switch on at the rear.
elect the mode using the Mode button.
3 Press the tarttop button for seconds to activate the product.
eration
Sto
When restarting the product, the product will
operate with the mode set before restart.
When restarting the product within minutes
after stopping the operation, the product will
restart after minutes.
The product will shut off for minutes to protect
the compressor
Restart
dust the swich depending on the cooling
water temperature.
Cooling water control switch
Cier
Place the container for additives at
the top of the product.
er
Use only water without any additives.
sec
ow to se the Container
Fillthe container with additives and firmly close it using the container cap open wrench.
Put the container upside down in the container compartment on the top.
3 Press the container mode using the container mode on the control panel.
very time the mode button is pressed, the mode is changed from
the container mode to the water mode and from the water mode
to the container mode.
If the cap is not firmly closed, the contents may leak.
fter closing the cap, turn the container upside down to check if it leaks.
Change the drum speed by pressing the
UpDown button during operation.
The number is displayed on the screen.
The drum speed can be set from to .
xcessive drum speed may cause failure or error.
e careful to adeuately control the drum speed.
rum Seed Setting
low amount ma. low amount min.

Ice will not form when the tank is not fied.
e careful of the sharp blade of the knife and the sharp edge of the tank.
e careful to prevent water from flowing into the electronic parts.
reuently clean the ice shaver to keep it clean and prevent sanitary issues.
nplug the power cord when cleaning the ice shaver or replacing parts.
Do not directly spray water on the ice shaver. This may cause failure short circuit electric shock or fire.
Do not use powder detergent benzene thinner hydrochloric acid petroleum hot water or rough brushes.
This may cause corrosion or damage to the product.
When using a detergent wet a soft towel in lukewarm water or a neutral detergent and wipe the product.
After using a detergent wipe the product with a clean wet towel once more.
3
Cleaning CIM-15/Series
Press the peration button during operation or after stopping the product for seconds.
The compressor will stop working and the drum will work for minute.
Press the Mode button, and the Water supply valve wil be opened or closed.
3 Press the peration button for seconds to stop cleaning.Cleaning will stop.
The Cleaning icon will flash on the CD screen during cleaning.
e careful to prevent water from flowing into the control box when cleaning the product.
Failure to do so may cause operational failure, short circuit or errors.
Cleaning unction
Turn the Power off and unplug the power cord from the outlet.
emove the container for additives and open the top plate of the ice shaver.
3 pen the tank cap and screws at the bottom of the ice shaving drum and completely remove water or milk
from the tank. Push the fix bolt to the direction of the arrow to separate the tank from the back.
Dilute dishwashing detergent in lukewarm water and wet a clean cloth or towel withthis. Clean the tank and the drum.
terilize the drum and inside the drum using the disinfectant or a steam cleaner and wipe with clean cloth.
6 ssemble the tank in the reverse order of tank disassembly. e careful to prevent water from flowing into the
electronic parts.
Close the top plate of the ice shaver.
Cleaning inside the roduct

Ice will not form when the tank is not fied.
e careful of the sharp blade of the knife and the sharp edge of the tank.
e careful to prevent water from flowing into the electronic parts.
reuently clean the ice shaver to keep it clean and prevent sanitary issues.
nplug the power cord when cleaning the ice shaver or replacing parts.
Do not directly spray water on the ice shaver. This may cause failure short circuit electric shock or fire.
Do not use powder detergent benzene thinner hydrochloric acid petroleum hot water or rough brushes.
This may cause corrosion or damage to the product.
When using a detergent wet a soft towel in lukewarm water or a neutral detergent and wipe the product.
After using a detergent wipe the product with a clean wet towel once more.
Cleaning CIM-5/Series
Press the Cleaning button during operation or after stopping the product for seconds.
The compressor will stop working and the drum will work for minute.
Press the Mode button, and the Water supply valve wil be opened or closed.
3 Press the peration button or Cleaning button for seconds to stop cleaning.Cleaning will stop.
The Cleaning icon will flash on the CD screen during cleaning.
e careful to prevent water from flowing into the control box when cleaning the product.
Failure to do so may cause operational failure, short circuit or errors.
Cleaning unction
Turn the Power off and unplug the power cord from the outlet.
emove the container for additives and open the top plate of the ice shaver.
3 pen the tank cap and screws at the bottom of the ice shaving drum and completely remove water or milk
from the tank. Push the fix bolt to the direction of the arrow to separate the tank from the back.
Dilute dishwashing detergent in lukewarm water and wet a clean cloth or towel withthis. Clean the tank and the drum.
terilize the drum and inside the drum using the disinfectant or a steam cleaner and wipe with clean cloth.
6 ssemble the tank in the reverse order of tank disassembly. e careful to prevent water from flowing into the
electronic parts.
Close the top plate of the ice shaver.
Cleaning inside the roduct
Check if the water valve is opened.
Check if there are additives in the container.
Do not allow the product to idle for a long period.
this may cause Compressor error
Contact the customer service center.
Contact the customer service center.
Contact the customer service center.
Check if the hydraulic pressure.kPa is normal.
Check if water is cut off.
Close the water valve and contact the customer service center.
rror Codes Causes
ack of water
ack of additives
Idle Working
efrigerant Pressure rror
igh Pressure
Motor rror
Power Part rror
Coolant upply rror
Coolant alve rror
Water eakage
ctions
Check before Requesting Service
Sesesreiresrserierrseeererreri
isiesiesCierCierCiSrCrsreieCeisee
1. The product will
not activate.
Issues What to Check ctions
2.
Water is not supplied.
3. The product is
activated but ice
is not made.
4. Loud or abnormal
noises.
5. The followings are
not errors of the
product.
●
Is the power supply 220V ±10%?
●
Is the power cord connected properly?
●
Is the power switch turned on?
●
Check the power supply.
●
Plug in the power cord.
●
Turn the power switch on.
●
Is the water valve opened?
●
Is water cut off?
●
Is the water supply hose connected properly?
●
Open the water supply valve.
●
Wait until water is supplied again.
●
Connect the water supply hose.
●
Is there no ice in the drum or ice in one side in the drum?
●
Does the buzzer sound while the Container LED flashes?
●
Does the compressor workproperly?
●
Are there any heating appliancesnear?
●
Does the buzzer sound while the Water LED flashes?
●
Contact the customer service center after checking.
●
Place the additives in the container.
●
Contact the customer service center after checking.
●
Keep as far away from heating appliances as possible.
●
Contact the customer service center after checking the water
supply valve.
●
Is the floor where the product is installed unstable or weak?
●
Is any side of the Ice Shaver in contact with other objects?
●
Is the ice thick or abnormal?
●
Level off the Ice Shaker and firmly install it on a stable floor.
●
Keep the distance to other objects to be over 10cm.
●
Contact the customer service center after checking.
●
The product may shake a little during operation. This is not an error.
●
There may be slight water drops condensing through the shaved ice outlet becaus of the freezing inside. This is not an error.
●
The buzzer may sound for a moment at initial operation and the relevant Mode LED may flash.
It is automatically released when the tank is filled.
Check the following before requesting customer service.
The product doesn’t work properly due to improper usage that doesnot comply with the instructions.
If the product has any functional errors, check the product in accordance with the table below.
If the issues persist even after checking, contact the customer service center.
< Errors and Actions >
CIM-15/Series
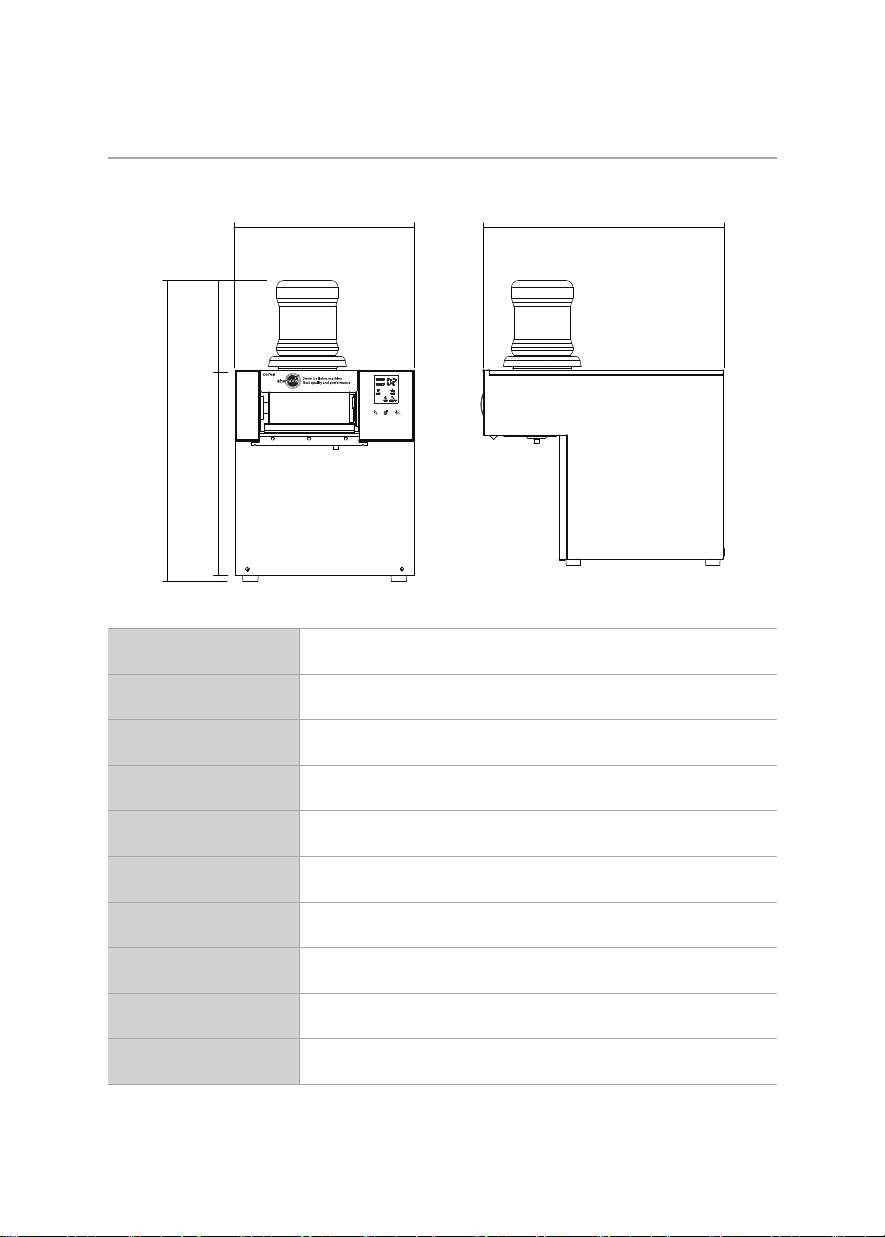
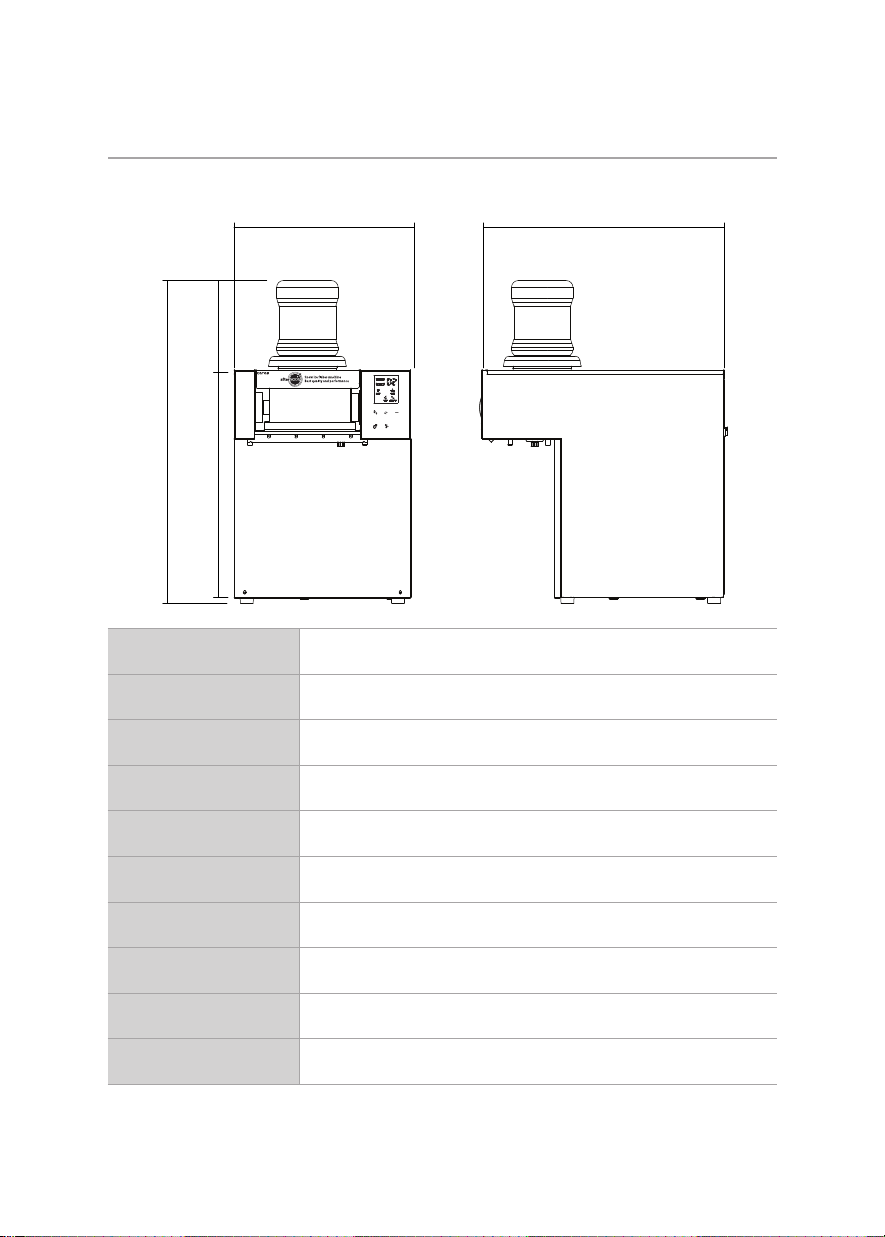
Secification
5
/Snow ICE / SELECTION SLOW
Product ame
Model
Dimension
W x D x
Ice having Capacity
Weight
ated oltage
ated Current
efrigerant
Condenser
perating Temperature
rum Type Ice haver
Ieries
mm ecept the container and adustment legs
ccmin.
kg
, 5
,
a
ater ooling Type
6
eesereesiseiiiiisserMreseeirir
ieesreeiireeer
CIM-5/Series
Secification
535380
5
/Snow ICE / FAST SLOW
SELECTION /CLEAN
rum Type Ice haver
Ieries
38 35 mm ecept the container and adustment legs
ccmin.
kg
, 5
,
a
ater ooling Type
Product ame
Model
Dimension
W x D x
Ice having Capacity
Weight
ated oltage
ated Current
efrigerant
Condenser
perating Temperature
eesereesiseiiiiisserMreseeirir
ieesreeiireeer
Product Drum Type Ice haver
Date of Purchase 0 . . .
Customer T endor
ddress
Model CIMerise, CIMerise
When reuesting customer service, it is necessary to show the Warranty with the date of purchase written.
Delivery of
ew Product
Customers Collection of
ld Product
aste Reccling
The Company collects and recycles the products in cooperation with the government for a better
environment as specified below.
When customers purchase new products and dispose of the old ones, the Company will collect the old
products from customers without charge.
Agenc
aste ome Aliances
isosal lant
Warranty

MEMO

nstallation Agenc
We do not assume any responsibilityfor any issues caused by using other parts
or filters except genuine parts or filters for the Ice haver.
The appearance and specifications of the product are subect to change without
prior notice to ensure the improvement of the product.
This manual suits for next models
1
Table of contents


