AG Neovo V-10 User manual

AG Neovo
Digital Photo Frame
V-10
User Manual

T
TA
AB
BL
LE
E
O
OF
F
C
CO
ON
NT
TE
EN
NT
TS
S
Chapter 1 Preface............................................................................i
1.1. About this Manual ................................................................................... i
1.2. Copyright.................................................................................................. i
1.3. Operating Instruction .............................................................................. i
1.4. Safety Information .................................................................................. ii
Chapter 2 Introduction...................................................................1
2.1. Package Contents .................................................................................. 1
2.2. Features................................................................................................... 2
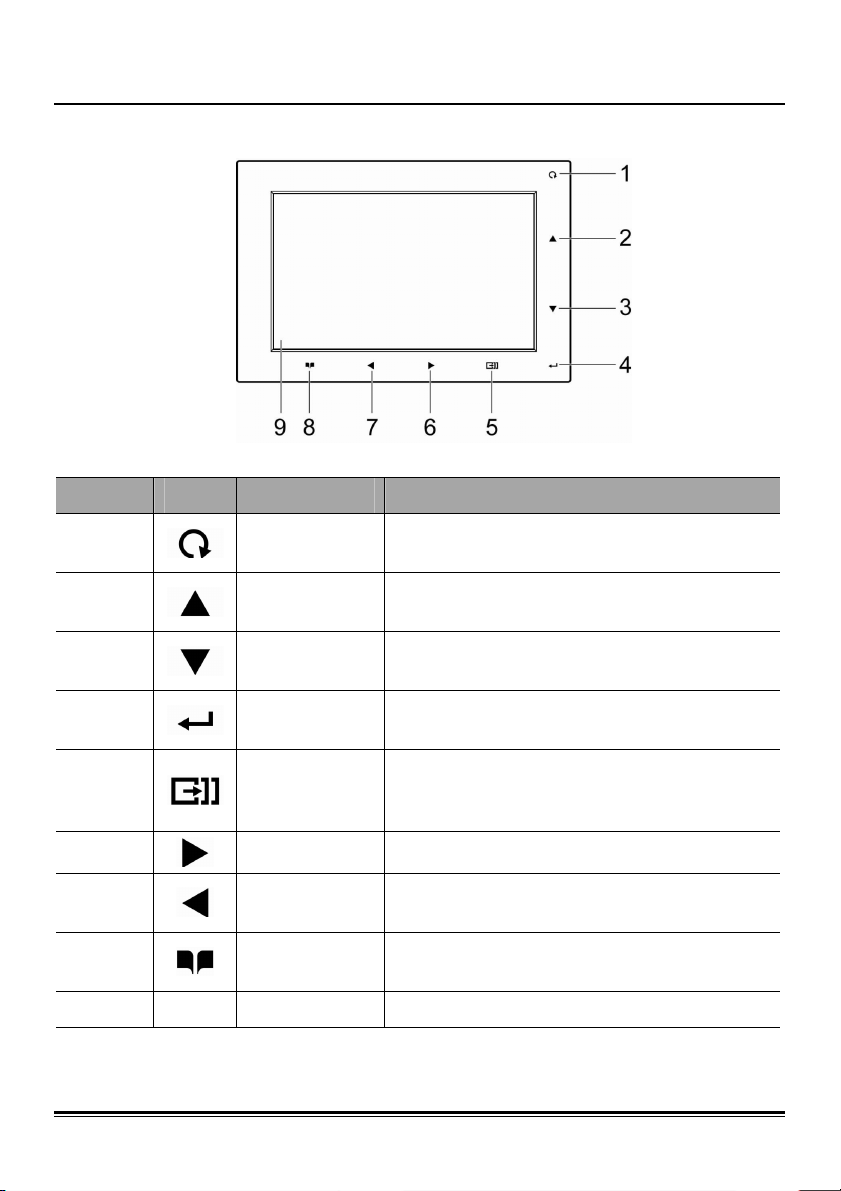
2.2.1. Front View...................................................................................... 2
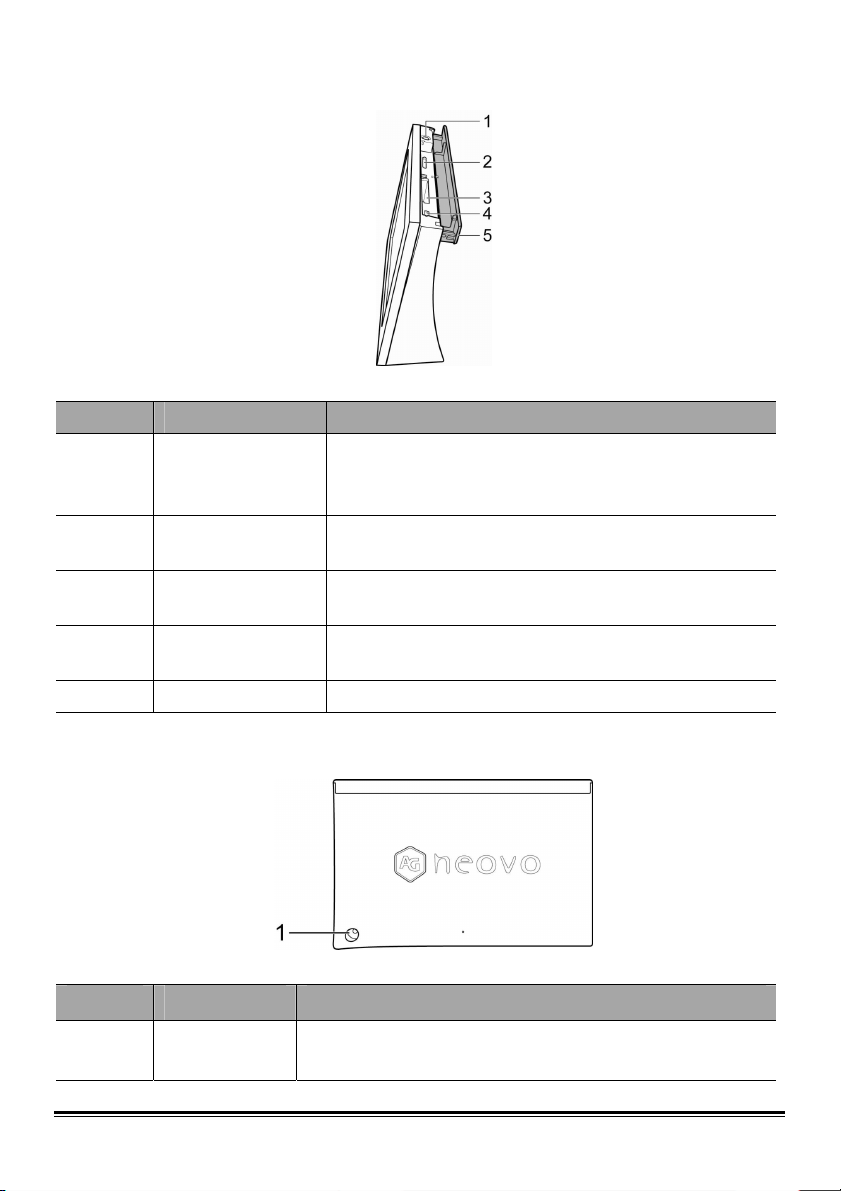
2.2.2. Top View........................................................................................ 3
2.2.3. Back View ...................................................................................... 3
Chapter 3 Getting Started..............................................................4
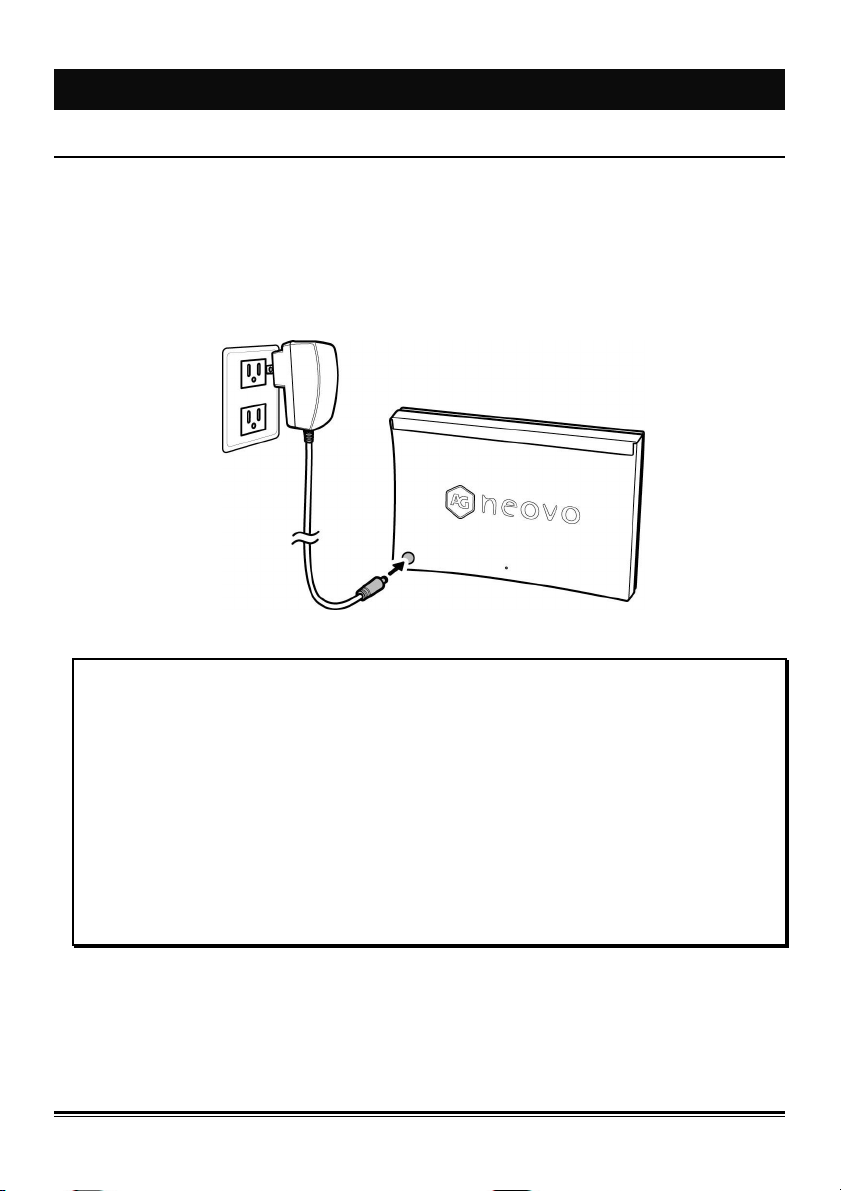
3.1. Connecting the Power............................................................................ 4
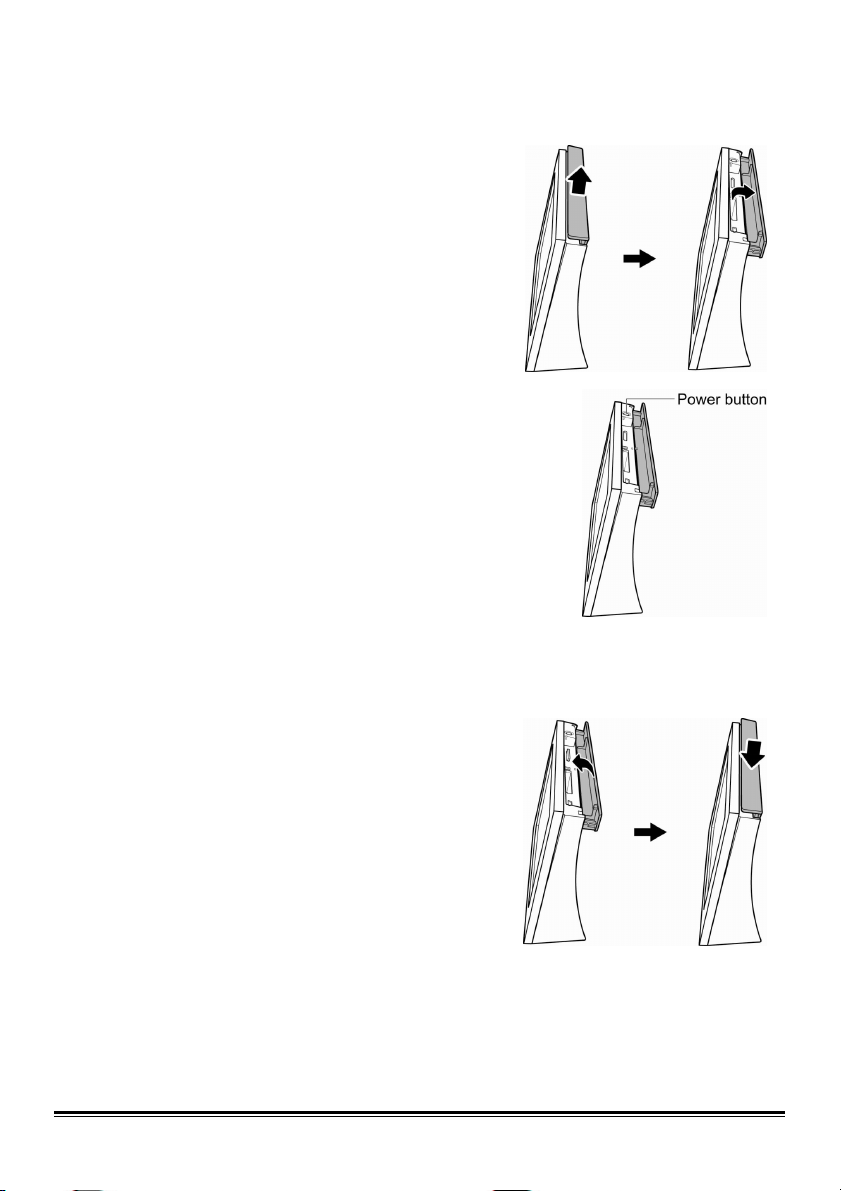
3.1.1. Using the Rechargeable Battery.................................................... 4
3.1.2. Turning On/Off the V-10 ................................................................ 5
3.2. Connecting to a Computer .................................................................... 6
3.2.1. Transferring Files........................................................................... 6
3.3. Inserting Memory Cards ........................................................................ 7
3.3.1. Compatible Memory Cards ............................................................ 8
Chapter 4 Using the V-10...............................................................9
4.1. Browsing Photos .................................................................................... 9
4.1.1. Selecting the Storage Interface ..................................................... 9
4.1.2. Notifications on Card Selecting ................................................... 10
4.1.3. Browse Photo .............................................................................. 11
4.2. Calendar and Clock.............................................................................. 14
4.3. Setup Menu ........................................................................................... 15
4.3.1. Screen Size ................................................................................. 15

4.3.2. Brightness.................................................................................... 16
4.3.3. Language..................................................................................... 16
4.3.4. Date and Time ............................................................................. 18
4.3.5. Auto ON/OFF............................................................................... 19
4.3.6. Status........................................................................................... 20
4.4. Slideshow Setting................................................................................. 21
4.4.1. Setting the Order ......................................................................... 21
4.4.2. Setting the Interval....................................................................... 23
4.4.3. Setting the Display Effect ............................................................ 24
4.5. File Management .................................................................................. 26
4.5.1. Managing Files in My Favorite..................................................... 26
4.5.2. Managing Files in memory cards................................................. 28
Chapter 5 Help..............................................................................30
5.1. Troubleshooting ................................................................................... 30
5.2. Warranty Information ........................................................................... 30
5.3. Contact Information ............................................................................. 30
Chapter 6 Appendix ........................................................................I
6.1. Specification ............................................................................................ I
6.2. Regulatory Information .......................................................................... II
6.2.1. FCC Compliance ........................................................................... II
6.2.2. UL .................................................................................................. II
6.2.3. WEEE ........................................................................................... III
6.2.4. Hg ................................................................................................. III
6.3. Operating Menu Tree.............................................................................IV

C
Ch
ha
ap
pt
te
er
r
1
1
P
PR
RE
EF
FA
AC
CE
E
1
1.
.1
1.
.
A
Ab
bo
ou
ut
t
t
th
hi
is
s
M
Ma
an
nu
ua
al
l
Thank you for purchasing our V-10. This manual provides you with instructions
on how to use your V-10. Please read through this manual before using the
V-10. Every effort has been made to ensure the contents on this manual are
accurate and up to date. However, no guarantee is made regarding the
correctness of its contents, and the manufacturer reserves the right to make
changes without prior notice.
1
1.
.2
2.
.
C
Co
op
py
yr
ri
ig
gh
ht
t
© Copyright 2006 All rights reserved.
This product and related documentation are protected by copyright and are
distributed under licenses restricting their use, copying, and distribution. No
part of this documentation may be reproduced in any form by any means
without prior written authorization of the manufacturer and its licensors, if any.
1
1.
.3
3.
.
O
Op
pe
er
ra
at
ti
in
ng
g
I
In
ns
st
tr
ru
uc
ct
ti
io
on
n
• Keep this manual for future reference.
• Keep this product from moisture and dust.
• Place the product on a stable surface before setting it up.
• Do not block any ventilation openings to prevent the product overheating.
• Please read the notes on page 4 for how to use the rechargeable battery.
• Do not insert or remove a card when the V-10 is in use.
• Do not use a sharp object on the LCD screen, or the surface may be
damaged.
• Please refer to Inserting Memory Cards on page 7 for details about how
to insert memory cards correctly.
i

1
1.
.4
4.
.
S
Sa
af
fe
et
ty
y
I
In
nf
fo
or
rm
ma
at
ti
io
on
n
Read the following safety notices carefully before using the product.
• Only use the supplied power DC adapter. Use of any other adapter may
damage the V-10 and void the warranty.
• Do not disassemble the V-10. There are no user-serviceable parts inside.
Opening this product will void the warranty.
• Do not use the V-10 near water and avoid spilling any liquids on it.
• Keep the V-10 away from direct sunlight or heat source, as this may
cause damage.
• Unplug the V-10 from the power outlet before cleaning or maintenance.
• Should any object or liquid fall on the frame, unplug it and have it checked
by qualified personnel before operating it again, or contact customer
support for advice.
• Use a soft absorbent cloth moistened with water to clean the LCD screen
gently.
• Avoid applying pressure to the surface of the LCD screen as this may
cause non-uniform images.
• Do not expose the V-10 to strong vibration, shock, or static electricity.
This may damage the unit and void the warranty.
i
i

C
Ch
ha
ap
pt
te
er
r
2
2
I
IN
NT
TR
RO
OD
DU
UC
CT
TI
IO
ON
N
2
2.
.1
1.
.
P
Pa
ac
ck
ka
ag
ge
e
C
Co
on
nt
te
en
nt
ts
s
V-10 Quick Guide
Power Adapter
CD
(Contains V-10 User Manual and
other information)
USB Cable
1

2
2.
.2
2.
.
F
Fe
ea
at
tu
ur
re
es
s
2.2.1. Front View
Number Icon Function Description
1 Rotate Press to rotate the currently displayed
image.
2 Up Press to move to the upper photo or
option.
3 Down Press to move to the lower picture or
option.
4 Enter Press to confirm a selection while
browsing different menus and photos.
5 Slideshow
Press to start browsing photos as a slide
show, press again to exit and return to
thumbnail page.
6 Next Press to move to the next photo or option.
7 Previous Press to move to the previous photo or
option.
8 Back / Menu Press to go back to the previous level in
the UI menu or to show menu options.
9 N/A
LCD screen View photos via this display.
2

2.2.2. Top View
Number Name Description
1 Power button
Use to power on / off the V-10.
When the V-10 is turned off, the Power button
becomes the Reset button.
2 Three-in-One
card slot SD / MMC / MS card slot.
3 Two-in-One
card slot CF / MD card slot.
4 Mini USB port Use to connect to a computer via a mini USB
cable.
5 Top cover V-10 top cover
2.2.3. Back View
Number Name Description
1 DC power
jack
Use the supplied power DC adapter to connect the
DC power jack to an electrical socket.
3

C
Ch
ha
ap
pt
te
er
r
3
3
G
GE
ET
TT
TI
IN
NG
G
S
ST
TA
AR
RT
TE
ED
D
3
3.
.1
1.
.
C
Co
on
nn
ne
ec
ct
ti
in
ng
g
t
th
he
e
P
Po
ow
we
er
r
3.1.1. Using the Rechargeable Battery
The V-10 is equipped with a built-in rechargeable Lithium battery.
To charge the battery, use the DC power adapter to connect the V-10 to an
outlet as shown:
Note:
1. Before first time use of the V-10, please charge the battery for at least 5 hours.
2. The V-10 can operate continuously up to an hour on a full charge.
3. When the battery is low, a warning message displays on the LCD screen for 5
seconds and then the V-10 automatically turns off. The power adapter is now
required to use the V-10.
4. To prevent damage and increase battery life, do not leave uncharged for more
than 2 months..
5. Charge the battery for at least 6 hours for a full charge when the V-10 is in use.
6. Charge the battery for at least 3 hours for a full charge when the V-10 is not in use.
4

3.1.2. Turning On/Off the V-10
To turn on V-10, follow the steps below:
1. Slightly raise the top cover and
slide it open.
2. Press the power button to boot the
V-10. While booting up the V-10,
the product information is
displayed on the LCD screen.
3. Slide the top cover back and push
it down gently.
Now the V-10 is ready for use.
After the V-10 is turned on and a
memory card is inserted in the slot, the
photo slide show starts automatically.
If no memory card is inserted, the
photos stored in built-in memory will
be displayed as a slide show
automatically.
If no files are detected, the V-10 enters
the thumbnail mode after turning on.
5

3
3.
.2
2.
.
C
Co
on
nn
ne
ec
ct
ti
in
ng
g
t
to
o
a
a
C
Co
om
mp
pu
ut
te
er
r
Connect your V-10 to a computer with a
USB cable to use the V-10 as a multi-
functional card reader. Connect the V-10
and the computer as shown.
While connecting your V-10 to the
computer, V-10 will stop all activities
including browsing, slide show, or
managing files until the V-10 disconnects
from the PC.
Also, you can edit or delete photos on the
V-10 after it is connected to a PC.
3.2.1. Transferring Files
To transfer files when connecting to the PC, please do the following:
1. Insert the memory card into the appropriate memory slot as described
in Inserting Memory Cards on page 7.
2. Connect the V-10 to the computer as described in Connecting to a
Computer on page 6.
3. Turn the V-10 on.
4. Start File Explorer or any other file managing.
5. The memory card slots and built-in memory display as three
Removable Disk folders on your computer. The contents of each
memory card are displayed under their respective folders. Delete
unwanted files and copy the desired files to the folders as required.
Note:
1. To prevent data loss or damage, do not insert or remove memory cards during file
access.
2. If the battery is low, file access may be interrupted. Please use the power adapter
for transferring files.
6

3
3.
.3
3.
.
I
In
ns
se
er
rt
ti
in
ng
g
M
Me
em
mo
or
ry
y
C
Ca
ar
rd
ds
s
When connected to a PC, the V-10 works as a multi-functional card reader. To
insert a memory card, do the following:
1. Slightly raise the top cover and
slide it open.
2. Follow the direction of the arrow
to insert a memory card, with the
gold contacts facing the rear of
the V-10.
Now the images stored on the card can be shown on V-10 directly or
transferred to your PC for advance editing.
Note:
1. If two or more memory cards are inserted at the same time, the most recently
inserted card takes priority.
2. Do not insert or remove any memory card when the V-10 is connected to the
computer. This may damage the card.
3. Do not insert a deformed memory card into the V-10 or the card slot may be
damaged.
4. Make sure the memory cards are inserted correctly.
7

3.3.1. Compatible Memory Cards
There are two card slots on the V-10, which support five different card types.
Insert the memory cards into the appropriate slot as described below. Make
sure the memory cards are inserted correctly without forcing them inside.
Three-in-One card slot Supports:
1. SD (Secure DigitalTM) card
2. MMC (MultiMedia CardTM)
3. MS (Memory StickTM)
Two-in-One card slot Supports:
1. CF (CompactFlashTM) card
2. MD (MicrodriveTM)
8

C
Ch
ha
ap
pt
te
er
r
4
4
U
US
SI
IN
NG
G
T
TH
HE
E
V
V-
-1
10
0
4
4.
.1
1.
.
B
Br
ro
ow
ws
si
in
ng
g
P
Ph
ho
ot
to
os
s
In the Browse Photo menu, you can browse photos stored on different
media. You can also choose to view all the photos with slide show mode.
To enter Browse Photo menu:
1. Turn on the V-10 and press to enter the Main Menu.
2. Press ▲or ▼to select Browse Photo menu, and press to
enter.
4.1.1. Selecting the Storage Interface
After entering the Browse Photo menu as described above, there are
three different storage media to select:
1. My Favorite : The built-in Flash Memory of V-10
2. SD/MMC/MS : Three-in-One card slot
3. CF/MD : Two-in-One card slot
The memory source in use is highlighted in orange.
To switch memory source:
1. Press ▲or ▼to select which memory source to use.
2. Press to confirm.
9

4.1.2. Notifications on Card Selecting
1. The most recently inserted card will take priority.
a. If no memory card is inserted, My Favorite folder will be
highlighted orange after entering Browse Photo option.
b. Followed above, if either a SD/MMC/MS card is inserted, the
SD/MMC/MS option will be highlighted orange immediately.
c. Followed above, if either a CF/MD card is inserted, the CF/MD
option will be highlighted orange immediately.
2. Please refer to Compatible Memory Cards on page 8 for details.
10

4.1.3. Browse Photo
Select your memory source and press , photos stored on the selected card
are shown as thumbnails, with six thumbnails in per page.
Number Name Description
1 Current Menu Indicates the current menu. Displays for about 5
seconds.
2 Memory Source Indicates which storage type you are using now.
3 Rotate Press to rotate a photo
4 Date & Time Shows current date and time.
5 Quantity Indicates the number of the stored images and
which image you’re viewing now.
6 Thumbnail Displays thumbnails of all photos. Six
thumbnails will be displayed in a page.
7 Slideshow Press to start the slideshow, and press again to
exit and return to thumbnail page.
8 Back / Menu Press to go back to the previous level in the UI
menu or to show menu options.
11

4.1.3.1. Thumbnail
In Thumbnail Mode, use ▲/▼/◄/►buttons to scroll through thumbnails, and
press to show the select thumbnail in photo browse mode.
Up
Down
Ente
r
Next
Previous
4.1.3.2. Slide Show
The slide show starts automatically when the V-10 is turned on. The V-10
detects the memory source and starts the slide show automatically. Press
to go to the Main Manu.
While browsing photos in Thumbnail mode or Browse mode, press to
start the slide show automatically. To exit slideshow mode, press again
and return to thumbnail mode.
To configure your slide show settings, please see Slideshow Settings on
page21 for details.
Menu / Back
Slideshow
12

4.1.3.3. Browse a Photo
If you wish to view a select thumbnail in Browse mode, press to display
the photo.
Also, press ▲/▼/◄/►buttons to move to the previous or the next photo.
Up
Down
Ente
r
Previous
Next
4.1.3.4. Rotate a Photo
While browsing a photo, you can press button to rotate a photo. Rotating
is only available in Browse mode.
Vertical Horizontal
13

4
4.
.2
2.
.
C
Ca
al
le
en
nd
da
ar
r
a
an
nd
d
C
Cl
lo
oc
ck
k
Use this function to use the V-10 as a digital desktop calendar and clock.
To enter Calendar & Clock menu:
1. Turn on the V-10 and press to enter the Main Menu.
2. Press ▲or ▼to select Calendar & Clock option, and press to
display the calendar and clock.
To display Calendar and Clock :
1. Select the Calendar & Clock option as described above.
2. Press to display the Calendar & Clock screen.
3. If you wish to exit the Calendar & Clock screen, press to exit.
If you wish to change date and time, please see Date and Time on page
18 for details.
14

4
4.
.3
3.
.
S
Se
et
tu
up
p
M
Me
en
nu
u
In the Setup Menu , you can adjust the system settings to display system
information.
To enter the Setup Menu :
1. Turn on the V-10 and press to enter the Main Menu.
2. Press ▲or ▼to select Setup Menu and press to enter.
4.3.1. Screen Size
Use this function to adjust the aspect ratio of the V-10.
To change the Screen Size :
1. Enter Setup Menu
as described
above and press ▲
or ▼to select
Screen Size . T
current setting
highlighted in black.
he
2. Press ►to enter the
submenu. Press ▲
or ▼select Normal
(4:3) or Full Screen
(16:9). The new setting is highlighted in orange.
3. Press to confirm and exit the setting. The new setting is highlighted
in black.
1
5
Other manuals for V-10
1
Table of contents
Other AG Neovo Digital Photo Frame manuals