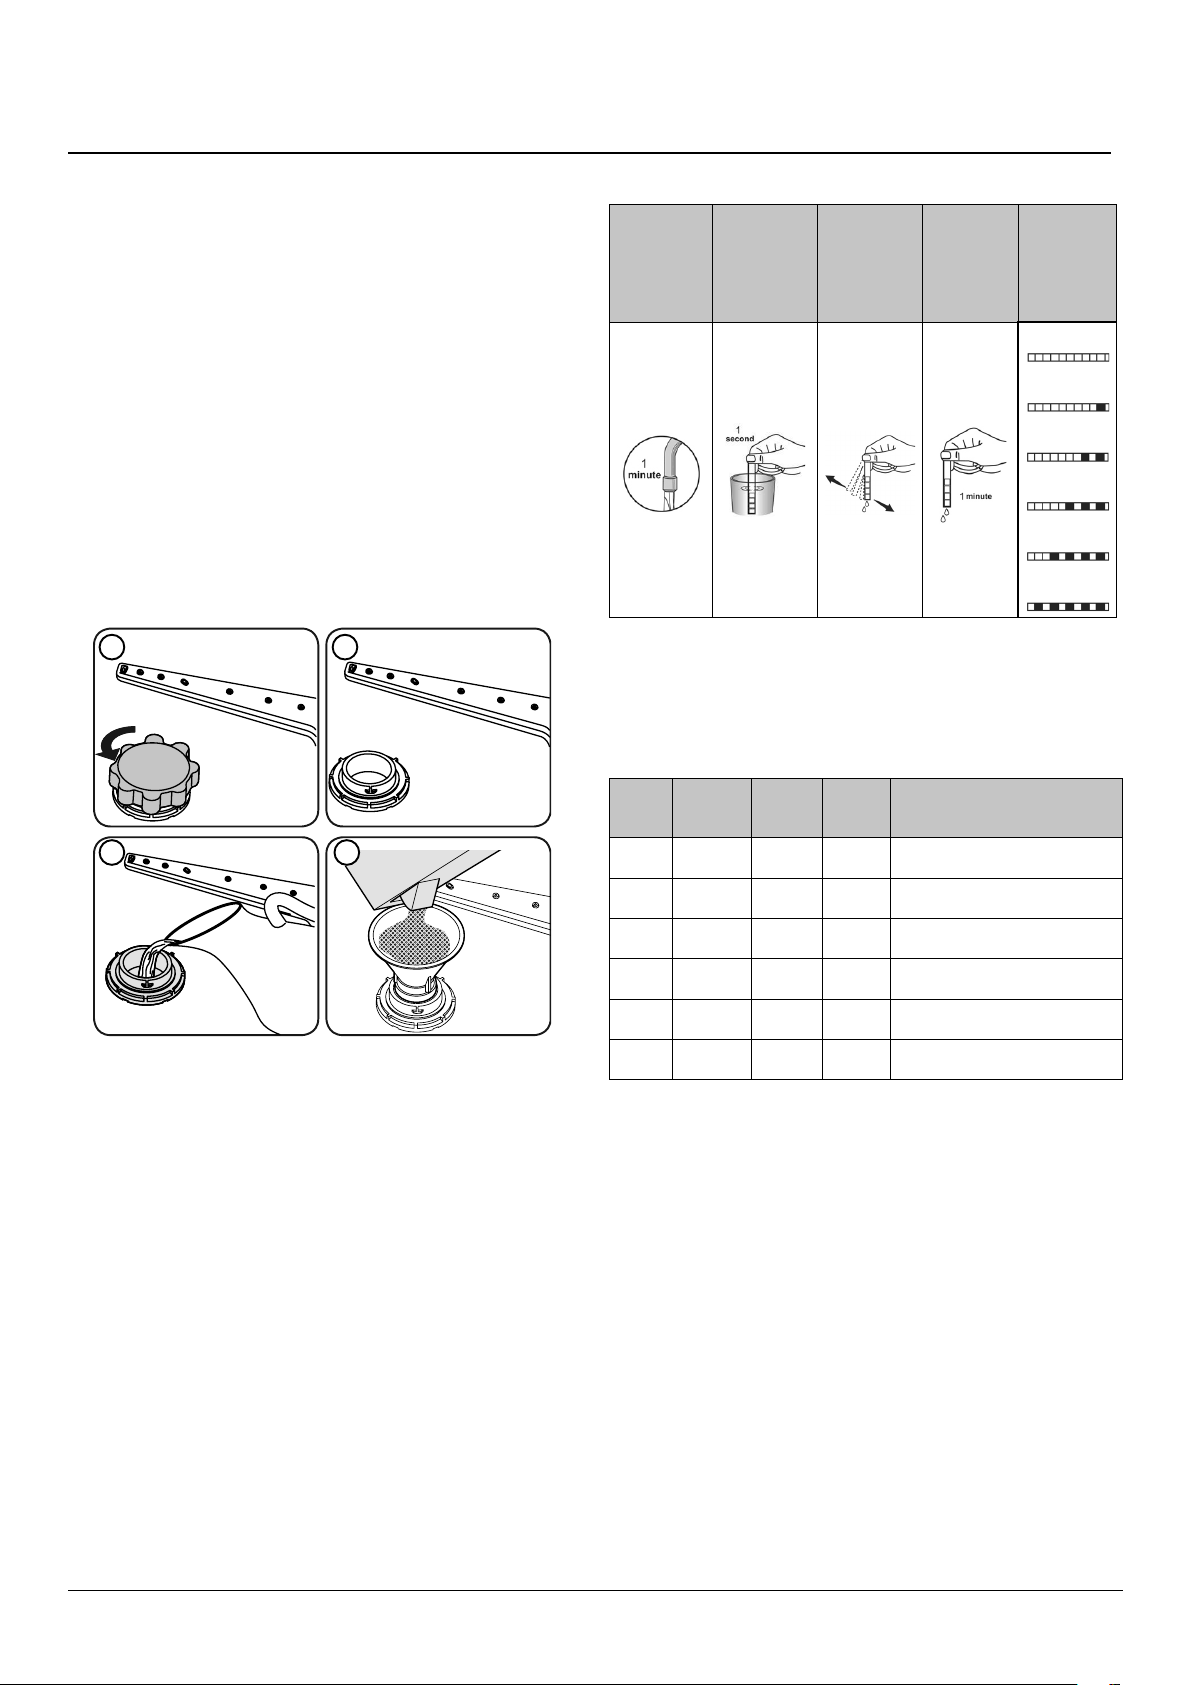
AGA Rangemaster P45 Manual

P45
Dishwasher
User Guide
&
Installation & Service Instructions
U111339 - 01


Contents
1. Before You Start 1
At Time of Delivery 1
About these Instructions 1
During Installation 1
During Normal Use 1
If a Fault Occurs 2
Caring for the Environment 2
Recommendations 3
2. Before Using Your Appliance 4
3. Overview 10
4. Control panel 11
5. Looking after your Dishwasher 14
6. Troubleshooting 16
7. Installation 18
Positioning the Dishwasher 18
Drain Hose Connection 19
Electrical connection 19
8. Circuit Diagram 20
9. Technical Data 21
10. Warranty/After Sales Service 23


1
1. Before You Start
This dishwasher is for use in GB and IE only.
After sales service applies to GB and IE only.
IMPORTANT: For an electronic copy of this user
manual please go to the following address:
www.rangemaster.co.uk/co-ordinating-
collection/dishwashing
At Time of Delivery
Check packaging and dishwasher immediately
for signs of transport damage. If the dishwasher
is damaged DO NOT USE. Contact your supplier
or customer services.
Please dispose of packaging materials properly.
About these Instructions
Please read these instructions carefully before
using this dishwasher. The instructions contain
important information which will help you get
the best out of the dishwasher and ensure safe
and proper installation, use and maintenance.
Keep this manual in a convenient place so you
can always refer to it for the safe and proper
use of the dishwasher.
If you sell the dishwasher, give it away, or
leave it behind when you move house, make
sure you also pass this manual so that the
new owner can become familiar with the
dishwasher and safety warnings.
During Installation
• Site the dishwasher and connect
in accordance with the installation
instructions.
• DO NOT connect the dishwasher to the
electricity supply while carrying out the
installation.
• Make sure that the wiring is properly
earthed.
• The mains electricity supply must conform
to national and local regulations and
the details shown on the dishwasher
nameplate.
• DO NOT connect the dishwasher to the
electricity supply with an extension cable.
• DO NOT connect the dishwasher to a
socket with multiple outlets.
• Built-under and built-in dishwashers
should always be installed under a
continuous work surface attached to
adjacent cupboards. This will make sure
that the dishwasher is stable.
• After the dishwasher has been installed,
the mains plug should be easily accessible.
• DO NOT excessively bend or flatten the
power supply cord during installation. The
dishwasher should not stand on the power
supply cord.
• The water pressure should be between
0.03 Mpa and 1Mpa. Pressures above 1Mpa
will require a pressure relief valve to be
fitted.
During Normal Use
• Following installation the first wash cycle
must be with the dishwasher unloaded.
• Commercial use of the dishwasher will void
the guarantee.
• The dishwasher must only be used for
washing household dishes and cooking
utensils.
• This dishwasher cannot be installed
outdoors.
• DO NOT place heavy objects on the
door or stand on it when it is open. The
dishwasher may tip forward.
• The water inside the dishwasher is NOT
suitable for drinking.
• DO NOT use solvents of any kind inside
your dishwasher. They could cause an
explosion.
DocNo.800-0101 - Introduction

2
• Use only detergent and rinse aid
specifically designed for use in domestic
dishwashers.
• The suitability of plastic items must be
checked before placing them in the
dishwasher.
• DO NOT place items in the dishwasher
that are not suitable for dishwashing.
• DO NOT overfill the dishwasher baskets.
This may result in basket movement and
damage the dishwasher.
• We do not recommend that the door is
opened during operation. However, the
dishwasher door is fitted with a safety
device that stops the dishwasher if the
door is opened during operation. As hot
water may escape the dishwasher, DO NOT
open the door fully until the spray arms
have stopped rotating. Also, be careful of
hot water escape at the base of the door.
• The dishwasher door should not be left
open. Failure to close the dishwasher door
may lead to accidents.
• Sharp ended objects and knives should
be placed into the cutlery basket with the
blade or sharp end facing down toward the
base of the dishwasher.
• Never touch the dishwasher with wet
hands.
• If the dishwasher is not operating properly
or maintenance is required, disconnect
from the power supply.
• This appliance can be used by children
aged from 8 years and above and persons
with reduced physical, sensory or mental
capabilities or lack of experience and
knowledge if they have been given
supervision or instruction concerning
use of the appliance in a safe way and
understand the hazards involved. Children
shall not play with the appliance. Cleaning
and user maintenance shall not be made
by children without supervision.
• Keep detergents out of reach of children.
• When unpacking the dishwasher make
sure that the packaging material is out of
reach of children.
• Keep children away from the dishwasher
when the door is open.
• Keep children away from detergents and
rinse aid.
• DO NOT allow children to play with or start
the dishwasher.
If a Fault Occurs
If the dishwasher malfunctions, turn o the
water supply and disconnect the plug from the
wall socket. If you cannot solve the problem,
contact one of our service centres on the below
numbers:
UK Service Centre Tel: 0844 847 6711.
Republic of Ireland Service Centre Tel:
051 302 333
Only authorized persons should make repairs.
If the supply cord is damaged it must be
replaced by the manufacturer, service agents
or authorized persons.
To maintain the eciency and safety of this
dishwasher we recommend:
• Call only Service Centres authorized by the
manufacturer.
• Always use original spare parts.
Caring for the Environment
Disposing of Your Packaging
Your new dishwasher was protected by suitable
packaging while on its way to you. All of the
materials used are environmentally friendly for
disposal and can be recycled. Please make a
contribution to protecting the environment by
disposing of the packaging appropriately.

3
Disposing of Your Old Dishwasher
Old dishwashers still have some residual
value. An environmentally friendly method
of disposal will make sure that valuable raw
materials can be recovered and used again.
When your dishwasher has reached the end of
its working life unplug it from the mains. Cut
o the mains cable and dispose of it together
with the plug.
Destroy the door locking mechanism so that
children and pets cannot accidentally lock
themselves in.
ArtNo.000-0019
Do not bin logo
This symbol on the product or
its packaging indicates that the
product may not be treated as
household waste. Instead it
should be handed over to your
local community waste
collection/recycling centre.
By disposing of this product correctly, you will
help prevent potential negative consequences
for the environment and human health, which
could otherwise be caused.
For more detailed information about recycling
of this product, please contact your local
council, your household waste disposal service
or the shop where you purchased the product.
Recommendations
Removing coarse residue from items before
placing them into the dishwasher will save
energy and water.
Try only to use your dishwasher when it is fully
loaded.
Use the pre-wash program only whenever
necessary.
Place hollow items such as bowls, glasses and
pots face down into the dishwasher.
DO NOT overload your dishwasher.

4
Preparing your Dishwasher for first use
• Make sure the electricity and supply water specifications
match the values indicated in the installation
instructions for the machine.
• Remove all packaging material inside the machine.
• Set the water softener level.
• Fill the rinse aid compartment.
Fill the salt (IF AVAILABLE)
To add softener salt, open the salt compartment cap by
turning it counter clockwise. (1) (2) At rst use, ll the
compartment with 1 kg salt and water (3) until it is almost
overowing. If available, using a funnel (4) will make lling
easier. Replace the cap and close it. After every 20-30 Cycles
add salt into your machine until it lls up (approx. 1 kg).
Only add water to the salt compartment on first use.
Use softener salt specically produced for use in dishwashers.
When you start your dishwasher, the salt compartment is
lled with water, therefore put the softener salt in prior to
starting your machine.
If the softener salt has overowed and you do not start
the machine immediately, run a short washing program to
protect your machine against corrosion.
2. Before Using Your Appliance
Test Strip
Run water
through
the tap
(1min.)
Keep the
strip in the
water (1sec)
Shake the
strip.
Wait
(1min.)
Set the
hardness
level
of your
machine.
1
2
3
4
5
6
NOTE: The level is set to 3 as default. If the water is well water
or has a hardness level above 90 dF, we recommend that you
use lter and renement devices.
Water Hardness Table
Level German
dH
French
dF
British
dE Indicator
1 0-5 0-9 0-6 L1 is shown on the display.
2 6-11 10-20 7-14 L2 is shown on the display.
3 12-17 21-30 15-21 L3 is shown on the display.
4 18-22 31-40 22-28 L4 is shown on the display.
5 23-31 41-55 29-39 L5 is shown on the display.
6 32-50 56-90 40-63 L6 is shown on the display.
Water Softener System
The dishwasher is equipped with a water softener which
reduces the hardness in the mains water supply. To nd out
the hardness level of your tap water, contact your water
company or use a test strip (if available).
Setting
Push the programme button and hold it down.
Turn on the machine.
Hold down the programme button until “SL” disappears.
The machine will display the last setting.
Set the level by pushing the programme button.
Switch o the machine to save the setting.
3 4
1 2
SALT

5
Detergent usage
Only use detergents specically designed for domestic
dishwashers.
Add the recommended amount of detergent for the selected
programme to ensure the best performance.
Keep your detergents in cool, dry places out of reach of
children.
See the detergent manufacturer’s instructions for further
information.
Filling the detergent
Push the latch to open the dispenser and pour in the
detergent.
Close the lid and press it until it locks in place. The dispenser
should be relled just before the start of each programme. If
the dishes are heavily soiled, place additional detergent in the
pre-wash detergent chamber.
Using combined detergents
These products should be used according to the
manufacturer’s instructions.
Never put combined detergents into the interior section or
the cutlery basket.
Combined detergents contain not only the detergent but
also rinse-aid, salt replacement substances and additional
components depending on the combination.
We recommend you do not use combined detergents in
short programmes. Please use powder detergents in such
programmes.
If you encounter problems when using combined detergents,
please contact the detergent manufacturer.
When you stop using combined detergents, make sure that
water hardness and rinse aid settings are set to correct level.
Rinse-aid usage
Rinse-aid makes dishes sparkle and helps them to dry without
spotting. Rinse-aid is required for stain-free utensils and clear
glasses. Use only rinse-aid for domestic dishwashers.
Filling the rinse-aid and setting
To ll the rinse aid compartment, open the rinse-aid
compartment cap. Fill the compartment with rinse aid to the
MAX level and then close the cap. Be careful not to overll the
rinse aid compartment and wipe up any spills.
In order to change the rinse aid level, follow the below
steps before turning on the machine:
Push the programme button and hold it down.
Turn on the machine.
Hold down the programme button until “rA” disappears from
the display. Rinse aid set follows water hardness set.
The machine will display the current setting.
Change level by pushing the programme button.
Switch o the machine to save the setting.
The factory setting is “4”.
If the dishes are not drying properly or are spotted, increase
the level. If blue stains form on your dishes, decrease the
level.
Level Brightener Dose Indicator
1 Rinse-aid not dispensed r1 is shown on the display.
2 1 dose is dispensed r2 is shown on the display.
3 2 doses are dispensed r3 is shown on the display.
4 3 doses are dispensed r4 is shown on the display.
5 4 doses are dispensed r5 is shown on the display.
DETERGENT

6
Loading your dishwasher
For best results, follow these loading guidelines.
Loading the household dishwasher up to the capacity
indicated by the manufacturer will contribute to energy and
water savings.
Manual pre-rinsing of tableware items leads to increased
water and energy consumption and is not recommended.
You can place cups, glasses, stemware, small plates, bowls,
etc. in the upper basket.
Do not lean long glasses against one another as they may
become damaged.
When placing long stem glasses and goblets, lean them
against the basket edge or rack and not against other items.
Place all containers such as cups, glasses and pots in the
dishwasher with the opening facing downwards otherwise
water can collect on items.
If there is a cutlery basket, you are recommended to use the
cutlery grid in order to obtain the best result.
Place all large (pots, pans, lids, plates, bowls etc.) and very
dirty items in the lower rack.
Dishes and cutlery should not be placed above each other.
n WARNING: Take care not to obstruct the rotation of
spray arms.
n WARNING: Make sure after loading the dishes do not
prevent opening the detergent dispenser.
Recommendations
Remove any coarse residue on dishes before placing the
dishes in the machine. Start the machine with full load.
n Do not overload the drawers or place dishes in the
wrong basket.
n WARNING: To avoid any possible injiuries, place
long-handle and sharp-pointed knives with their
sharp points facing down or horizontally on the
baskets.
Upper Basket
Height adjustment
The upper basket includes a mechanism which enables
the height of the basket to be adjusted up (1) or down (2)
without having to remove the basket. Hold the basket on
both sides and pull it up or push it down, ensuring both sides
of the upper basket are in the same position.

7
Height Adjustable Rack (peg type)
The height adjustable racks enable glasses and cups to be
placed on or under the racks. The racks can be adjusted to 2
dierent heights. Cutlery and utensils can also be placed on
the racks horizontally.
1
2
The foldable racks in the upper basket enable the placement
of large items such as pots and pans. Each section can be
folded separately. The foldable racks can be either raised up
or folded down.
Two Folding Racks (10 pc)
The folding racks allow easier placement of larger items,
such as pots and pans. Each section can be folded separately.
The racks can be raised up, or folded down, as shown in the
images.
1
2

8
Alternative basket loads
Lower basket
Upper basket
Incorrect loads
Unsuitable items for dishwashing
Cigarette ash, candle leftovers, polish, paint, chemical
substances, iron alloy materials.
Forks, spoons and knives with wooden, bone, ivory or nacre
coated handles; glued items, items soiled with abrasive, acidic
or base chemicals.
Temperature-sensitive plastics, copper or tin coated
containers.
Aluminium and silver objects.
Some delicate glasses, ornamental printed porcelains; some
crystal items, adhered cutlery, lead crystal glasses, cutting
boards, synthetic bre items.
Absorbent items such as sponges or kitchen rugs.
IMPORTANT: In future, purchase dishwasher-proof
kitchenware.
Incorrect loads
Incorrect loading can cause poor washing and drying
performance. Please follow the manufacturer’s
recommendations for a good performance result.

9
Programme table
P1 P2 P3 P4 P5 P6 P7 P8 P9
Programme
name Eco Smart
60°C - 70°C
Smart
50°C - 60°C
Smart
30°C - 50°C Hygiene 70°C Super 50’ Dual Pro
Wash Quick 30’ Mini 14’
Type of Soil:
Standard
program for
normally
soiled daily
dishes with
reduced
energy
and water
consumption
Auto
program
for heavily
soiled dishes
Auto
program for
normally
soiled dishes
Auto
program for
normally
soiled,
delicate
dishes
Suitable
for heavily
soiled dishes
requiring
hygienic
washing
Suitable for
normally
soiled daily
dishes
with faster
program
Suitable
for both
lightly soiled
delicate
glassware on
upper rack
and heavily
soiled
crockery on
lower rack
Suitable for
lightly soiled
dishes and
quick wash
Fastest
program for
lightly soiled
and recently
used dishes
and suitable
for 4 place
settings.
Level of Soil: Medium Heavy Medium Medium Heavy Medium Heavy Light Light
Amount of
detergent:
A 25 cm3
B 15 cm3”
AAAAAAAAB
Program
duration
(h/min)
03:05 01:46 - 02:32 01:28 - 01:44 01:06 - 01:20 02:04 00:50 01:46 00:30 00:14
Electricity
consumption
(kWh/cycle)
0.674 1.050 - 1.600 0.850 - 1.200 0.650 - 0.700 1.500 0.880 1.300 0.580 0.250
Water
consumption
(L/cycle)
9.0 10.0 - 20.0 9.6 – 16.7 9.7 – 16.0 14.6 9.5 15.4 9.9 6.6
• The program duration may change according to the
amount of dishes, the water temperature, the ambient
temperature and selected additional functions.
• Values given for programmes other than the eco
programme are indicative only.
• Eco programme is suitable to clean normally soiled
tableware, that for this use, it is the most efficient
programme in terms of its combined energy and water
consumption, and that it is used to assess compliance
with the EU ecodesign legislation.
• Washing tableware in a household dishwasher usually
consumes less energy and water in the use phase than
hand dishwashing when the household dishwasher is
used according to the manufacturer’s instructions.
• Only use powder detergent for short programs.
• Short programs do not include drying.
• To assist drying, we recommend slightly opening the
door after a cycle is complete.
• You can access the product database where the model
information is stored by reading the QR code on the
energy label.
Note: According to regulations 1016/2010 and 1059/2010,
Eco program energy consumption values may dier. This
table is in line with regulations 2019/2022 and 2017/2022.

10
3. Overview
Fig. 3.1
10
11
10
8
1
2
3
4
5
6
7
12
9
1Upper basket with racks
2Upper spray arm
3Lower basket
4Lower spray arm
5Filters
6Rating plate
7Control panel
8Detergent and rinse-aid dispenser
9Cutlery basket
10 Salt dispenser
11 Upper basket track latch
12
Turbo Drying Unit: This
system provides better drying
performance for your dishes.
3. Overview
Fig. 3.1
DocNo.800-0203 - Overview - RDW459 diswasher
1Upper basket with racks
2Upper spray arm
3Lower basket
4Lower spray arm
5Filters
6Rating plate
7Control panel
8Detergent and rinse-aid dispenser
9Salt dispenser
10 Upper basket track latch
11 Upper Cutlery Basket
12
Turbo Drying Unit: This
system provides better drying
performance for your dishes.
DocNo.800-0203 - Overview - RDW459 diswasher

11
1. On/Off touch button
2. Programme touch button
3. Display
4. Delay touch button
5. Energy Save touch button
6. Half Load touch buttons
7. Extra Fast touch button
8. Extra Silent touch button
9. Extra Dry touch button
10. Salt lack warning indicator
11. Rinse Aid lack warning indicator
1. On/Off Touch Button
Turn the machine on by pressing On/O button. When
machine is on, “--” will be shown on the Display (3).
2. Programme Touch Button
Select a suitable programme for your dishes by touching
Programme button. The programme will start automatically
when the door is closed.
3. Display
The Display shows the number and total time of the selected
programme alternately and the remaining time during
operation.
4. Delay Touch Button
Press the Delay Start touch button to delay the start time
of a programme for 1 hour up to 19 hours. Pressing once
will delay the start time for 1 hour, and continuing to press
the button will increase the delay duration. Press the Delay
button to change or cancel the delayed start. If you turn o
the machine after activating the delay time, the delayed time
is cancelled.
(1) (2) (3)(4) (5) (6) (7)
(9) (8)
(11)
(10)
(1) (2) (4) (5) (6) (7)
(8)
(9)
(3)
(11)
(10)
NOTE: Press and hold the delay touch button to change
the delayed start time faster. The rate of change in time is
proportional to the how long the button is pressed and held
for. When the delay start touch button is pressed for a long
period of time, the counter will stop at “h:00”.
Additional functions can also be selected.
5. Energy Save Touch Button
Press the Energy Save touch button to activate the automatic
door opening system at the end of a programme. This
reduces energy consumption by operating at low rinsing
temperatures and improves the drying performance.
NOTE: Each time the machine is turned o and on, the
Eco programme and Energy Save option will be set as
default. Options chosen before will be cancelled. If another
programme is selected, the Energy Save icon will switch o.
6. Half Load Touch Button
Press the Half Load button to select the area of the
dishwasher that contains the dishes to be washed. You can
select both baskets, the upper basket only, or the lower
basket only. Press the button until the light corresponding to
the basket contaning the dishes to be washed illuminates.
7. Extra Fast Touch Button
Press the Extra Fast touch button to reduce the programme
duration. The washing water temperature and pressure will
increase to ensure an improved washing quality in a shorter
duration. This option can only be selected at the beginning of
a programme.
8. Extra Silent Touch Button
Press the Extra Silent touch button to decrease the water
pressure, therefore providing a more sensitive and silent
wash. This option can only be selected at the beginning of a
programme.
4. Control panel

12
9. Extra Dry Touch Button
Press the Extra Dry touch button to add extra drying steps
to a programme in order to obtain drier dishes. This option
increases water temperature of the nal rinse step and
duration of the drying step.
NOTE: If an option is not compatible with the selected
program, a buzzer sounds.
NOTE: If an extra feature has been used on the most recent
wash programme, this feature will remain active on the next
selected programme. To cancel this feature on the newly
selected wash programme, press the feature button until the
light on the button switches o.
10. Salt lack warning indicator
When there is insucient softening salt, the Salt Lack
Warning Indicator will illuminate to indicate the salt chamber
needs lling.
11. Rinse Aid lack warning indicator
When there is insucient rinse aid, the Rinse Aid Lack
Warning Indicator will illuminate to indicate the rinse aid
chamber needs lling.
NOTE: If you decide not to start the selected programme,
please see the
“Changing a Programme” and “Cancelling a Programme”
sections.
Changing a Programme
Follow the steps below to change a programme while in
operation.
1. Open the door and press the Programme touch button
(2) to select a new programme. If the door is opened
during operation, the time remaining of the selected
programme will show on the display (3).
2. After closing the door, the newly selected programme
will resume the course of the old programme.
NOTE: Open the door slightly at rst to stop a wash
programme before it is complete in order to avoid water
spillage.
7.1 Cancelling a Programme
Follow the steps below to cancel a programme while in
operation or in standby mode.
1. Open the door of the machine, the most recently
selected programme will be shown on the display.
2. Press and hold the Programme touch button (2) for 3
seconds. At the end of 3 seconds, ‘1’ will show on the
Display (3).
3. The water discharge process will start after the door of
the machine is closed and will continue for 30 seconds.
When the programme is cancelled, a buzzer will sound
5 times.
NOTE: When the door is opened after the selected wash
programme is complete, a buzzer will sound and ‘0’will show
on the display (3).
7.2 Switching the Machine Off
When the selected wash programme is complete, a buzzer
will sound 5 times. You can then switch your machine o
using the Power On/O touch button (1).
NOTE: Do not open the door before a programme is
complete.
NOTE: Leave the door of your machine slightly open at the
end of a wash programme to speed up drying.
NOTE: If the door of the machine is opened or the power is
cut during operation, the programme will continue when the
door is closed or the power returns.
NOTE: If the power is cut or the machine door is opened
during the drying process, the programme will terminate.
Your machine will now be ready for a new programme
selection.
Buzzer Sound Control
To change the buzzer sound level, follow the below steps:
1. Open the door and press Extra Dry /Energy Save (5,9)
and Half Load (6) touch buttons simultaneously for 3
seconds.
2. When sound setting is recognized, buzzer gives a long
sound and machine will display last set level, from “S0”
to “S3”.
3. To decrease sound level press Extra Dry / Energy Save
touch button (5,9). To increase sound level, press Half
Load touch button (6).
4. To save the selected sound level, turn o the machine.
’’S0’’ level means all voices are o. Factory setting is “S3”.

13
Power Save Mode
To activate or deactivate power save mode, follow the below
steps:
1. Open the door and press Delay (4) and Extra Dry /
Energy Save (5,9) touch buttons simultaneously for 3
seconds.
2. After 3 seconds, the machine will display last Setting,
“IL1” or “IL0”.
3. When Power Save Mode is activated,“IL1” will be
displayed. On this mode, interior lights will turn o 4
minutes after the door is opened, and the machine will
turn o after 15 minutes of no activity in order to save
energy.
4. When Power Save Mode is deactivated“IL0” will be
displayed. If Power Save Mode is deactive, interior lights
will be on as long as the door is open, and the machine
will always be on unless it is turned o by user.
5. To save the selected setting, turn o the machine.
In factory setting, Power Save Mode is active.
Natural Ion Tech (Model Dependent)
This function provides extra hygiene to the machine thanks
to Ion Technology. Natural Ion Tech function is activated by
pressing Half Load (6) touch button for 3 seconds. Meanwhile
display counts from 1 to 3. At the end of 3 seconds,“Ion” will
be displayed which indicates Ionizer function is activated. The
button is released after “Ion” is displayed. If no intervention
by user, 24 hours after activation of Ionizer function, it is
automatically cancelled.
Note: If machine is turned o, Ionizer function is cancelled.
Note: Natural Ion Tech function does not work with any
program.
Crystalight (Model Dependent)
This technology uses Ion and Light Technology together,
providing extra hygiene. It prevents bad odour during a
washing program that includes a drying step.
Crystalight function is activated or deactivated by pressing
Half Load (6) touch button for 6 seconds. Meanwhile display
counts from 1 to 6. At the end of 6 seconds, “UV1” will be
displayed which indicates Crystalight function is activated.
When it is deactivated, at the end of 6 seconds, “UV0” will be
displayed. Crystalight setting follows Natural Ion Tech setting.
Default set is “UO”.
Note: If user do not deactivate Crystalight function at the end
of program, it will remain active until the machine turns o.
Note: If Crystalight or Ionizer function is active, ionizer led
lights up like dimming during door is open.
Info. LED (Model Dependent)
LED Indicator State of the Machine
Red, continuous The machine is running a
program.
Red, ashing A program is cancelled.
Red, ashing rapidly
The machine has a fault. Refer
to section “Automatic fault
warnings and what to do”.
Green, continuous Program has nished.

12
c
a
b
5. Looking after your Dishwasher
Fig. 5.1
Fig. 5.2
Fig. 5.3
Fig. 5.4
Cleaning your dishwasher is important to maintain the
machine’s service life Make sure that the water softening
setting (If available) is done correctly and correct amount of
detergent is used to prevent limescale accumulation. Rell
the salt compartment when the salt sensor light comes on.
Oil and lime may build up in your Dishwasher over time. If this
occurs:
• Fill the detergent compartment but do not load
any dishes. Select a programme which runs at high
temperature and run the Dishwasher empty. If this does
not clean your Dishwasher sufficiently, use a cleaning
agent designed for use with dishwashers.
• To extend the life of your dishwasher, clean the
appliance regularly; once a month.
• Wipe the door seals regularly with a damp cloth to
remove any accumulated residue.
Filters
Clean the lters and spray arms at least once a week. If any
food waste remains on the coarse and ne lters, remove
them and clean them thoroughly with water.
a. Micro Filter
b. Coarse Filter
c. Metal Filter
• To remove and clean the Micro/Coarse filter
combination, turn it counter clockwise and take it out
by lifting upwards (Fig. 5.1 and Fig. 5.2).
• Pull and remove the metal filter (Fig. 5.3).
• Rinse the filters with lots of water until they are free of
residue.
• Refit the metal filter.
• Insert the Micro/Coarse filter and rotate it clockwise
(Fig. 5.4).

13
Fig. 5.5
Cleaning
Drain Pump
Large food residues or foreign objects which were not
captured by the lters may block the waste water pump. The
rinsing water will then be above the lter.
n Warning Risk of cuts!
When cleaning the waste water pump, ensure that you do
not injure yourself on pieces of broken glass or pointed
implements.
1. First, always disconnect the appliance, from the power
supply.
2. Take out baskets.
3. Remove the lters.
4. Scoop out water, use a sponge if required.
5. Check the area and remove any foreign objects.
6. Install lters.
7. Re-insert baskets.
Spray arms (Fig. 5.5)
Make sure that the spray holes are not clogged and that no
food waste is stuck to the spray arms. If there is any clogging,
remove the spray arms and clean them under water.
To remove the upper spray arm undo the nut holding it in
position, by turning it clockwise, and pulling it downwards.
Make sure that the nut is properly tightened when retting
the upper spray arm.

14
6. Troubleshooting
FAULT POSSIBLE CAUSE TROUBLESHOOTING
The programme does not start.
Your Dishwasher is not plugged in. Plug your Dishwasher in.
Your Dishwasher is not switched on. Switch your Dishwasher on by pressing the On/O button.
Fuse blown. Check your indoor fuses.
Water inlet tap is closed. Turn on the water inlet tap.
Your Dishwasher door is open. Close the Dishwasher door.
Water inlet hose and machine lters are clogged. Check the water inlet hose and machine lters and make
sure they are not clogged.
Water remains inside the
machine.
Water drain hose is clogged or twisted. Check the drain hose, then either clean or untwist it.
The lters are clogged. Clean the lters.
The programme is not nished yet. Wait until the programme is nished.
Machine stops during washing. Power failure. Check mains power.
Water inlet failure. Check water tap.
Shaking and hitting noises are
heard during a wash operation. The spray arm is hitting the dishes in the lower basket. Move or remove items blocking the spray arm.
Partial food wastes remain on the
dishes.
Dishes placed incorrectly, sprayed water not reaching
aected dishes. Do not overload baskets.
Dishes leaning on each another. Place dishes as instructed in the section on loading your
dishwasher.
Not enough detergent used. Use the correct amount of detergent, as instructed in the
programme table.
Wrong wash programme selected. Use the information in the programme table to select the
most appropriate programme.
Spray arms clogged with food waste. Clean the holes in the spray arms with thin objects.
Filters or water drain pump clogged or lter misplaced. Check the drain hose and lters are correctly tted.
Whitish stains remains on dishes.
Not enough detergent used. Use the correct amount of detergent, as instructed in the
programme table.
Rinse aid dosage and/or water softener setting set too
low. Increase rinse aid and/or water softener level.
High water hardness level. Increase water softerner level and add salt.
Salt compartment cap not closed properly. Check that the salt compartment cap is closed properly.
Dishes do not dry. Drying option is not selected. Select a programme with a drying option.
Rinse aid dosage set too low. Increase rinse aid dosage setting.
Rust stains form on the dishes.
Stainless-steel quality of the dishes is insucient. Use only dishwasher-proof sets.
High level of salt in wash water. Adjust the water hardness level using water hardness
table.
Salt compartment cap not closed properly. Check that the salt compartment cap is closed properly.
Too much salt spilled in the Dishwasher while lling it with
salt.
Use funnel while lling salt to the compartment to avoid
spillage.
A poor mains grounding. Consult a qualied electrician immediately.
Detergent remains in the
detergent compartment.
Detergent was added when the detergent compartment
was wet. Make sure detergent compartment is dry before use.
DocNo.800-0401 - Troubleshooting - RDW6012 dishwasher
This manual suits for next models
1
Table of contents
Other AGA Dishwasher manuals