Agami Tantra-2400 User manual


1 2
3
4
5
6
1. One tantra 2400 access point
2. One AC power adapter
3. Ceiling-mount kit—4 T-bar clips and 2 screws
4. Wall-mount kit—2 wall plugs and 2 screws
5. One adhesi e rubber feet
6. Documentation—Quick Start Guide (this document)
Note: On unpacking the de ice,
inspect the package and immediately report any e idence of damage
Introduction
Thank you for purchasing tantra-2400 unit.
This is a cloud managed whole home Wi-Fi solution that works with your
existing internet connection to pro ide secure and fast internet
connecti ity to Wi-Fi enabled de ices in your entire home.
Package Contents

Note: Using a power supply with a different oltage rating than the one included
with the de ice will cause damage and oid the warranty for this product.
Getting Started
To get started, follow the below steps:
1. Open the package and place the tantra-2400 access point
(AP) and it’s package contents on a clean and flat surface
2. Verify that the power connection is a ailable for your tantra-
2400 AP
Hardware O er iew
Connections

The following table lists the connections a ailable in tantra-2400 AP.
1 USB USB Port
2 Eth2/LAN 10/100/1000BASE-T Gigabit Ethernet port
3 Eth1/WAN/Po
E
10/100/1000BASE-T Gigabit Ethernet port
with 802.3af-compliant Power o er
Ethernet (PoE) support
4 Reset Reset button to restore the AP to its
original factory default settings
5 Power
Receptor
Receptor for the supplied power adapter
1
Hardware Installation
Mount the AP – (a) Mounting on the Wall.
1. Set two screws in the wall 128 mm (5.0 in.) apart.
2. Slide the AP’s wall mounting slots down onto the screws so that
the unit is
secure.

1
2
(b) Mounting on a ceiling T-bar.
1.
Use the included screws to attach two ceiling-mount T-bar clips
to the back of
the AP.
2. Push the AP onto the ceiling T-bar until it clicks securely in place.
Note:
The ceiling mounting clips are for two different sizes
of ceiling T-bars.
The narrow clips are for 15 mm bars. The
wider clips are for 24.5 mm bars.
(a) Mounting on the wall

Note: The Eth1/WAN/PoE port connection can also pro ide power
to the unit when connected to a PoE enabled switch.
1
2
(b) Mounting on a ceiling T-bar
Connect the cables and power adapters.
(a) Connect Ethernet cables.
1.
Connect Category 5e or better cable to the Eth1/WAN/PoE
1000BASE-T RJ-
45 port. When connected to a PoE source, the
Eth1/WAN/PoE port connection
pro ides power to the unit.
2

2.
(Optional) Connect a local LAN switch or computer to the Eth2/LAN
1000BASE-T RJ-45 port.
(b) Connect AC power adapter.
1.
Connect the AC power adapter to the DC power jack on the AP and then plug
the adapter into a nearby AC power source
.
2
1
(a) Connect Ethernet Cables
1
2
1
(b) Connect AC power adapter
2
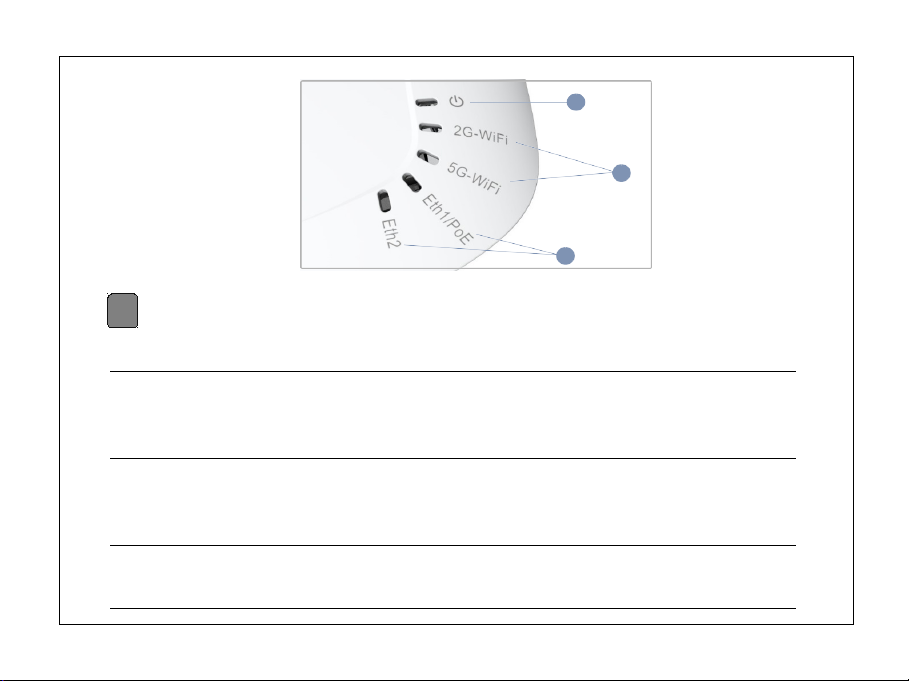
Check AP LEDs
Check AP LEDs.
3
1
1
2
3
The following table lists the LEDs available in tantra-2400 AP.
1 Power LED A solid orange light indicates that
the de ice is synchronized with
the cloud ser er
2 2G-WiFi/5G-WiFi A solid green light indicates that
the 2.4GHz/5.0GHz wireless radio
is enabled
3 Eth1/WAN/PoE & Eth2/LAN A blinking green light indicates a
alid connection

2
Network Topology
The following figure shows a graphical
representation of tantra-2400 AP
deployment and management.
Note: Eth1 represents WAN connection
and Eth2 represents LAN connection.

2
Setting up tantra 2400
Once the de ice is up, you can proceed with the following sections to
access and configure the tantra 2400 unit.
1. Verify that you ha e access to the Cloud configuration portal
and/or Mobile app.
2. The tantra Cloud configuration portal and mobile app, both
pro ide you access to create an account. To setup tantra 2400
follow the on-screen instructions and for detailed step-by-step
instructions refer the
tantra 2400 User Guide
a ailable at
https://agami.io/support/
Accessing Cloud Configuration Portal
The Cloud configuration portal allow you to manage your wireless
network and iew network statistics on your desktop/laptop. It is
accessible at the following URL:
https://cloud.agami.io

2
Mobile App Installation
Download the tantraWiFi Mobile App, a ailable from the App Store®
(iOS) or Google Play™ Store (Android). It pro ides ability to configure
tantra 2400 APs and access the extensi e isibility for the health and
performance of your network. It also offers quality indicators and
recommended resolutions to disco ered issues.
Specifications
AP Chassis
Size (WxDxH): 146.8 x 146.7 x 35.5 mm
Weight: 3.17 ounces (90 g)
Temperature Operating: 0° - 50° C(32° - 122° F)
Storage: -40° - 70° C (-40° - 158° F)
Humidity Operating: 10% to 90% (non-condensing)
Network Interfaces
Ports: Eth1/WAN/PoE RJ-45 Port: 1000BASE-T,
PoE PD Eth2/LAN RJ-45 Port: 1000BASE-T
2.4 GHz Radio: IEEE 802.11b/g/n
5 GHz Radio: IEEE 802.11a/ac/n

2
Radio Frequencies: 2.4 – 2.4835 GHz (US, Canada, ETSI)
5.15 – 5.25 GHz (lower band) US/Canada,
Europe
5.725 – 5.825 GHz (upper band) US/Canada
Power Specifications
PoE Input Power: 44–55 VDC, 0.63–0.3 A, 802.3af/at-Compliant
DC Input Power: 12 VDC, 1A
Power Consumption
PoE Input: PoE 44–55 VDC, 11 W max
DC Input: 12 VDC, 10 W max.
Regulatory Compliances
Radio: EN300 328 V2.1.1(2016-11) EN301 893
V2.1.1(2017-03)
47 CFR FCC Part 15.247
47 CFR FCC Part 15.407
AS/NZS 4268: 2017
Emissions:
EN 301 489-1 V2.1.1 (2017-02)
EN 301 489-17 V3.1.1 (2017-02)

2
EN 55032:2015
EN 55024:2010/A1:2015
AS/NZS CISPR 32:2015, Class B
47 CFR FCC Rules and Regulations Part 15
Subpart B, Class B Digital De ice,
Canada Standard ICES-003,Issue 6,ClassB
Safety: Low Voltage Directi e (2014/35/EU, formerly
2006/95/EC, formerly 73/23/EEC)
Ser ice Warranty
In order to protect your rights and interests, please read the Warranty
Policy carefully. The Warranty Policy is a ailable at: https://agami.io/
This Limited Warranty applies to tantra APs purchased from Agami
Creations P t Ltd.
Safety Information
●Only use power adapter pro ided in the box.
●Power adapter (if used) should be easily accessible near the tantra unit.
●Keep the tantra unit away from fire, water, hot or humid en ironments.

●Do not attempt to open, modify or repair the tantra unit.
●Do not use damaged power adapter or Ethernet cable to power on the
tantra unit.
●Do not use the tantra unit where wireless de ices are not allowed.
Please adhere to the abo e safety information while operating the tantra
unit. On improper use of the tantra unit, we cannot guarantee that no
accidents or damage will occur. Please use this product with utmost care
and operate at your own risk.
Support
For answers to frequently asked questions (FAQs) and technical support,
please na igate to:
https://agami.io/support/

Agami Creations P t. Ltd.
Flat No.12, 1st Floor, Sunder Sri Apts,
New No.20, Old No. 38/39, Ramanujam ST,
Chennai 600 017
©Agami Creations P t. Ltd.,
tantra are trademarks of Agami Creations P t. Ltd.
Non-Agami trademarks are used only for reference purpose.
Other manuals for Tantra-2400
1
Table of contents
Other Agami Wireless Router manuals


