AGT 2835 PR Manual

AGENT TRADE
GB
OPERATOR'S INSTRUCTION BOOK
RO
MANUAL DE UTILIZARE
DE
BEDIENUNGSANLEITUNG
AGT 2835 PR
www.agt.ro

2
GB
INTRODUCTION
TRANSLATION OF ORIGINAL INSTRUCTIONS
To correctly use the brush cutter and prevent accidents, do not start work without having first carefully
read this manual. You will find explanations concerning the operation of the various parts plus
instructions for necessary checks and relative maintenance.
Note: Illustrations and specifications in this manual may vary according to each country’s
requirements and are subject to change without notice by the manufacturer.
RO
INTRODUCERE
MANUAL DE UTILIZARE ORIGINAL
Pentru o utilizare corectă a motocoasei şi pentru a evita accidentele, cititi cu atentie acest manual
inainte de inceperea lucrului. În acest manual veţi găsi explicaţiile privind funcţionarea diferitelor
componente şi instrucţiunile privind verificările necesare şi întreţinerea.
N.B. Descrierile şi ilustraţiile din prezentul manual au caracter pur orientativ. Firma işi rezervă
dreptul de a aduce eventuale modificări, fără a-şi lua angajamentul de a actualiza de fiecare dată
acest manual.
DE
ENLEITUNG
ÜBERSETZUNG DER ORIGINALANLEITUNG
Um richtig mit der Motorsense umgehen zu können und Unfälle zu vermeiden, lesen Sie diese
Betriebsanleitung gründlich durch bevor Sie die Maschine im Betrieb setzen. Die Betriebsanleitung
enthält Hinweise zur Funktion verschiedener Teile und Erklärungen zu den anfallenden Wartungs- und
Kontrollarbeiten.
N.B.: Die in dieser Bröschure enthaltenen Beschreibungen und Abbildungen verstehen sich
unverbindlich. Der Hersteller behält sich das Recht vor, die Einzel - und Zubehörteile dieses
Modells aus technischen oder absatzbedingten Gründen zu ändern, ohne die Angaben dieser
Bröschure jedesmal zu berichtigen.
WARNING !!!
ATENŢIE!!!
RISK OF HEARING DAMAGE
IN NORMAL CONDITIONS OF USE, THIS
MACHINE MAY INVOLVE A DAILY LEVEL OF
PERSONAL EXPOSURE TO NOISE FOR THE
OPERATOR EQUAL TO OR GREATER THAN
85 dB (A)
RISC DE DIMINUARE A AUZULUI
ÎN CONDIŢII NORMALE DE UTILIZARE,
ACESTAPARAT POATE EXPUNE
ZILNIC OPERATORUL UNUI NIVEL DE
ZGOMOT EGAL SAU MAIMARE DECAT
85 dB (A)
ACHTUNG !!!
HÖRSCHADEN - RISIKO
UNTER NORMALEN
ANWENDUNGSBEDIGUNGEN KANN DIESES
GERÄT DIE BEDIENUNGSPERSON EINEM
TÄGLICHEN GERÄUSCHPEGEL VON
85 dB (A)
ODER MEHR AUSSETZEN

3
GB
INDEX
INTRODUCTION .................................................
EXPLANATION OF SYMBOLS AND SAFETY
WARNINGS..........................................................
BRUSH CUTTER COMPONENTS ....................
SAFETY PRECAUTIONS....................................
ASSEMBLY .........................................................
STARTING ..........................................................
2
4
5
6
10
12
USE ..........................................................
MAINTENANCE .......................................
STORAGE ................................................
TECHNICAL DATA ...................................
DECLARATION OF CONFORMITY ……...
MAINTENANCE CHART ..........................
15
18
20
39
40
41
RO
CUPRINS
INTRODUCERE ..................................................
EXPLICAŢIE SIMBOLURI ŞI RECOMANDĂRI
PRIVIND SIGURANŢA........................................
COMPONENTELE MOTOCOASEI ....................
NORME DE SIGURANŢĂ ..................................
MONTAREA .......................................................
PORNIREA .........................................................
2
4
5
7
10
20
UTILIZAREA .............................................
ÎNTREŢINEREA .......................................
DEPOZITAREA ........................................
DATE TEHNICE .......................................
DECLARAŢIE DE CONFORMITATE ........
GRAFIC DE ÎNTREŢINERE .....................
23
26
28
39
40
42
DE
INHALT
ENLEITUNG .......................................................
ERKLÄRUNG DER SYMBOLE UND
SICHERHEITSWARNUNGEN.............................
BAUTEILE DER MOTORSENSE........................
SICHERHEITSHINWEISE………........................
MONTAGE..........................................................
INBETRIEBNAHME............................................
2
4
6
8
10
28
GEBRAUCH ….........................................
INSTANDEHALTUNG ...............................
LANGERUNG............................................
TECHNISCHE DATEN…..........................
KONFORMITATSERKLÄRUNG.................
WARTUNGSTABELLE..............................
31
35
38
39
40
43

4
GB
EXPLANATION OF SYMBOLS AND SAFETY WARNINGS
RO
EXPLICAŢIE SIMBOLURI ŞI RECOMANDĂRI DE SIGURANŢǍ
DE
ERLÄUTERUNG DER SYMBOLE-UND SICHERHEITSWARNUNGEN
1
2
3
4
5
6
7
GB
RO
1 - Read operator's instruction book before
operating this machine.
2 - Wear head, eye and ear protection.
3 - Wear strong boots and gloves when cutting
with metal or plastic blades.
4 - Be aware that objects can be thrown.
5 - Keep bystanders away at min. 15 m.
6 - Max. speed of output shaft, RPM
7 - Guaranteed sound power level.
1 - Citiţi manualul de utilizare şi întreţinere înainte
de a folosi acest aparat.
2 - Utilizaţi cască, ochelari şi căşti de protecţie.
3 - Utilizaţi încălţăminte şi mănuşi de protecţie când
folosiţi discuri metalice sau din plastic.
4 - Atenţie la obiectele aruncate.
5 - Nu lăsaţi alte persoane săse apropie la mai
puţin de 15 m.
6 - Vitezămaximăa prizei de forţa (rot/min)
7 - Nivel de putere acusticăgarantat
DE
1 - Betriebsanleitung vor der Inbetriebsnahme lesen.
2 - Immer Helm, Schutzbrille und Gehörschutz tragen.
3 - Sicherheitsschuhe und -handschuhe tragen beim Umgang mit Metall- oder Plastikscheiben.
4 - Vorsicht, herumfliegende Gegenstände.
5 - Andere Personen mindestens 15 m entfernt halten.
6 - Maximale Drehzahl der Abtriebswelle (u/min).
7 - Garantierter akustischer Schalleistungspegel.

5
GB
BRUSH CUTTER COMPONENTS
1 - Harness attachment
2 - On/off switch
3 - Muffler guard
4 - Spark plug
5 - Air filter
6 - Fuel tank cap
7 - Fuel tank
8 - Throttle lever
9 - Handle/Safety bar
10 - Shaft tube
11 - Curved blade guard
12 - Blade
13 - Harness
14 - Starter Handle
15 –Primer bulb
16 - Choke Lever
17 - Oil Tank Cap
18 - Nylon line head
RO
COMPONENTELE MOTOCOASEI
1 –Inel prindere ham
2 –Buton OPRIE/PORNIRE (On/off)
3 –Protecţie tobă
4 - Bujie
5 –Filtru de aer
6 –Buşon rezervor combustibil
7 –Rezervor combustibil
8 - Acceleratie
9 - Mâner/Bară de protecţie
10 –Tub
11 –Apărătoare cuţit/cap tăietor
12 –Cuţit de tăiere
13 - Ham
14 –Mâner demaror
15 –Pompă amorsare
16 –Manetă şoc
17 –Buşon ulei
18 –Cap fir tăietor Nylon
1
2
8
9
10
11
12
13
18
3
14
17
6
7
15
16
5
4

6
DE
BAUTEILE DER MOTORSENSE
1 –Einhangvorrichtung für Schultergurt
2 - Ein- / Aus - Schalter
3 - Auspuffschutzgitter
4 - Zündkerze
5 - Luftfilter
6 - Tankdeckel
7 - Kraftstofftank
8 - Gashebel
9 - Handgriff /Schutzstange
10 - Schaft
11 - Schneidschutzvorrichtung
12 - Schneidblatt
13 - Traggurt
14 –Startergriff
15 - Dekompressionsventil
16 - Vergaserhebel
17 –Ölfüllstopfen
18 - 2-Faden Nylonkopf
GB
SAFETY PRECAUTIONS
WARNING: The brush cutter, if properly used, is a quick, confortable and efficient tool; if
used improperly or without due precautions it could become a dangerous tool. To ensure your
work is always pleasant and safe, please respect the following safety precautions scrupulously
and throughout this manual.
WARNING: The ignition system of your machine produces an electromagnetic field of very
low intensity. This field could interfere with certain pacemakers. To reduce the risk of serious or
fatal injury, persons with pacemakers should consult their doctor or the manufacturer of the
pacemaker before using this machine.
WARNING! –National regulations could limit the use of this machine.
1 - Do not operate the machine unless you have received specific instruction on its use. First time users
must familiarise themselves thoroughly with the operation of the machine before working in the field.
2 - The machine must only be used by adults in good physical condition who are familiar with the
operating instructions.
3 - Never use the brush cutter when you are tired or under the influence of alcohol, drugs or medication.
4 - Wear appropriate clothing and safety equipment such as: boots, heavy-duty trousers, gloves,
protective eyewear, ear protection and protective helmet. Use close fitting but comfortable clothes.
5 - Do not allow children to use the brush cutter.
6 - Do not allow other people to stand within less than 15 metres while using the brush cutter.
7 - Before using the brush cutter, make sure that the blade fixing bolt is well-tightened.
8 - The brush cutter must be equipped with the cutting accessories recommended by the manufacturer.
9 - Never use the brush cutter without the blade guard or the head guard.
10 - Before starting the engine, make sure that the blade is free to move and is not in contact with any
foreign objects.
11 - Every now and then while working, stop the engine and check the blade. Replace immediately if
cracked or broken.
12 - Only use the machine in well ventilated places, do not use in explosive or flammable atmospheres
or in closed environments.
13 - Never touch the blade or attempt any maintenance work while the engine is running.
14 - It is prohibited to fit any device other than that supplied by the manufacturer.
15 - Do not use a machine that has been damaged, poorly repaired, improperly assembled or modified.
Do not attempt to remove or bypass any of the safety devices. Only use cutting attachments indicated
in the table.
16 - All warning labels must be kept in good conditions. In case of damage or deterioration, immediately
substitute them.
17 - Do not use the machine for other applications than the ones specified in the manual.
18 - Never leave the machine unattended with the engine running.
19 - Do not start the engine with the arm not mounted.
20 - Check the brush cutter daily to ensure that all components and safety devices are functioning
properly.
21 - Do not attempt to carry out operations or repairs not included in the normal maintenance. See an
authorised dealer.
22 - When disposing of the machine at the end of its useful life, think of the environment. Take your old
unit to your dealer who will be able to dispose of it in a proper manner.
23 - Only experienced persons who are familiar with the operation and safe use of this machine should
use it. If you lend the brush cutter to someone else, also pass the instruction manual and ensure they
read it before using the machine.

7
24 –Allways contact your dealer for further explanations and details.
25 - Keep this manual on hand and consult it before each use of the machine.
26 - Please note that the owner or the user is responsible for any accidents or damage to third parties
or their property.
RO
NORME DE SIGURANŢĂ
ATENŢIE - Motocoasa, dacă este utilizată corect, este un instrument de lucru rapid, comod
şi eficient; dacă este utilizatǎ incorect sau fără a lua măsurile de precauţie necesare, poate
deveni un instrument periculos. Pentru ca munca dv. să fie întotdeauna plăcută şi sigură,
respectaţi cu stricteţe normele de siguranţă indicate mai jos şi în restul manualului.
ATENŢIE: Sistemul de aprindere al masinii dv. produce un câmp electromagnetic de
intensitate foarte joasă. Acest câmp poate interfera cu unele pacemakere. Pentru a reduce riscul
de leziuni grave sau letale, persoanele cu pacemaker trebuie să consulte medicul şi
producătorul pacemakerului înainte de a utiliza acest echipament.
ATENŢIE! – Normele naţionale pot limita utilizarea echipamentului.
1 - Nu utilizaţi aparatul înainte de a fi instruiţi în mod special în legătură cu folosirea acestuia.
Operatorul care foloseşte echipamentul pentru prima oară trebuie să se familiarizeze cu funcţionarea
acestuia înainte de a-l folosi pe teren.
2 - Aparatul trebuie utilizat numai de persoane adulte, cu o bună condiţie fizică şi care cunosc
instrucţiunile de utilizare.
3 - Nu folosiţi motocoasa dacă sunteţi obosiţi sau sub efectul alcoolului, al drogurilor sau al
medicamentelor.
4 - Purtaţi îmbrăcăminte adecvată şi echipament de siguranţă ca cizme, pantaloni de protecţie, mănuşi,
ochelari de protecţie, antifoane şi cască de protecţie. Nu purtati haine largi.
5 - Nu permiteţi copiilor să folosească motocoasa.
6 - Nu permiteţi altor persoane să se apropie la mai puţin de 15 metri în timpul utilizării motocoasei.
7 - Înainte să folosiţi motocoasa, verificaţi ca şurubul de fixare a discului să fie bine strâns.
8 - Motocoasa trebuie să fie echipată cu accesoriile de tăiere recomandate de producător.
9 - Nu folosiţi motocoasa fără elementul de protecţie al discului sau al capului de tăiere.
10 - Înainte de a porni motorul, verificaţi ca discul să se rotească liber şi să nu fie în contact cu corpuri
străine.
11 - În timpul lucrului controlaţi frecvent discul, oprind motorul. Înlocuiţi imediat discul dacǎ este fisurat
sau rupt.
12 - Utilizaţi aparatul doar în locuri bine aerisite, nu-l utilizaţi într-un mediu cu atmosferă explozivă,
inflamabilă sau în încăperi închise.
13 - Când motorul este pornit, nu efectuaţi nici o operaţie de întreţinere şi nu atingeţi discul.
14 - Este interzis să se aplice pe priza de putere a aparatului dispozitive diferite de cele furnizate de
producător.
15 - Nu lucraţi cu un aparat defect, prost reparat, montat incorect sau modificat în mod arbitrar. Nu
demontaţi, nu deterioraţi şi nu scoateţi din funcţiune nici un dispozitiv de siguranţă. Utilizaţi
numai dispozitivele de tăiere indicate în tabel.
16 - Păstraţi toate etichetele de avertizare în condiţii perfecte. În cazul în care sunt deteriorate,
înlocuiţi-le imediat.
17 - Nu folosiţi aparatul in alte scopuri decât cele indicate în manual.
18 - Nu părăsiţi aparatul cu motorul pornit.
19 - Nu porniţi motorul fără ca braţul să fie montat.
20 - Controlaţi zilnic motocoasa pentru a vă asigura că toate componentele si dispozitivele de siguranţă
sunt în stare de funcţionare.
21 - Nu efectuaţi operaţiuni sau reparaţii diferite de cele de întreţinere normală. Adresaţi-vă atelierelor
autorizate.
22 - În cazul în care aparatul trebuie casat, nu-l abandonaţi la întâmplare, ci predaţi-l distribuitorului
dvs., care se va ocupa de debarasarea sa corectă.
23 - Predaţi sau împrumutaţi motocoasa numai unor utilizatori bine pregătiţi, care cunosc modul de
funcţionare şi utilizarea corectă a aparatului. Predaţi, de asemenea, şi manualul de utilizare, care
trebuie citit înainte de a începe lucrul.
24 - Adresaţi-vă întotdeauna unui distribuitor autorizat pentru explicatii si detalii.
25 - Păstraţi cu grijă acest manual şi consultaţi-l înainte de fiecare utilizare a aparatului.
26 –Proprietarul sau utilizatorul răspund pentru orice accident sau pagube materiale provocate altor
persoane.

8
DE
SICHERHEITSHINWEISE
ACHTUNG: Bei bestimmungsgemäßer Anwendung ist die Motorsense ein schnelles,
bequemes und wirkungsvolles Arbeitsgerät; falls Sie sie falsch oder ohne die nötige Vorsicht
einsetzen, kann sie ein gefährliches Gerät werden. Beachten Sie bitte daher unbedingt die
Sicherheitsvorschriften die Sie nachstehend in der Betriebsanleitung finden, damit ihre Arbeit
immer angenehm und sicher ist.
ACHTUNG: Das Zündsystem Ihres Geräts erzeugt ein elektromagnetisches Feld geringer
Stärke. Dieses Feld kann unter Umständen Herzschrittmacher beeinflussen. Um die Gefahr
ernster oder gar tödlicher Unfälle zu reduzieren, sollten Personen mit Herzschrittmachern vor
Benutzung dieser Maschine ihren Arzt und den Hersteller des Herzschrittmachers zu Rate
ziehen.
ACHTUNG! –Nationale Vorschriften können den Gebrauch des Geräts einschränken.
1 - Verwenden Sie das Gerät erst, wenn Sie in seinen Gebrauch eingewiesen sind. Unerfahrene
Benutzer müssen sich vor dem Arbeitseinsatz mit dem Gerät vertraut machen.
2 - Das Gerät darf nur von Erwachsenen in guter körperlicher Kondition verwendet werden, die mit der
Gebrauchsanleitungen vertraut sind.
3 –Verwenden Sie die Motorsense nicht wenn Sie müde oder unkonzentriert sind oder unter dem
Einfluß von Alkohol, Drogen oder Medicamenten stehen.
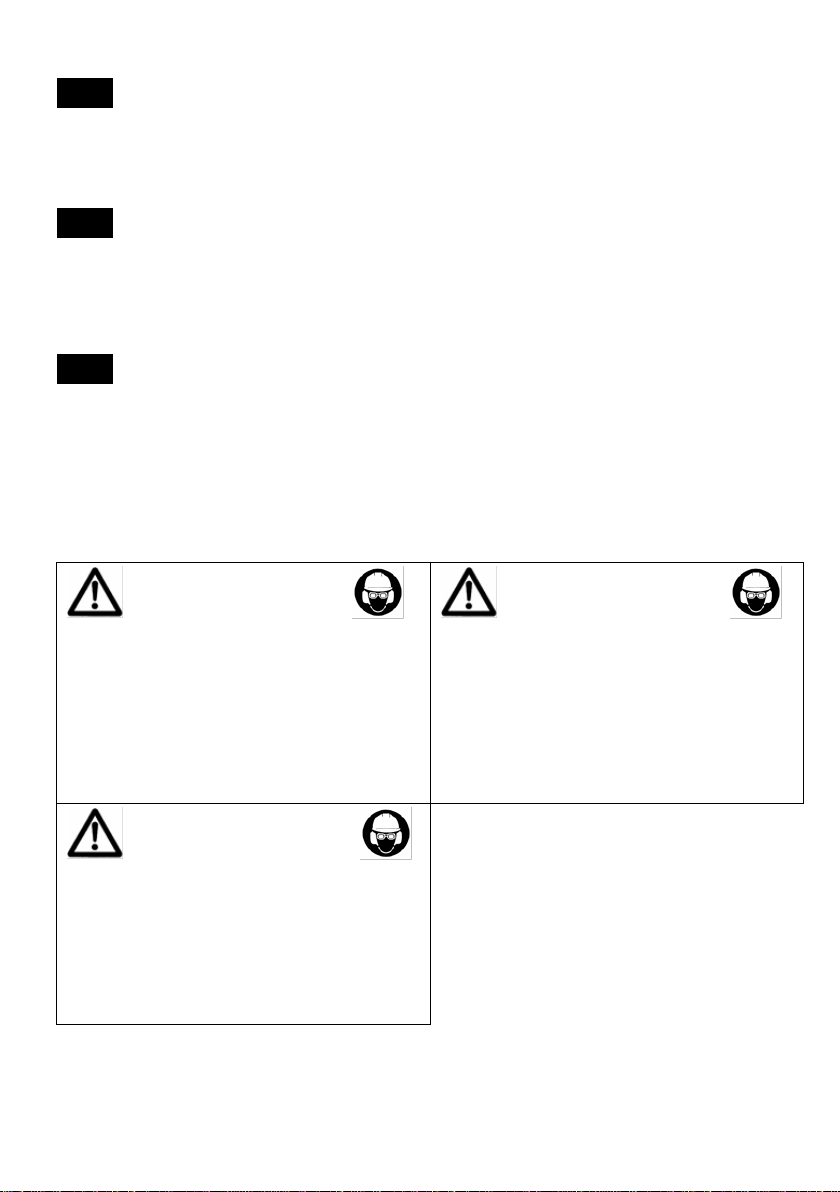
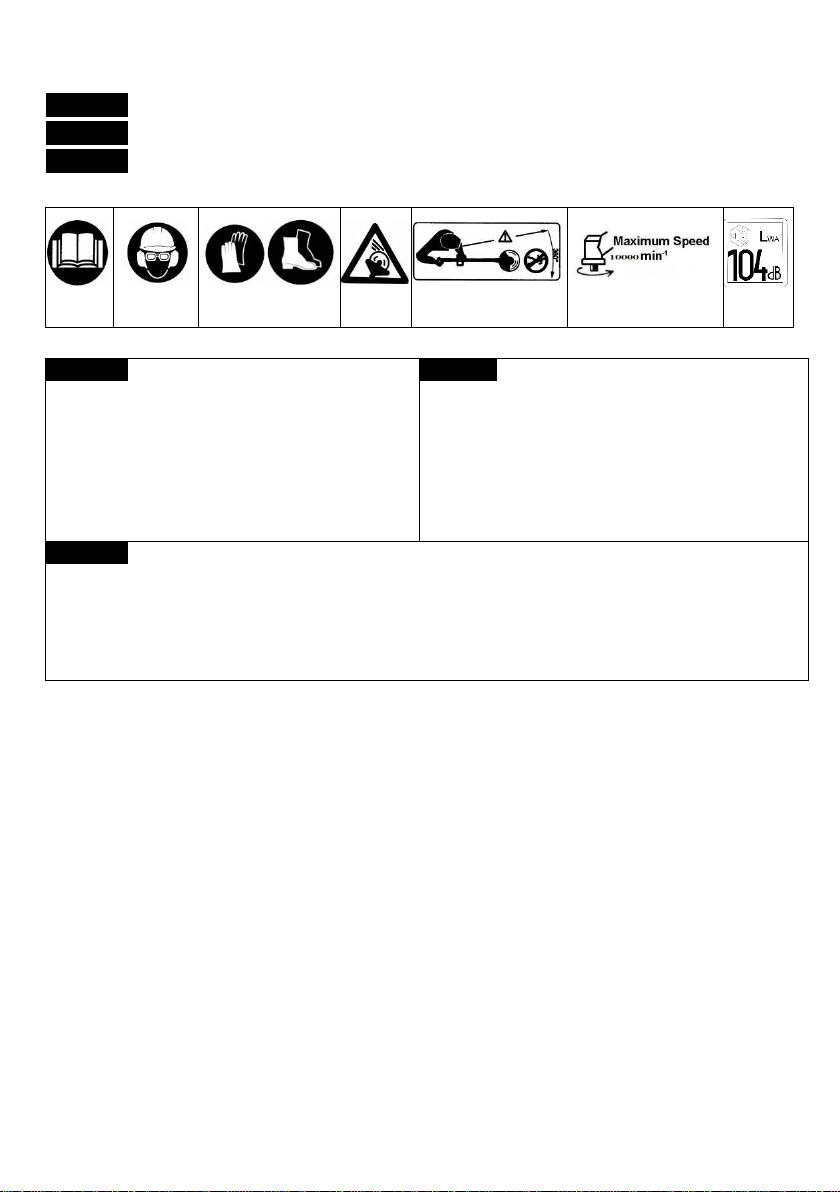
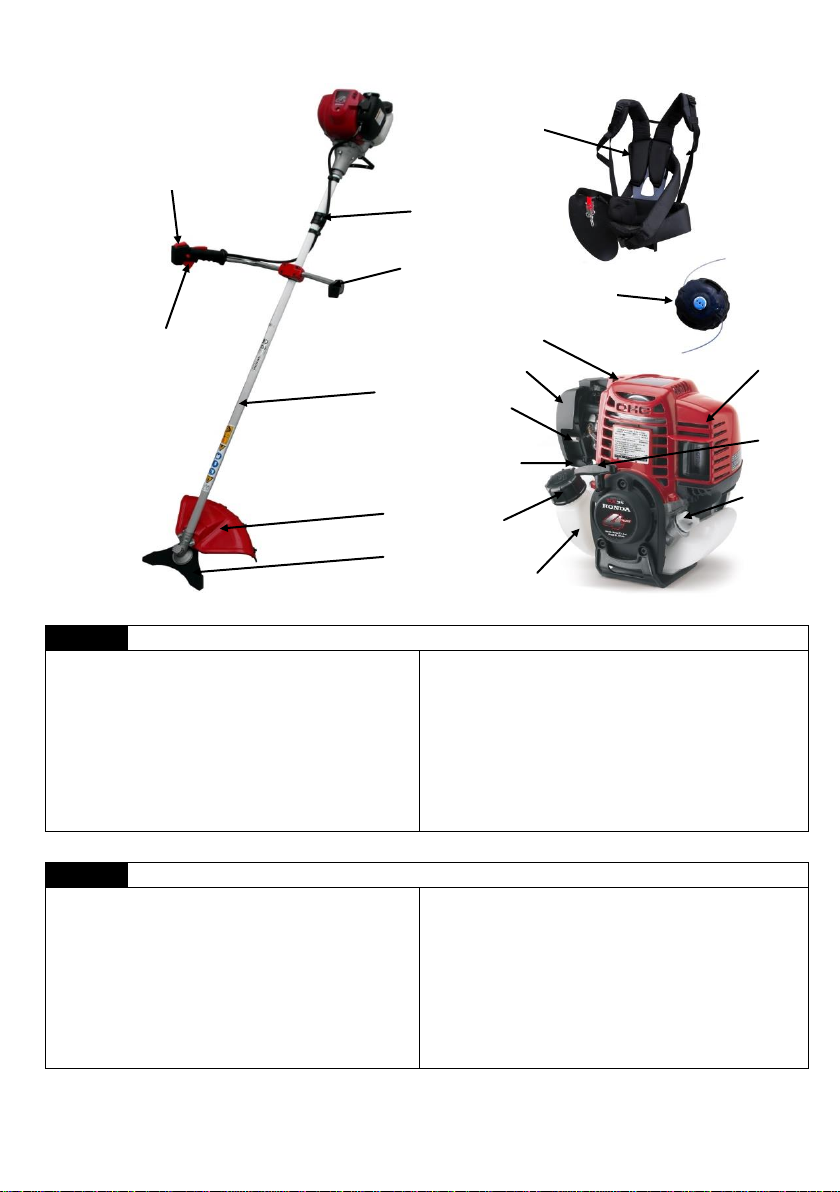
4 - Stets geeignete Schutzkleidung sowie rutschfestes Schuhwerk, Handschuhe, Lärmschutz,
Schutzbrille und Helm tragen. Die Kleidung soll anliegend aber bequem sein.
5 - Kinder dürfen die Motorsense nicht bedienen.
6 - Beim Starten und beim Gebrauch der Motorsense dürfen sich im Umkreis von mind. 15 m. des
Arbeitsbereichs keine Personen oder Tiere aufhalten.
7 - Vor jedem Gebrauch prüfen Sie ob die Spannschraube des Schneidwerkzeugs fest angezogen ist.
8 - Nur Schneidwerkzenge und Ersatzteile verwenden, die vom Hersteller ausdrücklich empfohlen
werden.
9 - Die Motorsense nur mit vorgesehener Schneidschutzvorrichtung gebrauchen. Schultergurte
müssen vorArbeitsbeginn entsprechend der Körpergrösse eingestellt werden.
10 - Vor dem Startvorgang darauf achten, daß das Schneidwerkzeug frei beweglich ist und keine
Hindernisse oder Gegenstände berühren kann.
11 –Bei abgestelltem Motor, prüfen Sie ab un zu, während des Betriebs, das Schneidwerkzeug auf
Brüchen oder Risse. Ersetzen Sie sofort das Schneidblatt falls nötig. (Abb. 3).
12 - Verwenden Sie das Gerät nur in ausreichend belüfteter Umgebung, nicht in explosions- oder
entzündungsgefährdeten Bereichen oder in geschlossenen Räumen (Abb. 4).
13 - Wartungs- und Reinigungsarbeiten dürfen nur bei abgestelltem Motor vorgenommen werden
(ausgenommen Vergaser- und Leerlaufeinstellung), Zündkerzenstecker vorher abziehen.
14 - Rüsten Sie denAbtrieb des Geräts nur mit den Originalausrüstungen des Herstellers aus.
15 - Arbeiten Sie nicht mit einem beschädigten, fehlerhaft reparierten, falsch montierten oder
eigenmächtig umgerüsteten Gerät. Keinesfalls die Sicherheitsvorrichtungen abnehmen, beschädigen
bzw. unwirksam machen. Verwenden Sie nur die in der Tabelle angegebenen Schneidwerkzeuge.
16 - Sämtliche Warnungssymbole und Sicherheitszeichen müssen sich in einwandfreiem Zustand
befinden. Wenn sie beschädigt oder unleslich werden, sofort ersetzten.
17 - Das Gerät darf ausschließlich für die in der Betriebsanleitung angegebenen Zwecke verwendet
werden.
18 - Die Maschine nicht mit laufendem Motor liegen lassen.
19 - Den Motor nicht starten, bevor Motor und Schaft fertig montiert sind.
20 - Vor jedem Einsatz alle Vorrichtungen (auch die Sicherheitsvorrichtungen) auf korrekte Funktion
prüfen.
21 - Reparaturen oder Eingriffe ausserhalb der normalen Wartung müssen vom Händler oder ein
Fachwerkstatt durchgeführt werden.
22 - Lassen Sie ausgediente Geräte unbedingt durch Ihren Fachhändler umweltgerecht entsorgen.
23 - Geben oder verleien Sie die Motorsense nur an Personen, die über Funktionsweise und
Bedienung der Maschine genauestens informiert sind. Geben Sie in diesem Fall auch die
Gebrauchsanleitung weiter.
24 - Wenden Sie sich für weitere Auskünfte stets an Ihren Fachhändler.
25 - Bewahren Sie dieses Handbuch sorgfältig auf und lesen Sie es vor jeder Inbetriebnahme der
Maschine.
26 - Der Besitzer bzw. Bediener haftet allein für Unfälle oder Schaden gegenüber Dritten oder deren
Besitz.

9
GB
SAFETY PROTECTIVE CLOTHING
While working with the brushcutter, always use safety protective approved clothing. The
use of protective clothing does not eliminate the risk of injury, but reduces the injury effects in case of
accident. Consult your trusted supplier to choose an adequate equipment.
The clothing must be adequate and comfortable. Wear close fitting clothes. Do not wear wide clothes,
scarfs, ties or bracelets that can stuck into twigs.
Tie up and protect long hair (ex. with foulards, caps, helmets, etc.).
Safety shoes with skid-proof sole and anti-piercing insert.
Wear protective goggles or face screens !
Use noiseprotection; for example noise reduction ear guards or earplugs. The use of ear protection
requests much more attention and caution, because the perception of danger acoustic signals
(screamings, alarms, etc.) is limited.
Wear gloves that permit the maximum absorption of vibrations.
RO
ÎMBRĂCĂMINTEA DE PROTECŢIE
Când lucraţi cu motocoasa, purtaţi întotdeauna îmbrăcăminte de protecţie omologată.
Folosirea îmbrăcăminţii de protecţie nu elimină riscul de rănire, dar poate reduce efectele
rănirii în caz de accident. Distribuitorul dvs. vă poate ajuta să alegeţi îmbrăcămintea adecvată.
Îmbrăcămintea trebuie să fie adecvată şi nu trebuie să vă stânjenească mişcările. Purtaţi îmbrăcăminte
de protecţie strânsă pe corp. Nu purtaţi haine largi, eşarfe, cravate sau bijuterii care se pot agăţa în
ramuri.
Protejaţi părul lung (de ex. cu un fular, o beretă, o cască etc.)
Purtaţi pantofi de siguranţă dotaţi cu tălpi antiderapante şi cu vârfuri de oţel. Purtaţi ochelari sau vizieră
de protecţie!
Purtaţi echipament de protecţie împotriva zgomotelor; de exemplu căşti sau dopuri pentru urechi.
Utilizarea echipamentului de protecţie pentru urechi necesită o atenţie şi o prudenţă sporite, deoarece
percepţia semnalelor acustice de pericol (strigăte, alarme etc.) este limitată.
Purtaţi mănuşi care permit o absorbţie maximă a vibraţiilor.
DE
SICHERHEITS-/SCHUTZKLEIDUNG
Tragen Sie immer zugelassene Sicherheits-/Schutzkleidung tragen wenn Sie mit der
Motorsense arbeiten. Durch die Benutzung der Schutzkleidung wird das Verletzungsgefahr zwar nicht
beseitigt, aber die Auswirkungen der Verletzungen im Falle eines Unfalls reduziert. Ihr Fachhändler
berät Sie gern beim Wählen der richtigen Schutzkleidung.
Die Kleidung muss geeignet sein und darf die Arbeit nicht behindern. Tragen Sie anliegende
Schutzkleidung.
Tragen Sie keine weite Kleider, Schals, Krawatten oder Schmuckstücke, die sich im Gestrüpp
verfangen könnten. Binden Sie langes Haar zusammen und schützen Sie es (zum Beispiel mit einem
Schal, einer Mütze, einem Helm usw.)
Tragen Sie Sicherheitsschuhe mit rutschfesten Sohlen und Stahlkappen.
Benutzen Sie eine Schutzbrille oder ein Schutzvisier!
Benutzen Sie einen Gehörschutz; zum Beispiel den Gehörschutz mit Bügel oder die
Gehörschutzstöpsel.
Die Verwendung eines Gehörschutzes erfordert erhöhte Aufmerksamkeit und Vorsicht, denn die
Wahrnehmung akustischer Warnsignale (Rufe, Alarme usw.) wird dadurch eingeschränkt.
Tragen Sie Handschuhe, die die Vibrationen maximal dämpfen.

10
GB
ASSEMBLY
RO
MONTAREA
DE
MONTAGE
FITTING THE SAFETY GUARD
Fit the blade guard 1 to the shaft arm with screws in a position
allowing the operator to work safely 2.
NOTE: use the guard 3 only with nylon head. Secure the guard
3 to the protection 1 by means of the screw 7.
MONTAREA APĂRĂTORII DE PROTECȚIE
Fixaţi apărătoarea de protecţie 1 la tubul de transmisie, cu
ajutorul şuruburilor 2, într-o poziţie care să vă permită să lucraţi
în siguranţă.
NOTĂ: folosiţi elementul de protecţie (3) numai cu capul cu fire
de nailon. Elementul de protecţie (3) trebuie să fie fixat cu
şuruburile (7) de apărătoare (1).
MONTAGE DER SCHNEIDSCHUTZVORRICHTUNG
Die kunststoff - oder Stahlschutzvorrichtung 1 mittels Schrauben 2 am Schaft befestigen.
ANMERKUNG: Schutzeinsatz 3 nur mit Nylonfedenkopf verwenden. Die Schutzverkleidung 3 muss mit
der Schraube 7 an der Schutzverkleidung 1 befestigt werden.
FITTING THE BLADE
Loosen the nut (5) clockwise; remove cup (4) and
lower flange (3).
Fix the blade (2) onto the upper flange (1) making
sure that the rotation direction is correct.
Fix the lower flange (3), the cup (4) and tighten nut
(5) counter-clockwise.
Put the pin provided (6) in the appropriate hole to
block the blade and allow the bolt (5) to be tightened
to 2.5 kgm (25 Nm).
WARNING: When using discs for wood (22-60
teeth), always set up metal guard.
WARNING! - Fit the disk protection (8) as
shown before transporting or storing the brushcutter.
MONTAREA DISCULUI
Deşurubaţi în sens orar piuliţa (5); scoateţi cupa (4) şi flanşa inferioară (3). Montaţi discul (2) pe flanşa
superioară (1), asigurându-vă că sensul de rotaţie este corect. Montaţi flanşa inferioară (3), cupa (4) şi
înşurubaţi piulia (5) în sens antiorar. Introduceţi pana livrata (6) în orificiul corespunzător pentru a bloca
discul şi a permite strângerea piuliţei (5) la 2,5 kgm (25 Nm).
ATENŢIE! Pentru discurile pentru lemn (22-60 de dinţi), utilizaţi întotdeauna capacul
corespunzător de protecţie din metal.
ATENŢIE! –Pentru transportul si depozitarea motocoasei montaţi capacul de protecţie al discului
(8).
MONTAGE DES SCHNEIDBLATTS
Die Mutter (55) im Uhrzeigersinn lösen, Gleitteller (4) und unteren Flansch (3) abnehmen. Das
Schneidblatt (2) am oberen Flansch (1) montieren, dabei auf richtige Drehrichtung sowie korrekten Sitz
auf der Nabe achten. Unteren Flansch (3) und Gleitteller (4) montieren, Mutter (5) egegen dem
Uhrzeigersinn eindrehen. Um die Mutter (5) (2.5 kgm/25 Nm) festzuziehen, den Schneidblatt mit dem
beiliegenden Stift (6) in die vorgesehene Bohrung blockieren.
VORSICHT: Wenn Sie Scheiben für Holz verwenden (22-60-zähnig), bringen Sie stets den
Metallschutz an.

11
ACHTUNG! - Für den Transport und die Lagerung der Motorsense montieren Sie den
Metall-Blattschutz (8).
FITTING THE NYLON LINE HEAD
insert the upper flange (1, 2) in place. Put the
head fixing pin (4) in the appropriate hole and
tighten the head (3) anticlockwise by hand.
MONTAREA CAPULUI DE TĂIERE CU FIR
DE NYLON
Introduceţi flanşa superioară (1, 2).
Introduceţi pana pentru fixarea capului (4) în
orificiul corespunzător şi înşurubaţi în sens
antiorar capul de tăiere (3), numai cu mâna.
MONTAGE DES NYLONFADENKOPFS
Die obere Flansch (1, 2) im vorgesehenen Nabensitz einsetzen. Den Arretierungsstift (4) in die
vorgesehene Bohrung einsetzen und den Nylonfadenkopf (3) nur von Hand gegen dem Uhrzeigersinn
festschrauben.
FITTING THE HANDLE
Fit the handle onto the shaft arm and secure it using screws, washers,
and nuts. The handle position can be adjusted acoording to the
requirements of the operator.
WARNING: Make sure that all components are connected properly
and all screws tightened.
MONTAREA MÂNERULUI
Montaţi mânerul pe tubul de transmisie şi fixaţi-l cu şuruburi, saibe şi
piuliţe. Poziţia mânerului poate fi reglată în funcţie de necesităţile
operatorului.
ATENŢIE: Asiguraţi-vă că toate componentele motocoasei sunt bine fixate, iar şuruburile sunt
strânse.
GRIFFMONTAGE
Den Griff auf den Schaft montieren und mittels Schrauben, Unterlegscheiben und Muttern gleichmässig
und kreuzweise festschrauben. Die Griffposition ist entsprechend der Ansprüchen des Bedieners
verstellbar.
ACHTUNG: Beachten Sie, daß alle Bauteile gut angeschlossen und die Schrauben festgezogen
sind.
Fitting the double harness with quick release (2)
Correct adjustment of the harness permits the brush cutter to be
properly balanced and at an appropriate height from the ground (3).
- Hook the brush cutter to the harness using the hook (1).
- Position the hook to obtain the best brush cutter balance.
- Position the buckle (3) to obtain the correct brush cutter height.
Montarea hamului dublu cu decuplare rapidă (2)
O reglare corectă a hamurilor permite motocoasei să aibă un bun
echilibru şi o înălţime adecvată faţă de sol (Fig. 40A-B).
−Suspendaţi motocoasa de ham cu cârligul (1)
−Poziţionaţi cârligul astfel încât motocoasa să fie bine echilibrata.
−Poziţionaţi cataramele (3) astfel încât motocoasa să se afle la o
înălţime adecvată.
Anlegen des doppelten Schultergurts mit
Schnelllösemechanismus (2)
Die richtige Einstellung des Gurtes ermöglicht der Motorsense ein
gutes Gleichgewicht und einen geeigneten Abstand zum Boden (3).

12
- Die Motorsense durch den Haken (1) mit dem Gurt verbinden.
- Den Haken so einstellen, daß die Motorsense gut ausbalanciert ist.
- Die Schnalle (3) einstellen, um die richtige Höhe des Schneidwerkzeugs zu erhalten.
Quickrelease - Decuplare rapidă – Schnelllösemechanismus
GB
STARTING
FUEL HANDLING
WARNING: Gasoline is an extremely flammable fuel. Use extreme caution when handling gasoline
or fuel mix. Do not smoke or bring any fire or flame near the fuel or the unit.
WARNING: Fuel and fuel fumes can cause serious injury when inhaled or allowed to come in
contact with the skin. For this reason proceed with caution when handling fuel and make sure there is
adequate ventilation.
WARNING: Beware of carbon monoxide poisoning.
Mix, store and transport fuel in a container approved for gasoline.
Handle fuel outdoors where there are no sparks or flames.
Select even ground, stop engine, and allow to cool before refuelling.
Loosen fuel cap slowly to release pressure and to keep fuel from escaping around the cap.
Tighten fuel cap securely after refuelling. Unit vibration can cause an improperly tightened
fuel cap to loosen or come off and spill quantities of fuel.
Wipe spilled fuel from the unit and allow remaining fuel to evaporate. Move 3 m away from
refuelling site before starting the engine.
Never attempt to burn off spilled fuel under any circumstances.
Store fuel in a cool, dry, well ventilated place.
Never place the machine in a combustible area such as dry leaves, straw, paper, etc.
Store the unit and fuel in an area where fuel vapours cannot come in contact with sparks or
open flames from water heaters, electric motors or switches, furnaces, etc.
Never take the cap off the tank when the engine is running.
Never use fuel for cleaning operations.
Take care not to spill fuel on your clothing. If you have spilt fuel on yourself or your clothes,
change your clothes. Wash any part of your body that has come in contact with fuel. Use
soap and water.
Don’t expose the fuel tank to direct sunlight.
Keep fuel out of reach of children.
WARNING: Always wear protective gloves when performing maintenance.
Refueling (Do Not Smoke!)
This product is powered by a 4-stroke engine. Store unleaded gasoline in a clean container approved
for gasoline.
RECOMMENDED FUEL: THIS ENGINE IS CERTIFIED TO OPERATE ON UNLEADED GASOLINE
INTENDED FORAUTOMOTIVE USE WITH AN OCTANE RATING OF 89 ([R + M] / 2) OR HIGHER
Never use stale or contaminated gasoline or an oil/gasoline mixture. Avoid getting dirt or water in the
fuel tank.

13
Filling the Tank
WARNING: Follow safety instructions for fuel handling. Always shut off the engine before
refuelling.
Never add fuel to a machine with a running or hot engine.
Move at least 3 m from the refuelling site before starting the engine. DO NOT SMOKE!
1. Clean the surface around the fuel cap to prevent contamination.
2. Slowly loosen the fuel cap.
3. Carefully pour the fuel into the tank. Avoid spillage.
4. Prior to replacing the fuel cap, clean and inspect the gasket.
5. Immediately replace fuel cap and hand tighten. Wipe up any fuel spillage.
WARNING: Check for fuel leaks, if any are found, correct before use. Contact an authorized
service center if necessary.
Engine Oil Tank
Engine oil level
CAUTION: Running the engine with insufficient oil can cause
serious engine damage. Be sure to check the engine on a level surface
with the engine stopped.
1. Remove the oil filler cap (A) and check the oil level: it should reach the
top of the oil filler neck (B).
2. If the level is low, fill to the top (C) of the oil filler neck with the
recommended oil.
Add the engine oil slowly to avoid overflowing, as the engine oil tank
capacity is small.
Every 10 hours, check the engine oil level and replenish oil up to the top
of the oil filler neck if the engine is operated for more than 10 hours
continuously.
Use 4-stroke, or an equivalent high detergent, premium quality motor oil
certified to meet or exceed U.S. automobile manufacturer’s requirements
for service classifications SG, SF. Motor oils classified SG, SF will show
this designation on the container. SAE10W-30 is recommended for
general, all temperature use.
CAUTION: Using nondetergent oil or 2-stroke engine oil could
shorten the engine’s service life.
The recommended operating temperature range is –5 °C to 40 °C.
Before starting the engine, make sure that the blade is free to move and is not in contact with any
foreign objects.
The cutting attachment must not rotate when the engine is idling. Otherwise contact an authorized
service center for verification and repair.
WARNING: Hold the brush cutter firmly with both hands. Always keep
your body on the left side of the tube. Never use a cross-handed grip.
Left-handers should follow these instructions too.
Keep a proper cutting position.
Over exposure to vibrations can result in blood-vessel or nerve injury to
persons suffering of blood circulation problems.
Seek medical attention if you experience physical symptoms such
numbness, lack of feeling, decrease of normal strength, changes in the
colour of the skin. These symptoms normally appear in the fingers, hands or
wrists.
Before starting the engine, make sure that the throttle lever works freely.
WARNING: Follow safety instruction for fuel handling.Always shut off the engine before refuelling.
Never add fuel to a machine with a running or hot engine. Move at least 3 m from the refuelling site
before starting engine. DO NOT SMOKE!
1. Clean surface around the fuel cap to prevent contamination.
2. Slowly loosen the fuel cap.
3. Carefully pour the fuel into the tank. Avoid spillage.
4. Prior to replacing the fuel cap, clean and inspect the gasket.
5. Immediately replace the fuel cap and hand tighten. Wipe up any fuel spillage.

14
WARNING: Check for fuel leaks, if any are found, correct before use. Contact a service center if
necessary.
Engine is Flooded
- Set the on/off switch to STOP.
- Unscrew the screw (1) on the cover.
- Remove the cover (2).
- Engage a suitable tool in the spark plug boot (3).
- Pry off the spark plug boot.
- Unscrew and dry off the spark plug.
- Open wide the throttle.
- Pull the starter rope several times to clear the combustion chamber.
- Refit the spark plug and connect the spark plug boot, press it down firmly,
reassemble the other parts.
- Set the on/off switch to ON, the starting position.
- Set the choke lever to OPEN position –even if engine is cold.
- Now start the engine.
STARTING THE ENGINE
Fill the carburetor by pushing primer bulb (A).
Put the ON/OFF switch (11) in the ON position. Pull
the throttle lever (13) and stop it at half-throttle by pressing the button (14),
then release the lever (13).
Put the choke lever (D) in the CLOSE position. Place the brush cutter on
the ground in a stable position.
Check that the blade is free. Holding the brush cutter down, pull the
starting rope slowly until you meet resistance. Then pull it hard several
times, and when the engine starts put the choke lever (D) back into its
original position OPEN.
Repeat until the engine starts. Once the engine has started, press
throttle trigger (13) to release it from the half-throttle position and let the
engine idle.
WARNING: Once the engine is warmed up do not use the choke
to start up again.
WARNING: Use the semi-acceleration device only in the phase of
starting a cold engine.
BREAKING-IN THE ENGINE
The engine reaches the maximum power after 5÷8 hours of activity.
During this period of breaking-in do not use the engine at wide open
throttle without load, to avoid excessive functioning stress.
WARNING! - During the breaking-in period do not vary the combustion
to obtain a presumed power increase; the engine can be damaged.
NOTE: It is normal for smoke to come off from a new engine during and
after its first use.
STOPPING THE ENGINE
Set the throttle lever to idle position (13) and wait a few seconds to let the
engine cool off .
Turn off the engine, putting the ON/OFF switch (11) in the STOP position.

15
GB
USE
PROHIBITED USE
WARNING: Avoid kickout which can result in serious injury. Kickout is the sideward or
sudden forward motion of the machine occurring when the blade contacts any object such as a
log or stone, or when the wood closes in and pinches the saw blade in the cut. Contacting a
foreign object can also result in loss of brush cutter control.
WARNING! - Always follow the safety precautions. The brush cutter must only be used to
trim grass material. Cut wood only with an appropriate saw blade. Do not cut metal, plastics,
masonry, or non-wood building materials. Do not use the brush cutter as a lever to lift , move or
break objects, nor lock it on fixed supports. It is forbidden to apply tools or accessories not
recommended by the manufacturer onto the brush cutter’s power take-off.
WARNING: When using rigid blades, avoid cutting close to fences, building sides, tree
trunks, stones or other such objects that could cause the brush cutter to kick out or could
damageo the blade. We recommend the use of nylon line heads for such jobs. In addition, be
alert to an increased possibility of ricochets in such situations.
WARNING: Never use the brush cutter above ground level or with the cutting attachment
perpendicular to the ground. Never use the brushcutter for cutting grass or trimming hedges.
WARNING: If the blade loosens after being properly tightened, stop work immediately. The
retaining nut may be worn or damaged and should be replaced. Never use unauthorized parts to
secure the blade. If the blade continues to loosen, see your dealer. Never use a brush cutter
with a loose blade.
Work Area Precautions
• Always cut with both feet on solid ground to prevent being pulled off balance.
• Make sure you can move and stand safely. Check the area around you for possible obstacles (roots,
rocks, branches, ditches, etc.) in case you have to move suddenly.
• Do not cut above chest height, as a brush cutter held higher is difficult to control against kickout
forces.
• Do not work near electrical wires. Leave this operation for professionals.
• Cut only when visibility and light are adequate for you to see clearly.
• Do not cut from a ladder, this is extremely dangerous.
• Stop the brush cutter if the blade strikes a foreign object.
Inspect the blade and brush cutter; repair parts as necessary.
• Keep the blade out of dirt and sand. Even a small amount of dirt will quickly dull a blade and increase
the possibility of kickout.
• Stop the engine before setting the brush cutter down.
• Be particularly cautious and alert while wearing hearing protection because such equipment may
restrict your ability to hear sounds indicating danger (calls, signals, warnings, etc).
• Be extremely cautious when working on slopes or uneven ground.
WARNING: Never use rigid blades when cutting in stony areas. Thrown objects or damaged
blades may result in serious or fatal injury to the operator or bystanders.
Watch out for thrown objects. Always wear appropriate eye protection. Never lean over the cutting
attachment guard.
Stones, rubbish, etc. can be thrown up into the eyes causing blindness or serious injury. Keep
unauthorised persons at a distance. Children, animals, onlookers and helpers should be kept outside
the safety zone of 15 m. Stop the machine immediately if anyone approaches. Never swing the
machine around without first checking behind you to make sure no one is within the safety zone.
Working Techniques
General Working Instructions
WARNING: This section describes the basic safety precautions for working with clearing saws
and trimmers. If you encounter a situation where you are uncertain how to proceed you should ask an
expert. Contact your dealer or your service workshop.Avoid all usage which you consider to be beyond
your capability. You must understand the difference between forestry clearing, grass clearing and grass
trimming before use.

16
Basic safety rules
1. Look around you:
• To ensure that people, animals or other things cannot affect your control of the machine.
• To ensure that people, animals, etc., do not come into contact with the cutting attachment or loose
objects that are thrown out by the cutting attachment.
WARNING: Do not use the machine unless you are able to call for help in the event of an
accident.
2. Do not use the machine in bad weather, such as dense fog, heavy rain, strong wind, intense cold, etc.
Working in bad weather is tiring and often brings added risks, such as icy ground, etc.
3. Make sure you can move and stand safely. Check the area around you for possible obstacles (roots,
rocks, branches, ditches, etc.) in case you have to move suddenly. Take great care when working on
sloping ground.
4. Switch off the engine before moving to another area.
5. Never put the machine down with the engine running.
• Always use the correct equipment.
• Make sure the equipment is well adjusted.
• Organise your work carefully.
• Always use full throttle when starting to cut with the blade.
• Always use sharp blades.
WARNING: Neither the operator of the machine nor anyone else may attempt to remove the cut
material while the engine is running or the cutting equipment is rotating, as this can result in serious
injury. Stop the engine and cutting equipment before you remove material that has wound around the
blade as otherwise there is a risk of injury.
The bevel gear can get hot during use and may remain so for a while afterwards. You could get burnt if
you touch it.
WARNING: Sometimes branches or grass get caught between the guard and cutting attachment.
Always stop the engine before cleaning.
Check before starting
• Check the blade to ensure that no cracks have formed at the bottom of the teeth or by the centre hole.
Discard a blade if cracks are found.
• Check that the support flange is not cracked due to fatigue or due to being tightened too much.
Discard the support flange if it is cracked.
• Ensure the locking nut has not lost its locking force. The tightening torque of the locking nut should be
25 Nm.
• Check that the blade guard is not damaged or cracked. Replace the blade guard if it is cracked.
• Check that the trimmer head and trimmer guard are not damaged or cracked. Replace the trimmer
head or trimmer guard if they are cracked.
WARNING: Never use the machine without a guard or with a defective guard. Never use the machine
without the transmission shaft.
Forestry clearing
• Before you start clearing, check the clearing area, the type of terrain, the slope of the ground, whether
there are stones, hollows etc.
• Start at whichever end of the area is easiest, and clear an open space from which to work.
• Work systematically to and fro across the area, clearing a width of around 4-5 m on each pass. This
exploits the full reach of the machine in both directions and gives the operator a convenient and varied
working area to work in.
• Clear a strip around 75 m long. Move your fuel can as your work progresses.
• On sloping ground you should work along the slope. It is much easier to work along a slope than it is
to work up and down it.
• You should plan the strip so that you avoid going over ditches or other obstacles on the ground. You
should also orient the strip to take advantage of wind conditions, so that cleared stems fall in the
cleared area of the stand.
Grass clearing using a grass blade
• Grass blades and grass cutters must not be used on woody stems.
• A grass blade is used for all types of tall or coarse grass.
• The grass is cut down with a sideways, swinging movement, where
the movement from right-to-left is the clearing stroke and the movement
from left-to-right is the return stroke. Let the left-hand side of the blade
(between 8 and 12 o’clock) do the cutting.
• If the blade is angled to the left when clearing grass, the grass will

17
collect in a line, which makes it easier to collect, e.g. by raking.
• Try to work rhythmically. Stand firmly with your feet apart. Move forward after the return stroke and
stand firmly again.
• Let the support cup rest lightly against the ground. It is used to protect the blade from hitting the
ground.
• Reduce the risk of material wrapping around the blade by following these instructions:
1. Always work at full throttle.
2. Avoid the previously cut material during the return stroke.
• Stop the engine, unclip the harness and place the machine on the ground before you start to collect
the cut material.
Grass trimming with a trimmer head
CAUTION: Do not work with mowing line longer than the intended working zone diameter. With a
properly mounted guard, the built-in cutter will automatically adjust the line to its proper length. Overly
long lines can overload the engine, resulting in damage to the clutch mechanism and
nearby parts.
Trimming
• Hold the trimmer head just above the ground at an angle. It is the end
of the cord that does the work. Let the cord work at its own pace.
Never press the cord into the area to be cut.
• The cord can easily remove grass and weeds up against walls,
fences, trees and borders, however it can also damage sensitive bark
on trees and bushes, and damage fence posts.
• Reduce the risk of damaging plants by shortening the cord to 10-12
cm and reducing the engine speed.
Clearing
• The clearing technique removes all unwanted vegetation.
Keep the trimmer head just above the ground and tilt it. Let the end of
the cord strike the ground around trees, posts, statues and the like.
CAUTION: This technique increases the wear on the cord.
• The cord wears quicker and must be fed forward more often when
working against stones, brick, concrete, metal fences, etc., than when coming into contact with trees
and wooden fences.
• When trimming and clearing you should use less than full throttle so that the cord lasts longer and to
reduce the wear on the trimmer head.
Cutting
• The trimmer is ideal for cutting grass that is difficult to reach using a
normal lawn mower. Keep the cord parallel to the ground when cutting.
Avoid pressing the trimmer head against the ground as this can ruin the
lawn and damage the tool.
• Do not allow the trimmer head to constantly come into contact with the
ground during normal cutting. Constant contact of this type can cause
damage and wear to the trimmer head.
Sweeping
• The fan effect of the rotating cord can be used for quick and easy clearing
up. Hold the cord parallel to and above the area to be swept and move the
tool to and fro.
• When cutting and sweeping you should use full throttle to obtain the best
results.
WARNING: Never cut, when visibility is poor or in very high or low
temperatures or in freezing weather.
Forestry clearing using a saw blade
• The risk of kickout increases with increasing stem size. You should therefore
avoid cutting with the area of the blade between 12 o’clock and 3 o’clock
(Fig.1).
• To fell to the left, the bottom of the tree should be pushed to the right.
Tilt the blade and bring it diagonally down to the right, exerting firm pressure.
At the same time push the stem using the blade guard. Cut with the area of
1

18
the blade between 3 o’clock and 5 o’clock. Apply full throttle before advancing
the blade (Fig.2).
• To fell to the right, the bottom of the tree should be pushed to the left. Tilt the
blade and bring it diagonally up to the right. Cut with the area of the blade
between 3 o’clock and 5 o’clock so that the direction of rotation of the blade
pushes the bottom of the tree to the left (Fig.3).
• To fell a tree forwards, the bottom of the tree should be pulled backwards.
Pull the blade backwards with a quick, firm movement (Fig.4).
• If the stems are tightly packed, adapt your walking pace to suit.
• If the blade jams in a stem, never jerk the machine free. If you do this the
blade, bevel gear, shaft or handlebar may be damaged. Release the handles,
grip the shaft with both hands and gently pull the machine free.
Using the circular saw blade
WARNING: Circular saw blades are suitable for thinning brush and
cutting small trees up to a diameter of 5 cm. Do not attempt to cut trees with
larger diameters, since the blade may catch or jerk the clearing saw forward.
This may cause damage to the blade or loss of control of the clearing saw which
may result in serious injury.
WARNING: A saw blade can only be used in connection with the proper
guard a twin handle and double harness with release mechanism.
Brush cutting with a saw blade
• Thin stems and brush are mown down. Work with a sawing movement,
swinging sideways.
• Try to cut several stems in a single sawing movement.
• With groups of hardwood stems, first clear around the group. Start by cutting
the stems high up around the outside of the group to avoid jamming. Then cut
the stems to the required height. Now try to reach in with the blade and cut from
the centre of the group. If it is still difficult to gain access, cut the stems high up
and let them fall. This will reduce the risk of jamming (Fig.5).
GB
MAINTENANCE
BLADE SHARPENING (2-3-4 TOOTH)
1. Blades are reversible: when one side is no longer sharp, the blade can be turned over and used on
the other side.
2. Blades are sharpened using a flat single-cut file.
3. To maintain the correct balance, file all cutting edges uniformly.
4. If the blades are not sharpened correctly, they can generate abnormal vibrations in the machine and
ultimately break.
BLADE SHARPENING
Always check the general condition of the blade.
Correct sharpening ensures maximum performance of the brush cutter. To sharpen the teeth, use a file
or grindstone and proceed with light touches, respecting the corners and the dimensions.
SHARPENING THE SAW BLADE
• See the cutting attachment packaging for correct sharpening instructions. Acorrectly sharpened blade
is essential for working efficiently and to avoid unnecessary wear to the blade and clearing saw.
• Make sure that the blade is well supported when you file it. Use a 5.5 mm round file.
• The filing angle is 15°. File alternate teeth to the right and those in between to the left. If the blade has
been heavily pitted by stones it may be necessary to dress the top edges of the teeth with a flat file, in
exceptional cases. If so, this should be done before filing with a round file. The top edges must be filed
down by the same amount for all the teeth.
WARNING! The wrong type of cutter or an incorrectly sharpened blade will increase the risk of
kickback. Check mower blades for deterioration or cracks, and replace if damaged.
WARNING: Never repair damaged cutting attachments by welding, straightening or
modifying the shape. This may cause parts of the cutting tool to come off and result in serious
or fatal injuries.
2
3
4
5

19
NYLON LINE HEAD
Only use line of the same diameter as the original to avoid overloading the engine.
In order to get more line out of the cutting head, tap it lightly on the ground while working.
NOTE: Danger:never hit the nylon head against hard spots such as concrete or stones.
REPLACING THE NYLON LINE
1 - Press the tab and remove the cover and the internal spool.
2 - Double back the line, leaving one end 14 cm longer than the other one. Lock the line in the notch.
Wind the line in the direction of the arrow, each end in its chink, regulary, without crossing them.
3 - At the end of the winding, lock in the slits. Assemble the spring. Slip the line through the eyelet and
pull it towards the outside. Lock the head with the cover.
WARNING! –Always wear protective gloves during maintenance operations. Do not carry
out maintenance while the engine hot.
AIR FILTER - Move the choke lever to the CLOSE (upwards) position.
Remove the air filter cover (B) by unhooking the upper tab (C) on the
top of the air filter cover and its two lower tabs (D). Check the air filter
(E) each day. Clean with degreaser, rinse with water and blast dry with
compressed air, not too close, blowing from the inside outwards.
Renew the filter if heavily clogged or damaged.
Reinstall the air filter. Reinstall the air filter cover (B) by inserting the
lower tabs (D), then insert the upper tab (C).
FUEL TANK
Check fuel filter periodically. A dirty filter can cause difficult starting and lower engine performance. To
clean the filter proceed as follows: remove it from the fuel filling hole. Replace it if too dirty.
ENGINE
Clean cylinder fins with a brush or compressed air periodically. Dangerous overheating of engine may
occur due to impurities on the cylinder.
SPARK PLUG
Clean spark plug and check electrode distance periodically. Use NGK CMR5H or
other brand with the same thermal grade.
BEVEL GEAR
Every 30 working hours, remove screw (A) on the gear housing and check the
quantity of grease. Do not use more than 10 grams. Use high quality molybdenum
bisulfide grease.
MUFFLER
Through normal use the screen can become dirty and should be inspected
weekly and cleaned as required.
To clean:
• Allow the muffler to cool.
• Remove the two deflector screws.
• Remove the deflector and spark arrester.
• Clean and inspect the spark arrester screen. If the spark arrester screen is damaged, faulty or
deteriorated, replace the screen.
• Reassemble components in reversed order of removal and torque the screw to 4.9 Nm.
WARNING: If the spark arrester screen is damaged, faulty or deteriorated, replace the
screen or entire muffler assembly.
WARNING: Do not operate your brush cutter if the muffler is damaged, missing or modified.
An improperly maintained muffler will increase the risk of fire and hearing loss.
Never use fuel for cleaning operations.
CARBURETOR
Before adjusting the carburetor, clean the air filter and warm up the engine.
Idle screw T is adjusted in order to ensure a good safety margin between
idle running and clutch engagement.
This engine is designed and manufactured in order to comply with the
applicable 97/68/EC, 2002/88/EC and 2004/26/EC Directives.

20
WARNING: Don’t tamper the carburetor.
WARNING: With the engine idling (2900-3300rpm), the blade should not rotate. We recommend
that you contact an authorised dealer or service center for any carburetor adjustments.
WARNING: Weather conditions and altitude may affect carburation.
TRANSPORTION
Carry the brush cutter with the engine off and with the protective blade cover on.
ATTENTION: Fit the disk protection before transporting or storing the brushcutter.
RECOMMENDED EXTRAORDINARY MAINTANANCE
It is recommended to have a qualified technician inspect the machine in an authorized service center at
the end of each season, if used intensively, and every two years in case of normal use.
ATTENTION: All maintenance operations not reported in this manual must be carried out
by an authorized service center.
To ensure steady and regular brush cutter operation, remember that parts must only be replaced with
ORIGINAL SPARES.
Any unauthorized changes and/or use of nonoriginal spare parts may result in serious injury or
death to the operator or third parties.
GB
STORAGE
If the machine is to be stored for long periods:
Drain and clean the fuel tank in a well ventilated area. To drain the tank, start the engine and wait
until the fuel is exhausted and the engine stops (leaving fuel in the carburettor could damage the
membranes).
The procedures for returning the machine to service following the winter storage are the same as
for starting up during everyday use.
Follow all the maintenance recommendations previously described.
Clean the brush cutter completely and lubricate the metallic parts.
Remove, clean and lubricate the blade to prevent rusting.
Remove the blade fixing flanges, clean, dry and lubricate the bevel gear seat.
Empty the fuel tank and put the cap back on.
Thoroughly clean the cooling slots and the air filter.
Store the brush cutter in a dry place, preferably not in direct contact with the floor and away from
heat sources.
RO
PORNIREA
MANEVRAREA CARBURANTULUI
AVERTIZARE: Benzina este extrem de inflamabilă. Manevraţi carburantul cu atenţie deosebită.
Nu fumaţi şi nu vă apropiaţi cu foc sau flacară descoperită de carburant sau de maşină.
AVERTIZARE: Carburantul şi vaporii de carburant sunt nocivi dacă sunt inhalaţi sau intră în
contact cu pielea. De aceea manevraţi cu atenţie carburantul şi asiguraţi o ventilaţie adecvată.
AVERTIZARE: Evitaţi intoxicarea cu monoxid de carbon.
Depozitaţi şi transportaţi carburantul în canistre omologate pentru benzină.
Manevraţi carburantul în exterior, într-un spaţiu fără scântei sau flăcări.
Selectaţi un spaţiu plan, opriţi motorul şi lăsaţi-l să se răcească înainte de a alimenta cu
carburant.
Deschideţi încet buşonul rezervorului pentru a elibera presiunea şi a împiedica scurgerea
carburantului în jurul buşonului.
Strângeţi bine buşonul după alimentare. Vibraţiile maşinii pot slăbi şi desprinde un buşon
strâns incomplet şi pot determina scurgerea carburantului.
Ştergeţi carburantul vărsat din maşină şi aşteptaţi evaporarea carburantului rămas.
Deplasaţi-vă aprox. 3 m de la locul de alimentare înainte de a porni motorul.
Nu încercaţi să ardeţi carburantul vărsat.
Depozitaţi carburantul într-un spaţiu răcoros, uscat şi bine ventilat.
Nu aşezaţi maşina în zone cu pericol de incendiu (cu frunze uscate, paie, hârtie, etc.).
Table of contents
Languages:
Other AGT Brush Cutter manuals