AIDA PTZ4K-NDI-X12 User manual

Ultra-HD 12x Optical Zoom PTZ
PTZ4K-NDI-X12
User Manual
V1.0
AIDA

Table of Contents
1
Safety Guides
2Packing List & Quick Start
4Product Highlights & Camera Specs
6Camera Interface & Dimension
7IR Remote Controller
9OSD Menu
12 Web Settings
18 VISCA Over IP
19 VISCA (RS-232) Port
20 VISCA Protocol
29 UVC Control
30
Warranty & Support
The information within this manual is subject to change at any time without prior notice*
NDI® is a registered trademark of Newtek Inc.*

Safety Guide
1
1. Before operation, please read all the instructions in the manual carefully. For your convenience,
please keep this manual.
2. The camera power input range is 100-240 VACv(50-60hz.) Ensure the power supply input is within this
rate before powering it on.
3. Camera power voltage = 12VDC, rated currency=2A. We suggest you use it with the original power
supply supplied in the packaging.
4. Please keep the power cable, video cable, and control cable in a dry, safe place out of any
obstructions.
5. Operational environment for the camera should be: 0°C-50°C/32°F-122°F, with humidity levels less
than 90%. To avoid any damage, do not place or pour anything on inside or on top of the camera.
6. Avoid placing any extra weight, stress, vibration or pressure on the camera during transportation,
storage, or operation.
7. Do not remove the camera housing or cover. Any attempt to self-repair or open the camera will void
all warranty.
8. Make sure the camera is on a fixed and balanced platform. Avoid any uneven surfaces.
9. Do no direct the camera towards strong / intensive light. Doing so could cause irreversible damage to
the camera sensor, thus voiding all warranty on the camera.
10. Use a dry cloth to clean the camera housing, along with a neutral cleaning agent if necessary. To
avoid damage on the camera lens, do not use strong or abrasive cleaning agents on the camera.
11. To avoid mechanical trouble, please do not hands to rotate the camera head. Please refrain from
touching or moving the camera while its in motion, as it can cause irreversible damage to the motor
mechanisms and thus voiding all warranty on the camera.
Power Supply Polarity Schematics:
Warning:
Video quality can be affected by specific frequencies of electromagnetic fields.

Packing List
2
Check for the items below when opening the package!
EA
Quick Start
-
AIDA PTZ Camera
-
Power Adapter
-
Power Cable
-
RS232 Control
Cable
-
USB Type-C
Cable
-
Remote Control
-
User Manual
-
Double Sided Adhesive
-
QC Certification
-
Wall Mount
1.
Please ensure all the cabling is correct. (PTZ Outputs may vary per model, please
check the back of the camera to see which outputs you have.)

Quick Start (CONTD)
3
For AIDA Support Representatives only:
Dial Switch (ARM)
SW-1
SW-2
Mode
1
OFF
OFF
Updating Mode
2
ON
OFF
Debugging Mode
3
OFF
ON
Undefined
4
ON
ON
Working Mode
Dial Switch
SW-3
SW-4
Instruction
1
OFF
OFF
Reserve
2
ON
OFF
Reserve
3
OFF
ON
Reserve
4
ON
ON
Reserve
Dial Switch (USB)
SW-5
SW-6
Instruction
1
OFF
OFF
Undefined
2
ON
OFF
Working Mode
3
OFF
ON
Undefined
4
ON
ON
Undefined

Product Highlights
C
4
•
Comes with a Sony Progressive CMOS Sensor providing 3840x2160 crisp UHD
resolution at up to 60 frames.
•
Wide angle optical lens with a UHD 12x optical zoom module.
•
UHD video over IP, via H.264 or H.265 encoding.
•
Contains traditional outputs such as HDMI, and RJ-45 for RTSP/RTMP/SRT/NDI®|HX
streaming.
•
Supports 4K USB streaming (Only if IP / NDI streams are disabled).
•
Supports line-in function for unbalanced 3.5mm audio.
•
Supports simultaneous outputs via HDMI, and RJ45.
•
In-depth fully adjustable camera settings, such as exposure settings, image
parameters, and white balance.
•
Supports PoE+ (P≤25.5W) which allows for single ethernet cable for control and
video over a single cable.
•
Fast and precise focusing for no-delay video-quality
•
Smooth and quiet PTZ movements for sound-sensitive rooms
•
Supports up to 10 presets via the remote, or 128 presets via RS232 / web UI.
•
Supports Sony Serial Visca and VISCA over IP. Also supports NDI control.
•
Supports in and out Serial Daisy Chaining for up to 7 PTZ cameras.
•
Menu based parameters such as image flip and mirror for stress-free installations.
•
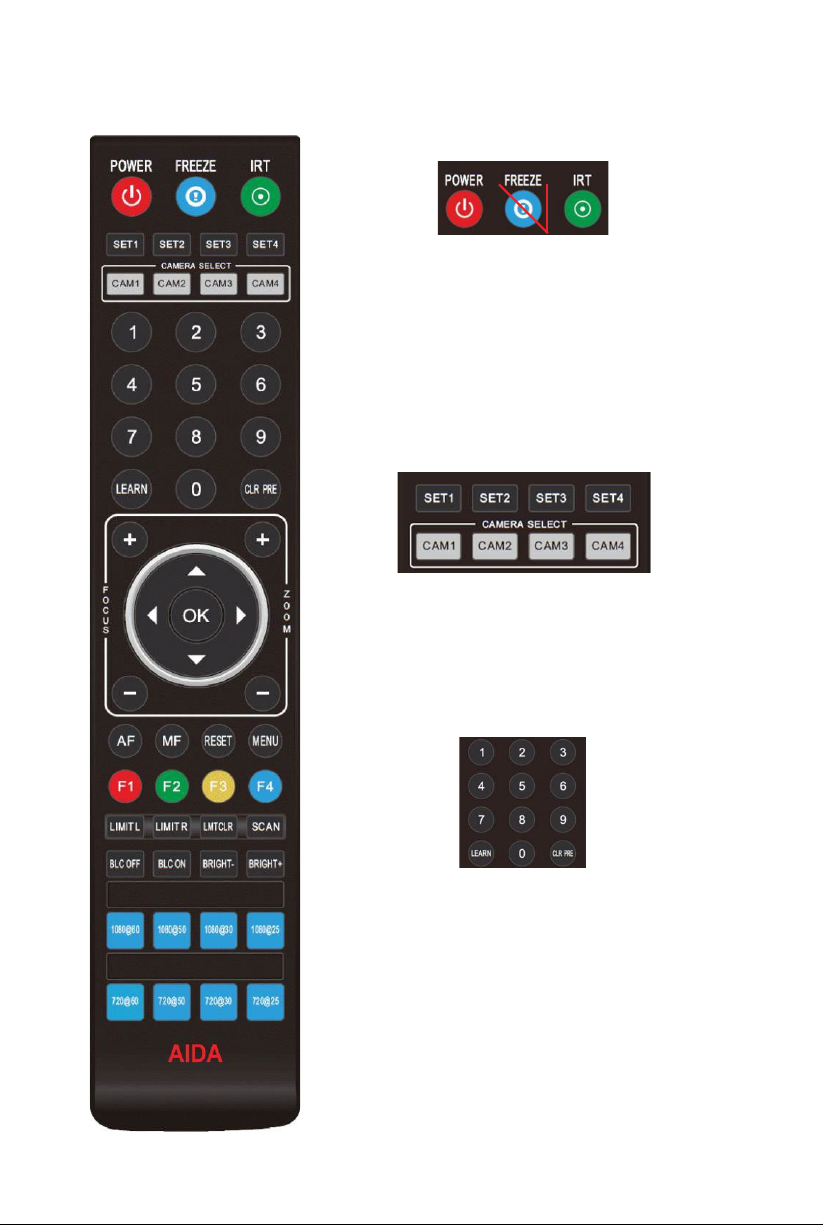
Handheld remote can also be used to switch video formats fast, as well as change
camera IP via the menu.
•
Free firmware updates to keep the camera up to date with the latest and greatest!
•
Supports NDI®| HX transmission.
Camera Specs
Video Formats
(Varies per
model)
HDMI 3840*2160P60/59.94/50/30/29.97/25
1920*1080P60/59.94/50/30/29.97/25/24/23.98
1920*1080I60/59.94/50
1280*720P60/59.94/50/30/29.97/25
USB Type-C MJPG, H.264, H.265: 3840*2160P30; 1920*1080P60;
1280*720P60; 1024*576P60; 800*448P60
NV12, YUY2: 1920*1080P5; 1280*720P15;
1024*576P25; 800*448P30
RJ-45
(NDI®|HX )
3840*2160P15~60;1920*1080P15~60;
1280*720P15~60; 1024*576P15~60;
640*360P30

Camera Specs
(CONTD)
5
Video Interface
HDMI, RJ-45
(NDI®|HX )
,
USB Type-C
Sensor
SONY Progressive CMOS Sensor
Zoom
12x 0ptical Zoom+ 4X Digital Zoom
Lens Field of view per lens:
80.5°(wide)~7.6°(Tele)
Focal Length and Fstop no.:
f
=
3.4(near)
~
40.3mm(far), F1.8(Wide)~3.6(Tele)
Rotation Angle Pan: -170°~+170°; Tilt: -30°~+90°
Rotation Speed
Pan: 0°~80°/s; Tilt: 0°~60°/s
Preset
Remote Controller: 10 RS-232: 128
Control Port
RS-232, RJ-45 (NDI®|HX)
Network Speed
1000M
Video Encode H.264/H.265 (default: H.264)
Bit Rate Control Variable Bit Rate, Constant Bit Rate
Video Bit Rate 1024kbps(min)~61440 kbps(max)
IP Protocol RTSP, RTMP, 0NVIF, VISCA over IP, NDI®|HX
Line in Supporting ACC audio coding
Daisy Chain Support RS-232 serial daisy chain
Minimum Lux
0.01 Lux
White Balance Auto/Manual/Indoor/Outdoor/One Push/Color Temperature
Exposure Auto/Manual/Bright/Shutter/Iris
Focus Auto/Manual
Iris Auto/Manual
Anti-Flicker 0FF/50Hz/60Hz
Image Voltage DC12V/PoE+(P≤25.5W)
Dimension
197.65mm×197.65mm×195.3mm/7.78"x7.78"x7.69"
Net Weight 2kg/4.4lbs

Camera Interface
8
6
Camera Dimensions (in mm)
1.Camera Lens
6.¼” tripod mounting hole
11.USB Type-C
2.Camera Base
7.WM Installation Holes
12.HDMI Output
3.IR receiver panel
8.RS-232 Control Input
13.RJ-45(NDI®|HX) Port
4.Power/Tally Indicator
9.RS-232 Control Output
14.DC12V Plug-in port
5.Dial Switches
10.Line in port

IR Remote Controller
8
7
Power
When powered on, pressing the power key will enter the
camera into Standby mode. Pressing it again will start up the
camera. *Note: This is not any means of shutting off the
camera, it only shuts down the motor mechanics. Video will
still display.
Freeze (No Function)
The freeze button has no functionality.
IRT (IR Transfer/IR Pass)
Enables IR Transferring onto 4 separate signals. Best used
when operating multiple PTZ’s in same line of sight.
SET 1~4 Address Setting:
Hold the SET# button to set the cameras IR address.
CAM 1~4Buttons:
Pressing the CAM# button will enable the IR control of the
selected IR Address.
Number Keys (0-9)
Setting Presets: To set a preset, hold down a key (0-9) and
wait 3 seconds. Once complete, the preset will be saved to
that #.
Recalling Presets: Pressing a key (0-9) will recall the
corresponding preset saved to that number.
Clearing Presets (CLR PRE)
Clearing Presets: To clear a preset, press CLR PRE and the #.
Learn (LEARN)
Currently has no independent function. Used with other
funcs.

IR Remote Controller
(CONTD)
8
Focus Adjustments (+/-)
Tapping the + or – will set the camera to manual focus for a
set precise focus adjustment.
Zoom Control (+/-)
Tapping the + or – will zoom in or out the camera head.
Camera head Control (Up/Down/Left/Right)
Tapping the directional buttons will adjust the PTZ head
accordingly. If menu is open, these can be used to navigate it.
Resetting the Camera Head (OK)
Pressing the OK button will reset the PTZ head to HOME. IF
menu is open, this can be used to enter sub-menus.
Limiting Camera Movement (LIMIT L/R/CLR)
You can adjust the pan / tilt threshold by pressing the LIMIT L
and LEARN button to set the Left (LIMIT L) or Right (LIMIT R)
threshold. You can use LIMIT CLR to reset this.
(SCAN)
Currently has no function.
Video Format Keys (Blue buttons at the bottom)
Allows for hot swapping specific resolutions when needed.
Simply hold the blue button corresponding to the resolution
you want and it will change. (Only works on HDMI/SDI
outputs only.)
Auto Focus (AF)
When enabled, the camera will automatically focus on
the object in the center of the camera.
Manual Focus (MF)
When enabled, the camera will remain the same
unless adjusted by the +/- focus keys.
Resetting Image Settings (RESET)
Press to reset all image parameters.
Accessing the Camera’s Menu (MENU)
Press Menu to enter the camera settings.

OSD MENU
(CONTD)
9
1. To enter the menu, simply use the handheld remote and press
the MENU key to enter the menu.
2. To navigate the menu, please use the directional keypad.
3. Press the RIGHT directional keypad to enter a submenu. Press
the LEFT directional keypad or MENU button to exit a submenu
or main menu.
PTZF
FOCUS MODE
AUTO/MANUAL: Ability to change from auto
or manual focus
DEFAULT: AUTO
DIGITAL ZOOM ON/OFF: Ability to digitally zoom 4X. DEFAULT: OFF
ZOOM SPEED
Zoom speed control IR remote: 7 changeable
levels.
DEFAULT: 5
SPEED BY ZOOM
When zoomed into the max, the camera will
adjust very slow. DEFAULT: ON
PAN/TILT SPEED Pan/Tilt speed control by IR remote.
Controllable at different levels DEFAULT: 18
FREEZE PRESET During preset movement, freeze the image
for smooth transitions (SDI/HDMI only) DEFAULT: OFF
PRESET SPEED Adjust the speed at which it will take to get
to the next preset DEFAULT: 18
PRESET SAVE
AE&AW
Optional: OFF, ON Default: OFF
RETURN Return to previous menu.
EXPOSURE
EXPOSURE
MODE
AUTO/MANUAL/BRIGHT/SHUTTER/IRIS:
Choose the current Exp. Mode DEFAULT: AUTO
SHUTTER Set shutter speed. 1/30-1/10000: Allows for
tuning of the shutter speed DEFAULT: AUTO
IRIS
Set Iris: CLOSE-F1.8: Allows for tuning of the
Iris opening. DEFAULT: AUTO
GAIN Set gain: 0dB-28dB: Allows for tuning the
gain of the camera DEFAULT: AUTO
BRIGHTNESS Set brightness: 0-15: Allows for tuning the
brightness of the camera DEFAULT: 8
FLICK
Allows for adjustment of the flickerless
options on the camera
DEFAULT: 50Hz
BLACKLIGHT
Allows for the enabling of the blacklight or
not.
DEFAULT: OFF
GAMMA Allows setting changes for the Gamma
option of the camera DEFAULT: 8
RETURN Return to previous menu

OSD MENU
(CONTD)
(CONTD)
1
IMAGE
WB MODE
Optional: ATW, MANUAL, AUTO, INDOOR,
OUTDOOR, PUSH, C.T.
DEFAULT: ATW
BLUE Set red gain level: 0-255 (Allows for precise
tuning of the blue setting) DEFAULT: AUTO
RED Set blue gain level: 0-255 (Allows for precise
tuning of the red setting) DEFAULT: AUTO
COLOR
TEMPERATURE
Set the color temperature value: 2500~10000
only valid under C.T. mode. Default: AUTO
MIRROR ON/OFF: Makes the image flip on the vertical
plane DEFAULT: OFF
FLIP
ON/OFF: (optional) Makes the image flip on
the horizontal plane
DEFAULT: OFF
COLOR/B&W COLOR/B&W: Allows for B&W color mode DEFAULT: COLOR
GAIN LIMIT Allows you to cap the gain at a certain level DEFAULT: 15
RETURN Return to previous menu
QUALITY
2DNR When enabled, image noise and sharpness is
reduced DEFAULT: OFF
3DNR OFF/AUTO/0-4 optional: higher level = less
image reduction happens DEFAULT: AUTO
SHARPNESS ON/OFF optional, 0-15 level: higher level =
sharper edges of image DEFAULT: 6
CONTRAST
Set contrast level: 0-15: Sets the contrast
level
DEFAULT: 8
SATURATION
Set image saturation: 0-15: Sets the
saturation level DEFAULT: 8
BRIGHTNESS Set brightness of auto exposure: 0-15: Sets
the brightness level DEFAULT: 8
RETURN Return to previous menu
FORMAT
SIZE 2160P, 1080P, 1080I, 720P
FRAME RARE 60, 59.94, 50, 30, 29.97, 25, 24, 23.98
VI FRAME RATE 60, 50, 30, 25
RETURN Return to previous menu
SYSTEM
ID Set VISCA control address 1-7
BAUDRATE Set RS-232 baud rate to 2400/4800/9600/115200
LANGUAGE/IDIOMA Set language: ENGLISH/SPANISH
DHCP IP address automatic acquisition switch: ON/OFF
IP Set camera IP
NET MASK Set camera net mask

OSD MENU
(CONTD)
(CONTD)
1
GATEWAY Set camera gateway
RETURN Return to previous menu
INFO
IP ADDRESS Display the current IP address
RTSP URL Display the current main stream RTSP URL
F/W VERSION Display the current ISP firmware version
ARM VERSION Display the current ARM firmware version
RELEASE Software release date
RESET
FACTORY RESET Reset whole camera to factory parameters
USER SETTING Save current parameters for User Reset use
USER RESET Recalls the saved user settings
RETURN Return to previous menu

Web Settings
12
The camera’s web UI can be accessed via Google Chrome, Firefox,
IE, Safari, Opera, or any other major internet browsers.
1. Logging in:
Open your browser and in the address bar, type in the Camera’s IP address:
Default IP: 192.168.1.188. If changed, enter that specific IP address.
Default Username: admin
Default Password: admin
*If you are having trouble logging in, please contact AIDA Imaging support.
2. Real-time Previewing:
When logging in, you will get a real time image preview of the camera via our
HTTP protocol.
On the right is the control interface. You can control the camera’s movements
with the directional buttons, as well as adjust the zoom and focus of the
camera via the corresponding +/- buttons. Feel free to adjust the speed at
which the camera focuses and adjusts via the slider bars as well. You will also
find the Preset control to create or recall presets via the web UI.
Near the bottom of the preview is a main and substream player, as well as the
option to do a picture in picture preview for adjustable movement of the
preview.

Web Settings
(CONTD)
13
Settings:
Clicking the “Settings” button at the top right will enter the cameras web UI settings.
Video Encode:
Under Video Encode, you will have access to adjust the main and sub video parameters
of the camera. This will also adjust the quality of your RTSP, RTMP, SRT and NDI® (if
applicable.)
Option Descriptions:
Encode Mode: Allows for H.264 or H.265 for better compression streaming (Will not work for
NDI and SRT)
Profile: Set the encoding profile mode for the camera.
MP: Main Profile – Used for web streaming.
Baseline: Baseline Profile – Used for streaming to legacy devices.
HP: High Profile – Use for recording purposes with other softwares.
Resolution: Set the resolution of the stream.
Bitrate: Set the bitrate of the camera via (kbps) Higher bitrate = better performance, but can lag
a slower system. Lower bitrate = stable performance, but at a loss of quality.
Framerate: Change your streams framerate.
Bitrate Control: Choose between CBR or VBR. (CBR Recommended for stable streams)
I-Frame Interval: Adjust the time inbetween key-frames. Doubling your current framerate is
recommended.

Web Settings
(CONTD)
14
Video Transmission Settings:
Under video transmission, you will find the options to adjust your RTMP, SRT, or
NDI® streams.
RTMP Setting:
RTMP can be used to stream directly to social media sites such as Youtube, Vimeo,
and Facebook Live. To utilize this, please follow the following steps:
1. For better results, please ensure your PTZ is in DHCP mode and connected
to the internet.
2. Next obtain the live RTMP address from your website. It should look
something like the (?) found on the page.
3. Place the live RTMP address in the RTMP address slot.
4. Next, ensure there is a forward slash after the RTMP address. (/)
5. Lastly, paste the stream key if necessary.
6. Click Save.
NDI Setting®:
Here you can adjust your cameras NDI settings. (if applicable to your camera)
Option Descriptions:
Name: Change the name that shows up on NDI Studio monitor for manageable multi-
cam setups.
Groups: Adjust the NDI group it is categorized in. (Default: public)
Discovery Server: For multiple subnets, set a dedicated NDI PC that hosts a discovery
service to connect to, regardless of where you are on the router chain. Enter the NDI
PC’s IP below.

Web Settings
(CONTD)
15
SRT Settings:
In this menu, you can setup a SRT stream to any given software / SRT player.
Option Descriptions:
Mode: Change the SRT mode into Listener or Caller.
Port: Enter the SRT port number here.
Encryption: Allows for an encrypted SRT stream.
Key Length: If Encryption is selected, choose the keylength of the password.
Passphrase: Enter the encryption password for the software to connect to the
camera.
Main Stream / Sub Stream: Will populate once complete.
Caller mode will look different than this. To get a better idea on how to setup a SRT
stream, head to our Youtube at youtube.com/aidaimaging for tutorials!
Audio Settings:
In the "audio settings" tab, audio can be turned off or on. You are also able to adjust
the encode mode, samplerate, and bitrate.

Web Settings
(CONTD)
16
Image Parameters Settings:
In this menu, you can adjust the same parameters found from the OSD menu. All settings
will save over the OSD settings.
Ethernet Settings:
In this menu, you can adjust ethernet settings of the camera. Below are the standard
settings found on the camera by default. Please power cycle the camera after clicking
“save.”
DHCP OFF DNS 192.168.1.1
IP Address 192.168.1.188 HTTP Port 80
Netmask
255.255.255.0
RTSP Port
554
Gateway 192.168.1.1 VISCA over IP 52381
Use the RTSP Encrypt option to encrypt your RTSP streams.
Reset to Default:
In this menu, you can reset some of the cameras settings.
Reset Simply: Reset ONLY image parameters. IP Settings will
remain the same.
Reset Completely: Factory reset the whole camera – will
default IP address.
Reboot: Does not reset anything, simply just restarts the camera.

Web Settings
(CONTD)
17
Account Settings:
In the account settings, you can change the account name and password from the
default. If you lose your new account / password, you will have to contact AIDA
support for help, so don’t forget to write it down!
System Time:
In the system time tab, you can adjust the timezone of each clock to sync them.

VISCA Over IP
18
VISCA over IP:
Our PTZ’s use VISCA over IP to reliably send and receive information from any
standard VISCA over IP controller!
Information of Communications port:
Control Port: RJ-45 LAN connection
IP Protocol: IPv4
Transmission Protocol: UDP
IP Address: *depends on your camera’s IP
Port Address: 52381
What is VISCA over IP?
Simply put, VISCA over IP is the magic behind the communications between
controller and PTZ cameras! These VISCA commands are sent via UDP protocol. Since
UDP transmission isn’t stable, a couple of steps must occur before a movement is
executed. First, the controller will send out a VISCA command to our camera. Our
camera will then receive and send back the same command to the controller. Once
the commands are confirmed – the movement will be executed. At the end, a
message back to the controller will confirm the action was actually done. Each VISCA
command controls its own settings, as there could be no overlaps of existing
commands. Luckily, this happens instantaneously so there is no lag when using VISCA
over IP!
Table of contents
Other AIDA Security Camera manuals

AIDA
AIDA PTZ-X12-IP Installation and operation manual

AIDA
AIDA PTZ-NDI-X18 Installation and operation manual

AIDA
AIDA PTZ-NDI-X Installation and operation manual

AIDA
AIDA NDI3 POV User manual

AIDA
AIDA PTZ 4K-NDI-X30 User manual

AIDA
AIDA PTZ-X-IP Installation and operation manual

AIDA
AIDA PTZ-X12-IP User manual